Stranded at the foot of a monstrous mountain, your only way out is up-but as you pack your gear and scan your ragtag team, you realize the real danger isn’t just the climb. Before you set out in Peak, these 9 beginner tips will reveal the hidden hazards, survival secrets, and team tactics every scout wishes they’d known before their first step.
Below, we’ve listed nine beginner’s tips you should know before starting Peak.
Always help your friends
When playing Peak, always help your friends by lending a hand whenever possible. This means more than just pulling teammates up to higher ledges; you can share heavy supplies, provide food, heal each other, or even use creative means like acting as a trampoline. Making sure no one is left behind is crucial, as abandoning a teammate can lead to negative consequences in the game. Supporting each other not only strengthens the team but also makes climbing more efficient and enjoyable. Cooperation is key to overcoming the mountain’s challenges together.

When you’re playing with friends or other scouts, lend them a helping hand. That doesn’t have to mean pulling a scout up to higher ground, necessarily. You can assist your team by splitting heavy items, giving each other food, healing one another, and even lending your head as a trampoline.
Additionally, make sure to never leave a fellow scout behind, or you’ll face the wrath of the scoutmaster.
Cook your food
Cooking your food in PEAK is essential to boost your stamina and improve your chances of survival. Simply hold your food near any open flame, like campfires or portable stoves, and interact to cook it. Cooking increases the stamina restored by up to 66% on the first cook, but be careful-not to overcook, as burning food can poison you and reduce its benefits. Packaged foods don’t require cooking, but foraged items like coconuts and berries should be cooked to maximize their effect. Getting familiar with the cooking mechanic early on will help you maintain stamina and avoid falling during your climb.
You can cook more than just marshmallows at campfires, and cooked foods will provide you with extra stamina. This is particularly useful as soon as you start up a new game since there is a small flame on the shore. Crack open a few coconuts and cook them to easily fill up your extra stamina bar before you set off on your adventure. But only cook your food once – there isn’t a benefit to cooking them any further.
Know the difference between ropes and and chains
Ropes and chains play very different roles in climbing and other vertical activities. Ropes are dynamic or static fibers used as the core safety tool, designed to stretch and absorb the force of a fall or to facilitate controlled movement, depending on their type. In contrast, chains are metal links typically fixed at anchors or belay stations; they serve as strong, durable attachment points for lowering or rappelling, but are not intended for absorbing falls or dynamic loads like ropes. Understanding the distinction is crucial for safety: ropes are your lifeline during movement, while chains are the hardware you trust at rest points or at the top of a climb.
There are a lot of items that’ll make your climb to the peak a little easier. Two extremely useful items are the rope cannon and chain launcher, but their uses are very different. Rope cannons will launch a harpoon in the direction of your cursor and unfurl a rope that you can climb up. The rope cannon is particularly useful when you’re trying to gain height. However, make sure to not shoot it too high as the rope is pretty short.
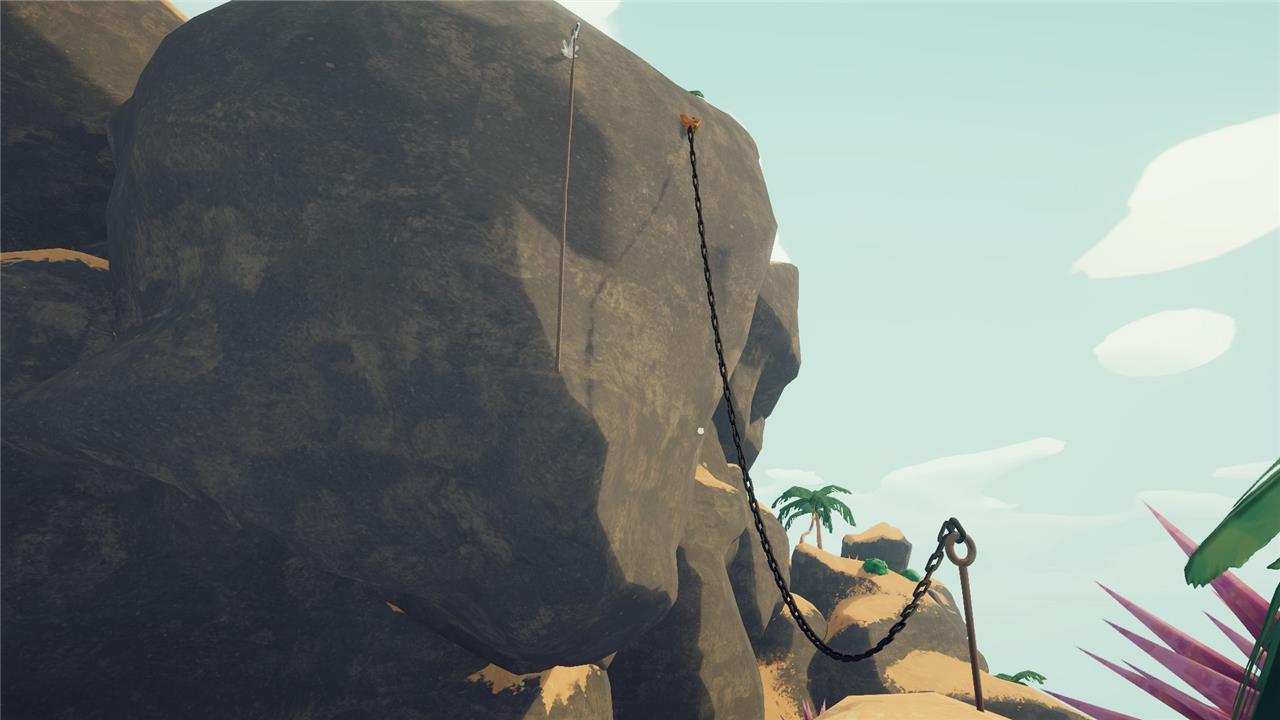
Chain launchers will connect wherever your cursor is aiming to your location with a chain, creating a chain-link bridge in the process. As rope cannons are great for height, chain launchers are for great for length. If you see an easy path to the top, but you have to make an impossible jump to reach it, use the chain launcher to create an easy-to-cross bridge.
Up isn’t the only direction
Climbing in Peak isn’t just about heading straight up-the terrain is full of opportunities to move sideways, clamber over obstacles, or even backtrack to safer ground. Sometimes the best path involves moving horizontally to avoid hazards or find helpful items, especially when stamina is running low or obstacles block your ascent. Keeping an open mind to alternative routes can make the journey to the top safer and more efficient, and sometimes reaching a side ledge or detour is the key to overcoming the mountain’s toughest sections.
When you want to reach the peak of a mountain, the best direction to head is, obviously, up, but sometimes you must descend to find the best path forward. As you climb up the mountain, you’ll reach areas that don’t have an easy or obvious path. Rather than forcing your way up, look to the side and beneath you in search of another trail. These passages can lead to a low-risk route that’ll help you keep your extra stamina and items.
Revive scouts at an ancient statue
In PEAK, reviving fallen scouts at ancient statues is crucial for maintaining team strength and stamina during your ascent. When a scout is downed, approach one of these statues to bring them back to life, which helps you keep the momentum going without losing precious stamina. Coordinating with your team to quickly revive each other at these points ensures that no one is left behind, making the climb less punishing and increasing your chances of reaching the summit together. Efficiently using ancient statues to revive scouts is a key part of teamwork and survival in the game’s challenging environment.
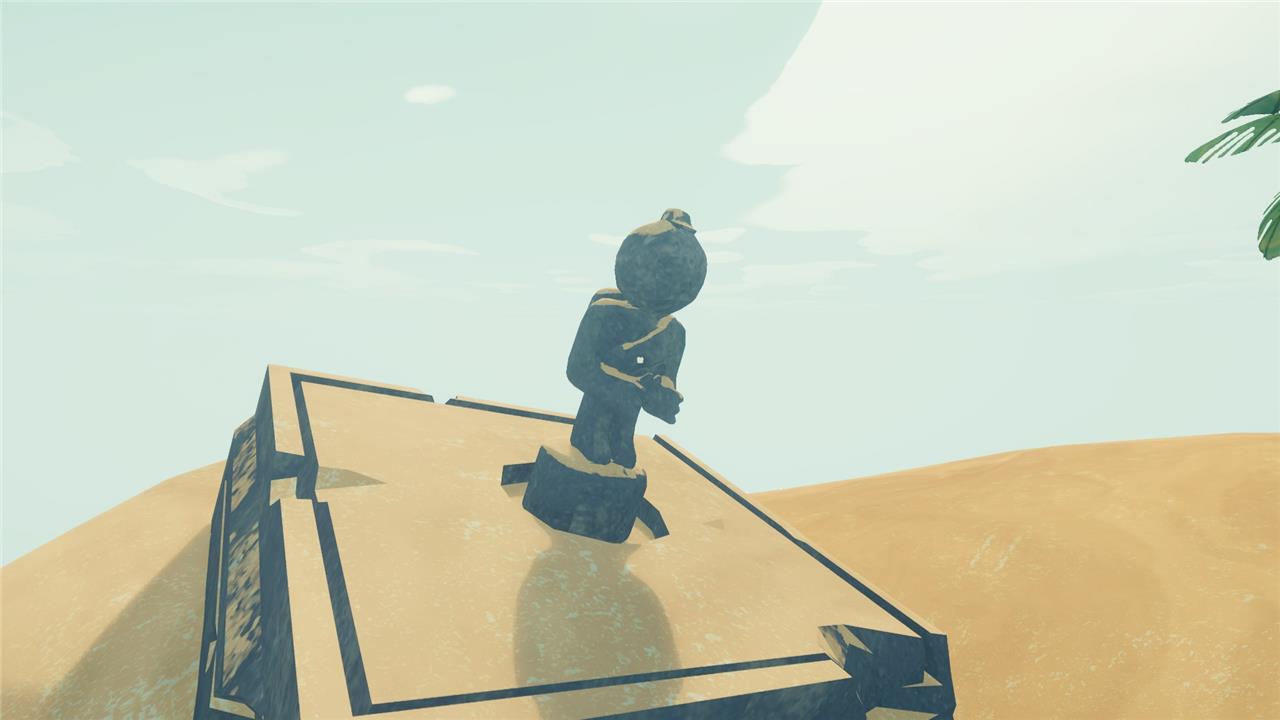
If you’ve lost a fellow scout, you can revive them at an ancient statue, which can be found at the top of each area. Simply interact with the statue, and watch all of your fallen friends will fall out of the sky! Unfortunately, revived scouts will receive a debuff that slightly limits their total stamina, but at least you’re back in the world of the living.
If you and all of your fellow scouts are alive, you should still interact with the ancient statue to receive a special item
Find flat land before trying new foods
Before trying any unfamiliar foods in Peak, always make sure you’re standing on safe, flat ground. Some foods may be poisonous, and if you consume them on a slope or ledge, a sudden bout of dizziness or negative effects could cause you to stumble or fall, leading to serious setbacks. Testing new foods in a stable area helps you react more safely and avoid accidental mishaps during your climb.
The ground in Peak can be a little funny sometimes. There will be times where you think you’re on flat ground, but, when you place your backpack on the floor, it slides off of the mountain making you lose all of your items.
The same thing can happen for your unconscious body. If you’re trying out a suspicious food for the first time, test it out on a flat surface! You never know if the berry or mushroom will poison you or put you to sleep. Rather than rolling off of the mountain, take a comfortable nap on flat land or, better yet, in a ditch.
If it looks dangerous, it probably is
In Peak, danger often announces itself if you’re paying attention-so trust your instincts and avoid anything that looks especially risky. Whether it’s a precarious ledge, unstable bridge, or a patch of strange plants and wildlife, taking chances with obvious hazards can quickly end your climb; many threats in the game, like sea urchins, poisonous plants, or slippery jellyfish, can seriously harm or even end your run if approached carelessly. Don’t ignore warning signs: if a shortcut or object looks suspicious or more dangerous than the alternatives, it’s safer to choose a slower, steadier path. Prioritizing caution over speed is key, especially for beginners still learning how the game’s many hazards play out.
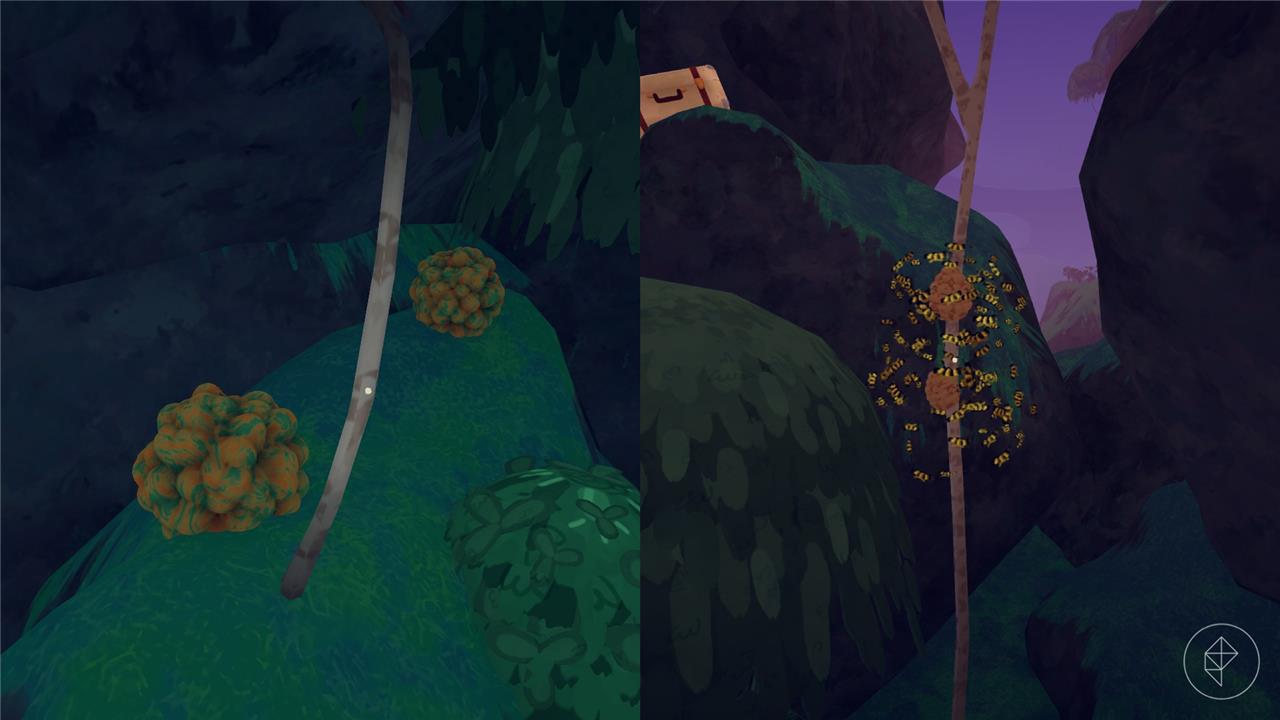
There are a lot of traps scattered around the mountain that you should look out for, but trust your instincts because dangerous objects, well, look dangerous. There are poisonous sea urchin-like bushes, explosive bulbous orange plants, and do I even have to mention the swarms of bees?
However, I should note that honeycombs are extremely useful as they provide a lot of extra stamina, but, again, watch out for the bees!
Out of stamina? Try lunging!
If you find yourself running out of stamina, lunging can be an excellent way to build endurance and strength. Lunges target major leg muscles like the quadriceps, hamstrings, and glutes, helping increase lower body power and stamina. They also engage your core and improve balance, which supports better overall stability and movement efficiency. Since lunges mimic everyday movements and require one leg at a time, they improve functional fitness and muscle balance, making it easier to sustain physical activity longer. Plus, lunges can be done anywhere without equipment, making them a convenient stamina booster for beginners starting their fitness journey.
Often times, you’ll find yourself just below the edge of a cliff with a tiny sliver of stamina. In situations like these, the best course of action is to lunge, which can be done by pressing the sprint button while climbing. However, this should only be done if you’re extremely close to the ledge.
As a last resort, you can also try spamming the jump button. Sometimes, this will give you the extra distance you need to grab hold of the ledge, but you will really need to press jump as fast as you can to gain the distance. This can be extremely risky because, if this fails, you will take an extremely large amount of fall damage.
Use Tenderfoot difficulty to find a path
Starting your journey on the Tenderfoot difficulty is the best way to learn how to navigate Peak’s shifting mountain terrain without overwhelming pressure. This mode removes the time limit and slows hunger and stamina depletion, letting you freely experiment with different paths and learn route-planning basics in a forgiving environment. By dropping the fog pressure, Tenderfoot gives you the chance to carefully scout for safer or alternative routes, making it much easier to identify and practice strategic detours or less risky climbs-important skills for long-term success in the game.
As the mountain changes every day, finding a route to the peak can be fairly difficult. As you’re getting to the mountain, consider lowering the difficulty to “Tenderfoot” to not have to worry about the looming fog.
What unexpected tricks can help beginners quickly master Peak’s mechanics
Several unexpected tricks can help beginners quickly master Peak’s mechanics and gain an early advantage:
-
Cook Unusual Items: You can cook not only food but also items like bandages and medkits, sometimes even using environmental heat sources like hot rocks or burning plane wings. Cooked versions of these provide extra stamina and sometimes additional effects, which most players overlook.
-
Lollipop & Energy Drink Combo: Eat a lollipop for infinite stamina (temporarily), then chug a sports drink before spamming jumps or climbs. This allows for bursts of extreme speed and verticality, but beware of the post-use drowsiness effect.
-
Heal While Falling: Start using a medkit or bandage mid-fall. If timed right, it instantly picks you up after you land and take damage, saving a run where a fall would have otherwise knocked you out.
-
Momentum-Based Swinging: Jump off ledges and grab chains or vines mid-fall to swing across large gaps without using stamina. This technique exploits your character’s carried momentum and can bypass tricky sections.
-
Jump Spam for Tough Terrain: While climbing, rapidly alternate between jump (or lunge) and grab to cover steep sections or traverse dangerous terrain faster and with less stamina lost. This is especially useful when you’re just short of reaching a ledge.
-
Master Gear Switching: Use the rope cannon for vertical climbs and the chain launcher for horizontal gaps. Knowing when to swap between tools (and practicing it) prevents wasted effort and dangerous falls.
-
Use Tenderfoot Mode if Stuck: Tenderfoot mode removes fog and some hazards, letting you focus on learning movement and mechanics without added stress. Many beginners skip this, but it’s a highly effective training tool.
-
Cook on Uneven Surfaces Cautiously: Test food and items only on flat ground. Eating or using items on slopes or rough terrain can cause you to fall or even get knocked out if affected by certain food debuffs.
-
Unequip Items Instantly: If you fall, press TAB to instantly unequip anything and be able to grab a surface. This is quicker than switching with number keys and can save lives in a panic situation.
These lesser-known tactics help new players move beyond basic survival and rapidly adapt to Peak’s unique climbing and survival systems.
What are some lesser-known drills to improve Peak’s editing speed quickly
Some lesser-known drills to improve Peak’s editing speed quickly include:
-
One-Time Maximum Speed Edits: Instead of repetitions, focus on performing single edits (like double resetting a cone and floor) at your top speed. Pause between each and aim to push your limits-even if you mess up-because this develops true high-speed muscle memory.
-
Click Timing Drills with Audio Cues: Remove one earphone so you can hear the exact timing of key presses and clicks. Practice double edits repeatedly, aiming for precise timing rather than consistency or speed at first. This trains your reflexes and builds foundational speed.
-
“Mongraal Classic” Building & Editing: Combine building and real-time editing instead of using pre-built edit courses. Start slowly, ensure accuracy, and increase speed while simulating live scenarios (build, then edit immediately).
-
Running Resets: Practice running forward, placing cones and floors, and rapidly resetting single tiles as you move. This drill combines aim stability with editing speed and forces your hands to work at live pace.
-
Triple Edit Progression Drill: If you miss stairs after triples, isolate the problem by practicing single triple edits that focus only on correctly placing the stair each time. Gradually add more repetitions as your consistency improves.
-
Ramp Flip Tunnel Drill: Place a ramp, flip it backward and underneath, then edit through a wall, flip back, and repeat. This movement-heavy drill for intermediate/advanced players builds both speed and transition smoothness.
-
Advanced Multi-Action Combo: String together double resets, piece control wall edits, quad edits, and ramp flips in one drill. Focus on explosive, one-off speed rather than long runs, then repeat to ingrain muscle memory and reduce delay between actions.
Practice recommendations: Spend 10 minutes on each drill daily, progressing from beginner to advanced drills in a session. This segmented approach prevents fatigue, trains speed under different conditions, and helps avoid developing lazy habits from standard edit courses.
These methods go beyond typical static edit courses by emphasizing speed bursts, real-game building-editing combos, and specific problem-area targeting, which helps boost editing speed much more quickly.