Sneak through the boundaries between platforms as you coax the Epic Games Launcher onto your Steam Deck, unlocking a pocket-sized powerhouse for on-the-go gaming.
Our guide to installing the Epic Games Launcher on your Steam Deck will walk you through every step you need to start playing Epic games to your Steam Deck.
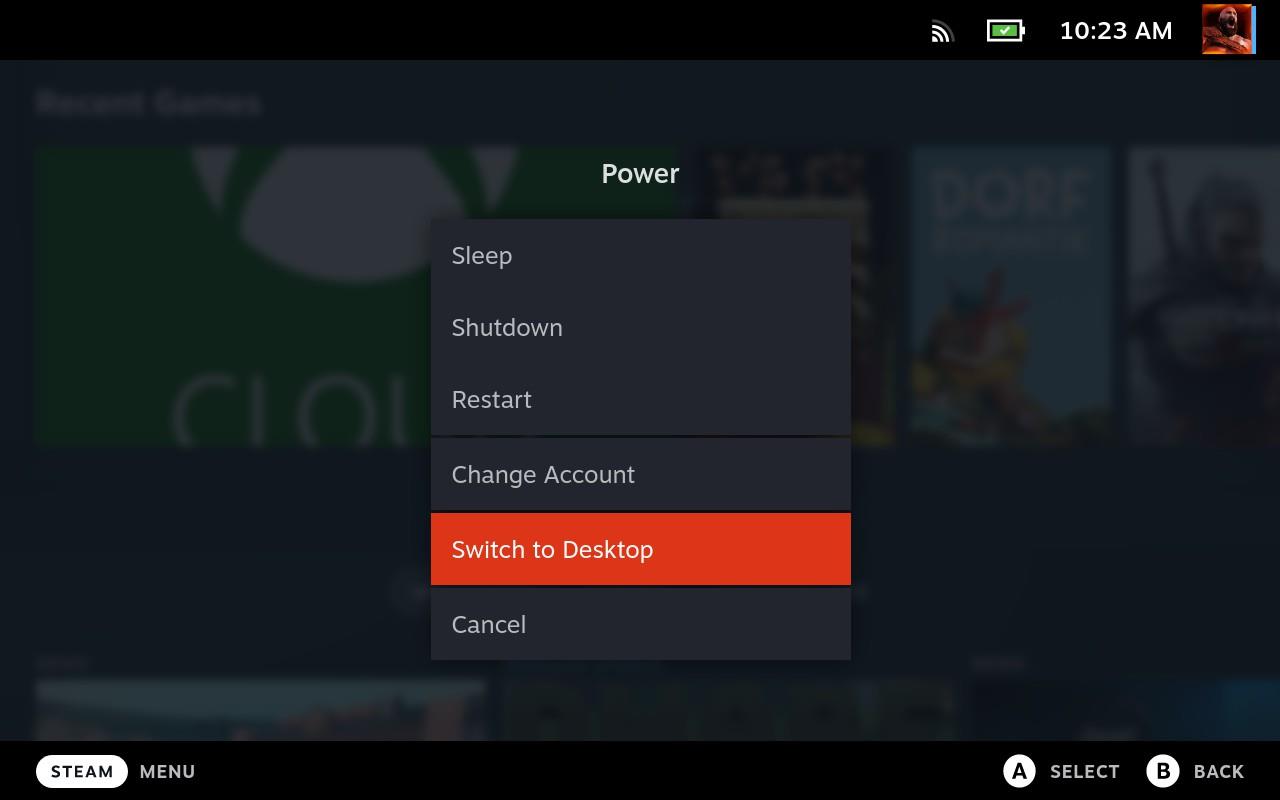
Switch to Desktop Mode
Switch your Steam Deck to Desktop Mode through the Power menu to access a full Linux interface. This mode lets you use the built-in Firefox browser or Discover Store to download files and manage installations easily. It provides a more traditional computer environment, making it simple to install the Epic Games Launcher and handle other setup steps before returning to Gaming Mode later.
Before anything else, you’ll need to switch over to the Steam Deck’s Desktop Mode to get at the underlying SteamOS. Hit the Steam button and scroll down to Power. In the next menu, choose Switch to Desktop Mode.
In Desktop Mode, you can use the touchscreen to interact with some things. More useful, though, is using the right trackpad to move the mouse, the right trigger to left-click, and the left trigger to right-click. Yes, the clicking is backward, but it kind of works once you get used to it.
Install Proton
Proton lets you run Windows games on SteamOS, so it’s needed before installing the Epic Games Launcher. Open Steam on your Steam Deck, go to Settings → Steam Play, and enable “Enable Steam Play for all other titles.” Choose the latest Proton version from the dropdown. This will ensure compatibility with the Epic Games Launcher and most of its games once installation is complete.
Unlike getting Xbox Cloud Gaming on the Steam Deck (which runs through a browser), the Epic Games Launcher is its own Windows-based app – much like PlayStation Plus. To get around this, you’ll need to install Proton, an emulator that tricks Windows programs into running on SteamOS (Linux).
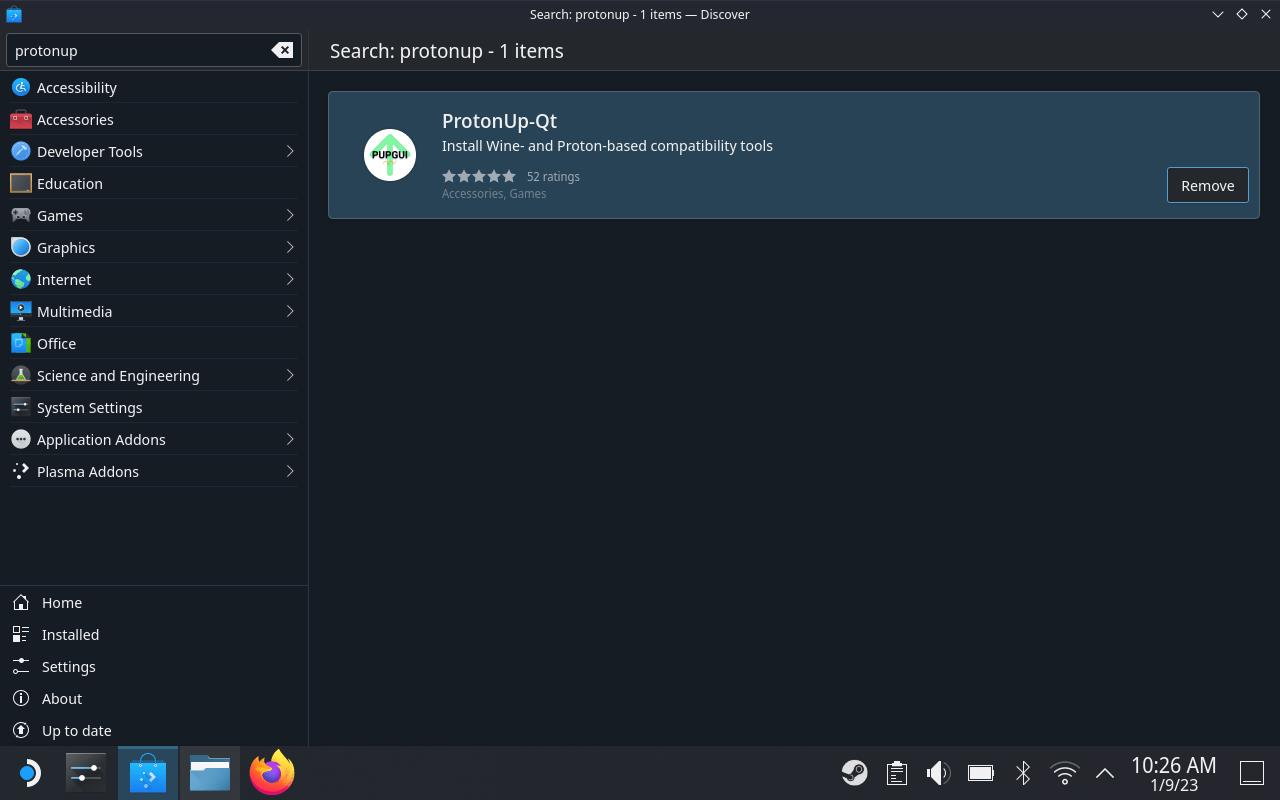
In Desktop Mode, click on Discover, the shopping bag icon on the left side of the taskbar. Hit Steam X to pull up the on-screen keyboard and type “ProtonUp” in the search bar. Click Install on ProtonUp-Qt.
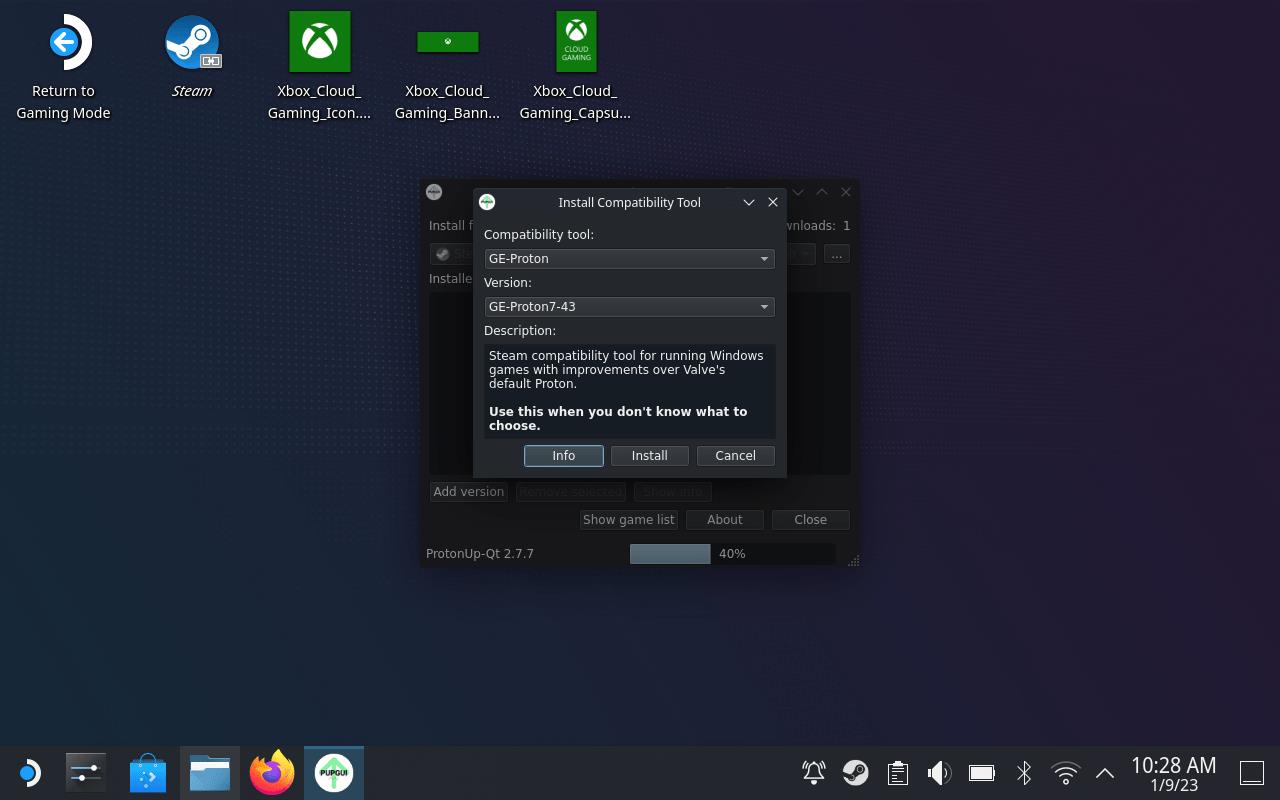
Hit the Application Launcher (the start button on the task bar), and go to Utilities to launch ProtonUP-Qt and Choose Add Version. Make sure the Compatibility Tool dropdown is set to GE-Proton, and pick the most recent version – as of this writing, it’s GE-Proton7-43.
Once it’s installed, go to the taskbar and right-click on the Steam icon. Choose Exit, and then relaunch Steam – either with the desktop icon or by going to the Application Launcher > Games > Steam.
Install the Epic Games Launcher
Install the Epic Games Launcher by downloading the standalone installer, running it, and following the on-screen prompts to complete the setup on your Steam Deck.
Open a browser from the desktop (like Firefox) and head to the Epic Games site to download the Launcher. Make sure you grab the Windows version – it’ll be a .msi file.
Don’t launch it yet, though. First, you have to work with Steam and do some convincing.
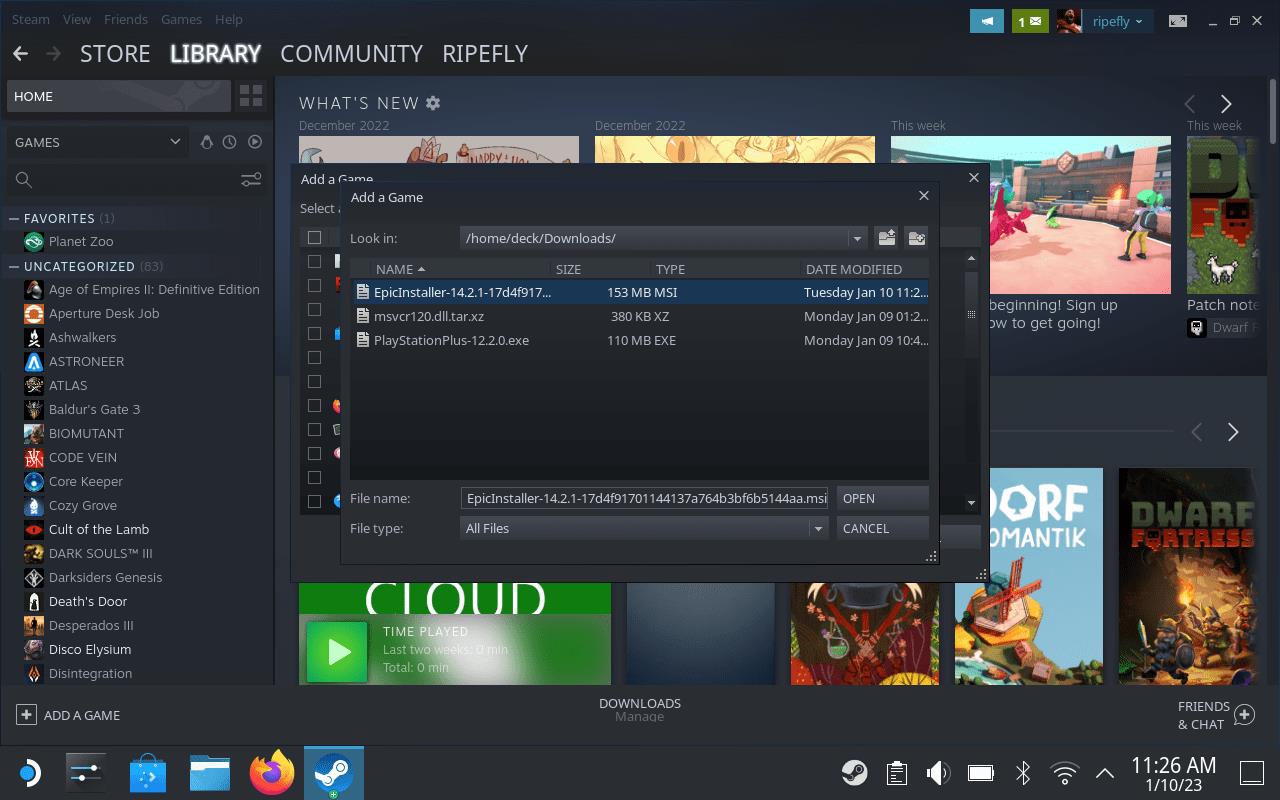
Open Steam. In the bottom left, click on Add Game > Add a Non-Steam Game. In the new window, hit Browse. Navigate to /home/deck/Downloads/ (or wherever you stored the installer) and change the file type to All Files. Pick the EpicInstaller you just downloaded and hit open. Back in the first window, hit Add Selected Programs.
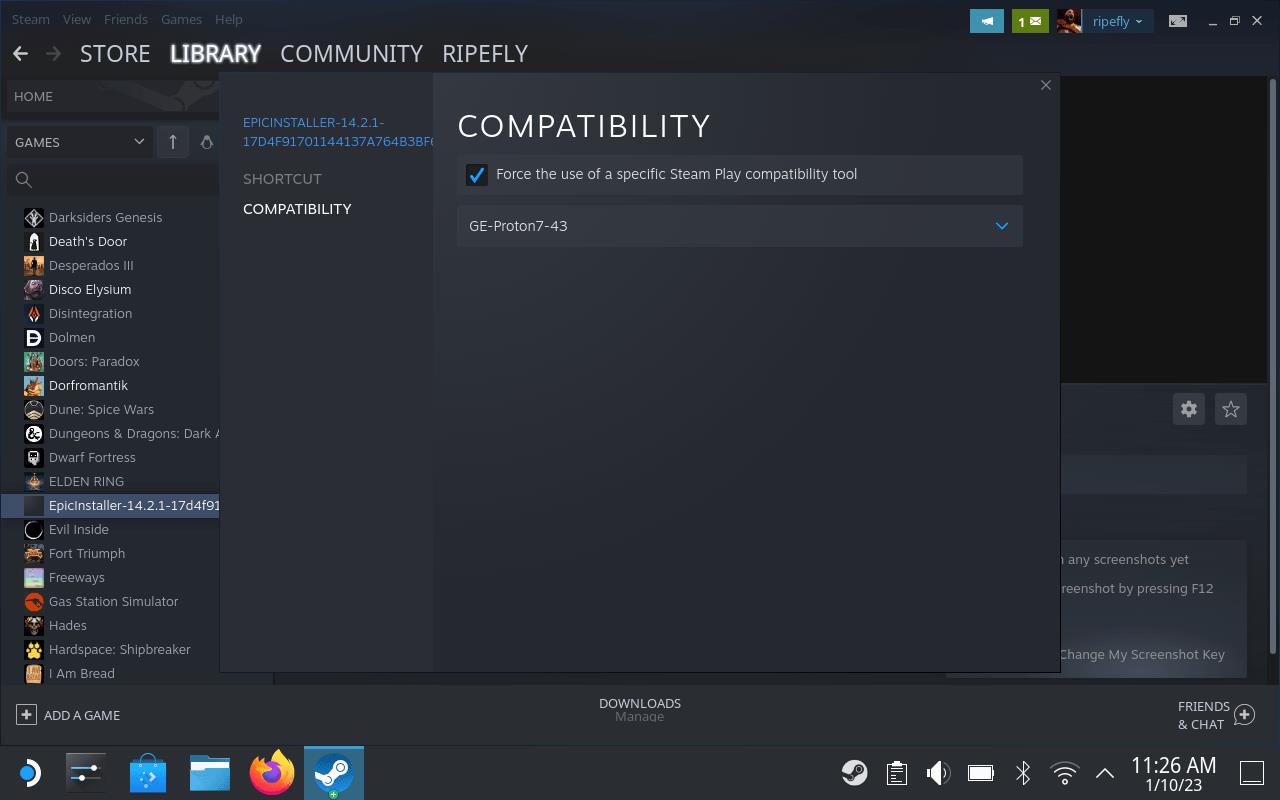
Open your Steam Library and scroll down to the new EpicInstaller entry. Right-click on it with the left trigger and go to Properties > Compatibility. Check the box next to Force the use of a specific Steam Play compatibility tool. Select the most recent version of Proton from the dropdown.
Go back to your Steam Library and hit Play to launch the installer. Hit Install when the new window pops up and wait.
Change the Target location
After installing the Epic Games Launcher, you need to specify where the launcher files will be stored. In Desktop Mode, right-click the Epic Games Launcher shortcut and select “Properties.” Under the “Target” field, change the file path to the correct directory on your Steam Deck, typically inside your user’s home folder or a designated games directory. This adjustment ensures the launcher runs smoothly from the proper location without installation errors.
Now that it’s installed, you have to tell the Steam Library entry to run the Launcher instead of the Installer. And to do that, you have to find our way to the Epic Games directory. Click on Home in the Places bar on the left. Over on the right side of the window, click the hamburger button to open the menu and select Show Hidden Files.
You’ll see new grayed-out folders in the Dolphin window – the ones with a . in front of their names. Navigate into the folders by double-clicking on them and head to /.local/share/Steam/steamapps/compatdata. The folders here are just series of numbers, so you’re looking for the most recent (or only, if you’re lucky) one – that should be the one with Epic Games in it. If you need to dig around for it, use the hamburger button and Sort By > Modified.
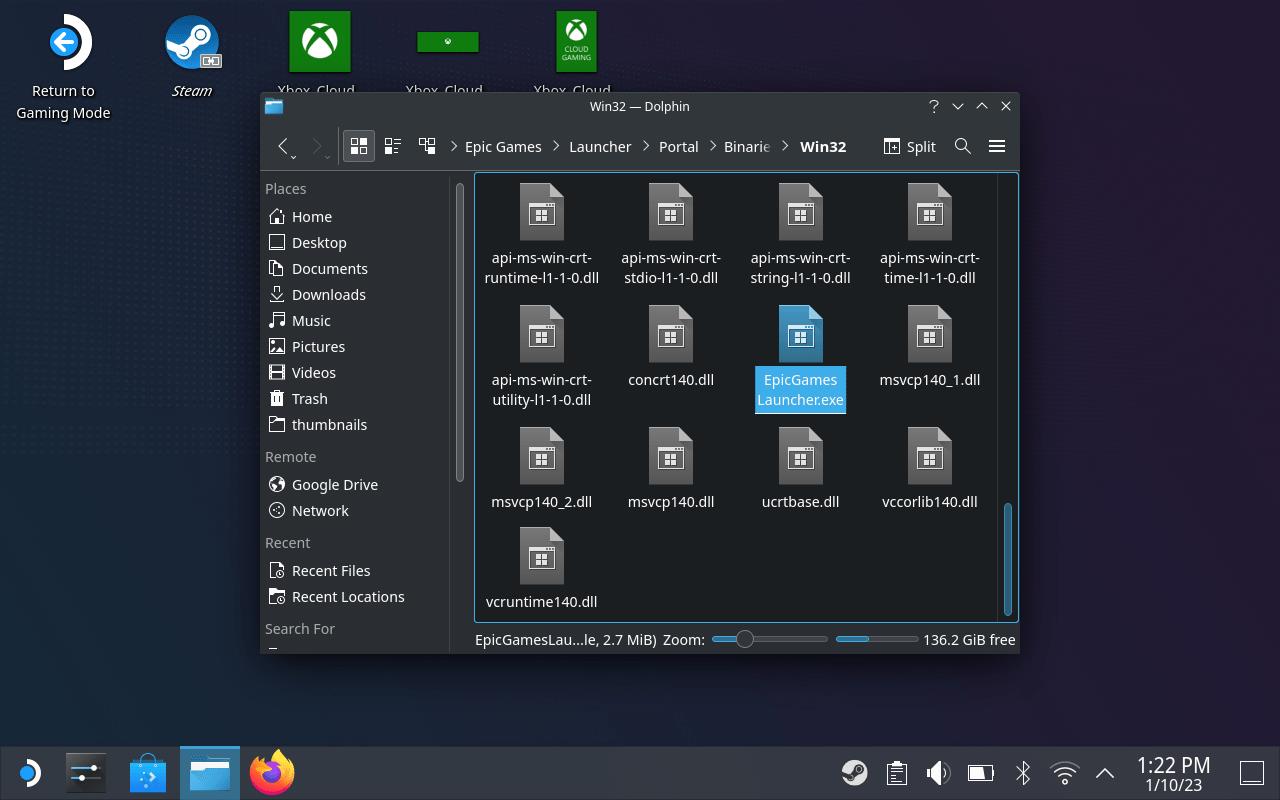
From there, you need to keep digging a little to /[series of numbers]/pfx/drive_c/Program Files (x86)/Epic Games/Launcher/Portal/Binaries/Win32/.
Scroll down to EpicGamesLauncher.exe. Right-click on it, and choose Copy Location.
Go back to your Steam Library and right-click on the EpicInstaller entry.
First, pull up the onscreen keyboard with Steam X and rename it to something friendlier like Epic Games Launcher.
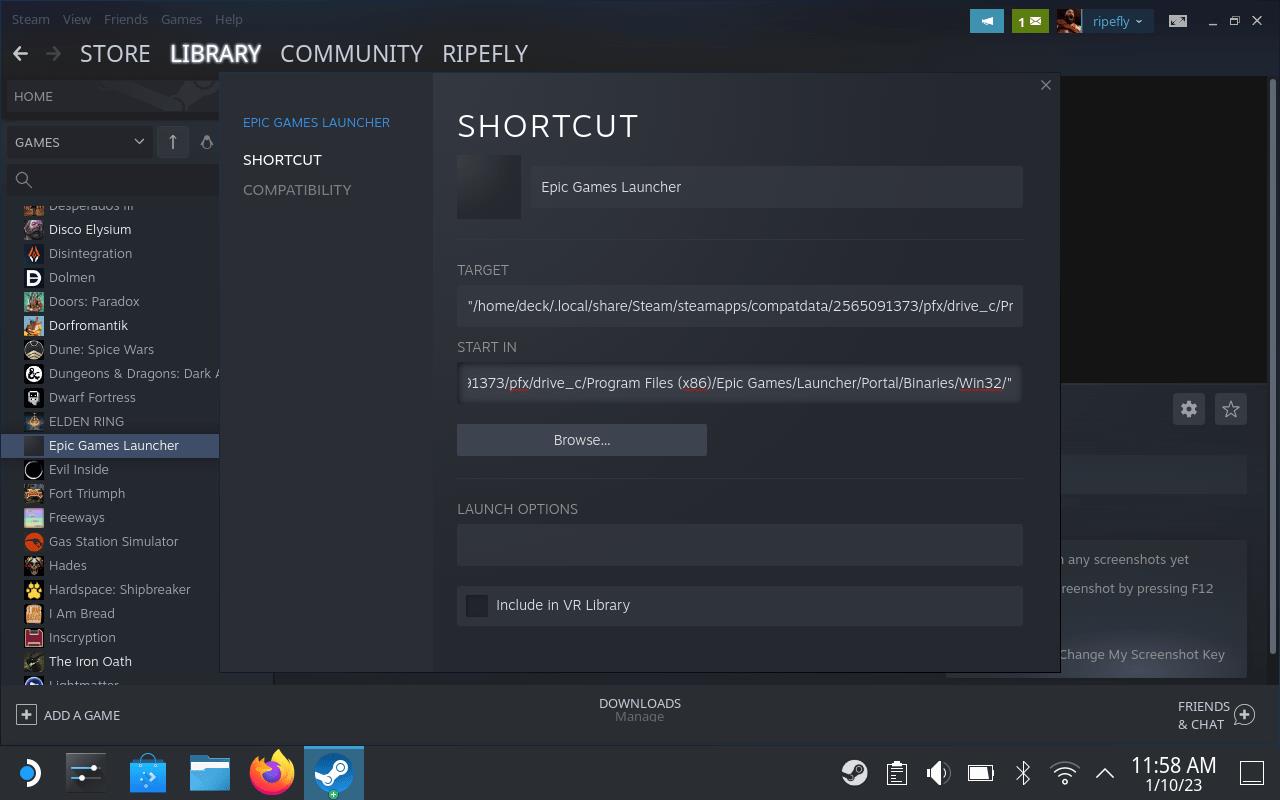
In the Target field, highlight everything except the quotes. Right-click on the highlighted text and paste in the address you just copied above.
Below that, highlight everything except the quotes in the Start In field. Right-click and paste again. Delete EpicGamesLauncher.exe from the end – make sure the leave the quote.
Switch back to Gaming Mode
After you’ve finished setting up the Epic Games Launcher, switch your Steam Deck back to Gaming Mode from the power menu. Once the system reloads, open your Library and check the “Non-Steam” section-you’ll find the Epic Games Launcher listed there. Launch it just like any other game, log in, and you’re all set to play your Epic titles directly through SteamOS with controller support.
Get back to the desktop and double-click on the Return to Gaming Mode icon.
Launch the Epic Games Store
After installing the Epic Games Launcher on your Steam Deck, open Desktop Mode and find the application either from the Applications menu or through the search bar. Once launched, sign in with your Epic Games account to access your library. From there, you can download and install any games you own. If you plan to play from Gaming Mode, make sure to add the launcher as a non-Steam game so it’s easily accessible from your main interface.
You’ll find your new Epic Games Launcher in the Non-Steam Games tab of your Library. The first time you launch it, it will probably update, and then you’ll have to sign into your account. Hold off on that one second, though, and set up some controls to make life easier.
Hit the Steam button and select Controller Settings. Change the current layout to Gamepad with Mouse Trackpad and then select Edit Layout. Scroll down to Trackpads.
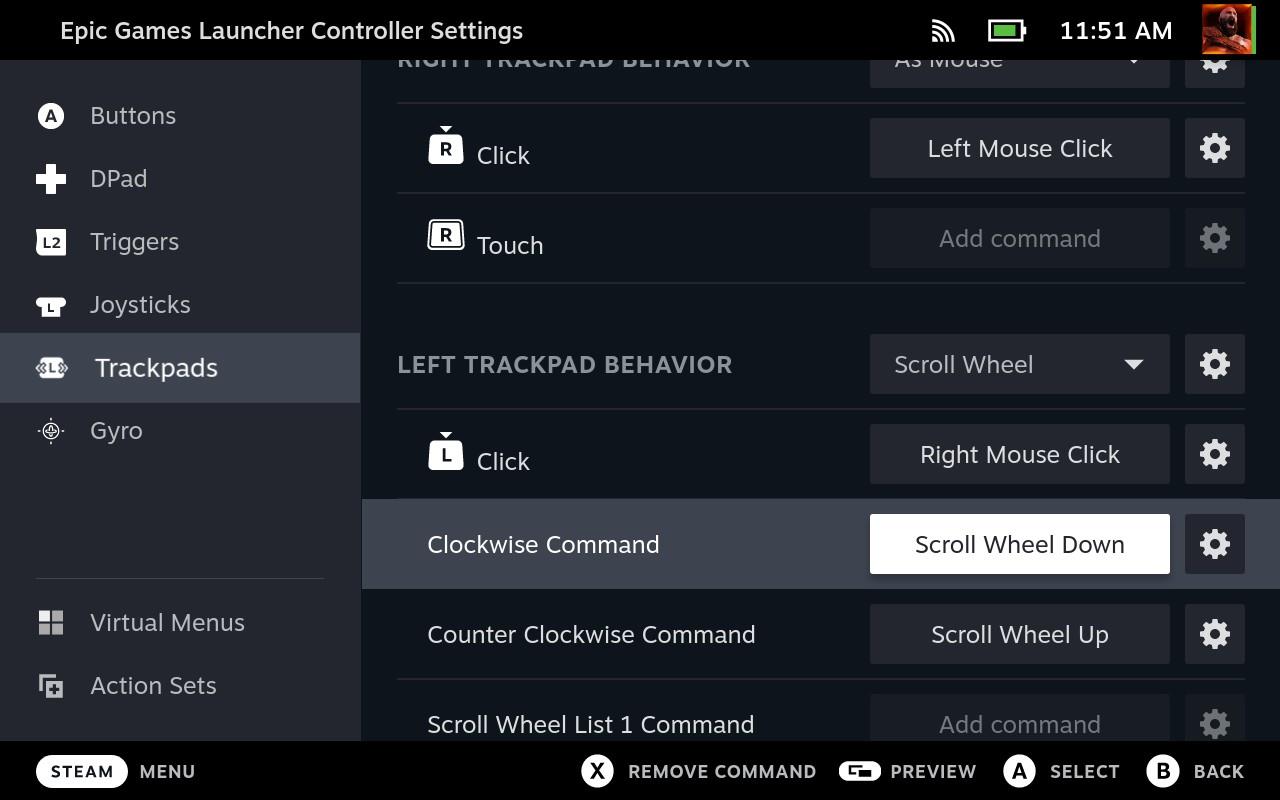
Set the Right TrackpadBehavior to As Mouse. Click in the R Click box, tab to the Mouse menu, and choose Left Mouse Click.
Set the Left Trackpad Behavior to Scroll Wheel. Click in the L Click box, tab to the Mouse menu, and choose Right Mouse Click. Click in the Clockwise Command box and set it Mouse > Scroll Wheel Down, and do the opposite for Counter Clockwise Command (or vice versa).
Now you’ve have some makeshift mouse controls for the Launcher (and games) with the Steam Deck’s trackpads.
Pull up the keyboard with Steam X and get signed in.
Some notes…
Some minor setup details can vary depending on your Deck’s system version or personal preferences. Keep your device updated and make sure you have enough storage before starting. You may also want to connect a keyboard and mouse for easier navigation during installation. If anything behaves differently from expected, retrace each step carefully and check for recent community tips or updated methods.
Putting anything beyond Steam onto your Steam Deck is asking it to do something it wasn’t expressly designed for – and you’ll meet with varying degrees of success doing it. Xbox Cloud Gaming works very well, PlayStation Plus Cloud Streaming works a little less well, and the EGS. is pretty hit or miss. Let’s talk about the issues we noticed.
The Epic Games Launcher launches in a window that’s just not the right size for the Steam Deck’s display, and making that window fullscreen makes it too big for the display. So that’s just something you’ll have to live with. Games work in fullscreen without issue, though.
From the Launcher, you can install games normally. You’ll have to be patient while things download, since they can’t (or won’t) download in the background.
Exiting out of games seems to cause some confusion in the app, so you might have to close and restart the Epic Games Launcher every time.
We got Maneater running with no issue, but there seems to be a problem with certain games – like Kerbal Space Program – that launch their own launchers. Games like that just don’t work. There do seem to be workarounds (like adding the .exe files to Steam after installing), but they’re a lot more intensive than we can cover here (or are comfortable covering) and have their own issues with controls and compatibility.
How to install and use Heroic Games Launcher on Steam Deck
Heroic Games Launcher provides a native Linux solution for accessing Epic Games, GOG, and Amazon Prime titles on the Steam Deck, outperforming the official Epic Launcher by avoiding Proton compatibility issues.
Enter Desktop Mode
Press the Steam button, select Power, then choose Switch to Desktop to access the full SteamOS interface.
Install Heroic
Open the Discover app store (shopping bag icon), search for “Heroic Games Launcher,” and click Install-the Flatpak version is recommended for seamless updates.
Initial Setup
Launch Heroic from Discover, log in to your Epic (or GOG/Amazon) account via the sidebar, and enable “Add games to Steam automatically” in Settings > General for direct library integration.
Add to Steam Library
In Desktop Mode, right-click Heroic in Discover or Applications and select Add to Steam; return to Gaming Mode to find it under Non-Steam games for controller-friendly navigation.
Install and Play Games
Browse your library in Heroic, select a game, choose install location (default is fine), pick Proton/Wine version if needed, then launch-games auto-appear in Steam for easy access.
How to add Heroic installed games as non-Steam games in Steam
Heroic Games Launcher simplifies adding its installed games to Steam as non-Steam entries, making them accessible directly in Gaming Mode.
Enable Auto-Add
In Desktop Mode, open Heroic, go to Settings on the left sidebar, select General, and toggle on “Add games to Steam automatically.” New installs will then appear under Non-Steam without extra steps.
Manual Add
Open Heroic in Desktop Mode, select an installed game from your library, click the three dots in the top-right of its details pane, and choose “Add to Steam.” The entry appears in Steam’s library and Gaming Mode’s Non-Steam tab.
Verify in Gaming Mode
Switch back to Gaming Mode; games show under Non-Steam for controller navigation and launch-Heroic handles the Wine/Proton prefix seamlessly.