Your settlers stand at the edge of a wild frontier, surrounded by stone, soil, and uncertainty. With careful planning, smart resource use, and a touch of dwarven stubbornness, you can turn a patch of wilderness into a thriving stronghold that endures the chaos waiting below.
Our guide to creating your first fortress will walk you through every step of building your first fortress. A quick note before we get started: There’s no right way to play Dwarf Fortress, so everything below is based on our (many, many) hours with the game. Every step below isn’t strictly necessary, but they will all help you stave off the inevitable “losing is fun” moment and teach you (the basics of) many of the game’s esoteric mechanics.
Create a friendly world
Building a friendly world in Dwarf Fortress begins with ensuring your dwarves have everything they need to stay content and cooperative. Provide good living quarters with furniture and decorations to lift their moods. Offer varied food and drink options to prevent boredom and tantrums. Keep them safe from threats by securing entrances and setting up a well-trained military. Small comforts like meeting halls, statues, and festivals go a long way in keeping your citizens happy and productive. A cheerful fortress runs smoother and stands stronger through tough times.
When you create a new world from Dwarf Fortress‘ menu, you’ll see a few parameters for the world you create. Your choices here can dictate how hard your game is to survive.
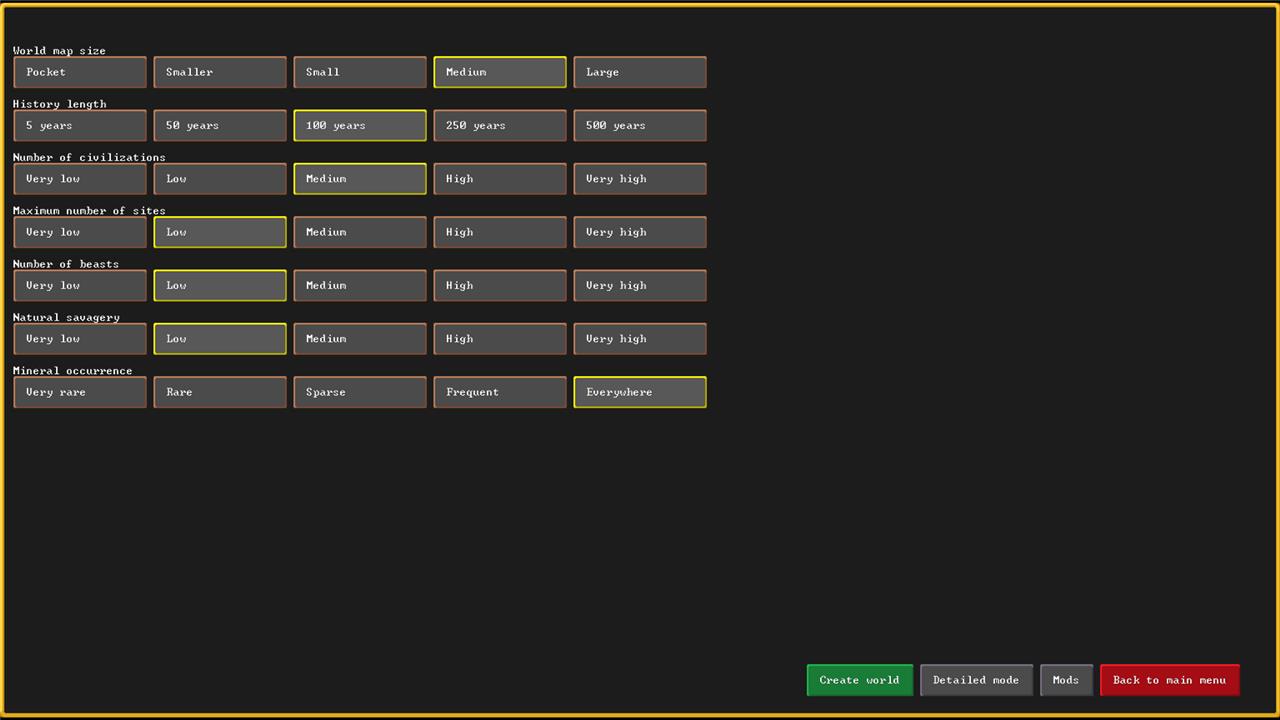
For a relatively easy world to start with, use these settings:
- Don’t worry much about the size of the world you create. Larger worlds require more resources from your computer, but give you more options for building sites. Until you get comfortable, keep it medium or small.
- Limit the history 100 years long or less to keep other civilizations from spreading too far and claiming the best spots. This also reduces how long the world takes to generate.
- Set the number of civilizations and maximum number of sites to medium or lower. You still want someone else out there to trade with, but too many other civilizations will take up valuable real estate. The number of sites controls how many settlements each of those civilizations have.
- Until you’re ready for more fun (read: chaos), set the number of beasts and natural savagery to medium or lower. The number of beasts determines how many Forgotten Beasts roam your world. These are named, legendary, and deadly creatures that wander around causing problems. Natural savagery means you’re more likely to end up in a place with hostile (or giant) creatures.
- Set mineral occurrence to everywhere. Lower settings mean fewer and less varied metal ores and minerals – and you’ll want options.
Once your world is created, it’s time to find a new home.
Choose your embark location carefully
Your starting location shapes everything that follows, so study the map before committing. Check for access to fresh water, varied terrain, and key resources like flux stone, trees, and metal ores. Avoid biomes prone to freezing or scorching temperatures unless you want an early challenge. A balanced site with manageable wildlife, nearby trade routes, and good soil will make the first few seasons far smoother and give your dwarves the foundation they need to thrive.
Once you’ve created a world, you’ll need to pick an embark location. With enough hard work and planning, you can probably carve a fortress out of just about any location, but it’s much easier to start yourself with as many advantages as you can. The tutorial will pick one for you with everything you need. To pick your own, though, there are a few things to keep in mind – basically a manual version of the same things the tutorial does for you automatically.
There’s even a search function to help you out here.
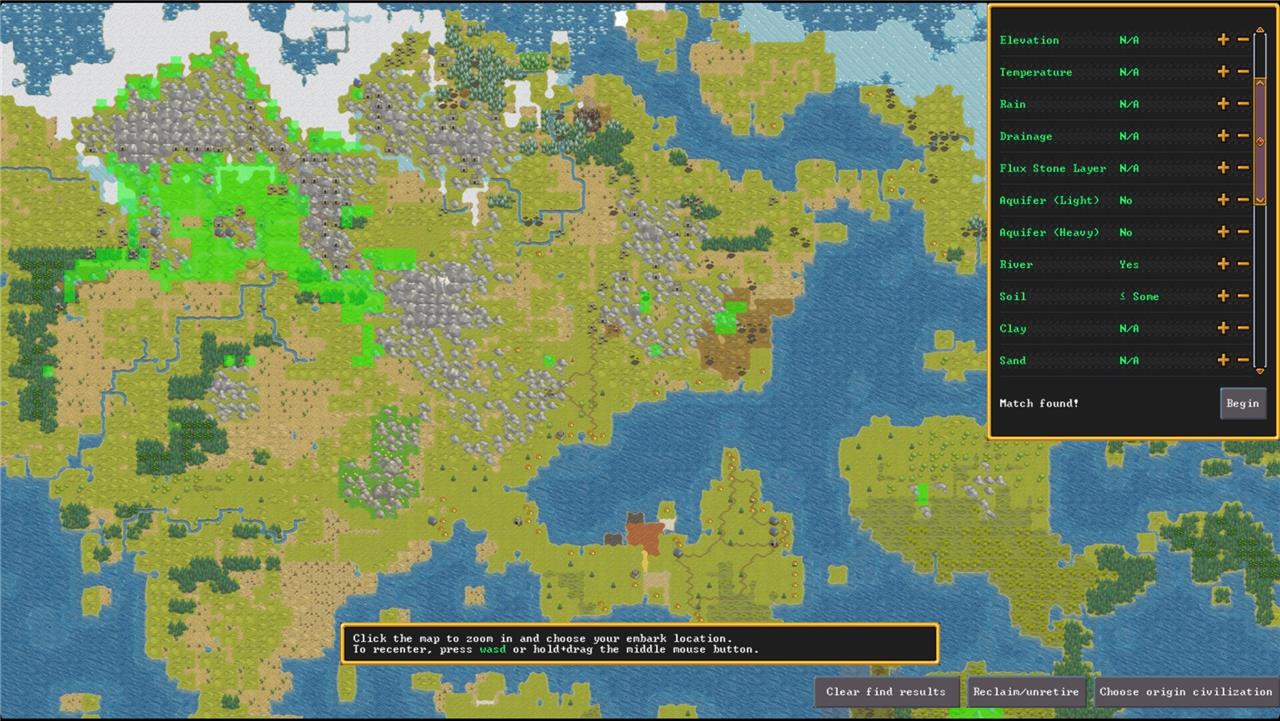
Click the “find embark location” button in the lower right. There are a lot of options here, but the most important for your first several fortresses are setting Aquifer (Light) and Aquifer (Heavy) to No, River to Yes, and Soil to <= Some. Aquifers are underground water deposits that are a pain to deal with, a river is a source of water and fish, and soil gives you a place to plant crops.
The finder will highlight any places that meet those requirements, but you still have some decisions to make. Click on one of the highlighted areas to zoom in. While you mouse around, watch the information panel in the upper right (right click to clear the finder menu). For now, focus on the Trees and Other Vegetation.
Trees supply lumber that you’ll need for furniture, charcoal, and construction, so you’ll want at least Sparse here, but Woodland or Heavily Forested are better. Other vegetation means there’s food to find and gather that you don’t have to grow yourself – having stuff just lying around will save you trouble later.
There’s stuff to do before you even get started
Before you strike the ground for your first fortress, some groundwork helps everything run smoother. Check that your world generation settings match your goals-mountains for metals, rivers for water, or flatlands for farming. Review your dwarves’ skills so each one has a clear purpose from day one, like mining, carpentry, or brewing. Take a moment to adjust your starting supplies too; trade a few axes or picks for extra seeds, wood, or drinks if needed. A little planning here can prevent early struggles deep underground.
After you’ve picked an embark location, you’ll get another screen where you can choose to carefully set up your caravan of colonists. There’s a lot going on there that you don’t need to worry about just yet, so pick “Play now!” to get started with a default set of colonists.
Assign Labors
Before anything else, open up the Labor menu (with the y key). This lets you decide which dwarves are available to do which jobs.
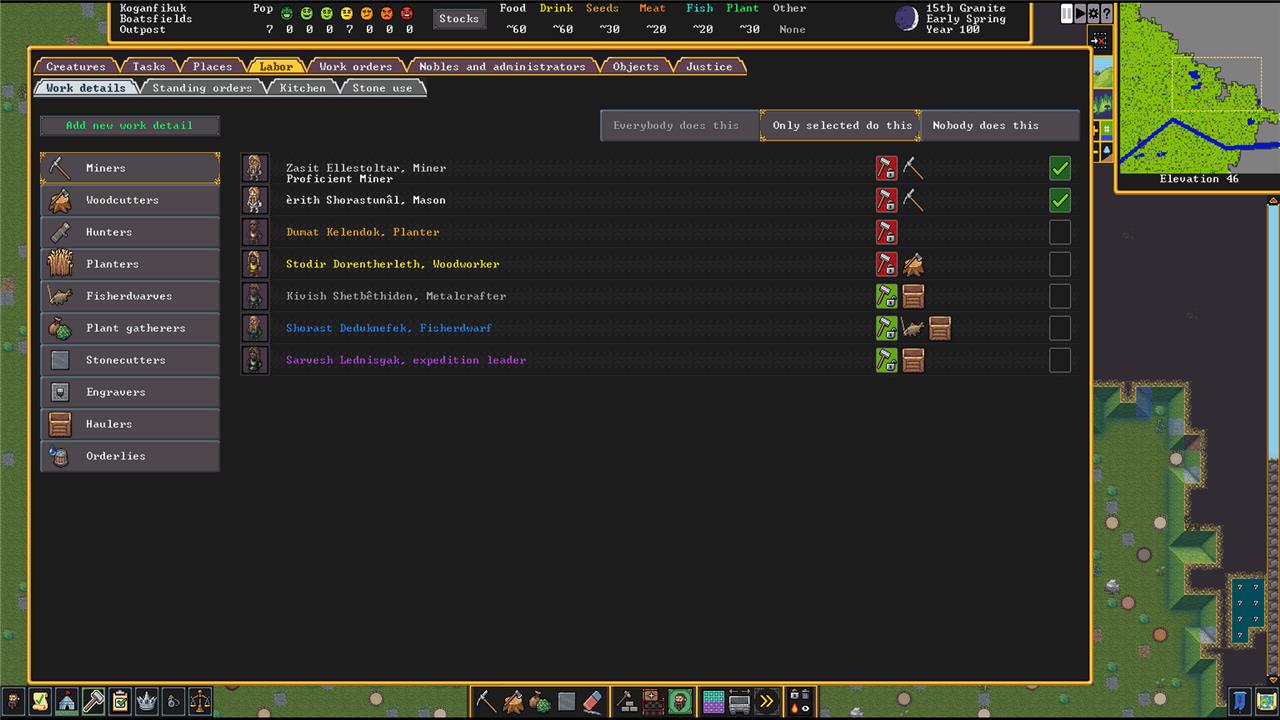
You can dig a lot deeper with customization later on, but for now, let’s just assign the basics.
- Pick at least one extra Miner, and click the hammer and lock button to make sure they only mine – we usually pick the default stoneworker as the extra one. Locking them makes sure they aren’t distracted and you don’t have to wait around for them.
- The Woodcutter and Fisherdwarf are fine as is, but you can lock the Woodcutter if you want to speed up logging.
- Scroll down to Haulers and set it to Only selected do this. Pick everyone not mining or woodcutting. This doubles down on your Miners and Woodcutter not getting distracted.
Designate Zones
Zones marks out where certain activities take place. For right now, set up Water Source, Fishing, and Pen/Pasture zones.
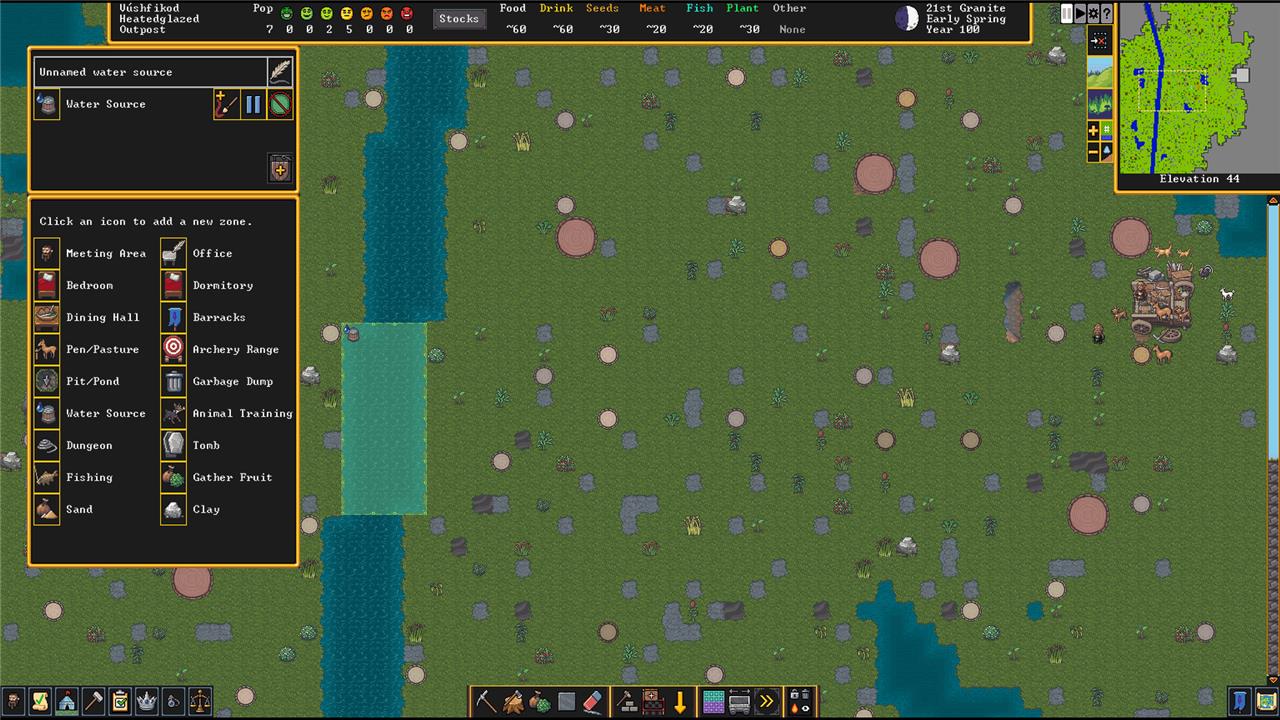
Open the Zones menu with z, and choose Water Source. Find a stretch of river nearby and highlight it. Zones can overlap, so go ahead and make the Fishing zone the same stretch.
A Pen/Pasture zone is where your animals will hang out. Attending to the animals is a little more involved, so they get their own section.
Move the animals
There are two broad kinds of animals in your fortress: pets and stray animals. Pets have names, and stray animals covers everything belonging in your fortress that isn’t a pet – livestock, basically. You don’t have to worry about pets since their owners feed them and take care of them. The livestock, though, needs somewhere to hang out with vegetation (see above) to eat. If they’re not in a pen, stray animals tend to starve to death.
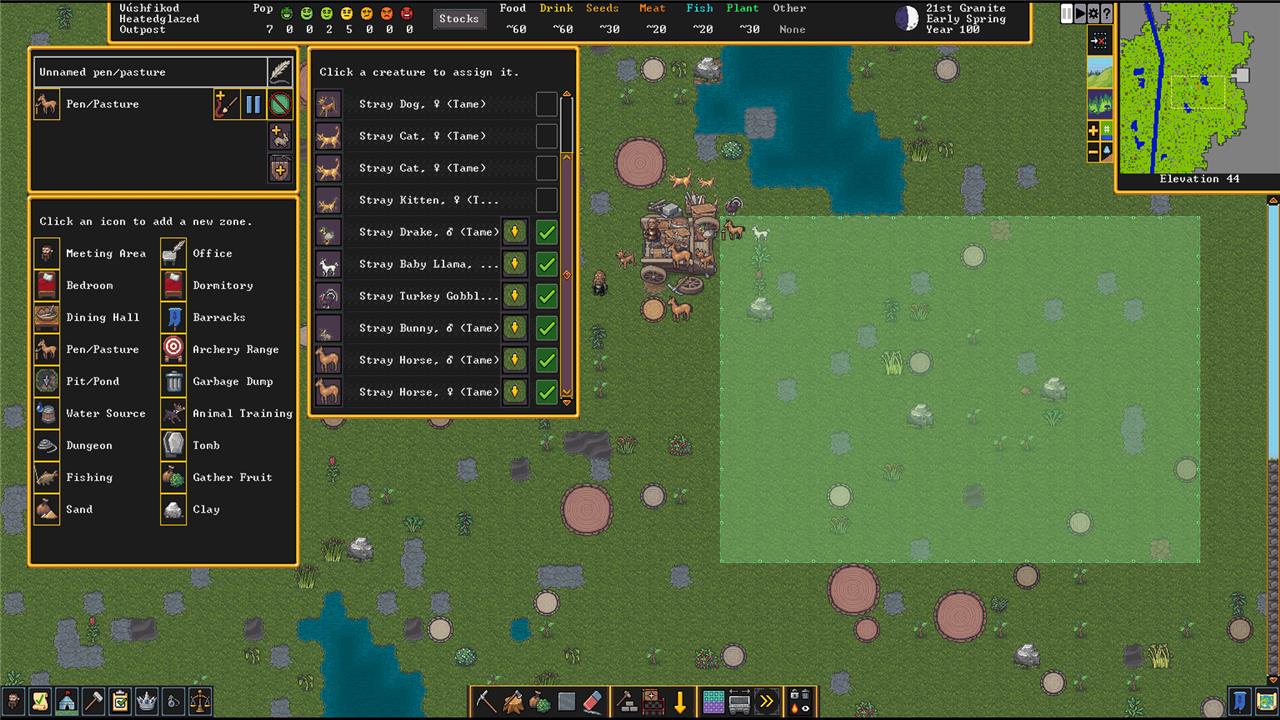
Pick a Pen/Pasture from the Zone menu and place a pen near where your fortress will be (you can always move it later). Accept it and then click the button with a plus sign and a bunny to assign animals there. Assign anything too big to be a pet. (Anything can be a pet, but you don’t need horses and yaks wandering around your fortress.)
Before you move on, open the Citizen Information menu with u. Click on the Pets/Livestock tab to view your animals. Click the dwarf and dog icon off to the right to make any animals you want available as pets – this lets them get adopted and cared for. (You can’t make cats available as pets – they choose their own owners if and when they deign to.)
Strike the earth!
Your first dig should aim for a safe, resource-rich hillside where your dwarves can carve out space away from surface dangers. Focus on setting up workshops and stockpiles near your entryway to limit travel time. Secure fresh water, wood, and stone early, then plan housing deeper underground for protection. A well-organized entrance and sturdy defenses will keep your fledgling fortress standing through its first attacks.
It’s finally time to start digging. Building above ground is possible, but all the best minerals (and metal) are underground. And digging out your home is a lot more efficient.
There are two ways to do this, and they depend on the terrain where you start out. Before that, though, let’s talk briefly about elevation and how Dwarf Fortress‘ levels work.
Elevation and levels
Every level of elevation in Dwarf Fortress has two parts – let’s call them a block and a floor.
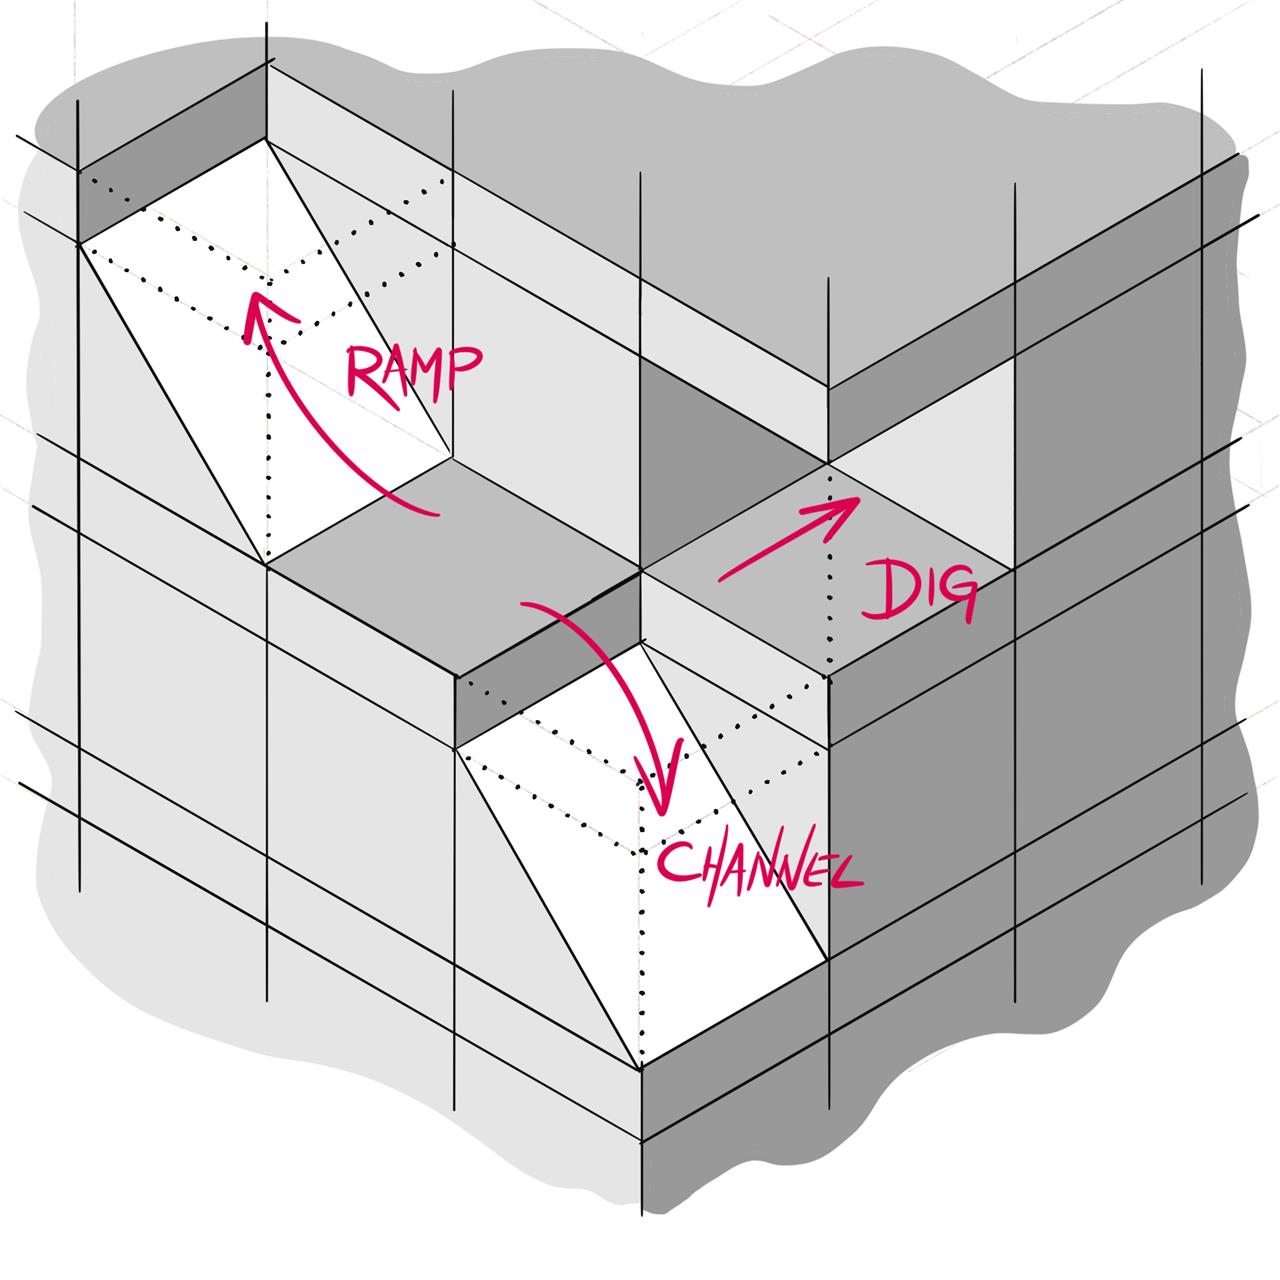
Aside from stairs, there are three ways to dig in Dwarf Fortress: dig, channel, and ramp. Each of these interact with the block and floor in a different way.
- Digging moves horizontally, removing the block and leaving the floor(s) alone.
- Channeling removes the floor and turns the block below into a ramp leading down to the level below.
- Ramping turns the block into a ramp up to the level above and removes the floor above.
Dig horizontally
If you’ve got a hill near your starting location, you can dig straight into it to start your fortress. Open the Digging Orders menu (m) and pick regular mining (m). Draw out the area you want mined, and let your dwarves get to work.
Channeling
If you’re somewhere flat, you’ll need to dig down. Channel down to the level you want, and then start digging horizontally.
Build a trade depot
A trade depot lets your fortress connect with merchants from other civilizations, bringing in materials and goods your dwarves can’t produce themselves. Build it on flat ground with a clear path wide enough for wagons to travel from the map edge. Place it near your stockpiles to speed up loading and unloading. Once finished, use it to request imports or offer surplus crafts and metals for trade, helping your settlement grow through commerce.
A Trade Depot allows caravans of traders to visit and exchange goods with you. Trading is a great way to get resources you aren’t set up to make on your own.
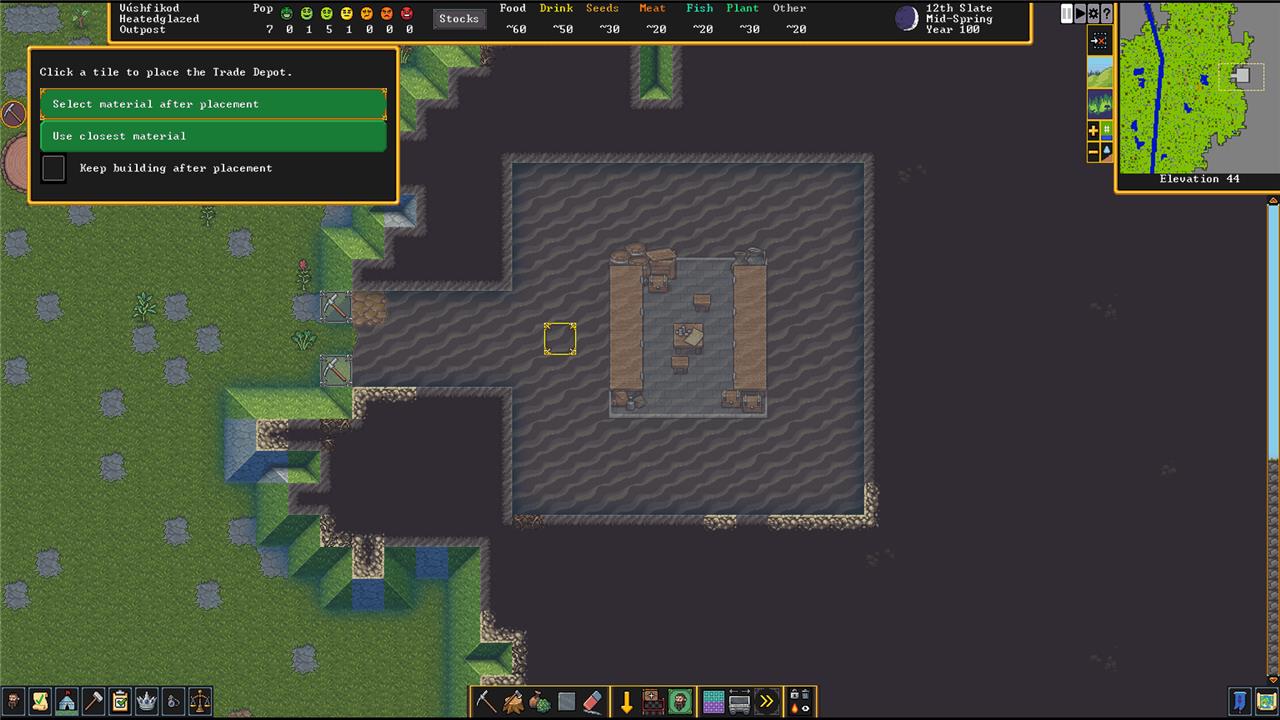
Build a Trade Depot with b>T. It requires a 5×5 space for the Depot itself, three units of some construction material, and a three block-wide path that leads to the outside so the trader’s wagons can access it. It makes sense to make this your fortress’ entrance.
Build stockpiles early
Start building your stockpiles as soon as your dwarves arrive, so supplies don’t clog your workshops or block passageways. Create separate stockpiles for wood, stone, food, and drink near the areas where they’ll be used most often. Keeping materials close to relevant workshops saves hauling time and prevents delays in production. A well-organized stockpile layout also helps you track resources easily and keeps your fortress running smoothly from the start.
Stockpiles are places where your dwarves store stuff – food, lumber, doors, beds, rocks, gems. everything. You’ll lay them out with the Stockpile menu (p). When you place one, you’ll get to chose what gets stockpiled there.
It’s fine to start with an All Stockpile for everything – just a place to collect your resources in one easy-to-access location – but it’ll quickly fill up with other stuff like wood and stone.
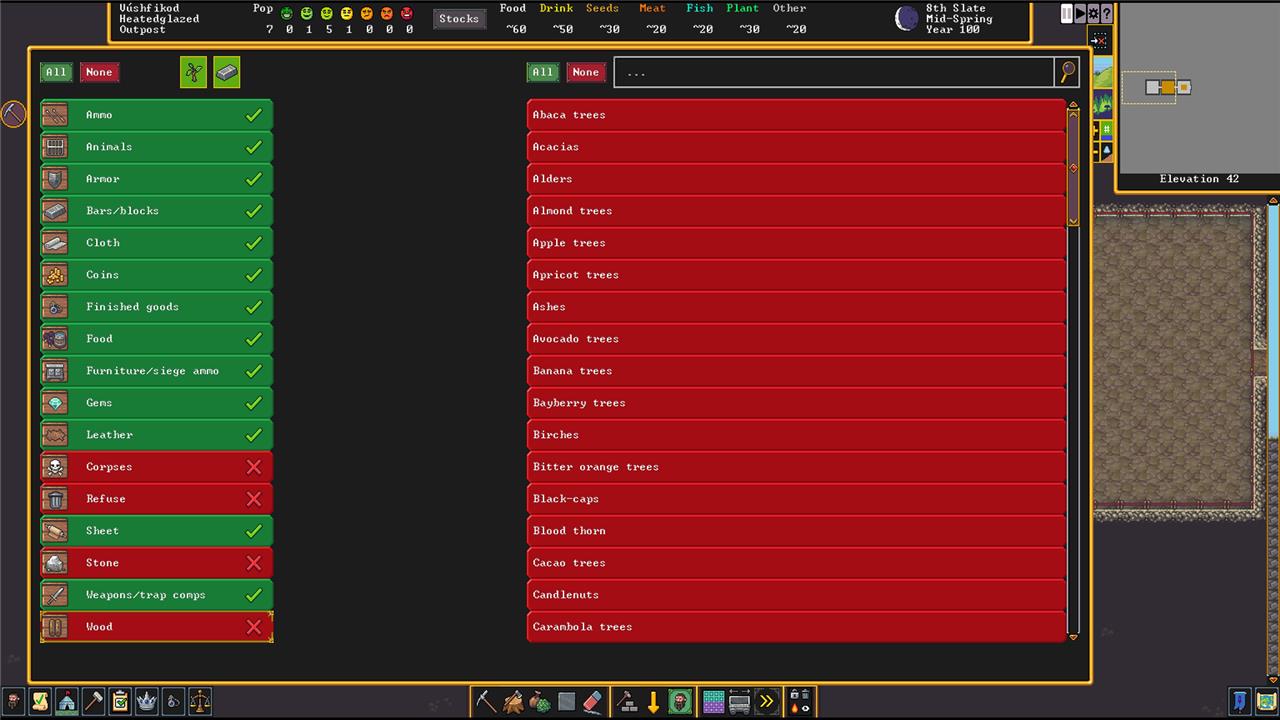
Instead of an All Stockpile, make your first a Custom, and select everything except corpses, refuse, wood, and stone – those resources will fill up your stockpile too fast. Set up (at least) a Wood and Stone stockpile nearby to keep those out of the way, or you can just leave them where they fall for now. (A Food stockpile is a good idea too.)
Assign a Manager, Bookkeeper, and Broker
Assign each dwarf a clear responsibility before unpausing your new fortress. A manager keeps job orders organized, ensuring production runs smoothly without constant micromanagement. A bookkeeper tracks supplies and wealth, providing accurate counts of materials and goods. A broker handles trade with caravans, using social and appraisal skills to strike fair deals. Setting up these roles early prevents confusion and keeps your economy and logistics stable as your settlement grows.
There’s a lot to keep track of while you’re trying to keep your fortress functioning. Luckily, you can assign dwarves to make your job easier. Open the Nobles and Administrators menu (n).
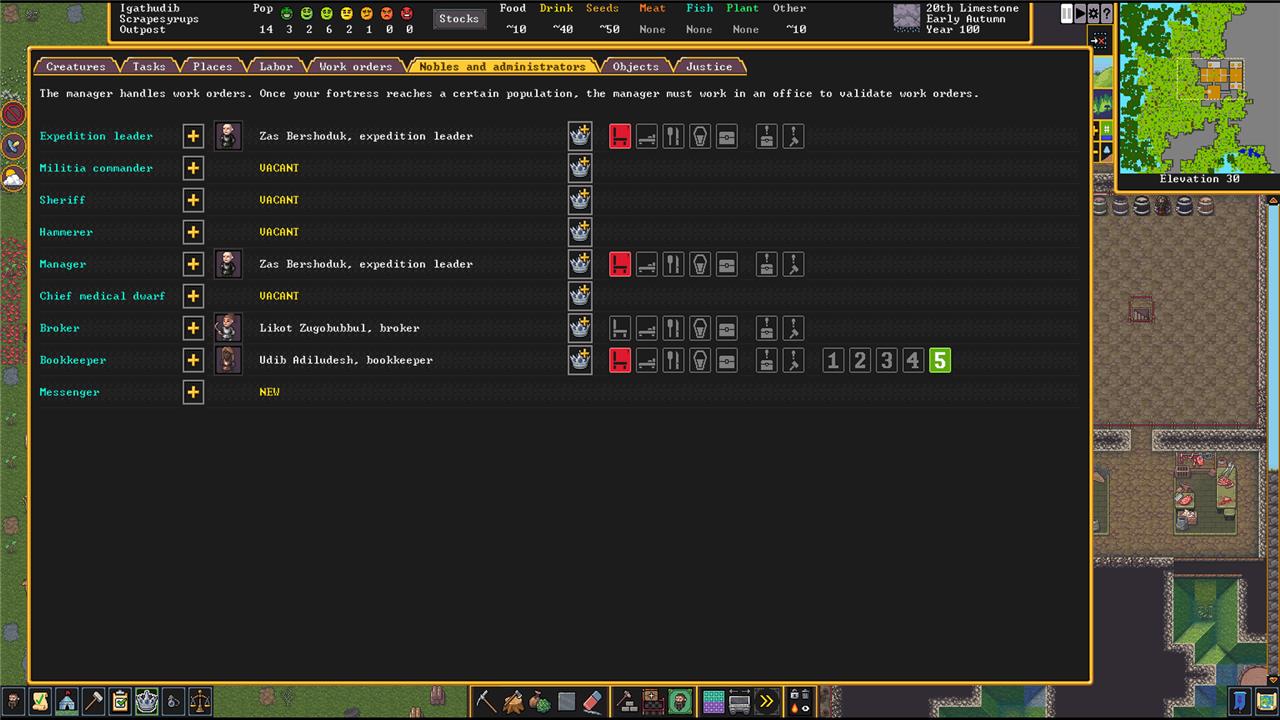
It’s a good idea to assign a Manager, a Bookkeeper, and a Broker right away. A Manager lets you order jobs from all of your workshops and they’ll handle the details. A Bookkeeper keeps a more accurate record of what resources you have and where. A Broker tells you what those resources are worth and deals with any trading caravans that show up. (At this point, the Broker is optional, but we’ve got the menu open, so why not?)
Eventually, the Manager and the Bookkeeper will need offices – a room with a door and a chair – but you don’t have to worry about it right away.
Build Carpenter, Jeweler, Mechanic, and Stoneworker workshops
Build workshops for your core trades early to keep materials and tools flowing. The Carpenter’s Workshop provides furniture, bins, and barrels; the Jeweler’s Workshop adds value through gem cutting and setting; the Mechanic’s Workshop produces mechanisms for traps and levers; and the Stoneworker’s Workshop handles furniture, doors, and statues from stone. Placing these workshops near stockpiles for wood, stone, and gems saves your dwarves time and keeps production moving smoothly.
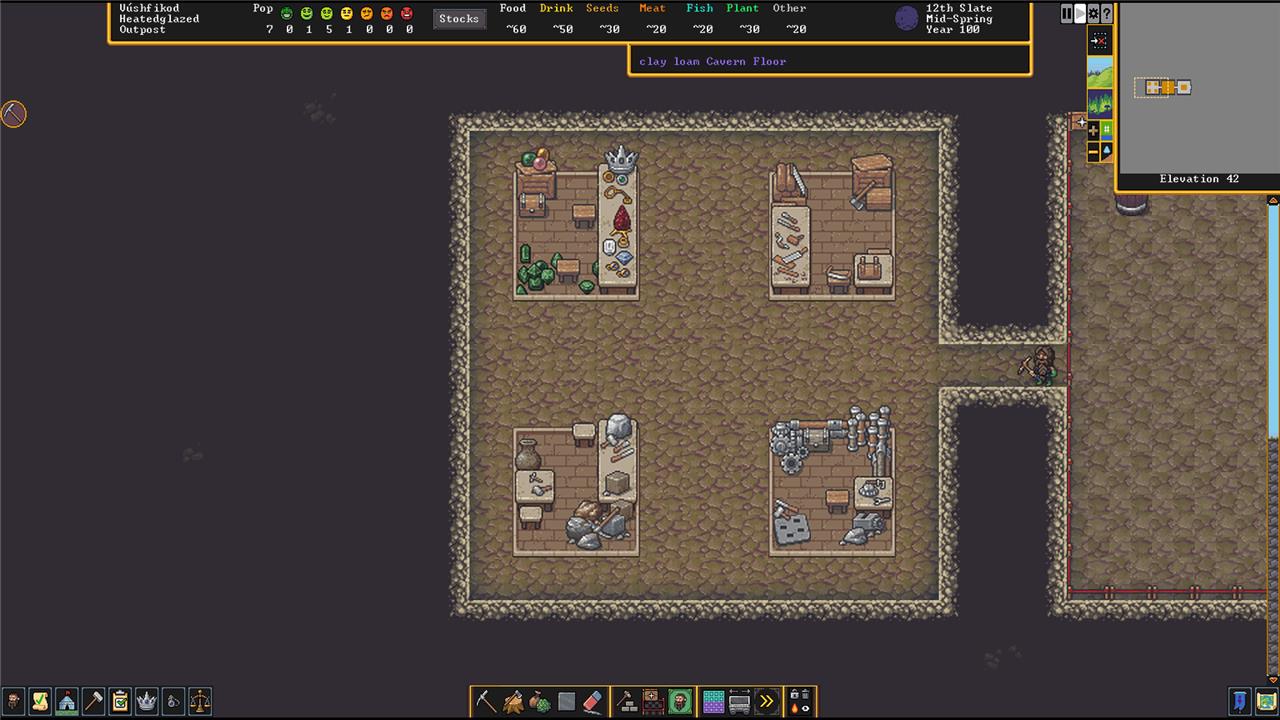
There are a lot of specialized workshops that you’ll need eventually, but the first four to build are the Carpenter, Jeweler, Mechanic, and Stoneworker.
- Carpenters build things out of lumber, like chairs and beds. Making things out of wood is faster than making them out of stone. Start with chairs for your Manager and Bookkeeper’s offices.
- Jewelers cut any gems you find into more valuable pieces. Once it’s built, set it to Cut Gems and let it repeat indefinitely. This is a great way to earn money for trading (more on that below).
- Mechanics build mechanisms out of stone. You’ll need these for things like levers and wells.
- Stoneworkers build things out of stone. You can build almost anything out of stone except for beds, which will take some pressure off of your Carpenter.
Open the Build menu, and then the Workshops menu by hitting b>o. Hit p for Carpenter, j for Jeweler, h for Mechanic, and t for Stoneworker.
Use work orders to save time
Work orders let you automate repetitive tasks, keeping your dwarves organized and productive without micromanagement. By setting clear conditions-such as maintaining a set number of drinks or prepared meals-you ensure supplies never run out while freeing dwarves to focus on construction, exploration, or defense. Linking work orders to workshops also helps distribute labor smoothly, preventing idle time and production bottlenecks.
Once you’ve assigned a Manager assigned and built a few workshops, you’ll be able to set up Work Orders to get things done. This is a lot easier than clicking on each workshop and choosing tasks one at a time.
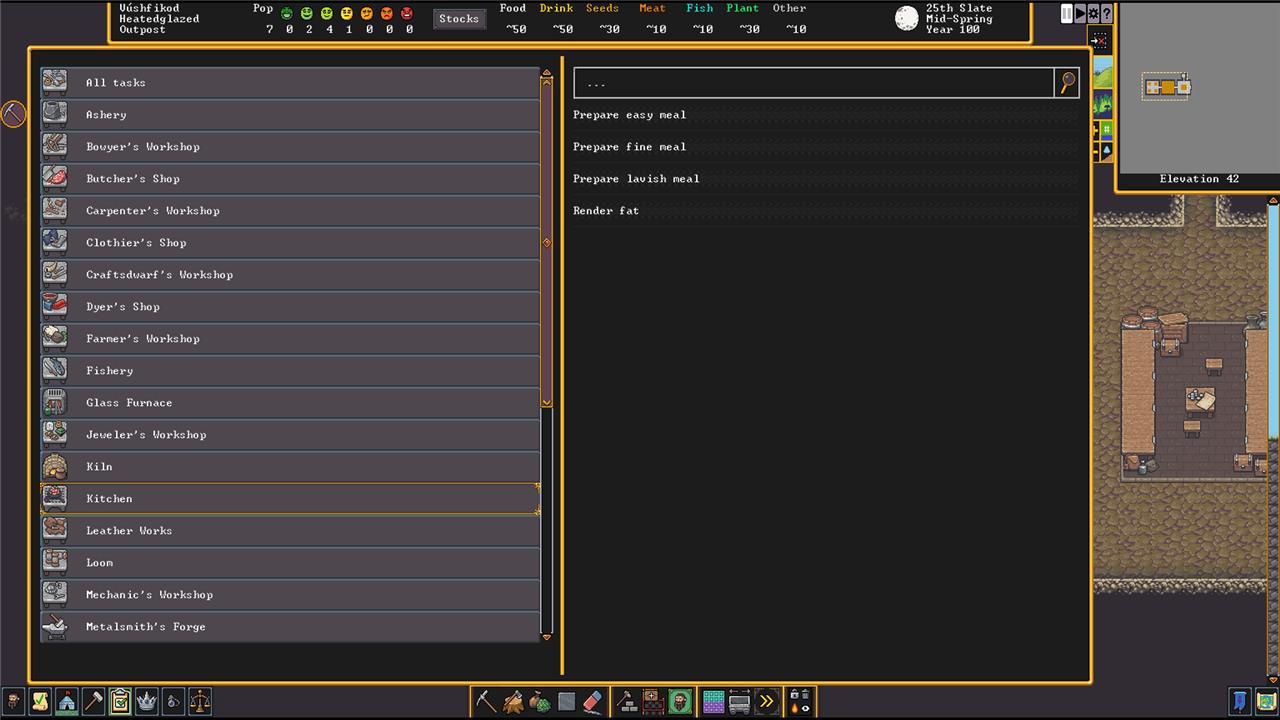
Open the Work Order menu with o. There will be a clipboard icon in the upper right that will add new orders. In this menu, you can search for what you need, or pick a workshop and then select tasks from a list of what they do.
As you get more comfortable with work orders, there’s a lot of customization that can happen here including creating standing orders and setting conditions for when the tasks are done.
Alcohol and meals are important resources
Alcohol keeps dwarves happy and productive, while good meals raise morale and attract migrants. A reliable brewing setup ensures your dwarves always have drinkable supplies, since water alone won’t satisfy them underground. Grow plump helmets and other crops for both food and drink, and assign dedicated stills and kitchens early. Stockpiling ingredients and barrels prevents shortages during long winters or sieges, keeping your fortress running smoothly.
In order to be a happy and productive member of your dwarven society, every dwarf (even children) requires alcohol – dwarves will slake their thirst with water, but they’ll get unhappy and temperamental unless they get booze. They also need to eat roughly two meals every season.
That means you need to get your food and drink manufacturing set up pretty quickly. Both come from workshops: Meals are made in a Kitchen – Build (b) > Workshops (o) > Farming (f) > Kitchen (k). Drinks are made at a Still – Build (b) > Workshops (o) > Farming (f) > Still (l).
Both require resources to turn into meals and drinks. You’ll start off with some on your wagon, but you’ll need to find more soon. You can get fish by designating a Fishing zone and a Fisherdwarf (above), meat through hunting (under the Labor menu), and some plants from gathering (which needs the Plant Gathering Labor enabled and a Plant Gathering area that you can designate with g).
Farming
For a little more control, set up Farm Plots and start farming your own food. Farming requires a Planter in your Labor menu.

Farm Plots have to be built on some sort of dirt (not stone) – clay, loam, sand, and silt. To build one, open Build (b) > Workshops (o) > Farming (f) > Farm Plot (p). Once it’s built, you’ll have to assign a crop to each season. Plump Helmets are a versatile crop to start with.
A few crops can be planted underground, but others need to have access to the sky.
Seeds and plants
How a plant gets processed determines whether or not you’ll get seed to replant. Anything turned into a meal – either plants or seeds – in a Kitchen will not give you seeds. Plants processed at a Still often do give you seeds.
Common mistakes to avoid in first fortress
New Dwarf Fortress players often fail due to poor site choice, neglect of basic needs, or risky digging without pausing to check. Avoiding these pitfalls ensures your first fortress thrives beyond the initial months.
Bad Embark Sites
Skip evil biomes, heavy aquifers, or hadal zones-these spawn frequent undead, flooding nightmares, or toxic threats early on. Opt for calm, temperate areas with soil, flux stone, and a river instead. Noobs die fast piercing caverns prematurely.
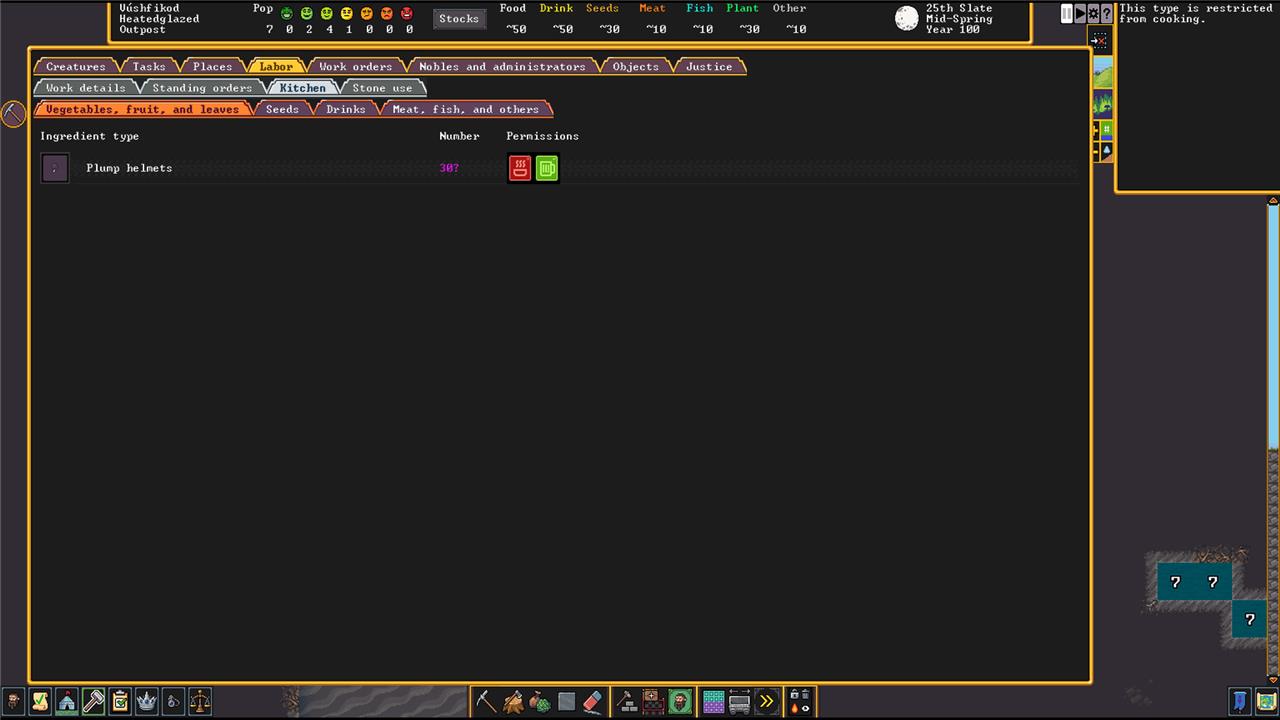
Food and Booze Neglect
Never let plump helmets get cooked or eaten raw-kitchen-forbid them immediately for farming and brewing. Without alcohol, dwarves tantrum from sobriety; prioritize stills and underground 5×5 farms over surface ones. Stockpile refuse separately to avoid rot.
Unsafe Digging
Channeling multi-level pits traps dwarves without ramps-stick to 1z-deep holes initially. Don’t smooth while actively mining, or expose adamantine/lava without prep; it unleashes demons or fires your fort. Pause (space) constantly to inspect before breaching.
Dwarf Overload
Disable all labors except mining, hauling, farming/brewing/plant processing for your 7 starters-overworking causes delays. Forbid kids/pets from kitchens or danger zones; build defenses (traps, bridges) before migrants arrive. No isolated child burrows without seals.
Layout Errors
Craft blocks before items; keep paths to trade depot 3-wide and clear of trees/boulders. Rooms need walls (not just floors) for value; centralize stockpiles but segregate wood/stone/refuse. No surface mega-entrances without moats.
How to set up proper stockpiles for food booze and refuse
Proper stockpiles for food, booze, and refuse in Dwarf Fortress prevent contamination, hauling delays, and tantrums by keeping dwarves happy and efficient. Set them up early near farms, kitchens, and stills using the ‘p’ menu, customizing settings to avoid rot or mixing.
Food Stockpiles
Designate separate piles: one for raw plants/seeds (near farms, disable barrels to save them), one for meat/fish (near butcher), and one for prepared meals (near kitchens/dining, allow barrels/pots). Forbid kitchen use on brewable plants like plump helmets. Use 5×5 or larger in cool, walled rooms below ground.
Booze Stockpiles
Create a dedicated booze/drinks pile next to your still (allow barrels only-no pots or food to avoid waste). Link it via ‘take from’ settings so kitchens pull only for cooking if needed. Keep it close to meeting areas; dwarves prioritize booze from nearest piles.
Refuse Stockpiles
Place refuse piles outside or in sealed surface rooms (allow bones/shells/vermin/fish/corpses but disable food to prevent rot spread). Use stone/dirt floors only-no barrels; items decay here intentionally. For corpses, add a separate dump or slab stockpile nearby to manage moods.
Key Settings Tips
-
Enable “take from linked stockpiles only” on food/booze to control flow (e.g., seeds only from farm pile).
-
Centralize early with one big “all items” pile, then split as production ramps up.
-
Barrels hold 60+ units; craft extras at carpenter’s. Watch for clutter-use bins later.