Hidden across the shattered cities and silent ruins of Clair Obscur: Expedition 33 lie journals whispering fragments of forgotten lives. Each page reveals clues, memories, and truths that piece together the world’s quiet collapse-and the secrets its survivors left behind.
All journal locations in Clair Obscur: Expedition 33
Players can find journals across Clair Obscur: Expedition 33 hidden in various areas such as abandoned camps, tucked-away rooms, and scenic outlooks. Each journal adds fragments of lore that reveal more about the characters and the events shaping the expedition. Collecting them not only deepens the story but also helps piece together secrets behind the world’s history and motivations of its travelers.
Journals are collectibles in Clair Obscur: Expedition 33 and the only way to learn more about the previous expeditions. In addition to providing more context to the game’s magically mysterious world, journals also function as a currency.
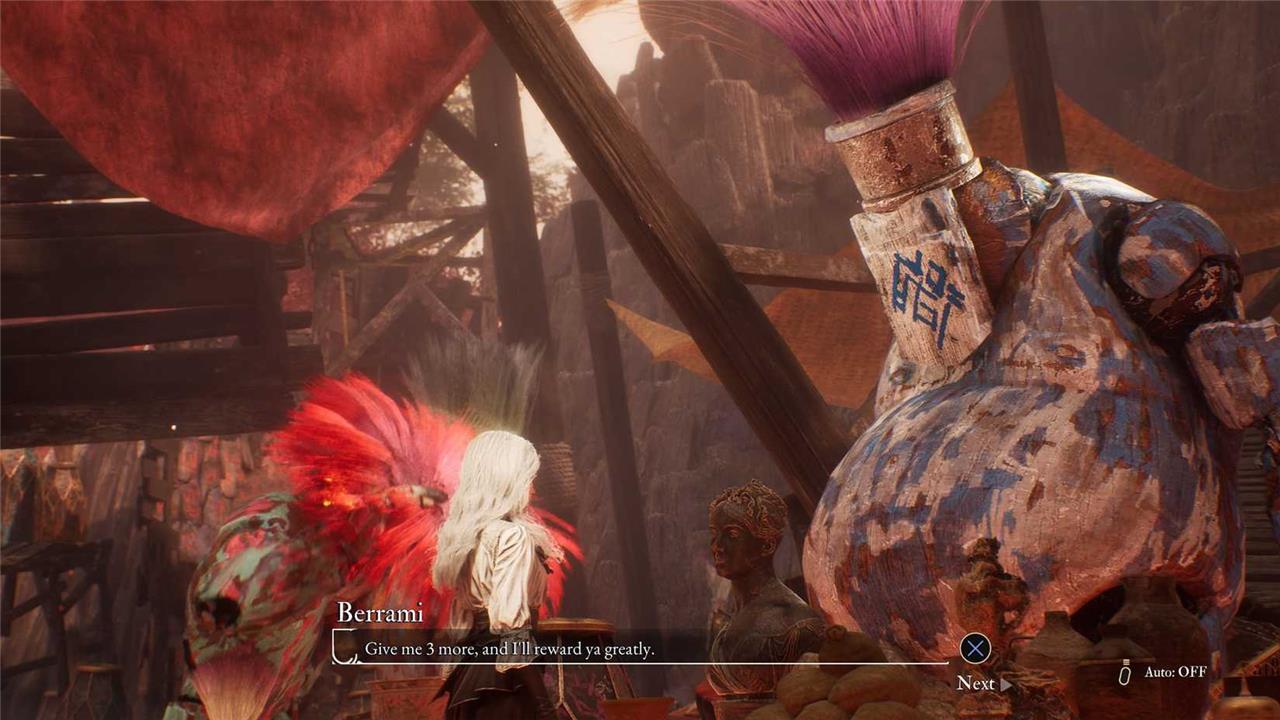
You can exchange them for Colours of Lumina in the Gestral Village. Simply talk to Berrami, a Gestral in the bazaar to the left of the Chief’s House and give them the journals you have.
There are a total of 49 journals and many become available only later in the game, requiring you to unlock some of Esquie’s abilities as well as develop your relationships with two characters.
Below, you’ll find a list of all journals, a brief explanation of how to find them, along with their areas and the nearest flags to teleport to in parentheses. To better follow the directions indicated to find some journals, use the compass that appears when you open the Expedition Status menu (Triangle or Y on controllers, or Y on the keyboard).
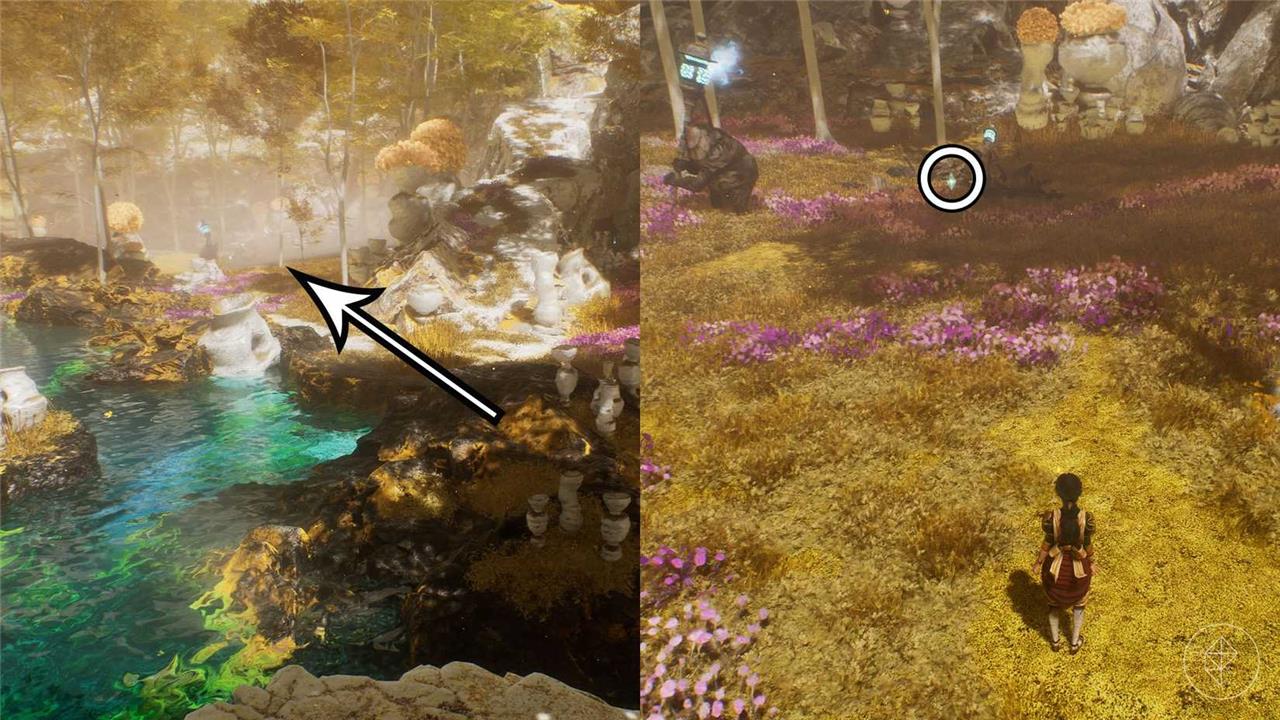
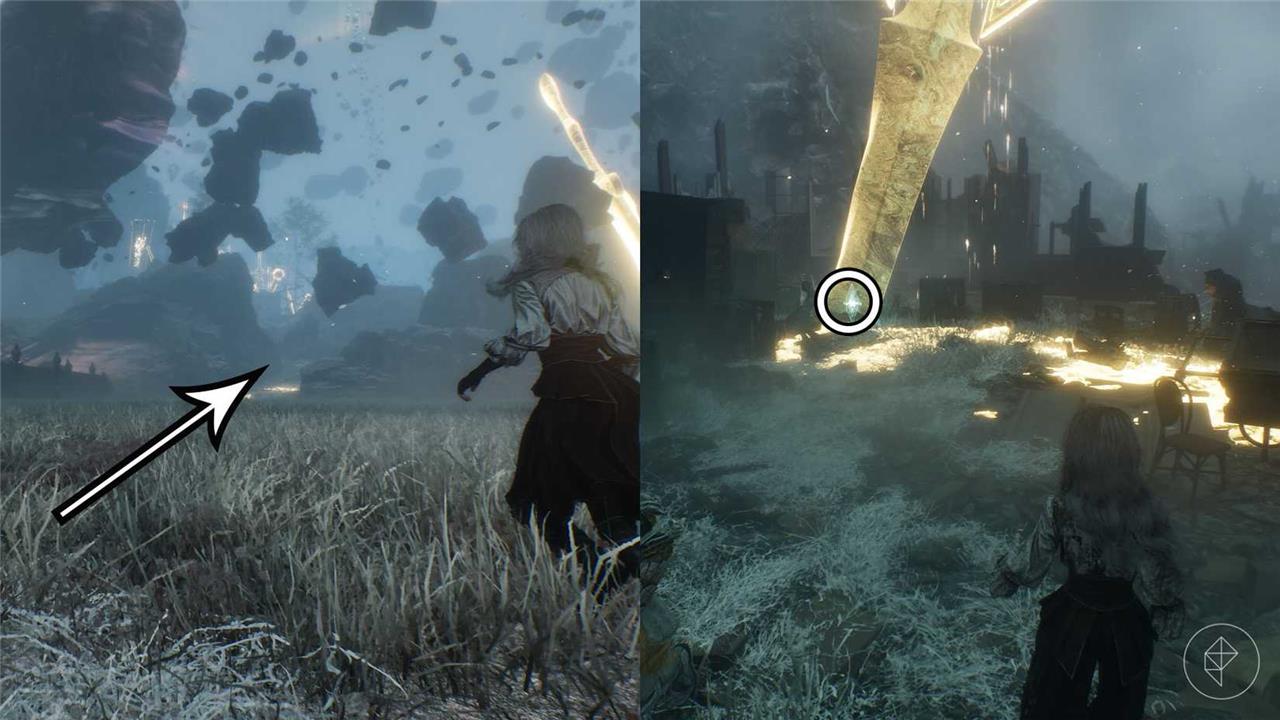
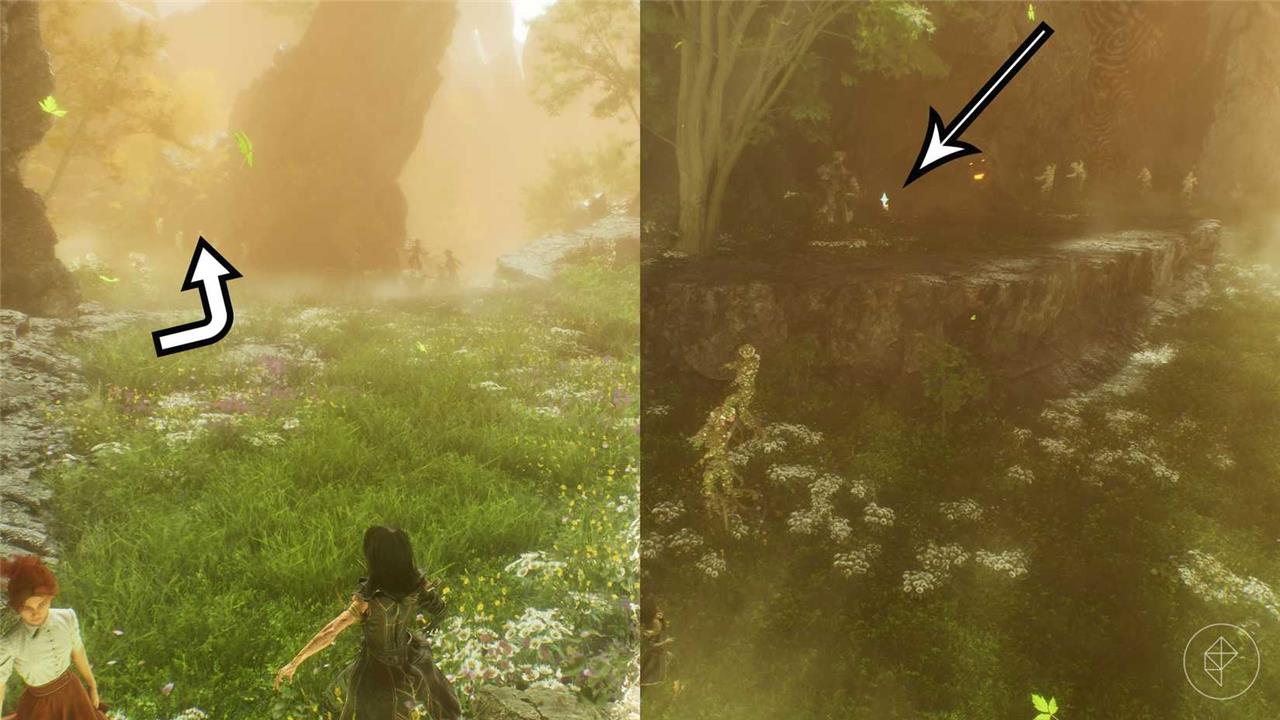
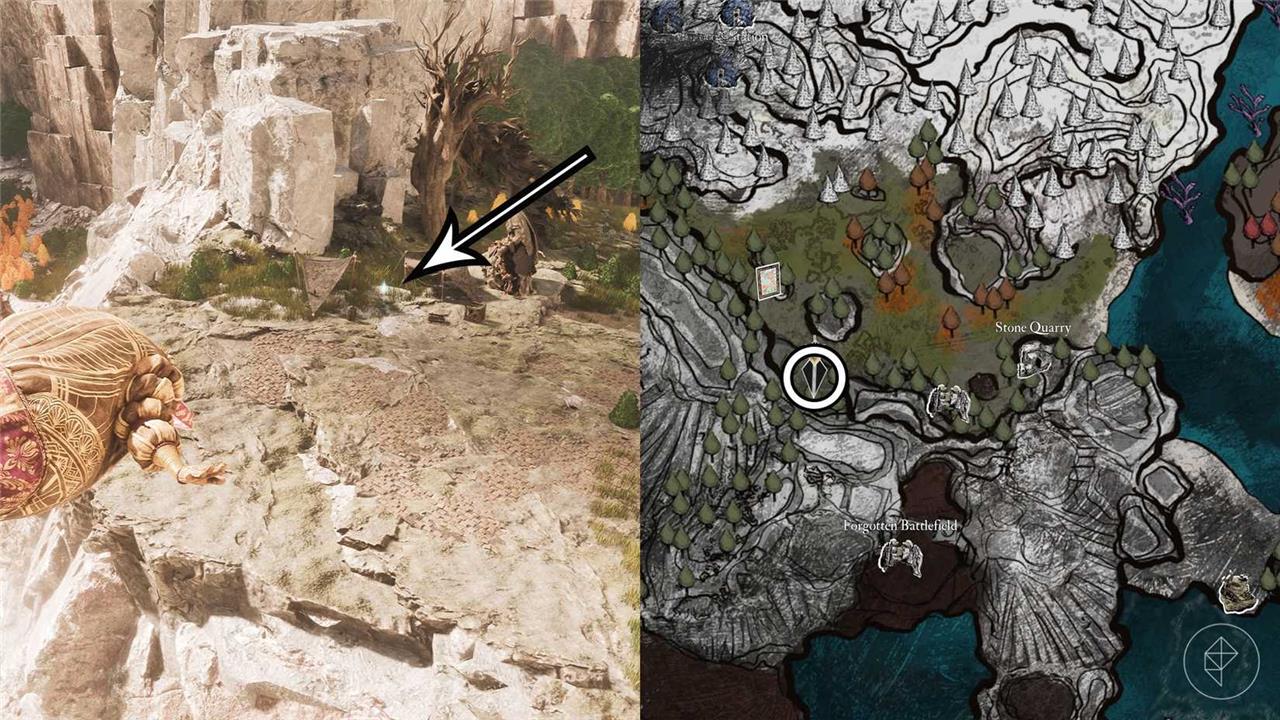
Journal 81(Spring Meadows – Abandoned Expeditioner Camp Flag)
The Journal 81 entry depicts a quiet, wind-worn encampment where abandoned tents sag under pale dawn light, flag fluttering faintly above a circle of cold, forgotten gear, and the rusted remnants of expedition spirits lingering in the air.
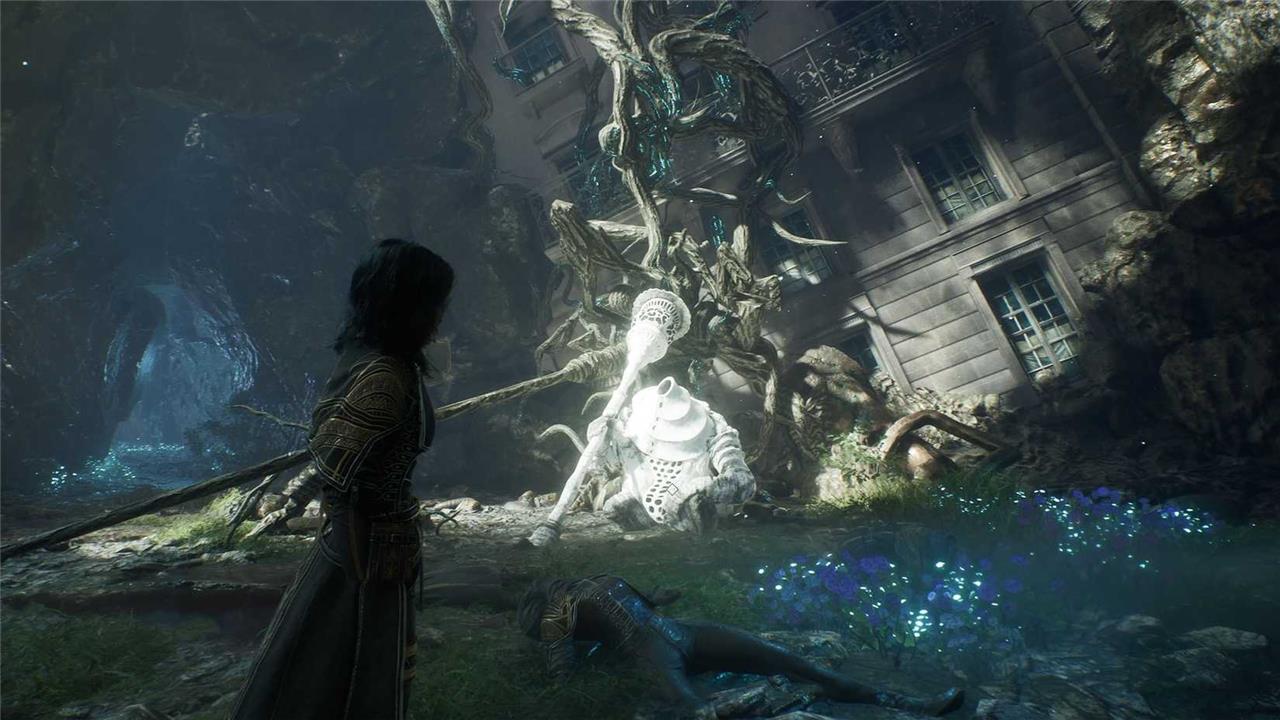
After climbing a wall with some climbers left by previous expeditions, you will enter a cavern. Inside, you’ll find Journal 81 on the ground along with Jar, a White Nevron.
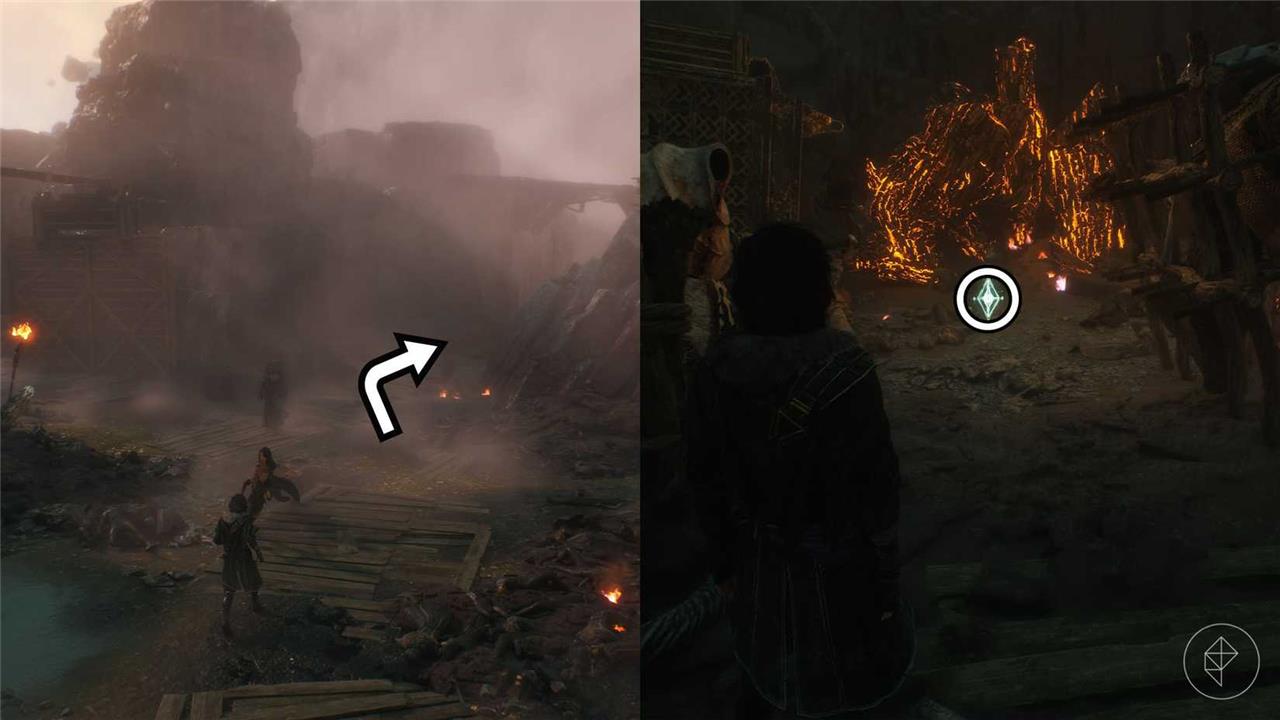
Journal 68(Flying Waters – Coral Cave)
Drifting through the Coral Cave, Journal 68 captures a glidepath of turquoise light filtering past coral arches, where venomous shadows retreat and currents whisper secrets of hidden chambers beneath the reef.
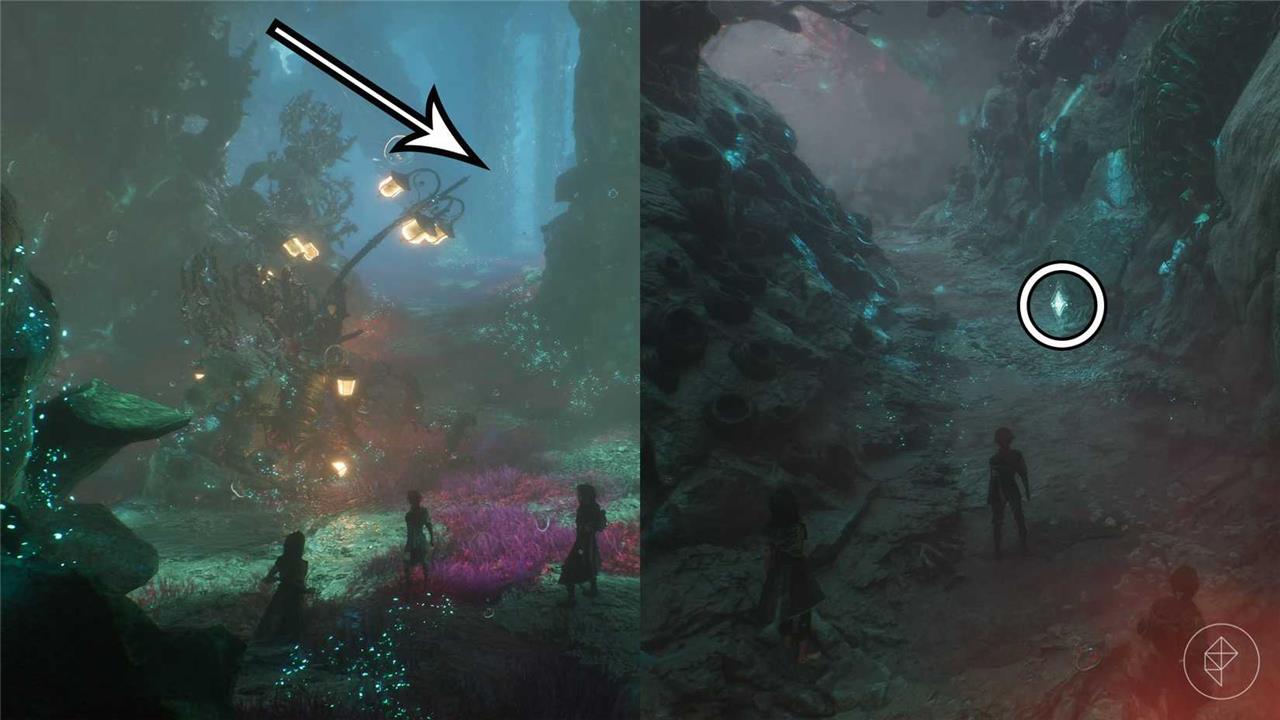
You’ll reach this flag after passing through a cave. From there, take the path to the right of the central lanterns and follow it to enter a corridor where you find the journal.
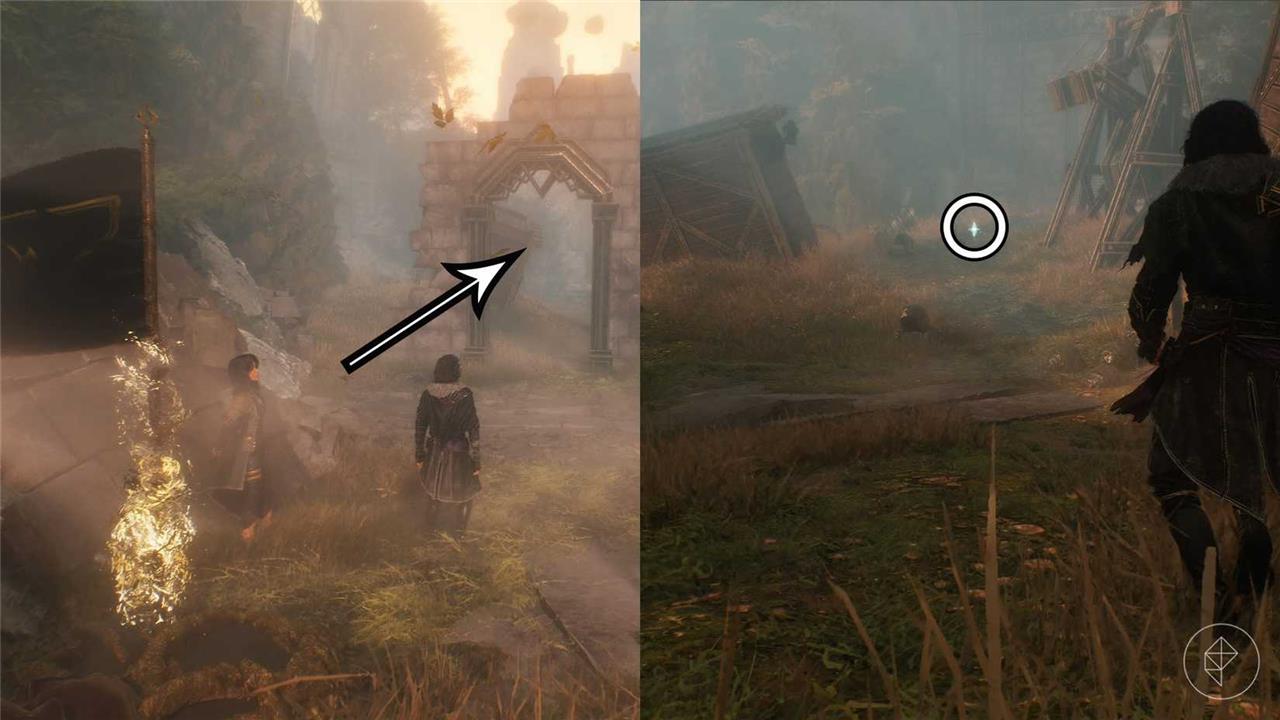
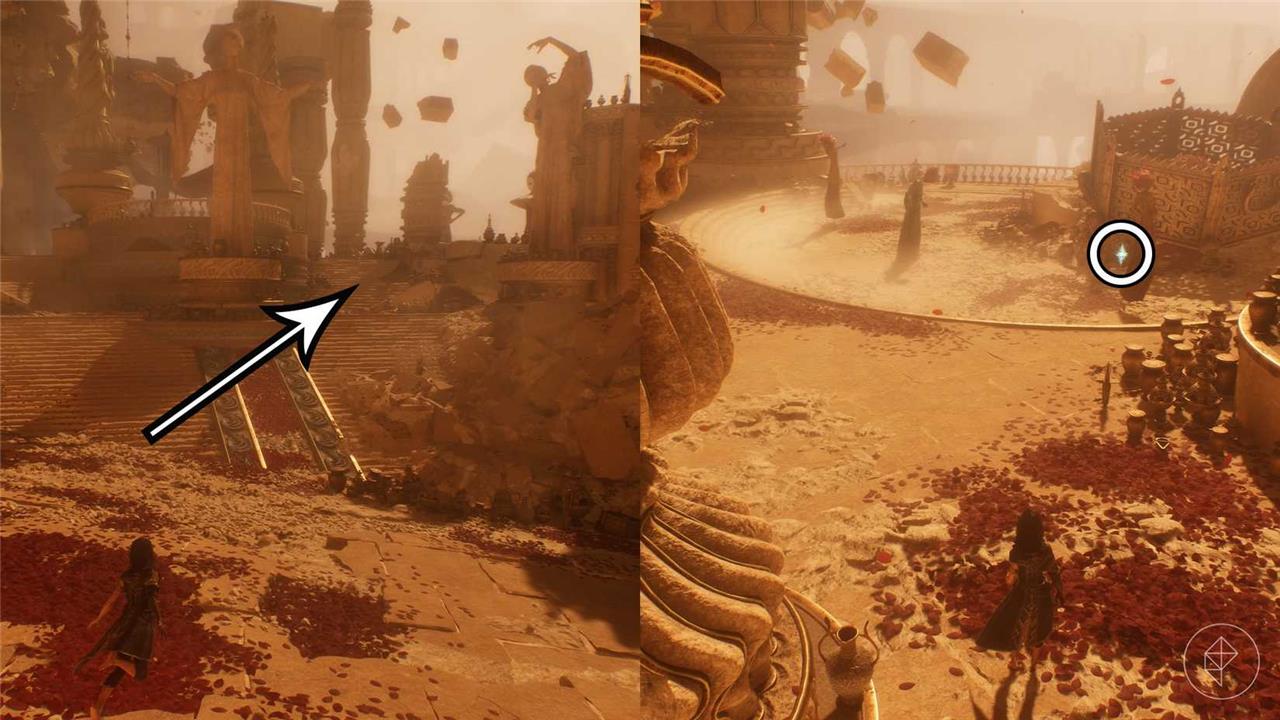
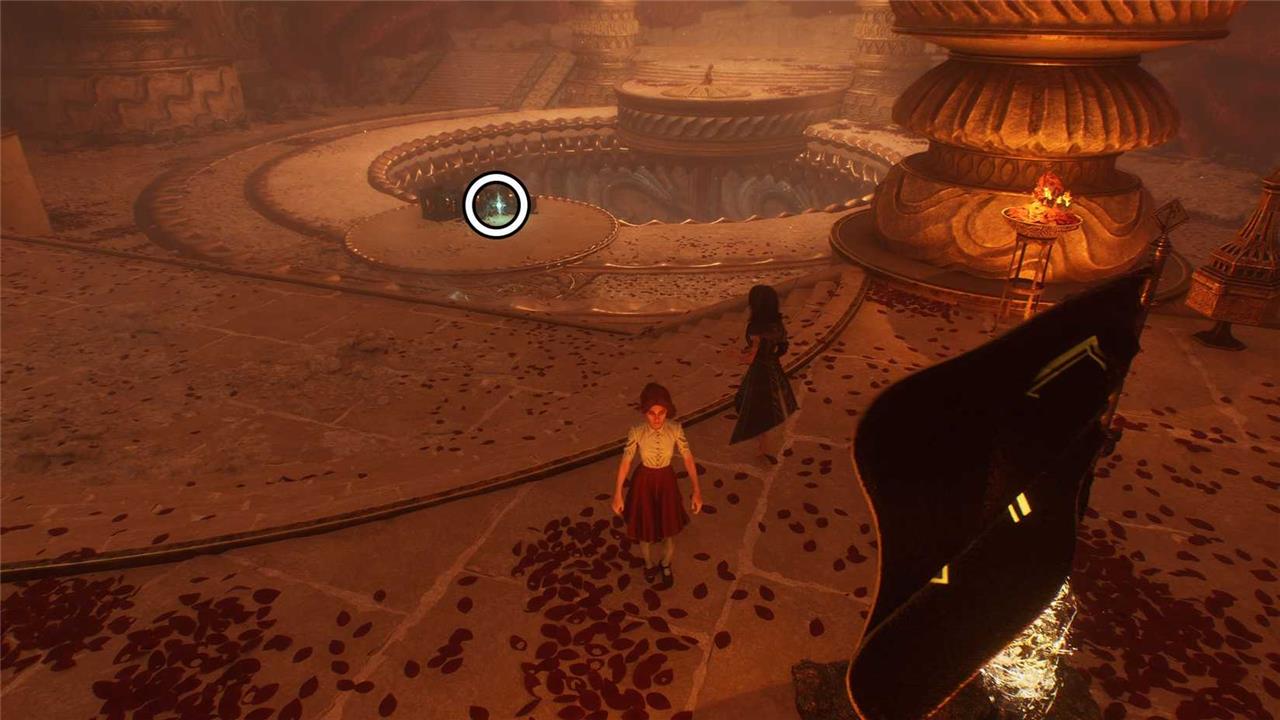
Journal 63(Ancient Sanctuary – Giant Bell Alley)
In Journal 63 (Ancient Sanctuary – Giant Bell Alley), Clair Obscur reveals a silent archway guarding a long-forgotten chime, its resonant echoes muted by centuries yet still stirring the dust of old stones and the faint scent of rain on sandstone. The passage threads between collapsed corridors and crane-boned pillars, where glyphs worn to shine by moonlight whisper hints of a ritual once performed to awaken memory and mercy within the sanctuary.
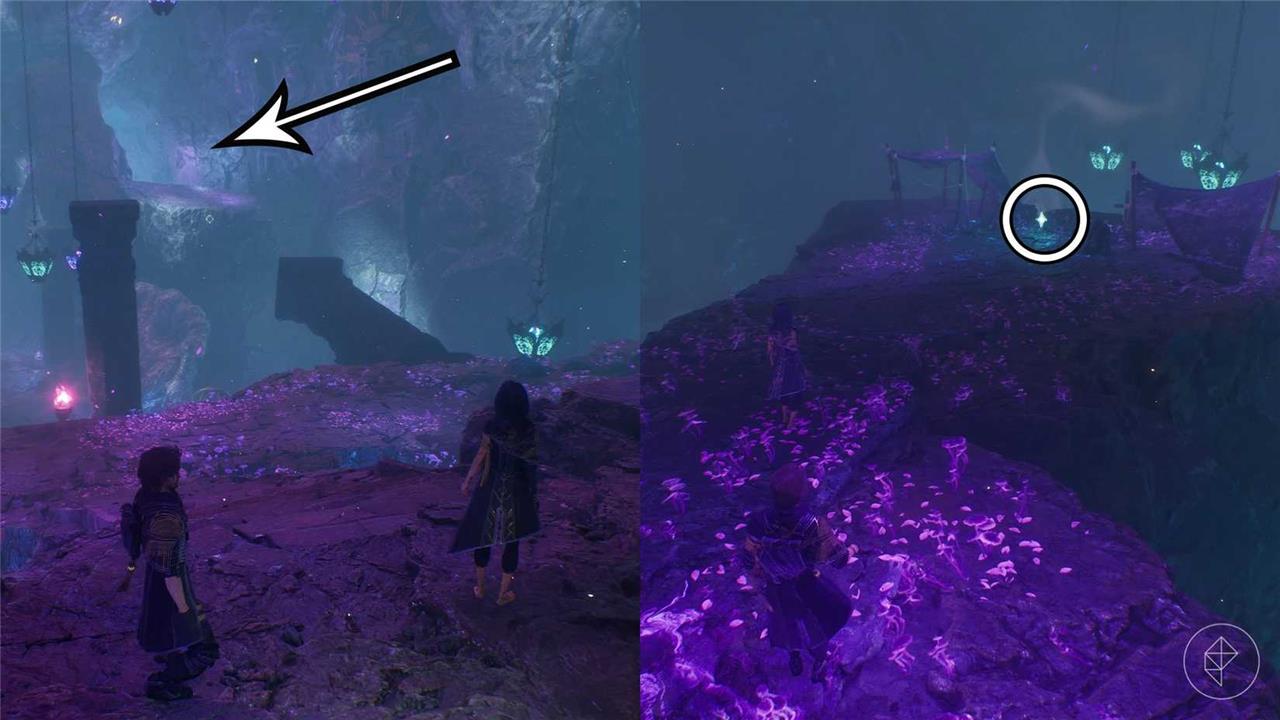
From the flag, go southwest and turn left, where a Robust Sakapatate, a shield-wielding Nevron is patrolling. Continue northwest to find the journal in front of a pile of stones.
Journal 52(Gestral Village – Entrance)
Journal 52 can be found near the entrance of Gestral Village, placed beside the broken cart close to the main gate. The area is guarded by a few patrols, so moving quietly or clearing the path first helps. This entry hints at the first settlers’ arrival and their struggles to adapt to the harsh surroundings of the valley.
Head north from the flag and follow the path to the left of the Chief’s House. Next, continue north following the Arena signs. When you reach the third sign, instead of turning right, take the left route, heading in the opposite direction indicated by the sign and you will find Journal 52.
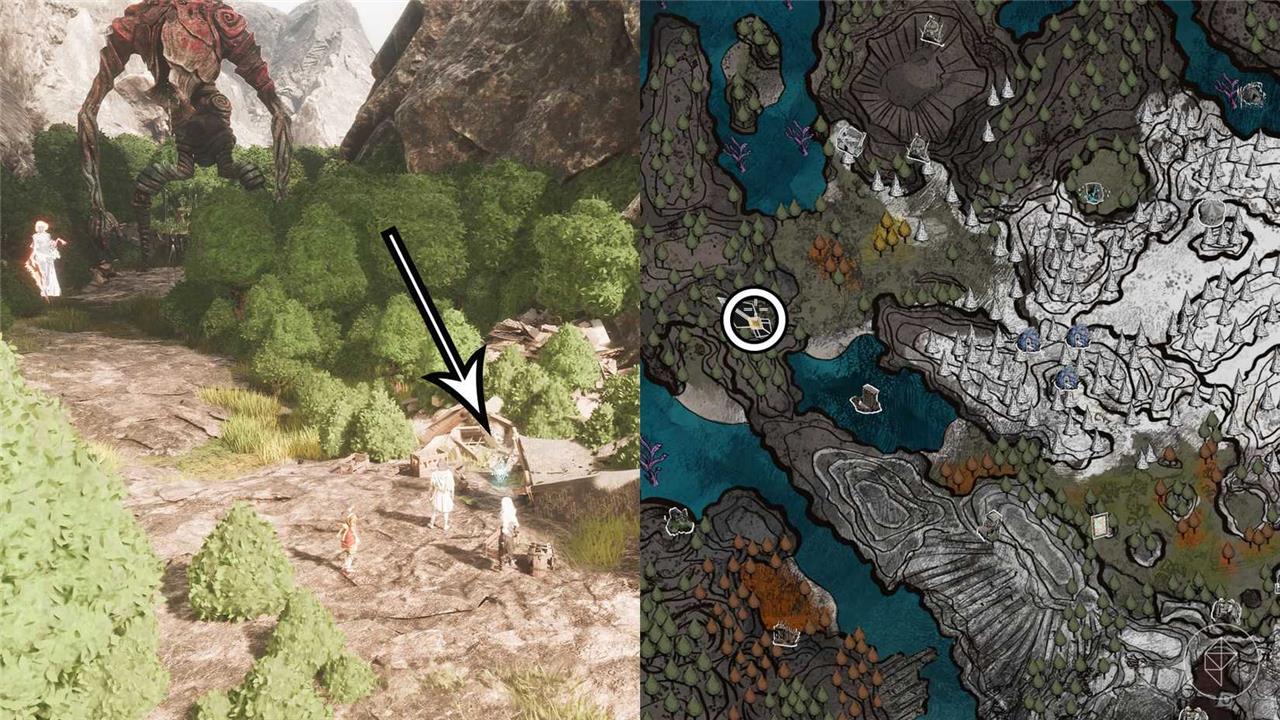
Journal 66 (Esquie’s Nest – Entrance)
Through the doorway of Clair Obscur, Journal 66 records a quiet vigil at Esquie’s Nest-where the first breath of dawn spills into shadowed corners and the path forward feels both intimate and inexorable.
Go down the stairs from the pool of water where you meet Esquie and turn right. You will see a pillar and, on the other side of a gap, a grappling point. You must progress in the quest so that the pillar falls, allowing you to reach the grappling point. Traverse the gap and you will eventually find a small camp on the right side. Journal 66 will be in the middle of it.
Journal 53 (The Small Burgeon – Southwest of the Ancient Sanctuary)
The journal entry for Journal 53 records a quiet, windswept waypoint southwest of the Ancient Sanctuary, where faint traces of old paths mingle with the scent of resin and stone. The scene emphasizes patient observation over dramatic finds, noting subtle shifts in light and slight geological cues that hint at previously unseen passages. As a waypoint in Expedition 33, it anchors a moment of stillness amid the expedition’s broader, unfolding map.
This journal is located in an optional area southwest of the Ancient Sanctuary. From the entrance of the Small Burgeon, go south, then southeast. You will encounter a burgeon and, behind them, you’ll find a corridor. Follow it to find Journal 53.
Journal 78 (Stone Wave Cliffs – Entrance)
From the Stone Wave Cliffs, the entrance yawns like a quiet doorway into memory: stark rock forms, wind-sculpted patterns, and a distant pulse of tides that keep time with the cliffs’ ancient rhythm.

Head northeast from the Entrance Flag and, before reaching the corridor, turn south and you will find a rope. Use it to reach the upper level, where you will find Journal 78.
Journal 56 (Stone Wave Cliffs – Entrance)
Tucked near the entrance of the Stone Wave Cliffs, this journal rests against a cracked stone pillar beside the main archway. The area is dimly lit, with faint rays of light filtering through the mist, making the journal easy to miss. Check near the cluster of broken crates to your left as you approach the cliffside path-its worn cover blends with the surrounding rock textures.
From the Entrance Flag, turn left and cross the tunnel behind the Hexga, stone-made with a large crystal Nevron. Move forward and use the grappling hook to cross the gap in the next area. Head northwest and stick to your left, following the wall until you reach a statue beside a bridge, with Journal 56 located in front of it.
Journal 50 (Stone Wave Cliffs – Paintress Shrine)
Journal 50 is found near the Stone Wave Cliffs, close to the Paintress Shrine. From the shrine, head down the narrow path to the cliffs marked by weathered stone arches. The journal rests beside a small set of broken easels and paint jars, partially hidden behind a collapsed rock slab. Its placement suggests a painter once paused here to capture the sea’s shifting tones before the site fell silent.
By progressing through the main story, you will reach the Paintress Shrine Flag in the Paintress Shrine area. From there, keep going northeast (the only available path) to reach an open area where a Rocher will jump in front of you. Kill them, then follow the path to the left until you find Journal 50 in front of the two statues.
Journal 62 (Continent – North of Gestral Village)
A crisp, windswept shoreline scatters with carmine-tinted rocks along the northern edge of Gestral Village, where cold spray stitches the air and the map’s margins fray at the edge of memory.
Go northwest of Esquie’s Nest, surrounding the Gestral Village. Eventually, you will find two old buildings with the journal in between them. You can’t reach it on foot though. You must mount Esquie, who can walk through the rocks and destroy them, to grab this journal.
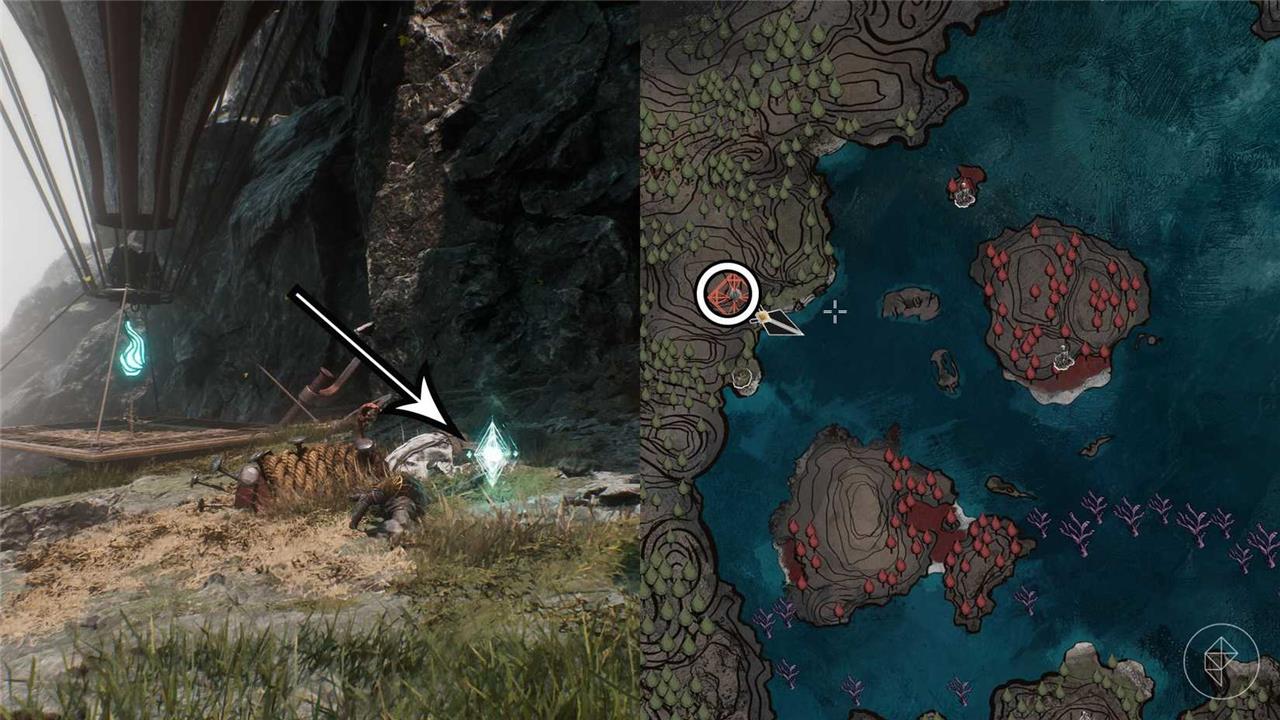
Journal 54 (Stone Wave Cliffs Cave – East of Stone Wave Cliffs)
From the east side of Stone Wave Cliffs, head into the cave past the eroded stone pillars. Journal 54 sits on a ledge inside, near glowing crystals by the back wall. Climb the rocks to reach it, avoiding loose gravel on the path.
After completing Act 1, you can finally use Esquie to swim across the ocean. From the Stone Wave Cliffs, go east to a small beach to find Stone Wave Cliffs Cave. Inside the cave, there’s only one path that will lead you to an enemy. You don’t need to fight it. Just grab Journal 54 on their left side and leave.
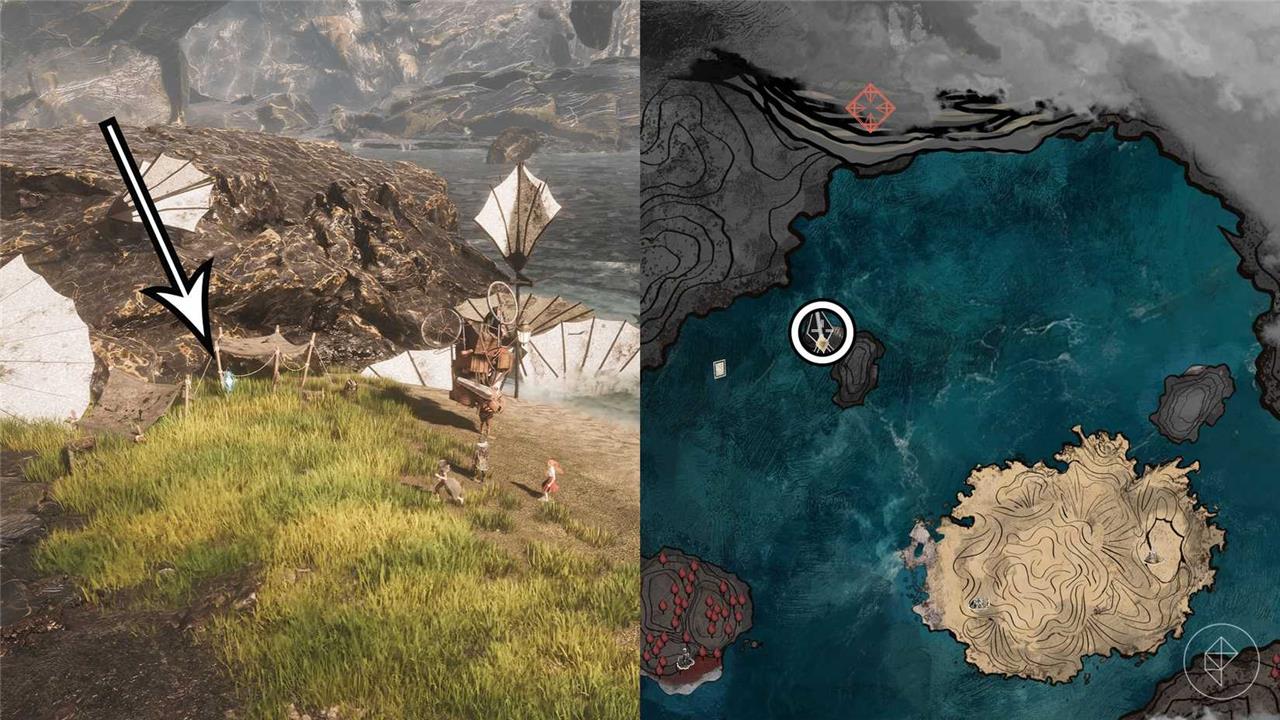
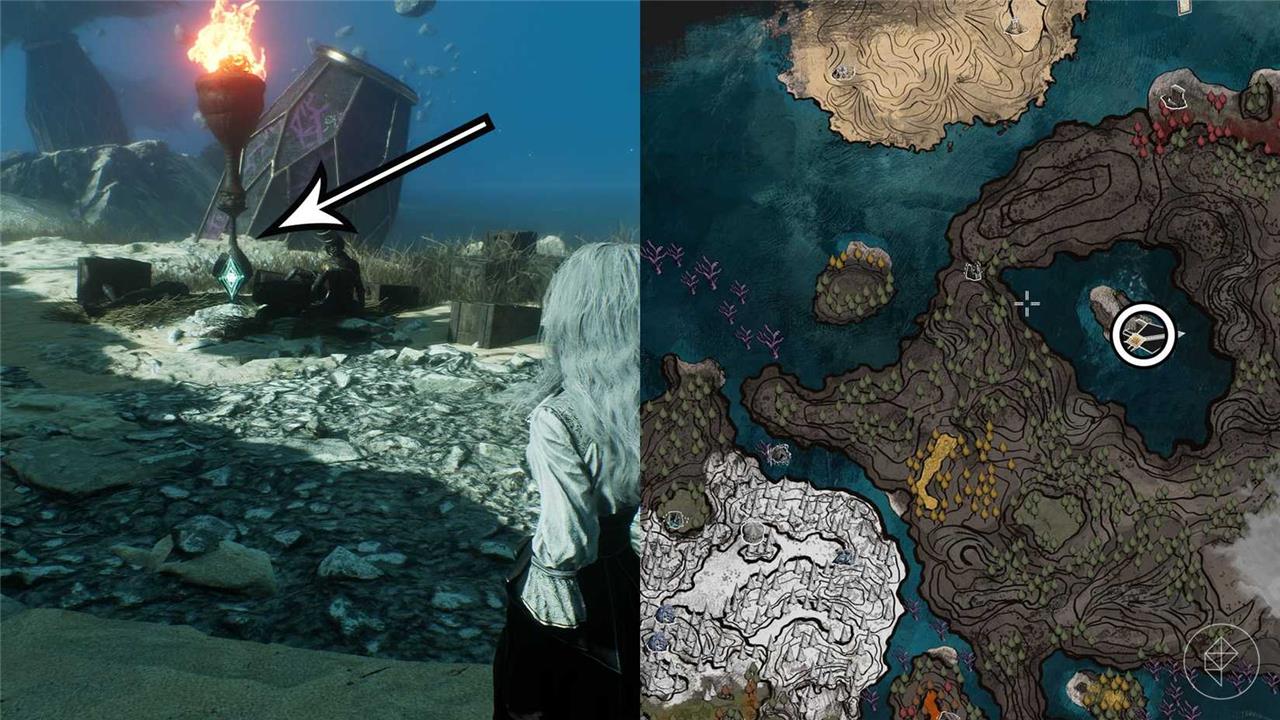
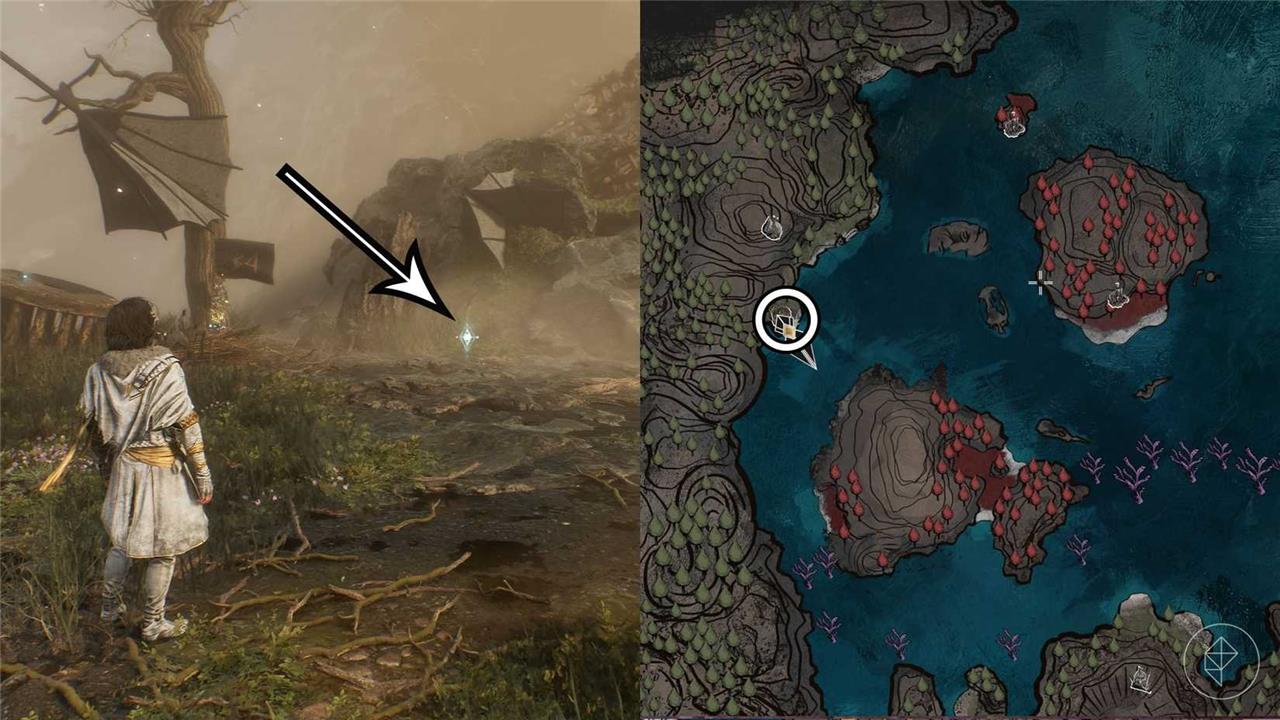
Journal 36 (White Tree – Island west of the Stone Wave Cliffs)
This journal rests beneath the pale branches of the White Tree on the small island west of the Stone Wave Cliffs. The spot is quiet, surrounded by soft waves and scattered white stones. Approach from the southern shoreline, cross the shallow water, and search near the roots where moss and sand meet. The journal’s cover is worn from the sea wind, hinting that someone once stopped here to rest before moving on.
Use Esquie to swim to a small island with a tall white tree on the west side of the Stone Wave Cliffs. Use the portal to enter and find Journal 36 right at the entrance.
Journal 64 (Continent – South of The Meadows)
Found south of The Meadows on the continent, Journal 64 sits on a raised stone platform amid sparse ruins. Approach from the east path to avoid the roaming Esquie patrols, then leap up using the nearby wind currents. Collect it before pushing north to the next zone.
Swim southeast of Esquie’s Nest. Pass through the portal to the Meadows and go further into the area to find a small camp containing Journal 64.
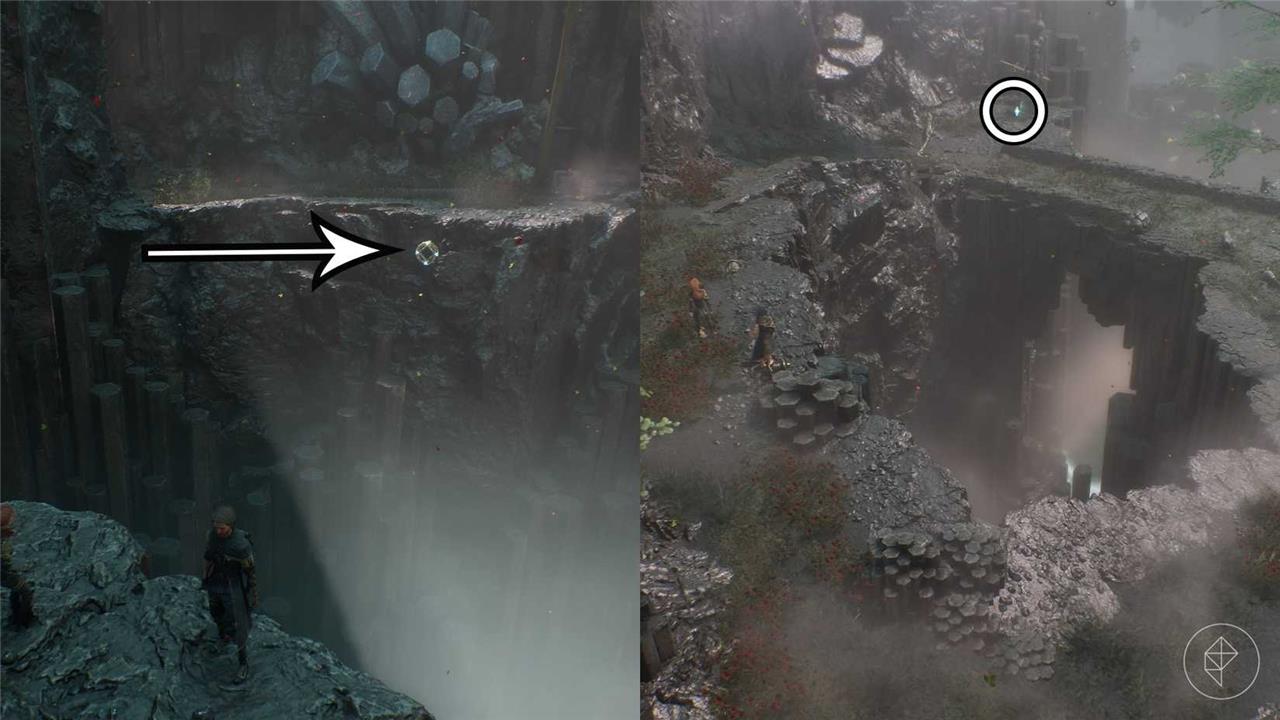
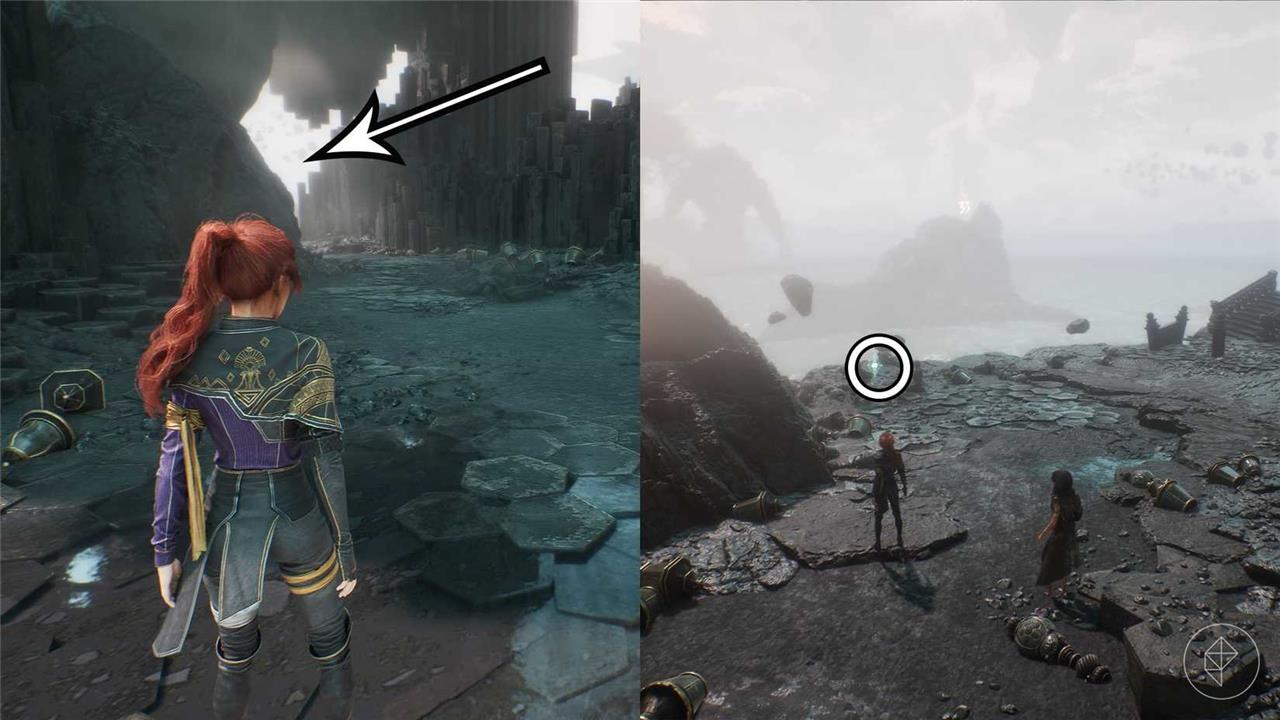
Journal 45 (Crushing Caverns – Entrance)
This journal lies near the entrance to the Crushing Caverns, not far from the first set of collapsed pillars. You’ll find it resting beside a cracked lantern near the stone archway leading deeper underground. The area is dimly lit, so follow the trail of flickering torches to spot its faint glow on the ground before crossing into the main cavern.
You can only access Crushing Caverns once you unlock Esquie’s swimming ability. Once inside, follow the only available path, which will lead you to an ambush. Defeat the Giant Sapling boss, then continue along the path that opened. Climb the rope and follow the path on the left to find Journal 45.
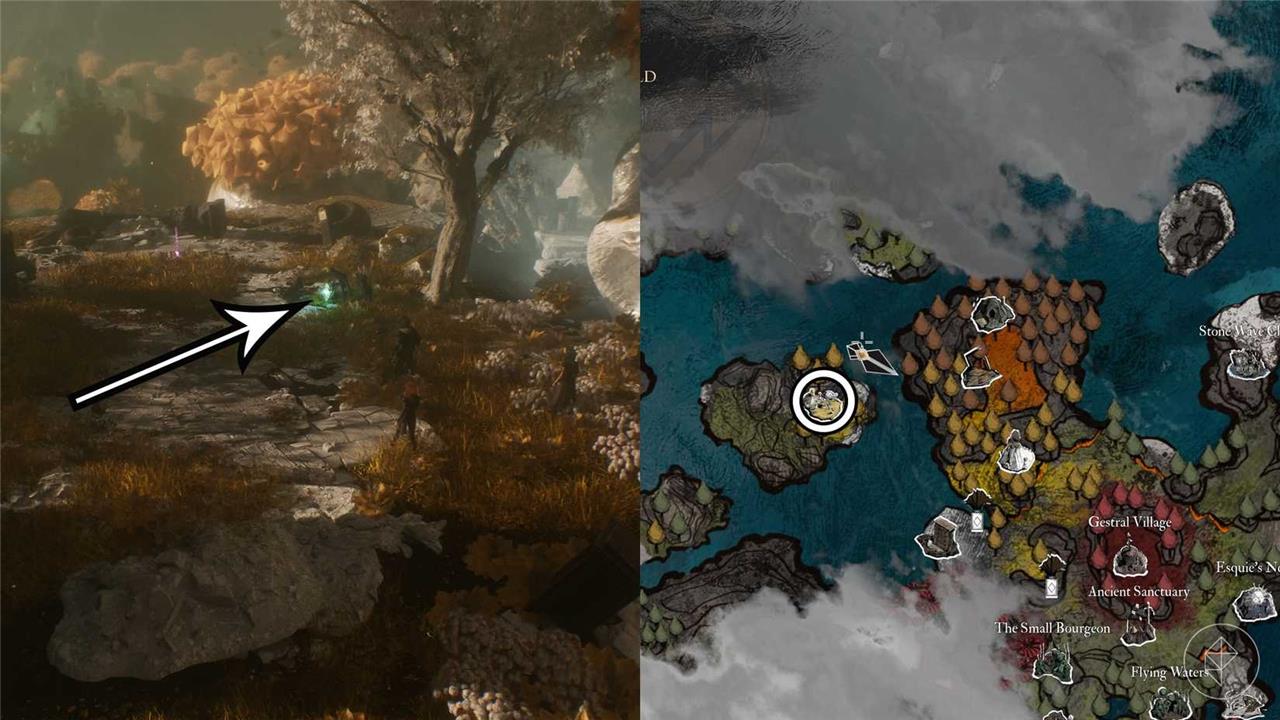
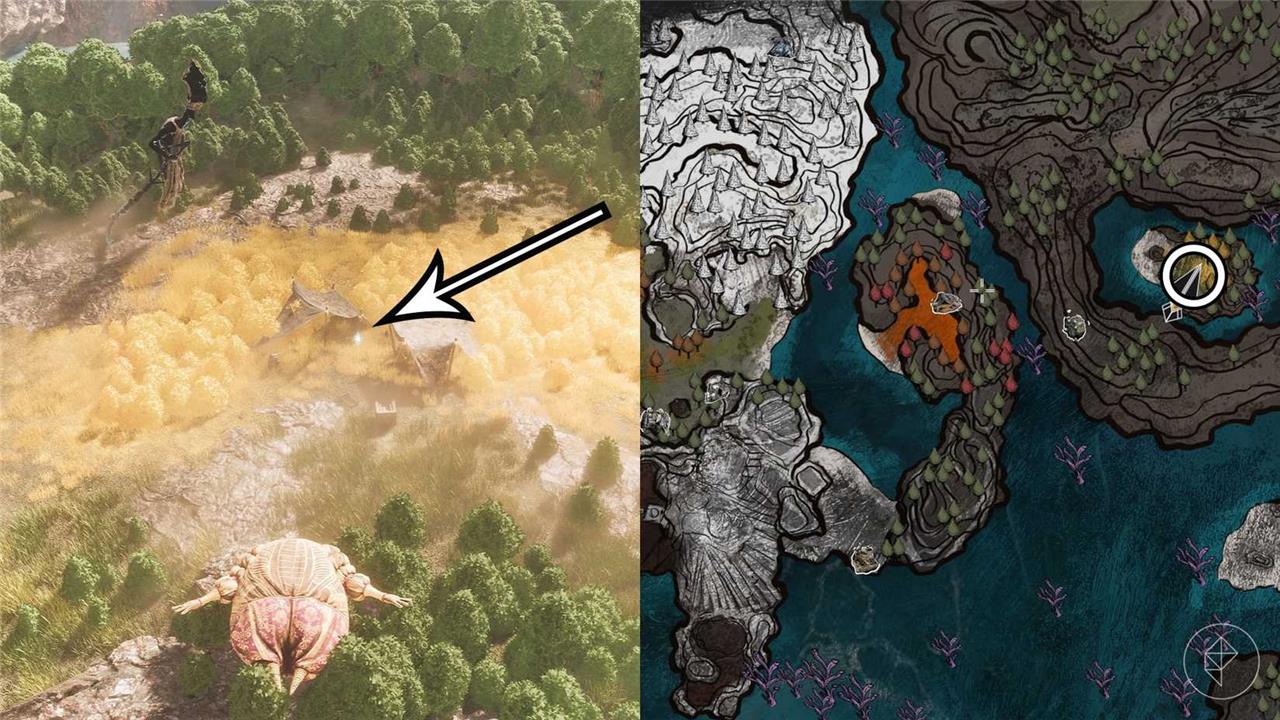
Journal 38 (Yellow Harvest – Harvester’s Hollow)
Found in Harvester’s Hollow during the Yellow Harvest phase, Journal 38 sits on a weathered crate beside the central grinding wheel. Approach from the eastern path after clearing the lesser scythe fiends, then climb the short ledge to spot the glowing entry. It details the hollow’s grim harvest rites and a lost expedition’s final pleas.
The Yellow Harvest is located northwest of the Gestral Village, but you will need to use Esquie’s swimming ability to get there. Once inside, head northeast from the Harvester’s Hollow Flag. A patrolling enemy stands in front of a ramp leading to an elevated area. Follow it to find Journal 38.
Journal 44 (Yellow Harvest – Harvester’s Hollow)
Hidden in the fields of Harvester’s Hollow, Journal 44 lies near a cluster of worn wooden carts, surrounded by the golden remains of the last yellow harvest. The page tells brief notes from a worker’s record, describing exhaustion after long shifts and the quiet pride of a successful harvest. Its placement among the broken tools and scattered grain reflects the passage of time and the labor that once filled this valley with life.
Starting from the flag, head northeast, passing to the left of the ramp you used to find the previous journal. You will arrive at a field with a patrolling Jar, a lance-wielding Nevron and Journal 44 can be found in front of a corpse near the enemy.
Journal 59 (Yellow Harvest – Yellow Spire Wrecks)
Found amid the scattered remains of the Yellow Spire wrecks, Journal 59 lies near a collapsed cargo platform coated in pale dust from the harvest fields. The pages recount a failed attempt to transport refined pigments before the Spire’s fall, offering clues about trade routes and resource scarcity during the expedition’s decline. The journal’s faint ink and brittle cover hint that it was hastily abandoned as evacuation efforts began, leaving this record as a silent trace of those who worked among the yellow mists.
Going north from the Harvester’s Hollow Flag, you will come across a broken bridge covered in flowers. Climb it and grapple your way to the small cave where the Yellow Spire Wrecks Flag is located. Next, follow the path to the west of the flag to find a large red structure and Journal 59 nearby.
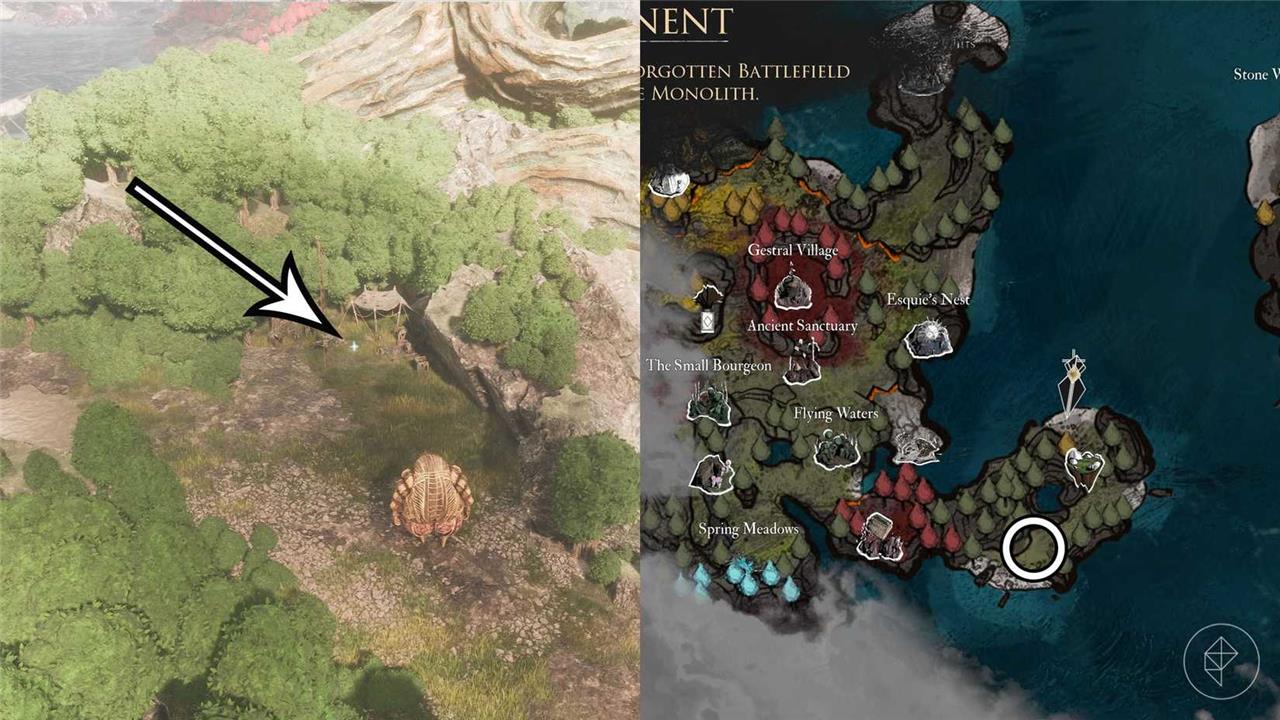
Journal 41 (Forgotten Battlefield – Battlefield)
Across the Forgotten Battlefield, the relics whisper of battles past, their scars painting the earth with quiet testimony to resilience and loss.
Head northeast from the flag, and pass the Fading Woman, a floating humanoid figure, taking the path to her right. Enter the corridor, then turn left to find Journal 41.
Journal 57 (Forgotten Battlefield – Ancient Bridge)
Journal 57 lies near the crumbling remains of an ancient bridge on the Forgotten Battlefield, partly hidden among moss-covered stones and scattered weapons. The area carries traces of an old conflict, with echoes of past struggles lingering in the air. Players will find the journal close to a collapsed arch, providing insight into the soldiers who once fought here and the events that shaped this desolate ground.
Head south of the Ancient Bridge Flag to reach a grassy open area, where you will find the Journal 57 in front of a corpse.
Journal 48 (Stone Quarry – East of the Forgotten Battlefield North exit)
From the east exit of the Forgotten Battlefield’s north side, head to the stone quarry. Climb the crates near the entrance, then jump across the broken wooden platforms to a ledge on the right wall. The journal sits on a small outcrop behind a cluster of loose rocks-smash them to reveal it.
In the area between the Forgotten Battlefield and Monoco’s station, head east to find the portal to Stone Quarry. Once inside, go straight ahead to find Journal 48.
Journal 65 (Monoco’s Station – Monaco’s Station)
Journal 65 can be found inside Monaco’s Station, resting on a bench near the central platform where trains arrive. The area is quiet compared to other parts of the station, with flickering lights giving it a slightly abandoned look. Check around the seating area and beside the luggage carts to spot the journal easily before moving on with your exploration.
You can only obtain this journal after recruiting Monoco to your party, which triggers a change in the area. From Monoco’s Station Flag, head south and turn left, passing under the train using the train tracks. Near the exit, you will find Journal 65.
Fracture Survivor Journal (Old Lumière – Left Street)
Hidden behind the crumbling storefronts of Old Lumière’s Left Street, this journal captures the voice of a survivor who endured the city’s collapse with grit and reflection. Its pages describe the fractures not only in stone and steel but in memory itself, hinting at a quiet resilience beneath the ruins. Players who find it gain insight into the lingering scars of the district and the people who once called it home.
To obtain this journal, you need the Old Key, which you can acquire during the Expedition Festival at the beginning of the game or in Lumière during the final part of the campaign. With the key in your inventory, go to Old Lumière, go down from the Left Street Flag and follow the right-hand trail. Pass through the broken gate, then turn right, and you will see a large broken pipe with a hole on top. Drop inside of it and unlock the cell using the Old Key to get the Fracture Survivor Journal.
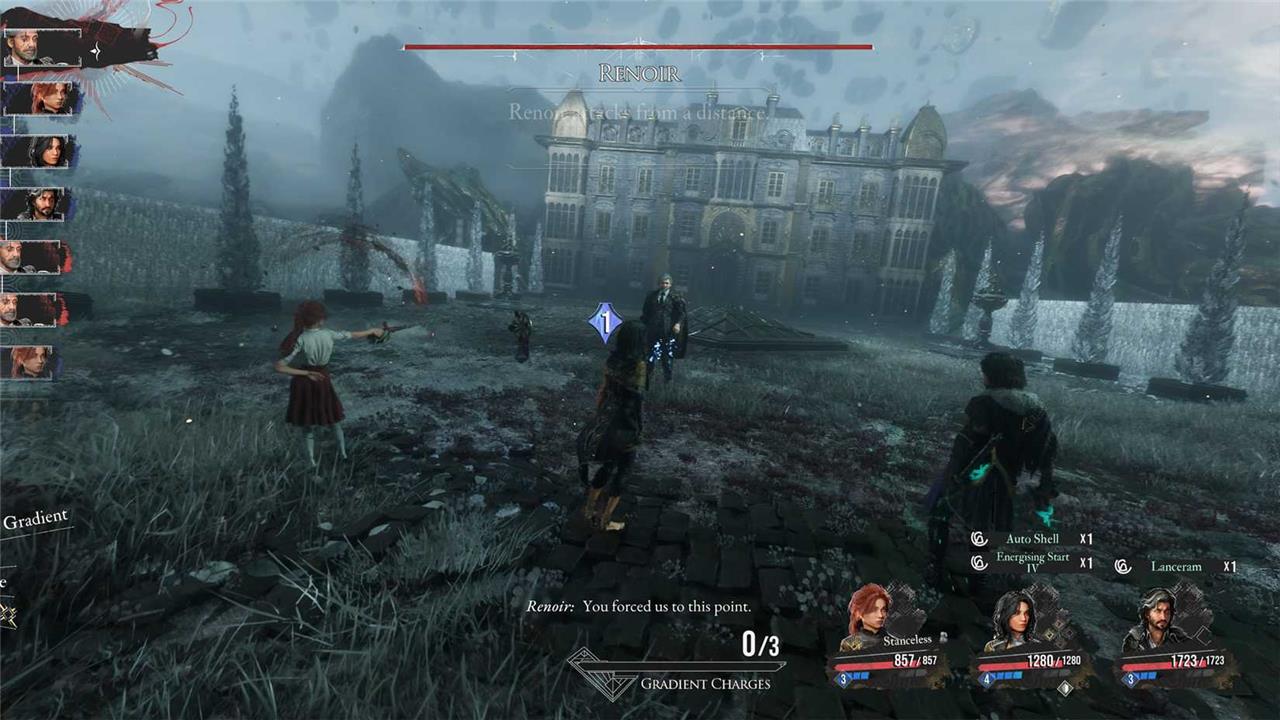
Renoir (Old Lumière – Manor Gardens)
Found in the Manor Gardens of Old Lumière, this journal lies near a Lumière statue overlooking the central fountain. Approach from the east path past the vine-covered archway, then turn left at the stone bench cluster. The notebook rests on a low pedestal beside blooming flowerbeds, partially hidden by overhanging branches. Collect it before ascending the nearby stairs to proceed.
While facing the manor, head northwest, and cross the wall through the hole. A short distance ahead, to your left, there’s a door which takes you to the Manor’s bathroom. In the next room, you will find the Renoir journal.
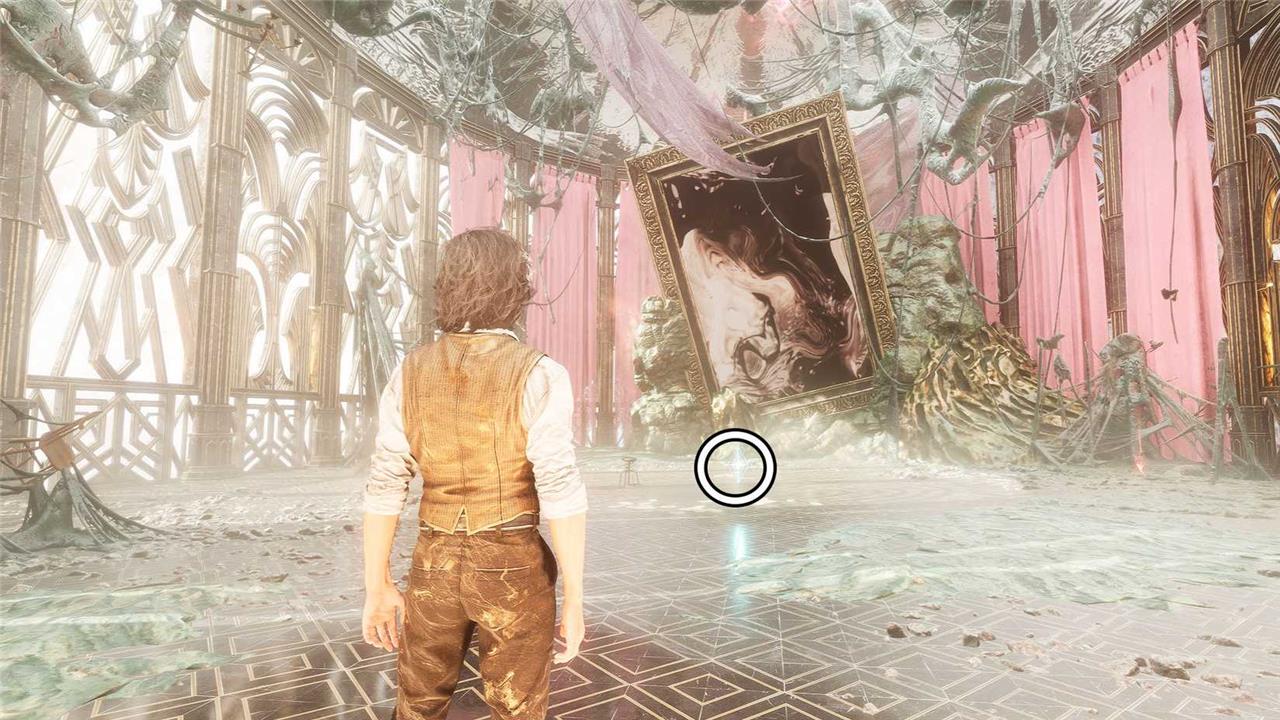
Journal 58 (Old Lumière)
Hidden in the quiet corridor of Old Lumière, Journal 58 contains the reflections of a researcher documenting the city’s peculiar shift between light and shadow. The entry hints at experiments with optical devices once used to capture motion, now distorted by residual energy from the Obscur field. Notes in the margins mention recurring flickers resembling human figures trapped in projected frames, suggesting the Lumière district once served as a testing ground for visual anomalies before being sealed off.
You receive Journal 58 by defeating the final boss in the Old Lumière area.
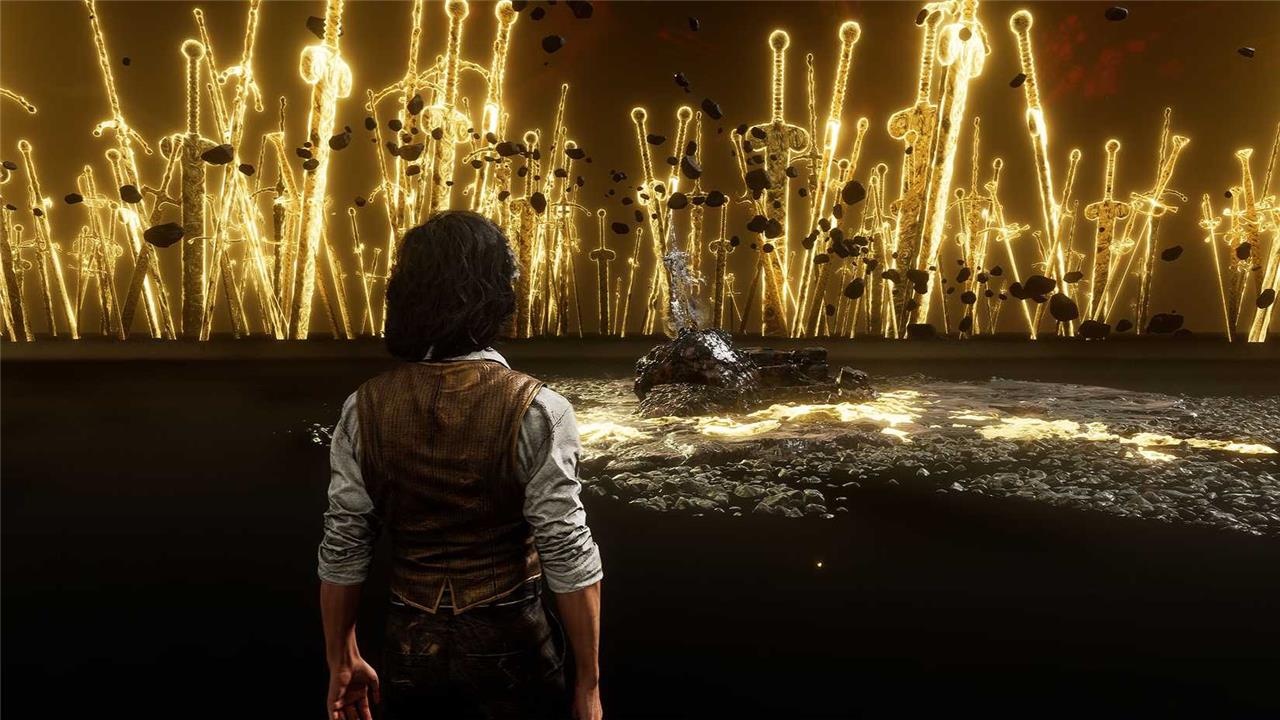
Journal 42 (Old Lumière – Manor Gardens)
Hidden among the ivy-clad arches of Old Lumière’s Manor Gardens, Journal 42 rests on a weathered bench near the central fountain. The pages contain notes describing experiments on artificial sunlight used to preserve rare plants during long nights. Faint ink smudges suggest the writer was interrupted, leaving behind speculation about the outcomes of their botanical trials.
To find this journal, you must have already defeated Renoir. From the Manor Gardens Flag, go to the right, then turn right again and use the rope to access the lower area where an enemy and Journal 42 are found in front of a golden sword.
Journal 55 (Sirène – Dancing Classes)
Tucked inside the Sirène dance studio, this journal captures fragments of routines and notes left behind by former students. Smudged ink and hurried pen strokes suggest late-night practice sessions filled with repetition and frustration. The pages offer small insights into the performers’ discipline and the quiet tension that lingers in places built for perfection and applause.
Head west up the stairs, and stick to the right side. Eventually, you will reach an area with three enemies dancing in front of Journal 55.
Journal 67 (Sirène – Dancing Arena)
Journal 67 can be found near the Sirène area within the Dancing Arena. It rests behind a curved section of the outer wall, close to a cluster of broken columns lit by faint blue lights. The entry mentions echoes from past performances and the audience’s fading excitement, adding context to the site’s former purpose. Collecting it offers another fragment of the story surrounding Sirène’s role in the wider history of the expedition.
As you progress in the main quest in Sirène, you’ll find Journal 67 next to the Dancing Arena Flag.
Journal 69 (Visages – Joy Vale)
In Clair Obscur: Expedition 33, Journal 69 (Visages – Joy Vale) catalogs locations across the expedition with crisp detail, linking each site to the mood of its discoveries and the faces behind them, casting light on small moments and their enduring warmth.
By taking the first path on the left side in Visages, you’ll get to Joy Vale. From the starting area, move forward until you reach Joy Vale Flag. Head west, keeping to the left side, until the path starts to ascend. On the left, there will be a couple of enemies surrounding Journal 69.
Journal 39 (Visages – Sadness Vale)
Hidden deep within Sadness Vale, Journal 39 lies near the broken statue surrounded by wilted flowers. The pages describe a time of mourning among the Visages, detailing their sorrow and the stillness that covered the valley. Faint traces of light ink suggest the writer struggled to continue, making this entry one of the most haunting in the collection.
Starting at the Sadness Vale Flag, go down the hill, then turn right before a giant crying face, and follow the path uphill. Pass the group of enemies and keep going upward to find Journal 39.
Journal Unknown number one (Visages – Anger Vale)
Found in Anger Vale during the Visages encounter, this journal lies on a corpse near the central platform after defeating the first Visage. Approach the body amid the scattered debris and interact to pick it up. It details early expedition logs on the vale’s hostile creatures.
From the Anger Vale Flag, head down the hill and turn right, staying to the right to find a cave beside the path that leads upward. Enter the cave, stick to the right side when the path forks to find a door to the Manor. It will take you to the piano room. Open the closed door in it to find the Journal Unknown.
Journal 40 (Continent – Island south of the Monolith)
Between the continent and the island south of the Monolith, the journal traces a quiet corridor where shoreline winds carry echoes of distant shores and the current shapes paths that blur the line between land and sea.
On an island south of the Monolith, you will find a vendor and beside them, Journal 40.
Aline (Monolith – Tainted Battlefield)
Aline’s journal in the Monolith – Tainted Battlefield area recounts her thoughts amid the devastation left by endless conflict. She reflects on the scars that war has carved into both the land and the people who fought there. The entry captures a haunting mix of regret and determination, revealing how Aline grapples with the weight of her past decisions while finding purpose in what remains.
At the end of Act 2, as you climb the Monolith, eventually you will reach the Tainted Battlefield Flag. Jump into the area in front of the flag and head northwest. Pass through an opened door and a broken gate, then turn left into a narrow corridor. Following it will lead you to a door to the Manor that takes you to a greenhouse where you obtain Aline’s journal.
Journal 70 (Monolith – Tower Peak)
Monolith towers over Tower Peak, its silent mass casting long shadows across the basin as you trace the routes this journal shuttles you through. Each entry reveals a fragment of the cliff’s memory, a stubborn history carved into stone and sky, inviting careful steps and patient observation.
South of the Tower Peak Flag there’s a large tree you passed while progressing in the main quest. Go to the square where the tree stands and enter the street on the east side of it. Cross the gaps, then fight a group of enemies. After defeating them, turn around the corner to find Journal 70.
Journal 37 (Gestral Beach – Southeast of the Monolith)
Perched near the southeastern cliffs of Gestral Beach, this journal rests beside a cluster of weathered crates partially buried in the sand. The area is easy to overlook, as it blends into the rocky shoreline just beyond sight of the Monolith. The notes inside reference coastal patrols and faint echoes from the structure offshore, hinting that the writer may have been among the first to sense the Monolith’s strange influence across the bay.
To reach the Gestral Beach, you must first unlock Esquie’s ability to fly. Once you get there, find Journal 37 on the right side near the entrance.
Journal 43 (Continent – Island northeast of the Forgotten Battlefield)
Journal 43 can be found on the island located northeast of the Forgotten Battlefield. It rests near the shoreline among scattered ruins, partially hidden by dense foliage. Players may notice a small broken pier nearby, which makes this journal easier to spot. The area often has roaming enemies, so clearing them first helps ensure safe exploration while collecting the entry.
To find this island, go northeast of the Forgotten Battlefield. There’s a patrolling enemy on this island and near them, a camp where you find Journal 43.
Julie (Continent – Cliff northwest of Forgotten Battlefield)
Julie’s journal lies near the edge of the high cliff northwest of the Forgotten Battlefield, overlooking the misty valley below. The area is quiet, with only wind and the faint echo of distant conflict breaking the silence. Search close to a weathered camp setup near a collapsed supply crate surrounded by charred stones. The journal rests among debris, half-buried under scattered papers and faded equipment, hinting at a hurried departure.
With Esquie’s flying ability unlocked, fly to the cliff northwest of the Forgotten Battlefield. The journal is near the edge of the cliff, where three enemies are standing.
Verso (Continent – Cliff northwest of Forgotten Battlefield)
The journal in this area is found near the edge of the cliff overlooking the Forgotten Battlefield. Follow the narrow path northwest until you reach a stone archway partially covered in moss. The notebook rests beside a fallen pack near the edge, close to a view of the sea below. Be cautious while moving around this spot, as the terrain can cause you to slip if approached too quickly.

On the south side of the cliff where you can find Julie’s journal, behind an enemy, you will find Verso’s Journal. You don’t need to fight them, so just fly with Esquie behind them to grab the journal.
Journal 47 (Continent – West of Monoco’s Station)
This journal can be found west of Monoco’s Station, near the series of weathered cargo crates by the old rail tracks. The area is quiet, with faint traces of machinery scattered around. The journal rests on top of a broken generator, partly covered by dust and metal fragments. Its contents give short notes about supply movements and maintenance schedules, hinting at how this outpost once supported expeditions moving deeper into the western territories.
On the world map, travel to the west of Monoco’s Station to find a Burgeon and near it Journal 47.
Journal 84 (The Fountain – Entrance)
The Fountain’s Entrance reveals a quiet, pale glow where water mirrors the corridor’s vaulted arches, inviting the observer to pause, listen, and trace the path ahead as a soft current directs footsteps toward unseen depths.
To reach this area, fly to the west of the Small Burgeon. Once inside, follow the path near the flag. You will come across a square with a powerful enemy at its center. Stick to the right and go southeast to find Journal 84.
Journal 35 (Fallen Leaves – Resinveil Grove)
Dust-laden leaves drift over resin-sweet air as the grove hushes, each fallen fragment a quiet chronicle of the forest’s slow turning.
This journal is located on the northern side of the Fallen Leaves area. Starting from the Resinveil Grove Flag, head north, taking the path to the left of a gate. Eventually, you will reach the edge of the map where a patrolling enemy guards the journal.
Journal 49 (Fallen Leaves – Resinveil Grove)
Hidden among the golden foliage of Resinveil Grove, Journal 49 rests near a half-collapsed wooden bridge beside a moss-covered lantern. The area hums quietly with drifting leaves and faint echoes of past travelers. Reading this entry gives clues about the grove’s fading guardians and the shifting balance between its lingering spirits and encroaching decay.
Talk to the Young Boy Spirit in front of the gate to the right of the Resinveil Grove Flag. He will send you on a quest to find the Lady of Sap. Next, go back south but take the path to your left to find a rope that leads downward. Follow the only available path to find the cave where the Lady is located. Talk to her, then return to the boy. He will then open the gate. Follow the recently opened path and, after using a rope to access the upper part of the area, you will find Journal 49.
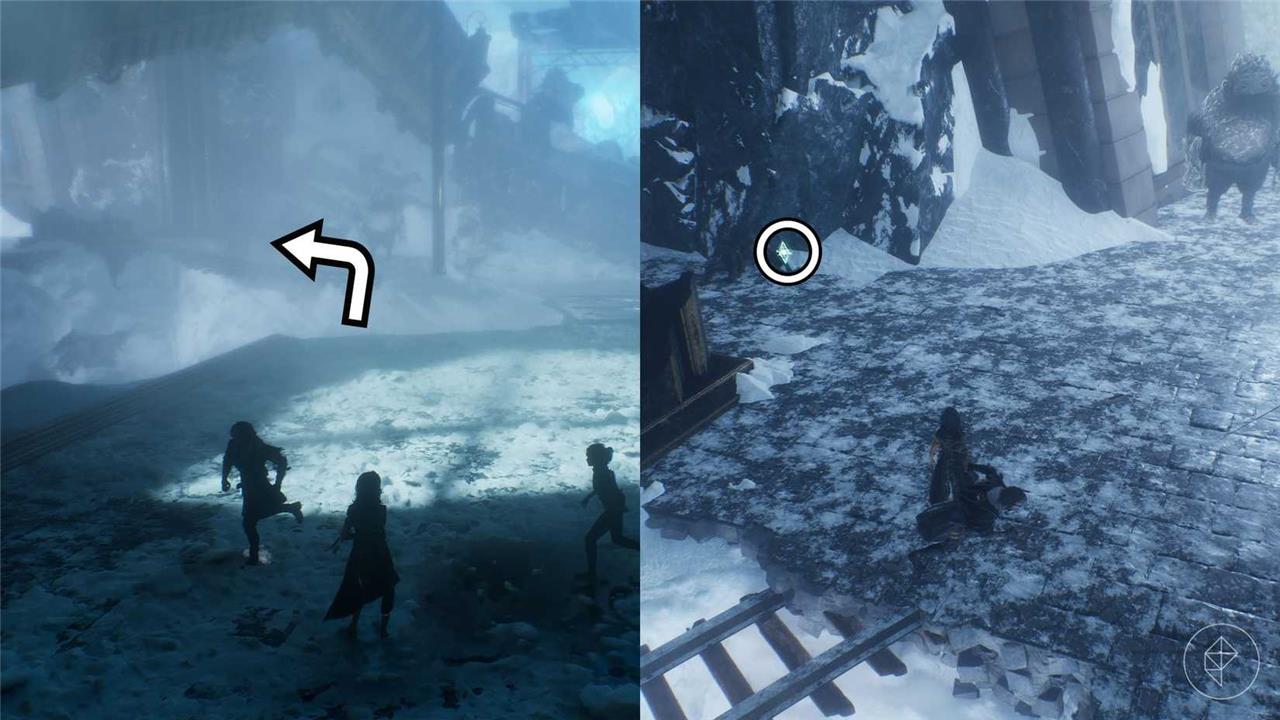
Journal 51 (Frozen Hearts – Icebound Train Station)
Snow whips across the abandoned tracks as the journal rests near a half-frozen bench in the Icebound Train Station. The area is quiet except for the wind whistling through shattered windows, giving the station an eerie stillness. Look for a flickering lantern near the central platform-its faint light marks the spot where the entry lies half-buried beneath ice.
After reaching the Icebound Train Station Flag, head northeast. Follow the path toward the north and pass another enemy. A bit ahead you will find Journal 51 in a small alley.
Journal 34 (The Crows)
Tucked away near the old battleground ruins, Journal 34 offers insight into a grim event witnessed by a lone observer. The entry recounts the unsettling behavior of crows gathering at dusk, their presence hinting at something dark beneath the surface. Its tone is somber, filled with unease, as if the writer knew the valley concealed more than shadows and carrion. Finding this journal helps piece together fragments of loss and superstition surrounding the aftermath of the war.
The Crows is a high-level area west of the Visages. Journal 34 is right at the entrance, beside the flag.
Journal 46 (Sirène Island – Sirène’s Dress)
Found on Sirène Island, Journal 46 is located near the ornate fountain beside the coral archway leading to the central plaza. The entry describes Sirène’s shimmering ceremonial dress, woven with threads infused by sea crystals. Reading it adds context to her role in the island’s traditions and deepens the understanding of the island’s connection to the sea’s magic.
Once you unlock relationship level five with Lune, travel to Sirène Island, where you will find the entrance to Sirène’s Dress on the northeast side of the area. Defeat the boss in the initial room to clear the path leading to Journal 46.
Journal Unknown number two (The Reacher – Ladder Area)
This journal is found in the Ladder Area, accessible after progressing through the lower platform near the large metal scaffold. Climb up the series of ladders to reach a narrow walkway where the journal rests beside a set of crates and scattered tools. The surroundings suggest it belonged to a worker or explorer documenting early site activity before the expedition’s main operations began.
The Reacher is an area located to the west of the Visages. You can only access the area after unlocking rank five with Maelle and Esquie’s flying ability. As you climb the Reacher, you will reach the Ladder Area. From the flag there, head north and take the downward path, where you will find a door to the Manor. Enter it to obtain another Unknown journal.
Journal 61 (The Reacher – Foggy Area)
This journal lies in a mist-covered sector where visibility is low and navigation can be tricky. You’ll find it near the edge of a broken walkway, surrounded by faint silhouettes of machinery half-hidden in the fog. Watch your footing, as the area drops sharply in some places, and enemies may appear suddenly through the haze.
Near the Reacher’s peak, you will get to the Foggy Area Flag. From there, go east, pass two enemies, to find Journal 61 near the next balloon.
Journal 60 (Lumière – Opera House)
Found in Lumière’s Opera House, Journal 60 sits on a chair in the backstage area near the costume racks. Approach from the main stage after the performance sequence, then head left through the velvet curtains. Pick it up before ascending the spiral staircase to avoid backtracking.
As you progress through Lumière in the final quest of the campaign, you will reach the Opera House. Instead of entering the building, turn right and head north. Go to the edge of a broken bridge to interact with Esquie, who will grab Journal 60 for you.
Journal Unknown number three (The Manor)
Found in the manor’s library on a dusty shelf behind the grand piano, this journal lies amid scattered papers. Approach the piano from the left side and inspect the shelf directly opposite the instrument. Pick it up to read notes on the expedition’s early encounters with the Paintress.
You obtain one of the three Unknown Journals by completing the Painting Workshop side quest. After obtaining the “Dessandre family portrait” and hanging it above the stairs on the right side of the Manor, the door at the far end of the Manor will open. Inside, you’ll find the journal.
Simon (Renoir’s Drafts – The Abyss)
Found on a desk amid scattered sketches in Renoir’s studio within The Abyss, this journal details Simon’s early concepts. It reveals the painter’s initial visions for the character, including rejected poses and color schemes from his preparatory drafts. Players reach it by solving the nearby easel puzzle after lighting the central brazier.
Which journals are missable and how to avoid missing them
Survivor Journal (#7) is the only missable journal in Clair Obscur: Expedition 33.
How to Obtain It
This journal is located in Old Lumière’s Left Street area, behind a locked gate in a pipe accessible after the first enemy. It requires the Old Key, a missable item obtained during the Prologue’s second section (often from festival interactions or specific vendors). To avoid missing it, grab the Old Key early and backtrack to the pipe once reaching Old Lumière; without the key, the gate stays locked permanently in that playthrough.
Avoiding the Miss
Check your inventory for the Old Key before advancing past the Prologue, as it cannot be retrieved later. Progress in the Journal menu tracks collections, but this entry (“Survivor”) won’t appear if skipped, forcing a replay or NG+ for the “Follow the Trail” achievement. All other 48 journals remain accessible post-story via world map exploration and flags.
Confirmation from Sources
Guides and forums consistently highlight only this journal as missable, with no areas becoming inaccessible afterward. Videos and player reports confirm backtracking works for everything else once abilities like flying unlock.
Steps to secure the Old Key in the Prologue to avoid misses
The Old Key in Clair Obscur: Expedition 33’s Prologue is essential for unlocking the Survivor Journal (#7) later, and missing it locks you out permanently until NG+.
Acquiring Festival Tokens
Start with one token automatically after the Gommage cutscene as you descend the steps toward the festival stalls.
-
Speak to Antoine at the middle stall and select dialogue options: “67 years ago”, “Expedition Zero”, and “Abilities you internalise by using a Pictos in battle after enough times” to earn the second token.
-
Challenge and defeat Maelle in a duel at her stall for the third token.
Trading for the Key
Approach Colette at the rightmost stall with all three tokens (or even just one, though extras ensure options). Agree to trade for the “artefact” to receive the Old Key quest item directly.
Using It Later
Fast travel to Old Lumière’s Left Street flag in Act II, enter the pipe behind the first enemy via the locked gate on the right path-backtrack immediately upon arrival to avoid story locks.