Unlocking all the secret armor sets in Monster Hunter Wilds is a thrilling challenge that pushes hunters beyond the usual monster parts grind. These elusive sets, hidden behind rare materials and special trades with mysterious vendors, unlock powerful skills and unique aesthetics that can transform your gameplay. Whether you’re trading with village merchants, hunting for rare resources, or completing special quests, mastering the path to these secret armors is essential for any hunter aiming to dominate the Forbidden Lands.
Thankfully, we’ve done the hard work for you, rounding up all the required materials and the armor set details to help you get all of them.
Ranging from silk hoods to the physical embodiment of death, Monster Hunter Wilds’ secret armor sets are certainly varied – here’s how to unlock all of them, and why you’d want to.
What are secret armor sets in Monster Hunter Wilds?
Secret armor sets in Monster Hunter Wilds are unique gear collections that are not crafted from typical monster parts but instead require rare materials obtained through special means such as trading with various village merchants, completing specific quests, or gathering elusive items from the environment. These sets become accessible only after reaching High Rank and often involve interacting with an intermediary trader named Nata, who facilitates exchanges with different villages. Each secret armor set offers distinctive skills that can enhance gameplay in unique ways, making them highly sought after by players aiming to optimize their hunter’s abilities beyond conventional armor options.

While the majority of armor sets in Monster Hunter Wilds are crafted from the remains of foes you’ve vanquished, secret armor sets won’t appear in your Smithy menu until you have the required raw materials.
These range from rare goods like Sild Cotton to completing a certain quest, or just getting very lucky with the in-game Supply Ship.
As for why you’d want to wear such a set, they come with their own Skills which can trigger in-game, but many don’t make a full set. For example, while the Battle set has five pieces of armor, the Sild set comprises of only two.
How to trade for secret armor set materials
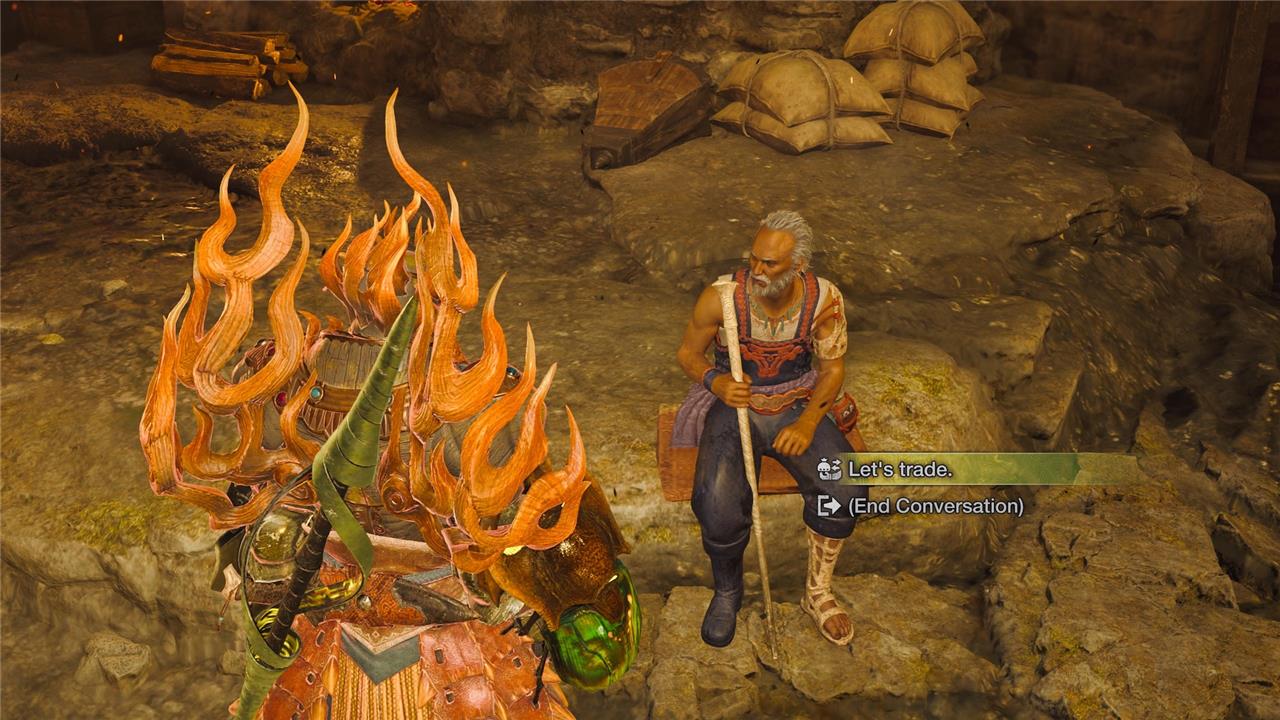
To trade for secret armor set materials in Monster Hunter Wilds, you must first reach High Rank, as these materials only become available then. Once at High Rank, seek out Nata, who can be found at every base camp and acts as a central trading hub connecting you with various village merchants. Through Nata, you can access the Item Trade mechanic, allowing you to exchange specific items with different villages to obtain rare materials like Dalthydon Wool, Suja Textiles, and Sild Cotton, which are essential for crafting secret armor sets. Keep in mind that many trades require Ancient Wyvern Coins, so farming these coins is crucial. Also, the available trade items rotate regularly, so checking back often with Nata is recommended to find the materials you need.
Many of the sets below require trading, but there’s no point doing this until High Rank because the materials can’t be earned until that point.
You can speak to the various vendors throughout Wilds’ different biomes, but it’s much easier and less time-consuming to speak to Nata. After reaching High Rank, he’ll be found in every base camp, but he will have the ability to handle trades from all the vendors.
It’s worth noting many of them require the Ancient Wyvern Coin currency, so be sure to stock up.
How to get all secret armor sets in Monster Hunter Wilds
To get all secret armor sets in Monster Hunter Wilds, you need to reach High Rank first, as these sets are unavailable in Low Rank. Most secret armor sets require gathering rare materials through the game’s new Item Trade mechanic, which allows you to exchange items with various villages in the Forbidden Lands. Nata, found at every base camp, acts as a trade hub, making it easier to access materials from all villages without visiting each one individually. Some sets also require special quest completions or rare materials obtained from the Support Ship or specific monster hunts. Collecting these unique materials unlocks the recipes for the secret armor sets, each offering distinct skills and bonuses that enhance your gameplay.
Here are all secret armor sets, their requirements, and skills at a glance:
Secret armor sets in Monster Hunter Wilds offer unique and powerful gear that cannot be crafted through the usual monster parts alone. These sets require players to gather rare materials often obtained through special trading with village merchants, completing specific quests, or acquiring elusive items via the Support Ship. Most secret armor sets become available only after reaching High Rank, where players can trade with Nata, the central trader at base camps, to efficiently collect the necessary materials. Each secret set features distinct skills and bonuses, making them valuable additions for hunters aiming to optimize their builds and tackle tougher challenges in the game.
| Secret armor | Requirement | Skills |
| Kunafa | Dalthydon Wool | Speed Eating and Free Meal Level 2, Wide Range and Palico Rally Level 4 |
| Suja | Suja Textiles | Divine Blessing Level 3 |
| Sild | Sild Cotton | Botanist Level 3, Wide Range Level 4 |
| Azuz | Azuz Tanned Leather | Maximum Might Level 2, Heroics and Geologist Level 3 |
| Death Stench | Sinister Cloth | Intimidator and Stun Resistance Level 2, Ambush Level 3, Resentment Level 5 |
| Butterfly | Great Hornfly | Recovery Up and Recovery Speed Level 2, Evade Extender Level 3, Evade Window and Constitution Level 5 |
| King Beetle | Great Hornfly | Sleep Resistance Level 1, Poison Resistance, Flayer, and Paralysis Resistance Level 2, Foray Level 3, Heroics Level 5 |
| Melahoa | Great Hibiscus | Poison Resistance, Bleed Resistance and Paralysis Resistance Level 2, Mushroomancer, Recovery Speed, Recovery Up, Survival Expert and Tool Specialist Level 3 |
| Battle | Scarred Scale | Bind Resistance, Constitution, Sleep Resistance, and Stamina Surge Level 2, Hunger Resistance, Free Meal, Marathon Runner, and Item Prolonger Level 3 |
| High Metal | Drearisite Scraps | Aquatic/Oilsilt Mobility Level 2, Stun Resistance, Blast Resistance, Bleeding Resistance, Partbreaker, Bombardier, Iron Skin and Flinch Free Level 3 |
| Commission | Commission Ticket | Earplugs, Maximum Might, and Tool Specialist Level 1, Quick Sheathe and Divine Blessing Level 2, Agitator Level 5 |
| Artian | âWhat We Protectâ quest | Earplugs and Adaptability Level 1, Windproof, Tremor Resistance, and Blight Resistance Level 2, Flayer Level 5 |
For more a closer look at each armor set.
Kunafa armor
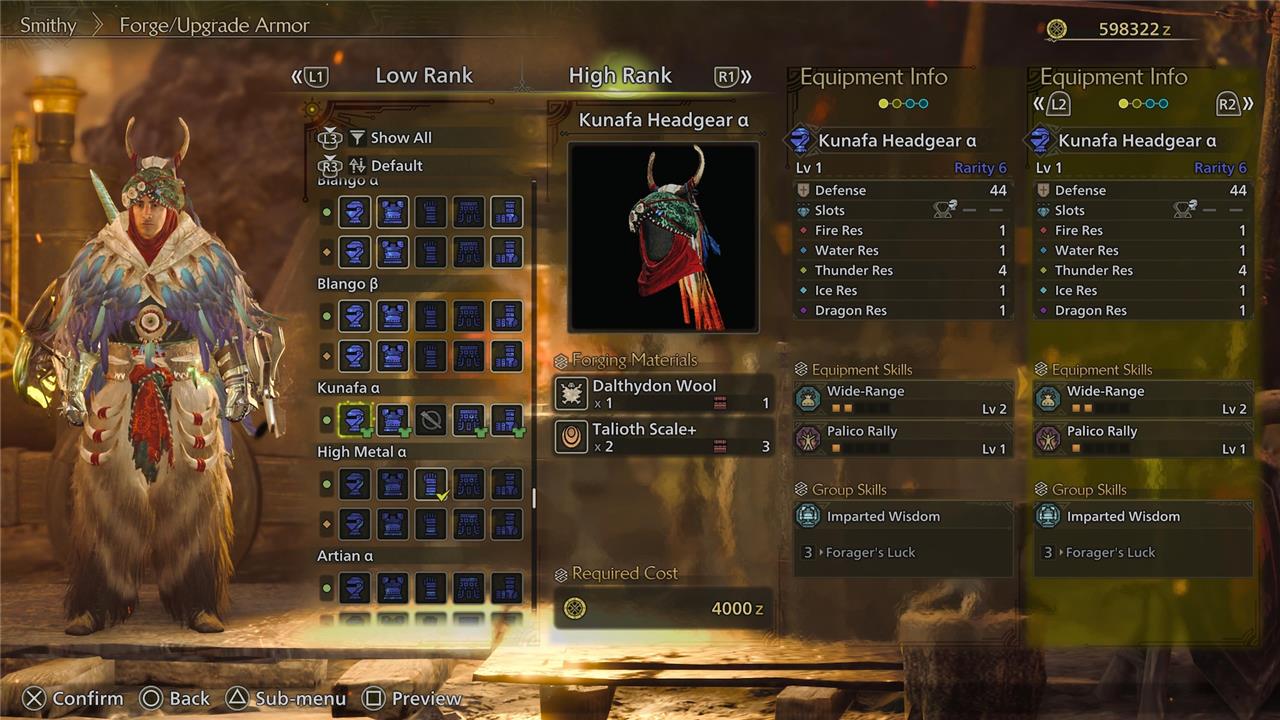
- Material: Dalthydon Wool
- Skills: Speed Eating and Free Meal Level 2, Wide Range and Palico Rally Level 4
This four-piece outfit is inspired by the in-game Kunafa tribe, and you’ll need to get Dalthydon Wool from trading with Kilama (or Nata, as we mentioned above).
Doing so will reward you with this set of armor which is strong against Thunder but weak to just about everything else. The Palico Rally Skill will increase your buddy’s attack and defence by 20% at this rate, which is not to be sniffed at.
Suja armor
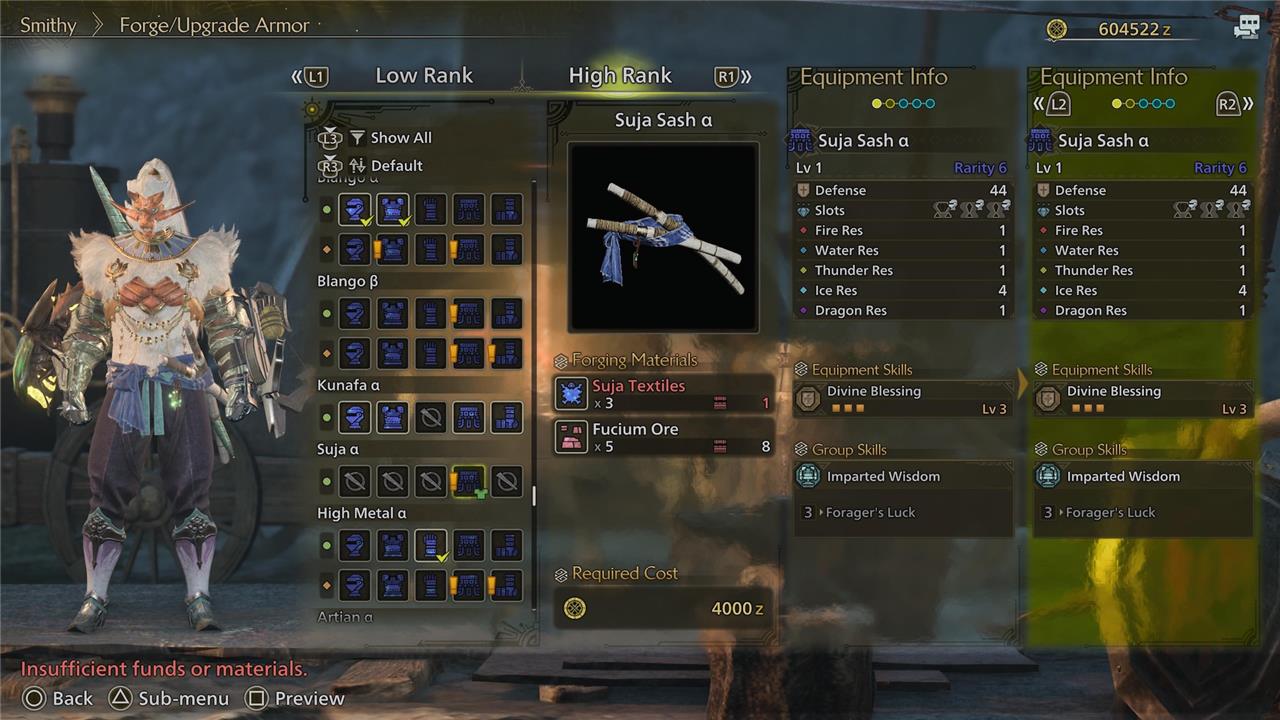
- Material: Suja Textiles
- Skills: Divine Blessing Level 3
Suja Textiles can be purchased from traders, and taking it to the Smithy will trigger a single item – a coil for your Hunter.
Don’t let that put you off, though, since it offers the Level 3 Divine Blessing Skill. This reduces damage taken by a whopping 50% when active, meaning it’ll be worth wearing for tougher fights. On its own, the coil is ideal against Ice, too.
Sild armor
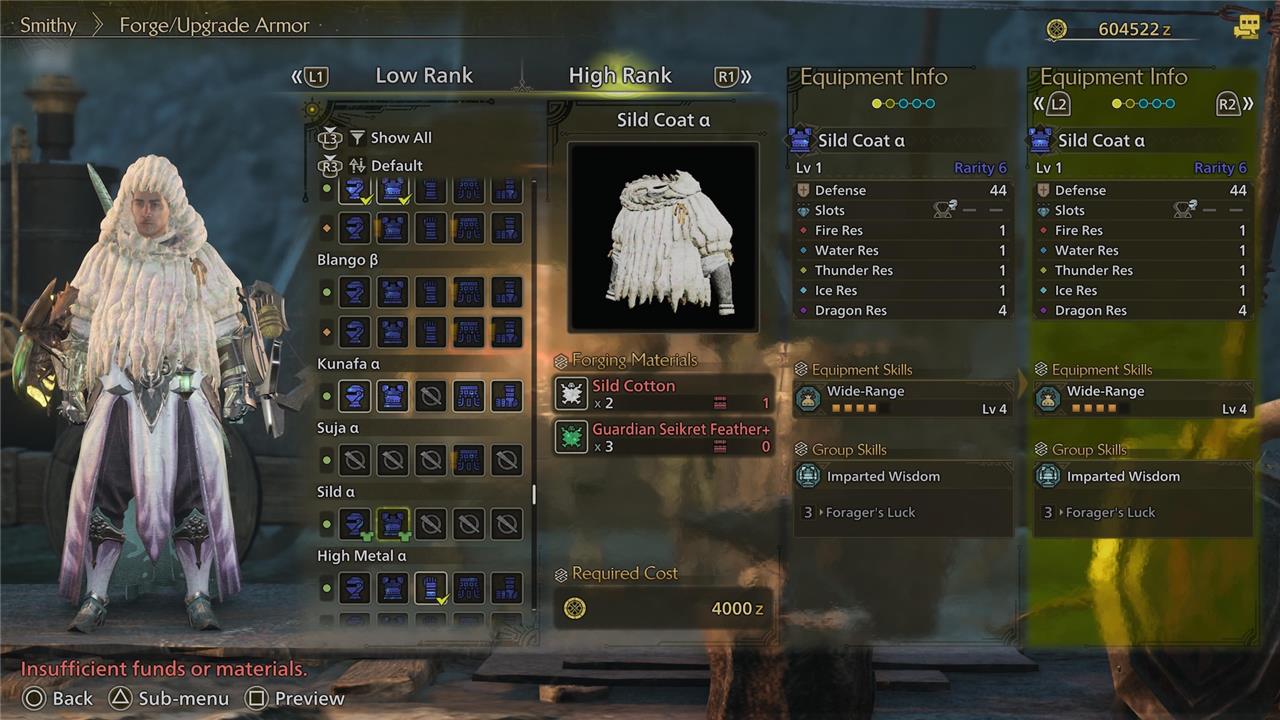
- Material: Sild Cotton
- Skills: Botanist Level 3, Wide Range Level 4
This cosy-looking pair of items comes from the Sild Cotton item which you can pick up from a vendor.
Believe it or not, it’s strong against the Dragon element, but it is weak against Fire, Water, Thunder, and Ice. The big draw is the Botanist Skill, which at Level 3 adds an extra consumable while gathering anything but mushrooms – ideal for material farming runs.
Azuz armor
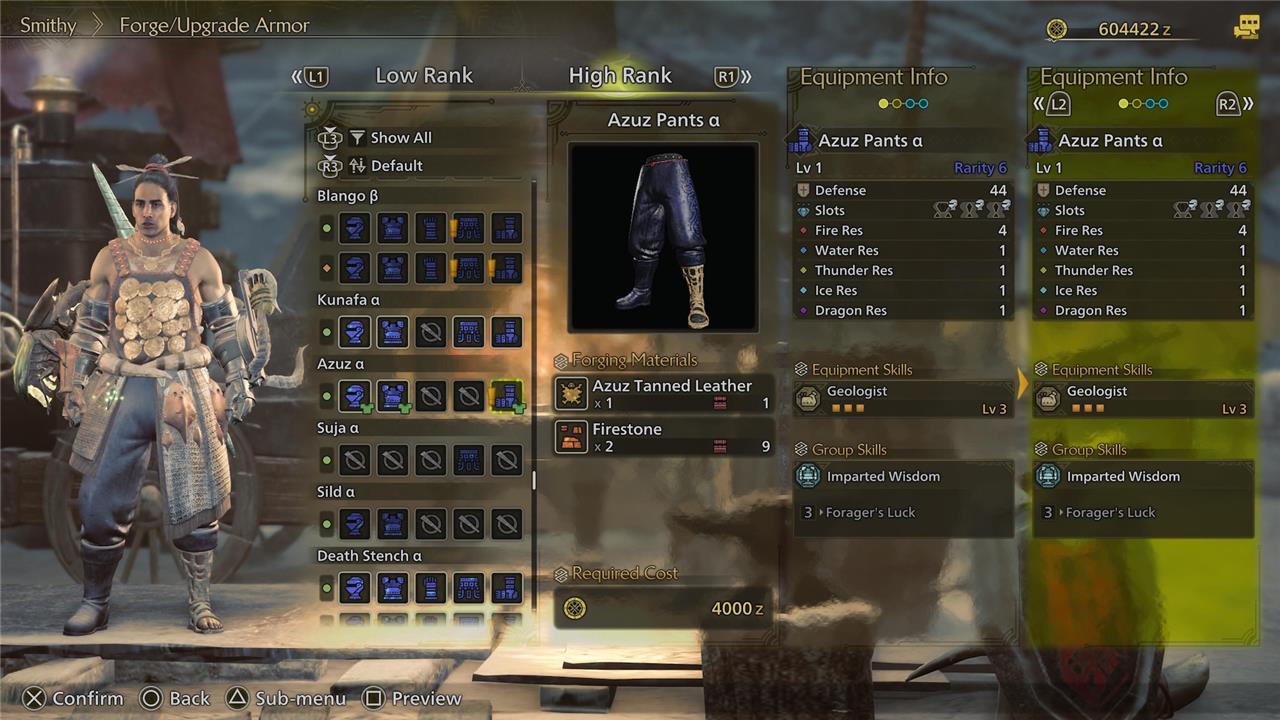
- Material: Azuz Tanned Leather
- Skills: Maximum Might Level 2, Heroics and Geologist Level 3
Again, swap your materials (or Wyvern coins) for Azuz Tanned Leather and you’ll be rewarded at the Smithy with a helmet, chestpiece, and boots.
Azuz armor comes in three parts, and the perk variety is nice. Heroics gives you attack and defence buffs when you’re on low health, while Geologist means more items while gathering from mining outcrops and bone piles. Best of all, Maximum Might adds 20% of Affinity at this level, too (think of it as critical hit chance).
Death Stench armor
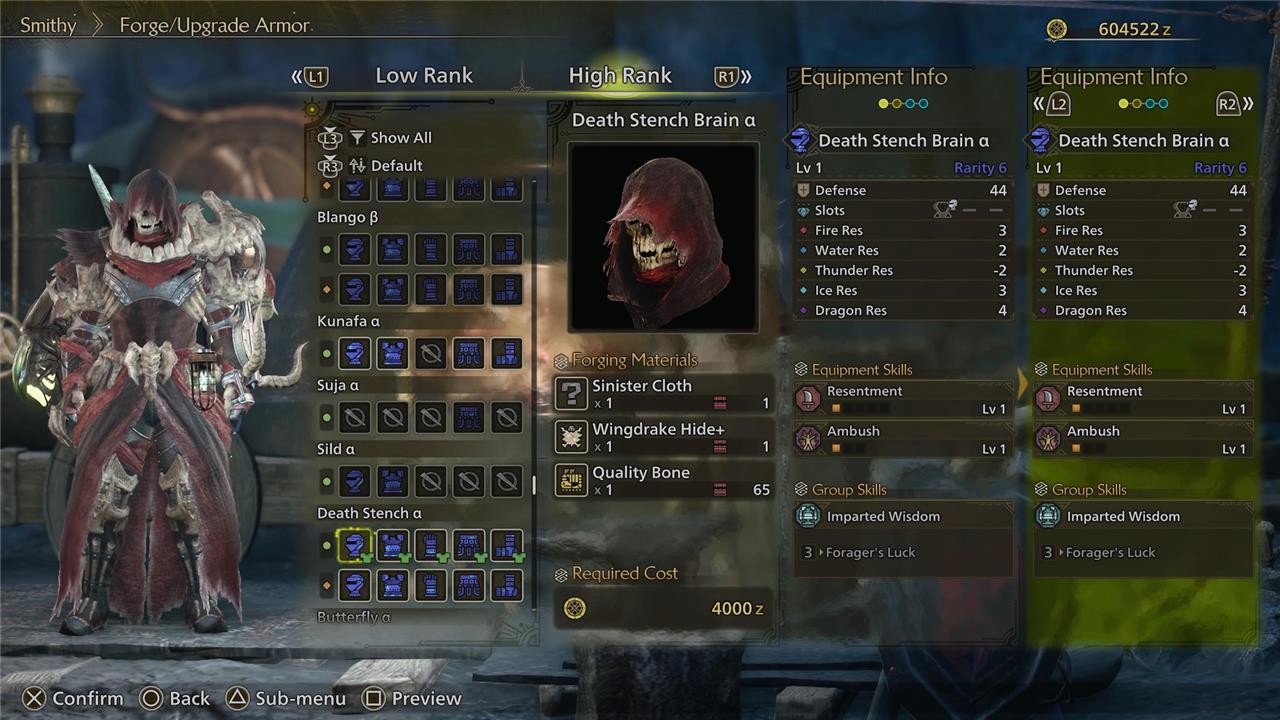
- Material: Sinister Cloth
- Skills: Intimidator and Stun Resistance Level 2, Ambush Level 3, Resentment Level 5
This unsettling Death Stench armor requires the Sinister Cloth material. In my experience, while you can trade for it, it can be gathered by NPCs, too – saving your coins. It can give you a big buff to attack.
The Resentment Skill gives you additional attack damage, which stacks with the Sneak Attack-focused Ambush for potentially big gains in terms of output. Add in Stun Resistance and Intimidator to help keep monsters from attacking you first and you can do major damage at the start of a hunt.
It’s strong against Dragon-type, but weak against Thunder.
Butterfly armor
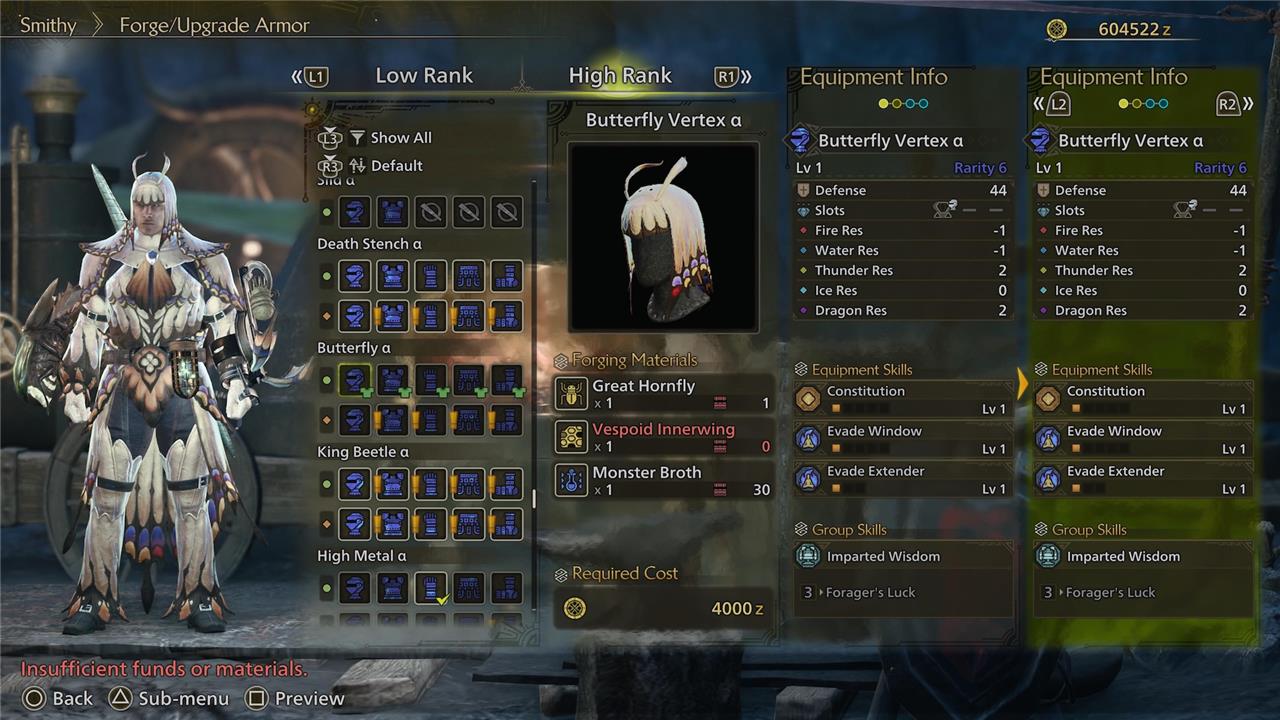
- Material: Great Hornfly
- Skills: Recovery Up and Recovery Speed Level 2, Evade Extender Level 3, Evade Window and Constitution Level 5
The Butterfly Armor set comes from the Great Hornfly, which can be found at the Scarlet Forest vendors, or via gathering.
It’s good to have against Thunder and Dragon types, but is weak to Fire or Water. The big draw is Constitution, which hits level 5 here meaning your stamina depletion is reduced by half – giving you more energy to hit harder, while Evade Window offers a greatly increased invulnerability window at Level 5.
King Beetle armor
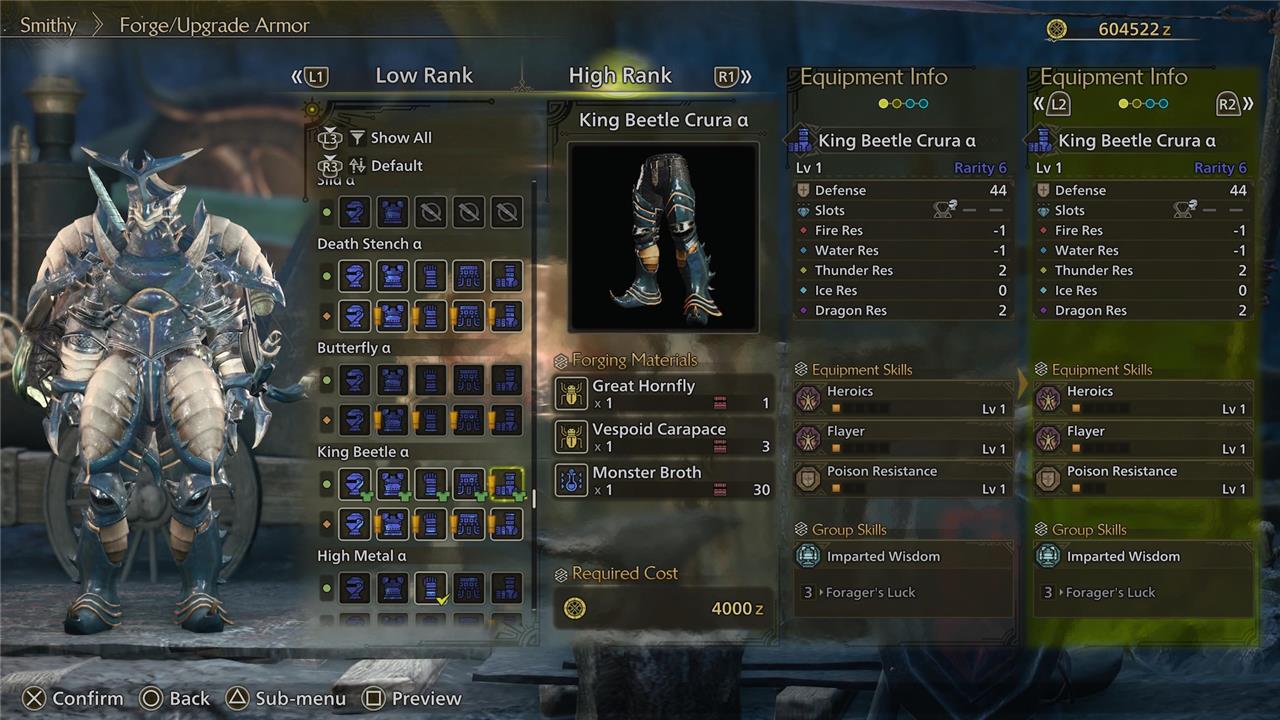
- Material: Great Hornfly
- Skills: Sleep Resistance Level 1, Poison Resistance, Flayer, and Paralysis Resistance Level 2, Foray Level 3, Heroics Level 5
No, that’s not a typo – you can use the Great Hornfly for two different armors sets, with each offering its own stats. You’ll need five of them for the full set, though.
The Skills here are focused on resistance to Poison and Paralysis, as well as using Heroics for an attack buff when wounded. Foray helps you deal big damage against monsters suffering from either of those status effects, while Flayer will help you open wounds.
Melahoa armor
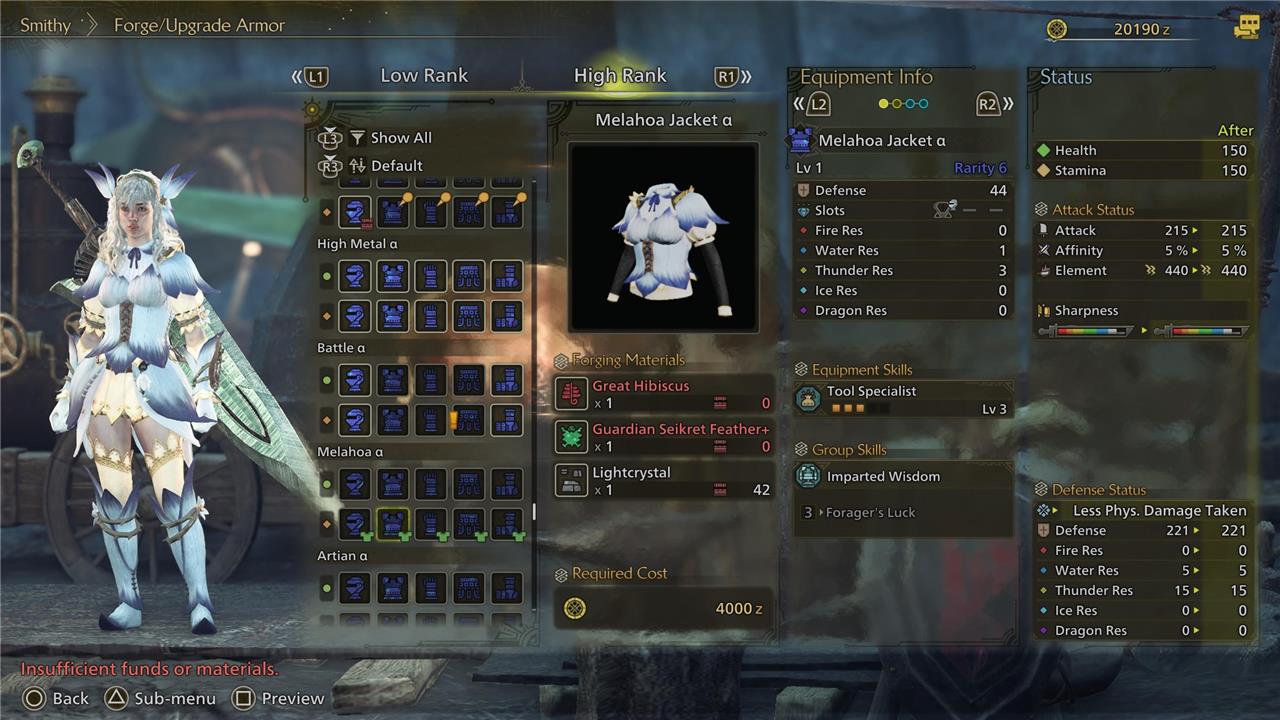
- Material: Great Hibiscus
- Skills: Poison Resistance, Bleed Resistance and Paralysis Resistance Level 2, Mushroomancer, Recovery Speed, Recovery Up, Survival Expert and Tool Specialist Level 3
An armor set with more Skills you can shake a Great Hibiscus at, the Melahoa outfit is stylish and functional.
It’s weak against Fire, Ice, and Dragon elements, but it does do well against Thunder. Its skills combine to help avoid poison, paralysis, and bleeding status effects, while also buffing health recovery and tool cooldown while letting you consume mushrooms in the open world.
Battle armor
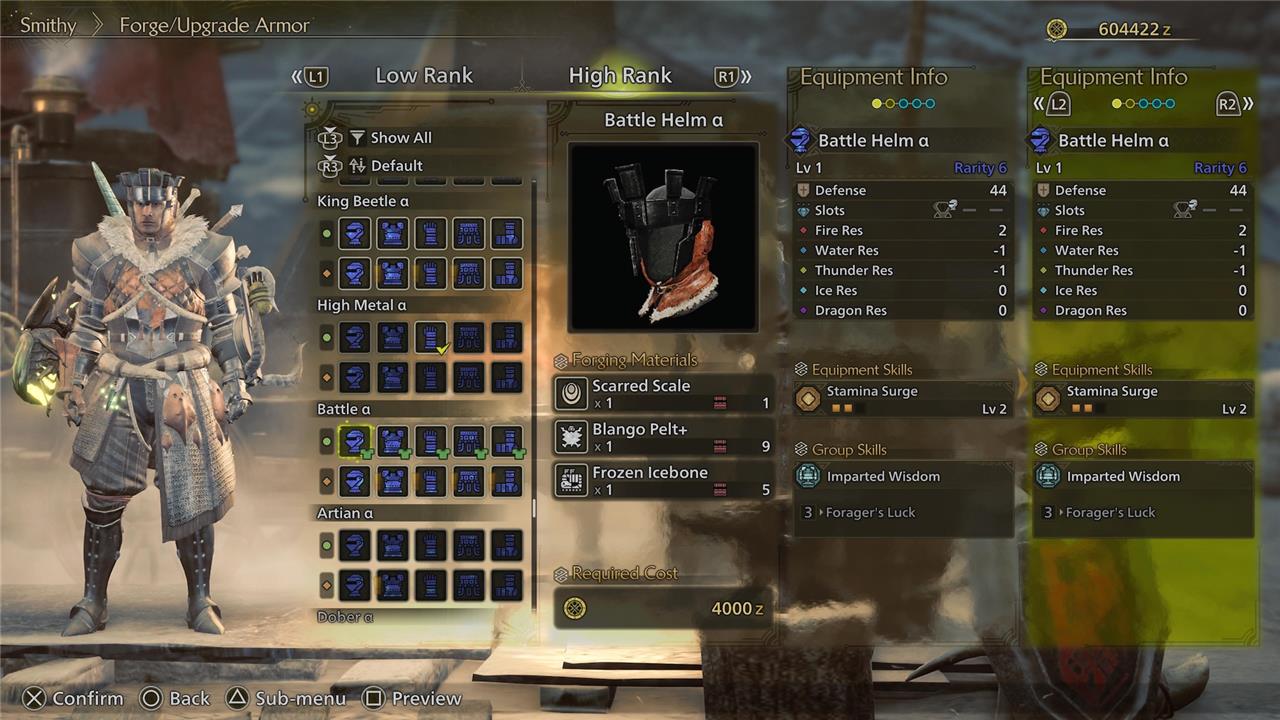
- Material: Scarred Scale
- Skills: Bind Resistance, Constitution, Sleep Resistance, and Stamina Surge Level 2, Hunger Resistance, Free Meal, Marathon Runner, and Item Prolonger Level 3
Scarred Scale has been particularly rare in my time with Monster Hunter Wilds, but it can be purchased with Ancient Wyvern Coins when it does appear.
This five-piece set offers sleep and bind resistance, as well as the chance to snag a free meal, lower stamina depletion while dodging or blocking, and even for sprinting. If you’re building your Hunter around being nimble, this might be a good way to go – just beware of its weakness to Water and Thunder.
High Metal armor
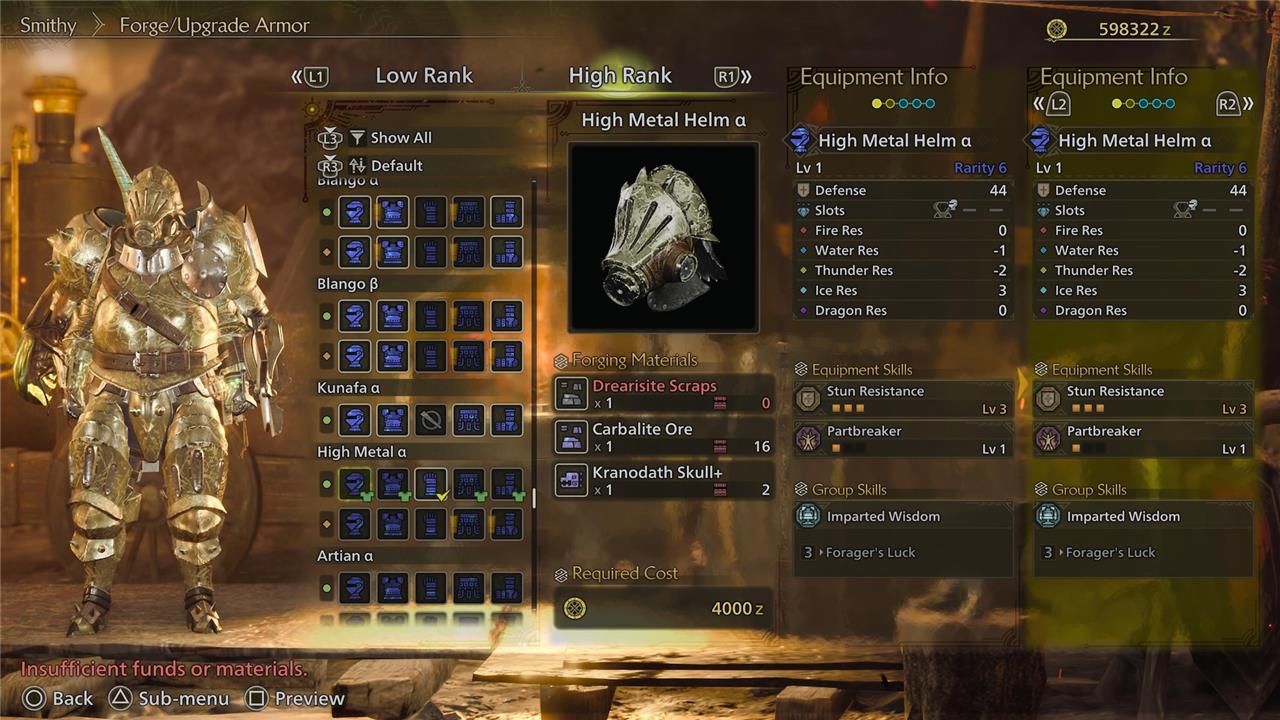
- Material: Drearisite Scraps
- Skills: Aquatic/Oilsilt Mobility Level 2, Stun Resistance, Blast Resistance, Bleeding Resistance, Partbreaker, Bombardier, Iron Skin and Flinch Free Level 3
Drearisite Scraps can be found from Azuz merchants, so keep your coins handy in case they pop up for trading.
This set offers a series of defence buffs, like Iron Skin that prevents a monster from lowering your defence at all at Level 3, as well as the very handy Partbreaker which means it’s easier to break parts of a monster and destroy wounds.
Commission armor
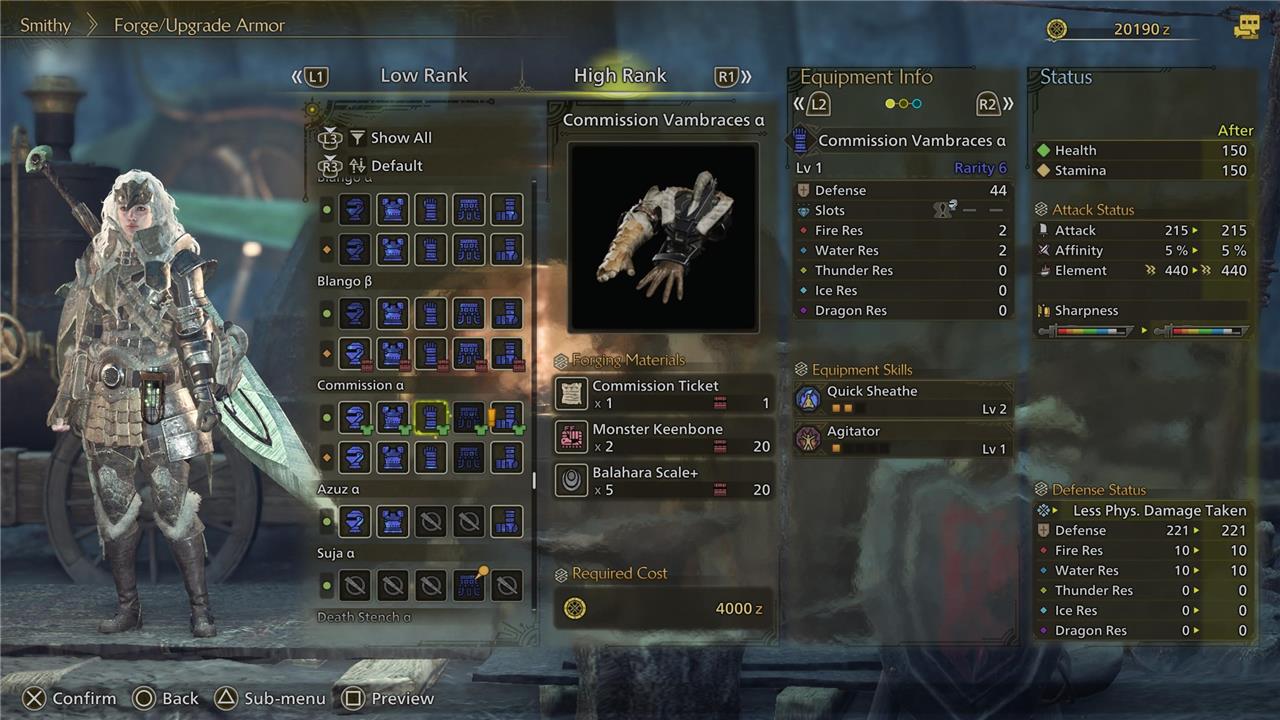
- Material: Commission Ticket
- Skills: Earplugs, Maximum Might, and Tool Specialist Level 1, Quick Sheathe and Divine Blessing Level 2, Agitator Level 5
No trading for this one, but it’s sadly still a little tricky to get hold of. You’ll need the Supply Ship to furnish you with a Commission Ticket, so my advice is to check it regularly and snap them up whenever you see them.
Its only real high-level stat is Agitator, which buffs attack and affinity when large monsters are enraged, but that feeds into Maximum Might which can buff affinity again by another 10%. Add in Divine Blessing, and you’ve got a decent all-rounder which is ideal for Fire and Water monsters.
Artian armor
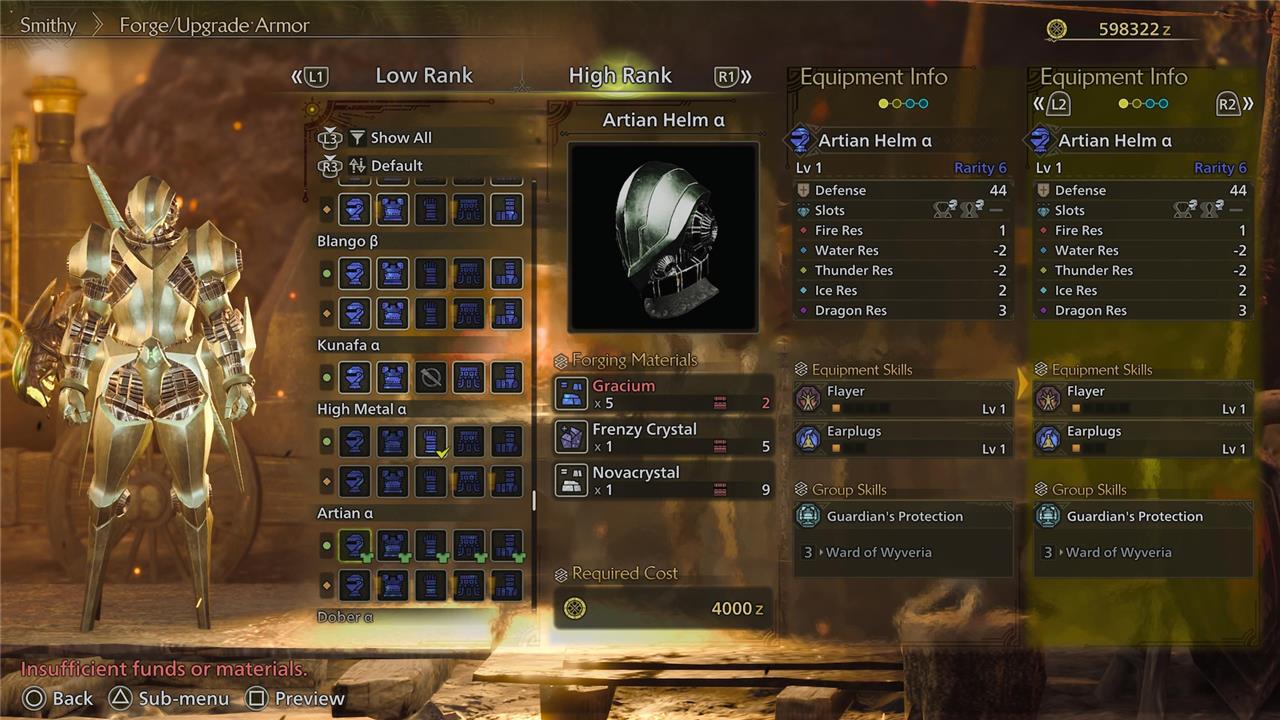
- Material: N/A
- Skills: Earplugs and Adaptability Level 1, Windproof, Tremor Resistance, and Blight Resistance Level 2, Flayer Level 5
As with Artian weapons, you’ll unlock the Artian armor set by completing the “What We Protect” optional quest.
What secret armor sets in Wilds are the most powerful for my playstyle
The most powerful secret armor sets in Monster Hunter Wilds vary depending on your playstyle, but here are top recommendations tailored to different approaches:
-
Aggressive, fast-paced playstyle: The Ebony Odogaron Armor excels with the Burst skill, which increases attack power after consecutive hits, making it ideal for Dual Blades, Long Sword, and Insect Glaive users. It also offers Divine Blessing and Bleeding Resistance for survivability.
-
Elemental damage focus: The Arkveld Armor set boosts elemental attacks with skills like Convert Element and Weakness Exploit, perfect for elemental weapons such as Charge Blade, Bow, and Switch Axe. It also has a set bonus that provides passive healing during offense.
-
Evasion and Frenzy management: The Gore Magala Armor is great for hunters who rely on dodging and managing Frenzy status. It features Evade Window, Antivirus (which speeds recovery from Frenzy and boosts Affinity), and Constitution to reduce stamina depletion. This set suits Bow, Dual Blades, and Light Bowgun users.
-
Balanced offense and defense: The Guardian Rathalos Set offers high defense and versatile skill slots, including Weakness Exploit and Survival Expert, making it a solid all-rounder for various weapons and playstyles.
-
Mobility-focused: The Balahara Set enhances dodging distance and mounting capabilities, ideal for players who prefer agile combat styles.
Choosing the right secret armor set depends on your preferred weapon and combat strategy, but these sets are widely regarded as top-tier for their respective playstyles in Monster Hunter Wilds.
Which secret armor sets in Wilds maximize burst damage for my weapon type
To maximize burst damage in Monster Hunter Wilds, the Ebony Odogaron Armor set is widely regarded as the best choice. This set not only provides the Burst skill, which significantly boosts attack power after consecutive hits, but also includes the Burst Boost set bonus that enhances the Burst skill’s potency and duration, making it especially effective for fast-hitting weapons like Dual Blades, Long Sword, and Insect Glaive.
For weapons that benefit from critical hits and sustained burst windows, mixing pieces from the Ebony Odogaron set with others like Gore Magala or Dahaad can optimize Burst alongside complementary skills such as Weakness Exploit and Max Might. For example, a combination of Ebony Odogaron helmet and braces with Gore Magala chest and legs can yield Burst level 5, Weakness Exploit, and other offensive buffs.
For slower weapons like Great Sword or Hammer, the Guardian EPO Doon armor set is recommended because its Burst-related set bonuses increase raw attack during Burst and extend the active duration, allowing these slower weapons to maintain burst damage longer.
In summary, for maximizing burst damage:
-
Fast weapons: Ebony Odogaron set (helmet and braces) for Burst + Burst Boost.
-
Slower weapons: Guardian EPO Doon set for extended Burst duration and raw attack boost.
-
Hybrid builds: Mix Ebony Odogaron pieces with Gore Magala or Dahaad for additional offensive skills like Weakness Exploit and Max Might.
This approach ensures your weapon type benefits fully from the Burst skill’s damage potential.