A routine return to your old mining outpost spirals into a high-stakes rescue mission in Starfield’s “Back to Vectera” quest. When pirates strike and a trusted companion vanishes, you’ll need to outwit hostile forces, repair crucial tech, and make tough choices-setting the stage for one of the main story’s most pivotal moments on both PC and Xbox.
“Back to Vectera” is one of three quests the game makes available to you when it opens up, with the others being “Into the Unknown” and “The Empty Nest.” We recommend starting with “Into the Unknown,” but “Back to Vectera” is the perfect second choice for this block of quests.
In this Starfield guide, we’ll walk you through the “Back to Vectera” mission and help you recruit three new crew members to your cause.
A possible bug at launch is that players are sometimes unable to follow the scanner. If this happens to you, we recommend returning to orbit and waiting by passing time. Consider shutting the game off and launching it fresh as well, just in case.
Also, when you make to re-land on the planet, be absolutely sure you’re picking the Scanner Anomaly Site. If you land anywhere else by accident, the temple won’t appear on the map and you won’t be able to find it.
Check on Barrett, Lin, and Heller
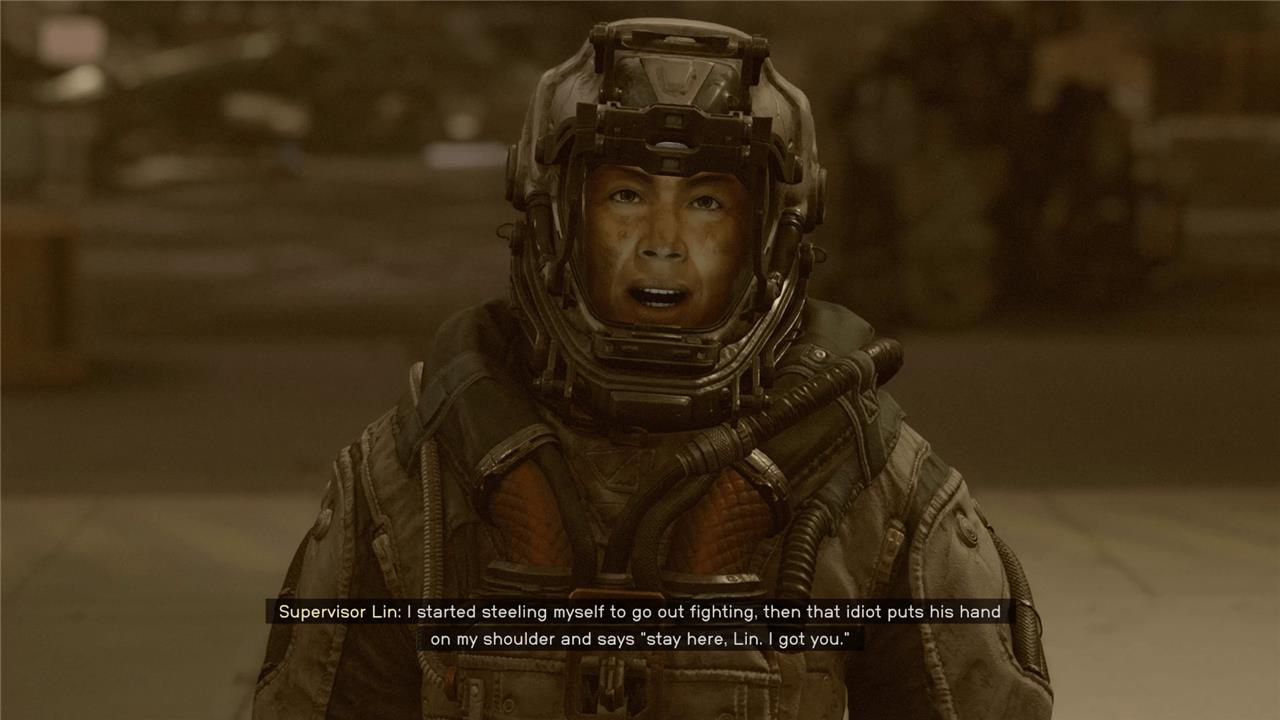
Upon returning to the Argos Extractors Mining Outpost on Vectera, your first step is to check in with Supervisor Lin. She informs you that the Crimson Fleet has attacked again, resulting in Barrett and Heller being taken captive, while she remains stranded at the outpost. To proceed, you’ll need to help Lin by fixing the broken comms computer, which may provide clues to Barrett and Heller’s whereabouts. After restoring power and accessing the emergency transmission, you learn more about their location and can relay this information to Lin, who expresses concern for Heller and offers to join your crew if you wish. This sequence ensures you’re up to date on the fate of all three characters and sets up the next steps in the quest to rescue Barrett and Heller.
The Constellation crew needs you to go check in on Barrett, who you last saw on the mining planet of Vectera, way back when you started Starfield. Head over there and see how Barrett, Supervisor Lin, and Heller are doing.
Return to Vectera // Talk to Lin
Fast travel to Vectera, the planet you started the game on, and land at the Argos Extractors Mining Outpost.
When you leave your ship, you’ll find the area partially destroyed and Supervisor Lin – your old boss – running up to talk to you. She’ll tell you the colony was attacked by pirates again and that Heller (your old goober co-worker) and Barrett were taken.
Lin has given up hope, but says there might be something on the broken comms computer, which is in the office to your right (across from the mine).
Fix the Comms Computer // (Optional) Obtain 3 power cells
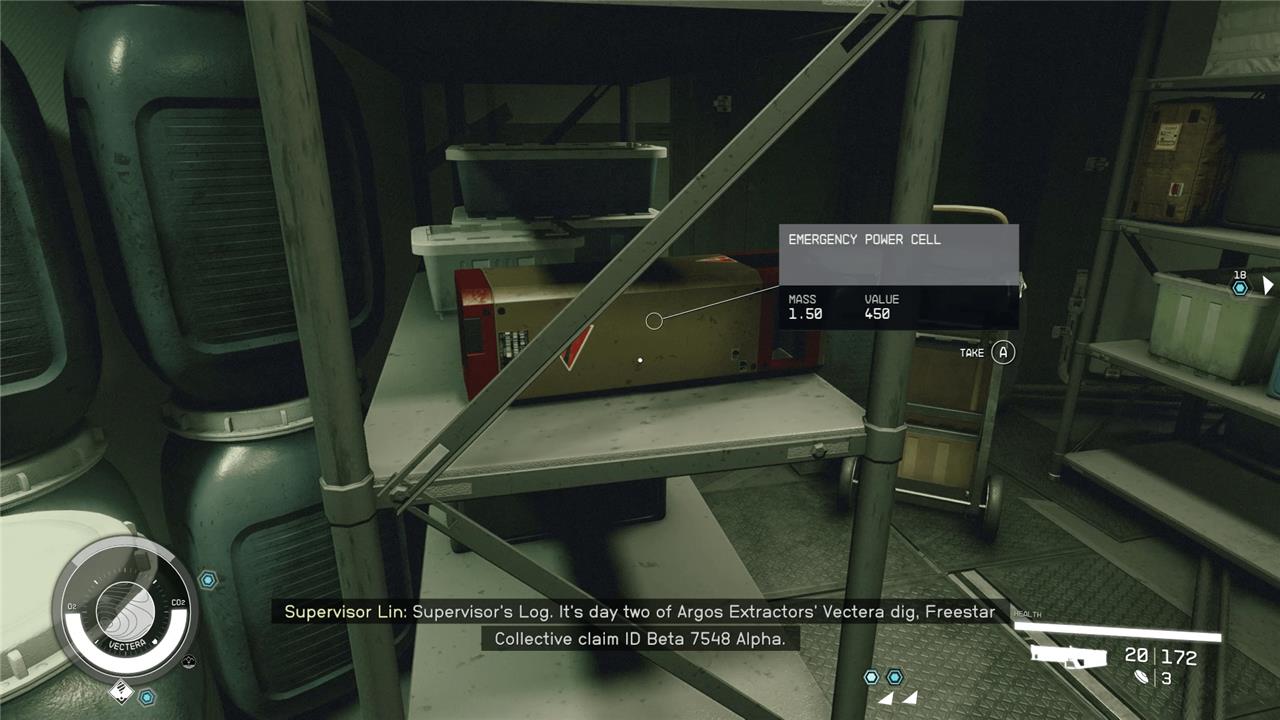
Enter the office and follow the waypoint to the broken computer. When you reach the inner office, you’ll realize the computer needs power to boot correctly.
If you already have three power cells from around the world of Starfield, you can plug them into the wall and get going with the quest. If not, you’ll find at least three hanging out in the mining area.
The game marks these power cells on-screen and they’re all easy enough to find if you follow the waypoint. You’ll find two by Lin (she’s holding one, and will give it to you if you talk to her) near the landing pad and one inside the infirmary. If you want to stock up on more power cells, you can find an unmarked one in the office building and in the storage area behind the infirmary.
Find a clue to Barrett’s location // Return to Lin // (Optional) Recruit Lin as crew
Once you’ve got an inventory full of industrial-sized batteries, head back over to the office, plug them into the wall, turn on the power, and look through the computer. Access the Incoming Ship Logs file to read the Emergency Transmission from Barrett and Heller. This SOS signal will tell you where and how to find your friends. Shut the computer down and head out to Lin.
Tell Lin you’re going on a rescue mission. She’ll mention looking for a change in career before you leave. Even if you ask her to join you, you’ll need to end the conversation and then strike up another one in order to officially recruit her. Once you talk to her again you can tell her she’s “just the kind of traveling companion” you want and hire her. You can assign her to your ship or to any outpost you may have.
Save Barrett and Heller
After speaking with Supervisor Lin at the Argos Extractors Mining Outpost on Vectera, you learn that both Barrett and Heller have been kidnapped by the Crimson Fleet during a recent pirate attack. To track them down, you must first repair the broken comms computer by collecting power cells scattered around the outpost and using the Vectera Control Room Key to access the necessary area. Once the computer is operational, it reveals a transmission with clues to their location, sending you to another planet-often Bessel III-where both are being held. Upon arrival, you’ll need to fight through Crimson Fleet pirates to reach Heller and then confront Matsura, the pirate holding Barrett. You can resolve Barrett’s rescue through persuasion, payment, or combat. Once both are safe, you can return to The Lodge, where Barrett becomes available as a companion and Heller can be recruited to your crew.

Now that you know what happened to Heller and Barrett, it’s time to mount a rescue mission and follow your coordinates to their emergency broadcast.
Travel to Gryphus (random planet) // Find Barrett and Heller
The emergency SOS will take you to a randomly selected planet, meaning that your game won’t necessarily send you to Gryphus like mine did. Hop in your ship and go where the quest asks you to.
When you land, regardless of the planet you’re on, you’ll find a crashed ship and an injured Heller clutching his wounds.
Talk to Heller // (Optional) Recruit Heller as crew
Talk to Heller for a bit and he’ll explain what happened and give you a note from Barrett. If you ask Heller how he’s doing, he’ll tell you he’s fine and needs help off of the planet. Talk to him again and you can recruit him to your crew. Then you can assign him to your ship or to one of your outposts.
Listen to ’Emergency Transmission 02’
Regardless of if you recruit Heller or not, he’ll give you a disk that has a message from Barrett on it. Open your inventory, go to “new” or “notes,” and select “Emergency Transmission 02.” Listen to the message and you’ll hear about where Barrett has gotten himself kidnapped this time and has been taken to a new planet: Bessel III.
Travel to Bessel III // Rescue Barrett
With your two new crew mates (or not, if you didn’t recruit Lin or Heller), jump back in your ship and fly off to Bessel III. Land by the Ransacked Research Outpost and make your way to the pirate village. Shoot or sneak your way in and you’ll find Barrett sitting there like nothing is the matter, chatting up a pirate captain named Matsura.
Matsura and Barrett are both chatting like old friends, and while the pirate captain seems pretty friendly (for a pirate captain), he still won’t let Barrett go for free. He’ll ask for 4,000 Credits for your friend back, and you can respond in a few ways.
- If you have Sarah Morgan with you, you can choose an option where she pays the fee out of the Constellation kidnapping insurance policy.
- You can also pay the cash yourself.
- You can shoot the pirate captain – but be warned that he has bodyguards in the room with him.
- Finally, you can Persuade Matsura to give Barrett back to you peacefully and (most importantly) for free. This is a mildly difficult persuasion check this early in the game. You’ll need to get six pips from the captain.
However you solve the Barrett problem, walk out of the camp and back to your ship with your buddy on your heels.
Return to the Lodge // Enter the library // Wait for Barrett // Talk to Barrett
Jump back in your spaceship and fly back to New Atlantis and the Lodge. Walk into the library with the rest of the crew and wait for Barrett to pop in and chat everyone up (including you).
What secrets does the ‘Back to Vectera’ quest reveal about the Artifact hunt
The “Back to Vectera” quest in Starfield deepens the mystery of the Artifact hunt by tying your early mining outpost directly to the larger search for these powerful objects. While the quest itself focuses on rescuing Barrett and Heller from Crimson Fleet pirates, it also revisits the site where you first encountered an Artifact, underscoring Vectera’s ongoing significance in the Artifact storyline. The mission involves uncovering clues via the comms computer, which leads you to new locations and advances your pursuit of the Artifacts.
Although the quest does not reveal major new secrets about the Artifacts themselves, it reinforces that the hunt is fraught with danger-pirate interest in your team hints at the broader competition and peril surrounding these mysterious objects. The quest also sets up future Artifact-related missions by bringing Barrett back into your crew, whose expertise and personal connection to the Artifact hunt are pivotal for the main story’s progression.
What clues does the audio transmission hold about Barrett’s location
The audio transmission, specifically Emergency Transmission 02, contains embedded location data that reveals where Barrett was taken after being captured by the Crimson Fleet. After recovering the transmission from Heller, you listen to it in your inventory, and it provides the coordinates for Barrett’s next location-directing you to Bessel III (or, in some cases, a different planet such as Hillex, depending on quest variation). This clue is crucial for tracking Barrett, as it is encoded within the transmission and automatically updates your mission objectives with the new destination. The game uses this mechanic to advance the quest, even though the specifics of how Barrett managed to embed the coordinates are not fully explained in the dialogue or logs.