Struggling to keep your inventory under control in Starfield? Whether you’re drowning in crafting materials or just looking for a safe place to stash your hard-earned loot, finding the right storage solution can make or break your interstellar adventure. From secret unlimited storage chests in the Lodge to building sprawling outpost warehouses and upgrading your ship’s cargo hold, discover the smartest ways to store-and access-your resources across the Settled Systems.
This is especially true if you often buy resources at shops like Jemison Mercantile. In this Starfield guide, we’ll tell you where to store resources so you can free up your inventory space.
How and where to store your resources
Storing resources in Starfield can be managed in several ways depending on your needs and playstyle. Early on, your ship’s cargo hold is the most convenient place to keep resources, as crafting stations on your ship can directly access these materials, though space is limited and upgrades can be costly. For more permanent or bulk storage, the Lodge in New Atlantis offers a safe in your personal room and two storage boxes in the basement, all with unlimited capacity; however, these are not linked to crafting stations, so you’ll need to manually retrieve items when needed. Building outposts allows for highly customizable storage solutions-by constructing and linking storage containers, you can create automated systems that not only expand your storage but also make resources available for crafting and research at the outpost. Ultimately, choosing where to store your resources comes down to balancing convenience, accessibility for crafting, and available space as your collection grows.
Starfield is filled with various chests scattered around areas. Normally your relationship with these chests is one of thievery – taking all the money and guns away from some space pirates, for example – but they can also be used to store your items.
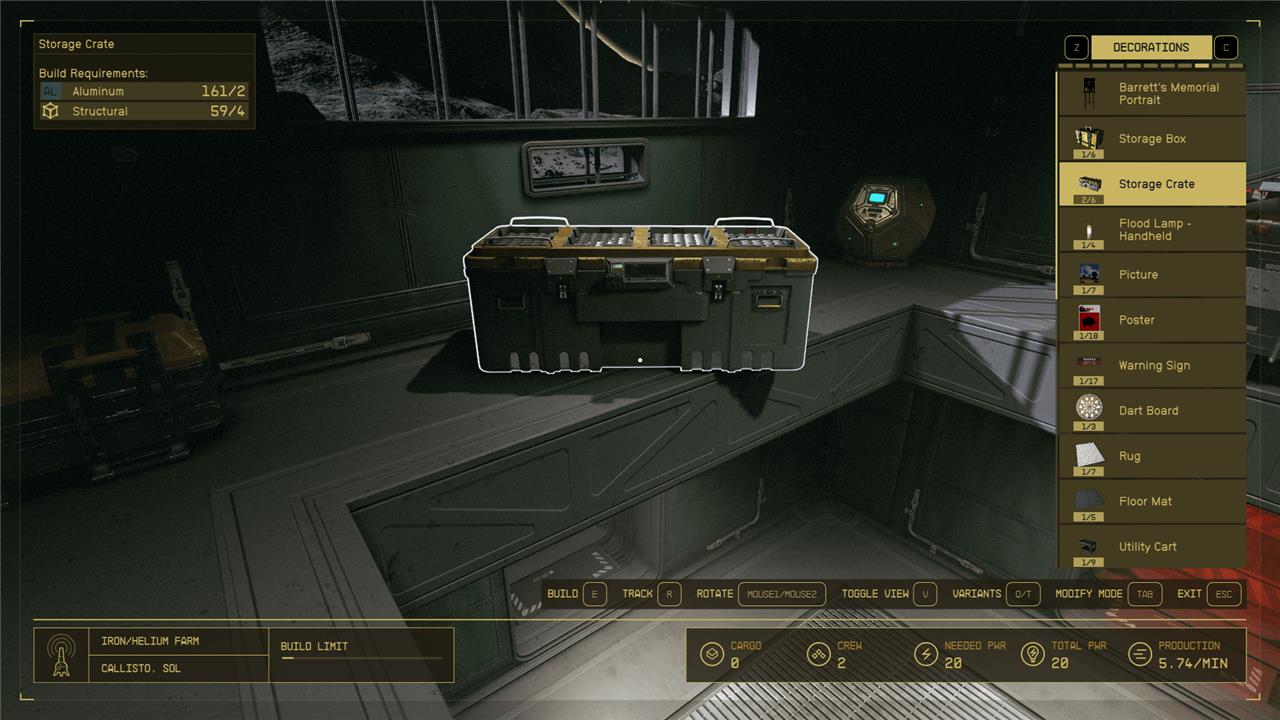
When trying to find space for all your resources, your best bet is to build some chests in your outpost (or getting a bigger cargo container for your ship, since it goes with you everywhere). These crates cost aluminum and “structural material,” both of which are very common items that you can get from the stores or out in the world.
When building a chest in your base, you can choose between a “storage box” and a “storage crate.” The box is a little bit cheaper, but can only hold 10 kg, which is almost nothing. The crates are a bit more expensive, but each can hold 150 kg. That means that if you make a room in your base with 10 crates – which would only cost you 20 aluminum and 40 structural materials – you could hold 1,500 kg total in that room. That’s a lot of bang for your buck!
Where to find unlimited storage
If you’re looking for unlimited storage in Starfield, the best place is the Lodge in New Atlantis. Inside the Lodge, you’ll find several containers with no mass limit: specifically, there are two storage boxes in the basement near the workbenches and a safe in your personal bedroom, all of which can hold an unlimited number of items. These containers are ideal for stashing excess resources, gear, and crafting materials without worrying about running out of space. However, keep in mind that items stored here are not automatically accessible at crafting stations elsewhere-you’ll need to retrieve them manually when needed. Additionally, finishing the Ryujin questline unlocks another safe with unlimited storage in your Ryujin office. While ship cargo holds and outpost containers are useful, they have storage limits, making the Lodge’s containers the go-to solution for truly unlimited storage in the game.
Other Bethesda games have had options for unlimited storage, which can make building out your bases both easy and convenient. Starfield also has some means for unlimited resource storage, but none are particularly convenient.
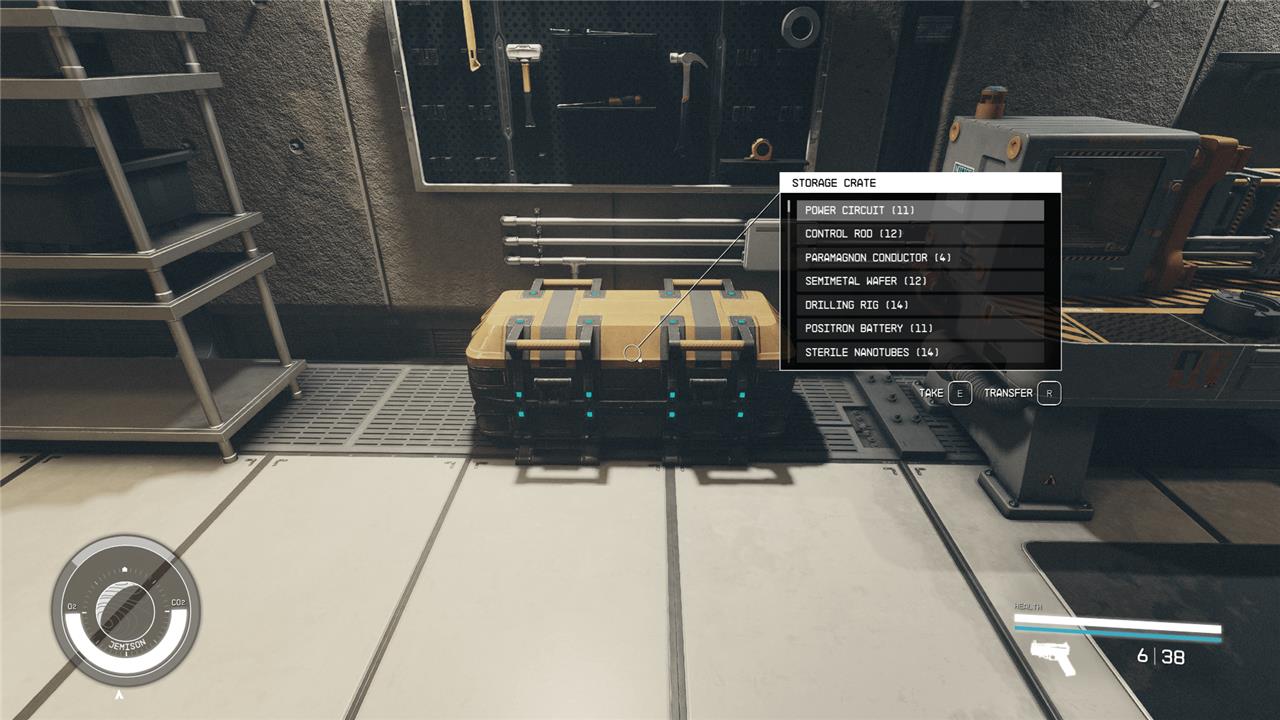
In the basement of the Lodge, you’ll find a storage crate and a storage box near a bunch of crafting stations. Both of these chests have unlimited storage. We’ve put over 2,000 kg of stuff in one of them, and it never gave us a “full” prompt. In fact, the chests have no indication of any weight limit like other chests do.
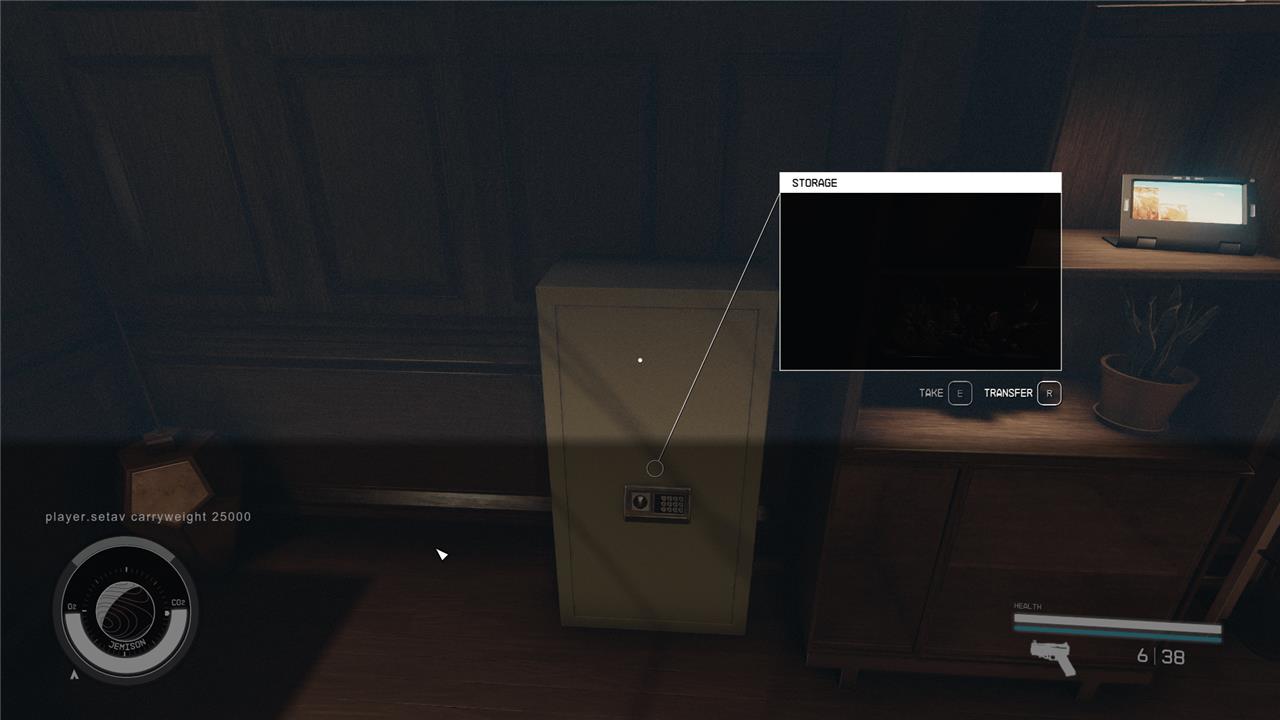
There is another unlimited storage chest in the Lodge: the safe in your room. If you’ve finished “The Old Neighborhood” quest, talk to Noel – she’ll show you your room if you ask. The safe is in the corner across from the bed.
As far as we can tell, these are the only unlimited storage options in Starfield, which means you’ll need to fast travel a lot if you decide to store all your resources at the Lodge. (It’s worth a reminder here that you can’t fast travel while encumbered, which means you’ll need to very slowly transport your resources to and from the Lodge if you don’t feel like walking to the New Atlantis spaceport every time.)
How to remove encumbrance (for PC players only)
PC players can quickly remove encumbrance in Starfield by using console commands. Press the tilde (~) key to open the console, then type player.modav carryweight [#], replacing [#] with your desired maximum carry weight. This will immediately increase your carrying capacity, effectively eliminating encumbrance. Keep in mind that using console commands will disable achievements unless you install an achievement enabler mod. This method is exclusive to PC and offers a fast solution for players who want to bypass inventory weight restrictions.
Starfield has console commands on PC, which you can use to spawn items, give yourself superpowers, and auto-complete quests. These console commands can also change your max encumbrance weight, which makes the game far less obnoxious if you’re an outpost builder or resource hoarder.
To change your encumbrance, hit the ’ button on your keyboard to pull the console command menu up. (It’s the key that also has the tilde on it, below the Esc key.) Then type this exactly (you can copy/paste the following command for ease, sans bullet point):
- player.setav carryweight 25000
Once in, hit enter and open your menu. You should see that your carrying capacity is now 25,000 (plus any bonus capacity you have from skills or gear). If you want that number to be higher – say 100,000 or even 1,000,000 – you can change the 25,000 value on the end of the command.
How can I set up an automated storage system for unlimited resources in Starfield
Setting Up an Automated Unlimited Storage System in Starfield
Automated storage systems in Starfield allow you to seamlessly collect, sort, and access massive quantities of resources without manual micromanagement. Here’s how you can set up such a system for virtually unlimited storage:
1. Establish an Outpost with Storage Infrastructure
-
Build your outpost on a planet rich in the resources you want to automate.
-
Enter Build Mode and construct a Transfer Container-this will serve as the main hub for dropping off and sorting resources.
2. Set Up Extractors and Power
-
Place Extractors specific to the resources you want to gather (solid, liquid, or gas).
-
Connect each Extractor to a power source (solar panel, wind turbine, etc.).
3. Link Extractors to Storage Containers
-
Use the “Create Output Link” function to connect each Extractor to the appropriate storage container (solid, liquid, or gas).
-
For maximum efficiency, chain multiple containers together using output links-when one fills, the next will begin filling automatically.
4. Automate Resource Transfer
-
Place your Transfer Container close to your landing zone for quick access.
-
When you arrive, use the “Store All Resources” function to instantly dump your inventory and ship cargo into the system.
-
The Transfer Container will automatically sort and distribute resources to the correct storage containers.
5. Expand for Unlimited Storage
-
There’s no hard cap on the number of storage containers you can build at your outpost. As your needs grow, simply add more containers and link them into your system for virtually unlimited capacity.
-
All resources stored this way are accessible for crafting, research, and building at the outpost.
6. Optional: Use Mods for Global Unlimited Storage
-
On PC, mods like SKK Universal Stash can connect all workbenches and outposts to a shared, unlimited storage container, accessible from anywhere in the game. This is a more advanced option for those comfortable with modding.
“You can land at your outposts, quickly drop all your resources from your inventory and your ship’s cargo into a single container to get auto-sorted… All the resources stored through this system will be made automatically available for any building, crafting, or research you do at that facility… You’ll essentially be able to build an unlimited amount of storage”.
Summary Table
| Step | Action |
|---|---|
| Outpost Setup | Build Transfer Container & Storage Containers |
| Resource Extraction | Place and power Extractors |
| Automation | Link Extractors to Containers via Output Links |
| Expansion | Add more containers for unlimited storage |
| Mod Option (PC) | Install SKK Universal Stash for global access |
This system will keep your inventory light and your crafting options limitless, letting you focus on exploration and adventure.
How do I connect multiple outposts for seamless unlimited storage in Starfield
How to Connect Multiple Outposts for Seamless Unlimited Storage in Starfield
To create a seamless, automated storage network across multiple outposts in Starfield, follow these steps:
1. Build Cargo Links at Each Outpost
-
Construct a Cargo Link module at each outpost you want to connect. This is essential for inter-outpost resource transfer.
2. Connect Cargo Links Between Outposts
-
Exit Outpost building mode after constructing the Cargo Links.
-
Interact with the Cargo Link terminal to establish a connection between your outposts. This will allow resources to move automatically from one outpost to another.
3. Set Up Storage Containers and Output Links
-
At each outpost, set up storage containers (solids, liquids, gases, or warehouses) and link them together using output links.
-
Chain storage containers by linking the output of one to the input of the next, maximizing your storage capacity.
-
Ensure that extractors feed into the first storage container in the chain, and the final container’s output is linked to the Cargo Link for transfer.
4. Automate Resource Flow
-
Resources extracted at one outpost will be stored in containers, then automatically transferred via Cargo Link to the connected outpost’s storage.
-
At the receiving outpost, set up storage containers to accept incoming resources from the Cargo Link, and link them for further use or storage.
5. Scale for Unlimited Storage
-
There is no hard limit to the number of storage containers you can build; keep adding containers and linking them to expand your capacity.
-
You can split extractor outputs to supply both bulk storage and manufacturing lines as needed.
“Connect the Cargo Link. When you have constructed a Cargo Link at two outposts and are ready to link them together and begin transferring materials, ensure you’ve exited the Outpost buildingmode.
Summary Table
| Step | Action |
|---|---|
| Build Cargo Links | Construct at each outpost |
| Connect Outposts | Use Cargo Link terminal to link outposts |
| Set Up Storage | Chain storage containers with output links |
| Automate Transfers | Link storage outputs to Cargo Links for automatic resource movement |
| Expand Capacity | Add more containers and links for unlimited storage |
By following these steps, you can create a seamless, automated resource network between your outposts, enabling virtually unlimited storage and efficient resource management across the Settled Systems.