Hidden among Honkai: Star Rail’s celestial trails, the Amphoreus nymphs hide in plain sight-if you know where to look.
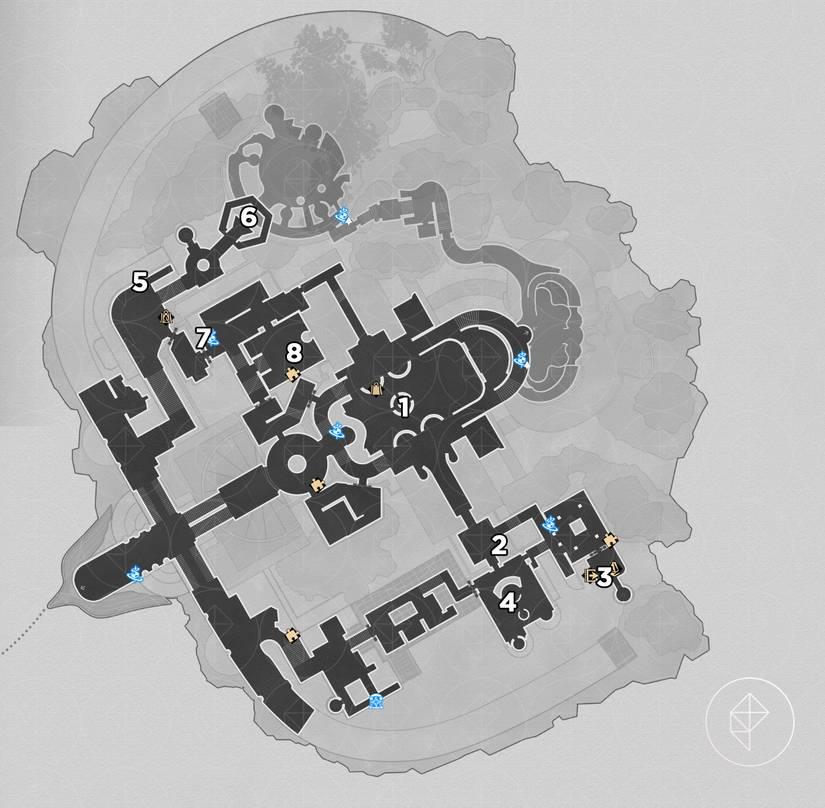
‘Eternal Holy City’ Okhema nymph locations
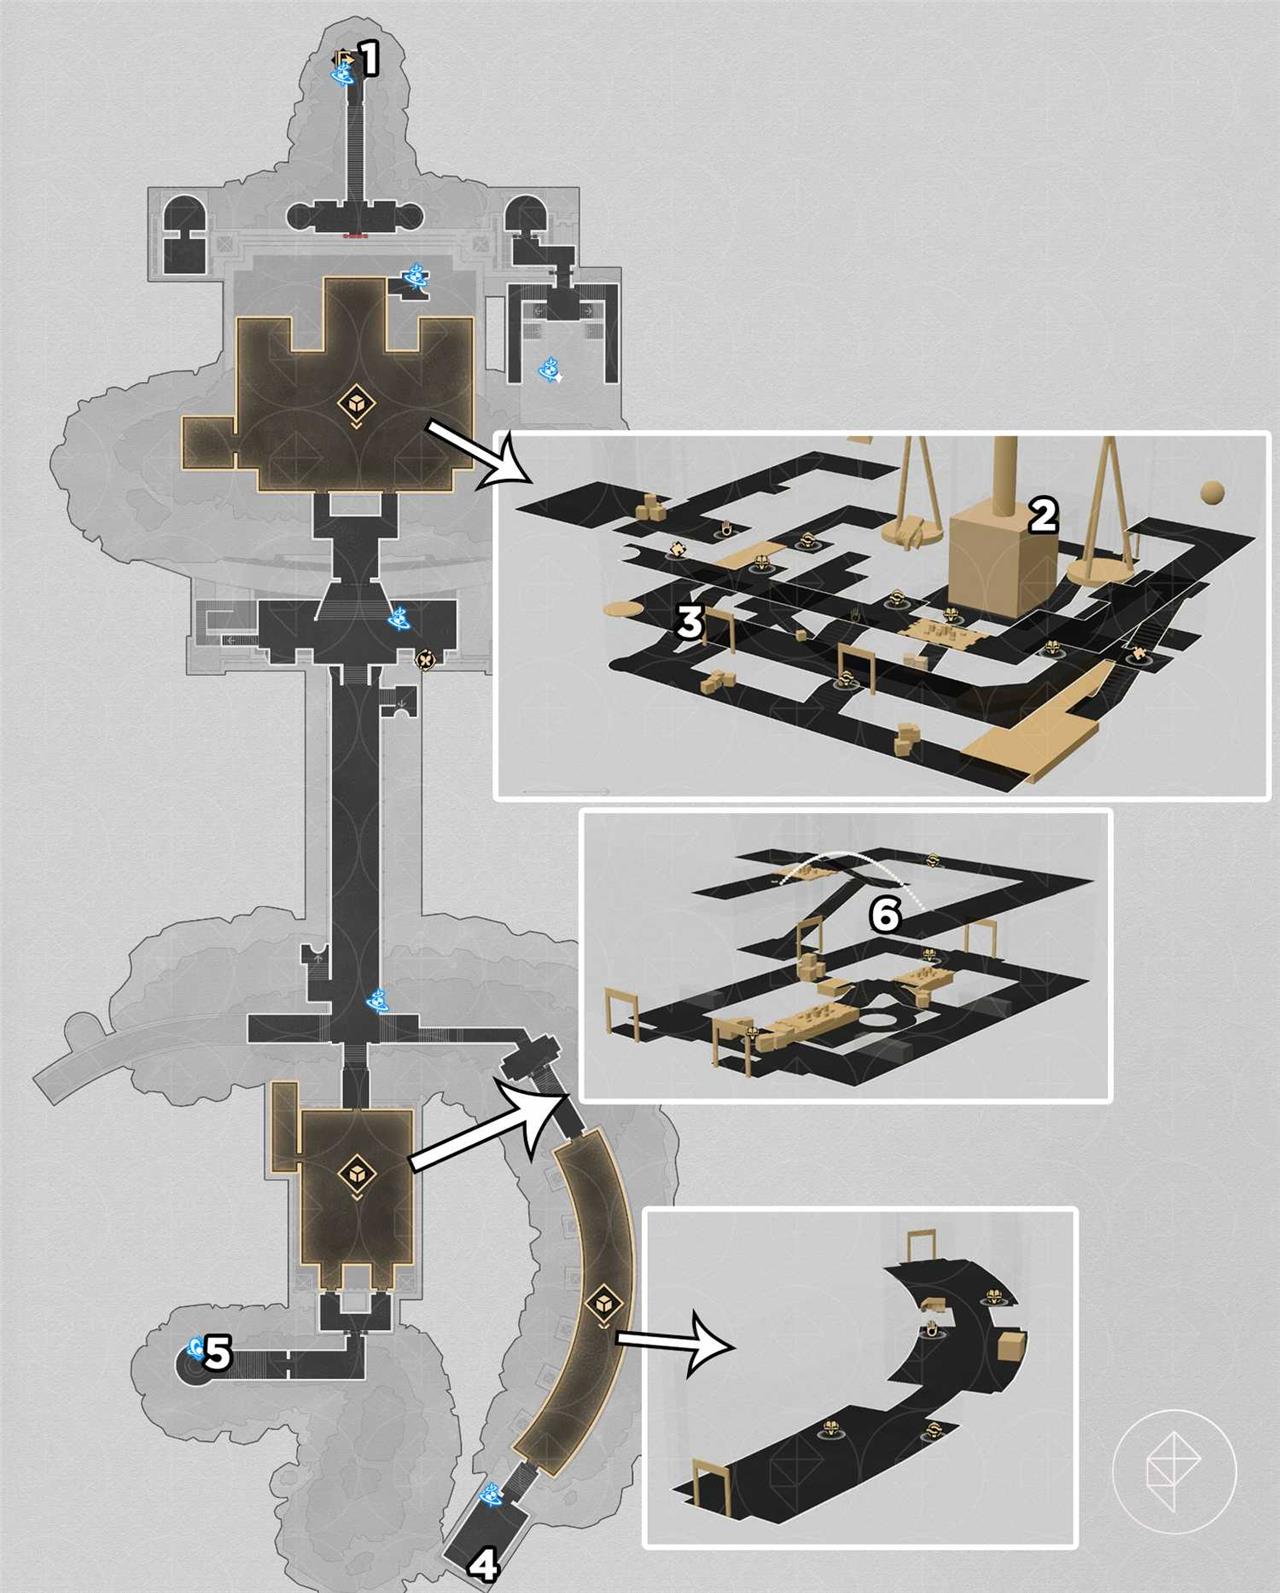
In the Eternal Holy City, Okhema nymph locations span hidden courtyards and sunlit alcoves, often tucked behind water features or within mossy alcoves near sacred statues, each offering a brief encounter before vanishing into the marble maze.
There are 20 nymphs total in Okhema, and they look like butterflies. Once you find all 20, you’ll get a text from Aglaea to return to the “Garmentmaker.” You’ll get Stellar Jade and Celestial Ambrosia for finding them.
After collecting all 20, the “Garmentmaker” will move near the elevator, pointing you towards a puzzle that reward you with a precious chest and the achievement “Chirping Secret: Golden Journey.” You’ll need to use the fountains in Okhema to solve the nymph’s secret message.
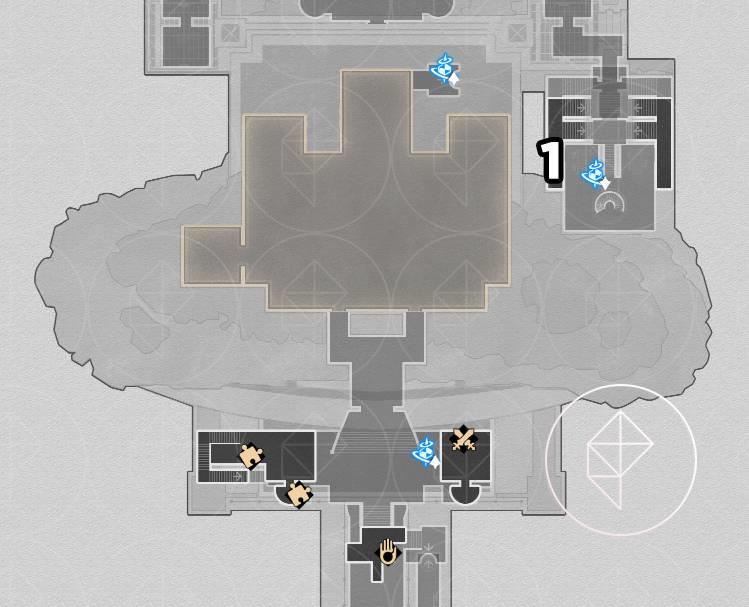
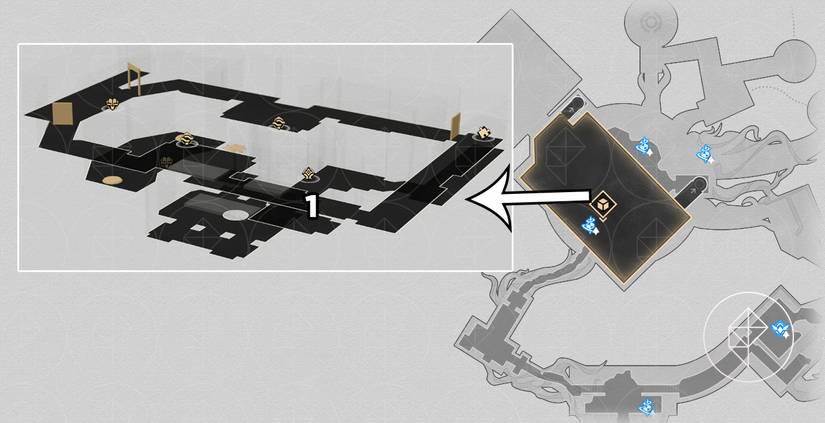
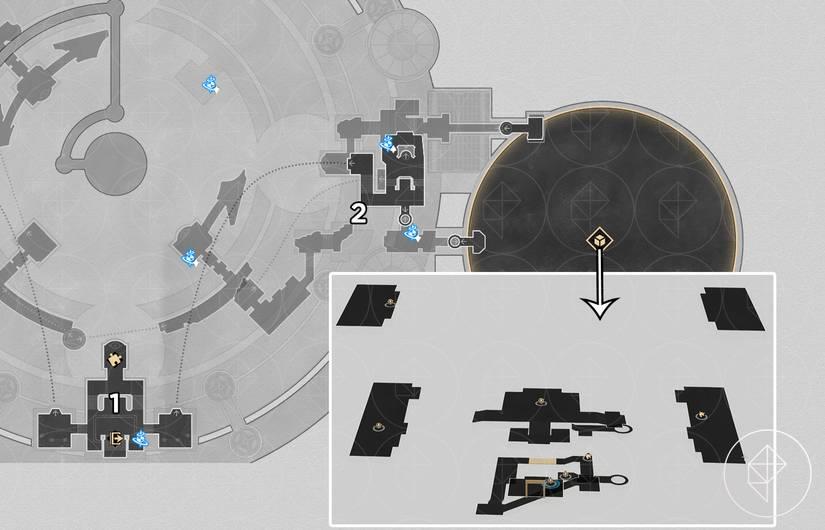
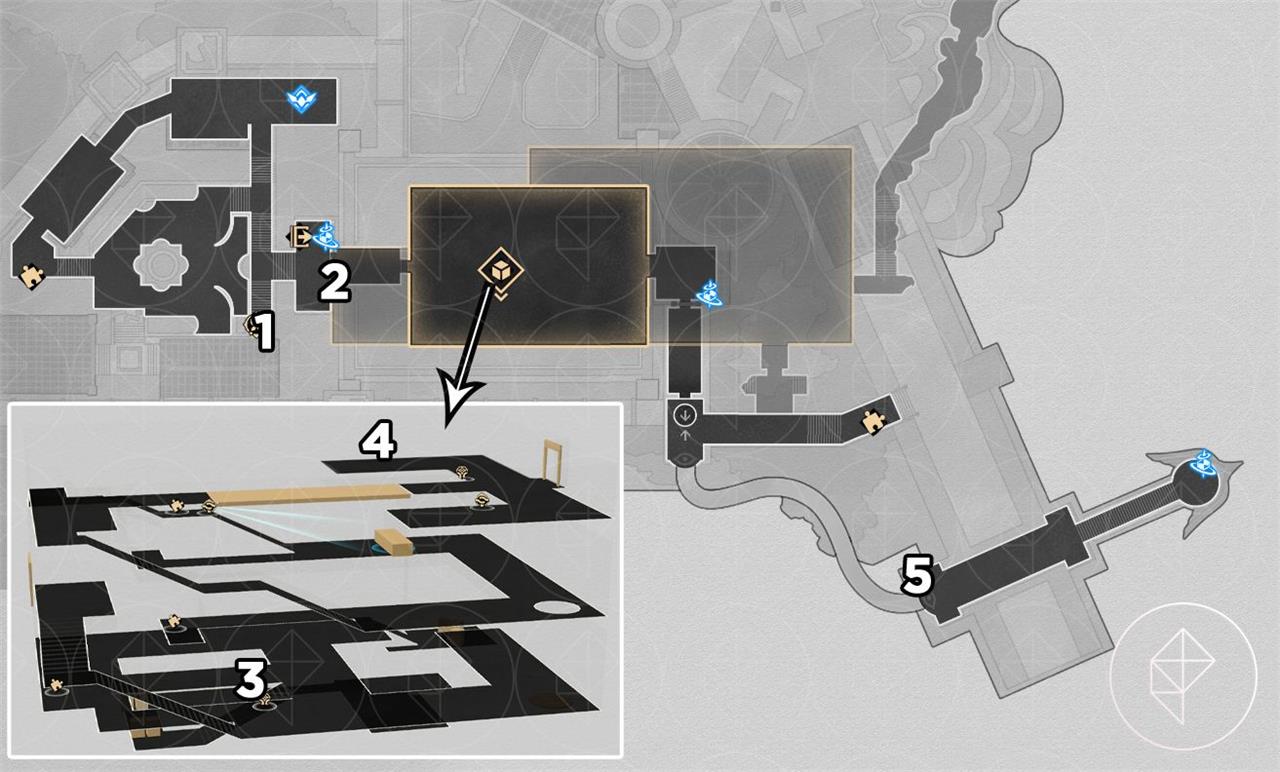
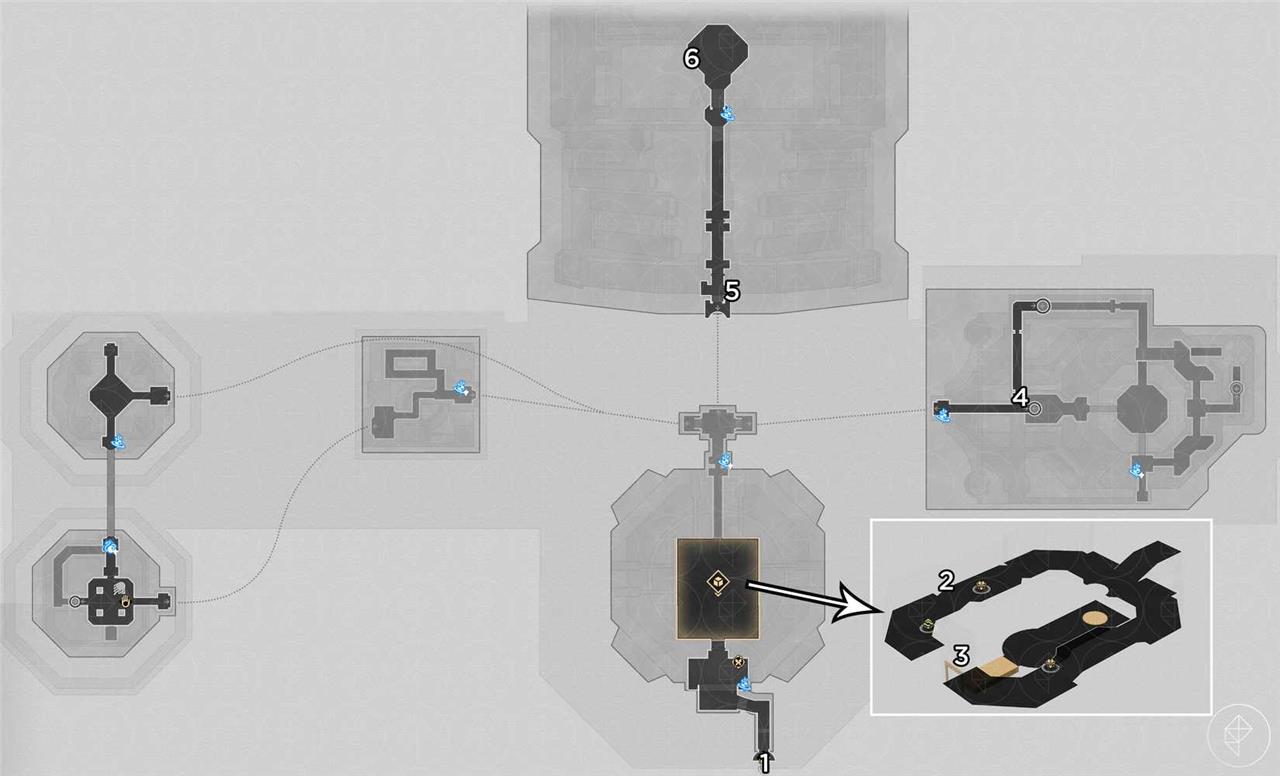
‘Eternal Holy City’ Okhema, Marmoreal Palace F2
- On the “Garmentmaker.”
- On some flowery bushes.
- Blending in to the butterfly mural on the wall.
- At the top of the ramp on the curved structure above.
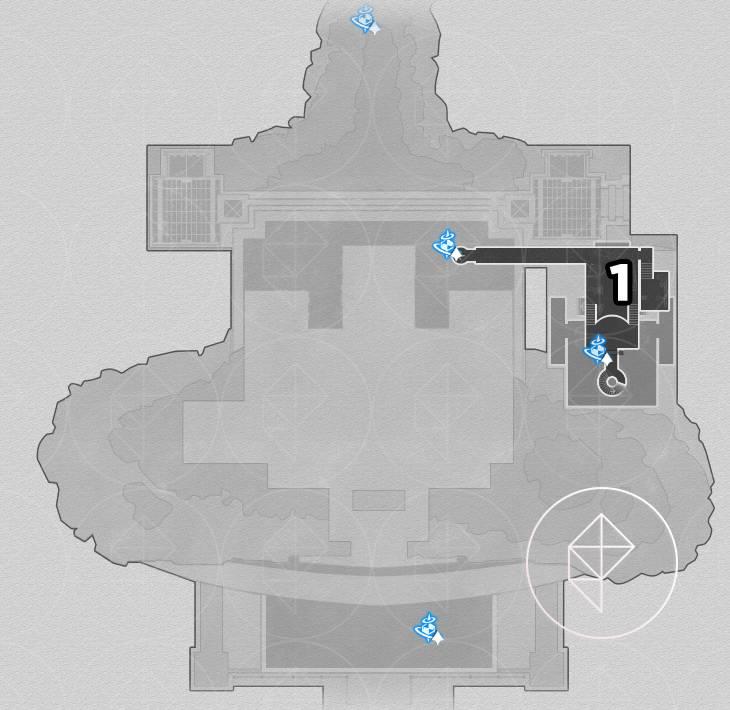
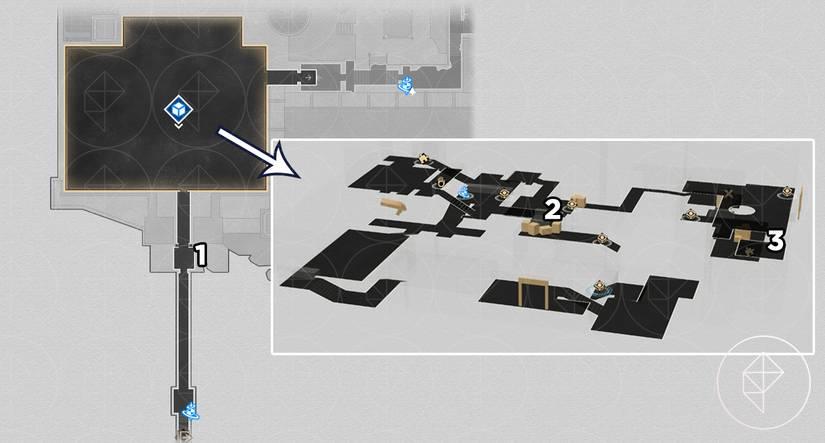
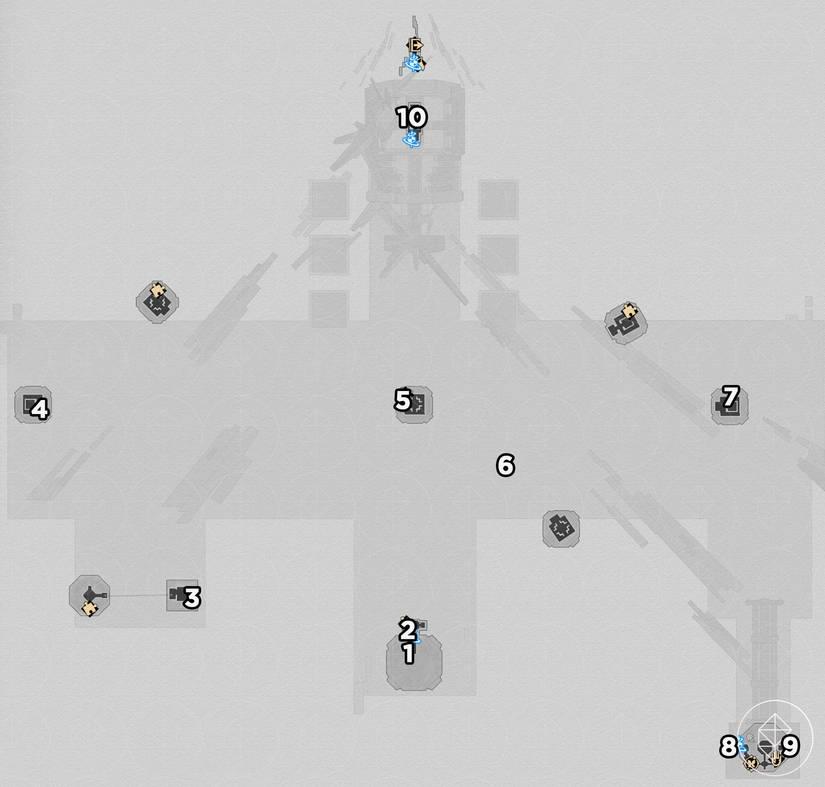
‘Eternal Holy City’ Okhema, Marmoreal Palace F1
- Laying on the center water fountain.
- Sitting upright on a chair.
- Sleeping in the towels by your bath.
- On the edge of the stage.
- On the potted plant on the table. It’ll fly away to another pot and you’ll need to catch it a few times.
- On the walls of the lift. You may need to take it up and down a few times to grab it, but the final spot will be at the top of the lift.
- Hiding among the stuffed seals on the shelf.
- Flying above the pool.
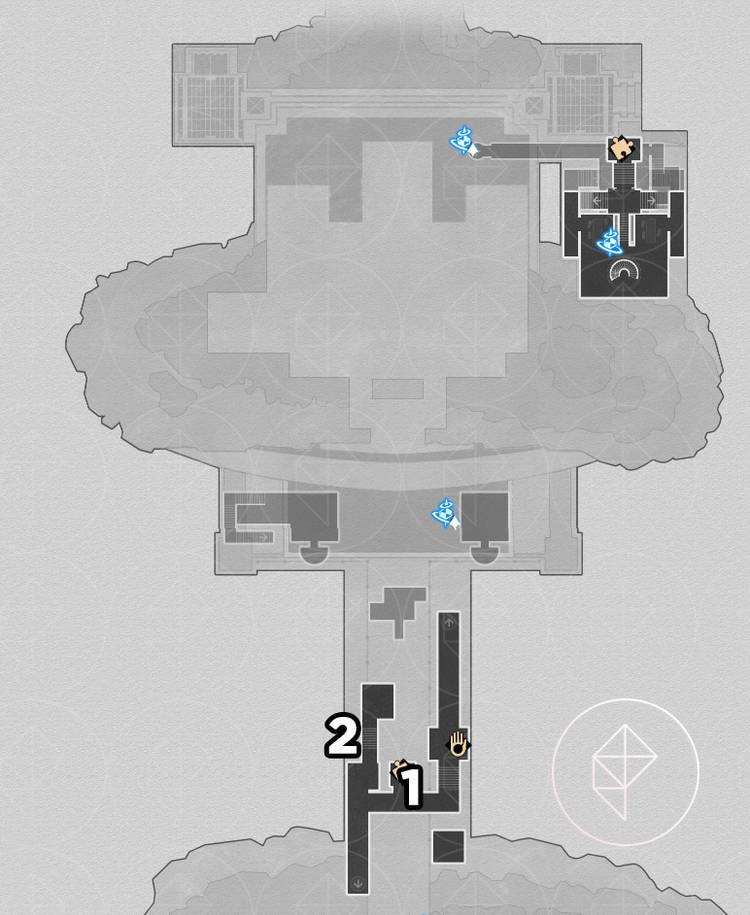
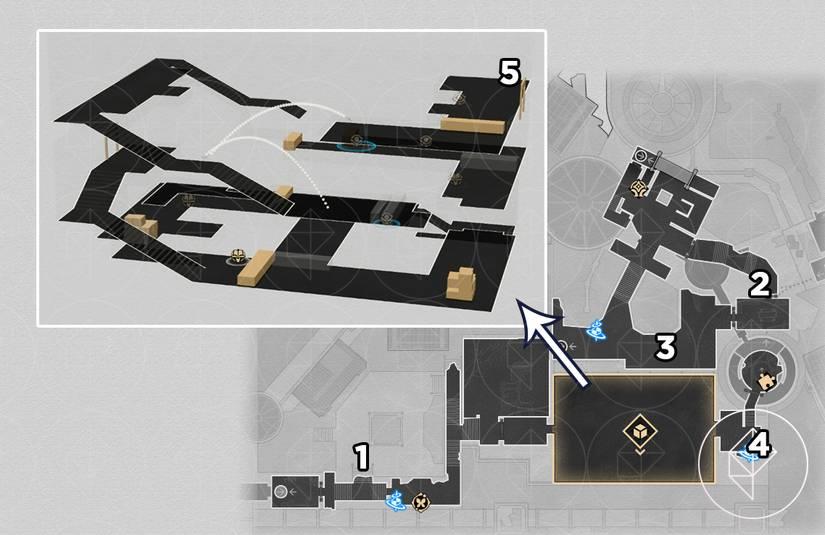
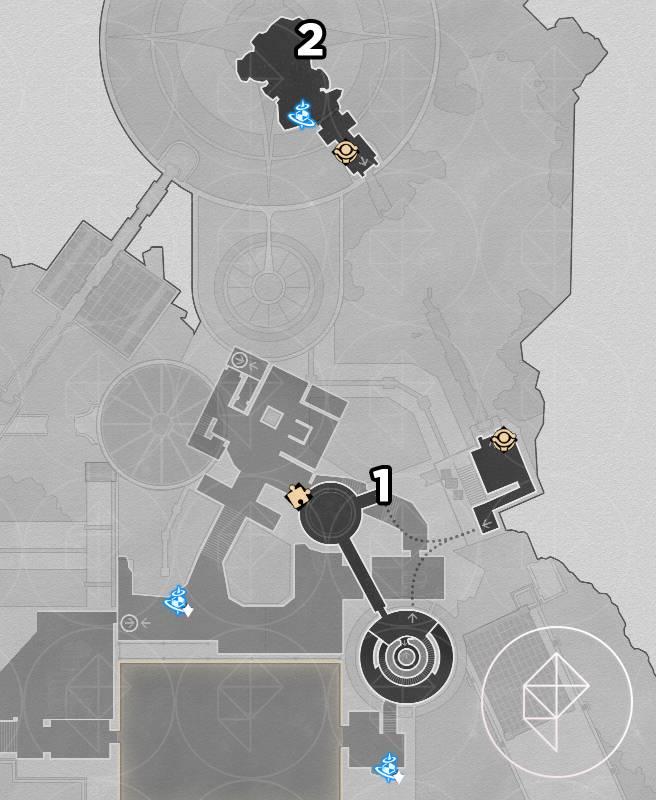
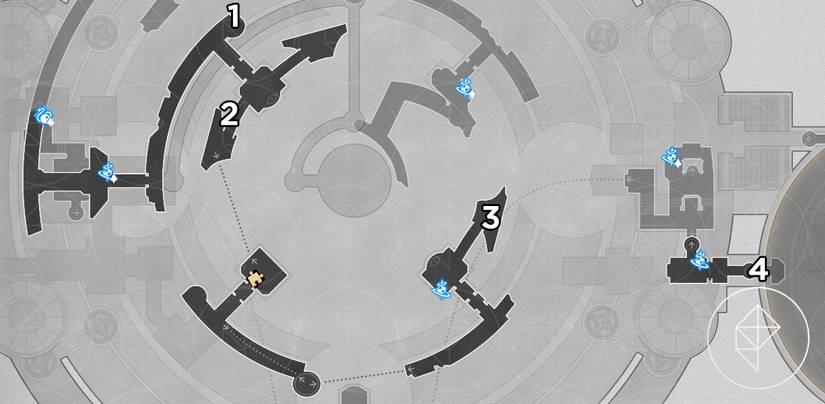
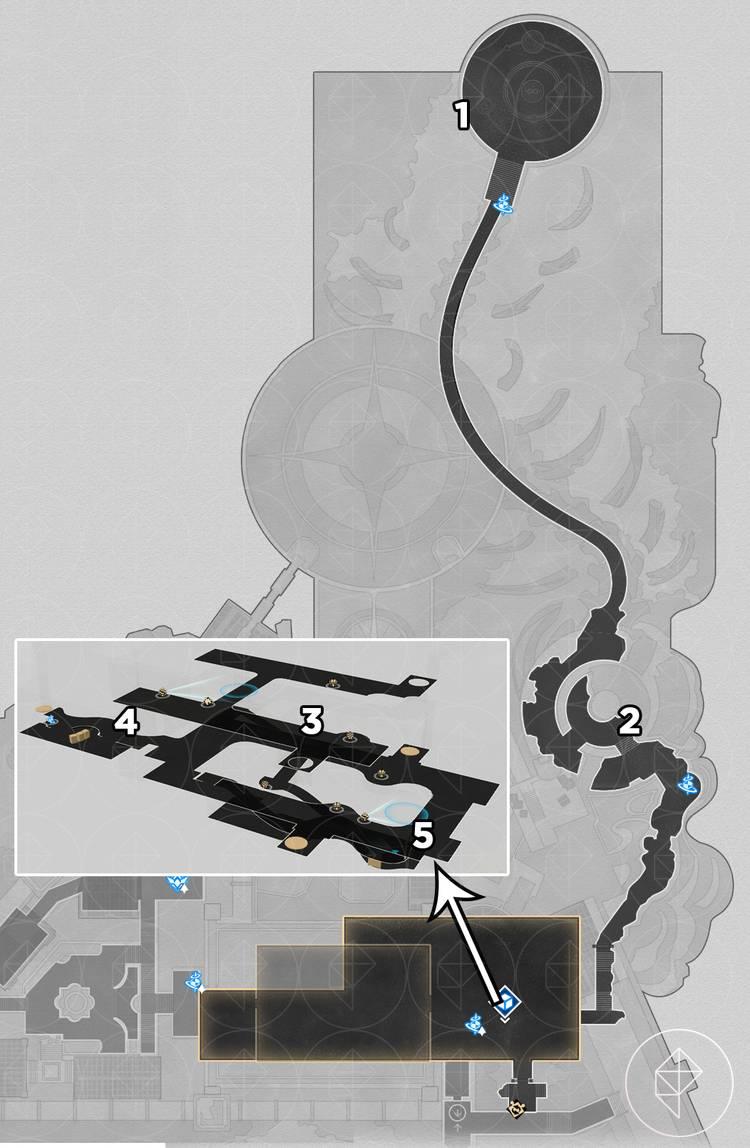
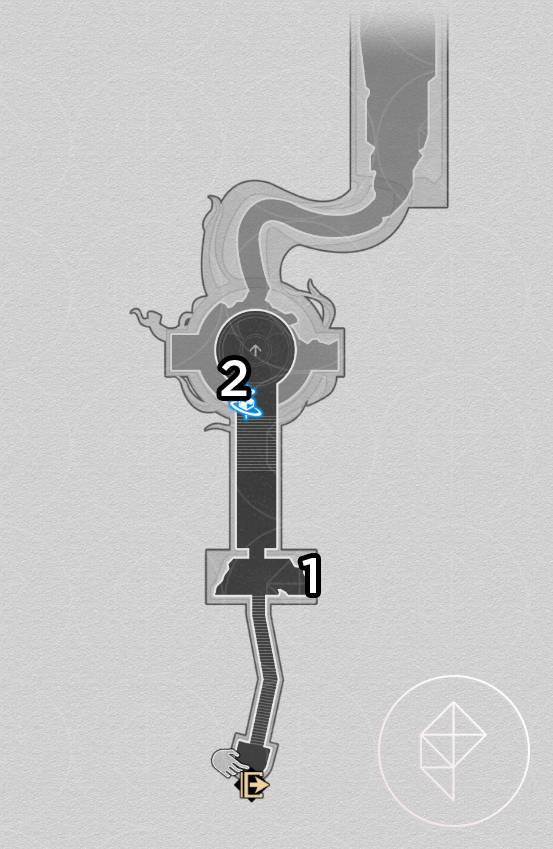
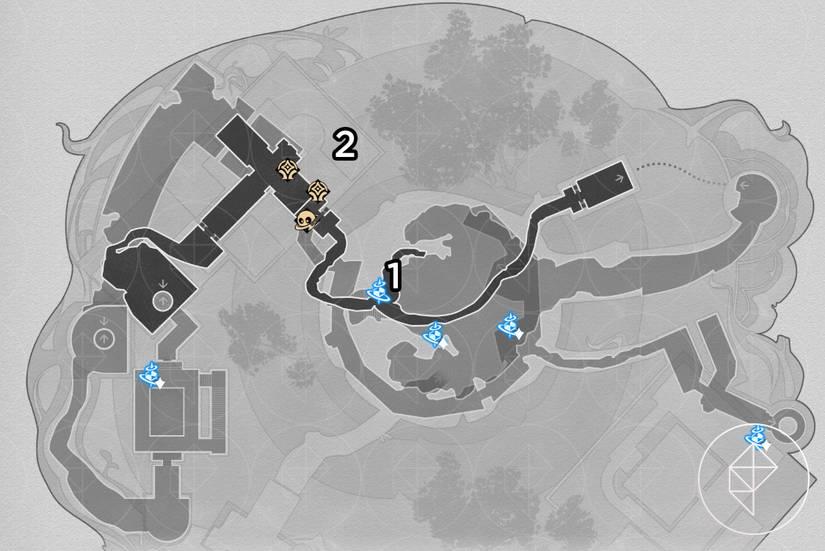
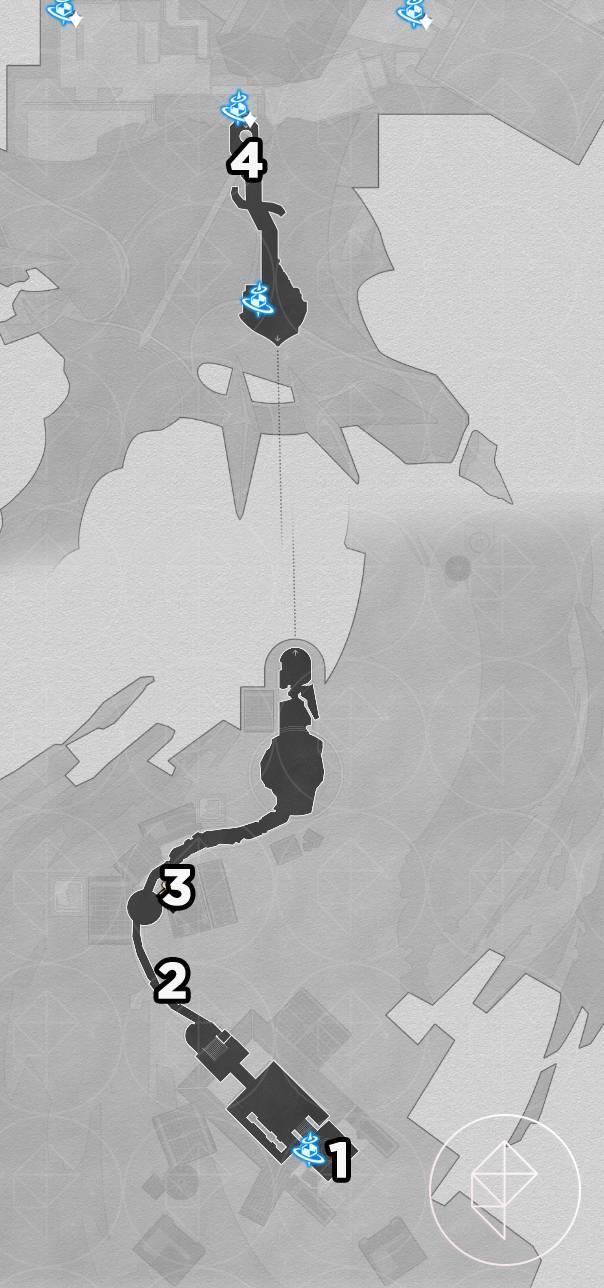
‘Eternal Holy City’ Okhema, Marmoreal Market F2
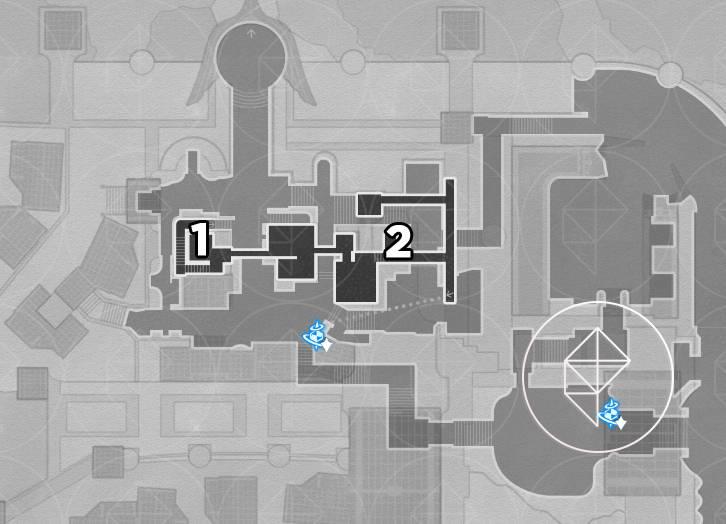
- In the prayer fountain.
- In a basket on the edge of the building.
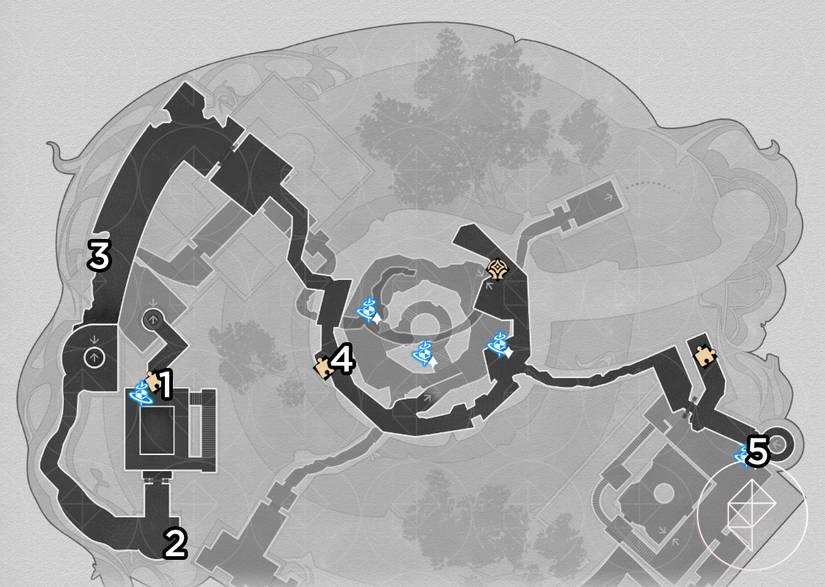
‘Eternal Holy City’ Okhema, Marmoreal Market F1
- On the golden wall structure.
- On the forge inside the smithy.
- High up on the pillar.
- Inside the dinosaur’s feeder.
- On the guard’s head.
- On the bell at the Droma’s station.
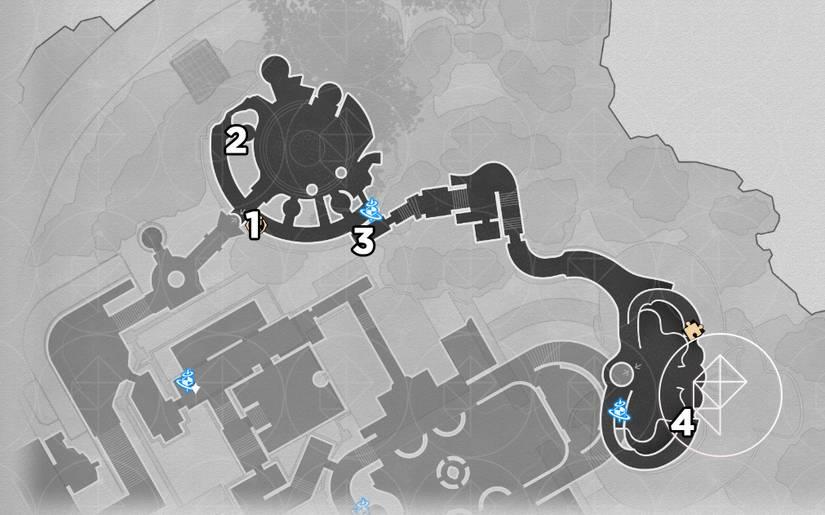
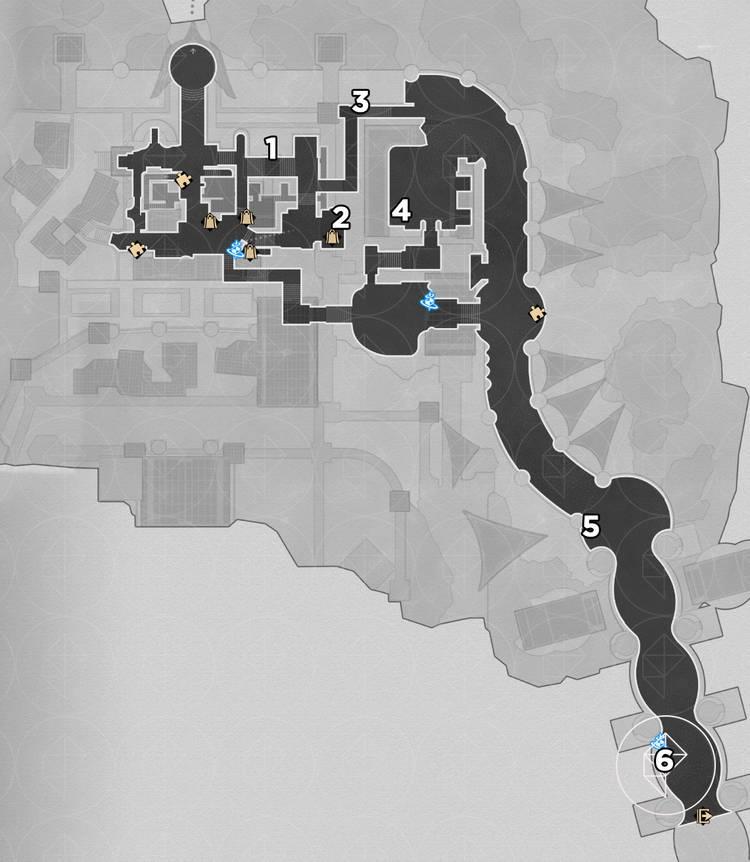
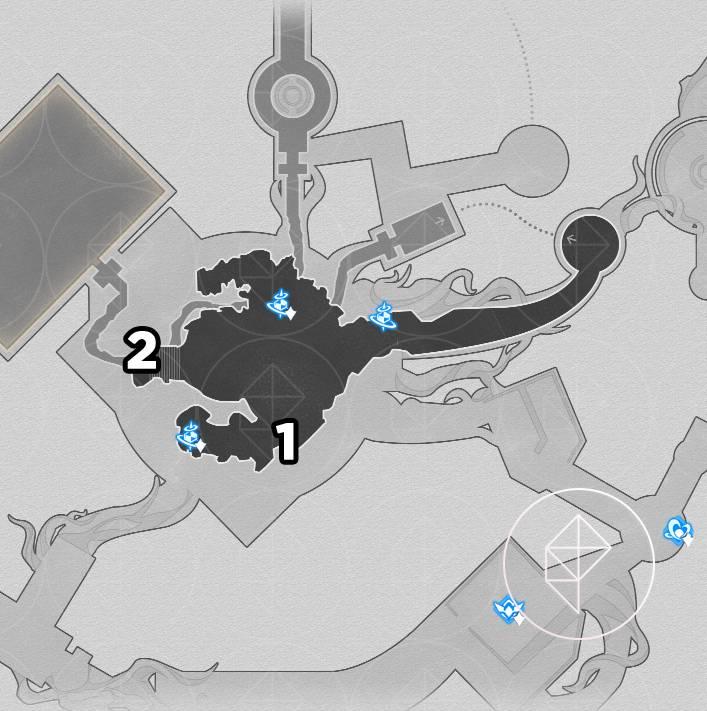
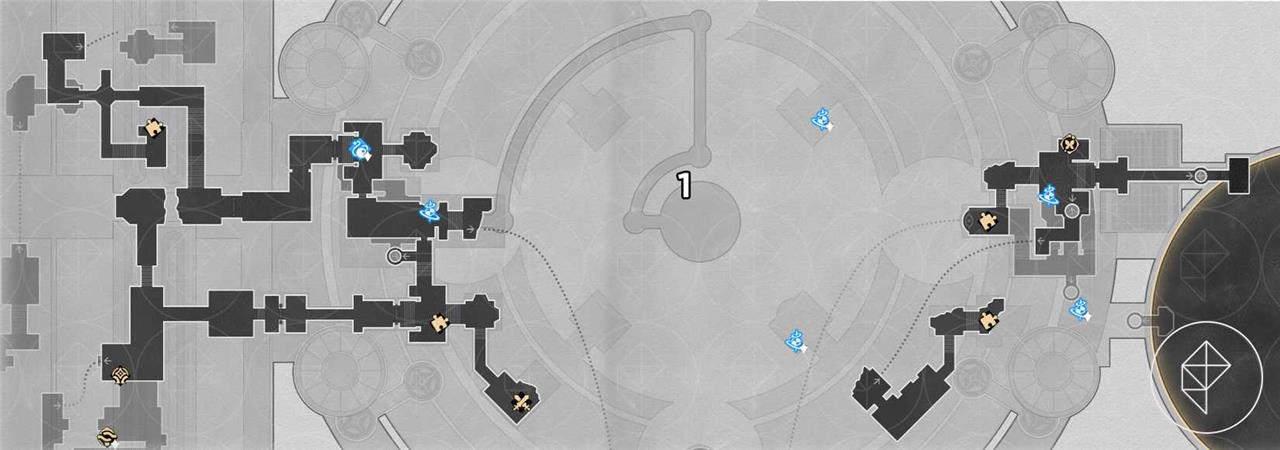
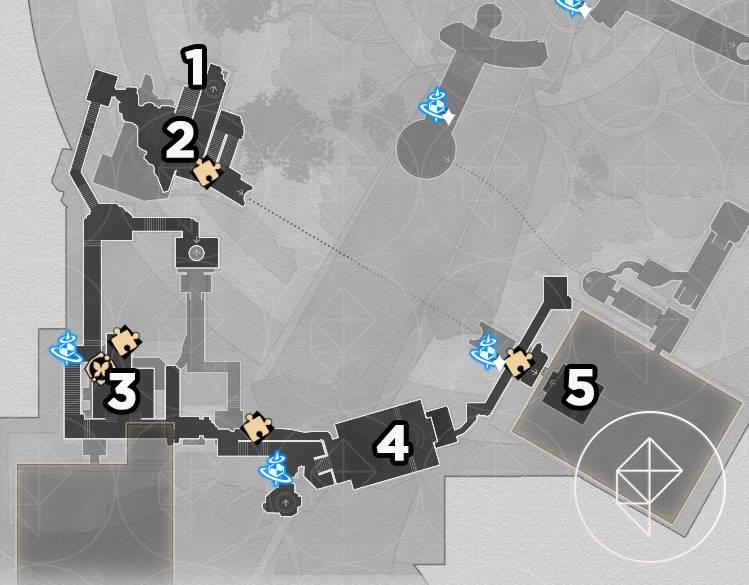
‘Bloodbathed Battlefront’ Castrum Kremnos nymph locations
In Bloodbathed Battlefront’s Castrum Kremnos, 20 Amphoreus nymphs hide across B1, F1, F2, Excavation Site, and Soul-Forging Zone. Players spot them near space anchors like Path of Conquest and Hall of Strife, on walls, stairs, bridges, and structures, switching between Dawn and Evernight cycles in special rooms. Return them to the Garmentmaker at Chisel Zone F1 for Stellar Jades and Celestial Ambrosia after collecting 10 or all 20.
There are 20 nymphs in the “Bloodbathed Battlefront” and they’re depicted as red-orange beetles. Once you find all 20, you’ll get a text from Aglaea. For your troubles, you’ll get the “Portentous Goldwoven: Bloodbathed Battlefront” quest item, Stellar Jades, and Celestial Ambrosia.
After collecting all 20 nymphs in this area, the aforementioned quest item will give you hints about getting the precious chest for this area. You’ll need to walk forward towards the center of the round 3D room on B1 at dawn. (It’s a little fiddly, so you may need to walk a bit or try backing up and walking in again.) If done correctly, a nymph will appear, asking you a question – to which you should answer “Four warriors,” to get the chest and the “Chirping Secret: Blemish of Light” achievement.
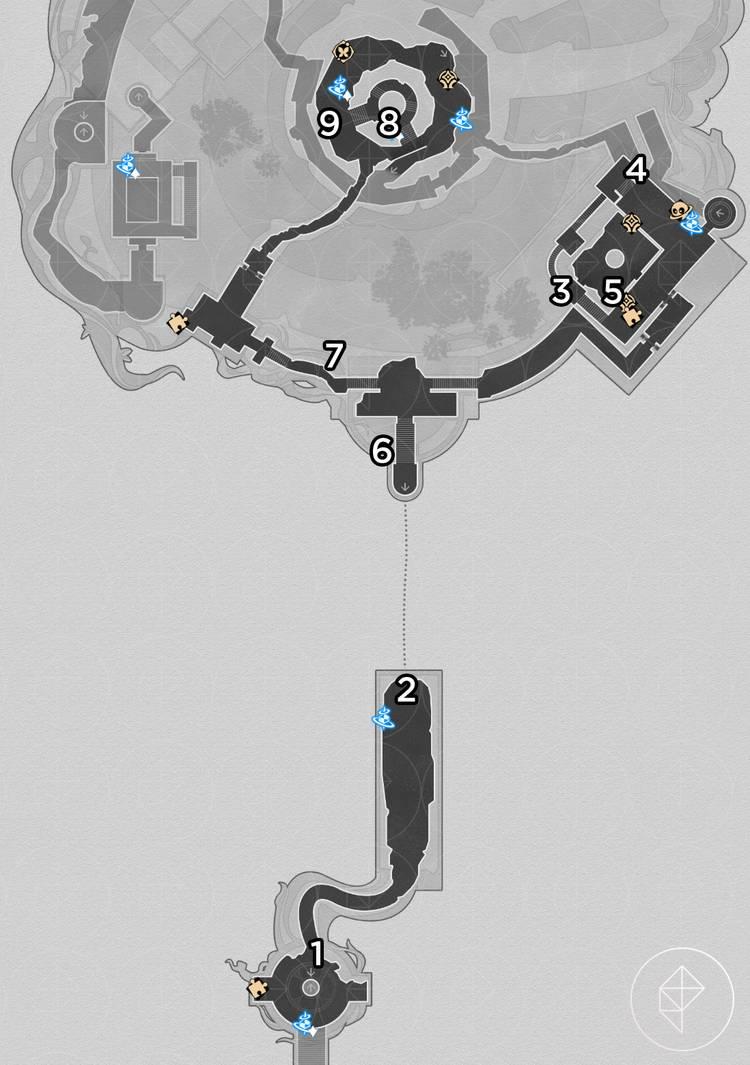
‘Bloodbathed Battlefront’ Castrum Kremnos F2
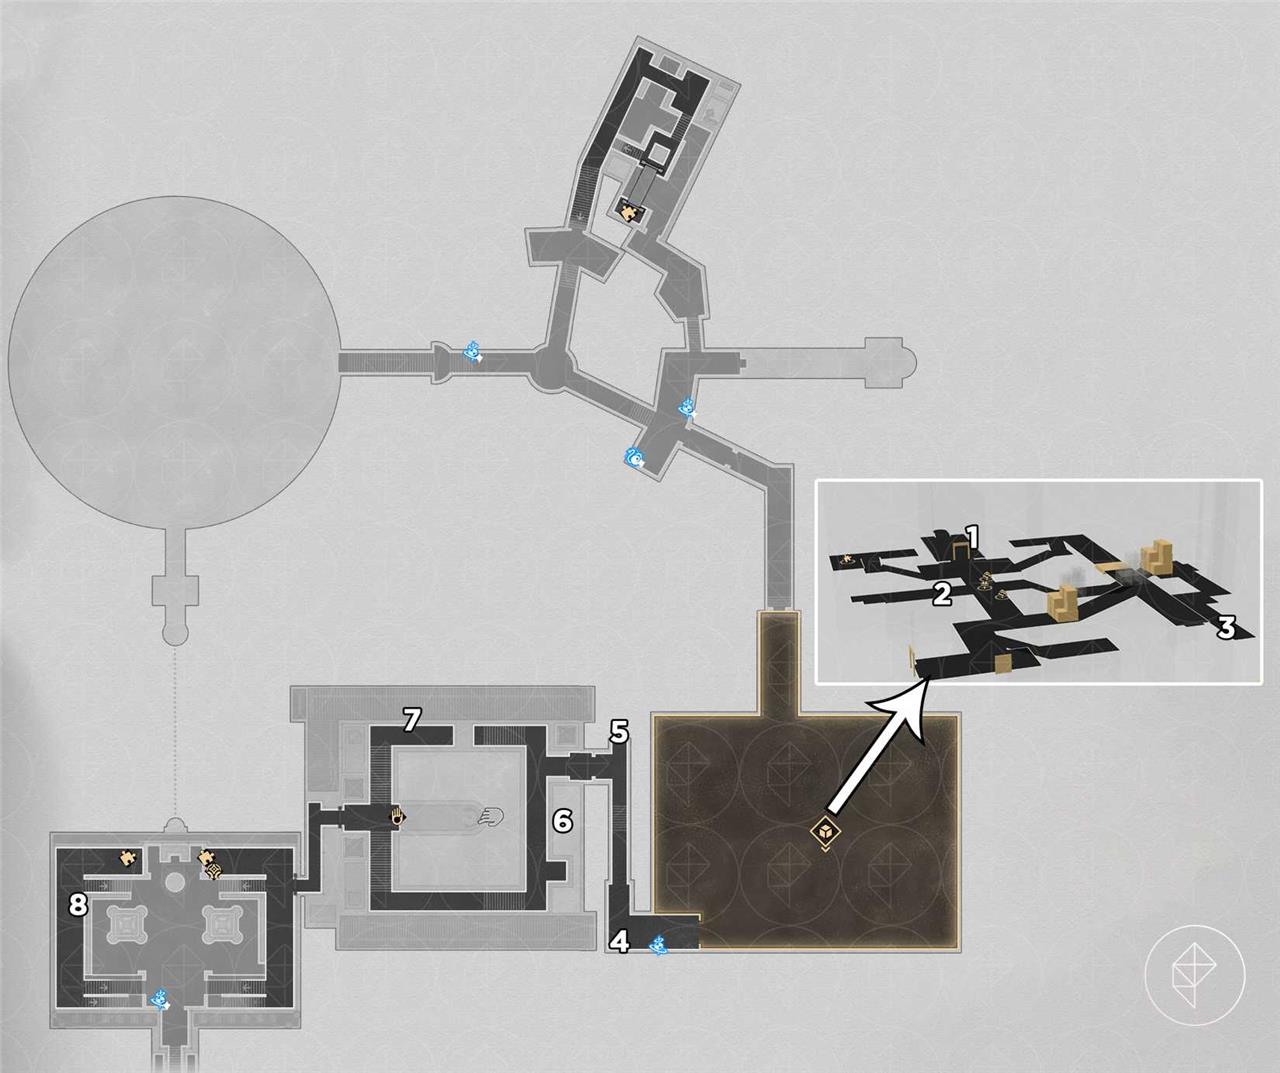
- On the wall in the room with the two enemies.
- On the edge of the walkway.
- On the edge of the walkway.
- On the wall decor.
- On the walls. We used a ranged character to hit the structures to reveal the critter.
- On top of the large sword structure in the area. Use the hand mechanism to grab it.
- On the ledge above the pathway.
- On the ground in front of the ball. We accidentally squashed it with the ball, which counted as collecting it, but we’re not sure if you have to squash it to collect it.
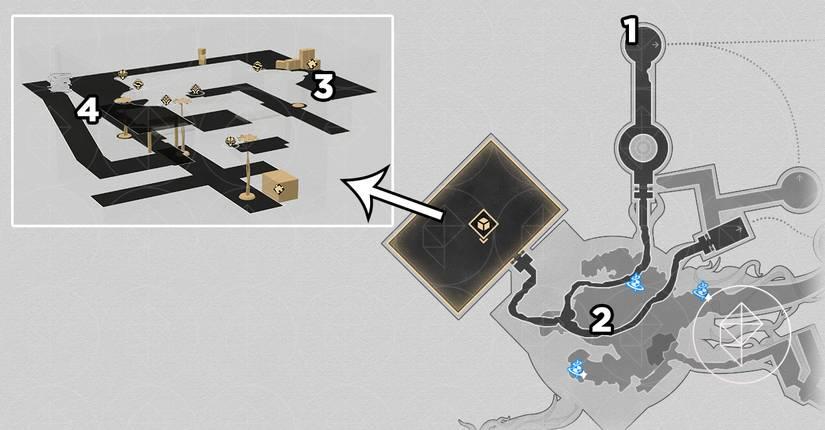
‘Bloodbathed Battlefront’ Castrum Kremnos F1
- At the entrance of the area behind the doorway to “Strife Ruins.”
- In the fire (ouch!).
- Rolling a ball up the side of the steps.
- On the edge of the ornamental structure.
- On the pile of blue cubes.
- On the edge of the platform.
- On the edge overlooking the area.
- By the boxes on the ground.
- High up on the wall. This one actually gets captured by a Spirithief.
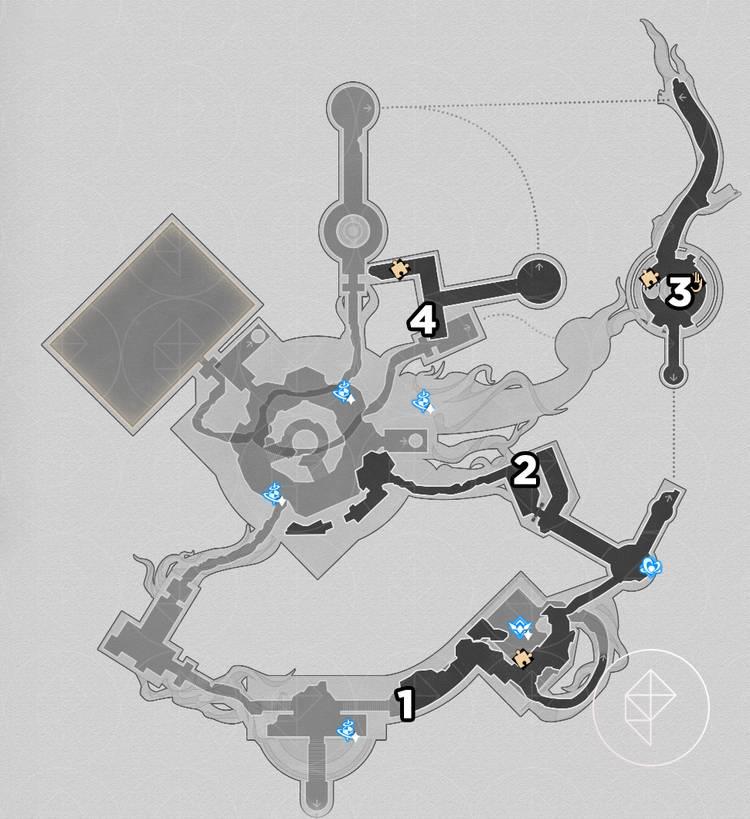
‘Bloodbathed Battlefront’ Castrum Kremnos B1
- On the curved structure above the path.
- Sitting on the sword of the giant statue. Use the floating hand mechanism to grab it.
- Standing next to the hidden passage machine.
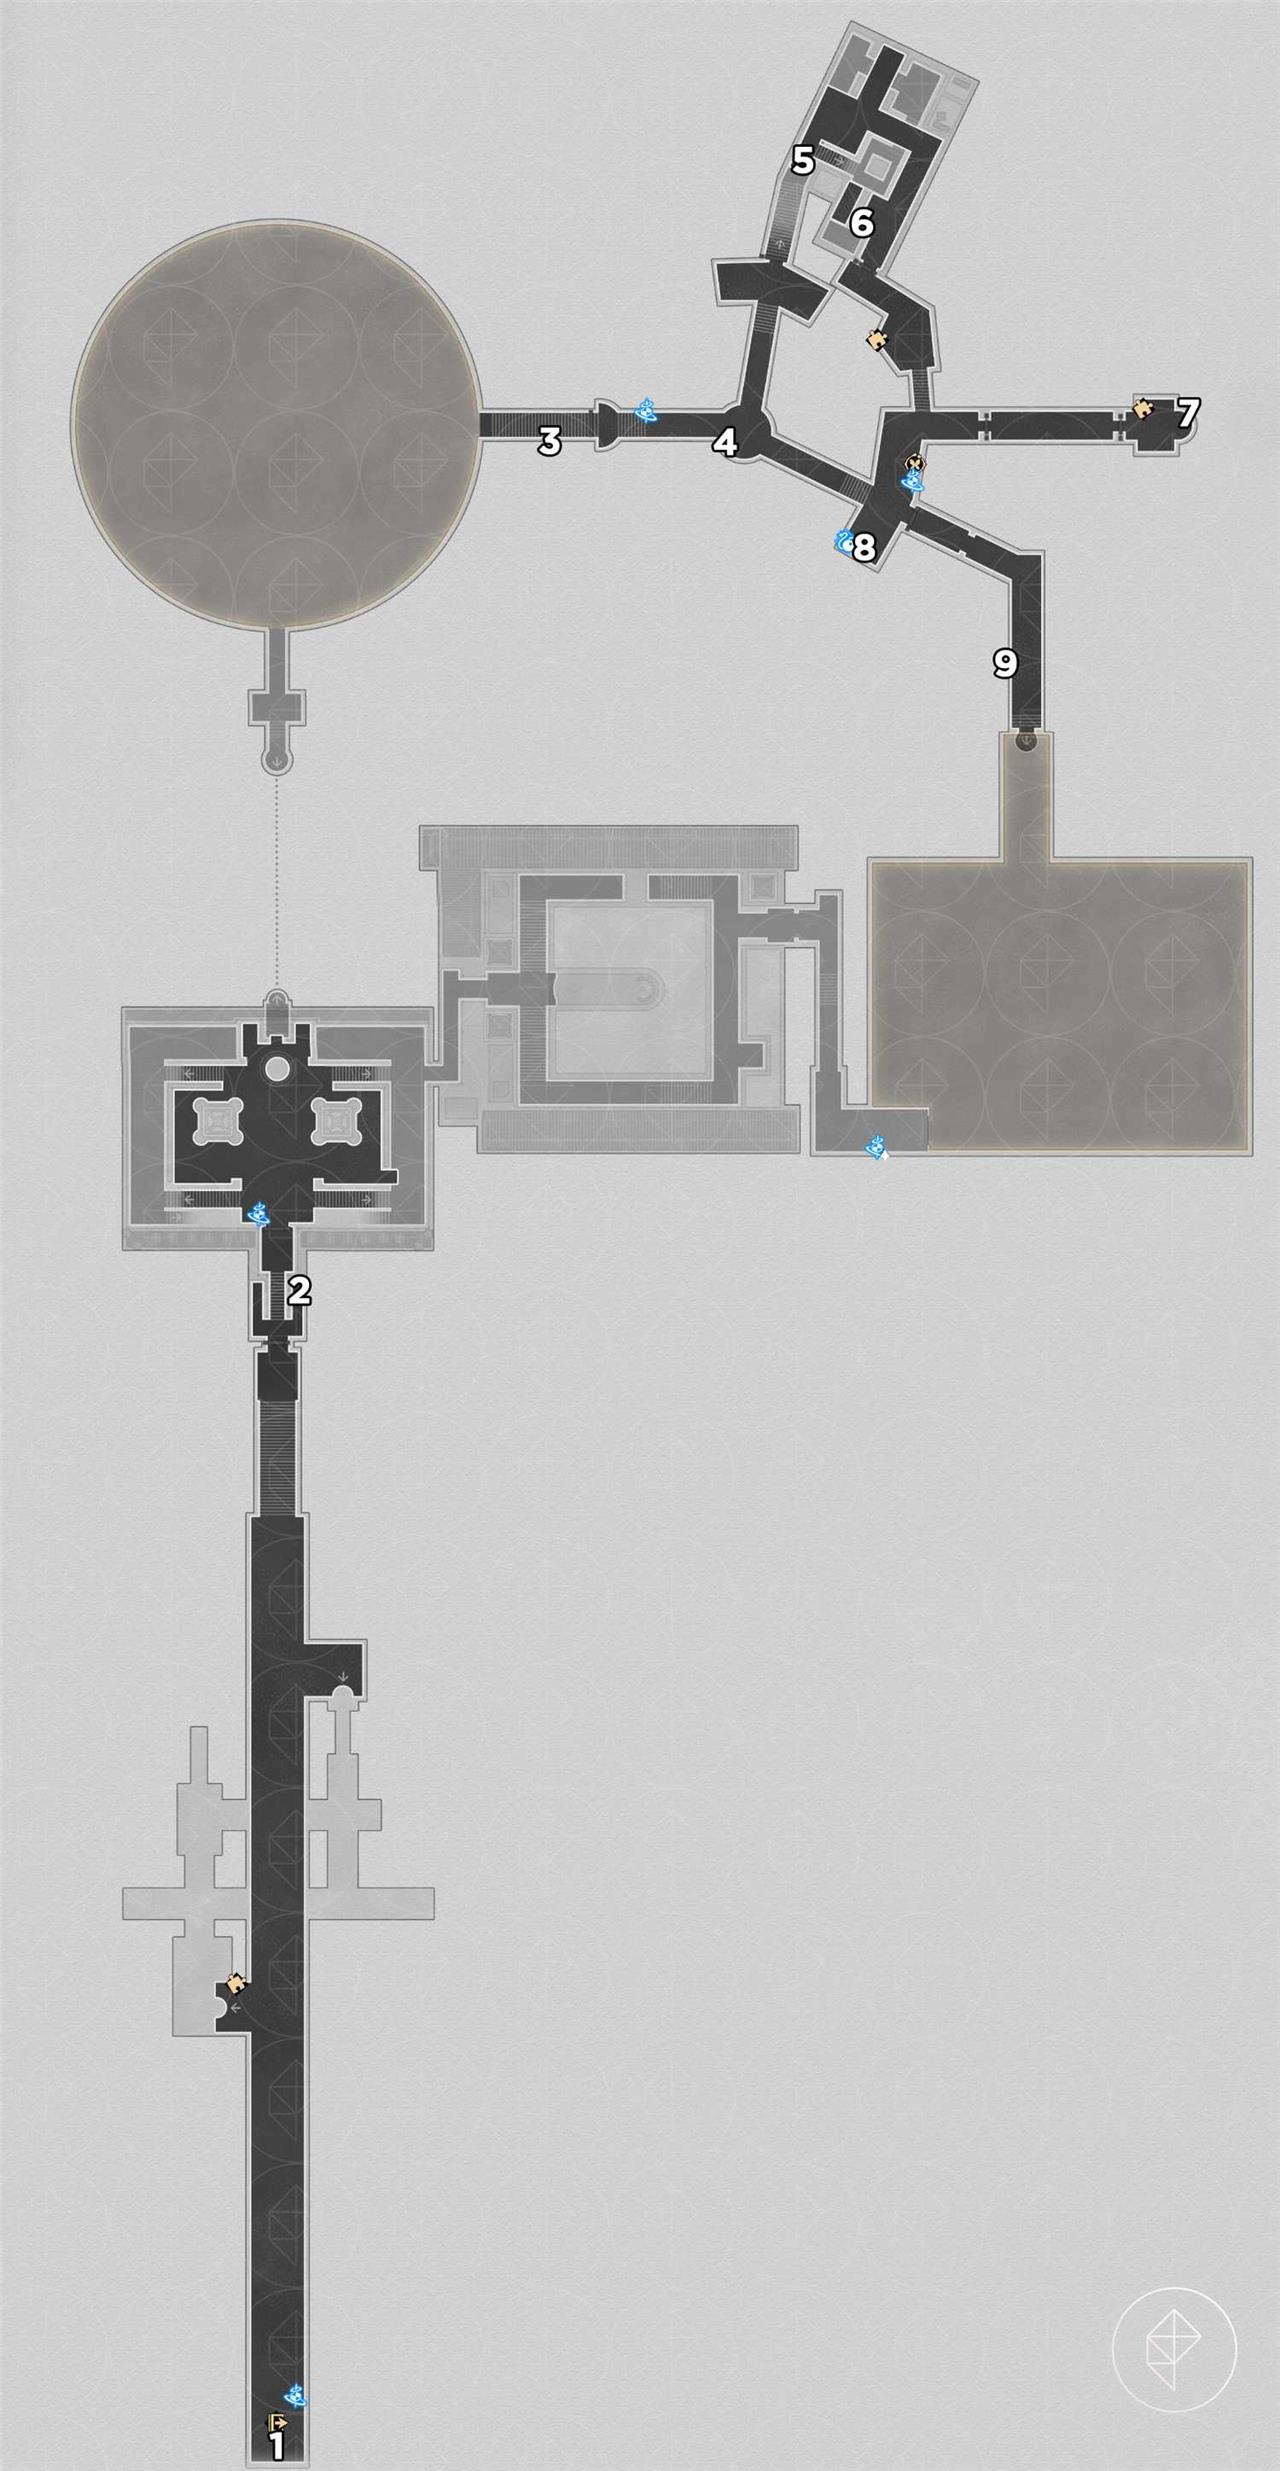
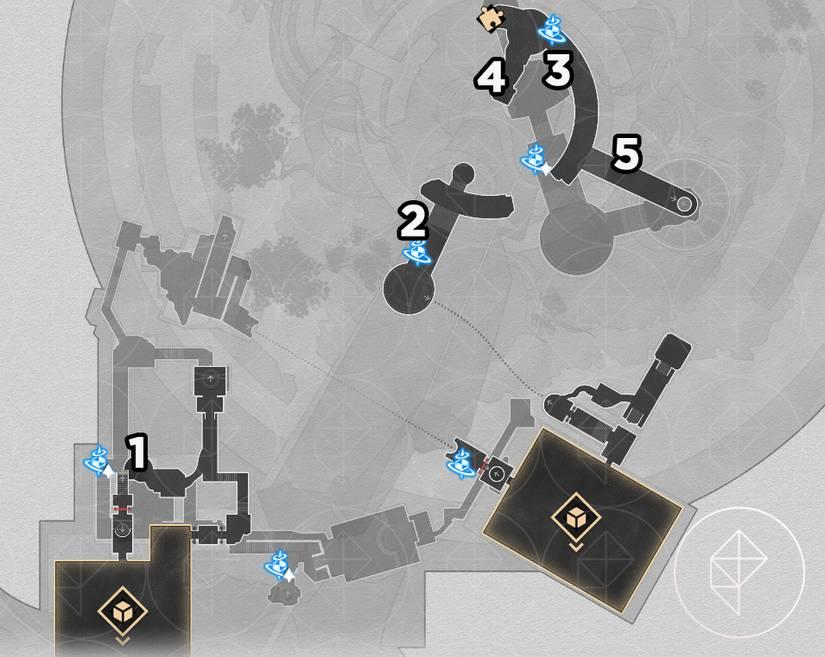
‘Strife Ruins’ Castrum Kremnos nymph locations
In Strife Ruins Castrum Kremnos, 20 blue Hercules beetle-shaped Amphoreus nymphs hide across areas like Soulchaser Pass, Great Hallway, Conquered Outlands, Old Quarry Ground, and Silent Chisel Ground. Players spot them on walls, under debris, railings, columns, braziers, and rafters, often requiring rewind mechanics, Hand of Zagreus flight, or puzzle clears such as Prophecy Tablets and dark tide corruption. Collect all at the Garmentmaker Outpost near Remnant Hall of Truce Space Anchor for 60 Stellar Jade and 200 Celestial Ambrosia.
There are 20 nymphs in the “Strife Ruins” and they appear as blue beetles. Once you find them, you’ll get Stellar Jade, the “Portentous Goldwoven: Strife Ruins” item, and Celestial Ambrosia.
Once you have all 20 nymphs, you can head to the Kremnos Arena (the northern part within the huge circle on F2), and walk forward into the arena. (Just like the Bloodbathed Battlefront instance, it may be fiddly, so you may need to try multiple times to walk in to the area.) If done correctly, a nymph will appear at the north of the map, asking you a question. Answer “13 flames” and you’ll get a precious chest and the achievement “Chirping Secret: Fleetfoot Paradox.”
‘Strife Ruins’ Castrum Kremnos F3
- On the wall.
‘Strife Ruins’ Castrum Kremnos F2
- In the pile of boxes.
- Attack the shields on the wall to get this nymph.
- On the railing.
- On the edge of the structure.
- On the lip of the bowl-like decor.
- On the mural.
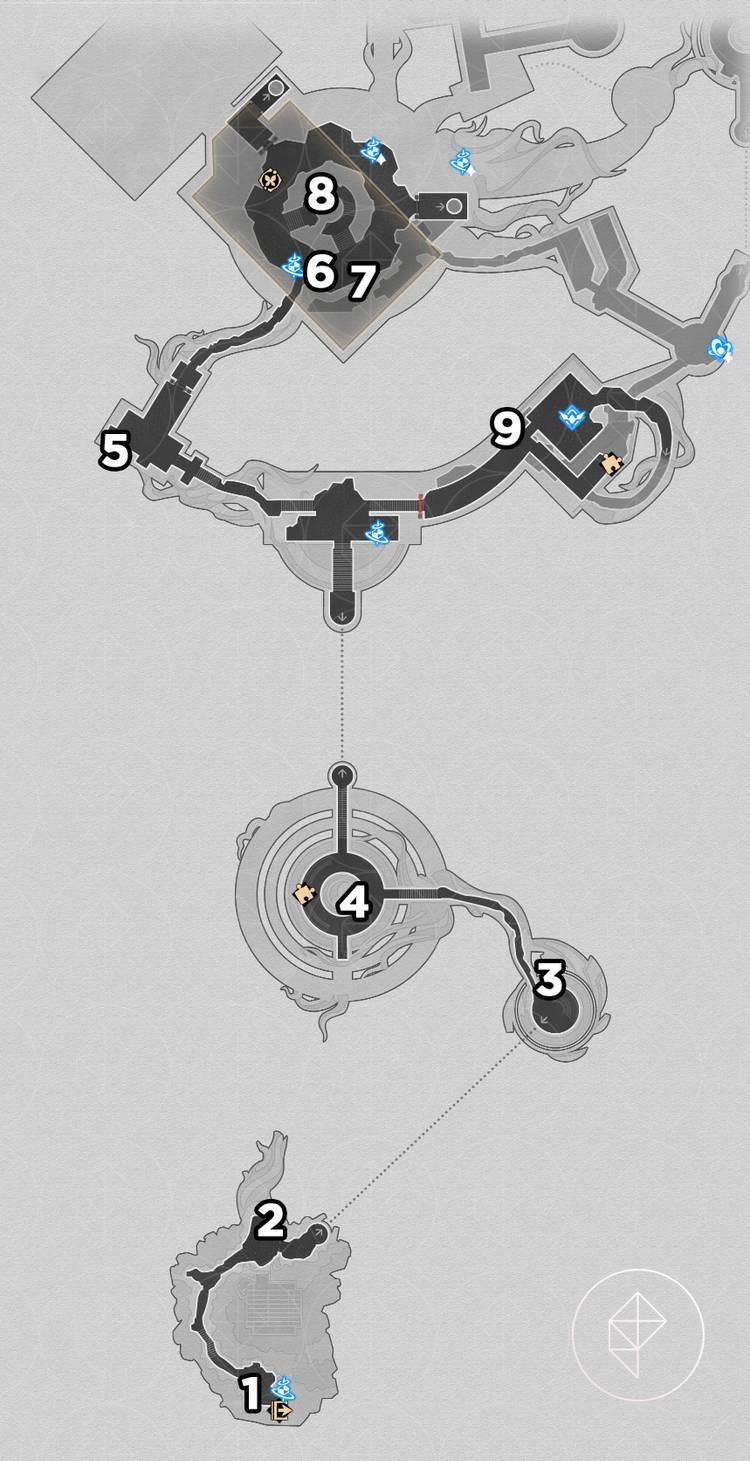
‘Strife Ruins’ Castrum Kremnos F1
- On the wall carving.
- Near the rubble.
- Overlooking the edge of the chain bridge.
- On the sword in the base.
- On the floor.
- Very high up on a light fixture. Use the hand mechanism to grab it.
- At the top of the center structure.
- Next to the space anchor.
‘Strife Ruins’ Castrum Kremnos B1
- In the fire.
- On the door.
- On the floor.
- On the blue light fixture.
- On the round structure. Use the hand mechanism to grab it.
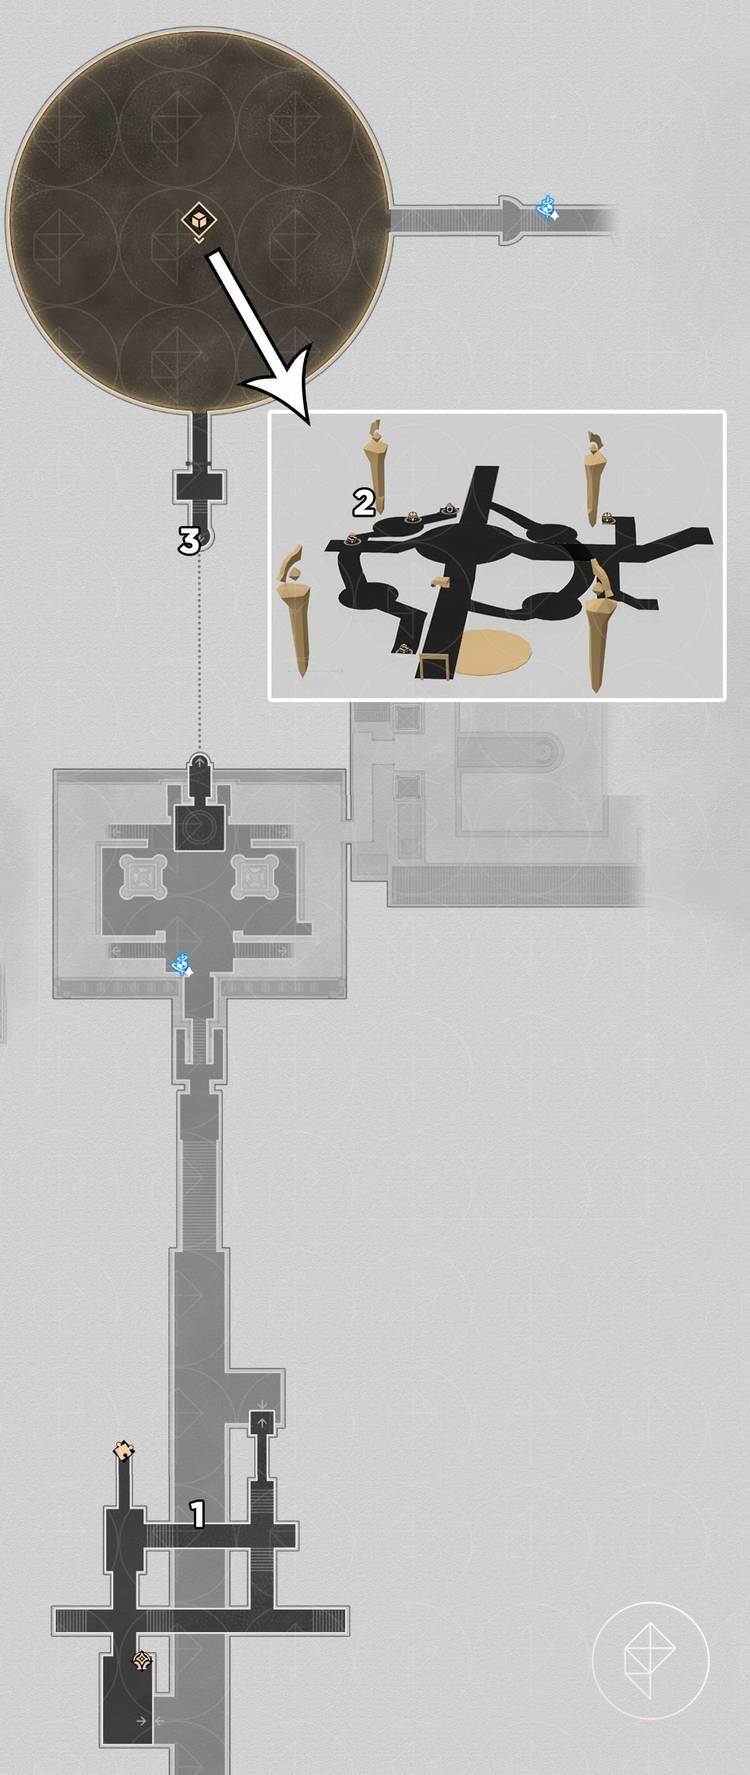
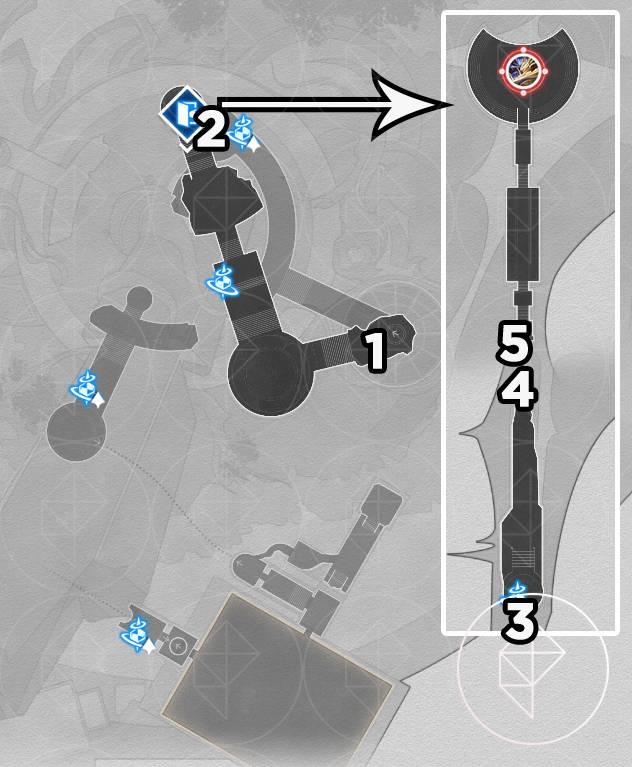
‘Abyss of Fire’ Janusopolis nymph locations
In Janusopolis’s Abyss of Fire, three Amphoreus nymphs hide amid volcanic hazards. The first floats near the central lava pit, guarded by fiery eruptions-approach from the left ledge after activating the nearby thermal vent. Scale the northern cliffside for the second, perched on a molten outcrop visible only post-eruption cycle. The third lurks in a submerged cavern below the eastern bridge; drop down via the crumbling platform and swim against the current to claim it.
There are 10 nymphs in the “Abyss of Fire” Janusopolis and they appear as teal beetles. Once you find them all, you’ll get Stellar Jade, the “Portentous Goldwoven: Abyss of Fate” item, and Celestial Ambrosia.
After grabbing all the nymphs, the quest item you get will reveal a fourth of the puzzle solution for the tablet in the southeast corner of Janusopolis F2. Once you correctly input the solution to the “Crrk?” prophecy tablet, you’ll get a precious chest and the achievement “Chirping Secret: Many-Faced.”
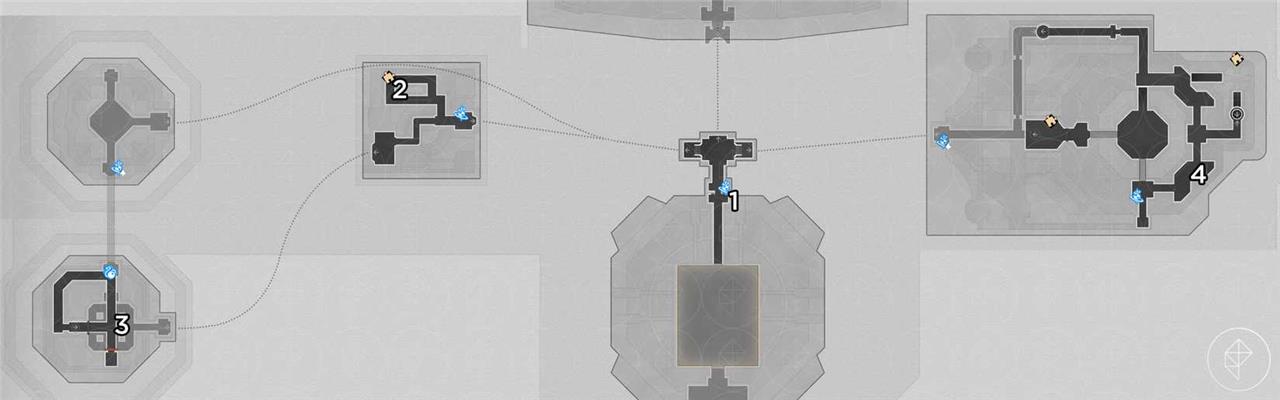
‘Abyss of Fire’ Janusopolis F2
- On the broken pillar (evernight).
- On the wall (evernight).
- On the bridge (dawn).
- On the edge of the path.
- Under the pillar on the ground.
- On the left scale (dawn).
- On the floor (dawn).
- In the back compartment behind the right scale on the third floor (dawn).
- On the top of the center part of the scales. Use the hand mechanism to grab it.
- In the hood of the tall statue.
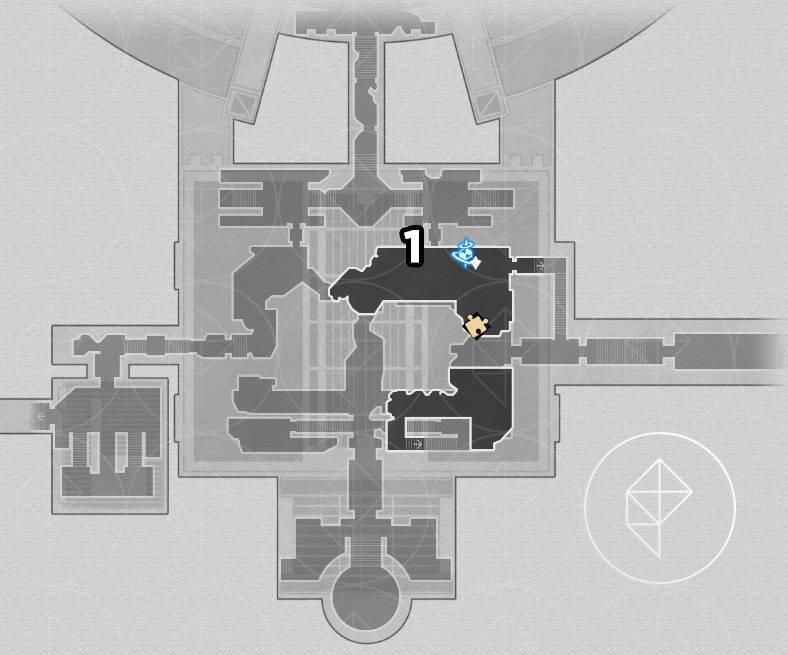
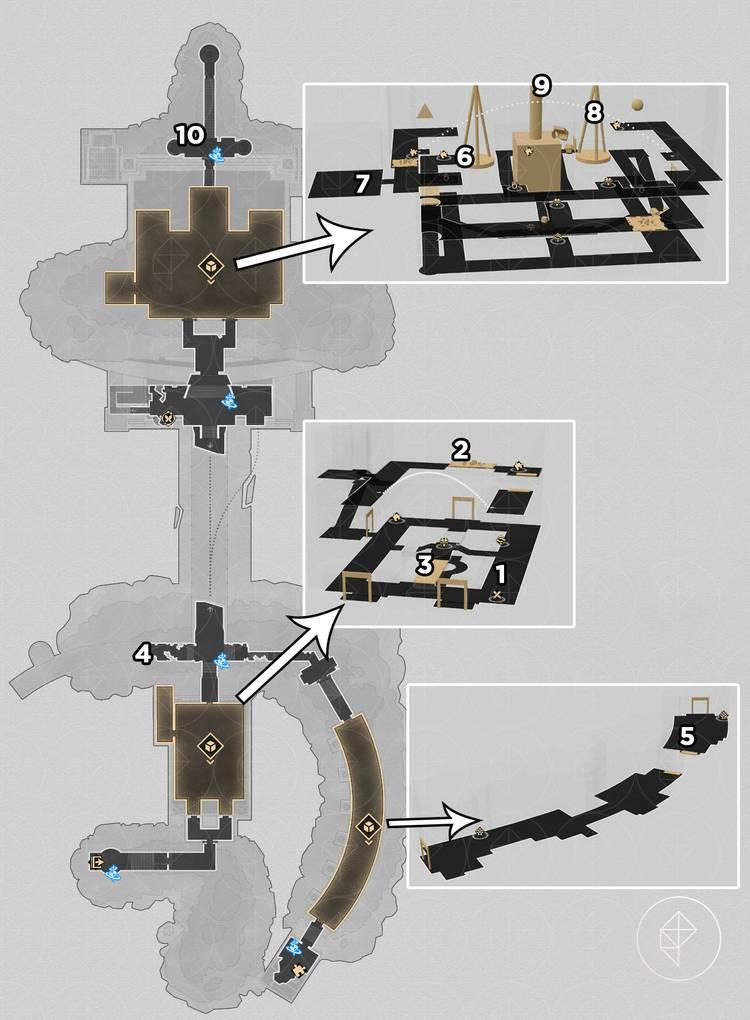
‘Sanctum of Prophecy’ Janusopolis nymph locations
Sanctum of Prophecy: Janusopolis nymph locations. In Honkai: Star Rail, Amphireus nymphs in Janusopolis are scattered across hidden corners of the city’s districts, often tucked behind airy courtyards and palatial balconies. Look for shimmering auras near sacred pools and within ornamental archways; interact with them to reveal directions and complete the collectible set.
There are 10 nymphs in “Sanctum of Prophecy” Januospolis, and they’re orange with blue detailing. Once you find them all, you’ll get Stellar Jade, the “Portentous Goldwoven: Sanctum of Prophecy” item, and Celestial Ambrosia.
Once you have the aforementioned item, you can complete a puzzle that involves driving the giant hand through specific circles on the B2 floor of this area. You’ll need to use the circles to represent pi, to the seventh digit. (What? I know.) You can see a video of this puzzle solution in action here. You’ll get a precious chest and the achievement “Chirping Secret: Law of Passage” for your time.
‘Sanctum of Prophecy’ Janusopolis F1
- On the edge overlooking the sky.
- On the light holder in the back (dawn).
- Sitting on a chair (dawn).
- Hanging from the tapestry.
- Looking at the calyx.
- On the curtain at the top of the room (dawn).
‘Sanctum of Prophecy’ Janusopolis B1
- On the floor looking at the scrolls.
‘Sanctum of Prophecy’ Janusopolis B2
- In front of the ram head puzzle.
- High up on a part of the bridge. Use the giant hand to float up and grab it.
‘Sanctum of Prophecy’ Janusopolis B3
- On the table.
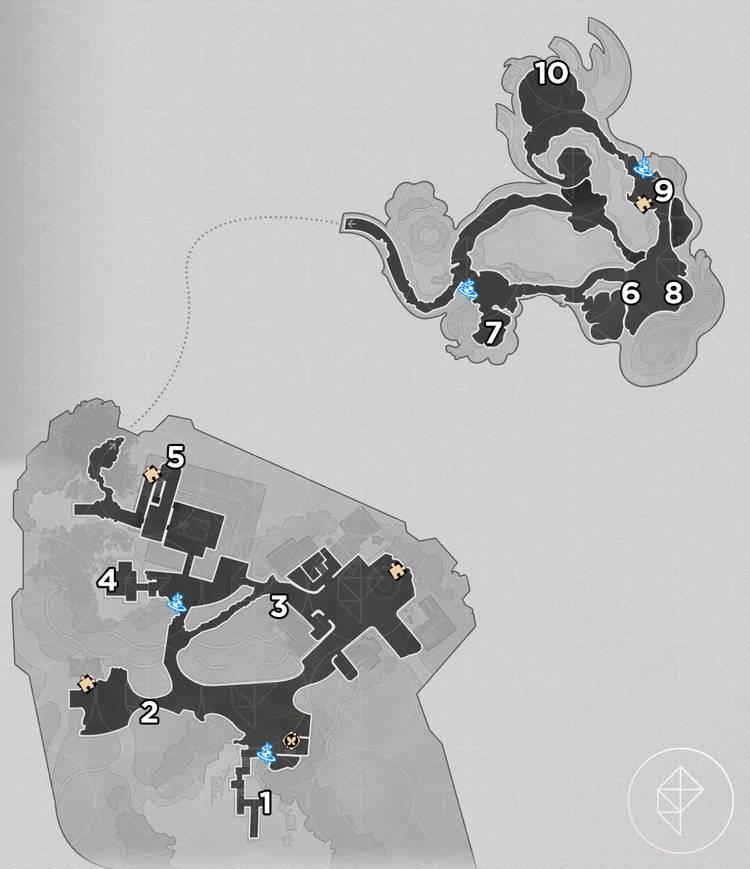
‘Murmuring Woods’ Grove of Epiphany nymph locations
In the Murmuring Woods, the Grove of Epiphany hosts several Amphoreus nymphs, each dwelling near mossy trunks and lilac-lit clearings. Follow faint mossy paths to tide pools where droplets shimmer, then listen for soft whispers as you approach latent glades-natives often blend into the foliage, revealing themselves only upon close inspection. Stay patient and scan the shaded corners; the last nymph tends to linger near a ring of mushrooms beneath low-hanging branches.
There are 20 nymphs in “Murmuring Woods” Grove of Epiphany and they appear as green beetles. Once you find them all, you’ll get Stellar Jade, the “Portentous Goldwoven: Murmuring Woods” item, and Celestial Ambrosia.
With the aforementioned item, you can unlock a precious chest by doing a relatively complex puzzle around this map. It involves destroying and rewinding specific sage statues. We recommend using this guide by KyoStinV. Once you finish setting all the statues, you can go back to the “Garmentmaker” for your chest, as well as the achievement “Chirping Secret: Lattice of Wisdom.”
‘Murmuring Woods’ Grove of Epiphany F4
- Looking at the mural.
- On the side of the throne.
‘Murmuring Woods’ Grove of Epiphany F3
- On the orange growth coming out of the wood.
- On the wood near the butterflies.
- On the topmost floor in the flowers (evernight).
- On the wall by the stairs (dawn).
‘Murmuring Woods’ Grove of Epiphany F2
- On the edge of the walkway.
- Inside the building on the window.
- In the pond.
- On the wall.
‘Murmuring Woods’ Grove of Epiphany F1
- In the lap of the statue.
- Next to the floating scroll.
- On the outer edge of the structure.
- On the center tree cocoon.
- On the railing.
- On the ground by the tree roots.
- On the water wheel. You’ll need to wait for the specific platform with the beetle to rotate around before you can grab it.
- On the edge of the fountain.
- On the wall.
‘Murmuring Woods’ Grove of Epiphany B1
- On the edge of the pool of water (evernight).
‘Demigod Council’ Dawncloud nymph locations
Dawncloud nymphs linked to the Demigod Council can be found near the Amphoreus Administrative Zone’s upper terraces and along the marble walkways leading to the Oracle Spire. Several appear near the Council Chamber’s reflecting pools, usually beside the radiant sigils on the stone rails. Another group rests near the eastern atrium, surrounded by faint golden motes that make them easier to notice against the pale floor. Inspect the ornamental urns nearby, as some nymphs only appear after interacting with these objects.
There are 10 nymphs in this map and they appear as red butterflies. As usual with these, you’ll get Stellar Jade, and Celestial Ambrosia, though this time you won’t get any key item.
The puzzle for these nymphs actually lies in the melody the collected nymphs play when you “investigate” them at the “Garmentmaker.” You’ll need to interact with specific points of the map to “offer greetings to Kephale” to get the special treasure chest to appear. You can see all the locations in action here. Completing this and opening the chest will reward the achievement “Chirping Secret: Path of Pilgrimage.”

- Above the fire.
- In the center of the mural.
- On the tip of the vessel.
- Riding on the nose of one of the pig speed vessels flying around. Wait for it to come by at this spot and use a ranged character to hit it.
- On the column.
- High up on the cliff on the bird mural’s head (requires giant hand mechanism to reach).
- On the trees.
- On a broken portion of the stone arch (requires giant hand mechanism to reach).
- On the chimes.
- Low on the waterfall (requires giant hand mechanism to reach).
‘Dragonbone City’ Styxia nymph locations
Dragonbone City Styxia nymph locations: 10 nymphs total are scattered across three levels; most sit near Space Anchors, with several perched atop moving Amphora and inside puzzle rooms. Start at Ancient City Main Gate Space Anchor, then use the map to reach Ancient City Market and Royal Palace Ruins, where you’ll encounter a Flying Amphora and a high platform nymph, respectively. As you progress, check Treasure Vault Secret Passage and the 3D room near the eastern area, where a nymph can be found behind shelves or in puzzle spaces, and continue through the remaining floors to locate all 10.
There are 10 nymphs in this map and they look kind of like. light blue fireflies? They’re kind of beetle-like, but not the stag beetles from the other maps. Finding them all will reward you with the usual Stellar Jade, Celestial Ambrosia, and the key item “Portentous Goldwoven: Dragonbone City.”
After finding them, you can complete a complex puzzle that has to do with the giant stone balls on the second floor of the area. You can see a solution for the puzzle here. Completing it and opening the chest will give you the achievement “Chirping Secret: Lost Prayers.”
‘Dragonbone City’ Styxia F1
- Floating over the railing.
- On the edge of the walkway. Requires the rune to make the surrounded area day.
- Atop the platform on the edge near the water. Requires the rune to make the surrounded area day.
‘Dragonbone City’ Styxia F2
- Sitting on the flying pig speed vessel. Stand around where our marker is and use a ranged character to hit the pig.
- By the fallen pot near the door.
- Floating along the path.
- Floating over the railing. Use a ranged character to hit it several times to catch it.
- Looking at the scrolls on the shelf.
‘Dragonbone City’ Styxia F3
- On top of the floating scroll.
- Flying by some debris.
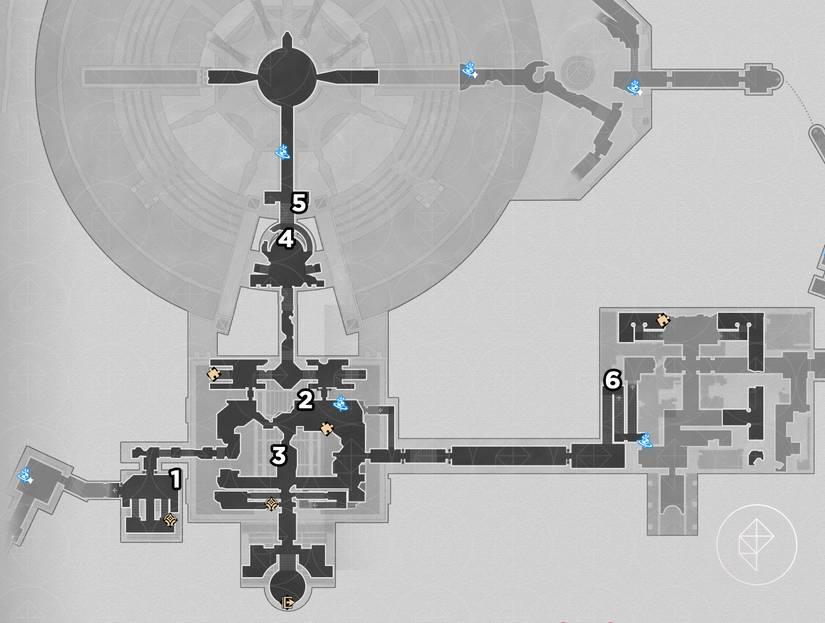
‘Fortress of Dome’ Eye of Twilight nymph locations
The ‘Fortress of Dome’ Eye of Twilight holds 10 nymphs resembling turtles with beetle traits. Players spot one on floating debris above a crack from the End of Neon Space Anchor, another on a platform edge near the Celestial Mural Space Anchor, and more on walls by the elevator, shelved balls, pillars requiring platform rides, tall corner structures, and shifting murals depicting hammers. A golden orb along a platform edge hides the ninth, while the tenth sits atop a pillar past Blacktide enemies or between wall spheres at the Arching BoneMech Space Anchor. Report to the Garmentmaker afterward for Celestial Ambrosia, Stellar Jade, and a hand-punch puzzle revealing a special chest with the ‘Chirping Secret: Divine Enigma’ achievement.
This area has 10 nymphs and they almost look like turtles, but also beetles? Finding them all will reward you with the usual Stellar Jade, Celestial Ambrosia, and a hint towards a larger treasure.
To get the final treasure after collecting the nymphs, you’ll need to use the giant hand on the eastern side of the map to punch huge nymphs away. You can see the hand in action via this video by KyoStinV. Doing so will make a special chest appear, and you’ll get the “Chirping Secret: Divine Enigma” achievement.
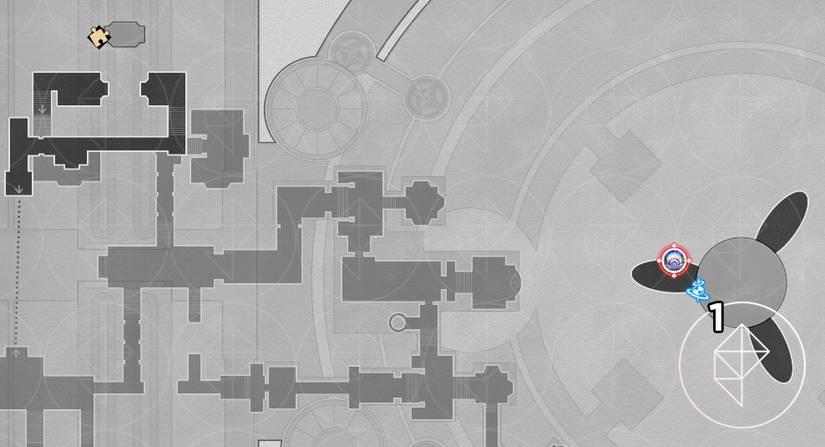
‘Fortress of Dome’ Eye of Twilight F1
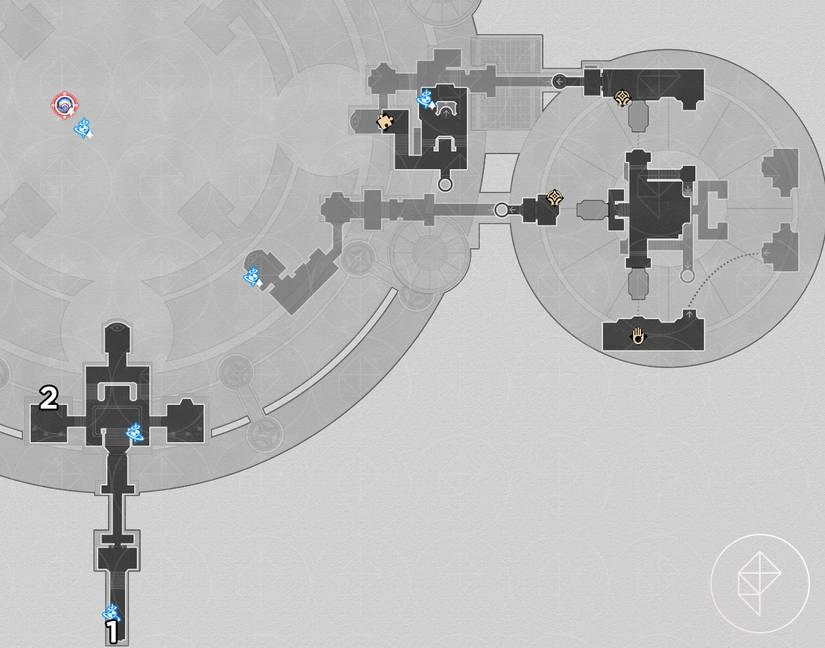
- On some debris floating above the crack.
- On the edge of the platform.
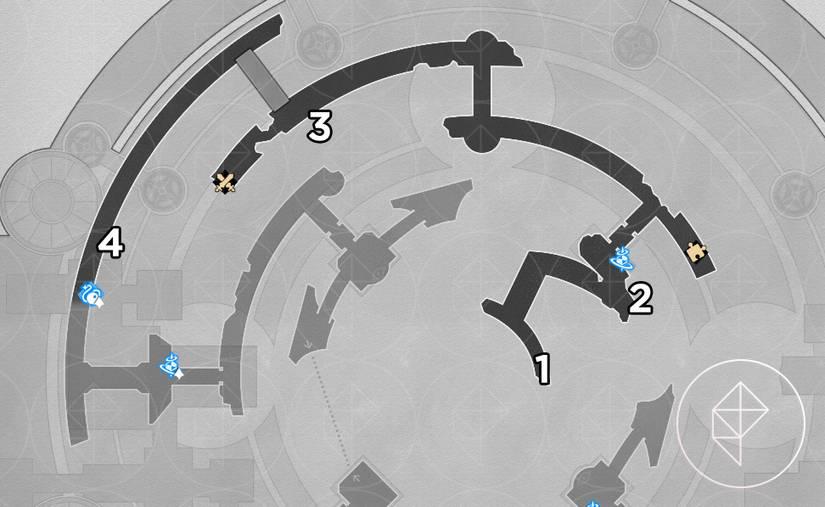
‘Fortress of Dome’ Eye of Twilight F2
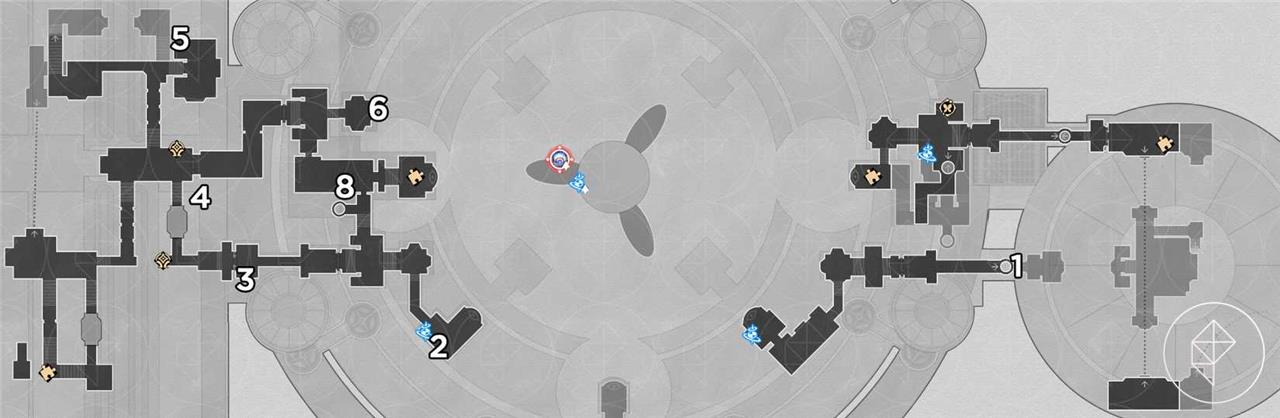
- On the wall in front of the elevator.
- Among the shelved balls.
- On the wall fixture.
- On a pillar. Ride the platform back toward the fan to grab it.
- On the tall structure in the corner.
- On the edge of the platform.
- On the mural, will move as you go from mural-to-mural.
‘Fortress of Dome’ Eye of Twilight F3
- On a golden orb along the edge of the platform.
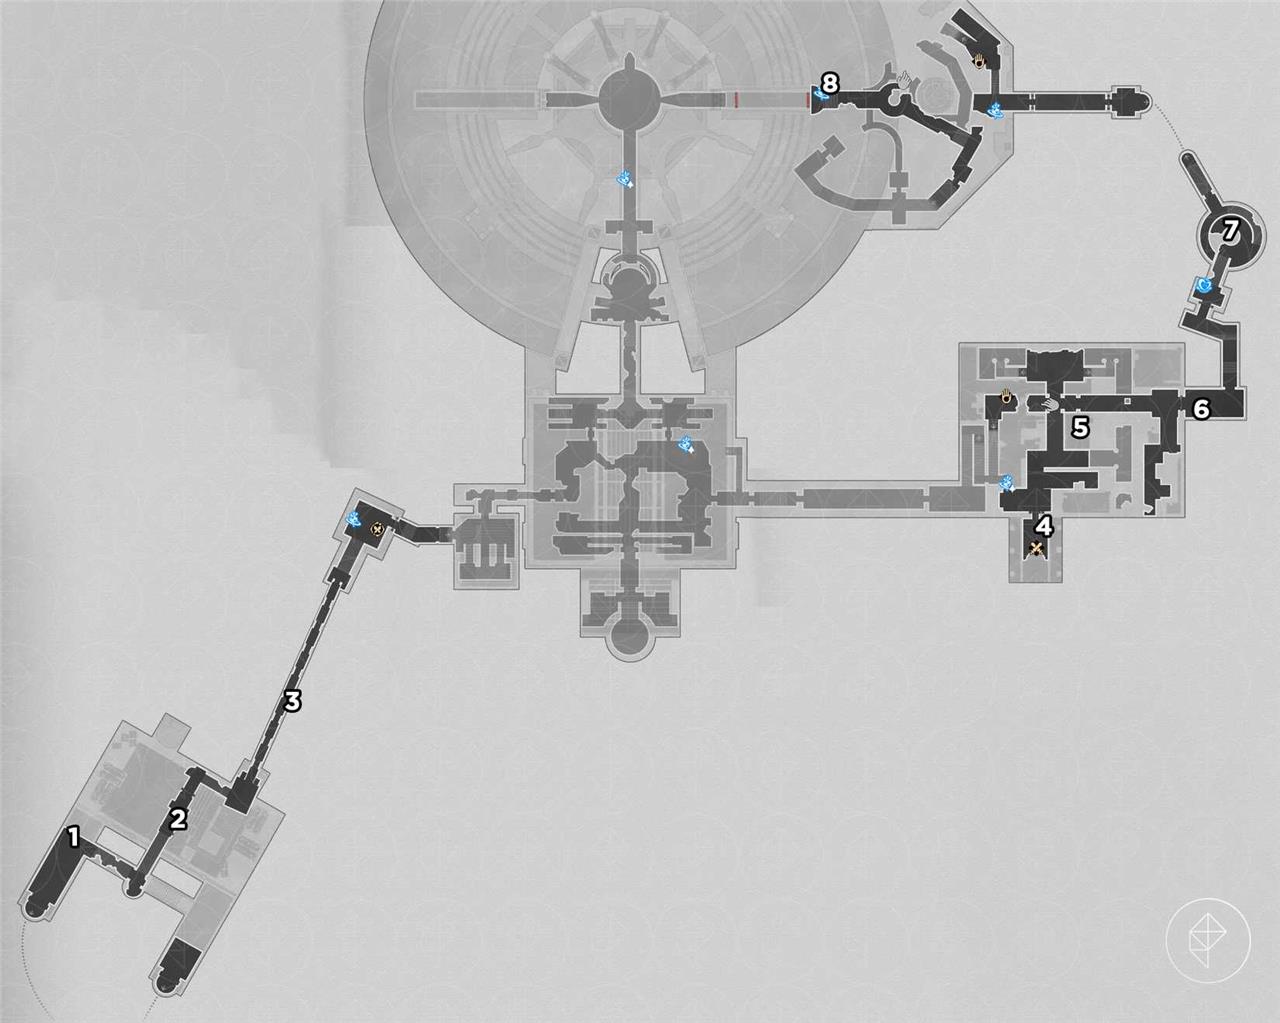
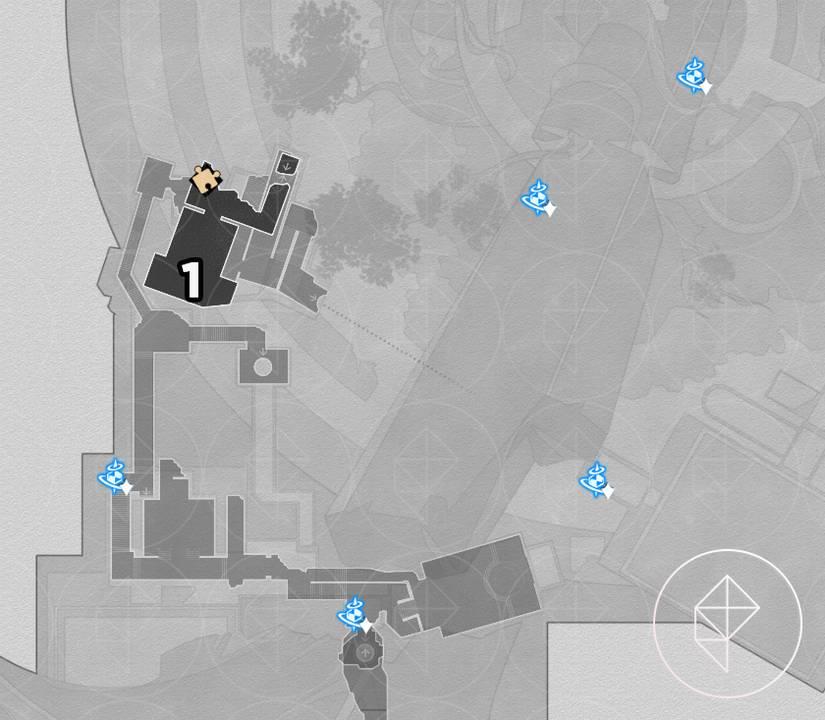
‘Fallen Twilight City’ Okhema nymph locations
The Fallen Twilight City in Okhema holds several Amphoreus nymphs scattered across broken walkways and dim alleys near the submerged district. Players can locate one near the collapsed bridge by the former plaza, another beside the sealed gate leading to the Core Nexus, and a third hidden behind a stack of luminous crates in the southern ruins. Keep an eye on faint blue glows-they mark areas where the nymphs often gather among the debris.
So, this map is kind of funny because if you’ve already collected all the nymphs in the normal, not-war-torn version of this map (“Eternal Holy City” Okhema), you can just talk to the Prototype Garmentmaker and ask her to collect all the nymphs for you for no charge or anything. Just instant completion! Nice. You still get the usual ambrosia and Stellar Jade rewards for collecting them all, too.
There’s also another cryptic puzzle that the Prototype Garmentmaker gives you, involving teleporting to the bottom-most point of the left side of Okhema city, following, and breaking all the speed-boost piggies that appear. Doing so will net you a precious chest and the “Chirping Secret: The Westward Ordeal” achievement. You can see this in action in this video.
‘Lightless Chapel’ Dawncloud nymph locations
In the Lightless Chapel on Amphoreus, two Dawncloud nymphs await collection. The first sits near the entrance altar, perched on a broken pillar amid shadowy vines. Head deeper into the main hall to find the second one hovering above a cracked stone pedestal, just before the sealed door. Both reveal themselves with a soft glow when approached, adding to your nymph tally without combat.
Just like the above map, if you’ve already collected the nymphs in the alternate version of this map (“Demigod Council” Dawncloud), then you can just talk to the Strict Garmentmaker to automatically collect the nymphs for you. Again, you do get the usual rewards like Stellar Jade and ambrosia for doing so, but she’ll give you a key item, “Portentous Goldwoven: ‘Lightless Chapel,'” as well.
Again, there’s a puzzle here to get a special chest and achievement that requires combining information you get from other players to solve. The key item rewarded above will show different slices of the puzzle, but if you don’t want to deal with talking to other people, you can see a solution here. Completing the puzzle will net you a precious treasure and the “Chirping Secret: The Unseen Steps” achievement.
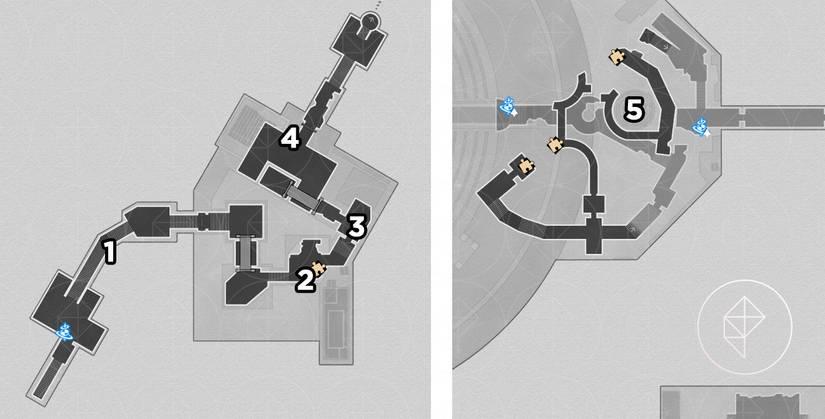
‘Cloudedge Bastion Ruins’ Eye of Twilight nymph locations
Cloudedge Bastion Ruins Eye of Twilight nymph locations.
There are 20 nymphs to find here. These are purple and blue versions of the previous mentioned turtle-like beetles and you’ll get the usual Stellar Jade and ambrosia reward for finding all 20.
This map serves as a mix of a “new” map and the above ones, since it is a variation of the other Eye of Twilight map. Some of the nymphs do need to be found manually, but some of them can also be automatically collected, so long as you found them in “Fortress of Dome” Eye of Twilight.
Below we list the nymph locations that are different, meaning they cannot be automatically collected. Full disclosure: We collected all the nymphs on F1 and F2 before realizing that you could auto-collect the nymphs on this map, so the first eight nymphs below may be able to be automatically collected, but we kept them on the list for good measure (this area isn’t accessible on the “Fortress of Dome” map, so it should be right.we think). We got a notification from the Gentle Garmentmaker after collecting nymph #4 on F2, so we’re leaving that in just in case it’s a requirement of some kind.
The Gentle Garmentmaker does give a treasure hint, which involves interacting with a specific compass on the second floor of the area. Solving the compass puzzle (which you can see in this video) will give you a special chest and the achievement “Chirping Secret: Rainbow’s End.”
‘Cloudedge Bastion Ruins’ Eye of Twilight F1
- Sitting on some debris, though it gets kidnapped by a Spirithief.
- In the gold waterfall fixture.
- In the river of golden liquid.
- On the pillar.
‘Cloudedge Bastion Ruins’ Eye of Twilight F2
- Under some rubble.
- On the side of the bridge.
- On the ceiling.
- On the wall in front of the elevator.
‘Cloudedge Bastion Ruins’ Eye of Twilight F3
- Atop the large console.
- On a pillar-like structure.
‘Cloudedge Bastion Ruins’ Eye of Twilight F4
- On the center-most platform, requiring you to get there via using the compass tool.
‘Aedes Elysiae’ nymph locations
Aedes Elysiae holds 10 pink firefly-like nymphs across Sacrament Courtyard and Membrance Maze. The first sits at Voyager’s Wharf pier south from the anchor, a Hayworm perches on a roadside scarecrow east of there, and Waitworm rests under Cyrene’s swing tree west of Sacrament Courtyard. Restworm occupies a leaf before the village chief’s house south of Membrance Maze anchor, Visitorworm floats by a southeast closed door, Balanceworm nears Wondrous Woods anchor, Thinkerworm hovers beside a northern stone, and Radishworm emerges from a lower-level sparkle clockwise from Membrance Maze.
This area was added in version 3.4 and it has 10 nymphs that appear as pink little beetles with wings. As usual, you’ll get Stellar Jade finding them.
Once you find all 10, the Old Garmentmaker will text you and you’ll score the “Portentous Goldwoven: Aedes Elysiae” key item and Disorder Ambrosia, a new type of ambrosia you can offer to the Tidal Bounty.
To get the bonus chest in this area, you’ll need to go to the harp in the northern part of Aedes Elysiae, run circles around the harp three times, and then hit the bells that appear in a specific order. You can see a video of this puzzle in action here. Once you do this, you’ll get a Precious Treasure and the achievement “Chirping Secret: Melodic Chimes of the Ancients.”
- Flying above the dock.
- On top of the scarecrow.
- Among the piles of hay.
- At the roots of the big tree.
- Attached to one of the flying pigs. Use a ranged character to shoot the pig as it flies by.
- On the lower portion of the map, hidden in the dirt. Interact with the sparkles to find it.
- On the table.
- On the porch of the tiny house.
- Flying by the stacked stones.
- Flying by the mural rocks.
‘Warbling Shores’ Styxia nymph locations
In “Warbling Shores” Styxia, there are 10 nymphs scattered across the area that resemble small yellow fireflies. They can be found on bridges, balconies, near statues, on walls, and around key landmarks like the large circular room and the Seabed of Luminous Remains; using the map markers and looking for dialogue bubbles makes them easier to spot. After collecting all 10, report to the Garmentmaker nearby to claim Stellar Jade, Celestial Ambrosia, and unlock the area’s Chirping Secret puzzle.
There are 10 nymphs to find in “Warbling Shores” Styxia and they look like little yellow flying beetles. As usual, once you find all the nymphs, the Revelry Garmentmaker will text you and you’ll get some Stellar Jade and Disorder Ambrosia.
You can get a hint that will lead you to a hidden treasure chest with the maze puzzle that’s at the bottom of the pool in the 3D room. You can see a solution for it here. Opening the reward chest will get you the achievement “Chirping Secret: Unfinished Business.”
‘Warbling Shores’ Styxia F1
- Flying behind the Revelry Garmentmaker, looking at the wall.
- Head to the square on the west side with the fountain in the center and then walk east from the fountain, leading you to a room with a lift. This critter is floating above some broken vases in the corner.
- On the bottom-most floor of the 3D room, near four artifacts on display.
- On the top-most floor of the 3D room, looking at harp-like structure.
- Floating over the edge of the structure, looking at the rainbow bridge.
‘Warbling Shores’ Styxia B1
- On the edge of the platform.
- Floating among the rubble on the passageway.
- On the middle floor, looking out the window in the 3D room (dawn).
- Floating in the water near the space anchor (evernight).
- On the very bottom of the pool. You’ll need to drain the water completely to get to this critter (dawn).
‘Radiant Scarwood’ Grove of Epiphany nymph locations
Radiant Scarwood is home to 20 Creation Nymphs scattered around the Grove of Epiphany in Amphoreus. First appears near the start by a golden statue along the main path, with subsequent nymphs tucked along walls, ledges, and hidden nooks as you traverse the area, including spots behind structures and along crumbling terraces. Keep an eye on elevated ledges and alcoves; some nymphs require a quick teleport or careful platforming to access their perches.
There are 20 nymphs on this map that look like pale blue-green beetles. As usual, once you find all the nymphs, the Garmentmaker will text you and you’ll get some Stellar Jade and Disorder Ambrosia. They’ll also give you the key item “Portentous Goldwoven: Radiant Scarwood,” which will lead you to a new puzzle.
To get the secret chest and achievement associated with this puzzle, you’ll want to use the nearby Bartholos to interact with the mask objects in the air, creating an infinity sign. You can see a video of this in action here. Once you do this, a chest will appear and you can open it to get the achievement “Chirping Secret: Wisdom in Confinement,” as well as some of the usual rewards.
‘Radiant Scarwood’ Grove of Epiphany B1
- On the edge of some ruins.
- On the rail next to the space anchor.
‘Radiant Scarwood’ Grove of Epiphany F1
Note for nymphs #3-5 below, you’ll need to use Bartholos to clog up the water ducts in the room, draining the water and giving you access to the lower floors.
- On the wall above the tunnel entrance.
- On the hidden passage.
- On the wall above the stairs to the lower level.
- On a box on the ceiling in the lower level.
- In the corner of the lower level, on top of a wooden crate.
- In the water next to the stairs.
- On the twisted tree root.
- On the edge of the water resevoir.
- Looking at the broken water wheel.
‘Radiant Scarwood’ Grove of Epiphany F2
- On a table on the upper level.
- On the rails overlooking the chasm.
- On a twisting tree branch.
- On the edge of the walkway.
- On the small pillar.
‘Radiant Scarwood’ Grove of Epiphany F3
- On the edge of the tree branch walkway.
- On top of a box on the upper level. Use Bartholos to fly up here.
‘Radiant Scarwood’ Grove of Epiphany F4
- On the ground near a winding tree branch.
- On the ground observing a glowing golden figure.
‘Universal Matrix’ Great Tomb of the Nameless Titan nymph locations
In the Universal Matrix section of the Great Tomb of the Nameless Titan, Amphoreus nymphs can be found tucked within hidden alcoves and gleaming chamber perimeters, often concealed behind shimmering walls or behind raised platforms that require careful timing to access.
This area has 10 nymphs that are very round orange-red beetles. After you find them all, the local Garmentmaker will text you, saying they’ve discovered something new. Talk to them for Stellar Jade, Disorder Ambrosia, and the key item “Portentous Goldwoven: Universal Matrix.”
The puzzle for this area involves using the Hand of Zagreus to punch the nearby squares until specific symbols show up. You can see a video of the solution in action here. Once you open the chest, you’ll get your usual rewards, as well as the achievement “Chirping Secret: The System of Four.”
‘Universal Matrix’ Great Tomb of the Nameless Titan F1
- On the wall in the room behind the space anchor.
- On top of the tall structure next to the pathway.
- Sitting on the circuit board off the path.
- On the ledge by the waterfall with several enemies looking at it.
‘Universal Matrix’ Great Tomb of the Nameless Titan F2
- On the wall behind the giant hand. It’s out of bounds, but you can still grab it.
- Looking at the mural on the wall (dawn).
- On the wall above the three spinning masks (evernight).
- Upside down in the water.
- Off to the side on the floor.
- On the side of the platform, behind a small structure.
‘Nightmare’s Echo’ Great Tomb of the Nameless Titan nymph locations
In Nightmare’s Echo within the Great Tomb of the Nameless Titan, three Amphoreus nymphs hide among shadowy ruins. The first floats near a cracked pillar by the entrance, pulsing faintly in the gloom. Scale the central spire for the second, perched on a ledge above thorny vines. The third lurks behind a false wall in the lower crypt-strike the suspicious stone slab to reveal it. Collect them all to banish the area’s haunting whispers.
This area has 10 nymphs, which look like yellow round beetles. Once you find them all, the Garmentmaker will text you, and give you the usual rewards as well as a hint to get the hidden treasure. To get the treasure, you’ll need to use the ship to cross through speed boost rings that get marked on your map in a specific order. You can see the puzzle solution in action here. After doing so, you’ll get a precious treasure, as well as the achievement “Chirping Secret: Kiss of Time.”
- Standing in front of the corrupted red muck.
- High up on the structure, requires the spaceship to fly up and grab it.
- On the ground, behind where the ship lands.
- On the lower portion of this platform. The catch prompt appears when you’re looking over the gap in the ground.
- On the long angled rock jutting out of the ground.
- On a broken pillar, requires the spaceship to grab it.
- On the edge of the platform.
- On a ledge against the wall.
- On a pile of rubble, overlooking a blocked-off exit.
- At the top of a small piece of rubble.
‘Memortis Shore’ Ruins of Time nymph locations
The ‘Memortis Shore’ ruins hold three Amphoreus nymphs amid time-worn structures. One sits near the central broken pillar by the shore’s edge, glowing faintly under moonlight. Another hides behind a collapsed archway to the east, partially obscured by vines. The third perches atop a fragmented statue overlooking the water west of the main path.
There are 20 nymphs on this map and they all vary in appearance, from butterflies to beetles. The Garmentmaker will (as usual) send you a text when you find them all and you’ll get the usual rewards for doing so, as well as a hint to find the hidden treasure for this area.
To solve this puzzle, you’ll need to interact with three amber found around the map. You can see the puzzle solution in action here. After doing so, you’ll get a precious chest and the achievement “Chirping Secret: Allegory of the Cave.”
‘Memortis Shore’ Ruins of Time F1
- On the door behind the space anchor.
- On the edge of the structure over the gap.
- Behind the breakable red lion mask.
- On the twisted roots behind the flowers.
‘Memortis Shore’ Ruins of Time B1
To get up here, you’ll need to come from B2, where you can interact with a box that turns out to be a Spirithief.
- On the dragonbone.
‘Memortis Shore’ Ruins of Time B2
To get through to the hallway and hidden room with the fifth nymph in it, you’ll need to follow the golden spear puzzle above the Falledge Terrace space anchor. This will open the path to the hallway, and you can follow the Spirithief to get into the secret room.
- Flying at the end of the broken staircase.
- On the blackboard.
- On the harp.
- On the ground in front of the red crystals.
- On the pile of gold.
‘Memortis Shore’ Ruins of Time B3
- Flying above the chessboard.
- On the tree branch behind the space anchor.
- On the edge, overlooking the water.
- Sitting on the vine archway.
- Off to the side, in the flowers.
‘Memortis Shore’ Ruins of Time B4
Best route to collect all Amphoreus nymphs efficiently
Efficient routes for collecting all Amphoreus nymphs in Honkai: Star Rail prioritize zone-by-zone completion using space anchors and minimizing backtracking, as nymphs are zone-specific and reported to local Garmentmakers
Optimal waypoint order to minimize teleport time
Optimal waypoint order for Amphoreus nymphs in Honkai: Star Rail minimizes teleport time by sequencing space anchors within and across zones logically, using 4-waypoint limits per zone for 22% faster clears. Prioritize central anchors with line-of-sight to multiple nymphs, chaining via hidden passages over long walks. Videos confirm this cuts total time to 18-25 minutes for 70+ nymphs.
Okhema Eternal Holy City
Sequence: Oronyx Shrine (F1 Palace fountain/chair/towels/stage first) → Marmoreal Market F2 (shelf seals/pool flyover) → Palace Lift Anchor (walls up/down) → Baths Entrance (murals/high spots). Instant teleports save 80 seconds vs walking.
Bloodbathed Battlefront
Janus Hidden Passage entry → Kremnos F2 Walkway (walls/decor/sword/hand mech) → F1 Entrance Fire (ball steps/cubes/platform) → High Ledge Wall. Drops from F2 to F1 avoid backtrack.
Janusopolis Zones
Abyss of Fate F2 Pillar (bridge/path/scales/statue) → Sanctum B2 Ram Head (bridge/mural/throne) → Dawn/Evernight Edge (spam-F variants). One anchor covers 70% via grabs.
Final Zones
Epany F3 Growth (woods/flowers/stairs/water wheel) → B1 Pool (cocoon/railing/roots) → Ruins F1 Carving (rubble/light fixture) → F2 Arena. Auto-collect skips repeats in Twilight/Chapel variants.