Ferocious beasts roam Valisthea, waiting for challengers bold enough to track them down. From notorious S-Rank targets to elusive lesser marks, here’s where to find every hunt in Final Fantasy 16 and what you’ll face when you arrive.
When do you unlock hunts in Final Fantasy 16?
Hunts become available after completing the main story quest “Fire in the Sky” in the early chapters of Final Fantasy 16. Speak to the Blackthorne recruiter standing outside the Hideaway’s Arete Stone to view the Hunt Board and accept your first mark, A-rank Svarog. Progress through additional story beats to access higher-ranked targets, with all 32 hunts opening by the post-game.
After completing the “The Gathering Storm” main story quest, you’ll unlock the Hunt Board in the Hideaway. Interact with Nektar the moogle to see which hunts are available for you. As you progress in the main story, you’ll unlock more bounties to track down at the Hunt Board. Also, make sure to complete side quests with the plus icon as some of them will give you more bounties to complete.
All hunt locations in Final Fantasy 16
All hunt locations in Final Fantasy 16 are spread across Valisthea’s major regions, including Rosaria, Sanbreque, Dhalmekia, the Iron Kingdom, and Waloed. Each area features unique marks that range from low-ranked beasts to powerful S-rank targets. Players can track these marks using the Hunt Board, which provides clues and coordinates for their whereabouts. Exploring each region carefully rewards rare materials, gil, and experience, making these hunts a key part of growing stronger throughout the game.
There are a total of 32 hunts in Final Fantasy 16. We’ve listed the notorious marks in chronological order, along with their ranks and locations.
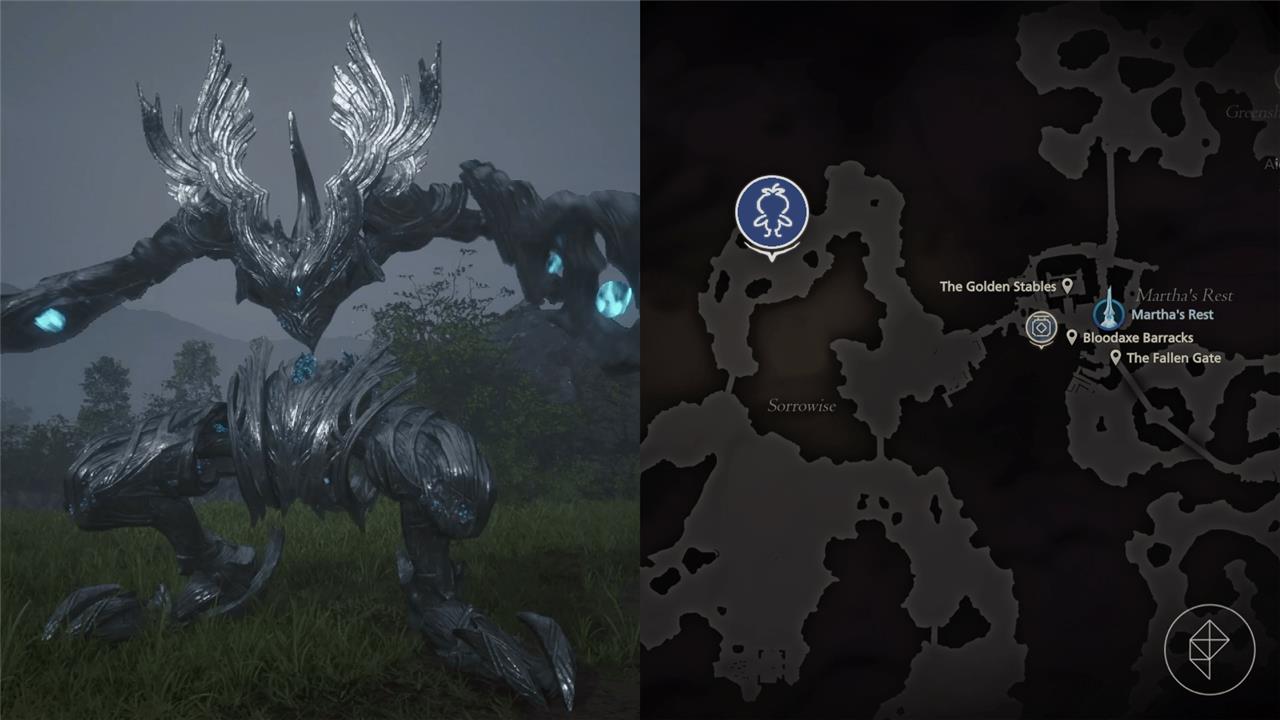
Ahriman location
Ahriman is a C-rank Notorious Mark that appears as part of the main quest “Release,” a subquest of “The Gathering Storm,” in the Grand Duchy of Rosaria. You will encounter it in the Sorrowise region, south or southwest of Martha’s Rest, effectively blocking the path as you travel toward Riddock’s Jump. Fast travel to the Martha’s Rest obelisk, then head out into Sorrowise and follow the main path toward Riddock’s Jump to find the mark in an open area along the route.

The Ahriman hunt is unlocked during the “The Gathering Storm” main story quest while you’re on your way to perform the Casting.
Level: 25, C-rank
Location: Southeast of Sorrowise in Rosaria
Obelisk: Martha’s Rest
Rewards: 10 magicked ash, one meteorite, 5,000 gil, and 10 renown
The Angel of Death location
The Angel of Death can be found in the southern part of the Imperial Province of Rosaria, near the Broken Hilt area. This notorious mark patrols the ruins close to the cliffs, so watch for its wide open-sector movements and limited cover. It’s a formidable foe with powerful aerial attacks, making ranged strikes and precise timing key to surviving the battle.
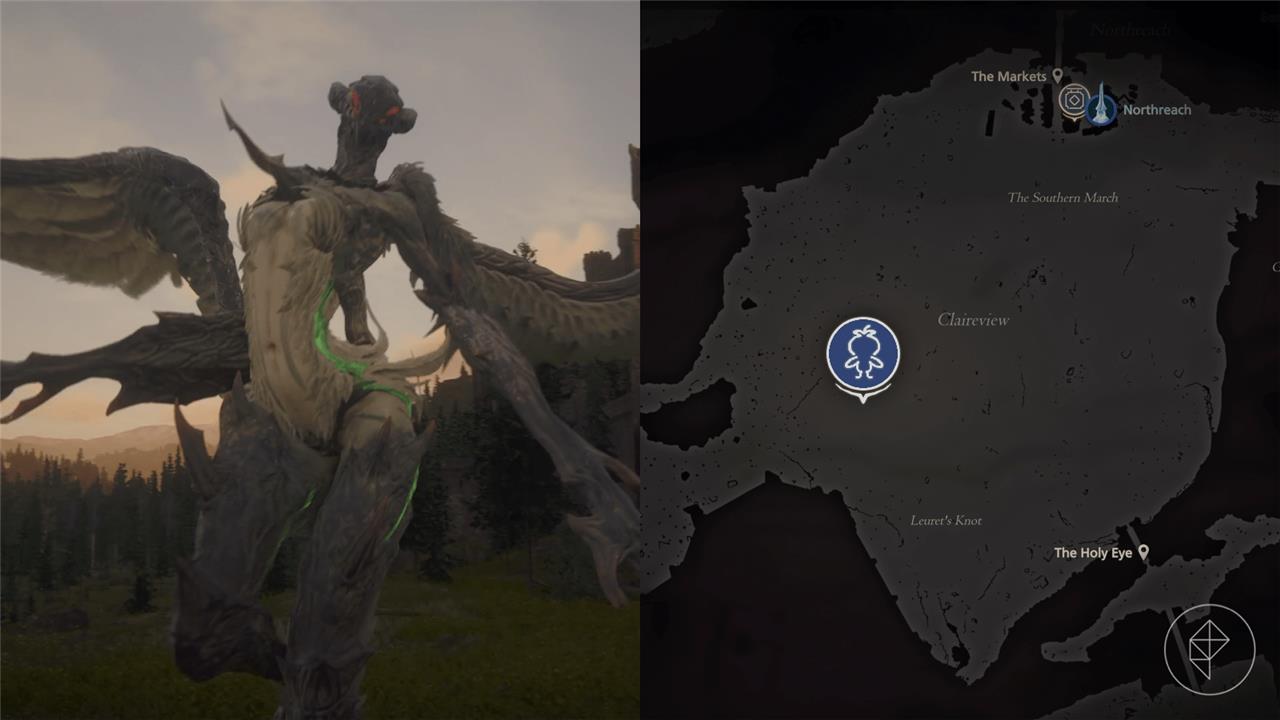
The Angel of Death hunt is unlocked after the “The Gathering Storm” main story quest after you interact with Nektar at the Hunt Board in the Hideaway.
Level: 27, C-rank
Location: Western side of Claireview in Sanbreque
Obelisk: Northreach
Rewards: One clouded eye, 6,200 gil, and 10 renown
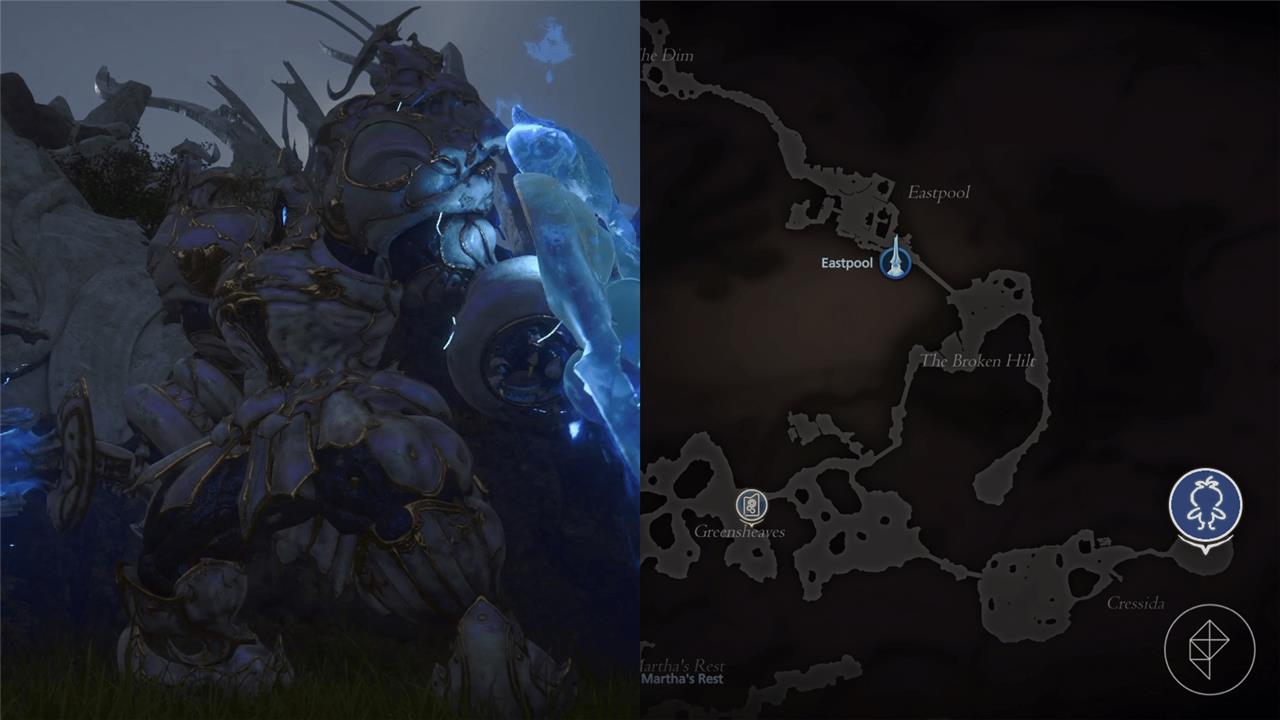
Belphegor location
Belphegor resides in the Broken Hilt region of Rosaria, perched atop a cliff overlooking the area. Fast travel to the Eastpool obelisk, then head southeast past farmlands and a narrow valley with minor foes toward a dead-end clearing at the cliff’s edge. The level 30 B-rank mark awaits there on the hill near a windmill.
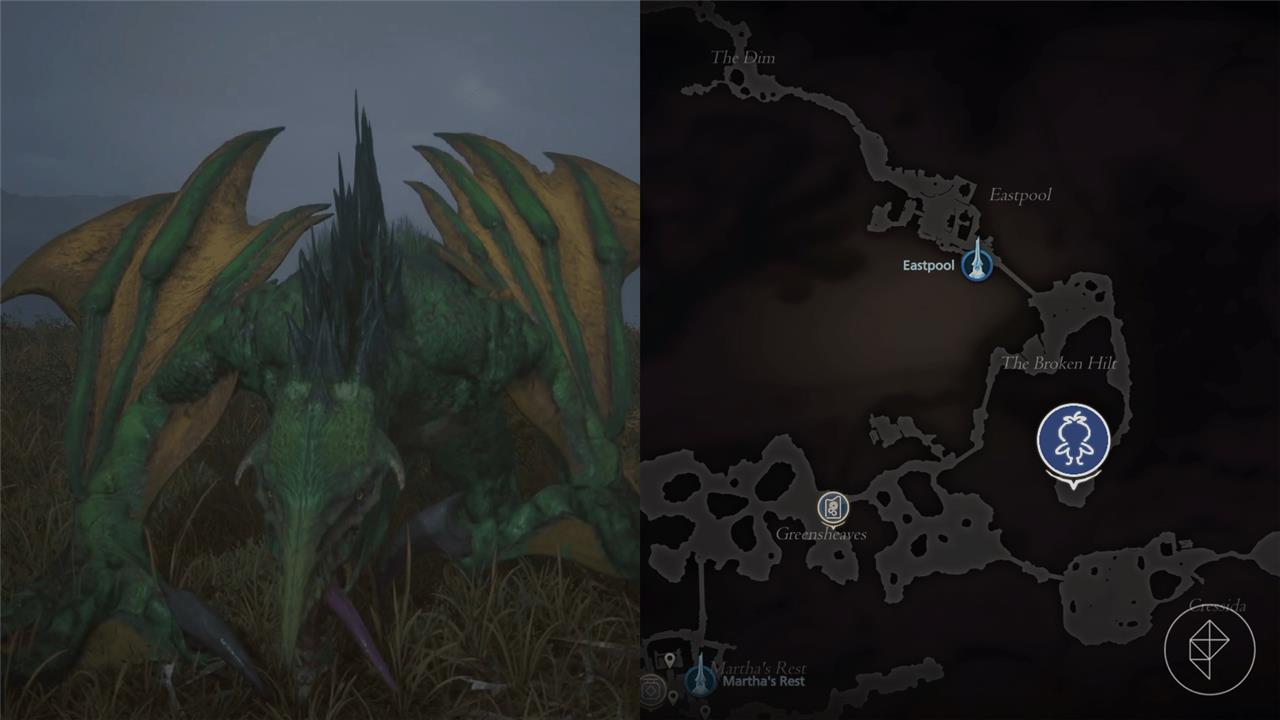
The Belphegor hunt is unlocked after the “The Gathering Storm” main story quest after you interact with Nektar at the Hunt Board in the Hideaway.
Level: 30, B-rank
Location: South of the Broken Hilt in Rosaria
Obelisk: Eastpool
Rewards: Two dragon talons, 8,000 gil, and 20 renown
Dozmare (Griffin) location
Dozmare, the B-rank griffin hunt at level 28, appears in Norvent Valley of the Holy Empire of Sanbreque. Fast travel to the Lostwing obelisk, then head south through the valley toward the Caer Norvent River Gate, where the beast perches atop the western wall. The hunt unlocks during the Blacksmith’s Blues side quest after speaking with Charon.
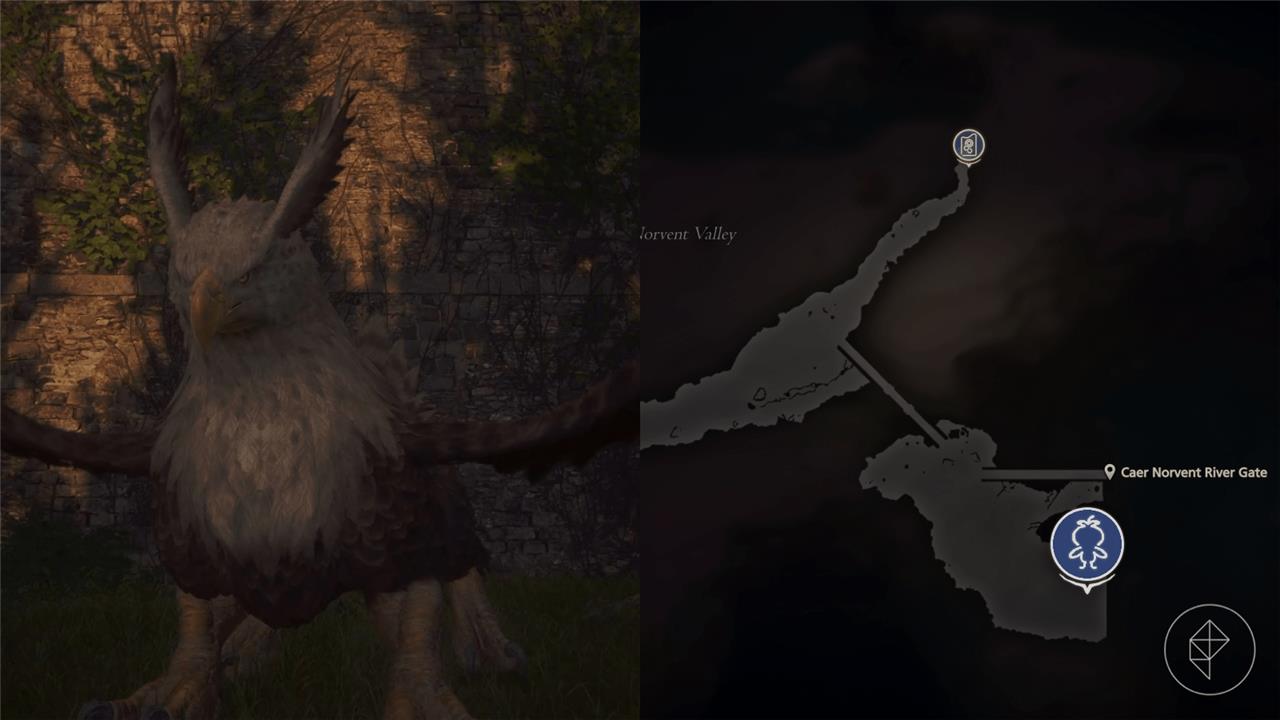
The Dozmare (Griffin) hunt is unlocked during the “Blacksmith’s Blues” side quest, which is given to you by August in the Hideaway after you complete the “Black Light Burns” main story quest.
Level: 28, B-rank
Location: South of the Caer Norvent River Gate in Sanbreque
Obelisk: Lostwing
Rewards: One scarletite, one meteorite, 8,500 gil, and 20 renown
Sekhret location
Sekhret can be found roaming the fields south of Martha’s Rest in Rosaria, near the swampy area close to the river. It appears once the Target Rank list becomes available after progressing through the main story. This creature is aggressive and swift, capable of dealing heavy physical damage with charging attacks, so keeping a safe distance and countering at the right moment is key to victory.
The Sekhret hunt is unlocked after completing the “Fire and Ice” main story quest.
Level: 31, B-rank
Location: West of Greensheaves in Rosaria
Obelisk: Martha’s Rest
Rewards: One minotaur mane, 8,200 gil, and 20 renown
Severian location
Severian appears north of Sorrowise in Rosaria. Fast travel to the Martha’s Rest obelisk, exit west through the elevator into the marshlands, then head northwest along the path to spot this Fallen Construct on an open field amid ruins.
The Severian hunt is unlocked after completing the “Fire and Ice” main story quest.
Level: 31, B-rank
Location: North of Sorrowise in Rosaria
Obelisk: Martha’s Rest
Rewards: One electrum, 8,500 gil, and 20 renown
Muddy Murder location
Muddy Murder can be found within The Gilded Path area of Rosaria. This notorious flan sits in a swampy region west of The Auldhyl Docks, surrounded by dense vegetation and shallow water that slow movement. The creature is a powerful A-rank target known for its heavy physical attacks and resistance to magic. Venture there prepared for a prolonged fight, as its toughness and area control make this encounter especially challenging for unprepared players.
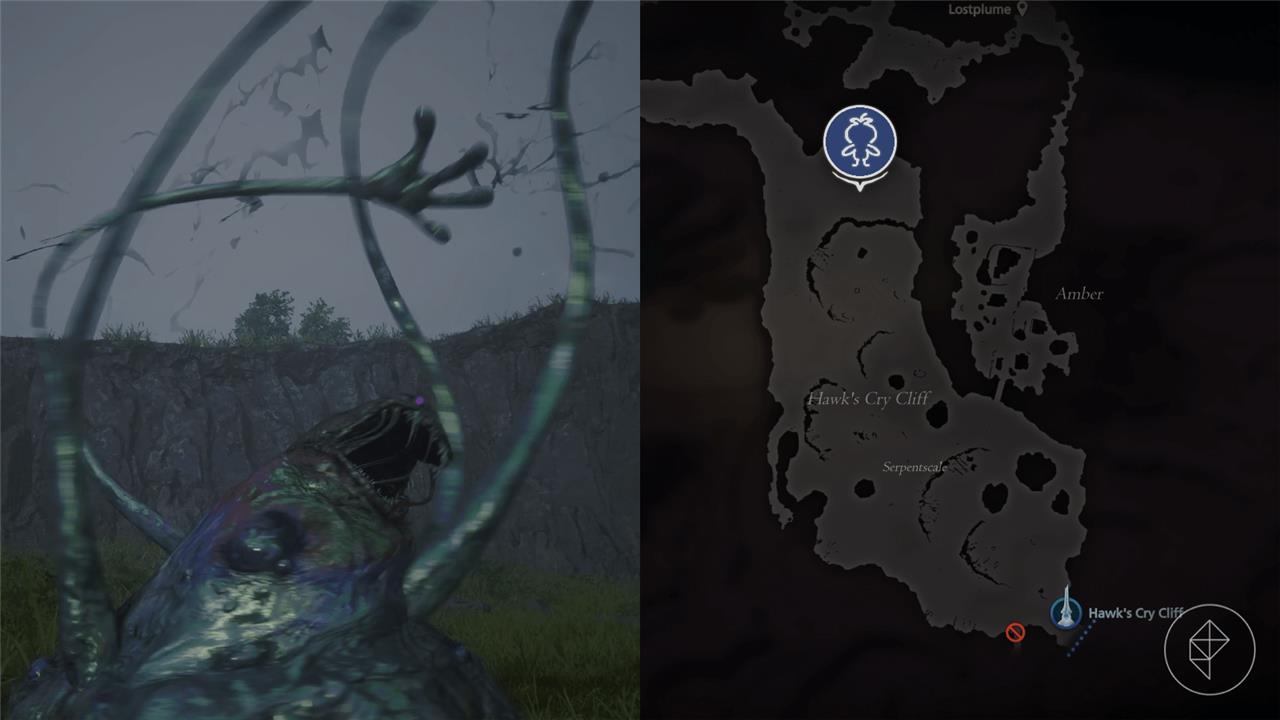
The Muddy Murder hunt is unlocked after completing the “Capital Punishment” main story quest.
Level: 38, A-rank
Location: Northern section of Hawk’s Cry Cliff in Rosaria
Obelisk: Hawk’s Cry Cliff
Rewards: One gelatinous mass, 12,000 gil, and 30 renown
After defeating the Flan Prince, you’ll receive one gelatinous mass, 12,000 gil, and 30 renown.
“A Hill to Die On” location
A Hill to Die On marks one of Final Fantasy 16’s toughest hunts, pitting you against Behemoth King on a remote mountain ridge in the far north of Dhalmekia. Access this spot after progressing through the main story to unlock higher-level marks, then ride north from the Dragon’s Aerie toward the snowy peaks bordering Ash. Defeat packs of wolves and ice elementals along the narrow path to trigger the boss arena at the summit, where the beast awaits with earth-shaking charges and meteor strikes. Rewards include rare crafting materials and substantial EXP for Clive’s growth.
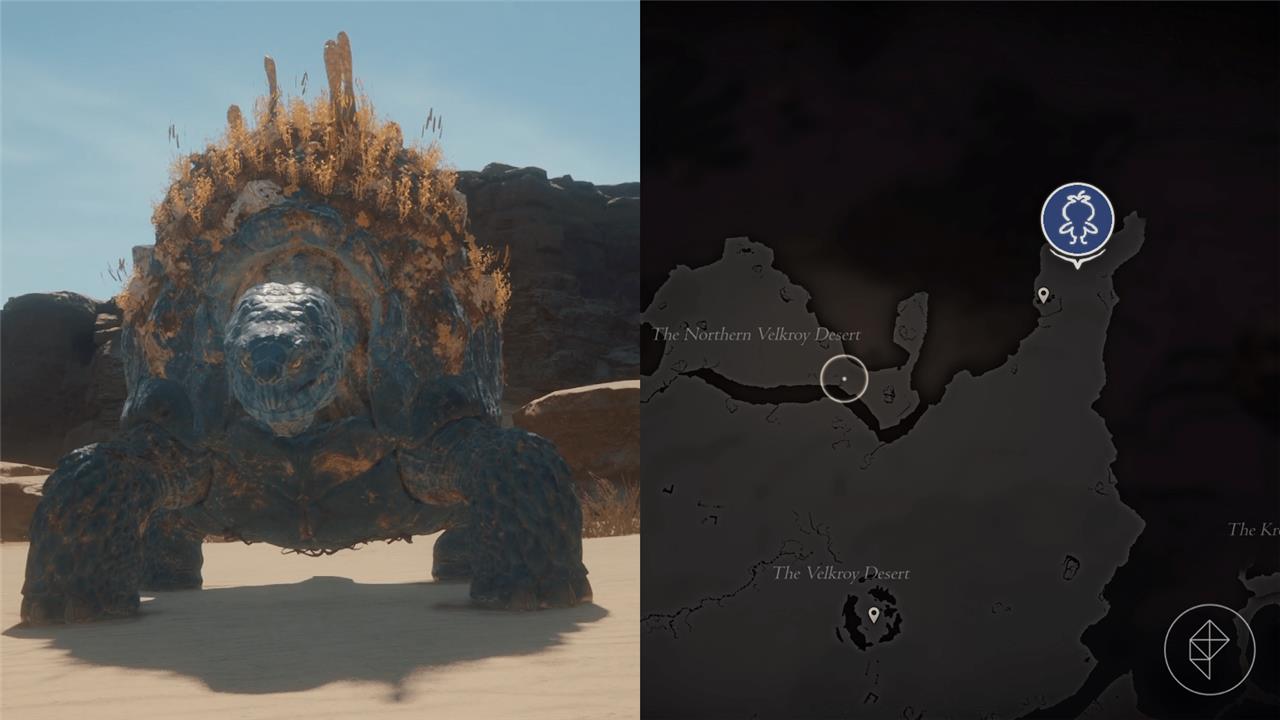
The exact moment you unlock the “A Hill to Die On” hunt is a little unclear, but we unlocked it after visiting Dhalmekia for the first time during the “Riddle of the Sands” main story quest.
Level: 34, B-rank
Location: Northeastern corner of the Velkroy Desert in Dhalmekia
Obelisk: Velkroy Desert
Rewards: Two scarletite, 10,000 gil, and 20 renown
After defeating the Fastitocalon, you’ll receive two scarletite, 10,000 gil, and 20 renown.
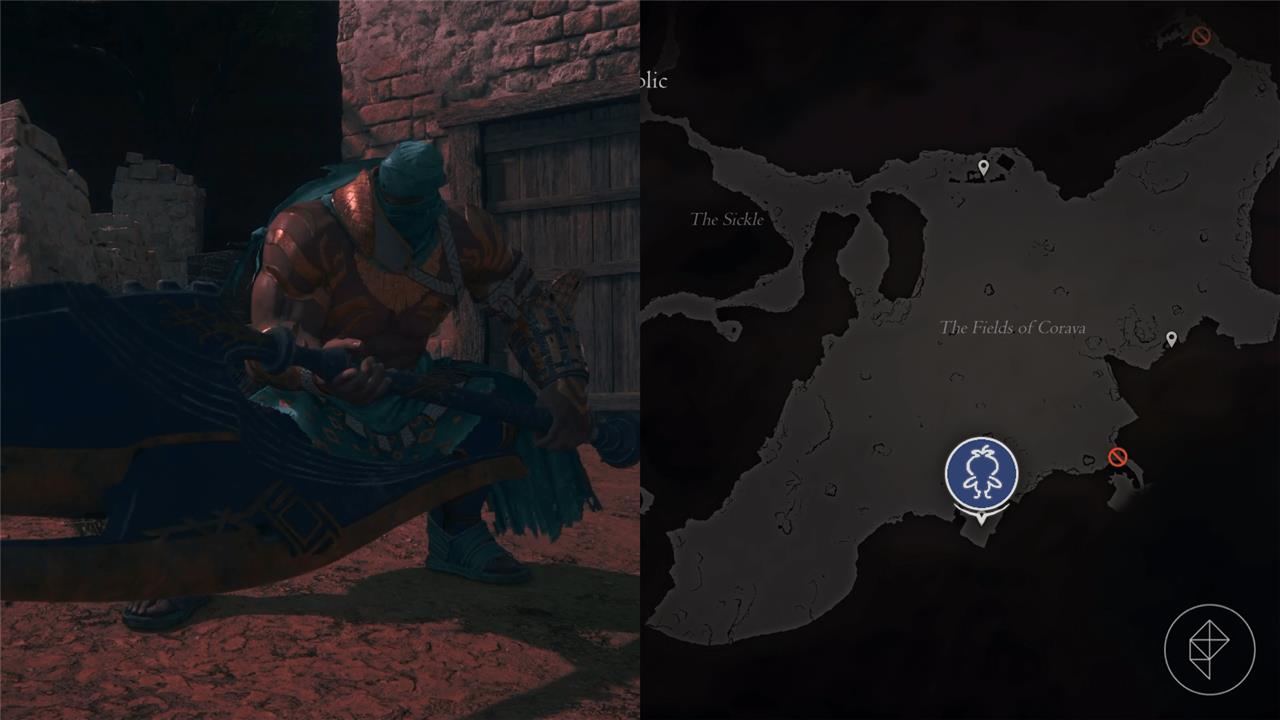
Soul Stingers location
The Soul Stingers can be found in the Dhalmekian Republic, in the Velkroy Desert region. They tend to appear near the northern part of the sands, where the heat and open space make them easier to spot from a distance. Fast travel to either The Dalimil Inn or The Velkroy Desert obelisk for quicker access. Be prepared for fast, venomous attacks and keep distance-based abilities ready to counter their speed.
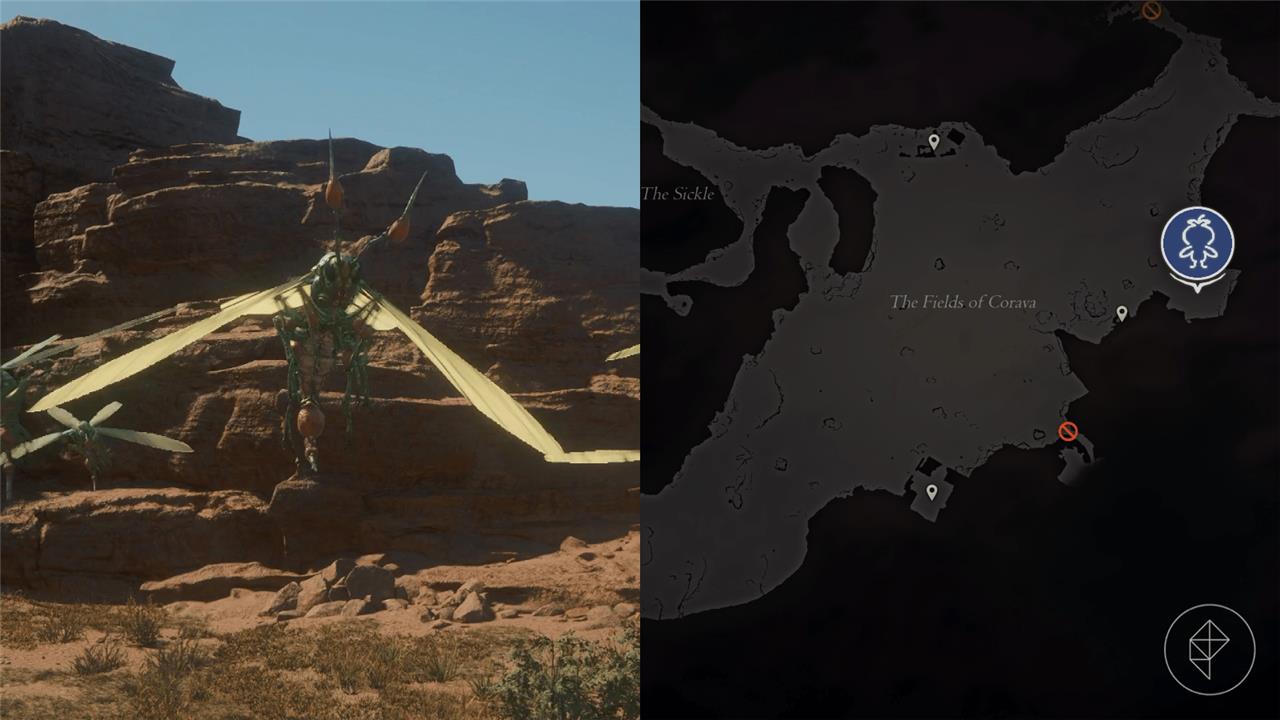
The Soul Stingers hunt is unlocked after completing the “Into the Shadow” main story quest.
Level: 32, C-rank
Location: Eastern side of the Fields of Corava in Dhalmekia
Obelisk: The Jaw
Rewards: 50 sharp fangs, 20 bloody hides, 10 magicked ash, 5,500 gil, and 10 renown
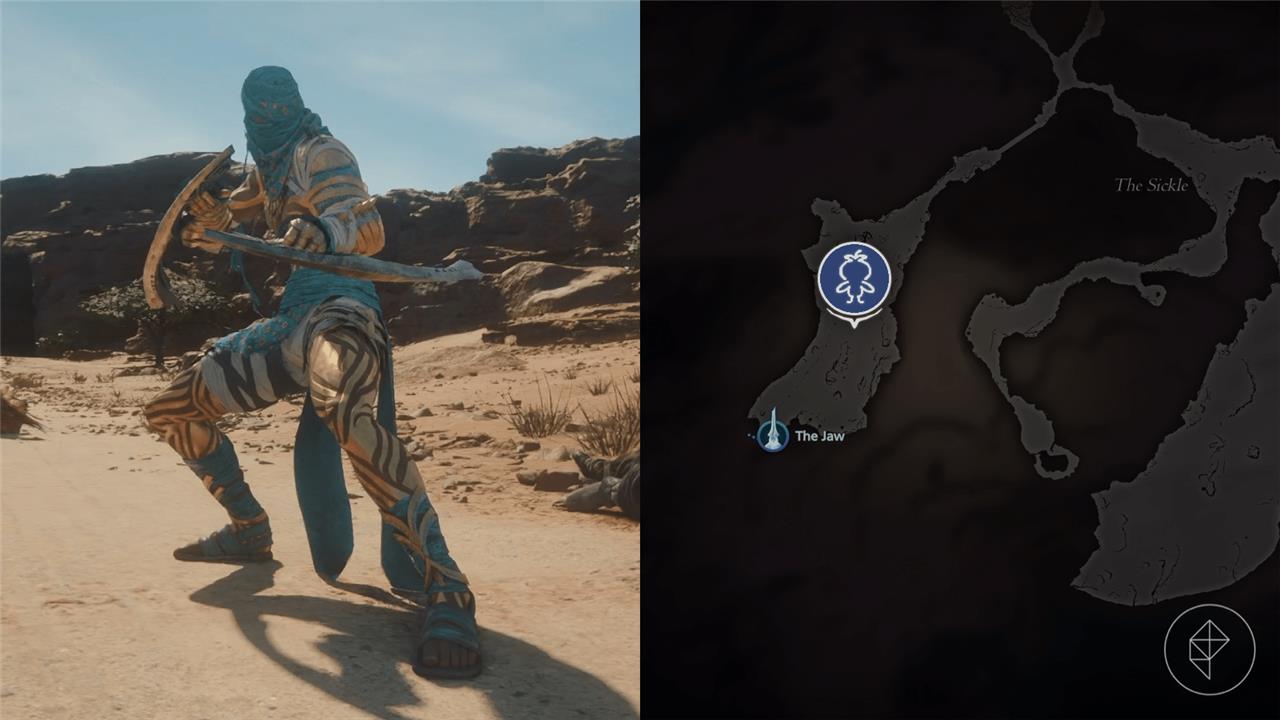
Grimalkin location
Grimalkin appears as a C-rank notorious mark in The Cattery region of Dhalmekia, reachable after starting the main quest “Out of the Shadow.” Fast travel to The Jaw obelisk, then ride east into The Sickle and follow the southern dead-end path through the canyon to find the level 32 mark at the far end.
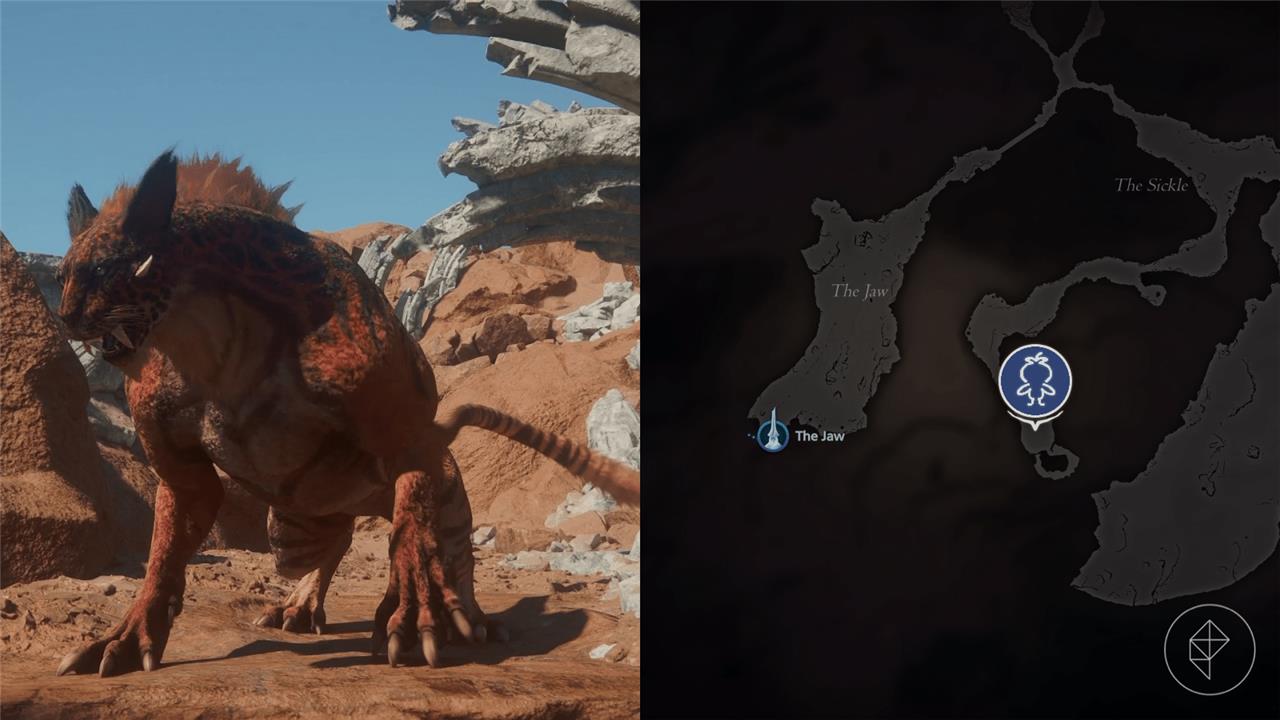
The Grimalkin hunt is unlocked after completing the “Into the Shadow” main story quest.
Level: 32, C-rank
Location: The Cattery in Dhalmekia
Obelisk: The Jaw
Rewards: One Grimalkin hide, 6,100 gil, and 10 renown
The Nine of Knives location
The Nine of Knives can be found in the southern part of Rosaria, near the Caer Norvent River Gate. This mark appears after progressing through the main story far enough to access the relevant Hunt Board entry. The path to the location includes strong enemies, so preparing appropriate gear and abilities is recommended before approaching the area.
The Nine of Knives hunt is unlocked after completing the “Into the Shadow” main story quest.
Level: 38, A-Rank
Location: The Jaw in Dhalmekia
Obelisk: The Jaw
Rewards: 25 wyrrite, 2 meteorite, 10,500 gil, and 30 renown
The Breaker of Worlds location
The Breaker of Worlds can be found in The Crock, a rocky area north of the Dhalmekian Republic. This S-rank mark, Atlas, roams near the ruins and demands careful preparation before facing it. The arena offers little room to move, so watching its attack patterns and managing stamina are key to surviving this powerful opponent.
The Breaker of Worlds hunt is unlocked after completing the “Into the Shadow” main story quest.
Level: 45, S-rank
Location: Eastern edge of Cressida in Rosaria
Obelisk: Martha’s Rest or Eastpool
Rewards: One fallen iron, one orichalcum, 20,000 gil, and 50 renown
Bomb King location
The Bomb King appears in the Rosarian leg of the Hunt board, located inside the Ironwoods north of the Waterside Way fast travel point in Dhalmekia. Head north from the trail marker into the dense forest area, where you’ll encounter the massive enemy amid explosive clusters and rocky terrain. Defeat it to claim 6,300 EXP, 2,500 Gil, 45 Renown, and a Magicked Meat drop.
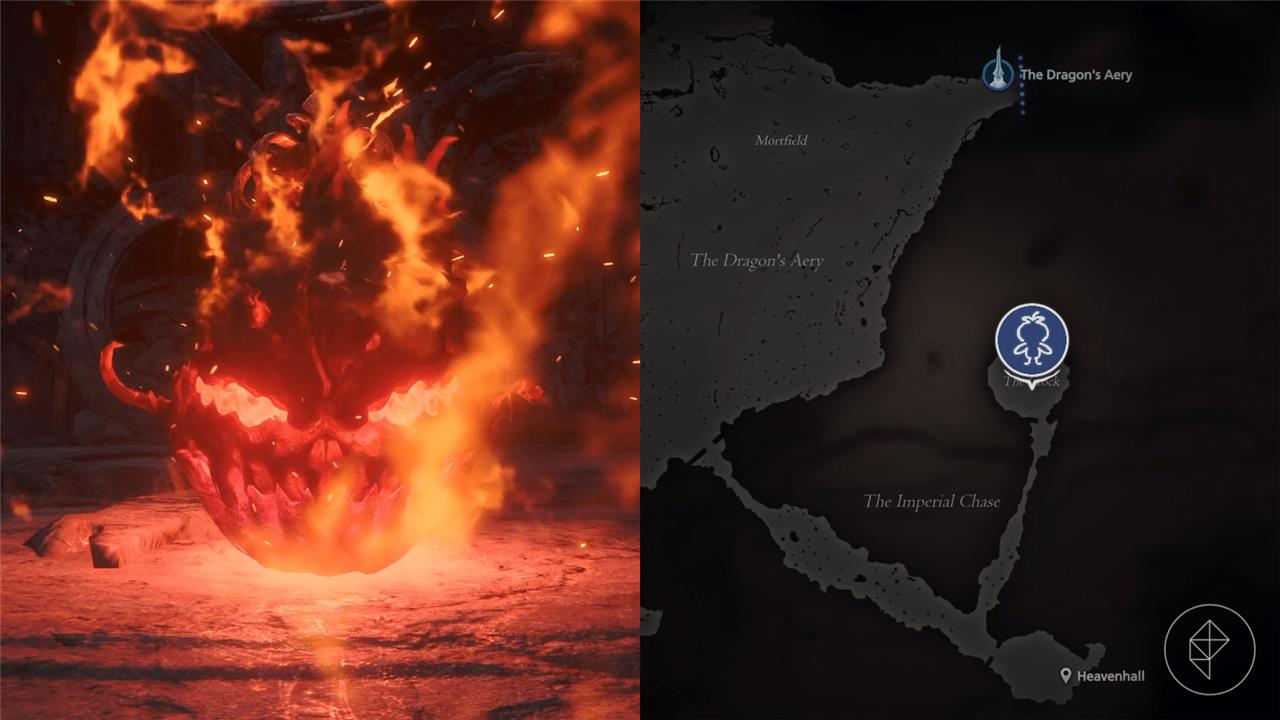
The Bomb King hunt is unlocked during the “Weird Science” side quest which is given to you by Owain in the Hideaway during the “Out of the Shadow” main story quest.
Level: 33, B-rank
Location: The Crock in Sanbreque
Obelisk: Dragon’s Aery obelisk
Rewards: One bomb ember, 9,000 gil, and 20 renown
The Ten of Clubs location
The Ten of Clubs can be found in the western part of Sanbreque, near the Caer Norvent River Gate. Fast travel to the Lostwing obelisk, then head north toward the bridge leading out of the area. The target patrols the open road surrounded by soldiers and ruins, so be prepared for multiple enemies joining the fight. This mark is aggressive up close, using quick melee attacks that can catch you off guard if you’re not careful.
The Ten of Clubs hunt is unlocked after completing the “Fire in the Sky” main story quest.
Level: 35, B-rank
Location: Vamare in Dhalmekia
Obelisk: The Jaw
Rewards: One scarletite, one meteorite, 9,200 gil, and 20 renown
The Mageth Brothers location
The Mageth Brothers await in Quietsands, Rosaria. Fast travel to the Port Isolde Obelisk, then head north along the path to the beach where the trio stands in the open. This A-rank mark unlocks after the Fire in the Sky main quest.
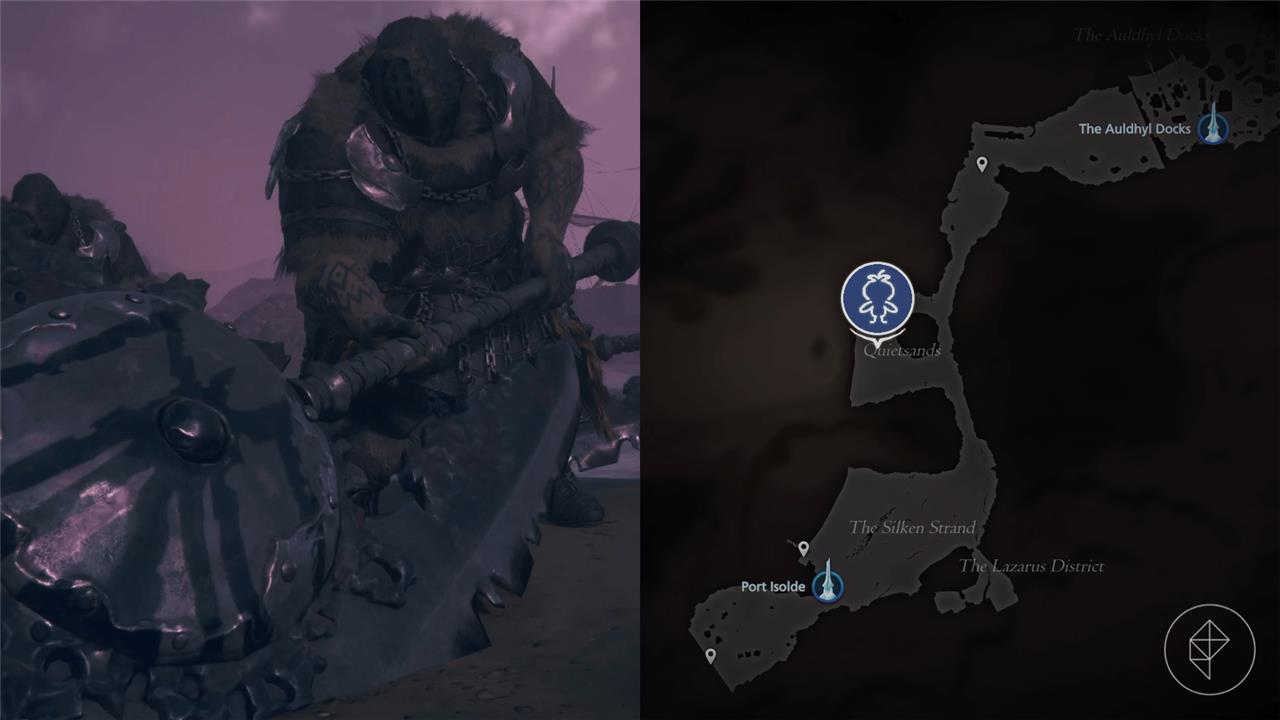
The Mageth Brothers hunt is unlocked after completing the “Fire in the Sky” main story quest.
Level: 38, A-rank
Location: Quient Sands in Rosaria
Obelisk: Port Isolde
Rewards: Two meteorite, 13,000 gil, and 30 renown
Ruin Reawakened location
Ruin Reawakened can be found in the Velkroy Desert within the Dhalmekian Republic. The easiest way to reach it is by fast traveling to the Velkroy Desert obelisk and heading west until you encounter the massive dragon roaming the open sands. This Rank S Notorious Mark is one of the most challenging foes, so prepare with strong gear and high-level abilities before taking it on.
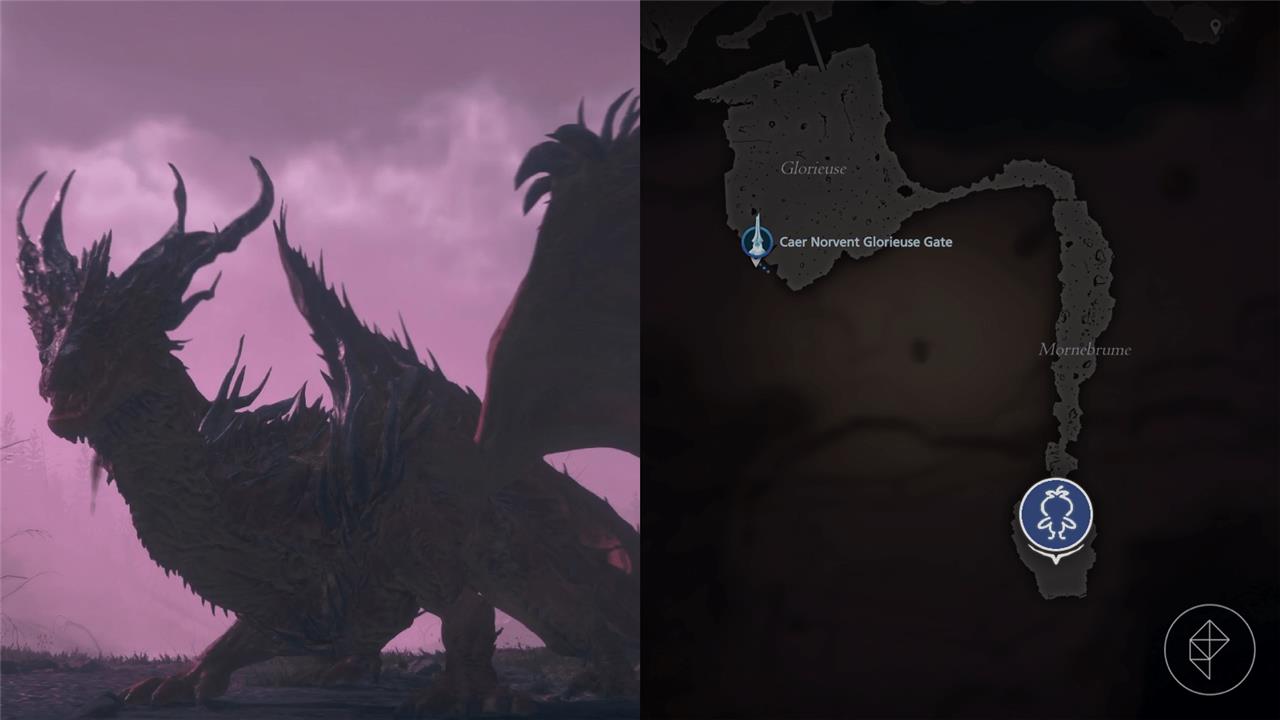
The Ruin Reawakened hunt is unlocked after completing the “Fire in the Sky” main story quest.
Level: 50, S-rank
Location: South of Mornebrume in Sanbreque
Obelisk: Caer Norvent Glorieuse Gate
Rewards: One orichalcum, one fallen enigma, one amber, one empty shard, 30,000 gil, and 60 renown
The Pack location
The Pack can be found in the Dhalmekian Republic, southwest of The Jaw. This Level 38 mark roams a deserted area filled with hostile creatures, so prepare for a challenging fight. Accessing this spot requires progressing the main story far enough to open the surrounding region. Keep an eye out for its pack behavior-it can close the distance quickly and overwhelm unprepared players.
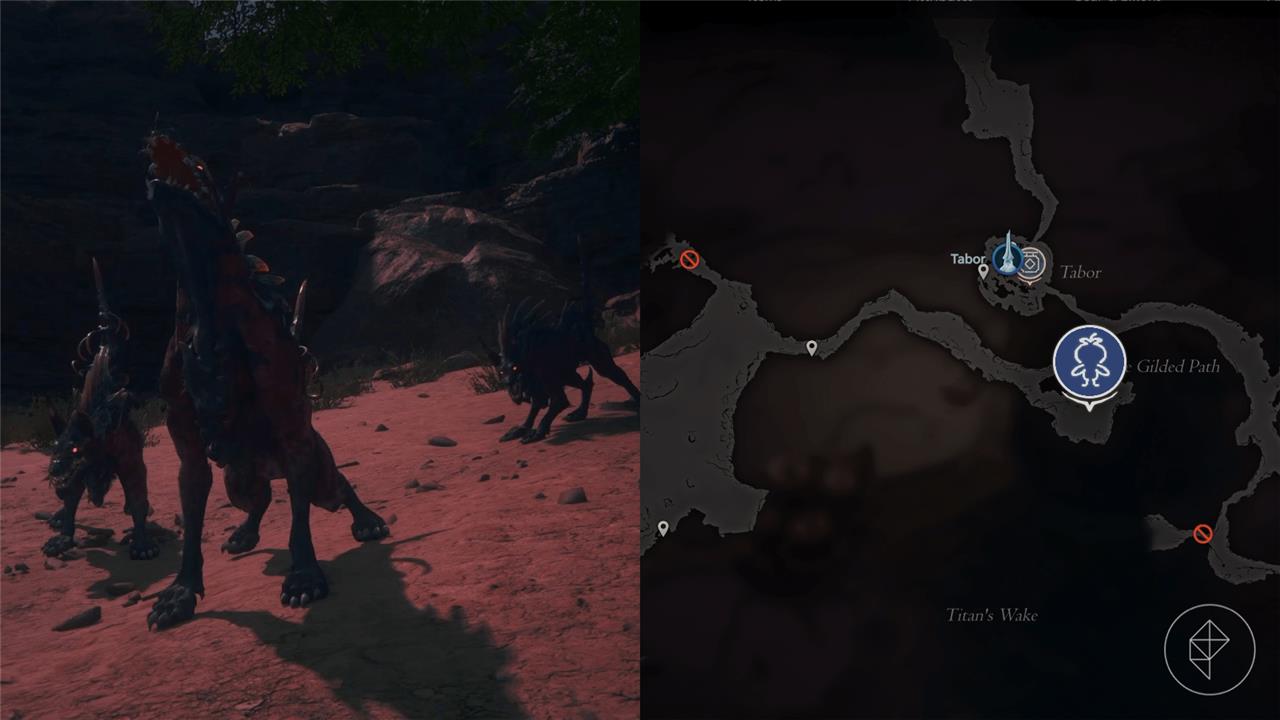
The Pack hunt is unlocked after you complete the “Things Fall Apart” main scenario quest.
Level: 33, C-rank
Location: South of Tabor in Dhalmekia
Obelisk: Tabor
Rewards: 20 sharp fangs, 50 bloody hide, 10 magicked ash, 5,800 gil, and 10 renown
The Man in Black (Holy Trumpitour) location
Holy Trumpitour, known as The Man in Black, waits at the end of Cellar Passage in Lostwing, part of the Holy Empire of Sanbreque. Fast travel to the Lostwing obelisk, then head east along the pier to the underground entrance on the right after the first fork. The path through the dark corridors leads straight to an outdoor clearing where the level 36 B-rank mark stands ready.
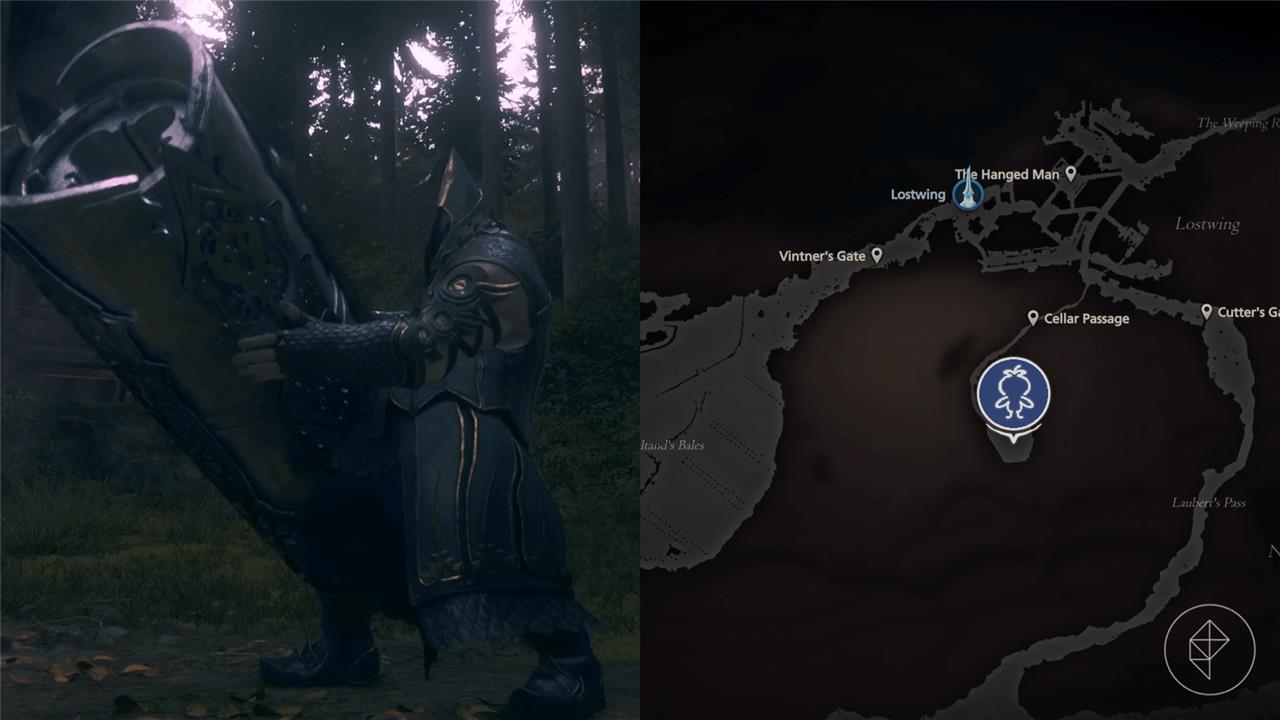
The Man in Black (Holy Trumpitour) hunt is unlocked after starting the “Rekindling the Flame” side quest, which is unlocked during the “Cloak and Dagger” main scenario quest.
Level: 36, B-rank
Location: At the end of the cellar passage in Lostwing in Sanbreque
Obelisk: Lostwing
Rewards: One scarletite, one meteorite, 9,800 gil, and 20 renown
Dread Comet hunt location
The Dread Comet can be found in the Velkroy Desert within the Dhalmekian Republic. To reach this powerful mark, travel to The Velkroy Desert obelisk and move northwest toward the open dunes. The monster patrols a wide area, making visibility easy but the fight challenging due to its speed and strength. Prepare for quick dodges and high-impact attacks, as this foe can punish slow reactions with devastating blows.
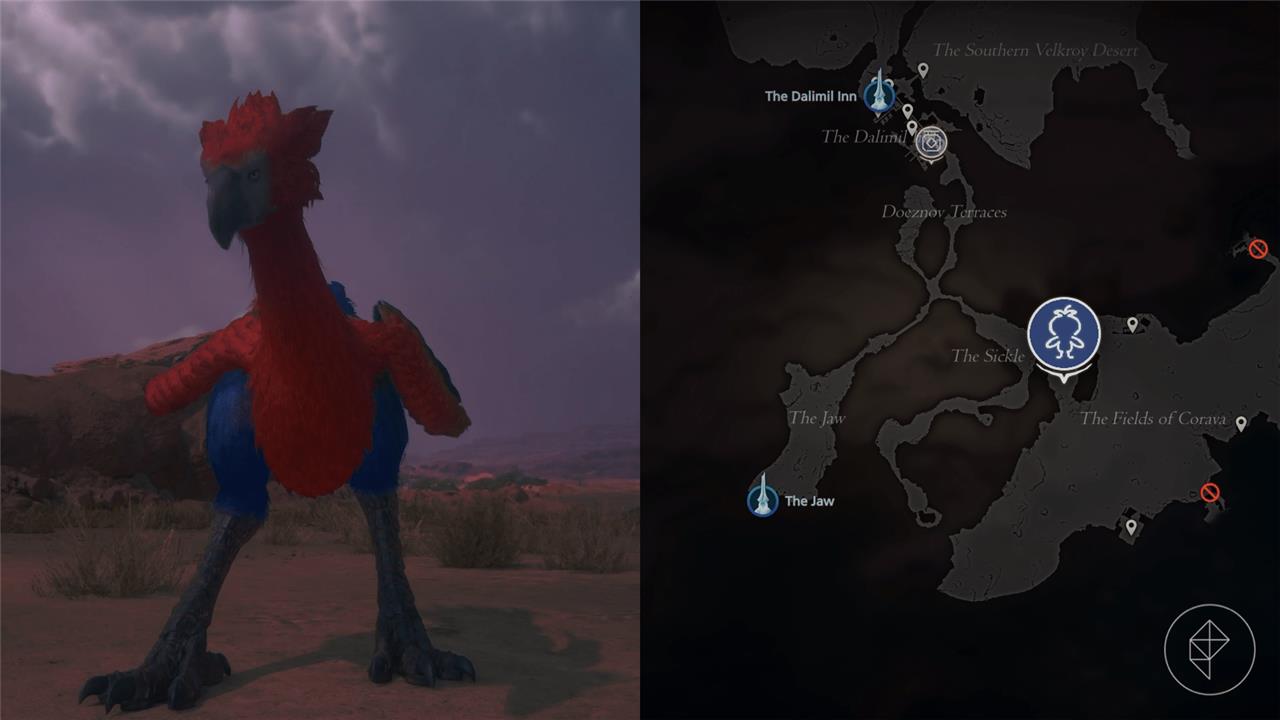
The Dread Comet hunt is unlocked after completing the “Evenfall” main scenario quest.
Level: 38, A-rank
Location: East of The Sickle in Dhalmekia
Obelisk: The Jaws
Rewards: One comet feather, 13,000 gil, and 30 renown
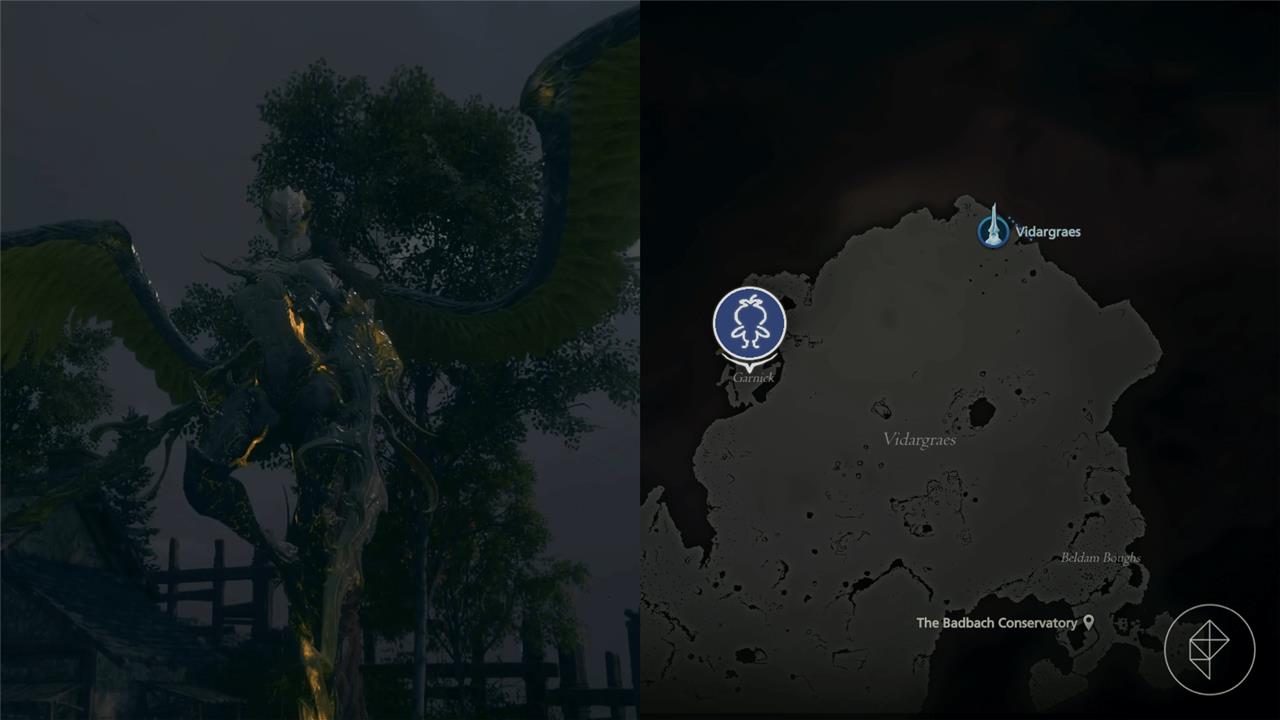
Carrot hunt location
The Carrot hunt takes place in the fields of Vidargraes, an area filled with overgrown vegetation and dangerous creatures. The mark, known as “Carrot,” is a powerful Morbol that appears after completing specific side quests involving the Cactuar Garden. To reach its location, travel northeast from Tabor and follow the dirt path leading deeper into the woods. Players should prepare for a fight against poison and area-wide attacks, as Carrot uses several status-inflicting abilities typical of Morbols.
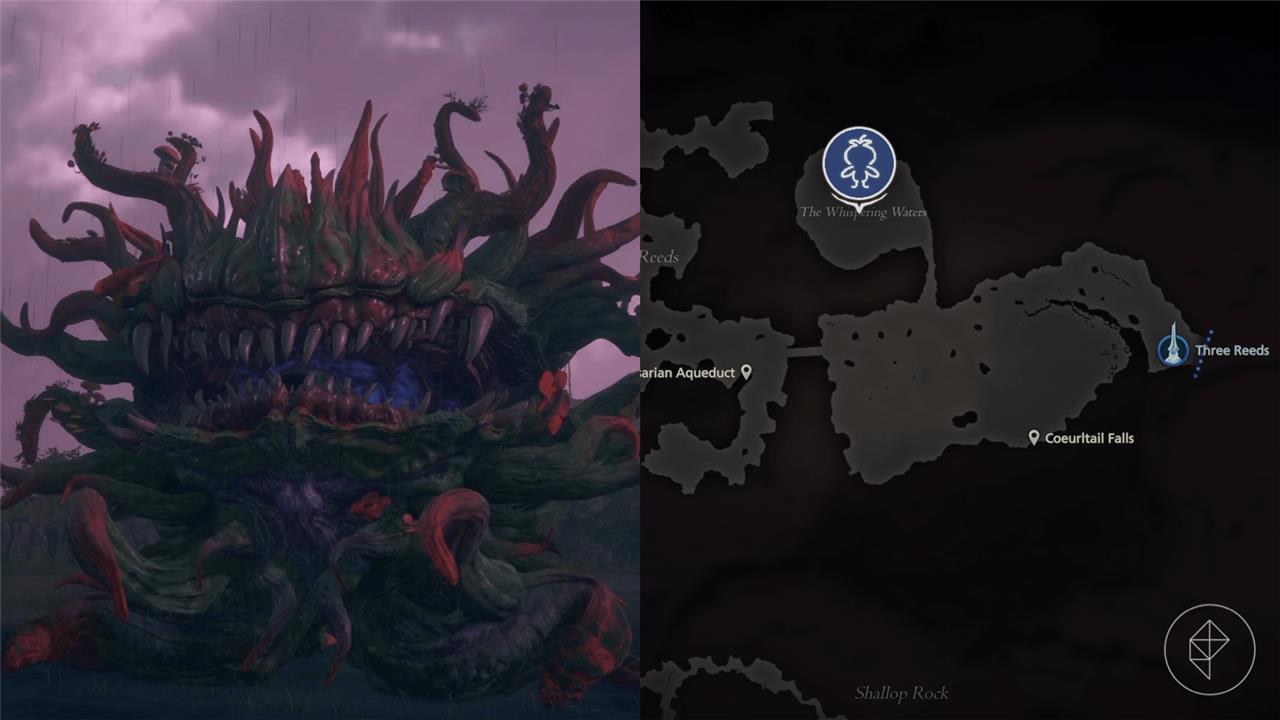
The Carrot hunt is unlocked during the “Please Sir, Can I Have Some Morbol” side quest, which is given to you by Nigel in the Hideaway during the “A Song of Hope” main scenario quest. You must also complete Nigel’s first side quest, “The Root of the Problem.”
Level: 35, B-rank
Location: The Whispering Waters in Rosaria
Obelisk: Three Reeds
Rewards: One morbol tendril, one morbol flower, 10,000 gil, and 20 renown
The Tricephalic Terror (Gorgimera) hunt location
The Tricephalic Terror, also known as the Gorgimera, appears in the Velkroy Desert within the Dhalmekian Republic. This massive beast roams the open sands southwest of The Dalimil Inn, waiting for challengers brave enough to face its mix of draconic and leonine fury. Equipped with devastating elemental attacks and wide-reaching strikes, it’s wise to prepare for both physical and magical damage before entering the area.
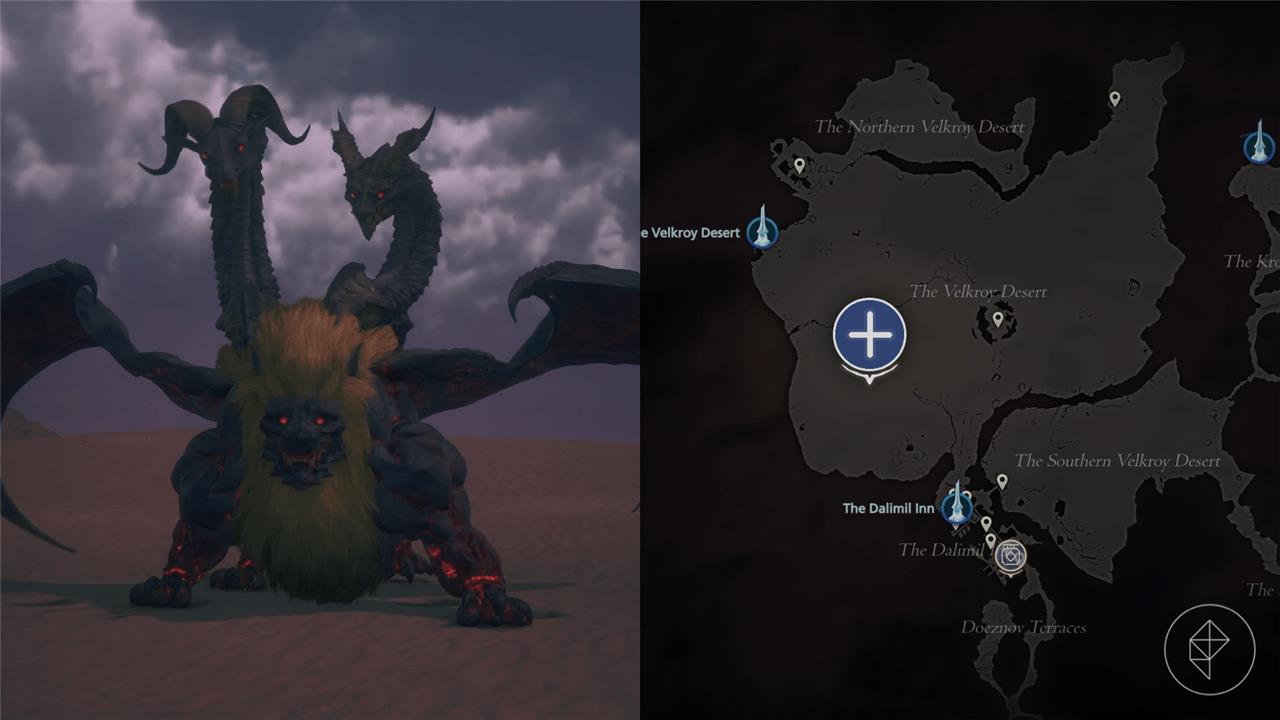
The Tricephalic Terror (Gorgimera) hunt is unlocked during the “Across the Narrow” main scenario quest.
Level: 45, S-rank
Location: West Velkroy Desert in Dhalmekia
Obelisk: The Dalimil Inn
Rewards: One orichalcum, 20,000 gil, and 50 renown
Pandemonium hunt location
The Pandemonium can be found in the Waloed region, south of the Vidargraes Obelisk. This powerful foe appears only after progressing far into the main story, so expect a challenging fight. The area is isolated and swarming with strong enemies, making preparation key before heading in. Bringing upgraded gear and abilities suited for sustained combat will help you withstand its devastating attacks.
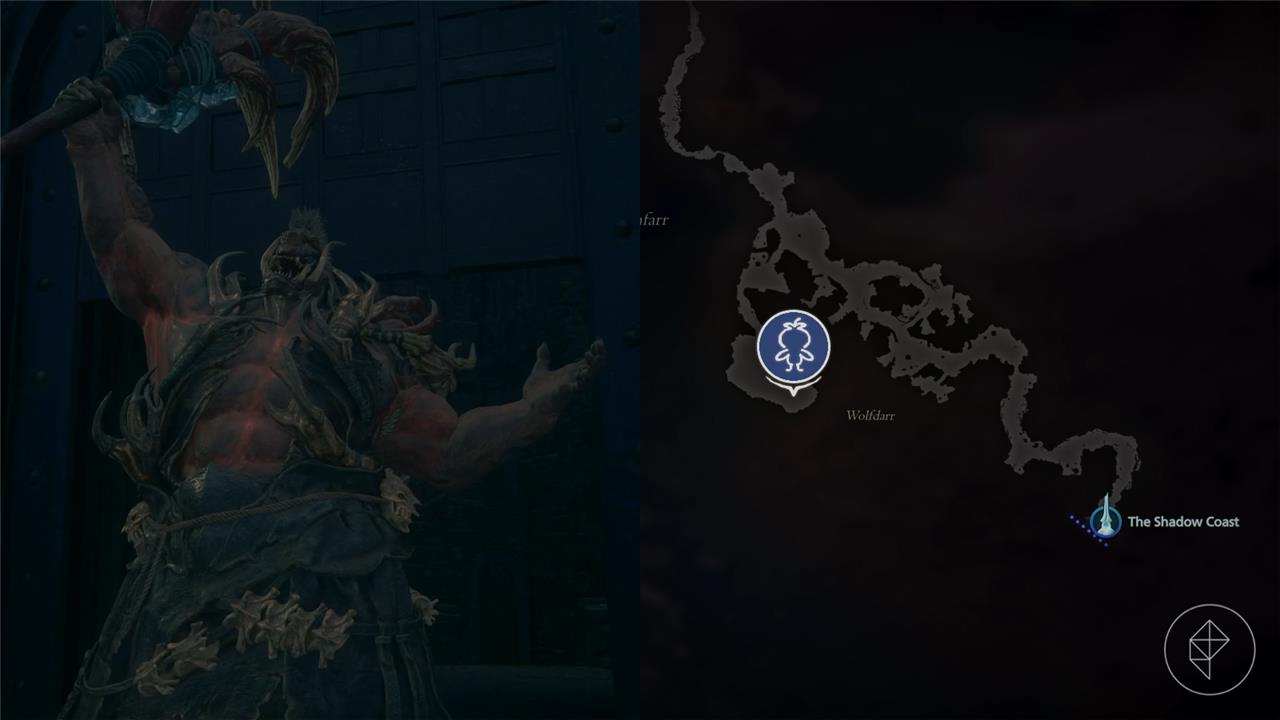
The Pandemonium hunt is unlocked during the “Across the Narrow” main scenario quest.
Level: 45, S-rank
Location: South Skaithfarr in Southwestern Ash Deadlands
Obelisk: The Shadow Coast
Rewards: One stained loincloth, 20,000 gil, and 50 renown
Gobermouch hunt location
Gobermouch can be found in the northern region of the Rosarian territory, specifically within the Royal Meadows area of Rosaria. The creature appears after progressing through the main story far enough for higher-rank targets to become available on the Hunt Board. Approach the battle with caution, as Gobermouch’s attacks inflict status effects that can turn the tide quickly. Bringing accessories or abilities that prevent confusion and poison can make the encounter far more manageable.
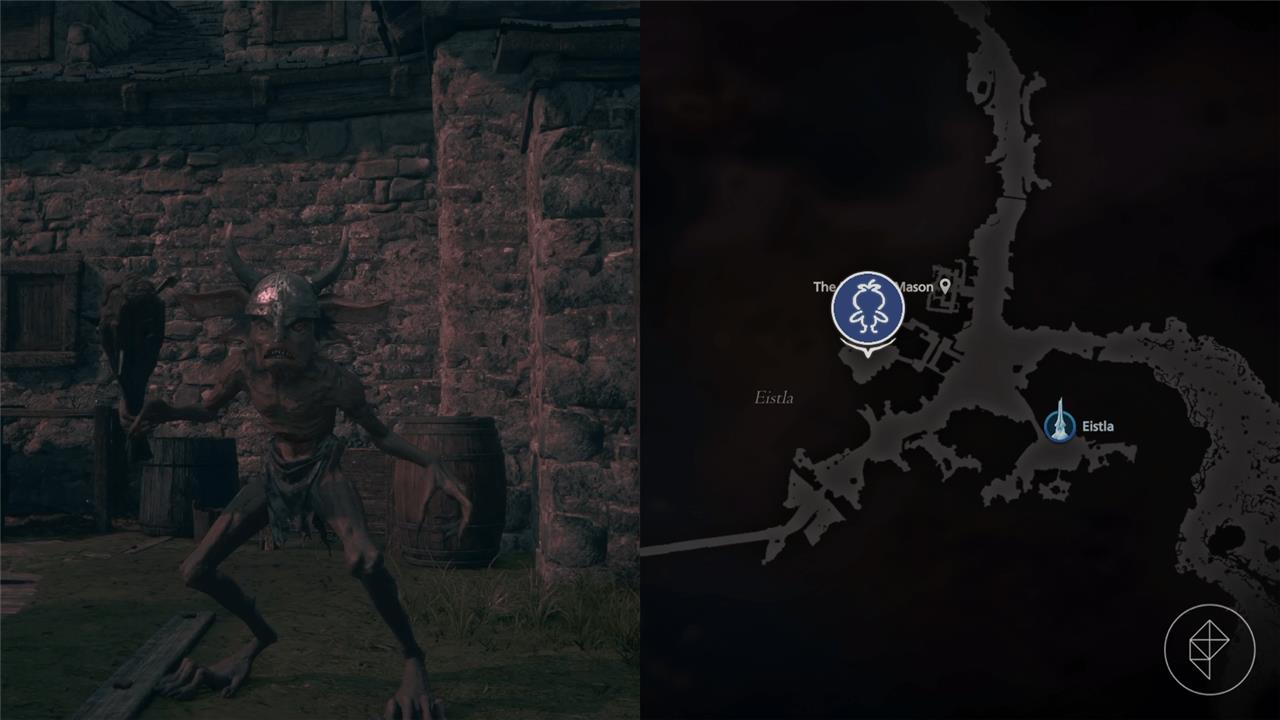
The Gobermouch hunt is unlocked after completing the “The Last King” main scenario quest.
Level: 38, A-rank
Location: South of the Maudlin Mason in Waloed
Obelisk: Eistla
Rewards: One primitive battlehorn, 15,000 gil, and 30 renown
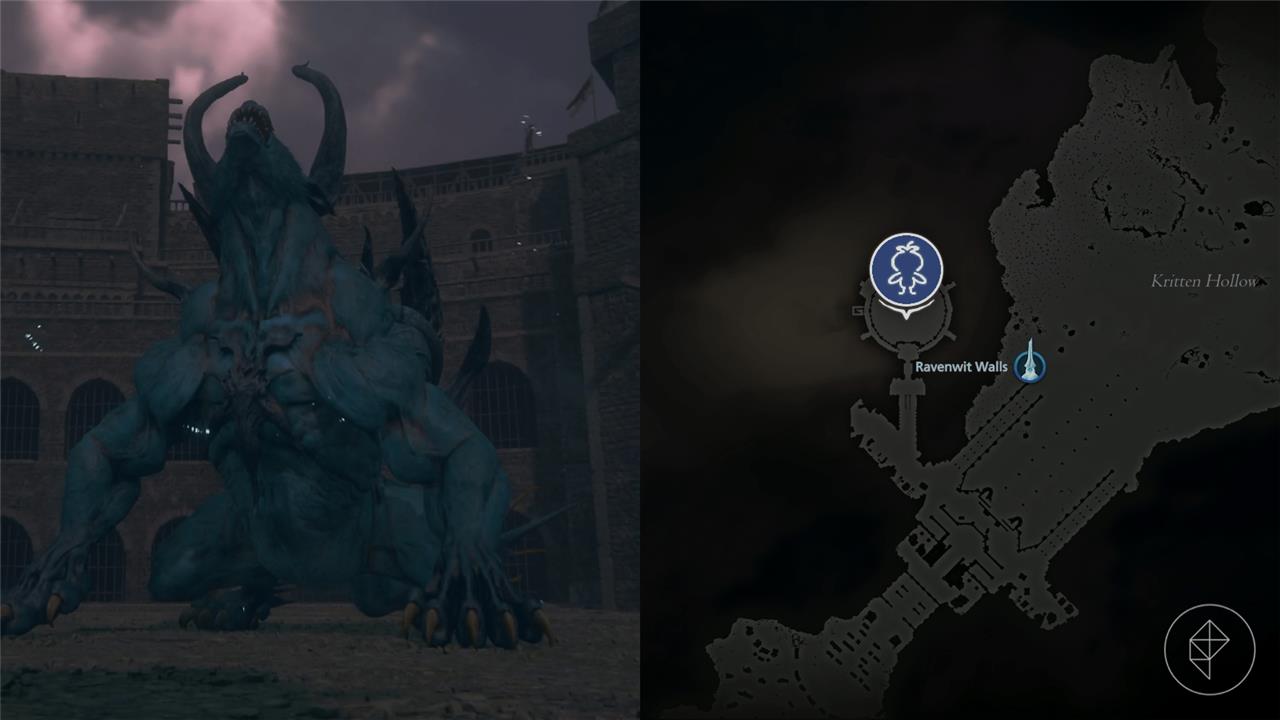
Bygul hunt location
Bygul can be found prowling in the northeast of the Holy Empire of Sanbreque, near the Royal Meadows. The area is filled with strong enemies, so players should prepare well before approaching. This hunt becomes available once Clive progresses far enough in the story, and tracking it requires careful observation of the surrounding terrain and weather. Defeating Bygul rewards rare crafting materials and a significant amount of experience and gil.
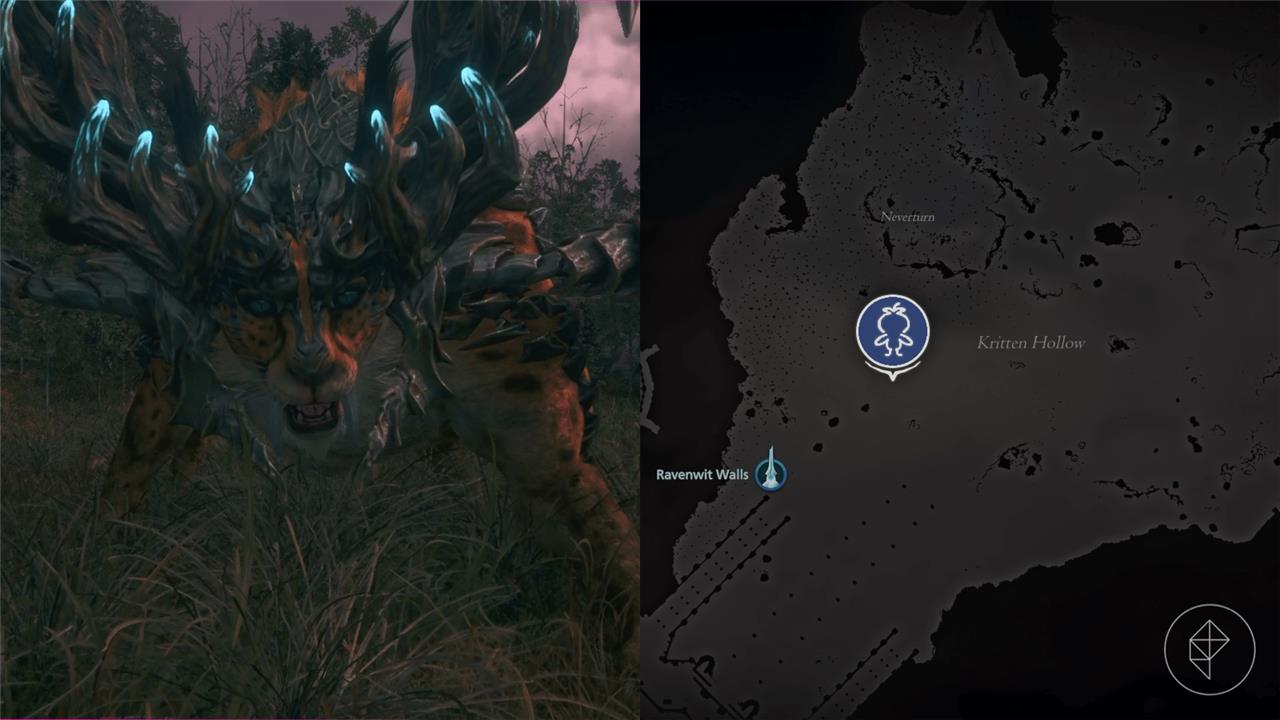
The Bygul hunt is unlocked after completing the “The Last King” main scenario quest.
Level: 40, A-rank
Location: Kritten Hollow in Waloed
Obelisk: Ravenwit Walls
Rewards: One coeurl whisker, one meteorite, 16,000 renown, and 35 renown
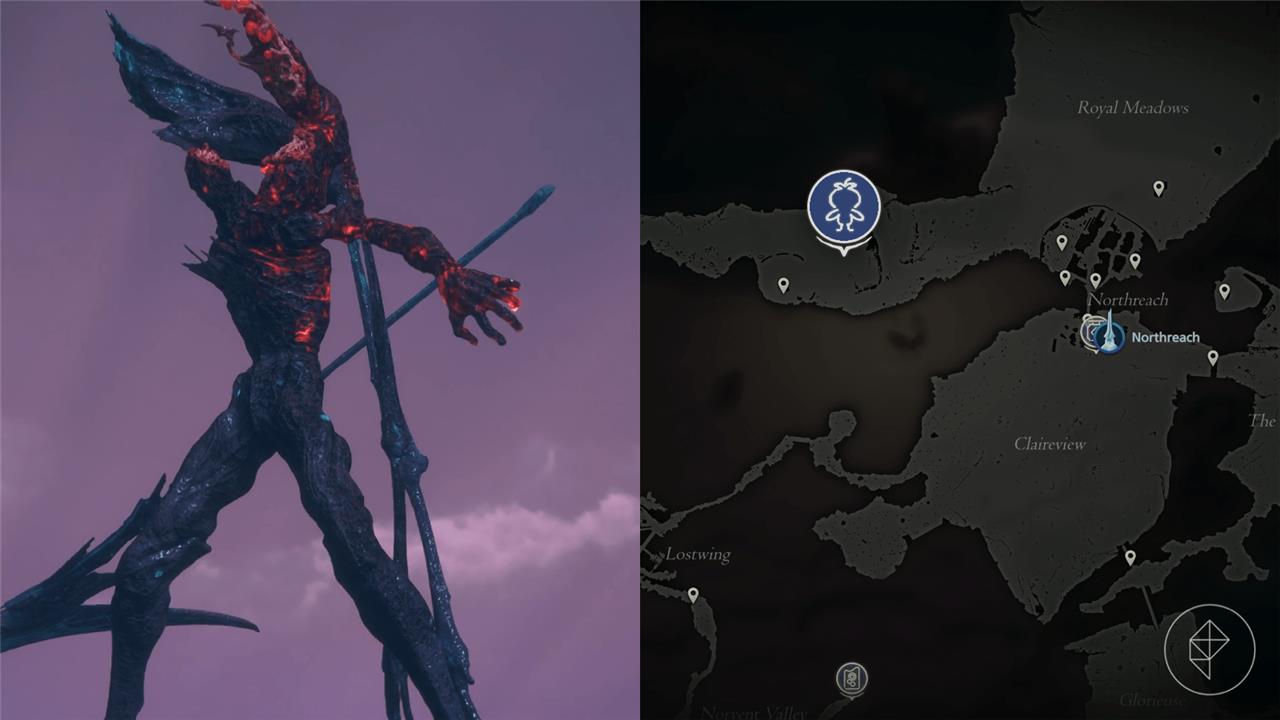
Agni hunt location
Agni can be found in the Sanbreque region, specifically within the Royal Meadows near the Glorieuse Plain. This fiery enemy appears after progressing through the story and accepting its corresponding Hunt Board notice. Agni favors open ground and uses powerful fire-based attacks that demand careful dodging and timing. Bringing gear or abilities that resist fire damage greatly improves the chance of survival during the encounter.
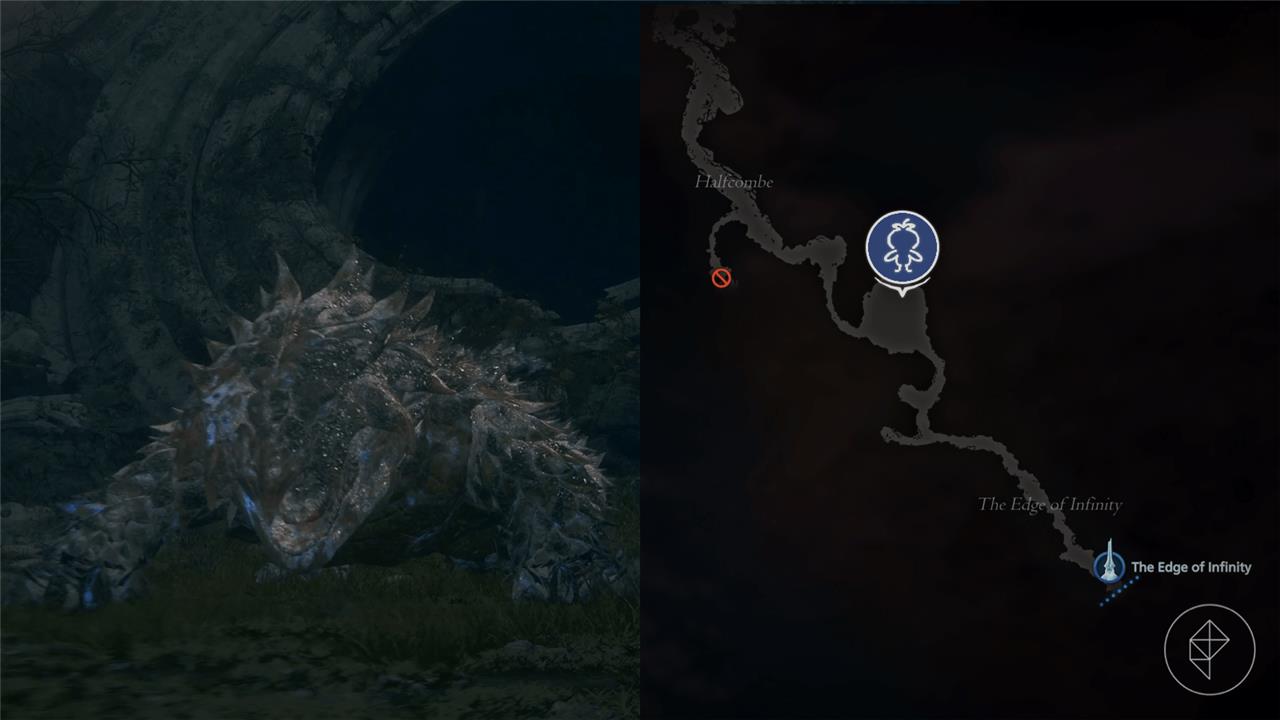
The Agni hunt is unlocked after completing the “The Last King” main scenario quest.
Level: 40, A-rank
Location: Southeast of Halfcombe in Ash Deadlands
Obelisk: The Edge of Infinity
Rewards: One stone tongue, 15,500 gil, and 35 renown
Usher to the Underworld (Thanatos) hunt location
Usher to the Underworld, also known as Thanatos, can be found in the marshy region of the Stillwind within the Rosarian territory. This S-Rank foe appears near a secluded area surrounded by dense fog and ruins, making it easy to overlook. Bring strong lightning-based attacks to counter its powerful dark magic and relentless melee strikes. Defeating Thanatos rewards valuable crafting materials and a significant amount of renown, making this encounter well worth the effort.
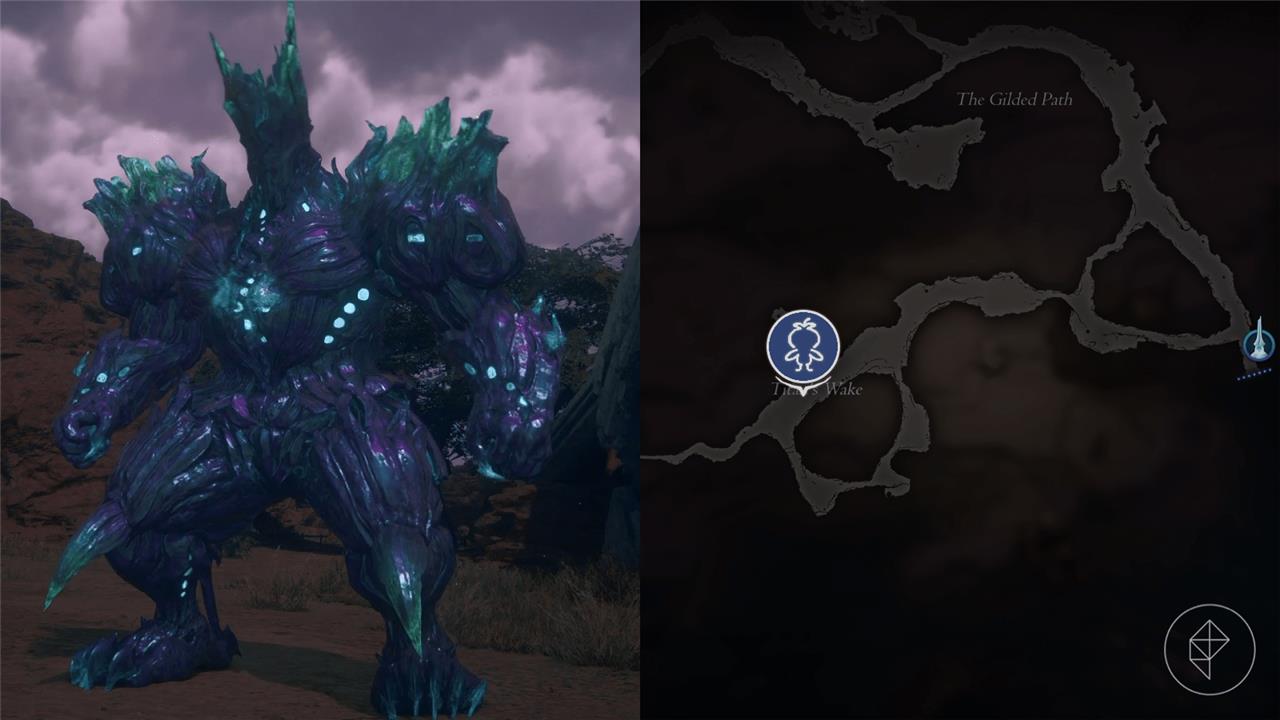
The Usher to the Underworld (Thanatos) hunt is unlocked after completing the “The Last King” main scenario quest.
Level: 42, A-rank
Location: Titan’s Wake in Dhalmekia
Obelisk: The Gilded Path or Kretov
Rewards: One darksteel, 17,000 gil, 45 renown
The Blood Moon (Terminus) hunt location
The Blood Moon (Terminus) mark can be found in the Kingdom of Waloed, deep within the region of The Sorrowise. This powerful A-Rank foe appears only after progressing through the main story and completing select side quests tied to later chapters. The fight demands careful timing and awareness, as Terminus uses quick, wide-ranged attacks that can punish reckless players. It’s best approached with a balanced build combining high stagger potential and sustained healing, ensuring you can withstand its relentless magical assaults.
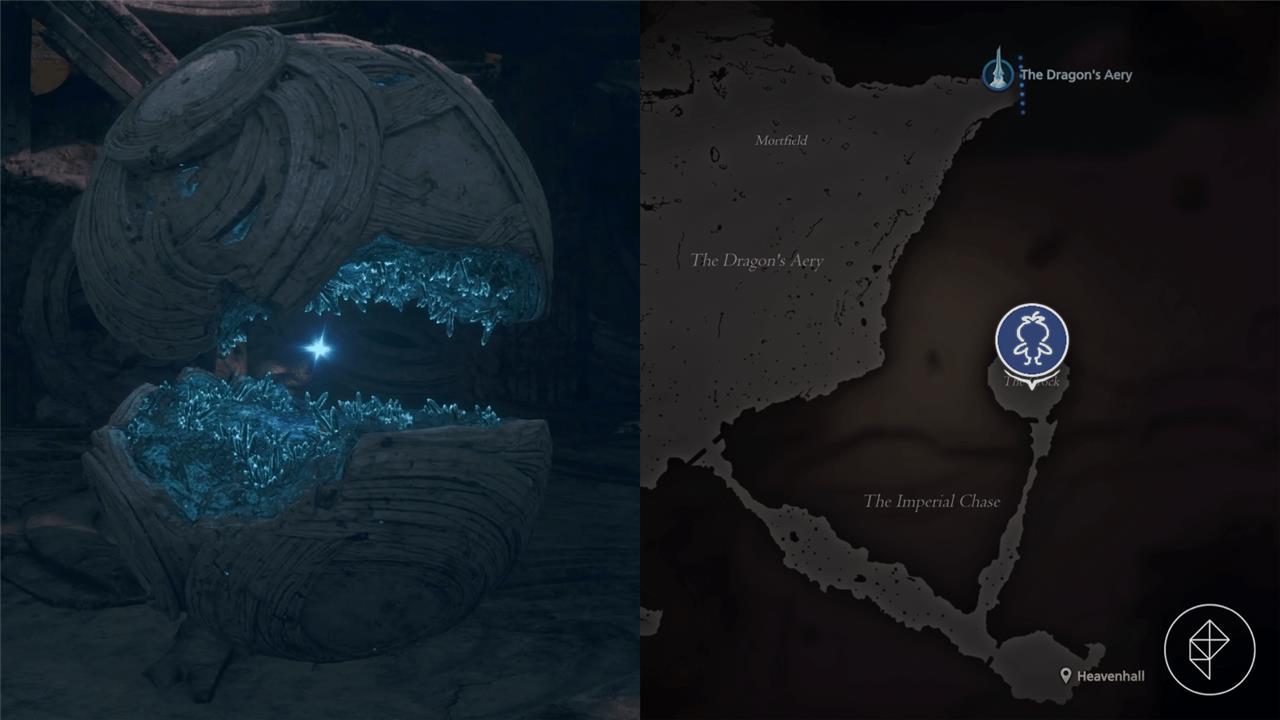
The Blood Moon (Terminus) hunt is unlocked after completing the “The Last King” main scenario quest.
Level: 40, A-rank
Location: The Crock in Sanbreque
Obelisk: The Dragon’s Aery
Rewards: Two meteorite, 9,800 gil, and 35 renown
The Masterless Marauder (Behemoth King) hunt location
The Masterless Marauder, also known as the Behemoth King, can be found in the northern region of Vidargraes in the Kingdom of Waloed. This powerful S-rank foe roams the fields near the Vidargraes Obelisk, and reaching it requires progressing through the main story until the later stages of the game. The surrounding area is open and dangerous, so players should be prepared for a challenging fight with high endurance and powerful lightning-based attacks.
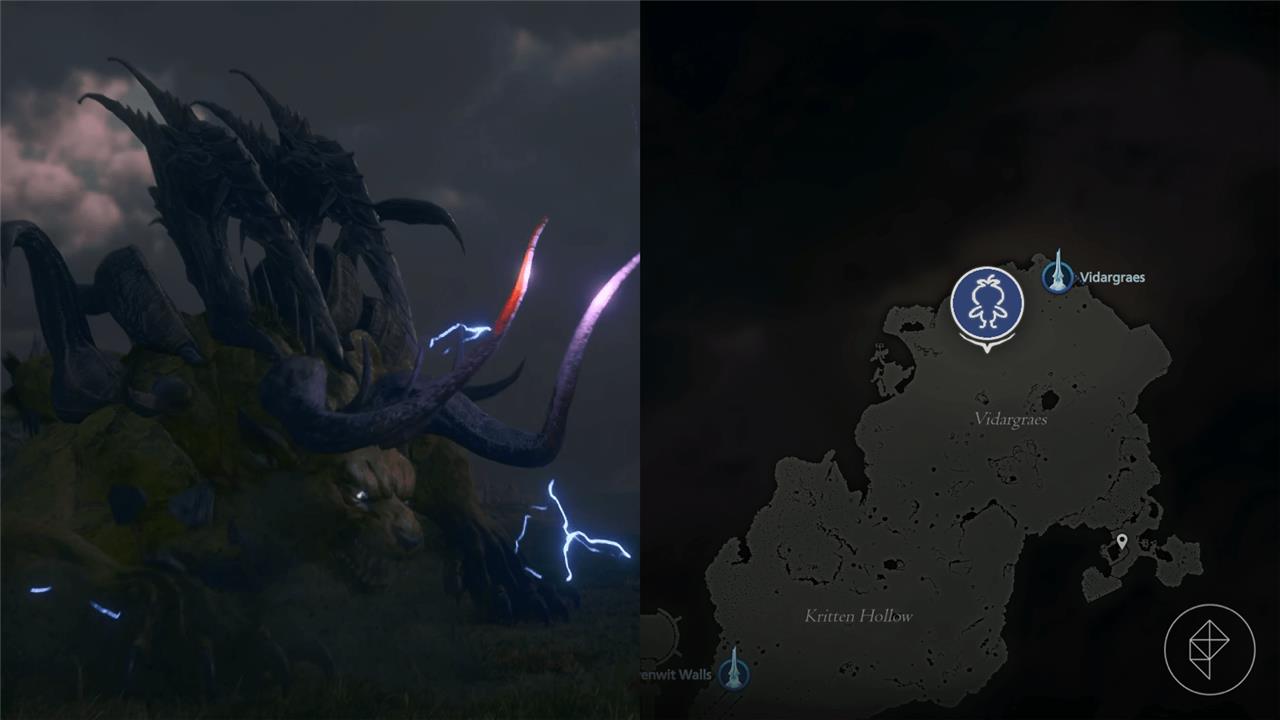
The Masterless Marauder hunt is unlocked after completing the “Nobody’s Tool” side quest, which is unlocked during the “Back to Their Origin” main scenario quest.
Level: 47, S-rank
Location: Northern Vidargraes in Waloed
Obelisk: Vidargraes
Rewards: One behemoth shackle, one orichalcum, 20,000 gil, and 55 renown
Kuza Beast hunt location
Kuza Beast can be found in the Velkroy Desert, located in the Dhalmekian Republic region. To reach it, travel to the Dalimil Inn and then head southwest across the sand dunes until you encounter its territory. This S-Rank target is known for its aggressive attacks and wide area strikes, so keeping distance while dodging is key. Defeating it rewards a large amount of experience, gil, and rare crafting materials used for late-game equipment.
The Kuza Beast hunt is unlocked during the “Nobody’s Tool” side quest, which is unlocked during the “Back to Their Origin” main scenario quest.
Level: 40, A-rank
Location: Balmung Dark in Waloed
Obelisk: Ravenwit Walls
Rewards: One behemoth shackle, two meteorite, 15,000 gil, and 35 renown
The Wailing Banshee hunt location
The Wailing Banshee appears in the Sorrowise region south of the Greatwood in Dhalmekia. Players reach this spot during the “Blacksmith’s Blues III” side quest by heading to the Caer Norvent area and following the path eastward past the broken bridge toward the Howling Gorge obelisk. Defeat nearby foes and proceed north along the elevated cliffs until the marker triggers the confrontation with this high-threat Notorious Mark.
The Wailing Banshee hunt is unlocked after completing the “An Inconvenient Truth” side quest, which is unlocked during the “Back to Their Origin” main scenario quest.
Level: 41, A-rank
Location: Garnick in Waloed
Obelisk: Vidgraes
Rewards: One clouded eye, 20 sharp fang, 10 magicked ash, 9,700 gil, and 45 renown
The Grim Reaper (Prince of Death) hunt location
The Grim Reaper, also known as the Prince of Death, can be found in the southeastern region of the Dhalmekian Republic, near the cemetery in Waloed territory. This S-rank mark poses an extreme challenge, using powerful dark magic and area-of-effect attacks that punish players who linger too close. To succeed, prepare with high-level gear and focus on timing dodges carefully to avoid its lethal scythe strikes.
The Grim Reaper (Prince of Death) hunt is unlocked after completing the “Under New Management II” side quest, which is unlocked during the “Back to Their Origin” main scenario quest.
Level: 40, A-rank
Location: East of Westwatch in Sanbreque
Obelisk: Northreach
Rewards: One darksteel, 15,000 gil, and 45 renown
Knight of the Splendent Heart hunt location
The Knight of the Splendent Heart appears in the Sorrowise region south of the Imperial Chase. Head to the broken bridge southeast of Eistla along the border with Dhalmekia, then drop down the cliffs to the beach area below. This mark patrols the sandy stretch near the water’s edge, making it visible from the upper paths.
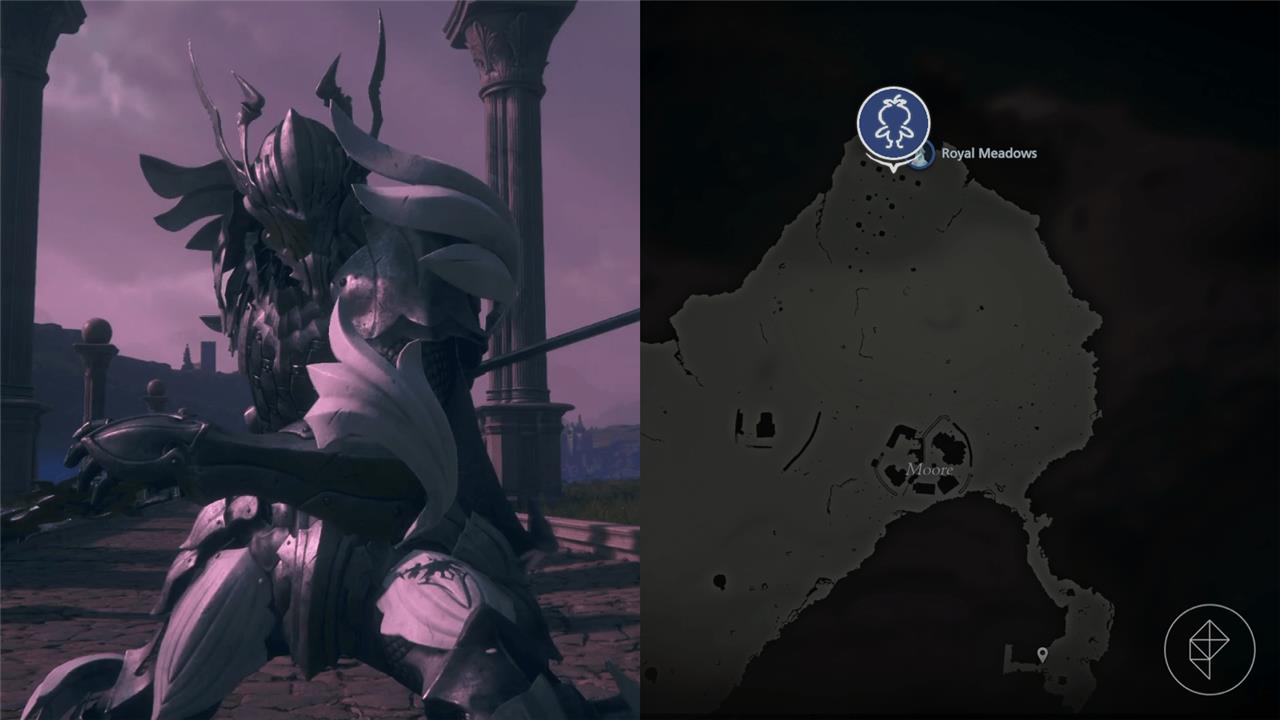
The Knight of the Splendent Heart hunt is unlocked after completing the “Under New Management II” side quest, which is unlocked during the “Back to Their Origin” main scenario quest.
Level: 42, A-rank
Location: Beside Royal Meadows obelisk in Sanbreque
Obelisk: Royal Meadows
Rewards: Two meteorite, 17,000 gil, and 35 renown
Tips for beating hunts
Use elemental weaknesses and stagger opportunities to bring down powerful marks faster. Prepare with the right gear, accessories, and Eikonic abilities suited to each foe’s attack pattern. Watch for tells before big moves and use precision dodges to open counter windows. Summons and limit breaks can turn the tide if timed carefully, especially during high-rank targets. Keep potions and tonics stocked-endurance is just as important as striking power.
The difficulty range for hunts is quite large, so you may not need help on the C-rank bounties, but the A-rank and S-rank bounties will test your strength.
Here are a few ways to make your hunts a little easier.
- Save before heading into the hunt location. A lot of the notorious marks will pack a punch, and the S-ranks especially have the ability to kill you in two hits. If you do end up dying, you’ll have to respawn at the closest obelisk, which in most cases is very far away. Save yourself some time by saving just before the fight, so you can revert to your save file instead of making the trek back.
- Bring your best equipment. Visit the blacksmith, Blackthorne, in the Hideaway to craft the best weapons and equipment that you can. You’ll want to increase your damage output and defenses as high as you can before taking on the more difficult notorious marks.
- Stock up on potions. Head to Charon’s shop and fill up your inventory with items. Pick up potions, elixirs, or whatever your heart desires, but make sure to head into the fight prepared.
- Upgrade your abilities. If you have any ability points lying around, use them to increase the strength of your abilities by upgrading them in the abilities menu. Any improvement to your damage output will be a great help. If you don’t like the upgraded ability, you can refund any of your upgrades at no cost whenever you want.
- Try, try again. Some of the more difficult hunts will really test your patience as the fearsome foes deal half of your health in one hit. However, there is no punishment in dying. If you know you’re going to die, focus on learning the enemy’s moveset to head into the next battle with a better game plan.
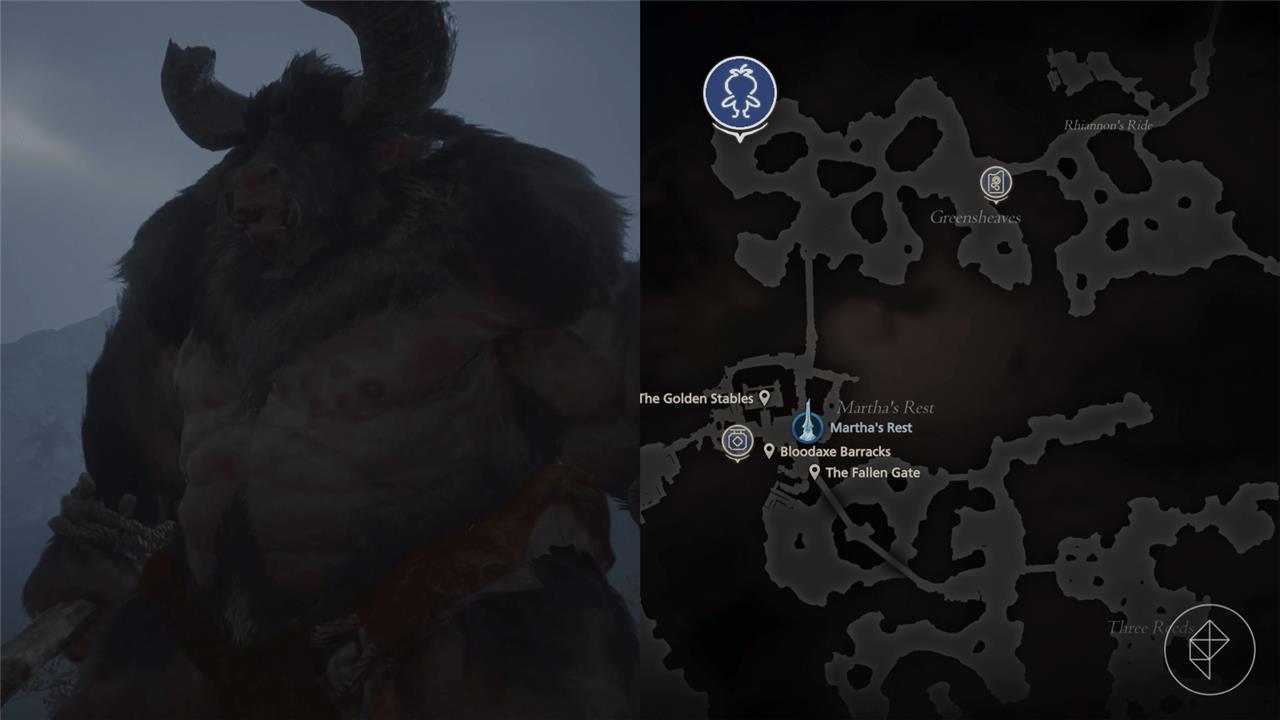
How to beat Sekhret hunt
Sekhret is a B-Rank Notorious Mark hunt in Final Fantasy 16, resembling a powerful minotaur located northwest of Greensheaves in Rosaria. Defeating it requires precise dodging of its melee combos and exploiting long recovery windows after attacks.
Key Attacks and Counters
Sekhret relies solely on close-range club swings and charges with no magic or projectiles, making mid-range positioning ideal.
| Attack | Description | Counter Strategy |
|---|---|---|
| Bull Charge | Double head-down rush toward Clive. | Dodge sideways at mid-range; expect the second charge. |
| Swing/Slam | Slow club pull-back then strike. | Dodge laterally during wind-up; punish recovery with combos. |
| Big Swing | Spinning overhead club circle while advancing. | Backpedal and spam dodge; rush in post-recovery for heavy damage. |
| Raging Bull | Multi-hit frenzy ending in slam (below 50% HP). | Keep full dist |
Where is Sekhret located in FF16
Sekhret is located in the northwestern corner of Greensheaves in Rosaria, west of Rhiannon’s Ride and north of Martha’s Rest.
Fast Travel Directions
Fast travel to the Martha’s Rest obelisk, then head north from the village along the left side of the map, past any dead ends, until reaching a marshy clearing at the water’s edge. Sekhret, a level 31 B-Rank minotaur, spawns there if the hunt is active on the board (unlocked after the “Fire and Ice” main quest).
Visual Reference
The spot is a small open field in the far northwest of Greensheaves, directly off the main road in the swamps around Martha’s Rest.