Boston’s Quarantine Zone hides more than danger-every note, artifact, and Firefly pendant deepens the story and rewards keen eyes. Here’s where to find them all before you move beyond the wall.
The “Quarantine Zone” has four sections: 20 Years Later, Beyond the Wall, The Slums, and The Cargo, but there will be no indication that you’re moving onto a different section as you’re playing. When starting your game, you can select and begin playing at any section from the Chapters option on the main menu.
Read on to find out when each section begins and ends, and where all of the collectibles can be found in “The Quarantine Zone.”
20 Years Later Collectibles
The “20 Years Later” chapter contains several collectibles scattered throughout the quarantine zone, including artifacts, Firefly pendants, and optional conversations. Explore the streets, checkpoint, and apartment buildings carefully to find them all. Some items are easy to miss during story moments, so sweep each area before progressing. Pay special attention to debris piles, shelves, and desks, where many artifacts are hidden. Collecting everything here helps build a fuller picture of the world and its survivors.
The “20 Years Later” section begins once you start playing as an older version of Joel, and ends when Joel and Tess enter the secret tunnel behind the shelf.
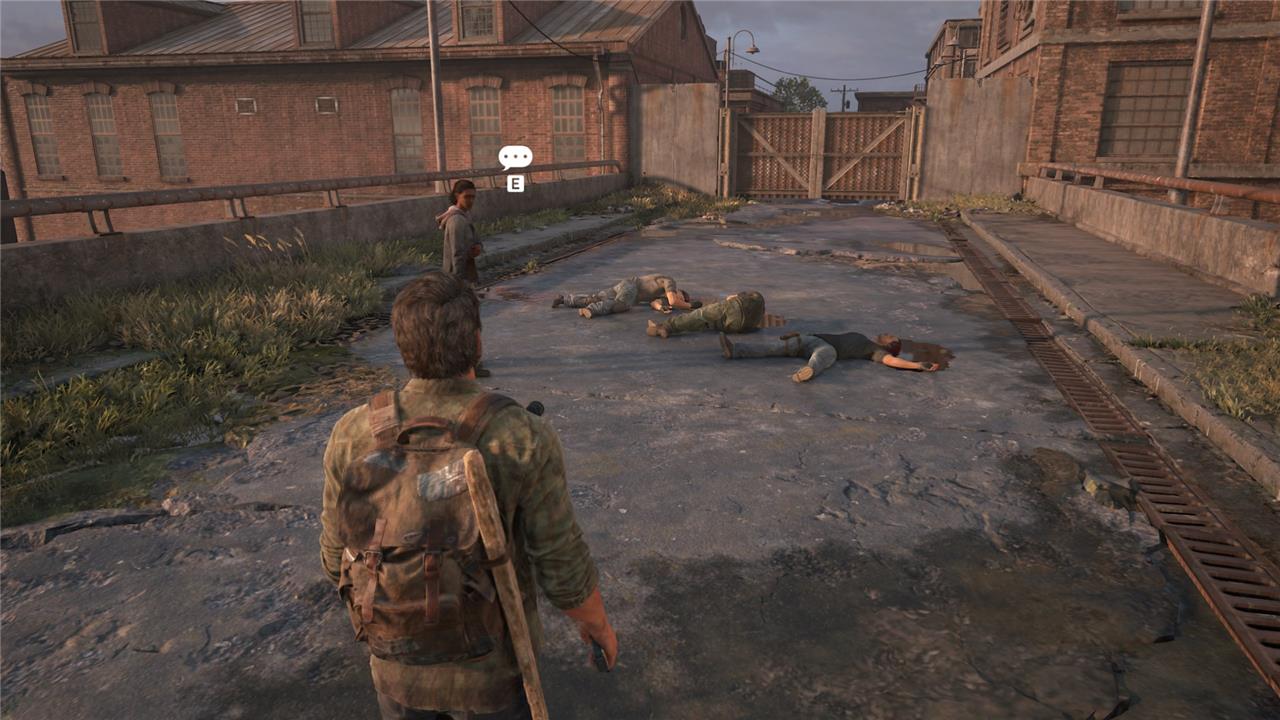
Optional Conversation 1 Location
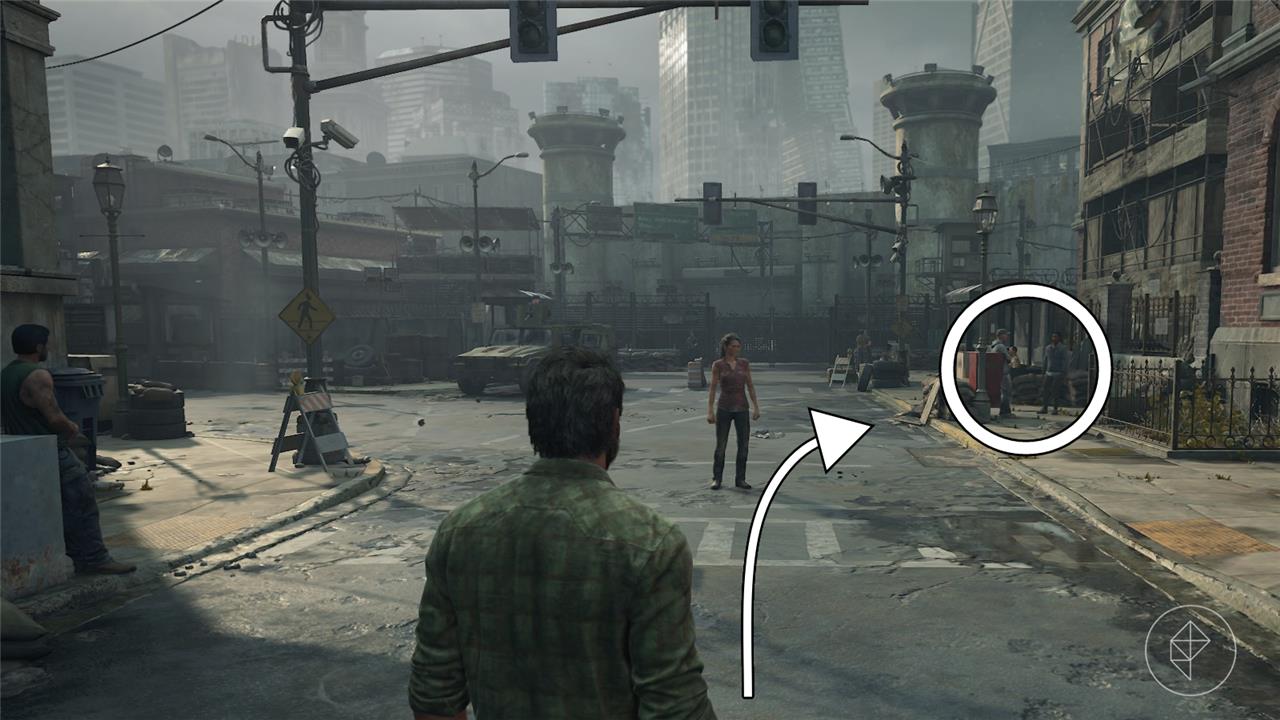
Before you turn left to reach the security checkpoint with Tess, look to the newspaper stands on the sidewalk to the right. Interact with the civilian leaning against the newspaper stand to start the dialogue option.
Beyond the Wall Collectibles
Beyond the Wall hides several secret items that add depth to the early story. Players can find Firefly pendants, artifacts, and optional conversations scattered throughout the destroyed streets and abandoned buildings. Keep an eye on dark corners and hard-to-reach spots, as many collectibles blend into the environment. Each item helps build the history of the quarantine zone and offers a closer look at the lives affected by its collapse.
The “Beyond the Wall” section starts as Joel and Tess enter the secret tunnel behind the shelf, and ends when they pass through the door guarded by a child.
Boston Q.Z. Map and Military Pamphlet Artifact Location
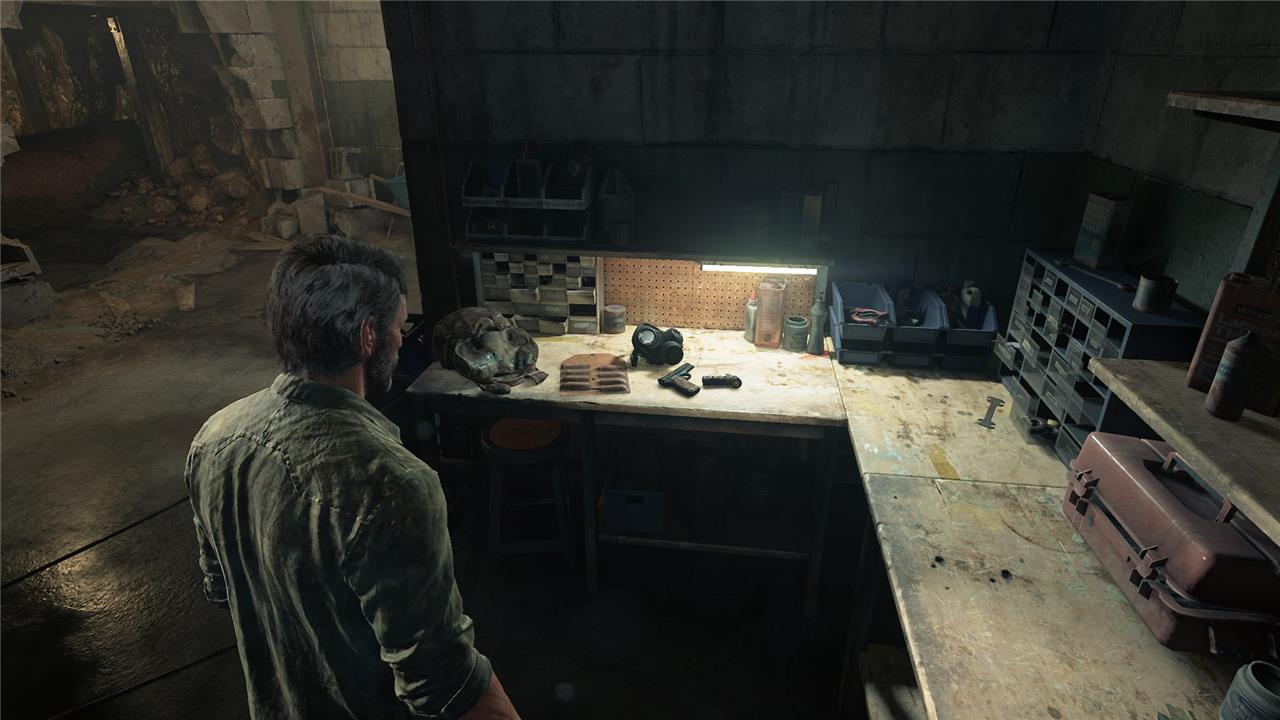
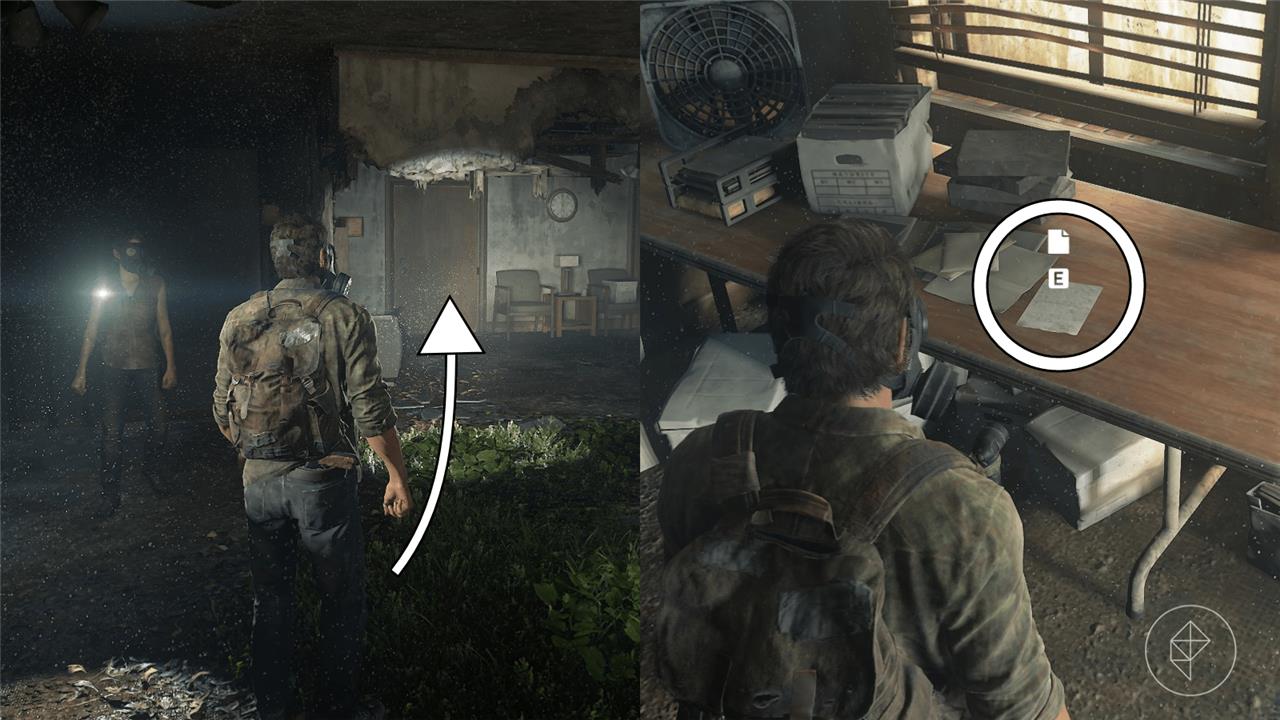
After you enter the secret tunnel behind the shelf, you’ll be instructed to pick up your equipment on the desk. You’ll automatically get the Boston Q.Z. Map and Military Pamphlet artifacts after you pick up your backpack, gun, and gas mask.
Optional Conversation 2 Location
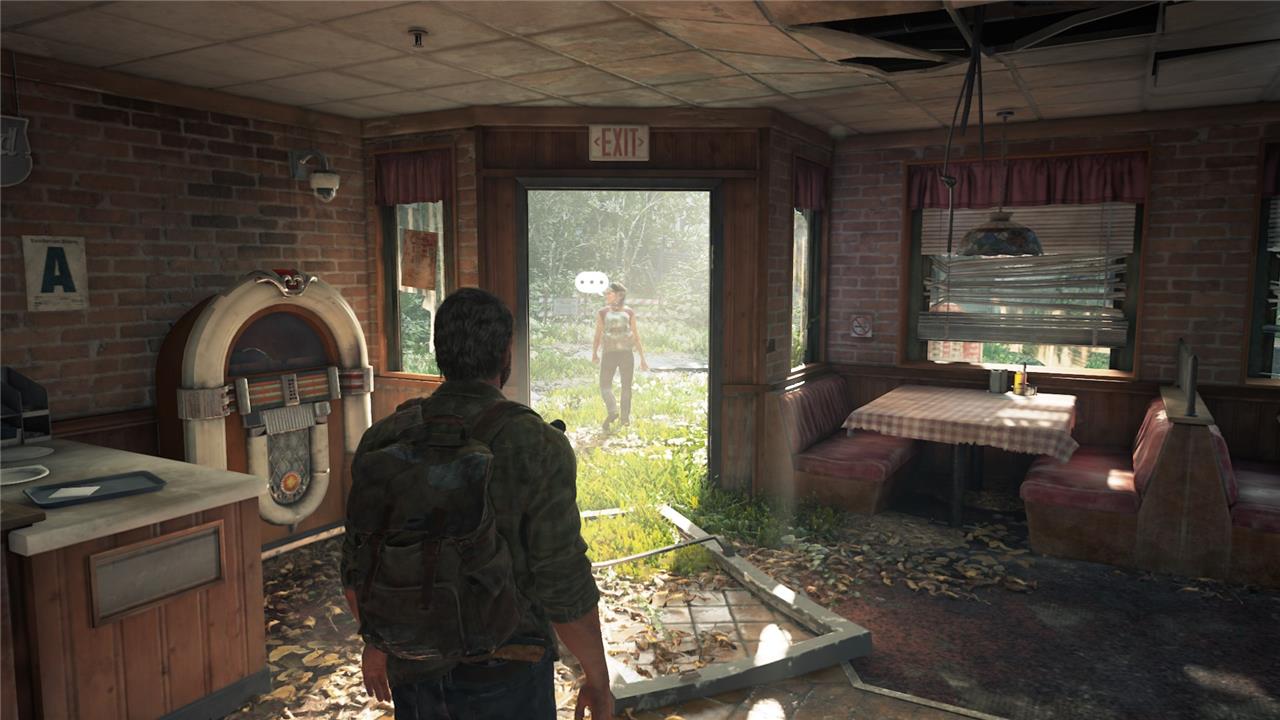
After you leave the secret tunnel, you’ll enter an abandoned pizzeria. Tess will walk out of the restaurant and an optional conversation icon will appear beside her. Make sure to talk to her before wandering around because it will disappear!
David Michael Vigil Firefly Pendant Location
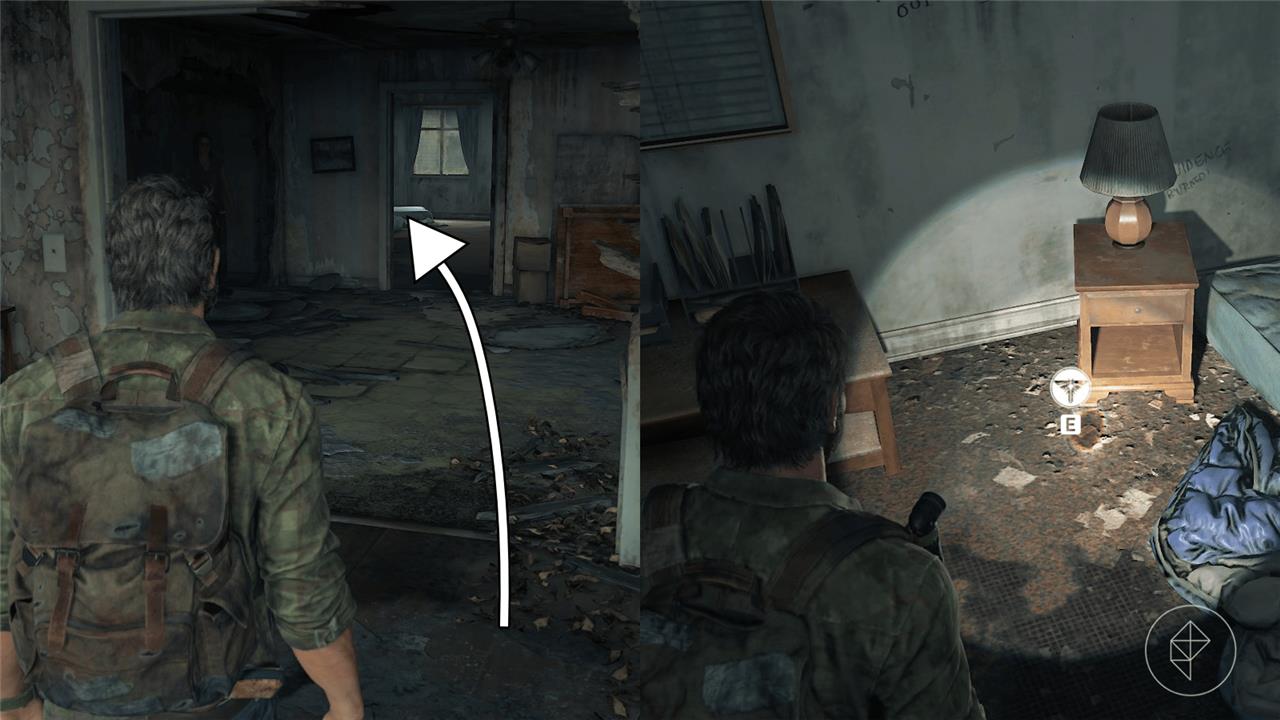
After you climb the ladder to enter the apartment building, walk past the pool table and kitchen into a room with two bunk beds and two mattresses on the floor. On the left side of the left most mattress, you’ll find the David Michael Vigil Firefly pendant on the floor.
Optional Conversation 3 Location
Head downstairs into a room full of spores. You’ll need to crouch down to enter a small corridor where a deceased civilian covered in spores can be found. Interact with the corpse to initiate another optional conversation.
Note to Brother Artifact Location
After you defeat the infected, head up the stairs and take an immediate left to find a closed doorway. Enter the room, and find the Note to Bomber artifact on top of a table inside the room.
Ben Glueck Firefly Pendant Location
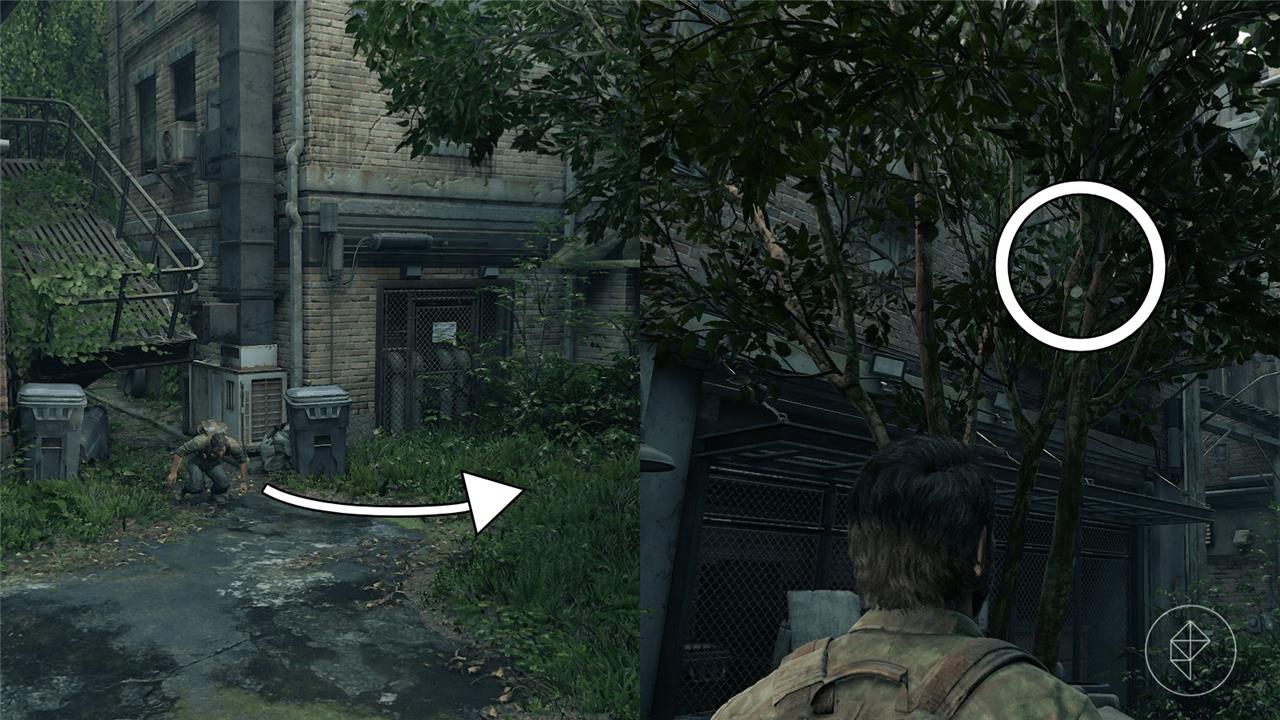
After you make it back outside, you’ll enter another building with Tess where you have to retrieve a plank to walk across. Walk across the plank back to proceed to another outdoor section where you’ll follow Tess until you reach an alleyway where you have to crouch under a collapsed metal walkway. After walking beneath the walkway, head over to the tree on your left and search for a faint glimmer to spot the Ben Glueck Firefly pendant hanging from one of the branches. Shoot the pendant to knock it down and collect the artifact.
The Slums Collectibles
In the Quarantine Zone slums, players find three collectibles amid crumbling buildings and guarded patrols. The first artifact sits on a green truck bed near the ration card kiosk, tucked beside wooden crates. Next, a note hides inside Apartment 3 on the second floor, reachable by climbing debris piles through a broken window. The final comic book rests in a flooded basement area, accessible after flooding the street-check the corner shelf behind submerged rubble.
“The Slums” portion of “The Quarantine Zone” starts after Tess bribes a child to check if the coast is clear, and ends when they confront Robert on the docks.
Drafting Notice Artifact Location
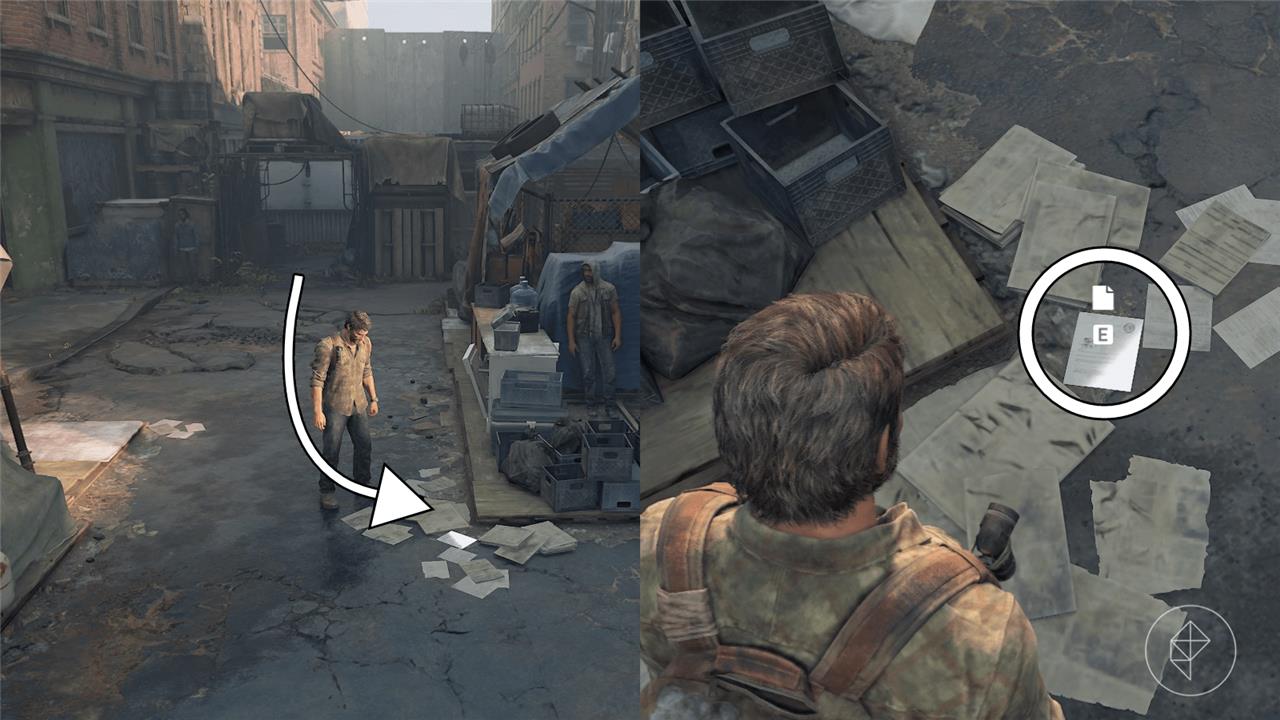
After walking through the bus and under the blue tarps, head straight ahead to find the Drafting Notice artifact in a scattered mess of papers on the ground.
The next artifact is right ahead of you as soon as you look up, so make sure to pick that up as well!
Wanted Poster Artifact Location
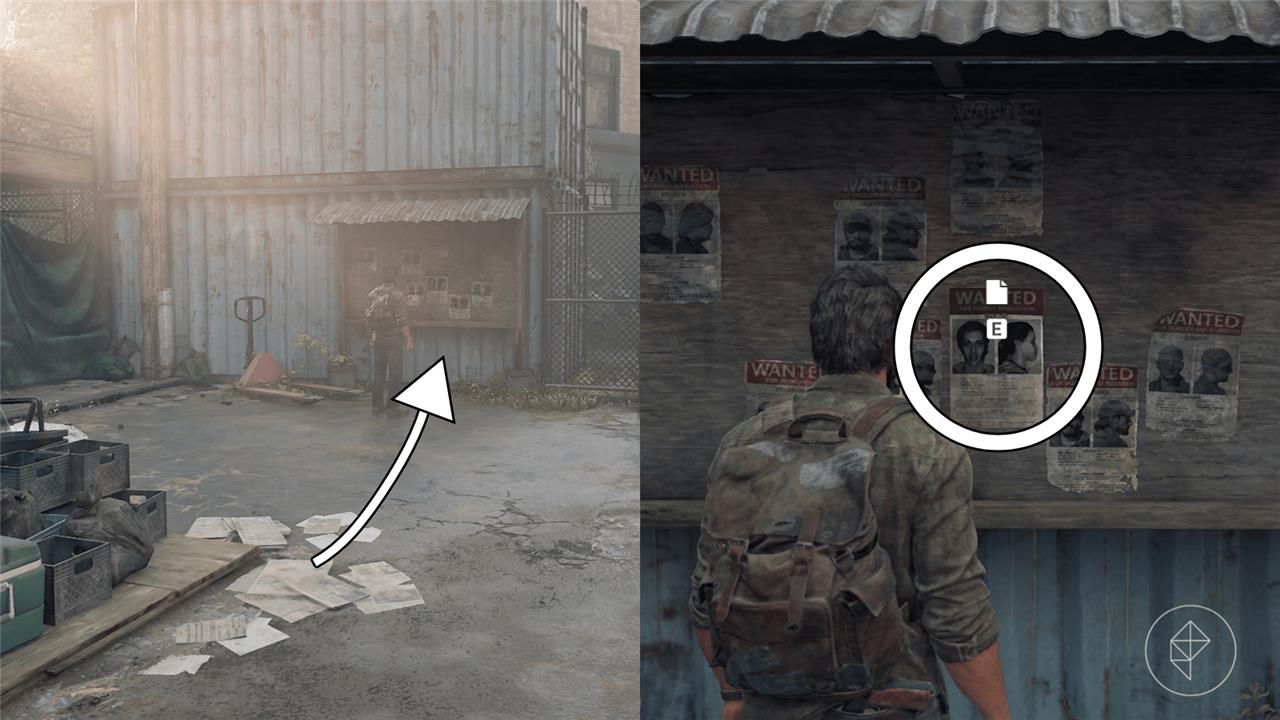
Right after you pick up the Drafting Notice artifact, look ahead to see two blue shipping containers stacked on top of each other along with a bulletin board that has the Wanted Poster artifact attached to it.
Warehouse Key Artifact Location
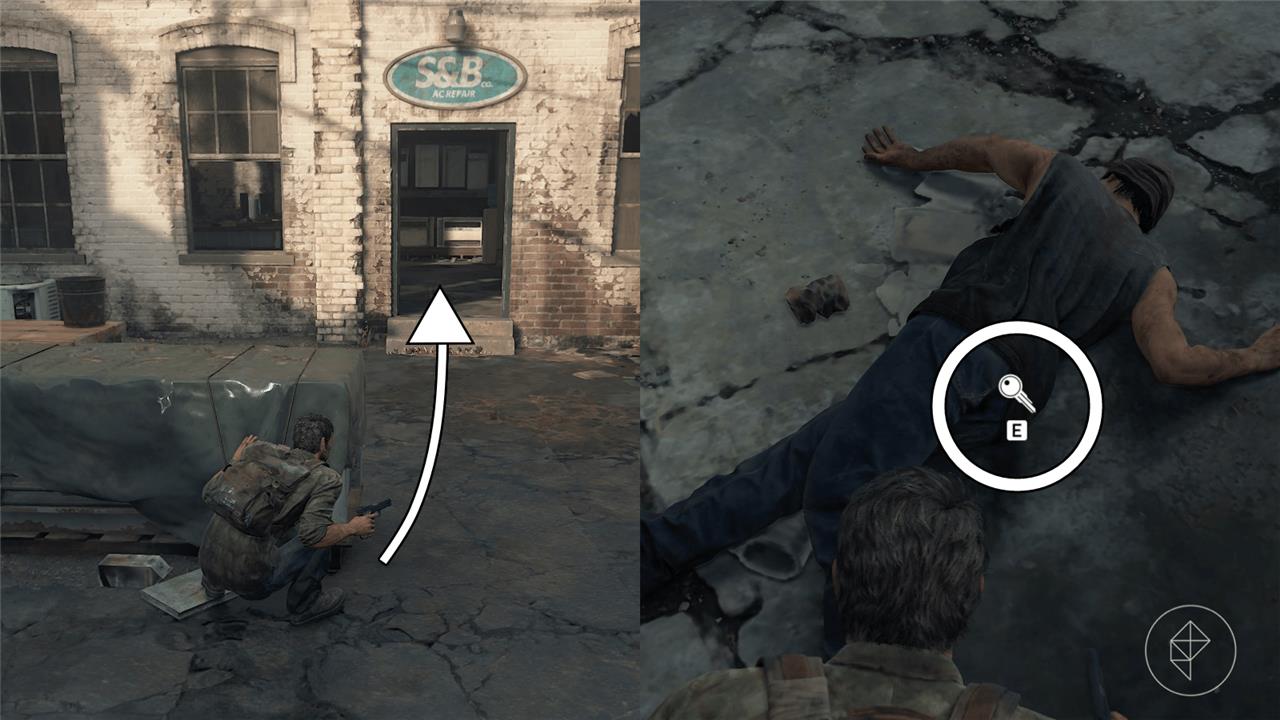
After the first encounter with Robert’s men, follow Tess through a hole in a chain link fence to a warehouse. First, silently take out the enemies outside of the warehouse before sneaking inside. Eliminate the men inside, and pick up the Warehouse Key artifact off of the man wearing the beanie.
Shipping Manifest Artifact Location
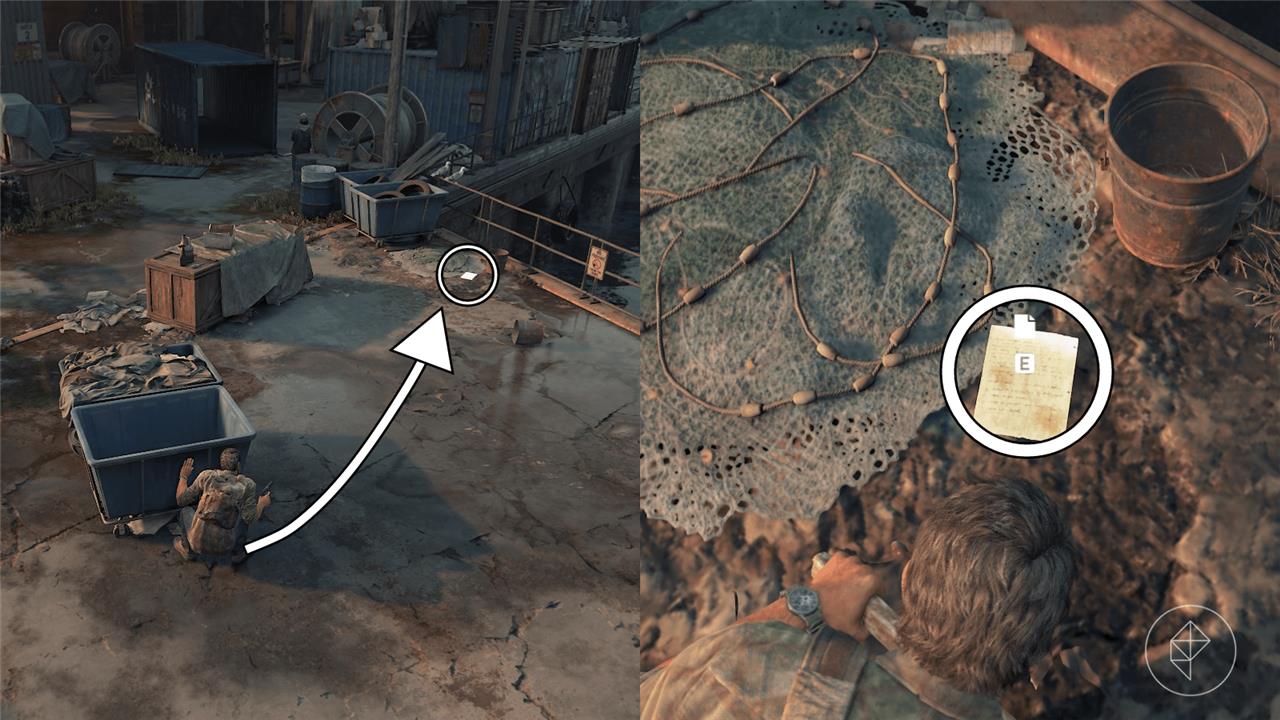
After taking out more of Robert’s men, you’ll be tasked with using a chain to open a garage door, which will start a cutscene in which you spot Robert. Once you gain control of Joel, sneak over to the right to find the Shipping Manifest artifact next to a few fishing nets and containers along the edge of the platform.
Before moving on to the next section, make sure to head over to the next artifact that is very close by.
Docks Note Artifact Location
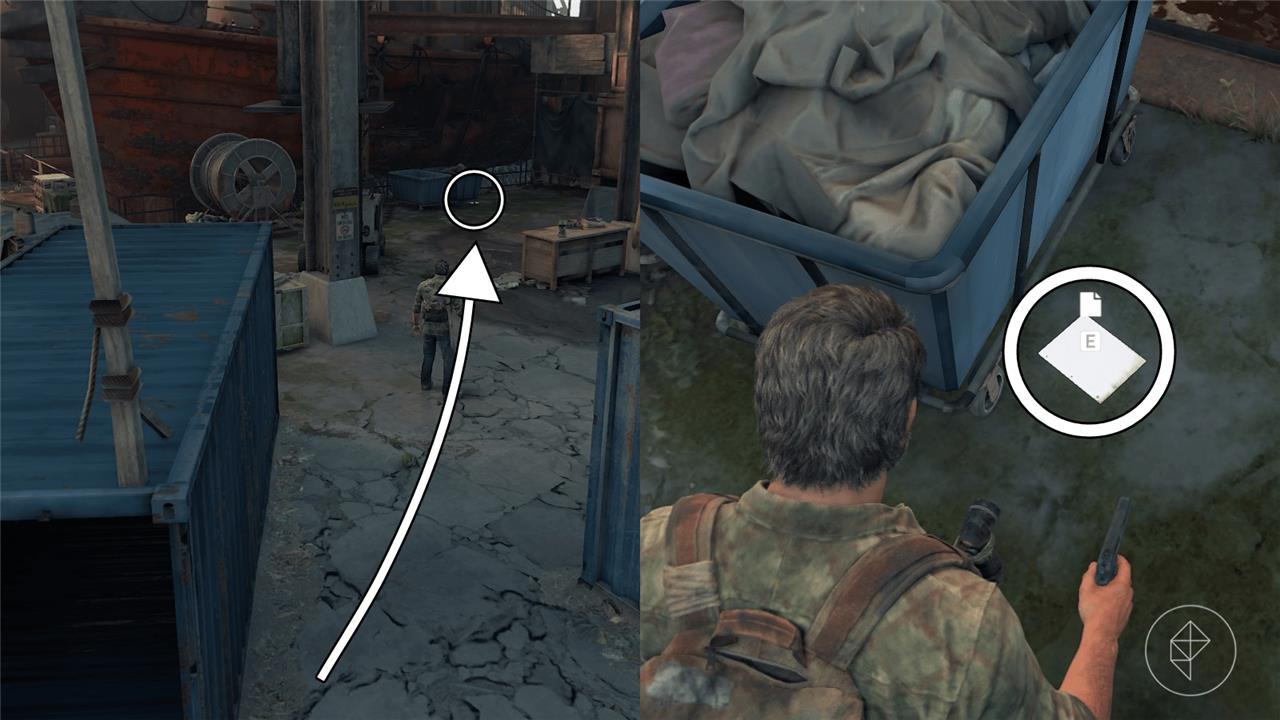
Head past the blue open shipping container ahead of you to find the Docks Note artifact on the right side of a blue cart.
The Cargo Collectibles
The Cargo area features several collectibles that give more background to Joel’s work and the state of the quarantine zone. Players can find these items scattered around the loading docks and storage rooms before helping Tess. Look carefully near the crates, office desks, and shelves to pick up artifacts that reveal fragments of smuggling operations and FEDRA control. Collecting them adds depth to the story and context to Joel’s early life in the broken city.
The last section in this chapter, “The Cargo,” starts after you chase Robert out of the office and ends when Joel and Ellie reach the apartment.
Optional Conversation 4 Location
Follow Marlene up the stairs to the upper portion of the bridge. Defeat all of the enemies in the area, and follow Marlene to a few deceased civilians. Interact with her to start an optional conversation.
Philip Liu Firefly Pendant Artifact Location
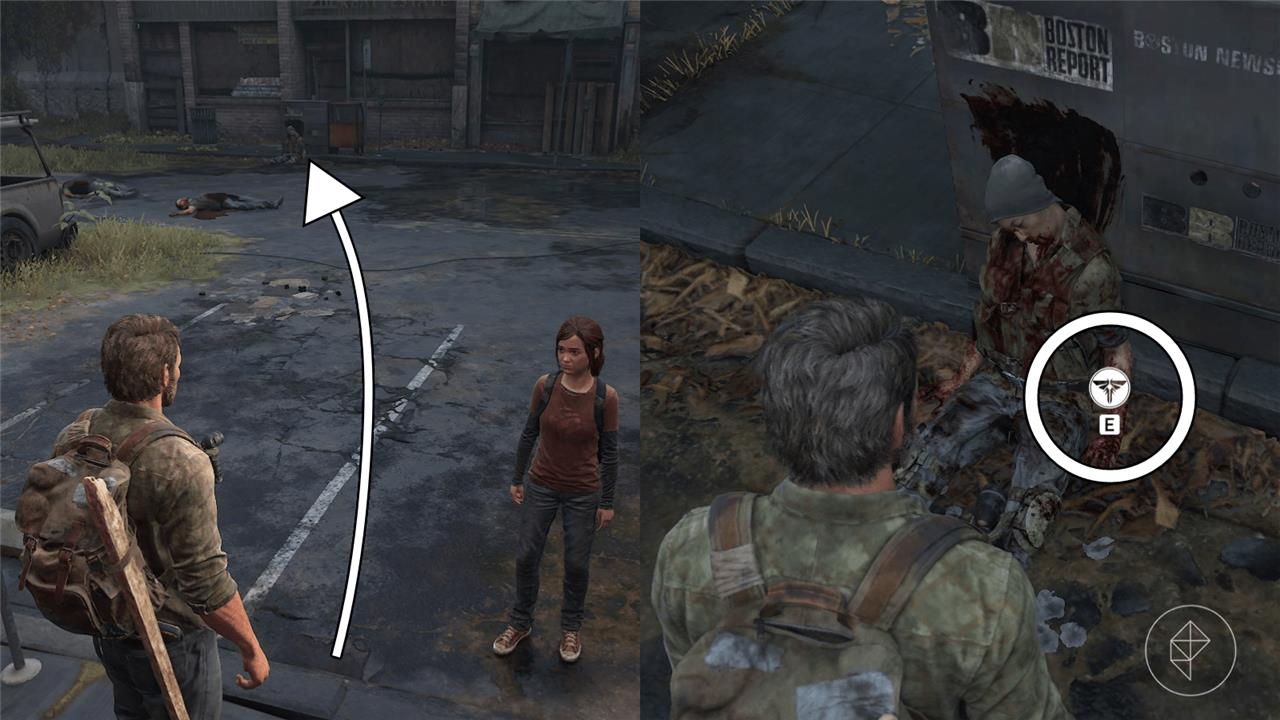
After you meet Ellie, walk over to the deceased firefly beside the newspaper stand. Interact with the body to acquire the Philip Liu Firefly pendant.
The Outskirts chapter collectibles locations
In The Last of Us Part 1, the chapter “The Outskirts” has 21 total collectibles: 9 artifacts, 4 Firefly pendants, 1 workbench, 3 shiv doors/safes, and 4 optional conversations, spread across Outside, Downtown, Museum, and The Capitol Building.
Collectible counts by section
-
Outside: 2 artifacts (including Tess’ List, Patrol Routes Map), 1 optional conversation.
-
Downtown: Multiple artifacts (Evacuation Leaflet, Field Ops Log, Firefly Map, Note to Derek + safe), at least 1 Firefly pendant (Joseph Lenz), several shiv/safe interactions, 1 optional conversation.
-
Museum: Medical Pamphlet artifact, Michael Kiper Firefly pendant, workbench, 1 optional conversation.
-
The Capitol Building: Firefly Orders, Smuggler’s Note artifacts, 2 Firefly pendants (including Melinda Davidson), remaining optional conversations and shiv uses.
Key artifact locations (short descriptions)
-
Tess’ List: Right at the start of Outside, turn back into the room with the couch after speaking with Tess; it is near the side of the room.
-
Patrol Routes Map: After powering the generator and taking the elevator down, turn right when you exit; the map is on the floor by the wall/boilers.
-
Evacuation Leaflet: After you first reach the streets outside the QZ, keep to the right side of the road; it’s on the ground near a trash can or bin.
-
Field Ops Log: Inside the leaning Goldstone/”OL STONE” building, go up the first stairs; the log is by a dead soldier on the landing.
-
Firefly Map: In the subway tunnels under the leaning building, after a body with a molotov, at the top of some stairs next to another corpse.
-
Note to Derek + safe: In the clicker-filled basement area, go into the left shop and check a drawer behind the cash register for the note; the corresponding safe is in the opposite shop, behind the counter, opened with code 03-43-78.
-
Medical Pamphlet: After moving a dumpster to climb a semi-trailer on the street toward the Capitol, climb over, drop down, and check inside the trailer for the pamphlet.
-
Firefly Orders: After the cutscene when you reach the front of the Capitol, go down the stairs and turn right at the bottom to find a Firefly body with the orders beside it.
-
Smuggler’s Note: After escaping the Capitol and entering the subway, swim through the flooded area; after a dive section under rubble, surface by a platform with a corpse that has the note.
Firefly pendant highlights
-
Joseph Lenz: In Downtown, outside the leaning building among some trees in planters to the right; s
The Firefly pendants exact locations in The Outskirts
The Outskirts chapter in The Last of Us Part 1 contains 4 Firefly pendants, located across Downtown, Museum, and The Capitol Building sections.
Joseph Lenz Pendant (Downtown)
Before entering the Goldstone (“OL STONE”) building through the rubble, head right into the open area with planters and trees facing back toward the Quarantine Zone. Climb the steps to the rightmost tree (the greenest one); the pendant hangs from a branch-shoot or throw a brick/bottle to knock it down and collect it.
Michael Kiper Pendant (Museum)
After the loading dock workbench, climb the collapsed floor ramp in the next room. Jump left to the narrow ledge, shimmy right/backward, and grab the pendant from the display case behind you.
Melinda Davidson Pendant (The Capitol Building)
As you approach the Capitol steps, drop into the flooded street. Head left to the stone gazebo/rotunda; swim to the center or near the opposite pillar-the pendant is submerged (watch for the Firefly pickup prompt, as it’s hard to spot).
Jirang Pendant (The Capitol Building)
After escaping soldiers, swim through the flooded subway tunnel to the end. With Ellie on your left platform, look right into a submerged side room/building off the main path; the pendant sits on shelving inside.