From icy peaks to scorched ruins, every giant Kemono guards its territory with lethal precision. This guide pinpoints their lairs, reveals what enrages them, and shows the tactics that turn a desperate fight into a decisive victory.
While some are certainly more difficult than others, they’re all tougher than your standard fare. We’ve cobbled together a list of giant Kemono, where they appear (and roughly when), and their individual weaknesses. And if you’re looking for advice on defeating these monsters, keep reading – we’ve detailed top-level strategies for defeating every giant Kemono in Wild Hearts.
All giant Kemono in Wild Hearts
The giant Kemono in Wild Hearts are powerful creatures inspired by nature’s fiercest forces, each dominating a specific region with unique behaviors and elemental traits. From the fiery Lavaback and the icy Deathstalker to the towering Earthbreaker, every Kemono demands a distinct strategy and gear setup. Learning their weaknesses, attack patterns, and preferred habitats is key to tracking them down and surviving each encounter.
In order of when they appear in your game, here’s a list of every giant Kemono in Wild Hearts, plus information about where to find them and what they’re weak against:
Wild Hearts giant Kemono list
Each giant Kemono in Wild Hearts presents a distinct challenge, from fiery beasts to ice-clad titans. This list covers every major creature you can track, their habitats, and the resources they drop. Whether you’re after rare crafting materials or seeking to master each fight, use it as a quick guide to plan your hunts and prepare the right weapons and gear.
Kemono |
Location |
Elemental Weakness |
Weapon Weakness |
|---|---|---|---|
| Ragetail | Blossom Trail (Chapters 1, 2) | Fire | Slashing, Blunt |
| Sapscourge | Blossom Trail (Chs. 1, 2) | Fire | Slashing |
| Kingtusk | Blossom Trail (Chs. 1, 2) | Fire | Slashing, Piercing |
| Spineglider | Spirit Isle Hunt/Blossom Trail (Chs. 1, 2) | Fire, Plant | Blunt |
| Dreadclaw | Spirit Isle Hunt (Chs. 1, 2) | Fire | Slashing |
| Gritdog | Spirit Isle Hunt (Chs. 1, 2) | Wind | Slashing, Piercing |
| Lavaback | Spirit Isle Hunt/Blossom Trail/Akikure Canyon (Chs. 1, 2) | Water | Slashing, Blunt |
| Earthbreaker | Spirit Isle (Ch. 1) | Wind | Piercing, Blunt |
| Sporetail | Akikure Canyon (Ch. 1) | Fire | Slashing, Blunt |
| Fumebeak | Blossom Trial Hunt/Akikure Canyon/Fuyufusagi Fort (Ch. 2) | Earth | Piercing |
| Goldshard | Akikure Canyon (Ch. 2) | Plant, Wind | Piercing, Blunt |
| Icetusk | Fuyufusagi Fort (Ch. 2) | Fire | Piercing, Blunt |
| Cobalt Lavaback | Fuyufusagi Fort (Ch. 2) | Water | Piercing |
| Deathstalker | Fuyufusagi Fort (Ch. 2) | Fire | Piercing |
| Mighty Ragetail | Blossom Trail (Chs. 3, 4) | Fire | Slashing, Blunt |
| Mighty Sporetail | Blossom Trail/Akikure Canyon (Chs. 3, 4) | Fire | Slashing, Blunt |
| Mighty Sapscourge | Blossom Trail (Chs. 3, 4) | Fire | Slashing |
| Mighty Kingtusk | Blossom Trail/Fuyufusagi Fort (Chs. 3, 4) | Fire | Slashing, Piercing |
| Mighty Spinegilder | Akikure Canyon/Spirit Isle (Chs. 3, 4) | Fire, Plant | Blunt |
| Mighty Dreadclaw | Akikure Canyon (Chs. 3, 4) | Fire | Slashing |
| Mighty Gritdog | Akikure Canyon/Spirit Isle (Chs. 3, 4) | Wind | Slashing, Piercing |
| Mighty Goldshard | Blossom Trail/Akikure Canyon (Chs. 3, 4) | Plant, Wind | Piercing, Blunt |
| Mighty Lavaback | Spirit Isle (Chs. 3, 4) | Water | Slashing, Blunt |
| Mighty Cobalt Lavaback | Fuyufusagi Fort (Chs. 3, 4) | Water | Piercing |
| Mighty Icetusk | Fuyufusagi Fort (Chs. 3, 4) | Fire | Piercing, Blunt |
| Mighty Deathstalker | Fuyufusagi Fort/Spirit Isle (Chs. 3, 4) | Fire | Piercing |
| Venom Glider | Blossom Trail (Chs. 3, 4) | Fire, Plant | Blunt |
| Ripclaw | Fuyufusagi Fort/Spirit Isle (Chs. 3, 4) | Plant, Fire, Earth | Slashing |
| Onyxshard | Blossom Trail (Ch. 4) | Plant, Wind | Piercing, Blunt |
| Mighty Fumebeak | Spirit Isle (Ch. 4) | Earth | Piercing |
| Amaterasu | Akikure Canyon (Ch. 4) | Wind | Slashing, Blunt |
| Emberplume | Spirit Isle (Ch. 4) | Earth, Water | Slashing, Piercing |
| Golden Tempest | Akikure Canyon (Ch. 4) | Fire, Earth | Piercing |
How to defeat the giant Kemono in Wild Hearts, Chapter 1
The giant Kemono in Chapter 1 can be tough opponents if approached without preparation. Focus on learning their attack patterns and timing your dodges carefully to avoid heavy damage. Use crafted Karakuri traps to interrupt their attacks and open windows for counterstrikes. Target weak points-often the head or glowing limbs-to deal higher damage and break parts for valuable materials. Staying patient and using the terrain to your advantage will help you bring each beast down without wasting too many resources.
More than a handful of Kemono are available to challenge in chapter one, “Azuma, Land of the East.” After you initially defeat a Kemono during a mission, it will potentially appear in other regions once they open up during that specific chapter. This means that certain Kemono are not locked to any location. Also, taking on those individual missions to defeat Kemono also open up more intensive hunts, which can sometimes see you facing off against more than one of these fearsome beasts at the same time.
Ragetail
The Ragetail is the first giant Kemono you will fight in Wild Hearts. Thankfully, it’s a fairly easy one to take down. It is weak to slashing and blunt weapon damage, though the bow also works just fine. And once you have access to the Torch Karakuri, you can use fire to deal extra damage to this flowery rodent.
Sapscourge
Another plant-based giant Kemono, the Sapscourge is weakest to slashing damage, with piercing and blunt damage also fairly effective. Like the Ragetail, the Sapscourge is susceptible to increased fire damage. The Spring Karakuri is your best friend in this fight, as it will allow you to shake free of the sap that the Sapscourge can throw at you, which will slow down your movement if you become encased in it.
Kingtusk
Like the Ragetail and Sapscourge before it, the massive Kingtusk is weak to fire – which makes sense, since it is another plant-based Kemono and can summon vines to shoot out of the ground at a whim. It takes the most damage from piercing and slashing damage. Once it’s enraged, make sure to dodge its vine attacks since they can stagger you and leave you susceptible to its devastating charge attacks.
Spineglider
Susceptible to fire and plant damage, the Spineglider is a giant Kemono that players will also want to practice using Karakuri on. When fighting the Spineglider, you will have the opportunity to unlock the Pounder Fusion Karakuri, which can topple the formation of rocks the beast can create. Doing so not only deals massive damage to the Spineglider, but also breaks its perch, preventing it from lunging down at you with a powerful sweeping attack. It is weak to damage from blunt weapons.
Dreadclaw
A massive rooster with a branch-like tail, the Dreadclaw is weak to fire damage. Like the Kingtusk, using the Torch Karakuri will help you deal additional damage to this Kemono as it imbues your weapon with fire. It is weakest to Slashing damage. Capable of successive lunging attacks, make sure to time your dodges properly or you could get caught up in its combos.
Gritdog
This earth aspected Tanuki packs quite the punch. Able to not only draw hunters into close range with its ability to manipulate the ground under your feet, it can also attack at a range by causing stalactites to shoot up from under you. Thankfully, the Gritdog is fairly slow, even when enraged and is easy to counter through the use of the Pounder Fusion Karakuri. It is most susceptible to wind elemental damage, and piercing weapon damage.
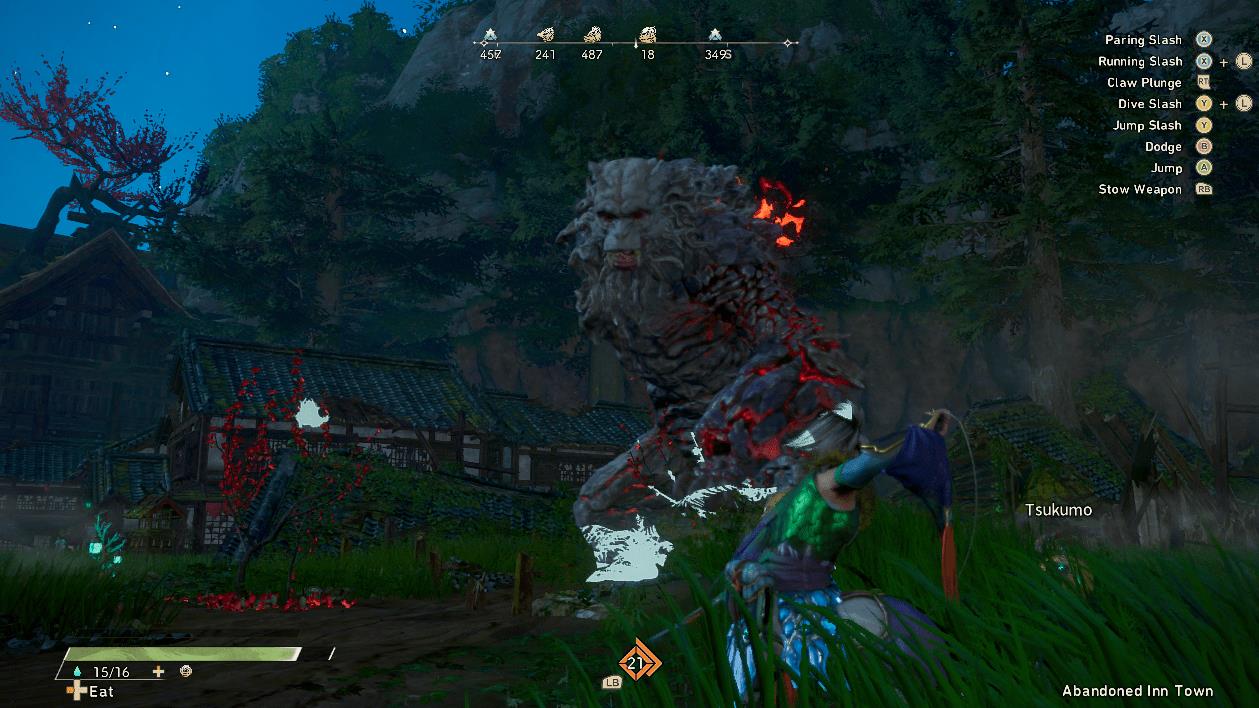
Lavaback
Perhaps the most challenging Kemono in chapter one of Wild Hearts, the Lavaback is capable of high maneuverability and boasts strong attacks that can down even the most prepared of hunters. Impervious to fire, players will want to instead exploit its weakness to water and perhaps craft a water aligned weapon through one of the game’s various weapon trees if they find themselves stuck. Slashing and piercing damage are what it is most susceptible to, along with the poison and sleep ailments. You won’t be able to create weapons with either of these effects yet, but it’s good to keep in mind for the future.
Earthbreaker
Fighting this gargantuan Kemono is fairly straightforward; as a mandatory story fight, you will get everything you need to fight it. Just make sure to follow the instructions the NPCs give you and the fight will be over in a flash!
How to defeat the giant Kemono in Wild Hearts, Chapter 2
To defeat the giant Kemono in Wild Hearts Chapter 2, craft poison-inflicting weapons and armor after beating the Earthbreaker, as many foes share this vulnerability. Target Fumebeak with piercing Claw Blades to counter its aerial dives and toxin clouds, using Healing Mist Karakuri for relief; stay close to Goldshard to block its crystal spine shots while exploiting wind and plant weaknesses; and wield fire weapons with Torch Karakuri against Icetusk’s charges, focusing on piercing or blunt hits. These approaches match their patterns and turn the fights in your favor.
After defeating the Earthbreaker, you’ll be able to fight another crop of giant Kemono. This includes the fearsome Deathstalker (the wolf you encountered earlier in the game) and a variety of other challenging monsters. Wild Hearts ramps up the difficulty significantly in chapter two, so we advise crafting better weapons and armors. You’ll also be able to start crafting weapons that have the poison status ailment, which almost all Kemono are weak to.
Sporetail
A variant of the Ragetail, this rodent is capable of putting hunters to sleep with a shake of its massive body. Additionally, it summons waves of mice to either serve as adds or send them running at you in waves. There isn’t any reason to fight the mice, and ignoring them is your best course of action. Like the Sporetail, they can put you to sleep, but avoiding their plumes of sleep inducing dust is fairly simple. Like the Ragetail, it is weak to fire, and susceptible to slashing and blunt damage.
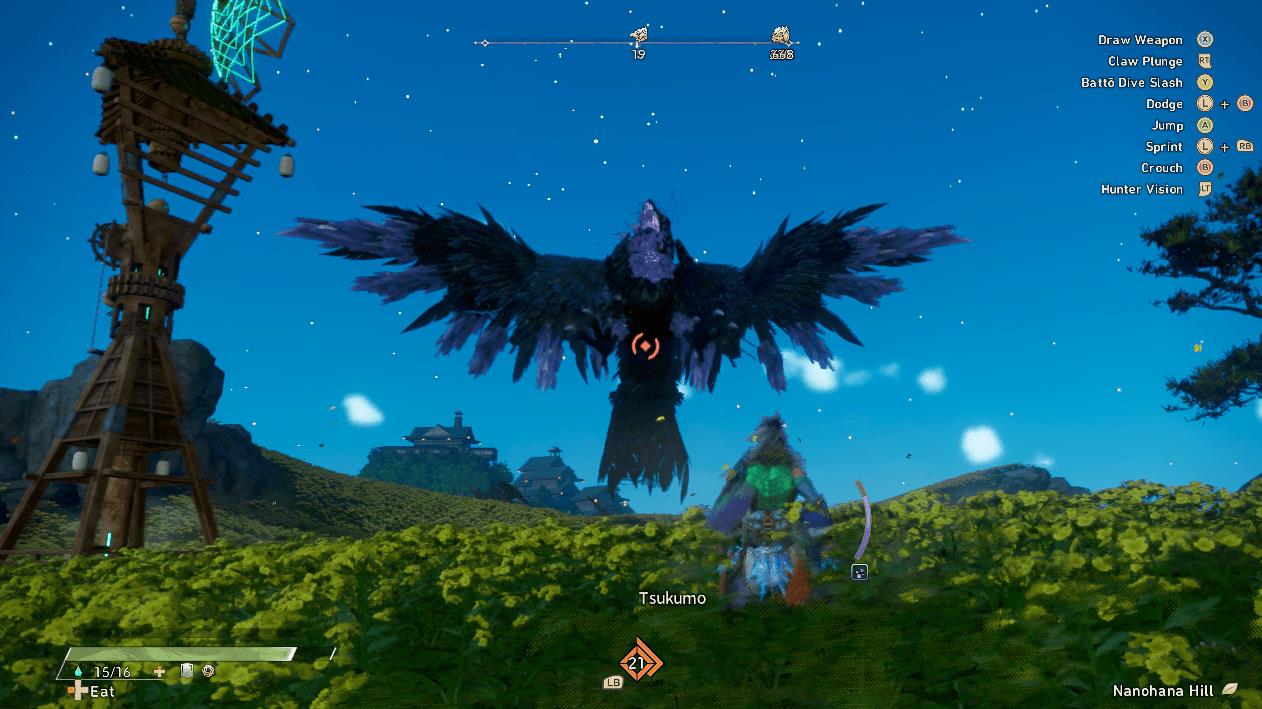
Fumebeak
One of the most dangerous Kemono in chapter two, the Fumebeak is the first truly aerial enemy you will fight in the game. The Fumebeak can poison you, which means you will want to bring food items that can help ward off its toxins. Using the Healing Mist Karakuri will help stave off the poison in a pinch. In addition, the beast is extremely fast and can take out hunters when enraged with its dives and spinning attacks. Using weapons with piercing attacks will deal the most damage, but this is when weapons like the Claw Blade come in handy.
Goldshard
Weak to wind and plant elemental damage, the Goldshard is a slow-moving opponent with has plenty of well-telegraphed attacks that make this one of the easier Kemono during chapter two. Staying close will prevent it from using ranged attacks, which involve shooting spines made of crystal your direction. Use weapons with piercing and blunt damage to take on the Goldshard.
Icetusk
An ice variant of the Kingtusk, this giant Kemono boasts the same dangerous charging attacks as its grass counterpart. However, it is weak to piercing and blunt damage, while keeping its vulnerability to fire attacks. Using the Torch Karakuri will help you beat this massive boar.
Cobalt Lavaback
The Cobalt Lavaback is a variation of the original Lavaback; it retains the same moveset but has different weaknesses. However, it deals significantly more damage. If you’re struggling with this enemy, make sure to eat food. The Cobalt Lavaback is susceptible to piercing damage, and is weak to the poison and sleep status ailments.
Ripclaw
The Ripclaw has the same weaknesses and moveset as the Dreadclaw. However, it is like the Sporetail in which it can put hunters to sleep with a range of its attacks. The best way to take down this specific Kemono is to stand behind it or use the Pounder or Harpoon Karakuri. It is weak to Fire attacks, so the Torch Karakuri is a must, and Slashing damage.
Deathstalker
One of the harder Kemono in the game, the Deathstalker can leap across the arena with incredible speed. Also capable of creating walls it can launch itself off of, the Deathstalker will almost certainly keep you on your toes until you commit its moveset to memory. Using the Torch Karakuri will deal damage to the Deathstalker, with its shoulders more vulnerable once it has enraged. It is weakest to piercing damage, but is highly susceptible to being poisoned.
How to defeat the giant Kemono in Wild Hearts, Chapter 3
After beating the Mighty Dreadclaw, take on Mighty Kemono, tougher versions of earlier beasts. Upgrade weapons and armor to match their higher damage output, and use food buffs for extra health and resistance. Deploy the Harpoon Karakuri to pin them down for heavy hits, especially flyers like Venom Glider, and stick to the same weak points and tactics as base forms.
You unlock the ability to fight “Mighty” Kemono after beating the Mighty Dreadclaw. These are just tougher versions of Kemono you’ve fought before, which means you can largely use the same strategies to defeat them. You will want to upgrade your weapons and armor at this point, though, if you haven’t already. Either branching into the Human or Kemono path on the skill tree will help give you that extra bit of defense you’ll need to get, or you could just farmn the next set of (identical) but stronger gear obtained from these Kemono.
Mighty Kemono Variants in Wild Hearts
- Mighty Ragetail
- Mighty Sporetail
- Mighty Sapscourge
- Mighty Kingtusk
- Mighty Spinegilder
- Mighty Dreadclaw
- Mighty Gritdog
- Mighty Goldshard
- Mighty Cobalt Lavaback
- Mighty Icetusk
- Mighty Lavaback
- Mighty Deathstalker
- Mighty Fumebeak (Chapter four)
The strategy against these “Mighty” versions is largely the same as the strategy you’d use against their normal counterparts. The only difference is that these Mighty Kemono deal a lot more damage. However, their attack patterns and skills are exactly the same. As always, the best piece of advice is to upgrade your weapons, armor, and start eating the food you’ve been drying, fermenting, or pickling up to this point if you feel yourself struggling.
You should also prioritize focusing on the story to the point where you unlock the Harpoon Karakuri. This Karakuri, which is unlocked during a story-specific fight, allows you to effectively hold a Kemono in place for a limited period of time while also doing a significant amount of damage to it in the process. It’s especially great for dealing with airborne Kemono, like the Fumebeak and Pearlbeak, but can be used effectively on any monster.
Pearlbeak
Like the Fumebeak, the Pearlbeak has dangerous dive attacks and a devastating spin attack that will test the defenses of even the most prepared hunter. And while it doesn’t inflict status ailments, it will instead create bursts of water after its attacks. This means you can’t just sit through any of its attacks and let the poison meter build up in exchange for damage. If you feel yourself struggling with this variant, go and unlock the Harpoon Karakuri to make this fight a breeze. It is weak to earth elemental damage, and both blunt and piercing damage.
Venomglider
A variation of the Spineglider, like the Fumebeak, it can poison hunters. Thankfully, it’s relatively easy to deal with if you use the same strategy as you did with the Spineglider. Liberal uses of the Pounder Karakuri will see this flying squirrel felled in no time.
How to defeat the giant Kemono in Wild Hearts, Chapter 4
In Chapter 4 of Wild Hearts, the giant Kemono Onyxshard falls to similar tactics as Goldshard-deploy the Harpoon Karakuri to pin it down and strike upgraded gear targets its vulnerabilities. Amaterasu in Akikure Canyon demands distance during rage phases to evade plunging strikes, paired with wind weapons and slashing or blunt force on weak spots after harpoon restraint. Emberplume’s slower dives and purple flame bursts open attack windows for earth damage via slashing and piercing, while Golden Tempest requires stamina control against whirlwinds and lunges, countered by piercing hits to head and tail plus frost to slow it.
Chapter four, “Nature Stagnant,” also features a handful of more challenging Kemono for hunters. Like chapter three, you’ll want to invest in the best food items and armor you can craft. These Kemono are no joke, and will require you to put in your best effort to beat. You’ll also want to utilize all of the tools at your disposal. This means making use of your drying rack, and creating ingredients to pickle with your fermentation barrel to make food items that will increase your health, damage, and damage mitigation. Upgrading your armor and making use of Human and Kemono passives will also help out a lot.
Onyxshard
A Goldshard variant, Onyxshard has the same moveset and weaknesses. Fighting this Kemono is fairly straightforward, and if you’ve been leveling up your armor and weapons, it will go down easily. But if you’re struggling, use the Harpoon Karakuri to hold it in place to attack its weak points.
Amaterasu
After defeating Amaterasu in a mandatory story fight, it can be found in Akikure Canyon. Like the story encounter you will want to use the Harpoon Karakuri to hold it in place and to break its most vulnerable parts. The best course of action is to keep your distance once it becomes enraged, as its attacks start dealing massive area-of-effect damage. Learning its patterns is essential, and make sure to conserve your stamina to ensure that you can dodge out of its plunging attacks. It is weak to wind elemental attacks, and to slashing and blunt weapon damage. Make sure to eat your best defensive food before tackling this Kemono.
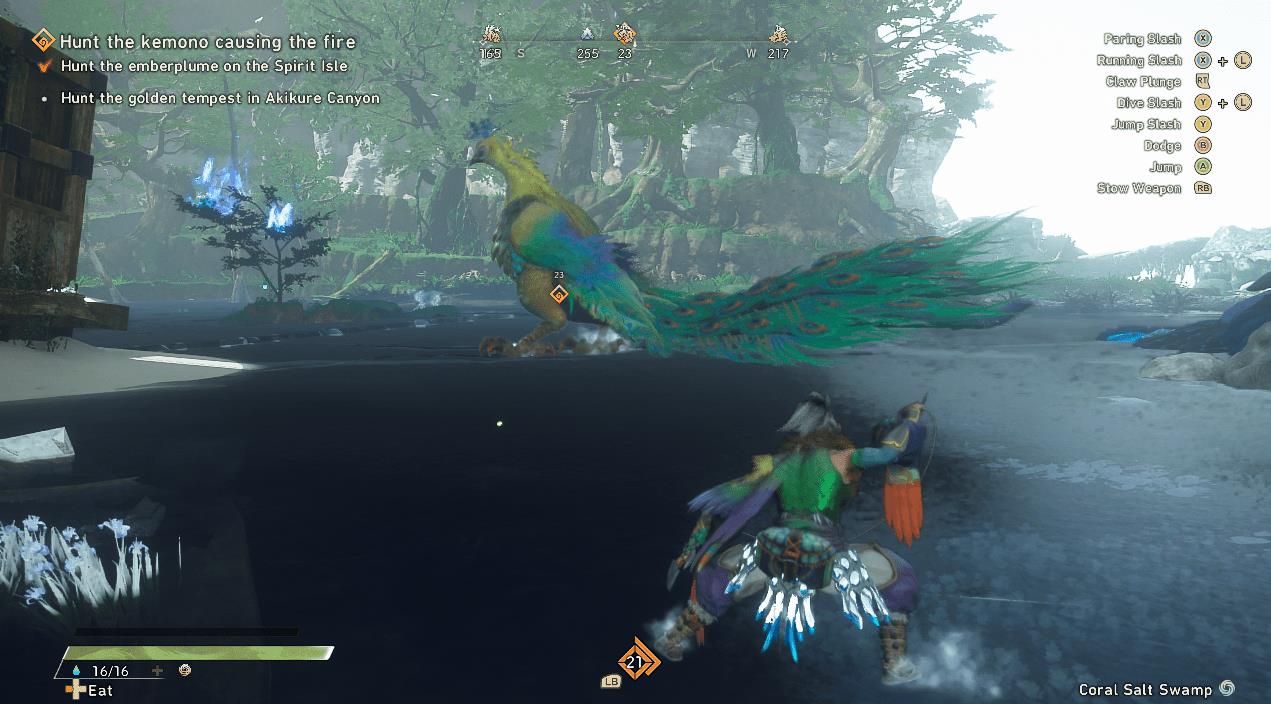
Emberplume
Significantly slower than both the Amaterasu and Golden Tempest, the Emberplume uses diving attacks and massive explosions of purple colored flame to damage hunters. Like the Amaterasu, using the Harpoon Karakuri is the easiest way to secure victory. Since the Emberplume has significantly longer windows for attacks, even when enraged, this is the first endgame Kemono you’ll want to take on – and potentially get weapon upgrade and armor from – before tackling the Golden Tempest. It is weak to earth elemental damage, and to both piercing and slashing damage.
Golden Tempest
Extremely fast, the Golden Tempest is capable of hitting you from almost any range. Its moveset includes a projectile fired from its mouth or tail, and the ability to draw hunters in or push them out through its manipulation of wind. Because of its massive size, it can be difficult to avoid attacks. So it’s best to conserve stamina to perform well-timed dodges or to use your arsenal of Karakuri to assist you in defeating this impressive feline. It is weak to piercing damage, and inhibiting it with the frost ailment will help keep this Kemono under control.
Best weapons and Karakuri for each Giant Kemono
The best weapons and Karakuri for each Giant Kemono depend on its element, mobility, and attack style, but a few general rules apply: always match elemental weakness, bring a weapon that can land part breaks, and use Karakuri to control or punish the monster.
Below is a tailored guide pairing weapons and Karakuri for each major Giant Kemono, based on current builds and meta.
1. Kingtusk (Fire/Ground) – Ashenvale Boss
Best Weapons:
-
Karakuri Katana – Fast, reliable damage with the Unbound state; great for breaking tusks and legs.
-
Nodachi – Strong Iai finishers and high burst damage during its long charge/charge canceller windows.
-
Maul – Slow, but with high stagger on legs; pair with Karakuri to chain combos.
Key Karakuri:
-
Torch – Imbues fire damage, which Kingtusk is weak to; great for extra burn.
-
Harpoon – Pins the boar after a charge, giving time to unload on head/legs.
-
Barrier / Bulwark – Essential for blocking its full-power charges and breaths.
Strategy:
-
Use Torch + Harpoon to pin it.
-
Focus on breaking tusks and legs (Karakuri Katana/Nodachi) or staggering legs (Maul).
2. Ragetail (Earth/Rabbit) – Ashenvale Early Hunt
Best Weapons:
-
Karakuri Katana – Fast attacks on legs and tail; Unbound mode shreds its hide.
-
Bow – Range is key; use Volley/Explosive shots to tail/legs while it’s licking.
-
Nodachi – Iai finishers on the tail when it’s swollen (enraged).
Key Karakuri:
-
Spring – Vital for dodging its bounding attacks and tail swipes.
-
Harpoon – Use to stop its long jumps and tail-charges.
-
Barrier / Bulwark – Block its jumps and tail slams that cover large areas.
Strategy:
-
Keep distance; Harpoon it mid-air after a big jump.
-
Break legs and tail with Karakuri Katana/Nodachi early, or use Bow to chip from range.
3. Spineglider / Venomglider (Earth/Flying) – Jagged Wastes / Natsukodachi
Best Weapons:
-
Bow – Excellent against flying Kemono; use Volley, Explosive, and Karakuri Arrow combos to wings/tail.
-
Hand Cannon – Fortified Shot deals massive damage; use from range after platform destruction.
-
Bladed Wagasa – Air combos and Jumps can reach its wings and back.
Key Karakuri:
-
Glider – Stay airborne to get above it and dodge stone attacks.
-
Harpoon – Pull it down from the air or pin it mid-flight.
-
Repeater Crossbow (Fusion) – Lets you deal ranged damage while staying behind barriers.
Strategy:
-
Destroy stone platforms to knock it down.
-
Use Bow or Cannon to melt wings/tail while airborne; Harpoon for contro
Best armor builds for Karakuri Staff and Bow
Here are the best armor builds for both Karakuri Staff and Bow in Wild Hearts, focusing on high damage, survivability, and synergy with each weapon’s playstyle.
Best Karakuri Staff Builds
Karakuri Staff is a “dual-charge” weapon that excels at big burst damage and controlling the field with Karakuri, so the best builds either focus on raw damage or Karakuri efficiency.
1. Max-Damage Build (Pure Human Path)
Great for melting bosses quickly once you’re comfortable with the weapon.
-
Main Skills:
-
Savage +3 (from special armor)
-
Battle Spirit 10 (in armor)
-
Desperation 7-12 (in armor or talisman)
-
Critical Draw 5 (in gloves)
-
-
Recommended Armor Set:
-
Head: Wayward Brigand Hat (or similar) → Rude Health / Savage +3
-
Body: Human-Path Earthbreaker Body Guard → Rude Health 12, Battle Spirit 10, Fusion Master
-
Arms: Garuda Gauntlets → Strong Arm: Spirit 5, Critical Draw 5, Desperation 7
-
Legs: Draconic Loincloth (or Wayward Brigand) → Core Boost, Ancient Tree Champion, or Rude Health
-
Boots: White Fang Brocaded Boots → Savage +3, Follow Through +3
-
-
Talismans:
-
Focus on damage: Savage, Battle Spirit, Rude Health, Desperation
-
For extra safety: Pious Cross Rosary (Resurrection)
-
-
Playstyle:
-
Use Karakuri (Barrier, Harpoon, Spring) to control the Kemono, then switch to Staff for 1-2 big burst combos.
-
Works best with high-raw Tempest Staff (like “Tempest Staff: Ano Seishun”).
-
2. Karakuri-First Build (Hybrid or Pure Kemono Path)
Balances damage with Karakuri utility – ideal for long hunts or learning the game.
-
Main Skills:
-
Rude Health 12-24 (in armor)
-
Strong Arm: Spirit 5 + Critical Draw 5 (gloves)
-
Deaf Ears / Fatigue Recovery 10
-
Thread Thrift 10-22 (for Karakuri Spool)
-
-
Recommended Armor Set:
-
Head: Garuda Hat → Fatigue Recovery 10, Deaf Ears, Solar Protection 5
-
Body: Draconic Back Guard / Earthbreaker Body Guard → Rude Health 12, Battle Spirit 10
-
Arms: Garuda Gauntlets → Strong Arm: Spirit 5, Critical Draw 5, Desperation 7
-
Legs: Draconic Loincloth / Wayward Brigand → Core Boost, Ancient Tree Champion, Rude Health
-
Boots: Wayward Brigand Boots → Resurrection, Tangle Recovery, Grab Master
-
-
Talismans:
-
Survival: Rude Health, Resurrection, Deaf Ears or Fatigue Recovery
-
Optional damage: Battle Spirit, Savage, Desperation
-
-
Playstyle:
-
Use Karakuri to block, control, and create openings; switch to Staff for burst during downtime.
-
Best Bow Builds
The Bow is a ranged damage dealer, so the best builds focus on arrows per shot (Haya/Otoya), crit, and stamina to keep up volley pressure.
1. Extreme Archery (Volley) Build
Best overall DPS: high arrows per shot, long volleys, strong burst on weak points.
-
Main Skills:
-
Extreme Archery 20-30
-
Nocking Marvel 30-40 (for more arrows per shot)
-
Critical C
-