Moving between camps in Wild Hearts doesn’t have to take ages. With the right setup and timing, you can warp across Azuma in seconds, saving precious moments for crafting and combat instead of travel.
How to fast travel in Wild Hearts
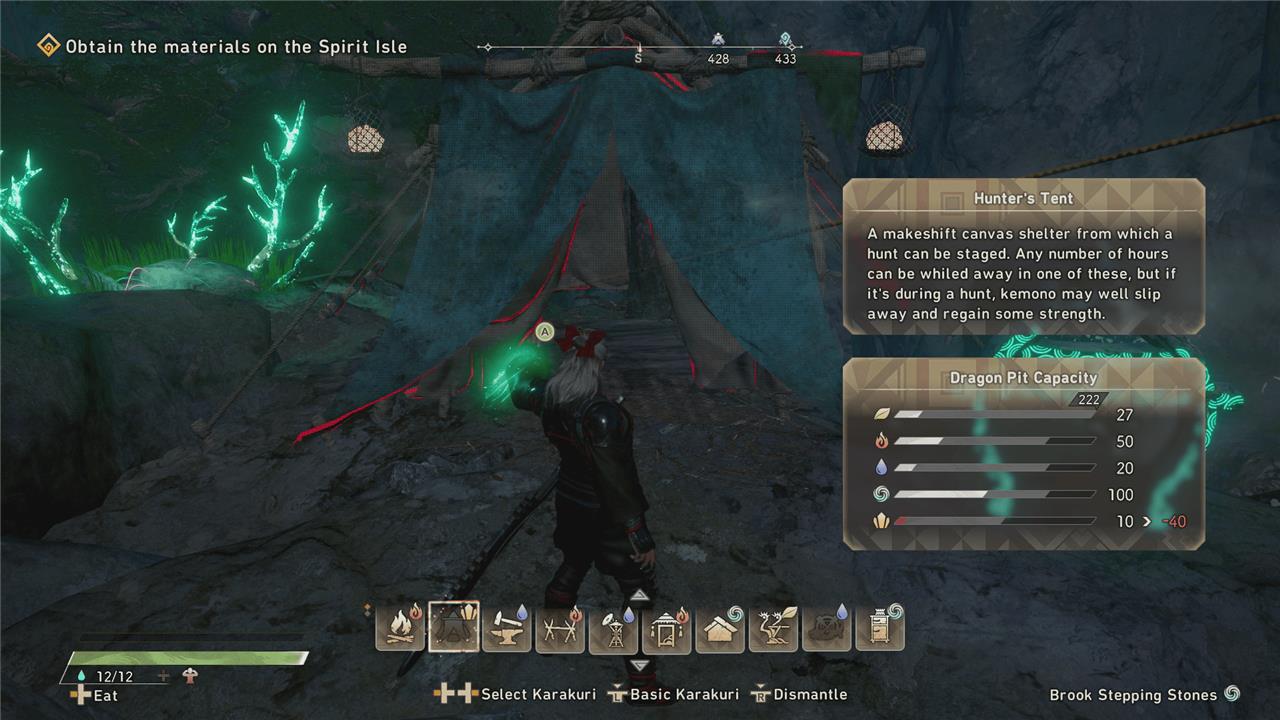
Open the map to select Dragon Pits or Hunter’s Tents marked as fast travel points. Build Hunter’s Tents at eligible Dragon Pits via the Dragon Karakuri menu, using Earth energy, after reaching a pit. Select a tent icon and press the travel prompt (X on PlayStation, A on Xbox) to teleport instantly between unlocked spots.
The short explanation is: You can fast travel to any Dragon Pit where you’ve built aHunter’s Tent. The longer explanation, though, is: You can fast travel to any Hunter’s Tent, but you can only build Hunter’s Tents at certain Dragon Pits depending on that pit’s stats.
It’s a little confusing, because it’s (very) tempting to just build a Hunter’s Tent at every Dragon Pit you find, but, when you try, the Dragon Karakuri for the tent is just grayed out.
And that’s because of the Dragon Pit.
Understanding why fast travel doesn’t always work in Wild Hearts
Fast travel in Wild Hearts relies on constructing Hunter’s Tents at Dragon Pits, but the game restricts tent placement based on available elemental energies like Earth. Players cannot build tents at every pit since energy supplies vary by location and deplete with use, limiting active fast travel points to a handful at once. Kemono nearby or incomplete camp setups also block access, forcing manual travel until conditions align.
Dragon Pits are wells of energy that you’ll find as you explore each of Wild Hearts’ regions. Each one has a certain amount of energy – split into earth, fire, water, wind, and wood energy.
Each Dragon Karakuri you build has an elemental requirement – indicated by that little icon in the corner. If a Dragon Pit doesn’t have enough of that Dragon Karakuri’s element, you can’t build it. (You can upgrade Dragon Pits with rare materials, but we haven’t found one yet that upgrades to the point where you can build a Hunter’s Tent there.)
Hunter’s Tents cost 50 earth, and very few Dragon Pits have that much earth energy available. For example, in Harugasumi Way – the first area you explore – only four of the 13Dragon Pits can support a Hunter’s Tent. They are, from south to north (and roughly in the order you’ll find them): Giant Tree Trunk Camp, Windswept Plain, Tavern Ruins, and Tumbledown Hillside Shrine.
How do you build Hunter’s Tents at Dragon Pits
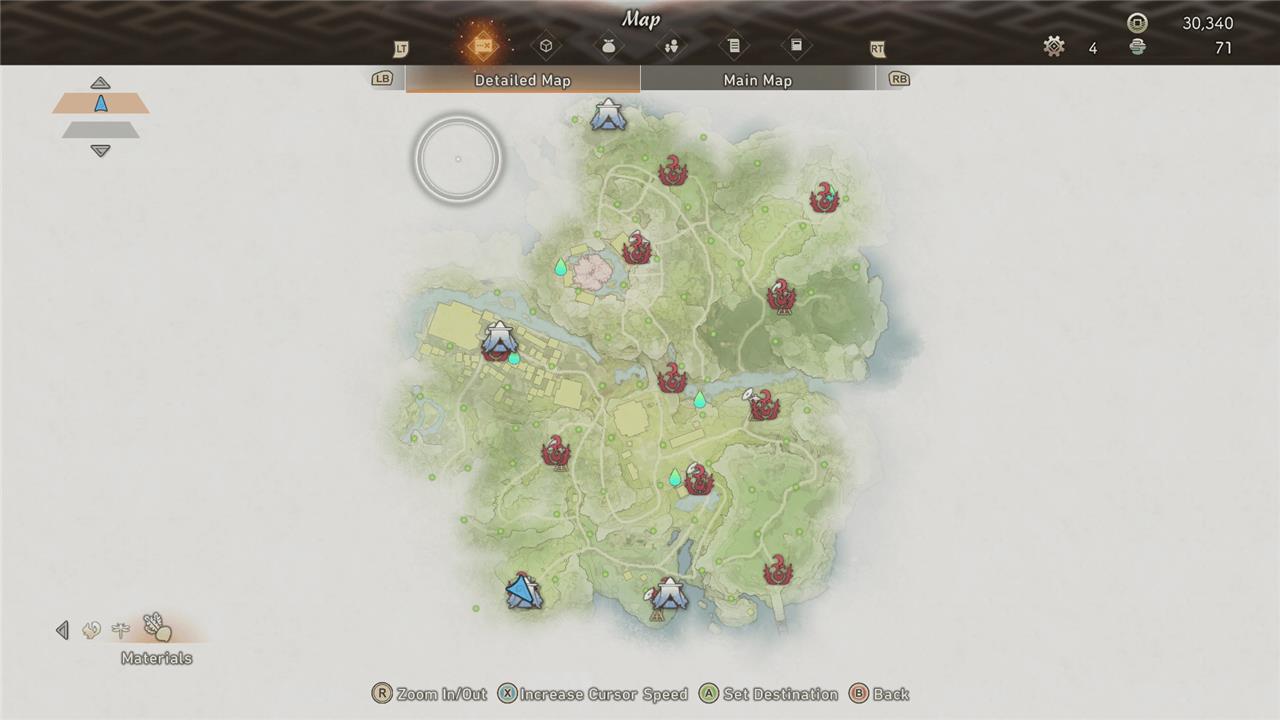
To build Hunter’s Tents at Dragon Pits in Wild Hearts, first locate a suitable Dragon Pit on your map-these appear as smiley face-like icons with energy stats (Earth for tents).
Steps to Build
Approach the Dragon Pit and hold your Conjure button (PC: RMB + Mouse Wheel Down; Controller: Hold LB + D-Pad Down) to open the Dragon Karakuri menu. Select the Hunter’s Tent icon (costs 50 Earth energy), aim at a flat spot nearby, and hold the confirm button to place it-ensure the pit has enough Earth capacity shown in the menu.
Requirements and Upgrades
Not all pits start with 50 Earth; unblock/upgrade them via the map (press M, hover over the pit icon, and select Enlarge/upgrade using local crystals like Mist Crystals). Each region allows multiple tents based on total Earth across pits, with one often free early on-prioritize Earth-heavy pits for more spots.
Tips
Build near Ancient Tree Wells for reduced costs (e.g., 5 Earth) at hidden points, and space tents for coverage; destroy extras if needed via the menu. Once placed, fast travel shows blue tent icons on the detailed map.
All Dragon Pit locations by region
Wild Hearts features Dragon Pits scattered across four main regions, each providing Earth energy for building Hunter’s Tents.
Harugasumi Way (13 Pits)
-
Giant Tree Trunk Camp
-
Windswept Plain
-
Nanohana Hill
-
Forgotten Burial Ground
-
Tavern Ruins
-
Southern Obsidian Cave (Underground)
-
Shrine Approach Marsh
-
Crystal-Clear River
-
Brook Stepping Stones
-
Rustling Bamboo Grove
-
Great Sakura Clearing
-
Shrine Forest
-
Cedar Path
Natsukodachi Isle (13 Pits)
-
Seashore Camp
-
Shipwreck Inlet
-
Sal Tree Hollow
-
Ironsand Beach
-
Lava Cavern (Underground)
-
Caldera Dolmen
-
Stargazing Ridge
-
Dragon Altar (Underground)
-
Underground Ruins Entrance
-
Sleeping Stones Chamber
-
Breezy Cape
-
Coral Salt Swamp
-
Dripstone Shore
Akikure Canyon (12 Pits)
-
Stone Buddha Camp
-
Derelict Shrine Approach
-
Kintōdō Tower
-
Mushroom Hollow Entrance (Underground)
-
Buddha Cave (Underground)
-
Gingko Forest
-
Silvergrass Plains
-
Dawn Camp
-
Last Bastion Ruins
-
Higan Falls
-
Six Paths Lagoon
-
Winter Solstice Cavern (Underground)
Fuyufusagi Fort (13 Pits)
-
Cavern Camp
-
Snowy Ōtsuki Path
-
Sturdy Bridge
-
Icy Castle Town
-
Icicle Forest
-
Mournful Ruined Fort
-
Lifeless Palace
-
Cold Castle Compound
-
Chilling Lane (Underground)
-
Permafrost Lake
-
Lonely Lower Keep
-
Derelict Castle Keep
-
Gloomy Tower