Dive into the enigmatic depths of The Outer Worlds 2 with our ’Arbitrary Measures’ quest walkthrough. Navigate tough choices, uncover hidden secrets, and master the challenges that will shape your journey in this thrilling sci-fi adventure. Ready to bend reality to your will?
’Arbitrary Measures’ quest location in The Outer Worlds 2
The “Arbitrary Measures” quest in The Outer Worlds 2 takes place in the bustling industrial zone of Novo Velora. This location features a mix of towering factories and crowded marketplaces, offering various environmental hazards and NPC interactions that influence your mission’s outcome. Exploring this area thoroughly can uncover hidden paths and key items essential for progressing through the quest.
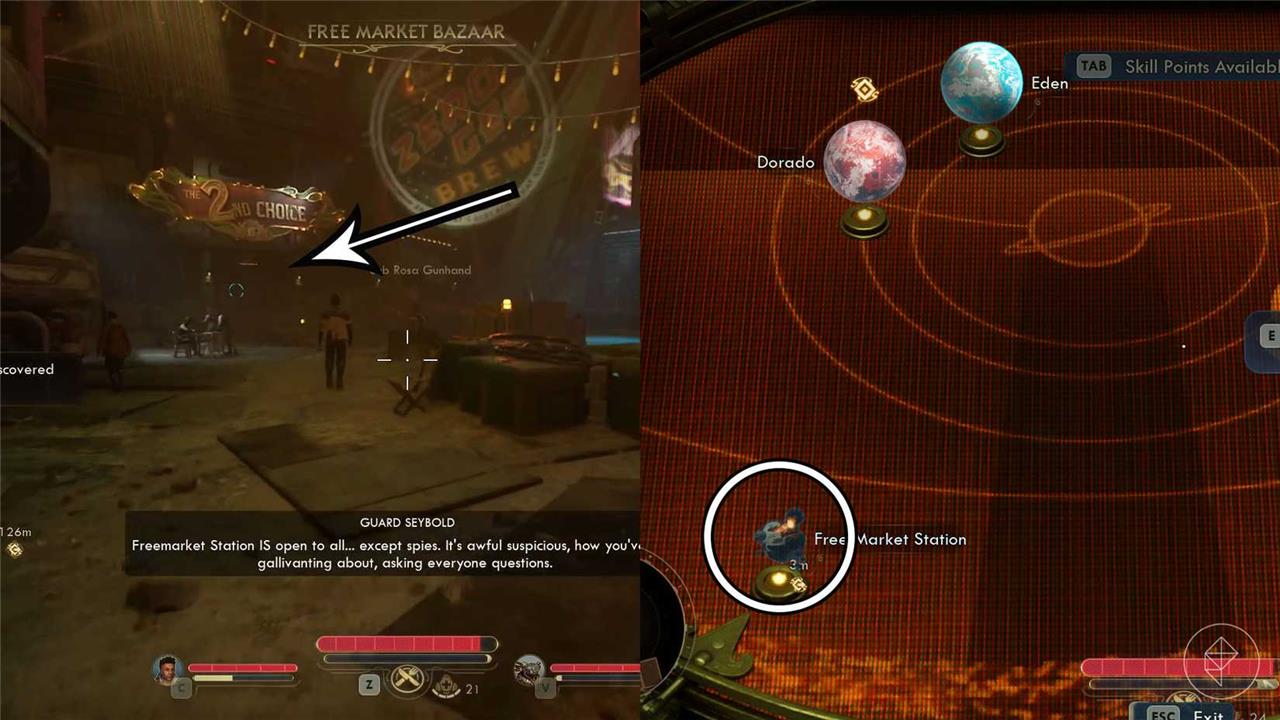
To start the “Arbitrary Measures” quest in The Outer Worlds 2, interact with Barney “Bruiser” Bass, who is the bartender at the 2nd Choice bar at Free Market Station, and select one of the following dialogue options:
- “What seems to be the problem here?”
- “Why not let him have an audience with the Broker? Least he wouldn’t bother you any more.”
- “Meeting the Broker sounds like it could be useful. somehow. Maybe we can work together.”
- “Seems like a plan. I’m in.”
’Arbitrary Measures’ quest walkthrough in The Outer Worlds 2
In the ’Arbitrary Measures’ quest of The Outer Worlds 2, players need to investigate suspicious activity in a remote settlement. Start by gathering clues from local inhabitants and scanning the area for hidden devices. Pay close attention to dialogue choices, as they influence the outcome. Navigating carefully between factions while completing objectives will unlock multiple endings and valuable rewards, making it vital to balance stealth and diplomacy throughout the quest.
After having accepted the job to investigate the camp alongside Tristan, go back to your ship and travel to Dorado. The refugee camp is on the southwestern side of Golden Ridge, left of the “Guardian Estates” fast travel point.
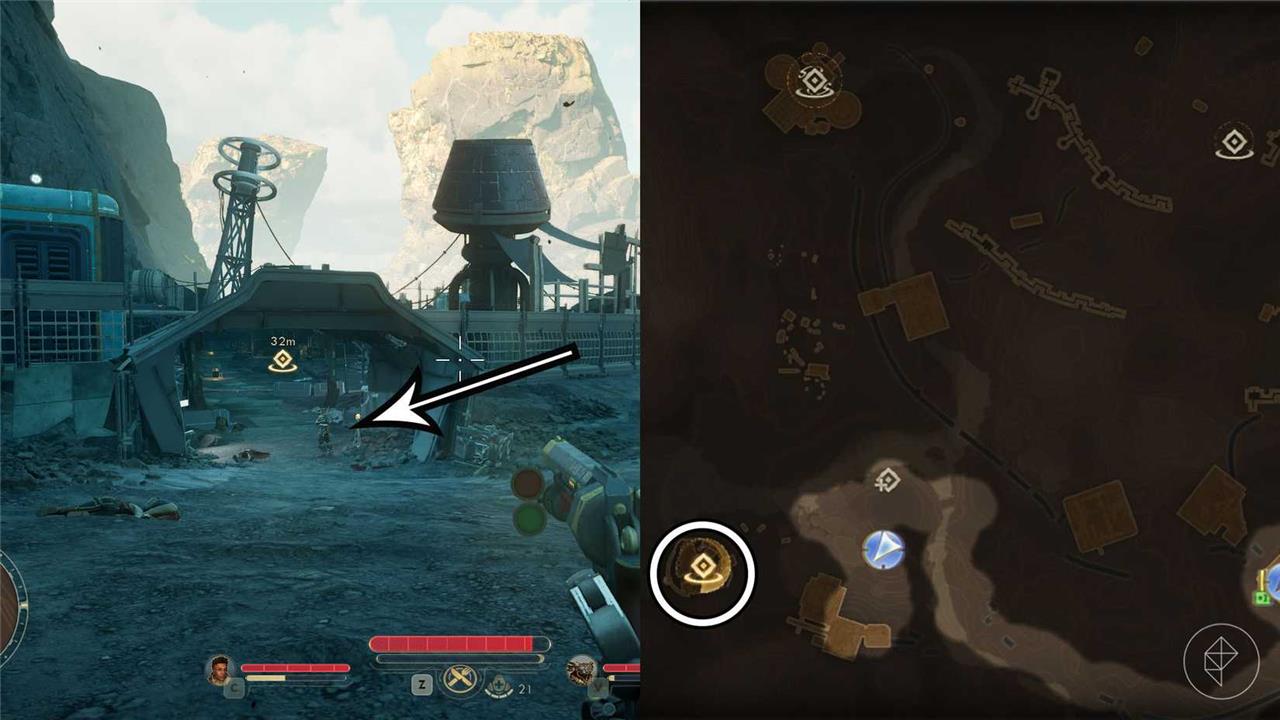
You’ll find Tristan waiting for you at the entrance of the refugee camp, and, following a brief conversation, you’ll learn that the refugees are all dead.
To find out what happened, you’ll need to investigate the area and find five clues around the camp. As you find the clues, you can uncover more information if you have specific skills at level five.
The quest will progress even if you don’t meet the level requirement of the skills, so you don’t need to worry too much about that.Acquiring all the info will improve your relationship with Tristan, who will be impressed by your keen eyes. However, if you don’t care about your relationship with Tristan, you can just find one piece of evidence and select the “I’m done with my investigations, and I think I’ve discussed everything I wanted to” dialogue option to speed up the quest.
Clue #1
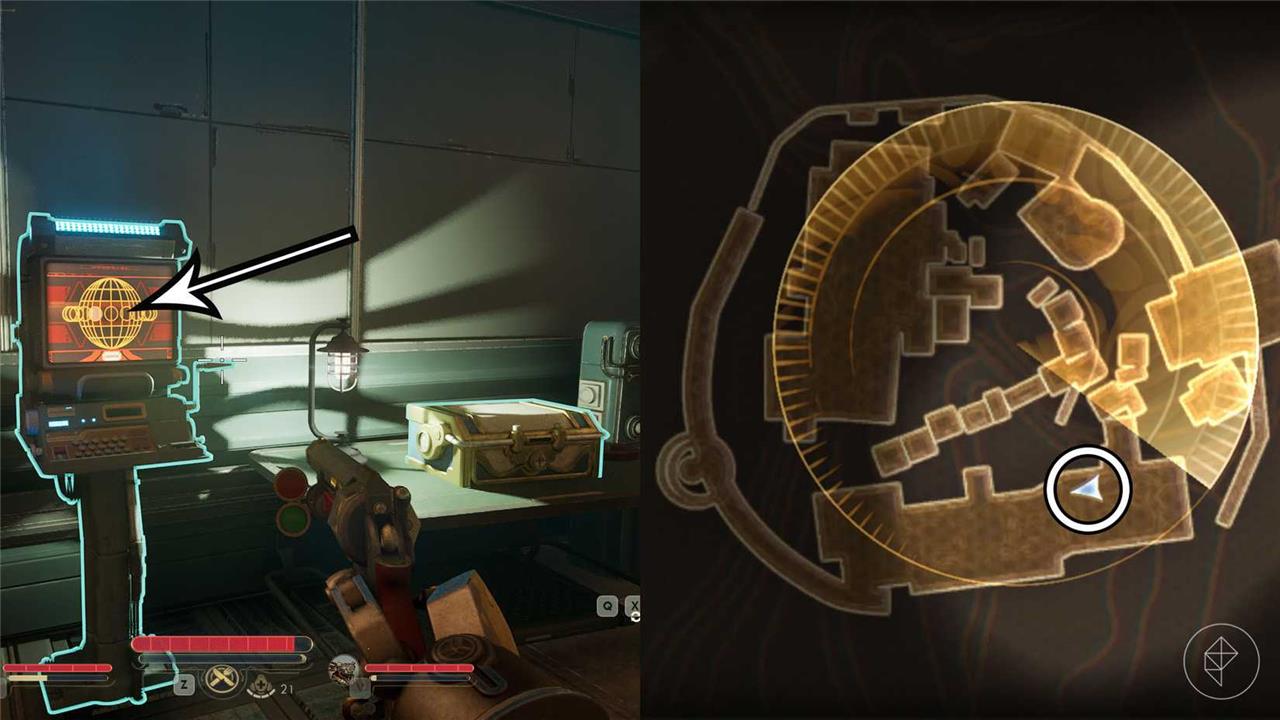
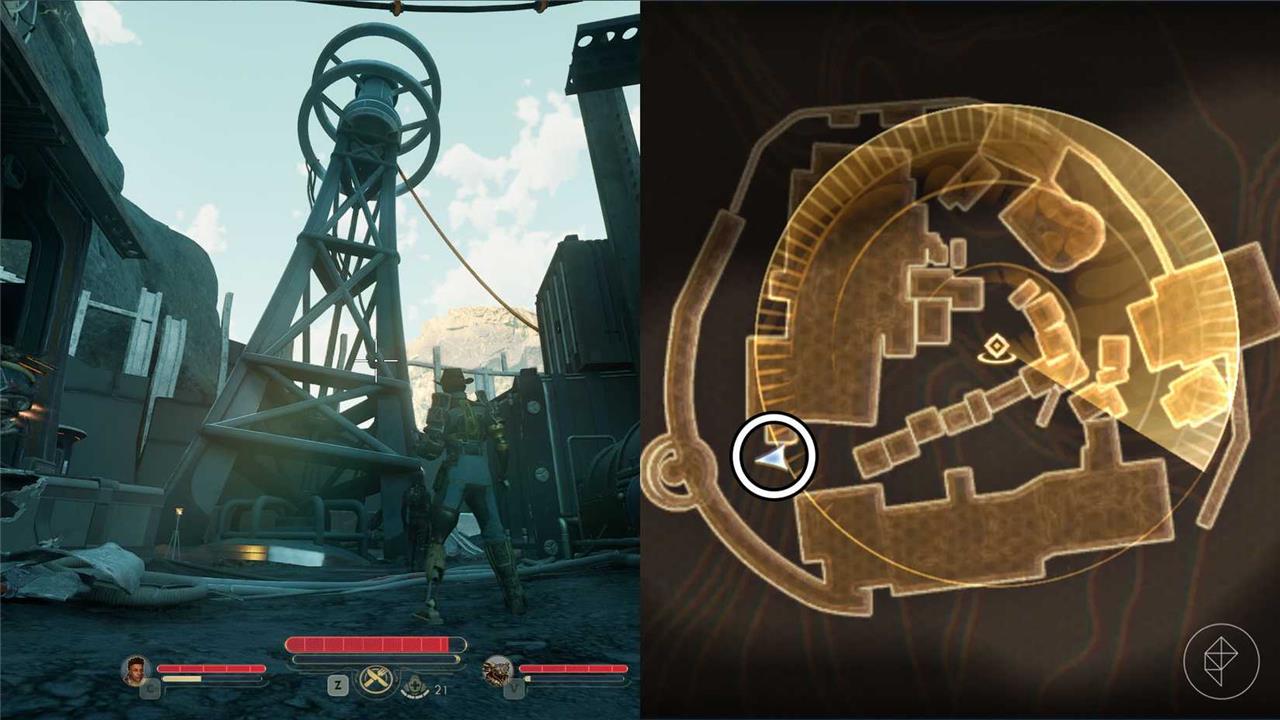
On the south side of the camp, there’s a building with blue walls where you’ll find the camp terminal. Read the two entries to learn about an automech defense force.
Clue #2
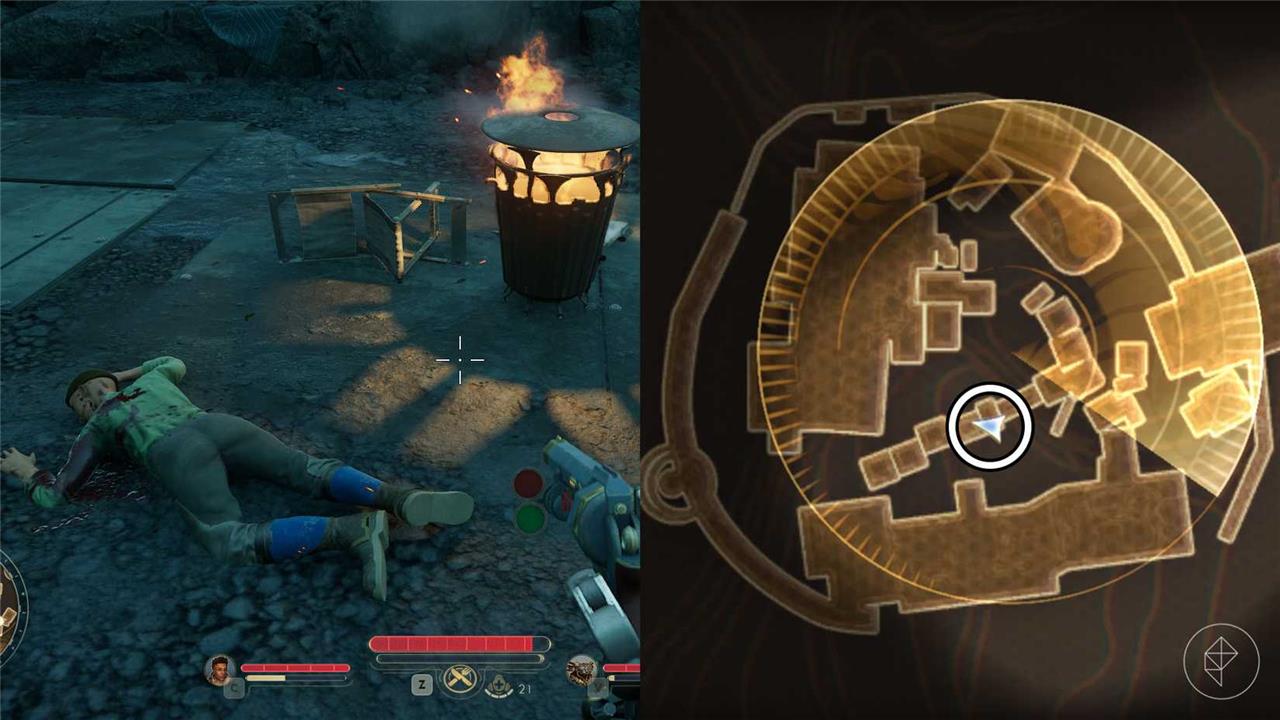
West of the entrance to the southern building, you’ll find a corpse beside a bin on fire. Examine it to identify its wounds. You can obtain more information about how this person died if you have the Medical skill at level five.
Clue #3
To the west of the corpse, you’ll find a transmission tower.It’s completely destroyed, but if you have level five Engineering, it’s possible to learn more information about the tower.
Clue #4
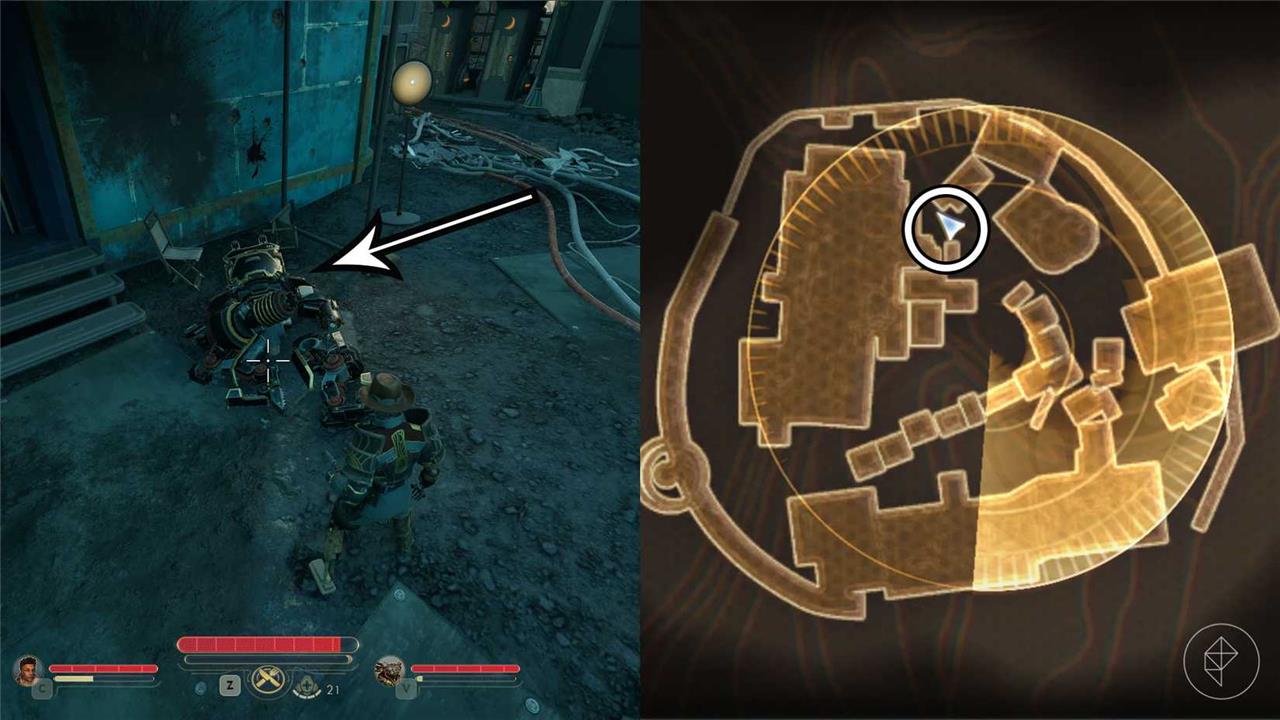
Go to the north side of the camp and look for the automechanical wreckage close to the entrance of one of the buildings in this region. The surroundings have marks of a fierce fight, and the automechanical’s weapon barrel has warped from heat damage. To really know what happened to it, you must be at level five with the Hack skill.
Clue #5
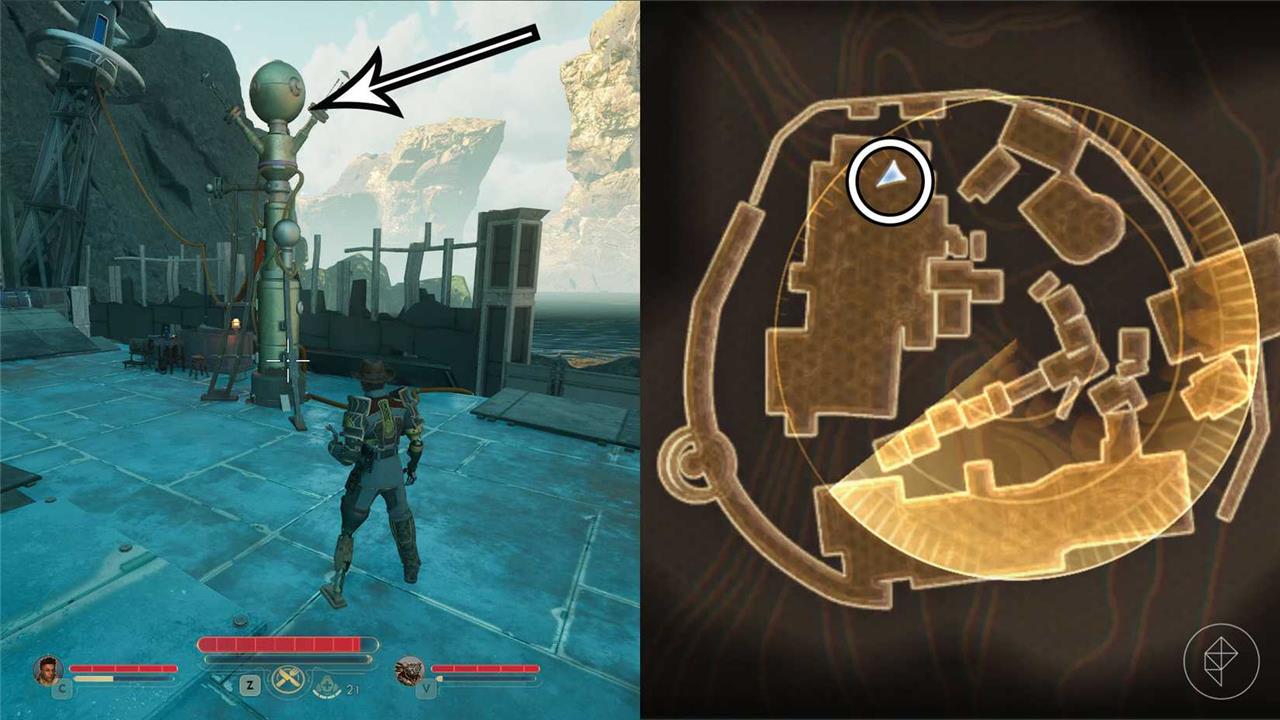
At the northern end of the camp, a bit ahead of where you found the destroyed automechanical, you’ll find a ramp that allows you to climb on top of the northwestern building. There, you’ll find a radio tower. Whether its signal was tempered or not is a mystery – unless you have a level 5Science skill.
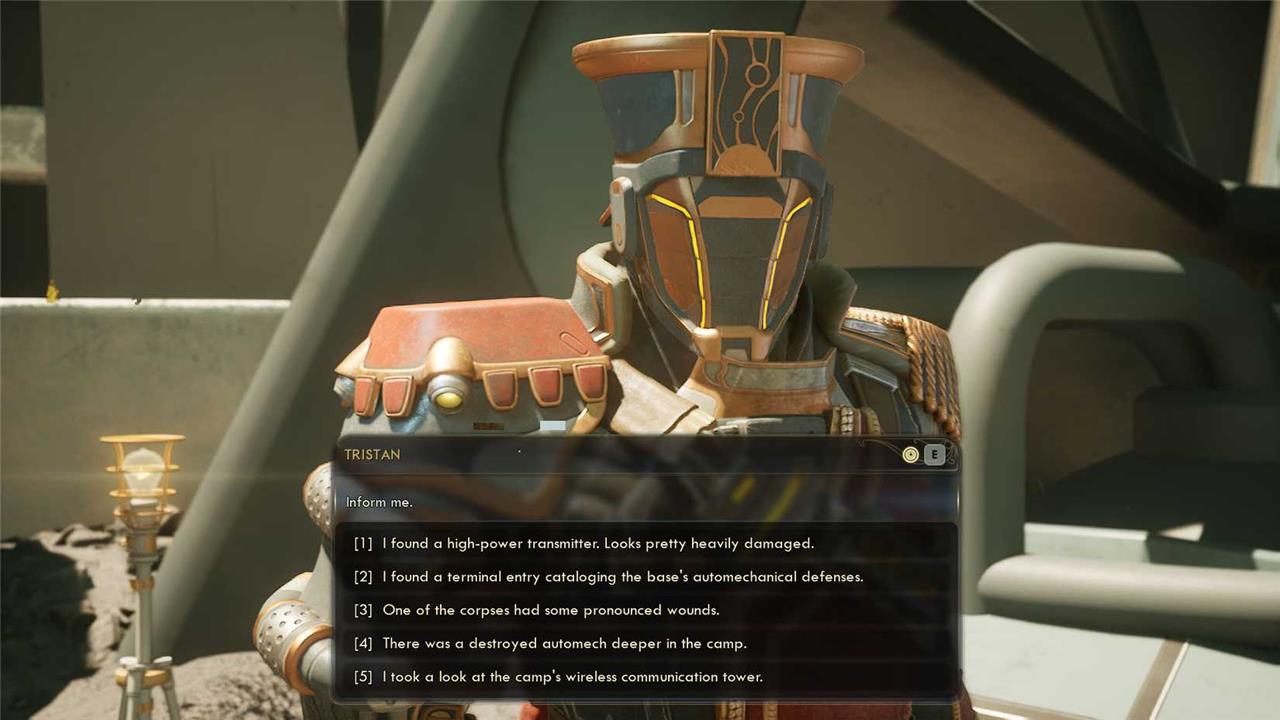
As soon as you finish checking all five points of interest, return to Tristan, and discuss your findings with him. You don’t have to find all the clues to complete the quest, having the chance to choose a dialogue option when talking to him, saying you’re done (
Discussing your findings
After you’ve collected your evidence, interact with Tristan and select the “Found something I think might be important” to discuss your findings with him.
While there are no “wrong” answers when talking about the clues, you have the chance to impress Tristan by giving specialized responses. Always choose them if they are available to you, but you can only pick these unique answers if you have the required skill level or background. In our experience, one dialogue option appeared because we had the “Professor” background.
Here are the skills you need to give Tristan the best answers when discussing each clue:
- Terminal: Engineering (Level 3)
- Corpse: Medical (Level 3) or Guns (level 5)
- Transmission tower: Engineering (Level 5)
- Badly damaged automechanical: Melee (Level 5) or Hack (Level 5)
- Radio tower: Science (Level 5)
Completing the investigation with one or more clues will trigger a fight against two automechanicals. Defeat them, and you will be ready to go back to the 2nd Choice bar in the Free Market Station.
Best choices to recruit Tristan and outcomes
To recruit Tristan in The Outer Worlds 2 and get the best outcomes, follow these choices and tips:
-
Start the “Arbitrary Measures” quest by talking to Tristan and Barney Bass at the 2nd Choice saloon on Free Market Station.
-
Help Tristan investigate the refugee camp in Golden Ridge on Dorado by carefully examining clues. Use dialogue choices that support Tristan’s sense of justice and thorough investigation.
-
During the investigation, leverage skill checks to gather deeper information (Engineering, Hack, Science, Medical skills).
-
Survive the ambush with Tristan by supporting him in combat.
-
Return to Free Market Station and continue the conversation that leads to accessing the Information Broker’s hidden room.
-
Show loyalty and understanding to Tristan’s motivations by choosing dialogue options that align with his protective and lawful nature.
-
Completing “Arbitrary Measures” properly will recruit Tristan to your crew.
Best choices to secure Tristan’s loyalty and recruitment involve supporting his quest without betraying his Protectorate values, choosing dialogue that emphasizes justice, protecting the innocent, and understanding his role as an arbiter.
Regarding outcomes, Tristan can serve as a tank or bruiser in combat depending on how you build his perks and equipment:
-
As a tank: Focus on perks like Juggernaut (increased aggro), Shield of the Law (taunt enemies), Aggressive Challenge (goad enemies), Zyranium Regeneration (health regen), and Steel Wall (extra health).
-
As a bruiser: Focus on perks like Explosive Strikes (bonus area damage), Frenzied Charge (increased attack and movement speed), and Propulsion Rocket (powerful companion ability).
Tristan is excellent frontline melee support, wielding the Supreme Arbiter Hammer that can be upgraded for different damage types and adds crowd control. Pairing him with ranged companions or healers (like Inez) enhances his effectiveness in combat.
In summary, recruit Tristan by completing and aligning with his “Arbitrary Measures” quest faithfully. Build him either as a high-aggro tank or damage bruiser depending on your playstyle. His loyalty and combat utility depend on your dialogue and quest choices reflecting his Protectorate values and justice-driven personality.
Which dialogue options increase Tristan loyalty outcomes
Dialogue options that increase Tristan’s loyalty outcomes largely revolve around showing empathy, questioning his strict Protectorate loyalty, and advocating for merciful and just decisions. Key points to boost his loyalty are:
-
When confronting Virgil, choose dialogue that convinces Tristan to spare Virgil instead of executing him. Options like “Let Tristan spare Virgil” keep Tristan loyal and in your crew. Sparing Virgil unlocks extra dialogue to encourage Tristan to reconsider his Protectorate loyalty.
-
Question Tristan’s loyalty to the Protectorate by selecting lines like, “How can you, Tristan?” This influences him to think about leaving the Protectorate eventually, increasing loyalty through shared doubt about harsh Protectorate dogma.
-
Use speech skill checks (Speech 3 or higher) during these dialogues to successfully persuade Tristan, which is crucial especially during Virgil-related conversations.
-
During the “Listening For a Clue” quest, negotiate peacefully and avoid aggressive choices such as killing key characters like Mayhall, as Tristan approves more merciful resolutions.
-
Choose dialogue that appeals to Tristan’s sense of justice, his conscience, and the possibility of alternatives to violent actions (“Well, is there anything else he could have done?”).
-
Maintain loyalty by supporting Tristan’s value system but also gently challenging his rigid Protectorate mindset to encourage growth and trust.
In summary, to maximize Tristan’s loyalty, advocate for sparing life, question harsh Protectorate actions alongside him, pass speech checks to persuade him, and seek peaceful, just outcomes during critical quest decisions.