Ready to dive into the chaotic depths of Deep Rock Galactic: Survivor? Before you drop your first drill into the alien rock, mastering a few key tips can mean the difference between a triumphant haul and a swift demise. From strategic mining and smart positioning to unlocking powerful weapon overclocks, these beginner tricks will help you survive the relentless hordes and carve your path to victory.
Each of the dwarves has their own weapon and playstyle, and some of them have access to completely different weapons. You’ll need all of these tools and some upgrades in order to shoot and mine your way through the depths of the three different biomes.
In this Deep Rock Galactic: Survivor guide, we’ll walk you through some beginner tips and teach you how to take out legions of bugs relatively unscathed.
Get your weapons to level 12 ASAP
To maximize your effectiveness in Deep Rock Galactic: Survivor, prioritize leveling your weapons to level 12 as quickly as possible. Reaching level 12 unlocks powerful overclocks for each weapon, which provide significant boosts and can dramatically improve your combat capabilities. Focus on farming experience early in the game by mining resources and defeating enemies efficiently, as this will accelerate weapon progression and unlock these crucial upgrades. Having at least one weapon at level 12 before progressing too far will give you a meaningful power spike, making subsequent runs easier and more manageable.
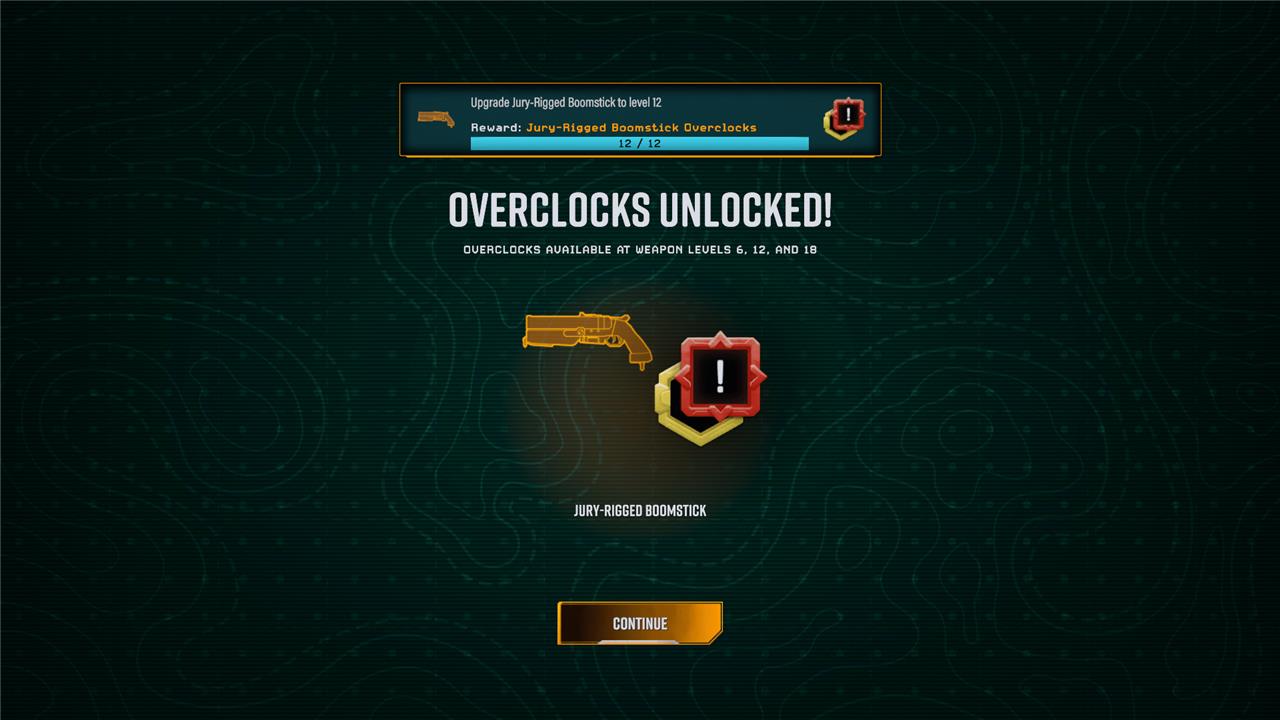
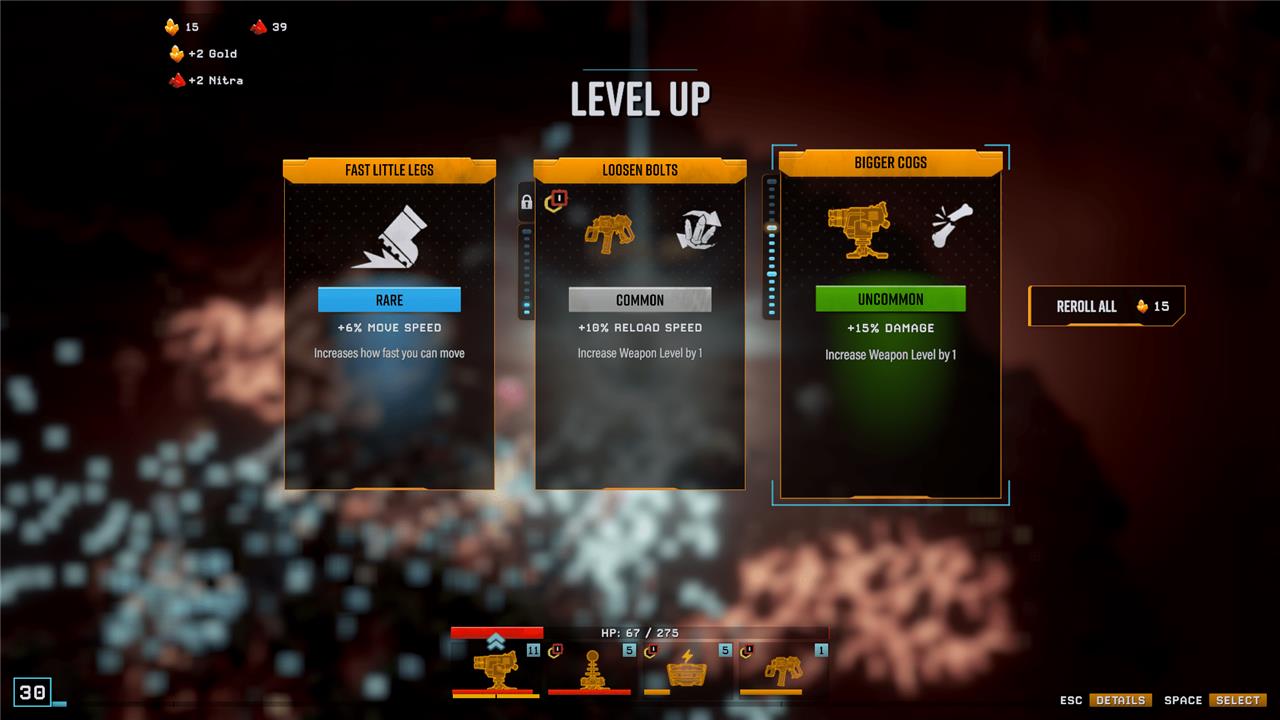
Each time you pick up an upgrade for a weapon in Deep Rock Galactic: Survivor, you’ll also increase its level. This is usually just by one, but some rarer upgrades can level up weapons faster. These upgrades are always useful, giving you faster reload speed or increased damage. But when you first unlock a weapon, you want to upgrade it to level 12 before you end your run.
By doing this, you’ll unlock special Overclock upgrades for your weapons. The next time you drop into a dive, you’ll be able to pick up new upgrades that can drastically alter the functionality of that weapon when you reach certain level thresholds. These upgrades are extremely powerful, so unlocking Overclocking on as many weapons as possible will really boost your power in Deep Rock Galactic: Survivor.
Read the weapon descriptions carefully
When starting out in Deep Rock Galactic: Survivor, it is crucial to read the weapon descriptions carefully. Each weapon has unique properties and quirks, such as firing direction constraints or target prioritization, which can significantly affect your combat effectiveness. Understanding these details helps you choose weapons that synergize well with your playstyle and passive upgrades, maximizing your damage output and survivability. Additionally, weapons level up and unlock powerful overclocks that can change the tide of battle, so knowing what each weapon offers will guide your upgrade priorities and improve your chances of success in the caves.
The weapons in Deep Rock Galactic: Survivor all work differently and some are a little goofy. Because of this, you want to make sure that you carefully read a weapon’s description when you first pick it up, as it might only shoot at enemies when your back is to them, or only fire at things you’re facing.
One of the best examples of this is the starting weapon for the Engineer class, the LMG turret. Some turrets – like this one – collect charges and only pop out when you stand still for a second. If you aren’t stopping to throw your turrets down, you’re essentially wasting a very powerful tool. So just be sure to familiarize yourself with weapons before you start using them in earnest.
Check out the milestones to set a goal for yourself
Setting clear milestones is essential to progressing effectively in Deep Rock Galactic: Survivor. Start by focusing on unlocking new hazard levels and biomes, which gradually increase the game’s difficulty and rewards. Prioritize mining resources like Nitra and gold early on to fund weapon upgrades and overclocks, which significantly boost your power. Aim to reach key weapon upgrade thresholds (such as levels 6, 12, and 18) to unlock important overclocks. Additionally, completing secondary objectives and collecting rare resources will accelerate your meta progression. Setting these milestones helps you stay ahead of the increasing swarm difficulty and prepares you for higher hazard levels, ensuring steady improvement and survival success.
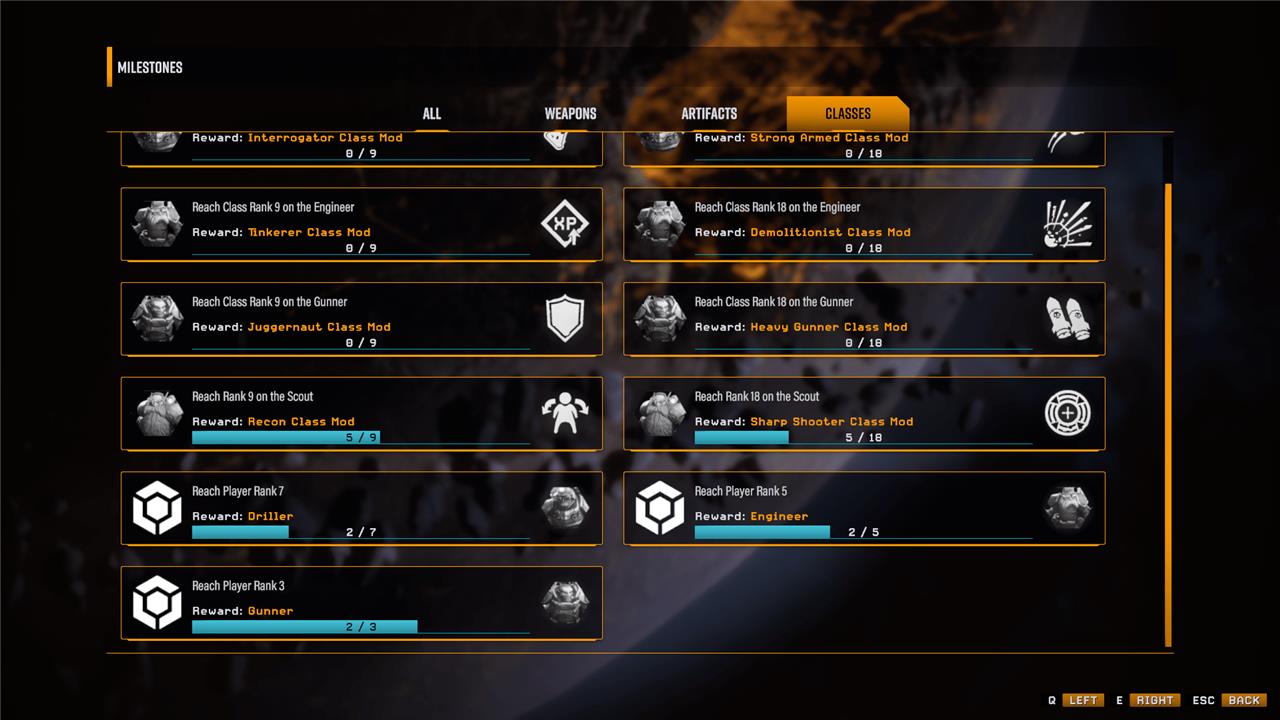
In games like Deep Rock Galactic: Survivor, it’s not always clear what you should be doing. Sure there are objectives for each level and difficulty, which will earn you bonus upgrades if you complete them. But there are also milestones in the milestones menu, which is how you unlock new weapons and artifacts.
Deep Rock Galactic: Survivor does a great job of showing you milestones you’re close to when you start a new dive. However, I recommend poking your head into the milestone menu before each dive so you can see what you’re close to unlocking. If you find out you just need to do a bit more cold damage to unlock a new artifact, that might change the kind of weapons and upgrades you select on your next dive.
Make paths through the rocks
In Deep Rock Galactic: Survivor, making paths through the rocks is essential for controlling enemy movement and creating strategic choke points. Since the terrain is fully destructible, use your mining tools to carve tunnels and corridors that funnel swarms of bugs into narrow areas where you can deal massive damage efficiently. Planning your escape route ahead of time by mining through rock formations not only helps in managing hordes but also provides safer navigation through the caves. Avoid getting cornered by continuously creating new paths and using the environment to your advantage, ensuring you always have an exit strategy during intense fights.
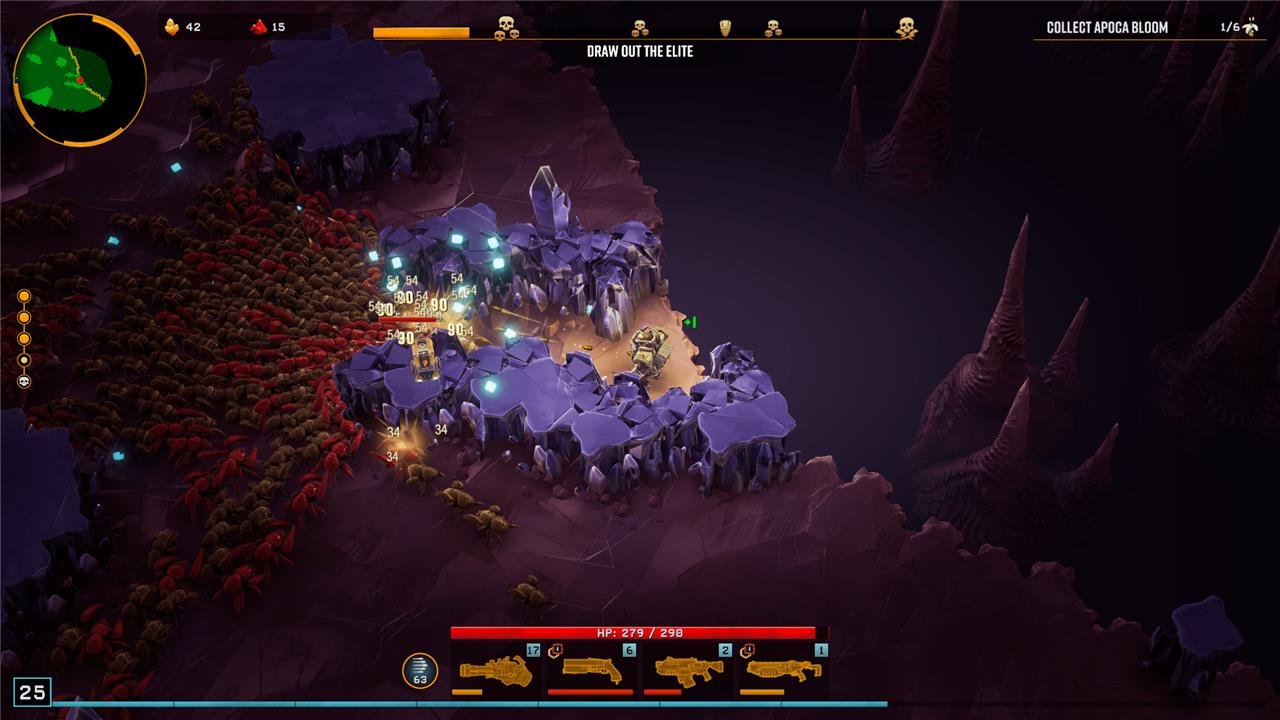
Because Deep Rock Galactic: Survivor marries mining with killing legions of bugs, it can be tempting to clear out large patches of rocks, leaving the entire floor clean so you have freedom of movement. Resist this urge! Instead, cut simple paths through the rocks and then come out the other side.
Bugs will take the fastest route to you possible, and if you create a small path for them, they’ll all funnel inside. This can slow bugs down, which is great, but it can also create a bit of a kill box for you, giving you a chance to decimate a legion of bugs (especially if you’re playing a Gunner) from relative safety.
Note that some of the bigger bugs can also do some mining, so be careful relying on these tunnels too heavily.
Don’t undervalue mine speed
Don’t undervalue mine speed in Deep Rock Galactic: Survivor, as it directly impacts your ability to gather resources quickly and stay ahead of the increasingly dangerous bug swarms. Mining efficiently early in each stage allows you to unlock powerful weapon overclocks and upgrades faster, giving you a significant advantage in combat. Since the game’s difficulty scales with time, mining speed helps you maximize resource collection before swarms intensify, enabling better preparation and survivability. Prioritize mining right after dropping from the pod to make the most of your time and improve your overall progression.
As I’ve explained, mining is a pretty important part to Deep Rock Galactic: Survivor, and it’s partially what separates this game from others in the genre, like Vampire Survivors. If you’re not used to Deep Rock Galactic: Survivor, you might think you should pump all your resources into increasing your damage or survivability. But while those things are very important, increasing your mining speed can get you out of some serious jams.
One of the easiest ways to protect yourself is to dive through a nearby rock, giving you an easy out from a bad situation. If you have low mining speed, you could get caught before you ever get the chance to escape, causing your health to plummet faster than you thought possible. Another reason why mining speed is useful is that you need to cut through rocks in order to get resources like gold. These resources can help you buy upgrades between floors, but you’ll also need other, more dense resources to unlock permanent upgrades for your dwarves outside of dives.
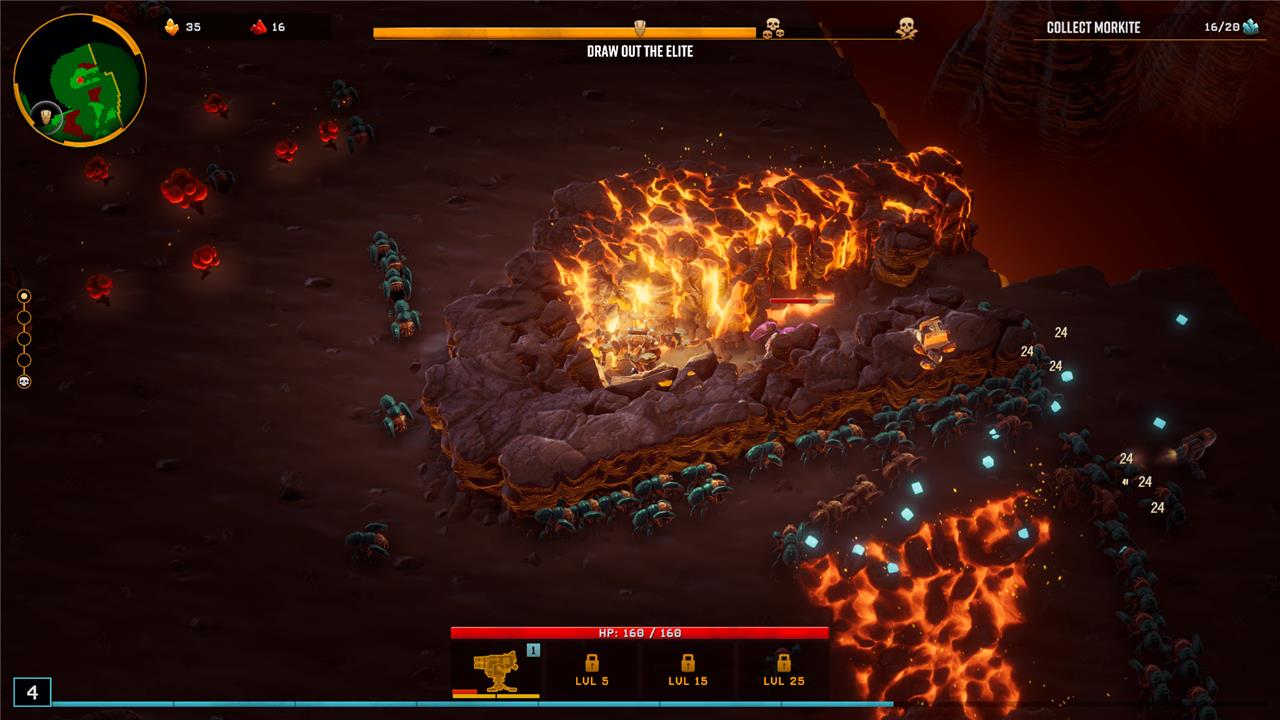
Bait exploder bugs
The Bait Exploder bugs in Deep Rock Galactic are a dangerous variant of Glyphid Exploders known for their explosive attacks. They have distinctive orange bulging tumors on their backs which, when destroyed, can trigger a powerful explosion. Skilled players can strategically target and pop these blisters to neutralize the threat before the bug detonates, sometimes turning the explosion’s radius into a valuable gold zone. However, these bugs explode quickly and can cause chain reactions, so maintaining distance and timing your attacks carefully is crucial to avoid damage and control the swarm effectively.
One of the most dangerous bug types in Deep Rock Galactic: Survivor are the exploder bugs, which are big, orange, and hard to miss. They travel in a pack with the other bugs and, if you get too close, they explode and deal massive damage. The thing is that you can use these guys to your advantage if you’re fast and careful.
Because these bugs travel in packs and deal damage to other bugs around them, you can actually walk close, wait for them to glow, and then run the hell away as fast as possible. If you do this correctly, you can cause a chain reaction capable of blowing up an entire swarm of bugs. This is not only an excellent way to get a group of bugs off your back, it’s also extremely efficient for killing elite bugs and farming XP.
Learn to manipulate the exploder bugs and you’ll find a lot of early success in Deep Rock Galactic: Survivor.
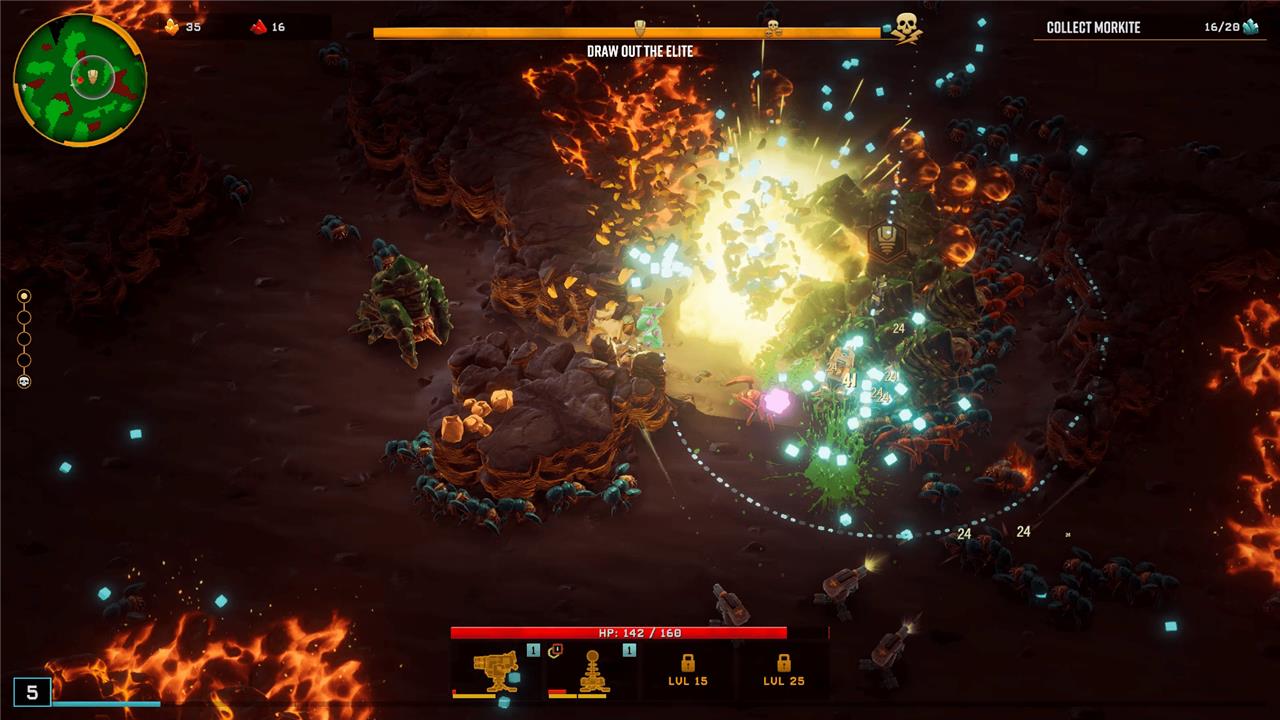
Drop Supply Beacons on boss bugs
When facing boss bugs in Deep Rock Galactic: Survivor, strategically dropping Supply Beacons can turn the tide of battle. These beacons not only provide crucial resupplies but can also be used offensively to deal significant damage to bosses if timed correctly. Positioning yourself near a Supply Beacon during intense fights allows you to maintain your ammo and health while leveraging the beacon’s explosive potential to weaken or stagger boss bugs, making these encounters more manageable and increasing your chances of survival.

Part of the way through each floor, you’ll get notified that a Supply Beacon has appeared on the map. If you find one of these, dig out all the rocks from the nearby area, and stand nearby for a few seconds, you’ll summon a pod down and net yourself a new artifact. Now, this is almost always worthwhile, as you can get some powerful artifacts that increase your health or even give you XP every time you get damaged. But there’s something even better about these pods if you can time them correctly: they deal a ton of damage.
If you save these Supply Beacons until the boss comes out, and then kite the boss around in the circle while you’re waiting, the pod can drop onto the boss’ head, killing it instantly. This even works for the massive boss at the end of the dive – although it just does a lot of damage in this case, rather than killing it instantly.
What hidden tips can help me survive longer in Deep Rock Galactic
Here are some hidden tips to help you survive longer in Deep Rock Galactic:
-
When on a zipline and swarmed by shockers and mactera, spam the interact key (E) to stay on the zipline despite damage, preventing you from falling off.
-
Combine a shield and an incendiary grenade placed quickly in the same spot to burn enemies around you while staying safe inside the shield.
-
Use the Born Ready perk with the autocannon since it has a long reload time, allowing you to shoot immediately after reloading.
-
Equip Dash, Iron Will, Vampire, and fast ammo restock perks together. This synergy lets you clutch revives and survive when the team is down by using Iron Will and healing methods like shield restock, red sugar, or melee kills.
-
Plan your escape route ahead by using the destructible terrain to funnel bugs into chokepoints, making them easier to kill.
-
Use the mini-map frequently to locate objectives, resupply pods, and minerals, and try to pick up magnet powerups late in the stage to maximize XP gain.
-
Turn off your flashlight to spot hidden minerals in walls like jadiz or aquarqs.
-
Grab cave angels to fly and steer them, giving you mobility advantages.
-
Jump near the end of a Dash to extend the speed boost, and grab ledges to cancel fall damage, allowing you to survive long falls.
-
Use snow and goo patches to reduce fall damage and slow down ground enemies, respectively.
-
When using power drills, let them cool naturally at 99% heat rather than overheating to save time.
-
Use explosives carefully to clear enemies around downed allies without harming teammates, and throw satchel charges forward while jumping and walking backward for longer throws.
These tips combine movement tricks, perk synergies, terrain use, and combat tactics to improve your survivability in the harsh caves of Deep Rock Galactic.
How can spammed E on ziplines help me avoid damage from swarms
Spamming the interact key (E) on ziplines helps you avoid falling off when taking damage from swarms in Deep Rock Galactic. Normally, if you take enough damage while on a zipline, your character will fall off, making you vulnerable. However, by repeatedly pressing E to grab the zipline again immediately after being hit or jumping before the damage, you can stay on the zipline longer despite incoming attacks. This technique prevents you from being dropped and allows you to maintain mobility and avoid melee enemies, though it doesn’t make you invincible.