Hidden beneath Sumeru’s lush canopies and ancient ruins lie quests that many travelers overlook-stories whispered by forgotten monuments, secret scholars, and mysterious spirits. This guide lists every concealed mission waiting to be found, so you won’t miss a single tale the region keeps off the main path.
Rather than being marked with the usual blue exclamation point on the map as you approach the quest NPCs, some quests are completely locked until you do some kind of special puzzle or interaction. Our Genshin Impacthidden Sumeru quest guide will list out all the reputation quests that you may not have been able to find.
Three quests are locked behind commissions: “Garcia’s Paean: A Gift of Compatibility,” “Gourmet Supremos: Within Our Duties,” and “Cost-Effective Hook?”. We list the requirements to unlock these quests below using the help of the Genshin Impact Wiki, as we haven’t gotten lucky enough to get these ourselves yet.
The other quests are locked behind specific interactions or puzzles. We list out these hidden world quests below. (Note that there may be other hidden world quests, but for now we’re just scouting out the ones that the reputation NPC in Sumeru City has listed.)
A Short Encounter with a Rare Bird
A traveler exploring the Avidya Forest may come across a small event involving a rare bird perched near a quiet clearing. Approaching it triggers a brief interaction that hints at a hidden connection to one of Sumeru’s forest NPCs. Completing the short task that follows rewards the player with a few items and unlocks another clue tied to deeper regional quests often overlooked on a first playthrough.
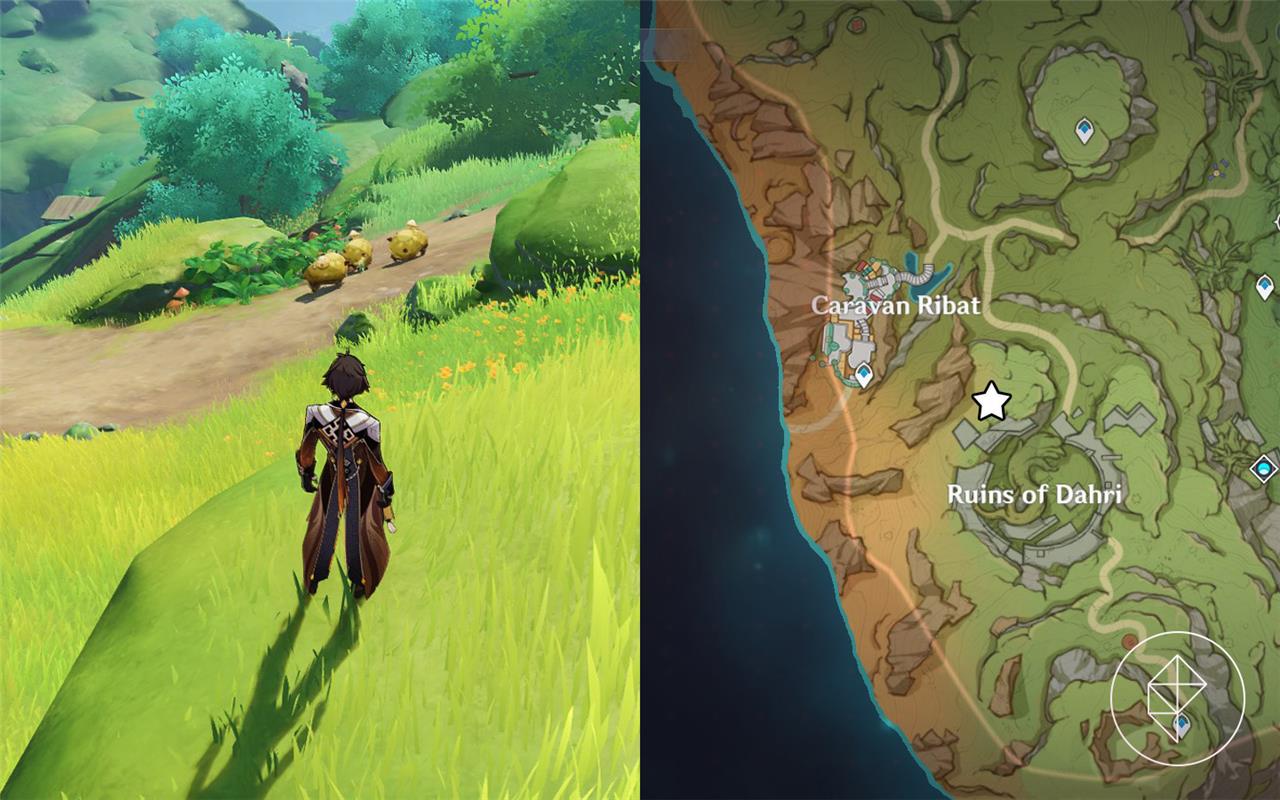
To start “A Short Encounter with a Rare Bird,” kill the Shroomboars at this location.
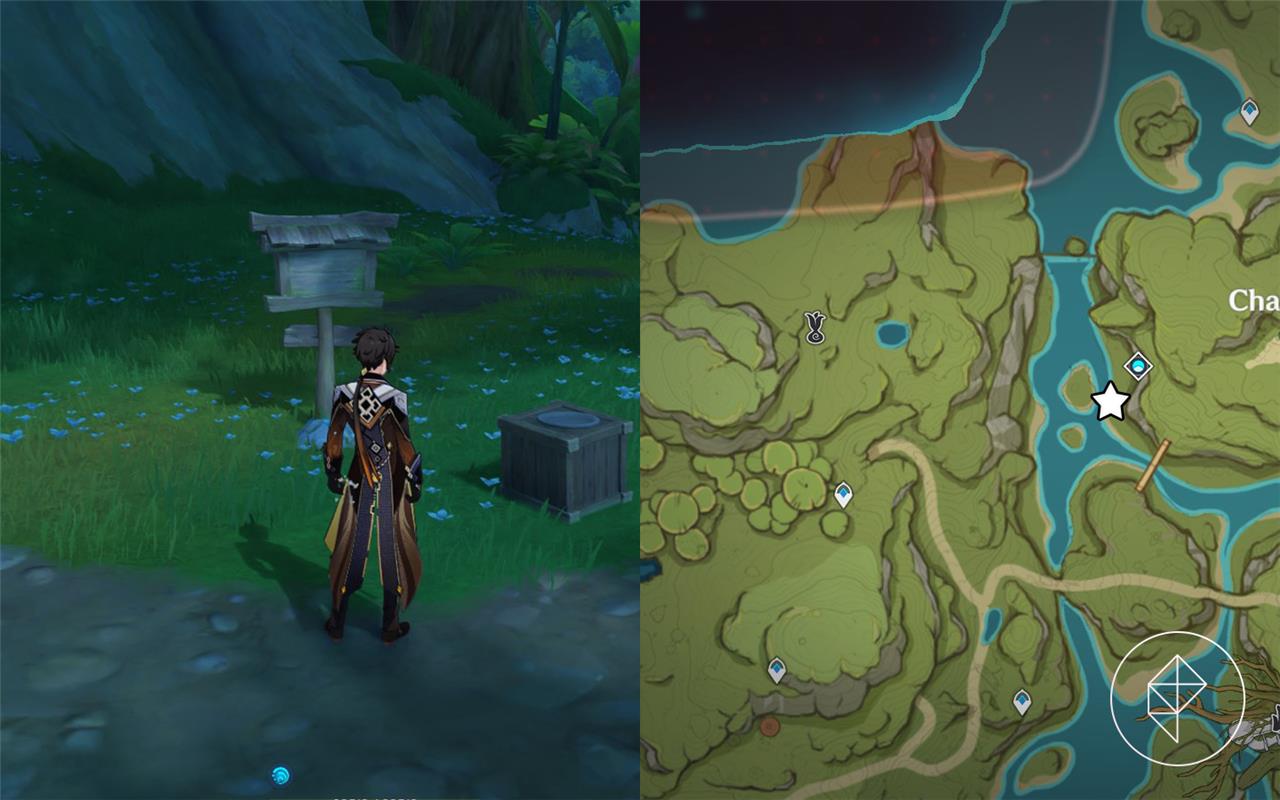
Where are the Fierce Creatures?
The Fierce Creatures hide in one of Sumeru’s animal-filled groves, where mossy stones and hanging vines cloak a small, sun-dappled ruin. Look for a faded statue warning travelers away; solve a quick, nature-themed riddle to reveal the quest marker. Once triggered, you’ll uncover the quest’s hidden steps and rewards.
Talk to the NPC above, who will describe three large beasts at three different locations.
Go to each location (marked below) and defeat the large monsters. You’ll know it’s the special monster because they’ll get a big health bar at the top of the screen, similar to a boss fight. For the tiger, you’ll need to place a piece of fowl on the plate and fast forward to midnight for the beast to appear.
Once you defeat the last one, Paimon will say something along the lines “That’s all of them!” signaling you to head back to the NPC and claim your rewards.
All these monsters only spawn once, so it’s entirely possible that you will have killed one or two of them already. If Paimon’s voice line hasn’t been said, you will not be able to claim rewards. You can try revisiting the locations above to get her to talk. (For whatever reason, we had to revisit the Sumpter’s spawn point and then she noted that they were all dead, even though we killed the Sumpter first.)
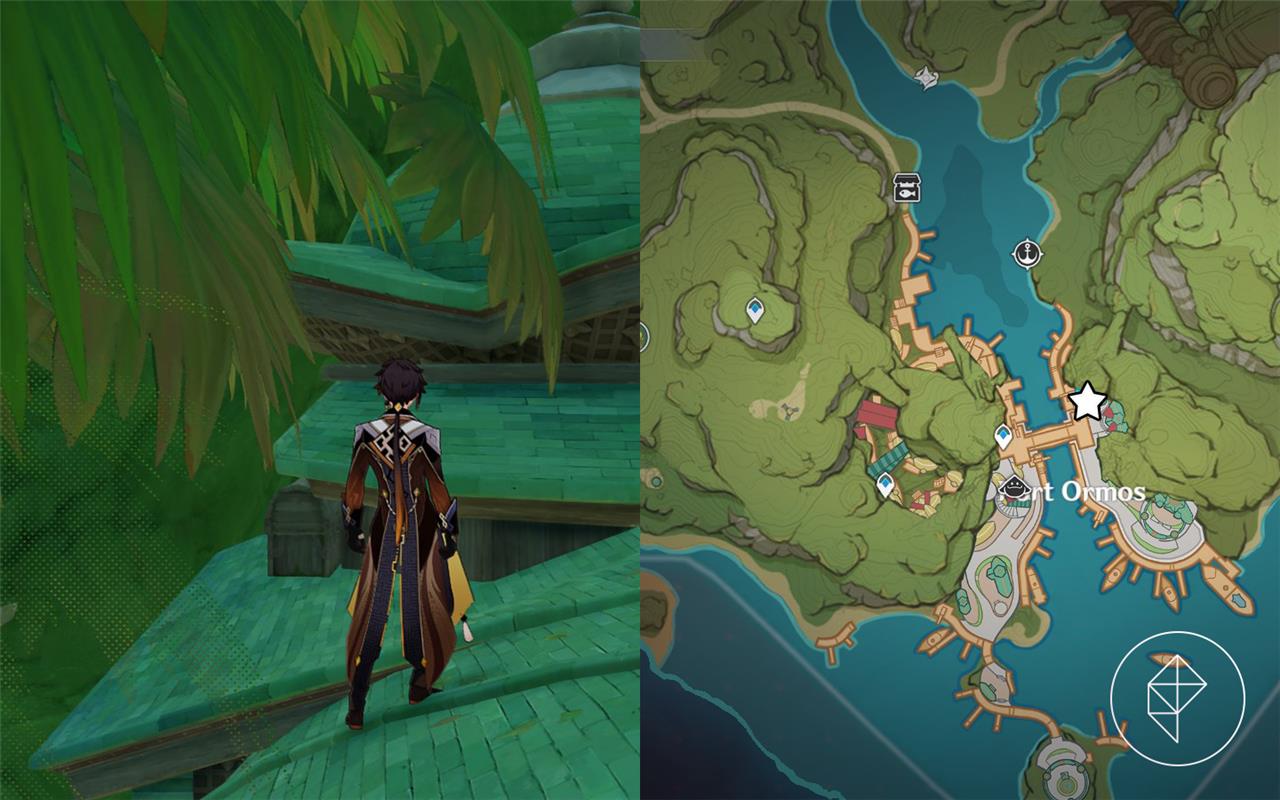
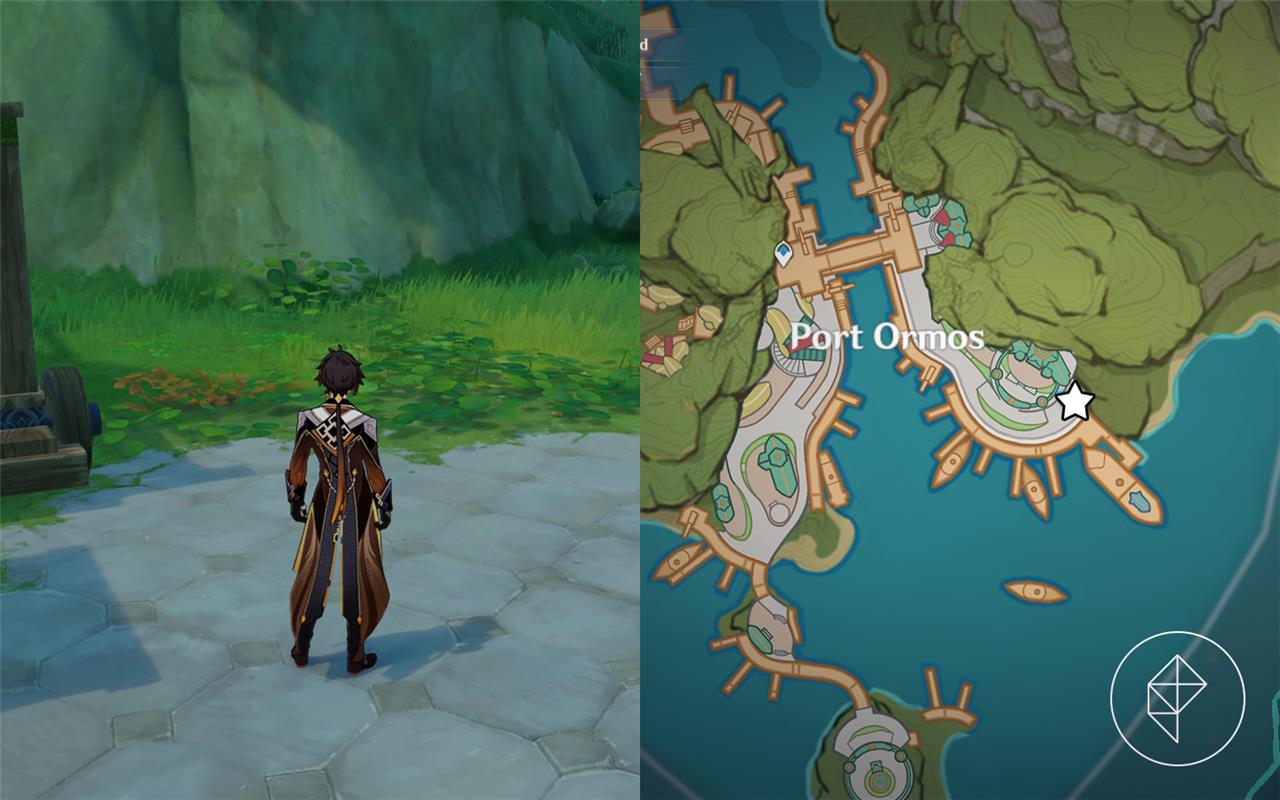
The Price
This quest follows the Traveler as they help a man named Khedive with a strange transaction deep within Sumeru’s desert. Players must investigate clues and gather materials tied to buried ruins, revealing a moral dilemma about greed and knowledge. Completing the task grants Primogems, Mora, and valuable items, while expanding the lore around ancient desert civilizations and their forgotten experiments.
To start this quest, open this Common Chest on top of a roof in Port Ormos.
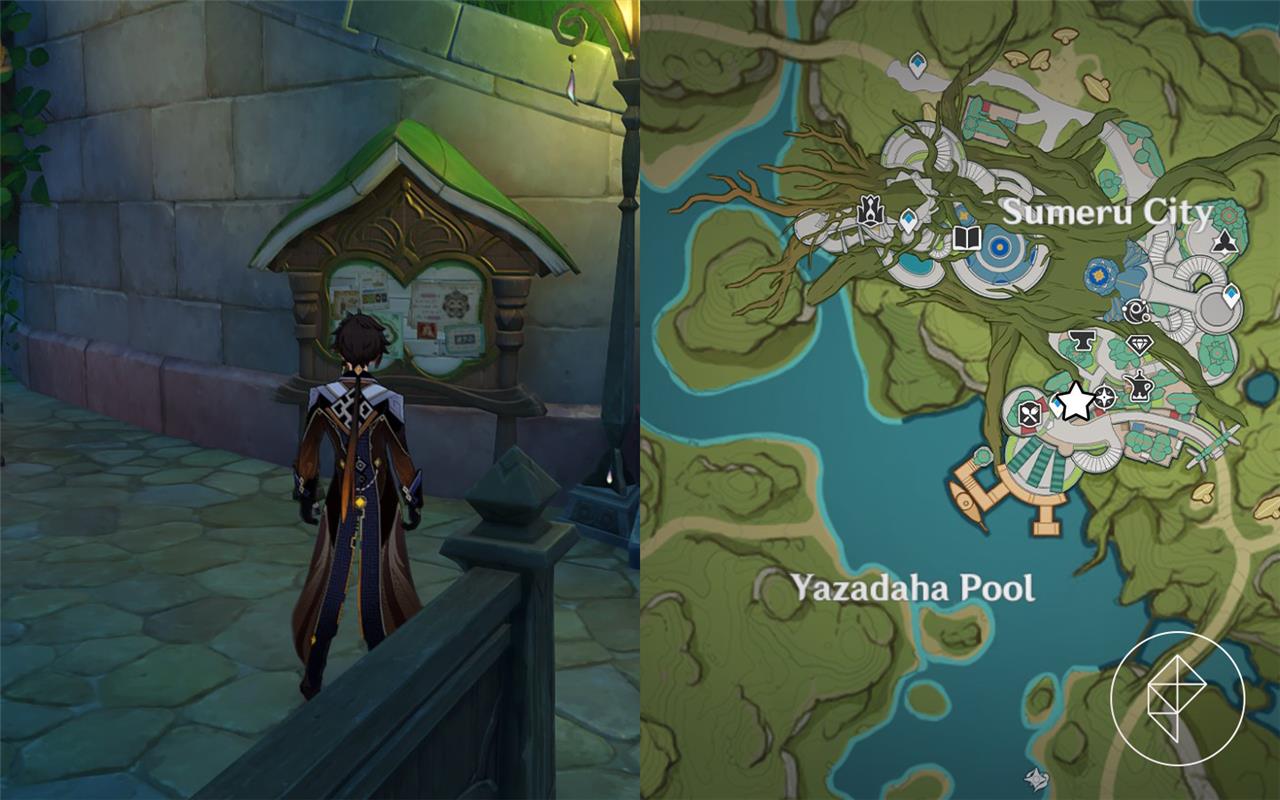
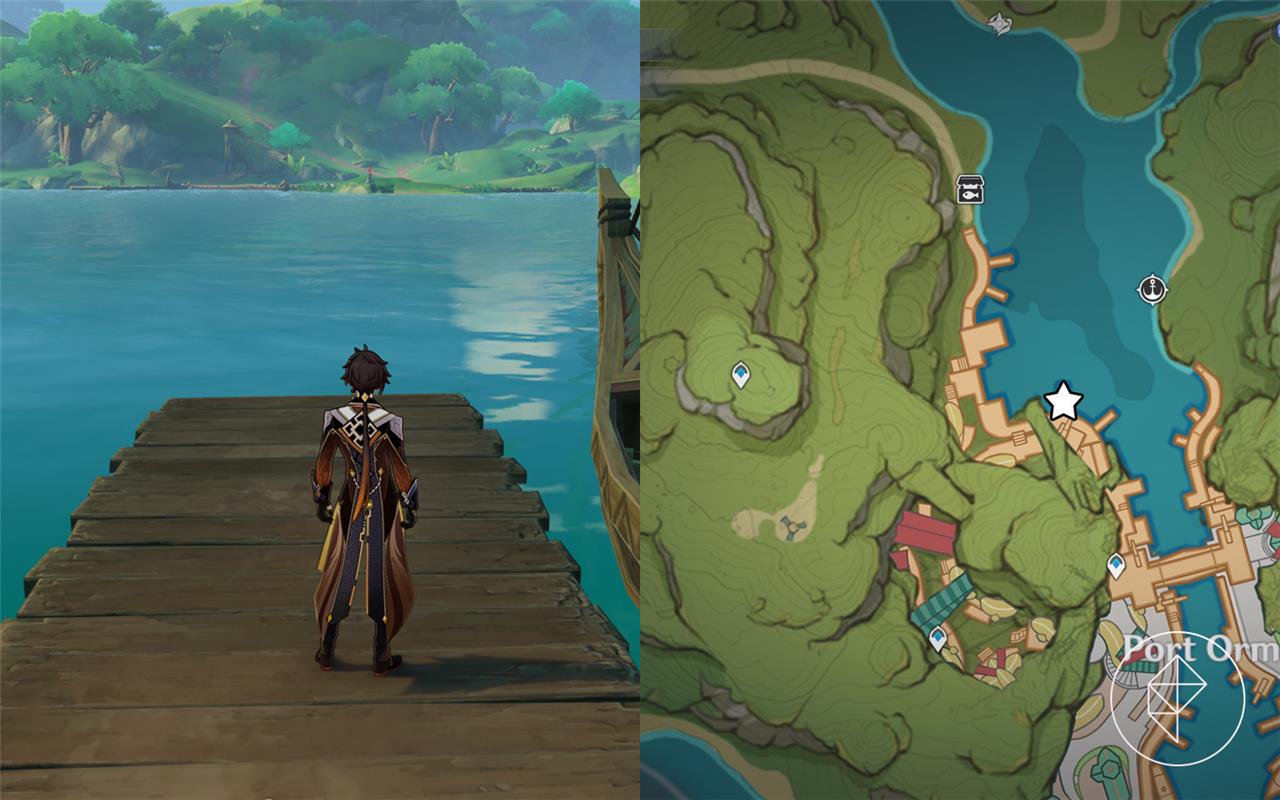
Treasure of Wisdom: A New Plan
A quiet hoard of wisdom awaits among Sumeru’s shadows, where clues thread through arboreal streets and age-old ruins, guiding readers toward a plan that reveals hidden insights, rewards, and the path to mastery.
In order to get this quest, you have to solve the billboard puzzle in Sumeru City. First, you’ll need to interact with the billboard below.
Then, go open the following boxes and chests in order:
The first box is under the docks by the fishing hole.
The second box is near the stage where Nilou performed.
The treasure chest is inside the Sumeru Akademiya building, beyond the doors. You’ll need to interact with the large doors inside to access this room.
The fourth and final box is in the pond below the Teleport Waypoint.
After this, talk to this NPC at noon (in-game time, not real life).
After finishing that hidden achievement, the NPC will be waiting at the following location one real-life day later.
The Foolish Fatuus
The Foolish Fatuus is a mysterious hidden quest in Sumeru that centers on a wandering adventurer who seems to be chasing illusions. Players must follow a trail of strange clues through the forest and interact with a series of odd devices left behind by the so-called “fool.” Completing each stage rewards insight into the traveler’s strange motives and offers modest but satisfying rewards once the truth behind their pursuit is revealed.
To start this quest, you’ll need to complete the eight Saghira Machine challenges at the various Eremite camps. We’ve marked their locations below.
If you haven’t done any of the Saghira Machine challenges before, all you have to do is get close to the machine and then find the glowing keys inside the various buildings. Each building will have broken walls, floors, or ceilings for you to jump into to get the keys. Once you get all two or three keys, head back to the mechanism and defeat the Eremites that spawn to complete the challenge.
Once you’ve done all eight of these, head to the specific camp we marked below to start “The Foolish Fatuus.”

Memory’s Final Chapter
As time erodes the Akademiya’s records, a forgotten scholar’s notes surface in a buried ruin, chronicling lost memories of Sumeru’s ancient kings. Players trace faded murals and decipher cryptic tablets to piece together her final thoughts before oblivion claims them. This poignant quest closes with a quiet revelation, sealing the past’s echoes forever.
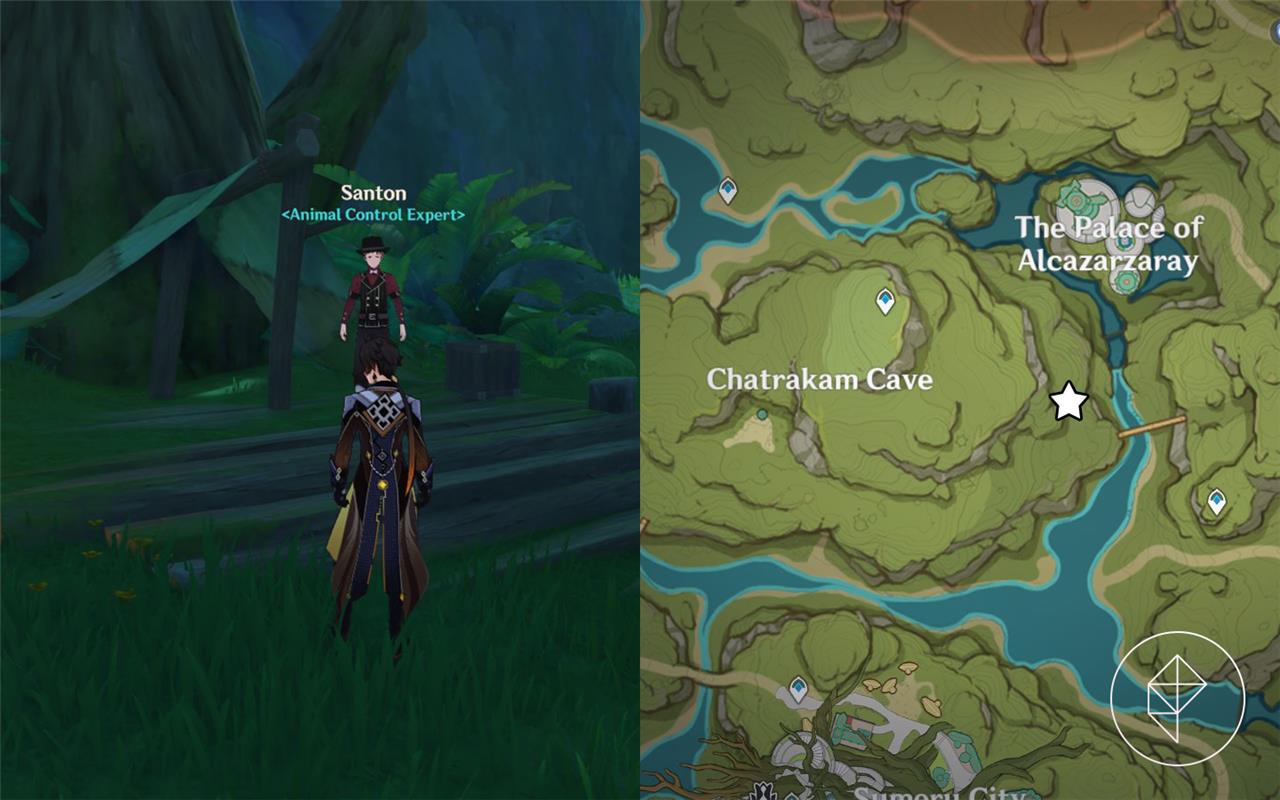
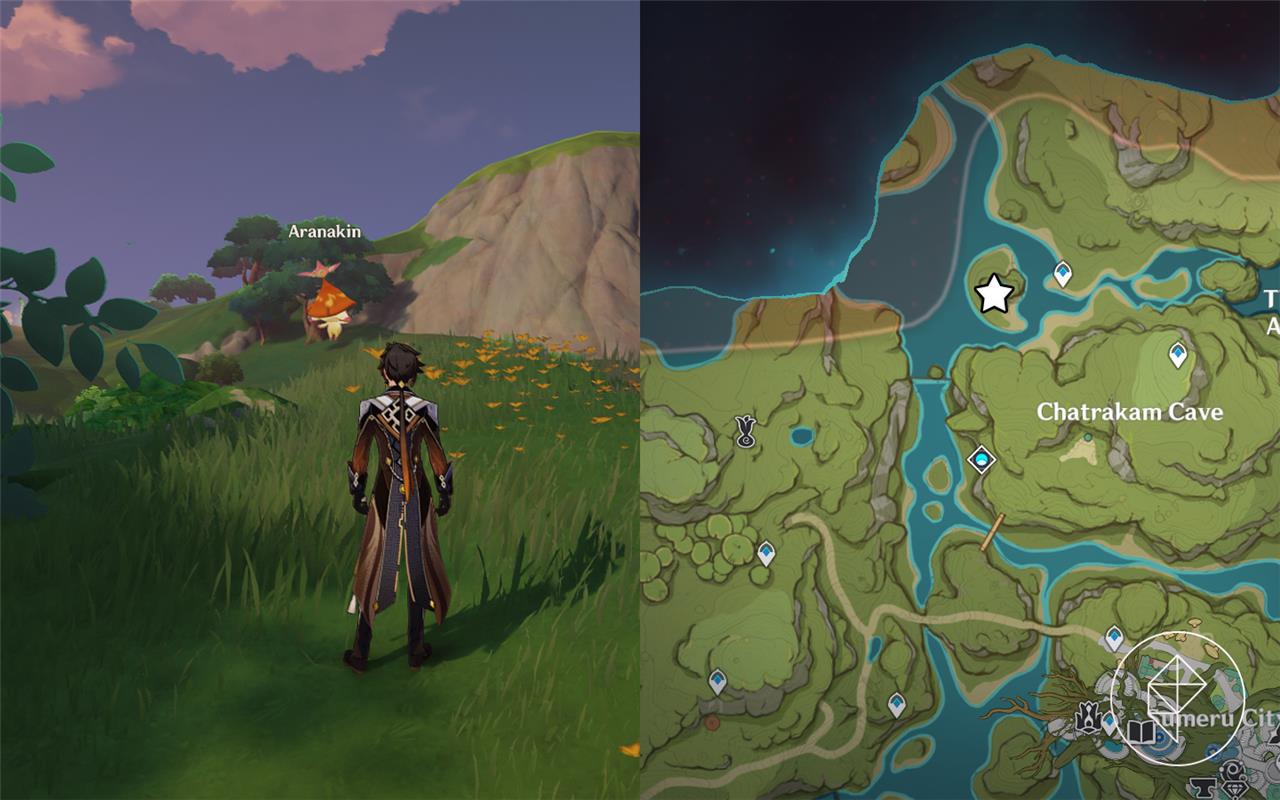
You have to have fully completed the long “Aranyaka” quest line in order to do this quest. This quest is also locked behind some other unmarked world quests (that do not reward reputation points). To start the first prerequisite quest, “Aranga’s Memory,” talk to the NPC marked below and follow the quest navigation.
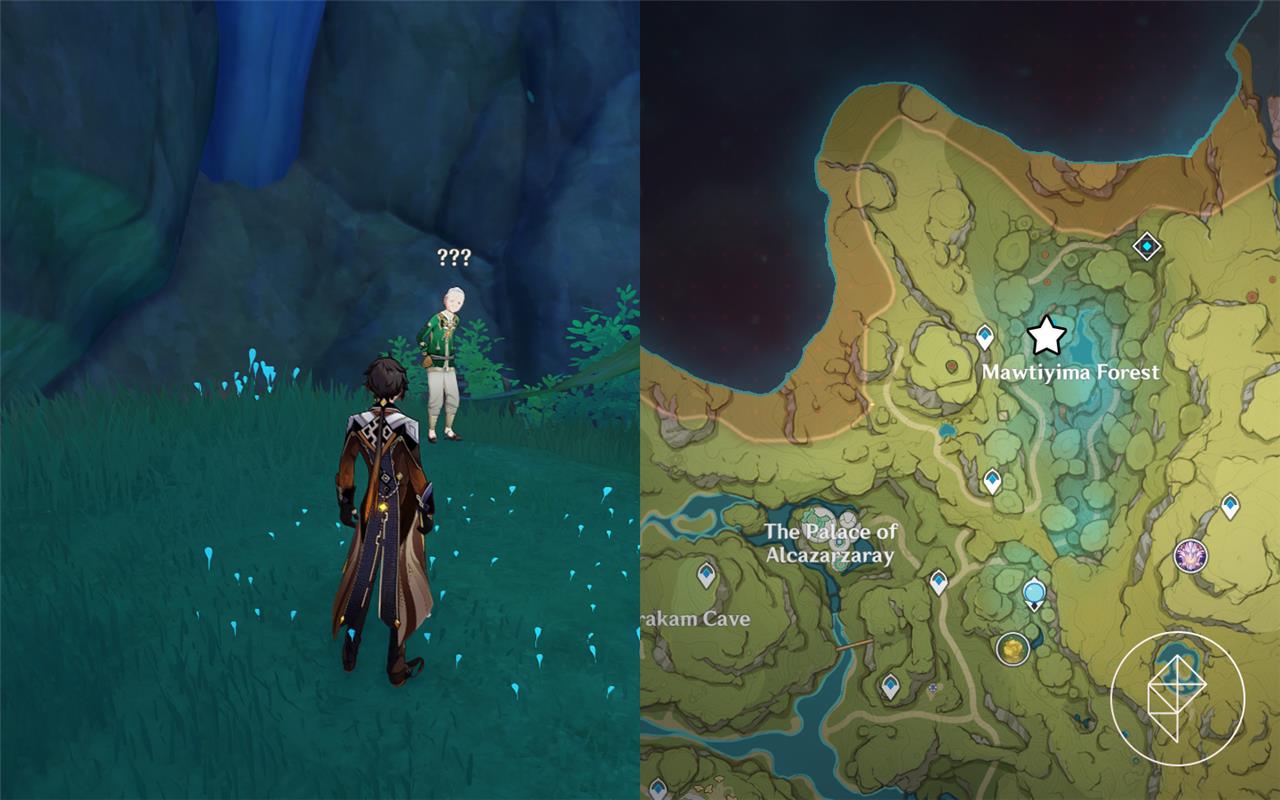
Once you finish the first one, you’ll need to do another unmarked quest called “Aranakin’s Old Friend.” You can start it at the location below. Again, you can just follow the quest’s navigation to complete it.
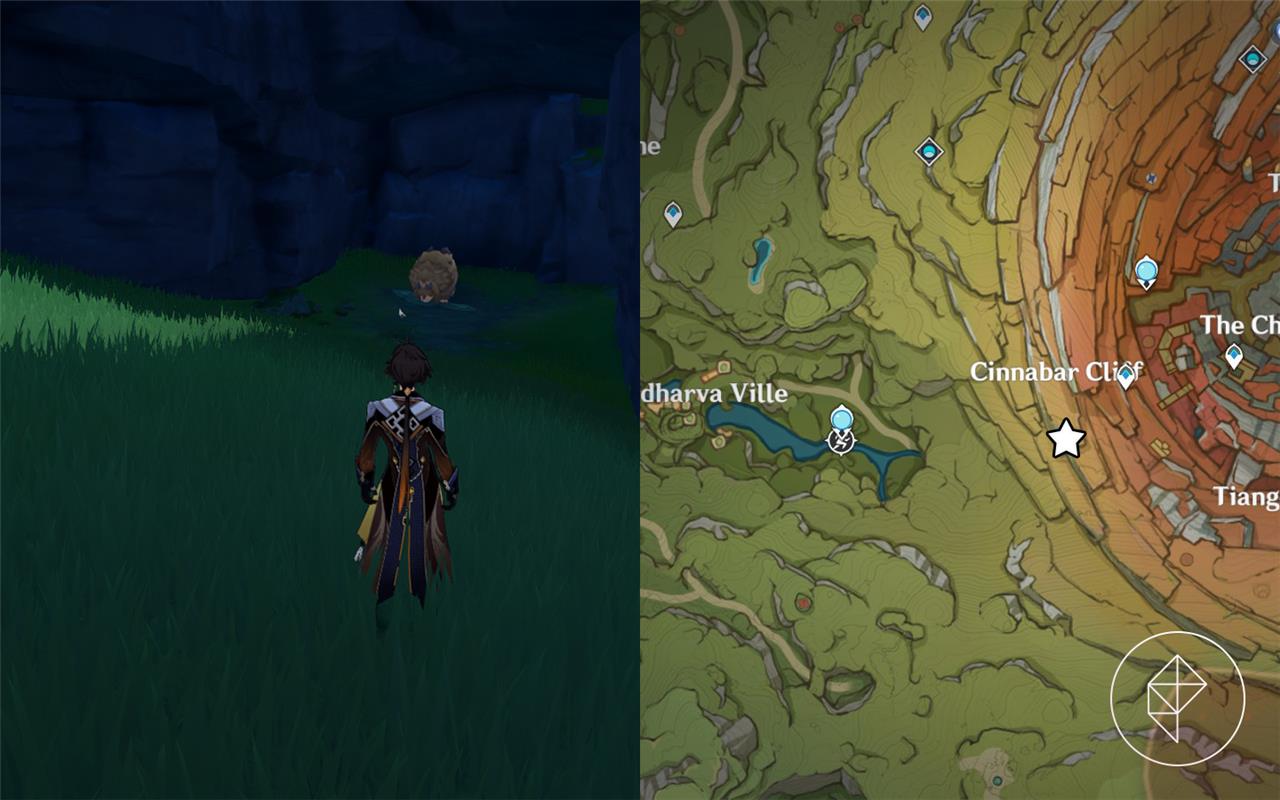
The third and final prerequisite quest is called “Arangaru’s Drawing” and you can start it by entering the cave marked below and clearing out the Eremite enemies. Once you defeat them, a boss Eremite will appear. Upon taking him down, Arangaru will pop out with the quest, which has easy-to-follow navigation to complete.
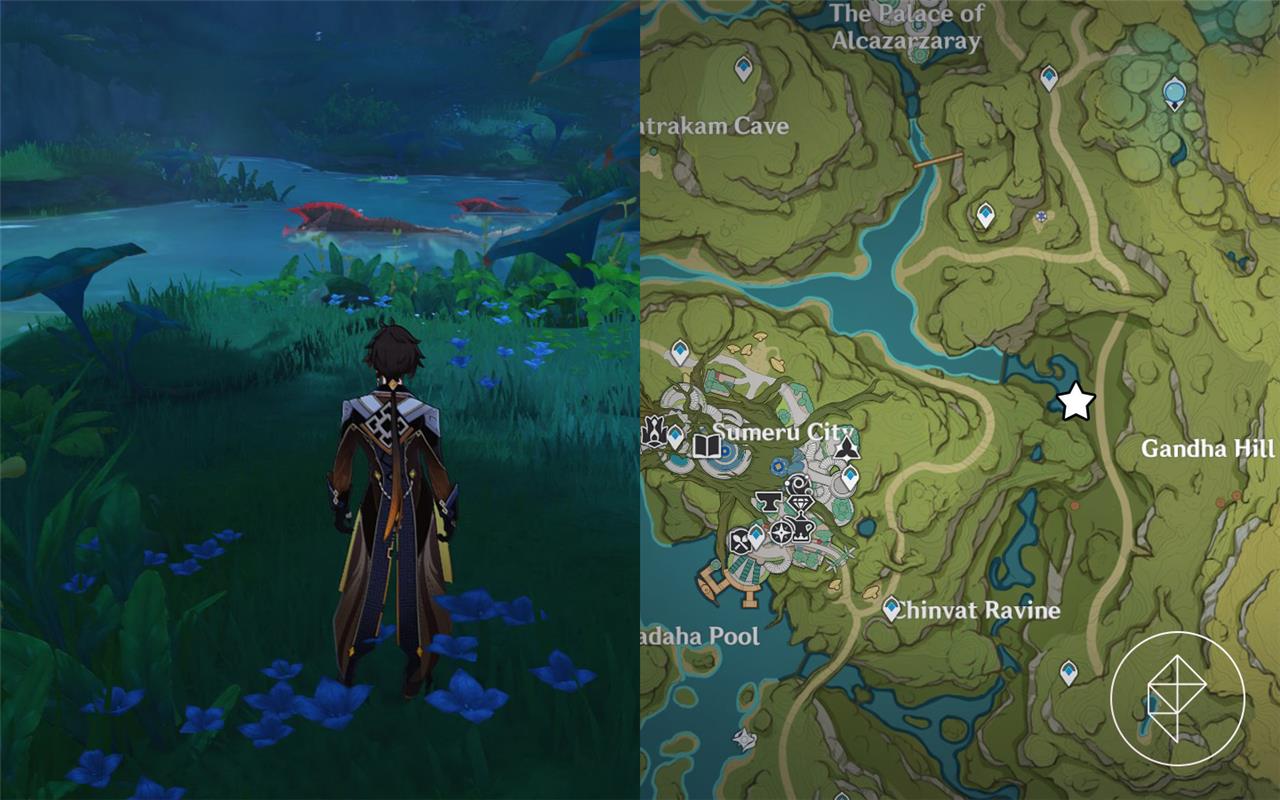
After you finish these three prerequisites, you’ll automatically get “Memory’s Final Chapter” in your journal, leading you back to Mawtiyima Forest for the quest.
Static Views, Part 2
Static Views, Part 2
-
Expanded list of hidden Sumeru world quests continues to reveal tucked-away tasks and lore-rich moments that players can uncover through careful exploration and interaction with environmental clues, NPC whispers, and subtle quest triggers.
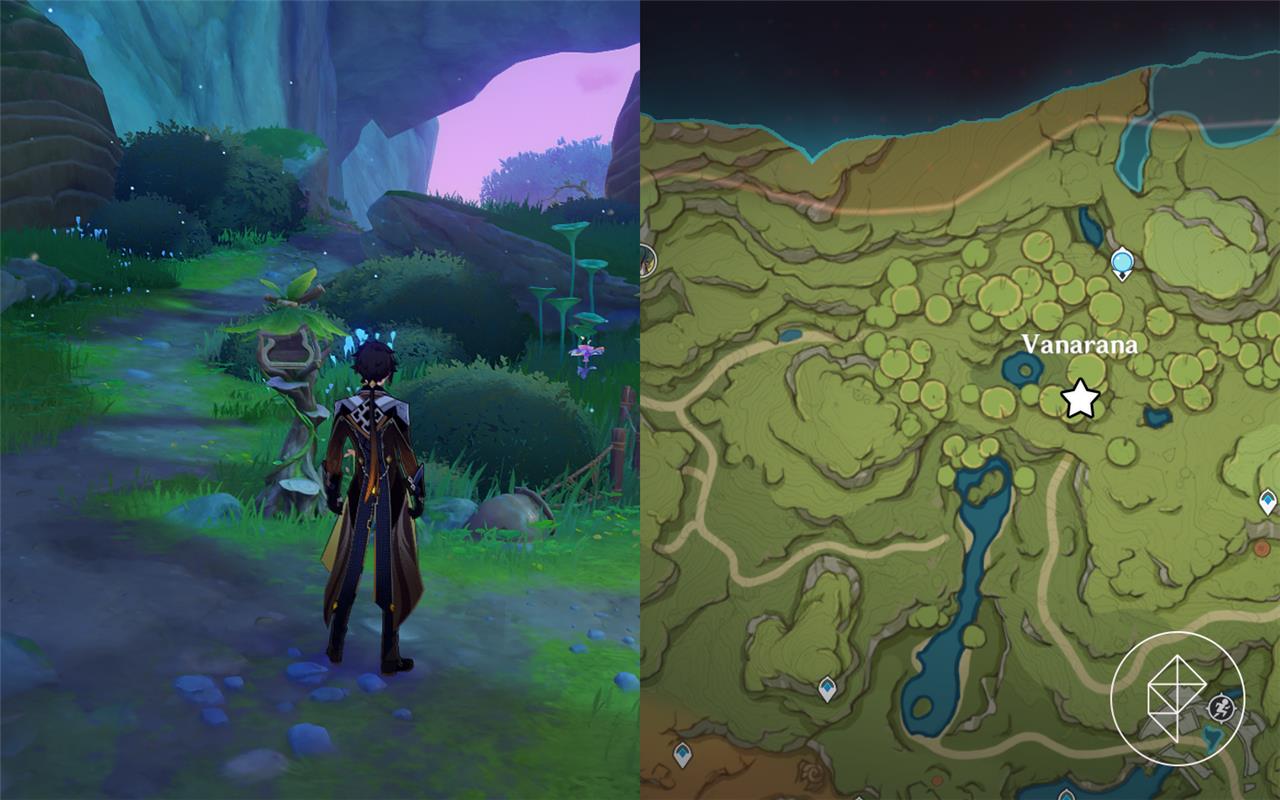
To do this quest, you’ll have to have completed the first “Static Views” quest, which is obtainable from the mailbox in Vanarana. This quest will be marked on your map with a blue exclamation point and isn’t hidden, but we’ve marked its starting location below anyway.
Once you do that, you’ll need to find all 10 hidden treasure chests in the Aranyaka notebook. You can find the notebook in your quest item inventory to check it for buried treasure hints, or you can use our guide.
When you get nine of the 10 chests, “Static Views, Part 2” will automatically appear in your journal leading you to the final area and completing the quest.
Gourmet Supremos: Within Our Duties
Gourmet Supremos players take on roles as food critics across Sumeru, sampling dishes from street vendors to high-end spots. They judge flavors, presentation, and creativity through blind tastings that reveal surprising chef secrets. Completing their rounds grants exclusive recipes and ties into local festivals, blending culinary trials with subtle story branches hidden among the region’s eateries.
The quest will appear in the above location after you have obtained the Gourmet Supremos achievements from Inazuma, according to the Genshin Impact Wiki. The achievements are “Meal For Two,” “A Question of Diet,” and “Samurice.” After getting all three achievements, you need to complete the Inazuma commission “The Gourmet Supremos: Where’d the Ingredients Go?”
If you completed these before the release of patch 3.0 (Sumeru), then you will need to get the “Where’d the Ingredients Go?” commission again before the quest appears.
Cost-Effective Hook
Players who want to expand their adventure in Sumeru without spending extra resources will appreciate how these hidden world quests offer meaningful rewards at no cost. Many of them provide Primogems, Mora, and valuable items while enriching the region’s lore. With a clear guide, you can complete them efficiently and gain solid returns on your time investment.
According to the Genshin Impact Wiki, you need to complete the Sumeru daily commission “Supreme Hookshot?” three times for this quest to appear in the above location. Once you complete the commission a third time, it will appear the next day (in real time, not in game time).
Garcia’s Paean: A Gift of Compatibility
This Sumeru world quest hides in plain sight among the desert ruins near Aaru Village. Players befriend Garcia, a wandering merchant from Mondstadt, who shares his clay flute-a paean to the god of contracts. Completing his requests reveals a hidden compatibility ritual with local merchants, granting exclusive trading perks and lore on cross-nation alliances. Activate it by interacting with a specific buried chest after his storyline.
To get this quest, you need to complete a short world quest at Wangshu Inn called “Garcia’s Paean” which starts at the location below:

After completing this quest, the “Garcia’s Paean” quest line may start showing up as part of your daily Sumeru commissions. This includes “Garcia’s Paean: Key Items” and “Garcia’s Paean: Substitute.”
Where to start hidden Sumeru world quests guide
You can start most hidden Sumeru world quests just by visiting a few key spots and talking to specific NPCs, plus doing a couple of puzzles first. Here’s a practical “where to go and who to talk to” style guide, focused on the better-known hidden quests.
Core setup first (unlocks many)
Do these early, since they unlock a ton of Sumeru world and hidden quests:
-
Start Aranyaka chain in Gandharva Ville: Find Rana being attacked by monsters on the road just outside Gandharva Ville to begin “The Children of Vimara Village,” which leads into Aranyaka and many rainforest quests.
-
Progress main Sumeru Archon Quests:
-
Chapter III: Act I-III to open main rainforest/world quests.
-
Chapter III: Act III “The Morn a Thousand Roses Brings” and Act IV “King Deshret and the Three Magi” to unlock many desert quests.
-
-
Reach Sumeru City and Aaru Village early: Just having waypoints and talking to NPCs in these hubs is enough to reveal several hidden quests once their conditions are met.
City-based hidden quests (easy to start)
These begin in Sumeru City or close by and are often missed because their starters are small puzzles or unmarked chests.
-
The Price
-
Where to start: Port Ormos, on a hotel rooftop.
-
Trigger: Open the Common Chest on the corner of the roof to automatically start the quest.
-
-
Treasure of Wisdom: A New Plan
-
Where to start: Sumeru City billboard puzzle.
-
Trigger: Interact with the bulletin/billboard in Sumeru City, then follow a sequence of boxes and chests around the city (docks, Nilou’s stage area, interior building chest, pond chest). The quest starts as you follow this puzzle chain.
-
-
The Path of Papers
-
Where to start: Sumeru City.
-
Trigger: Talk to Niloofar in Sumeru City to begin.
-
-
While the Dream Lingers
-
Where to start: Northwest of Sumeru City.
-
Trigger: Find Javi crouching and searching for something north-west of the city and speak to him.
-
Rainforest hidden quests
These are often tied to Aranyaka and exploration in the forest regions.
-
A Short Encounter with a Rare Bird
-
Where to start: North of Ruins of Dahri.
-
Trigger: Hunt Shroomboars in the area north of Ruins of Dahri; this eventually triggers the quest.
-
-
Vimana Agama (and related)
-
Where to start: After “The World of Aranara.”
-
Trigger: Complete “The World of Aranara,” then Vimana Agama will become available as a world quest chain in the rainforest.
-
-
Memory of Stone
-
Where to start: After Varuna Gatha.
-
Trigger: Finish the “Varuna Gatha” quest line; this unlocks “Memory of Stone.”
-
-
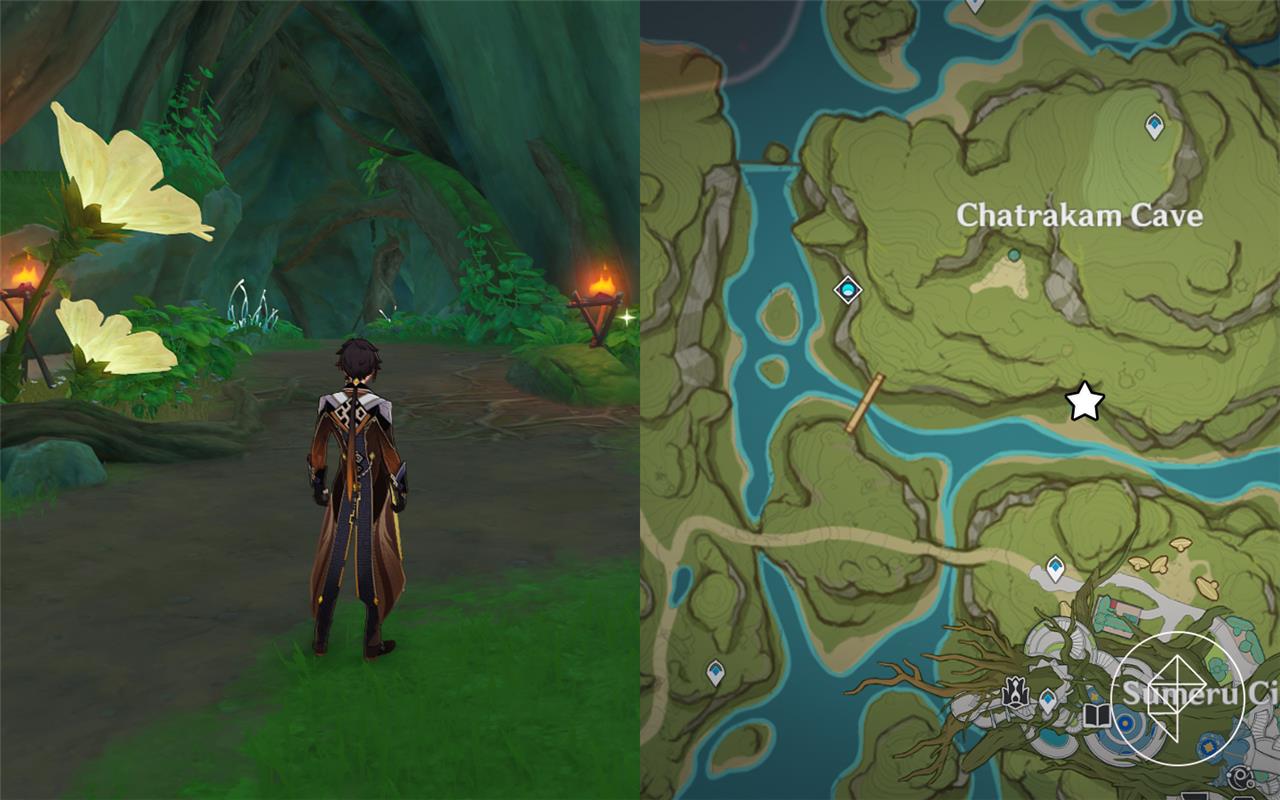
Aragaru’s Drawing / Memory’s Final Chapter prerequisites
-
Where to start: Cave south of Chatrakam Cave.
-
Trigger: After finishing the main Aranyaka quest line, enter a cave south of Chatrakam Cave, defeat waves of Eremites; Arangaru appears and gives “Aragaru’s Drawing,” a hidden-feeling quest that leads into the “Memory’s Final Chapter” chain.
-
Desert hidden quests and chains
Many “hidden” quests in the desert only appear after doing large chains like Golden Slumber and The Dirge of Bilqis.
-
Golden Slumber
-
Where to start: Aaru Village.
-
Trigger: Complete “Slumbering Roots” (desert exploration) then talk to Bonifaz in Aaru Village to start “Golden Slumber.”
-
-
Lost in the Sands
-
Where to start: Aaru Village.
-
Trigger: Talk directly to Bonifaz in Aaru Village if you haven’t yet; this initiates “Lost in the Sands,” which leads into Golden Slumber.
-
-
Dual Evidence
-
Where to start: Aaru Village Statue of the Seven.
-
Trigger: After completing “Golden Slumber,” wait for a daily server reset, then teleport to the Statue of The Seven in Aaru Village; the quest
-
Detailed walkthrough for Treasure of Wisdom billboard puzzle
Here is a full, step-by-step walkthrough of the Sumeru City billboard puzzle (Drusus’s Riddle), which you must clear to unlock the world quest Treasure of Wisdom: A New Plan and the achievement “I’ve Got It! I’ve Got It!”.
1. How to start the billboard puzzle
-
Go to Sumeru City’s Adventurers’ Guild (Treasure Street).
-
From Katheryne, walk a short way down the sloping main street, then take the first right into a side path.
-
You’ll see a large, interactable bulletin board/billboard beside the street – interact with it.
-
After reading the first riddle, Kamal (the Branch Master) will speak to you and mention the riddle’s author, Drusus, officially starting the puzzle chain.
Reading the board gives you Riddle Note 1 and a text clue in your inventory.
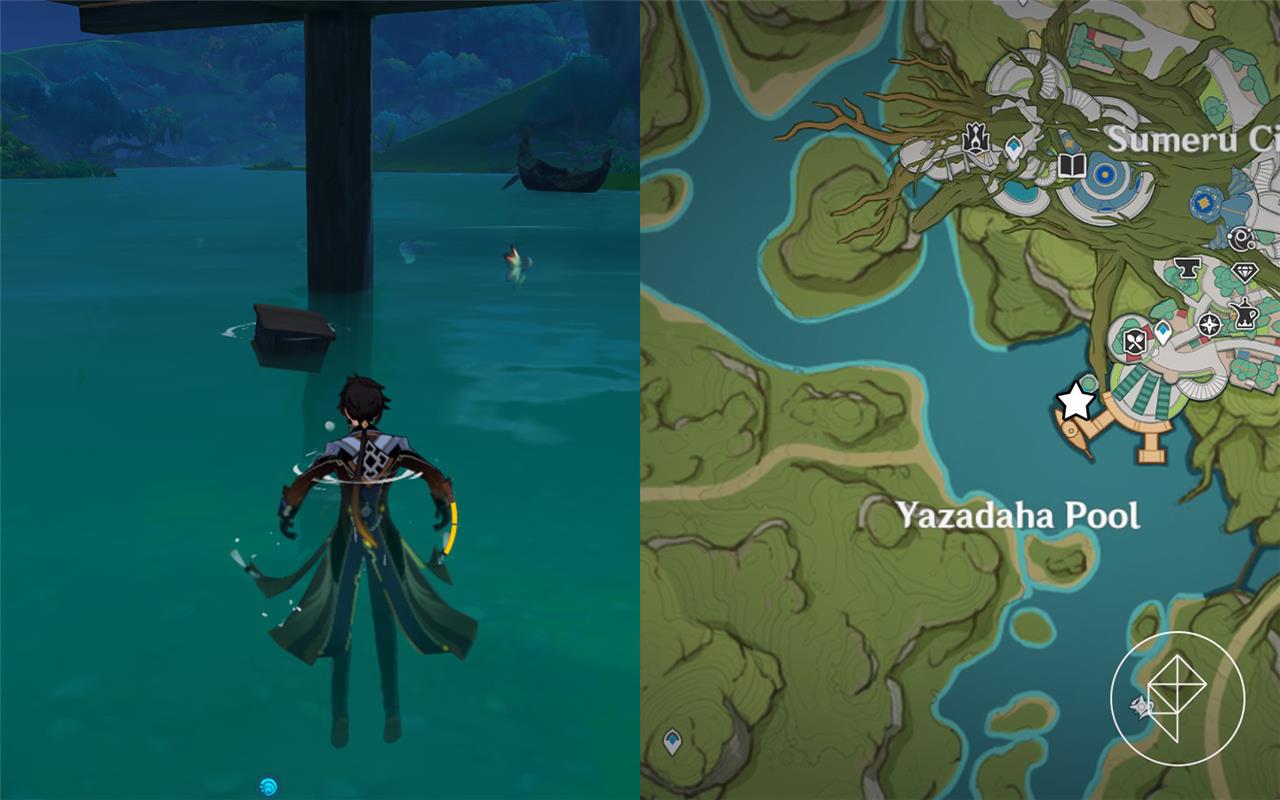
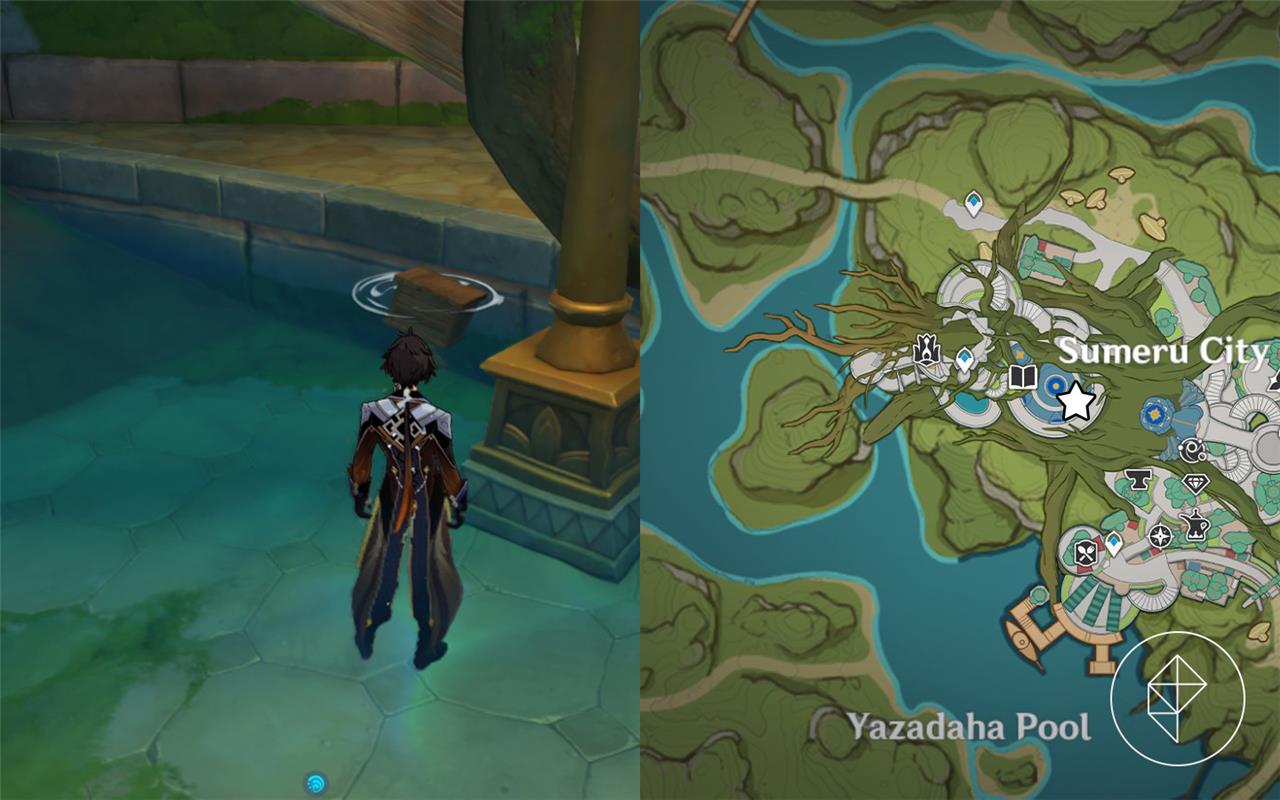
2. First riddle note: docks under the bridge
-
Riddle text:
“In the light of alternating day cycles, one can see the homeward figure of the beacon on the bridge.”
Steps:
-
From the board, turn southwest and head toward the city’s docks near Yazadaha Pool.
-
Go down toward the pier where two NPCs, Halva and Shahbandar, are chatting on a wooden platform.
-
Look under their platform, into the water. There’s a small wooden box/crate floating below the bridge.
-
Drop or glide down, swim to the box, and Investigate it to pick up Riddle Note 2.
3. Second riddle note: Grand Bazaar fountain
-
Riddle text:
“A mirror not made of glass reflects every drama.”
The “drama” is the performances in the Grand Bazaar, and the “mirror not made of glass” is the fountain/pool in front of the stage.
Steps:
-
Fast-travel back to the Sumeru City Teleport Waypoint on Treasure Street.
-
From the waypoint, go up the slope, then left when you see the freelancer Mawyo. Follow the tunnel to enter the Grand Bazaar.
-
On the left side as you enter, there’s a fountain/pool near a girl named Kumari.
-
Jump into the water behind the hedge/edge of the pool and search the right-hand side of the water.
-
Interact with the next small box in the pool to obtain Riddle Note 3.
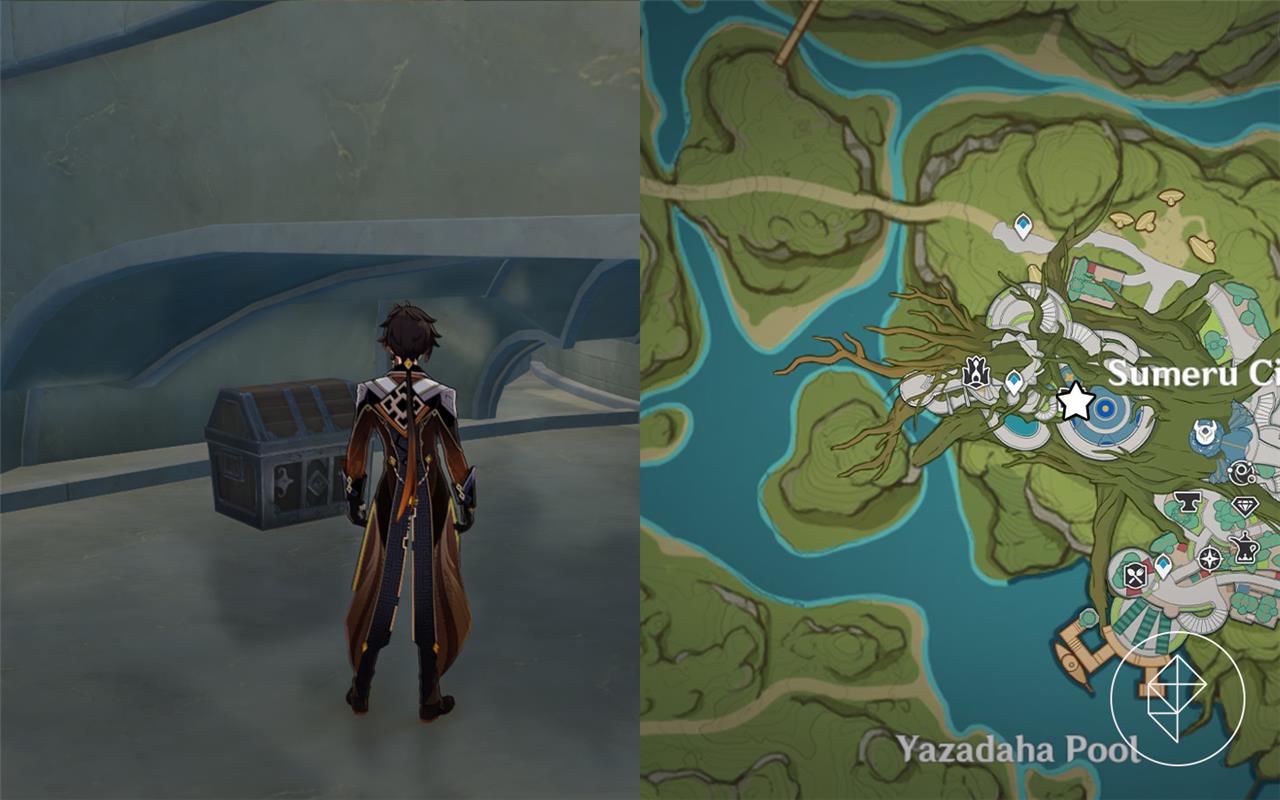
4. Third riddle note: Akademiya / House of Daena
-
Riddle text:
“The sole path to knowledge.”
This points to the Akademiya and its library, the House of Daena.
Steps:
-
Teleport to the Waypoint near the Sanctuary of Surasthana (north of Sumeru City / above Chinvat Ravine).
-
Go up the ramp into the Akademiya and continue inside to reach the door at the back that leads to the House of Daena (library).
-
Once inside the House of Daena, head toward the central area and look for a bridge/platform crossing over water below.
-
Under that bridge, there is a chest/box in the water (or near the water) that you can investigate.
-
Open it to receive Riddle Note 4.
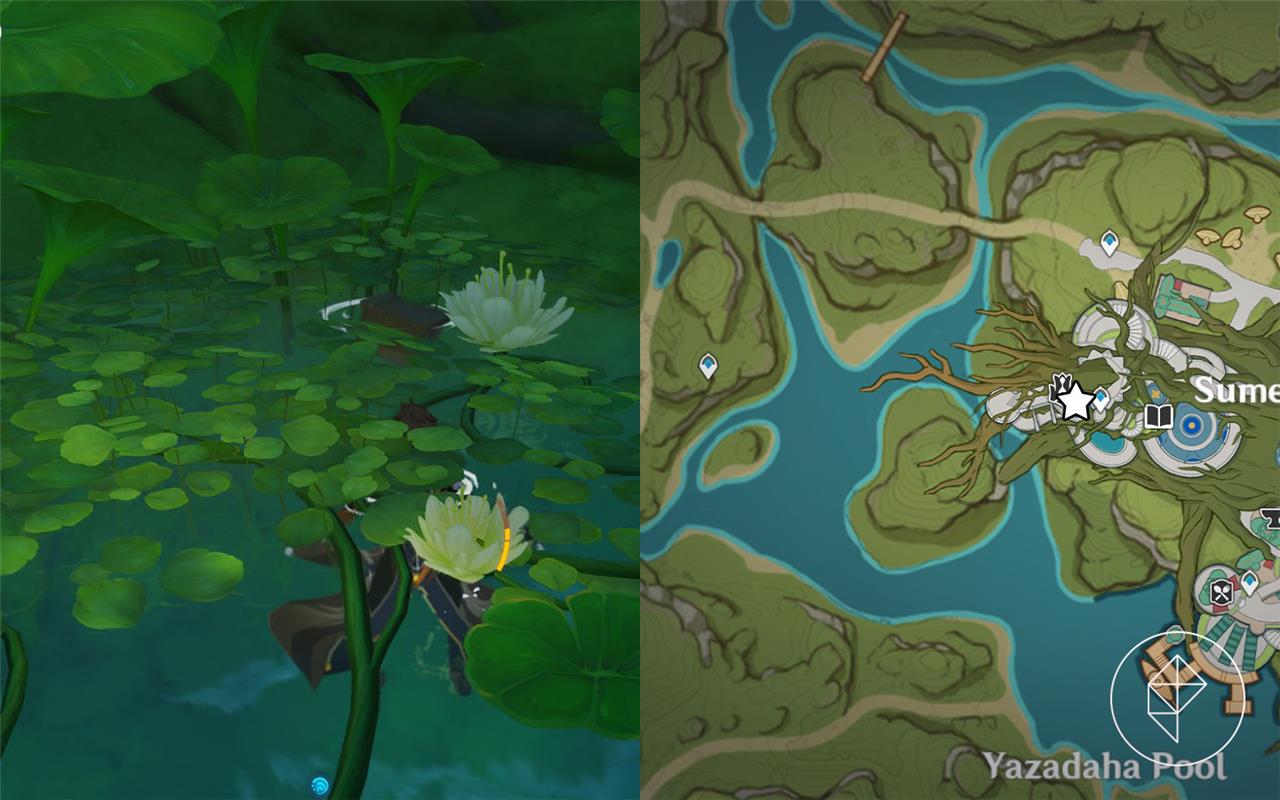
5. Fourth riddle note: pool north of the City
The fourth note directs you to a more hidden water area around Sumeru City; guides describe it as a pool along the street that curves upward.
General solution (from long-form guides):
-
Exit to Sumeru City and follow the main street northward from the area near the Sanctuary of Surasthana waypoint.
-
Keep going until the road starts to curve right and slope upward, with vegetation and water to the side.
-
Look to the right-hand side for a small pond/pool with greenery, and a floating crate/box partly hidden in the plants.
-
Drop into the water, swim to the crate, and investigate it to acquire Riddle Note 5 (the final note).
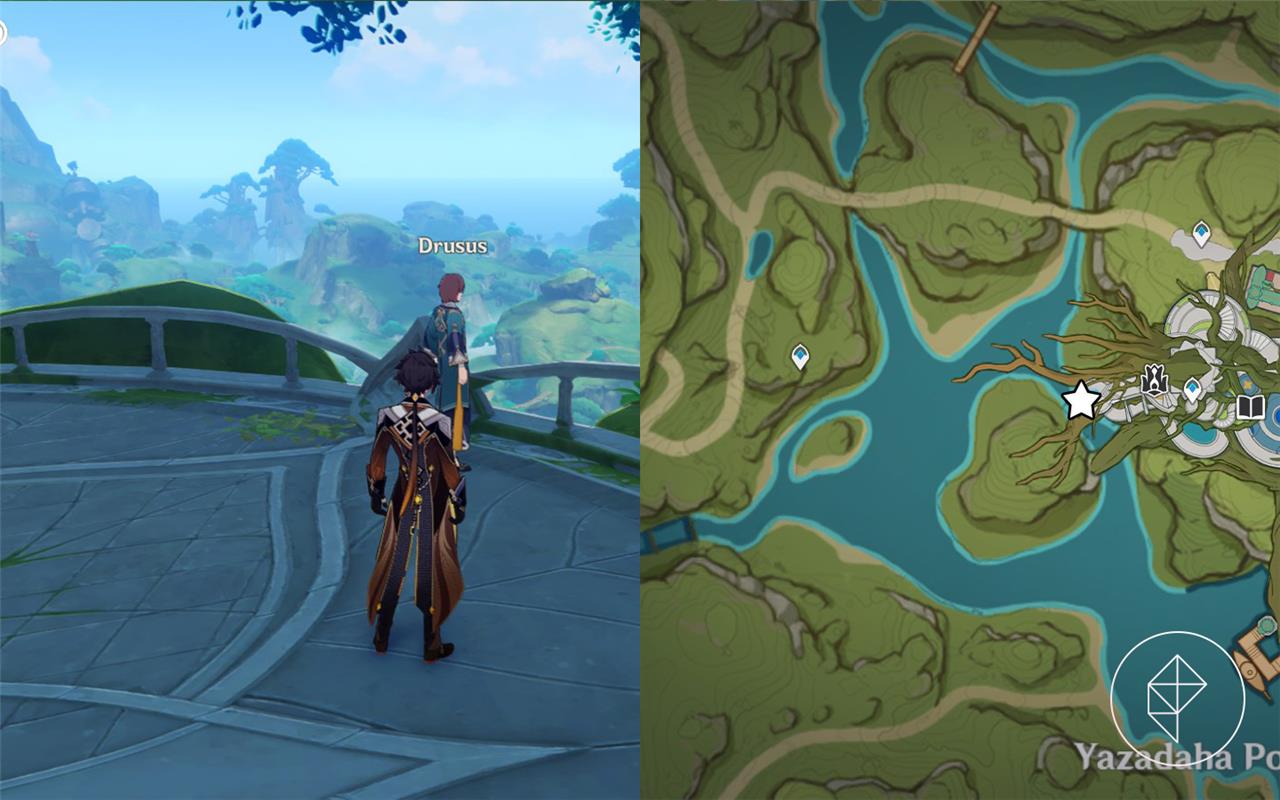
6. Fifth riddle note: meeting Drusus at noon
-
Riddle text:
“Please go to the front door of the Temple of Knowledge at noon.”
The “Temple of Knowledge” is the Sanctuary of Surasthana.
Steps:
-
Open your Inventory, read the fifth Riddle Note to confirm the clue.
-
Open the clock in the Paimon menu and set the time to 12:00-12:30 p.m. (any time a bit after noon works).
-
Teleport again to the Sanctuary of Surasthana waypoint.
-
Walk up the slope to the front entrance area of the Sanctuary – near the rails/overlook in front of the doors.
-
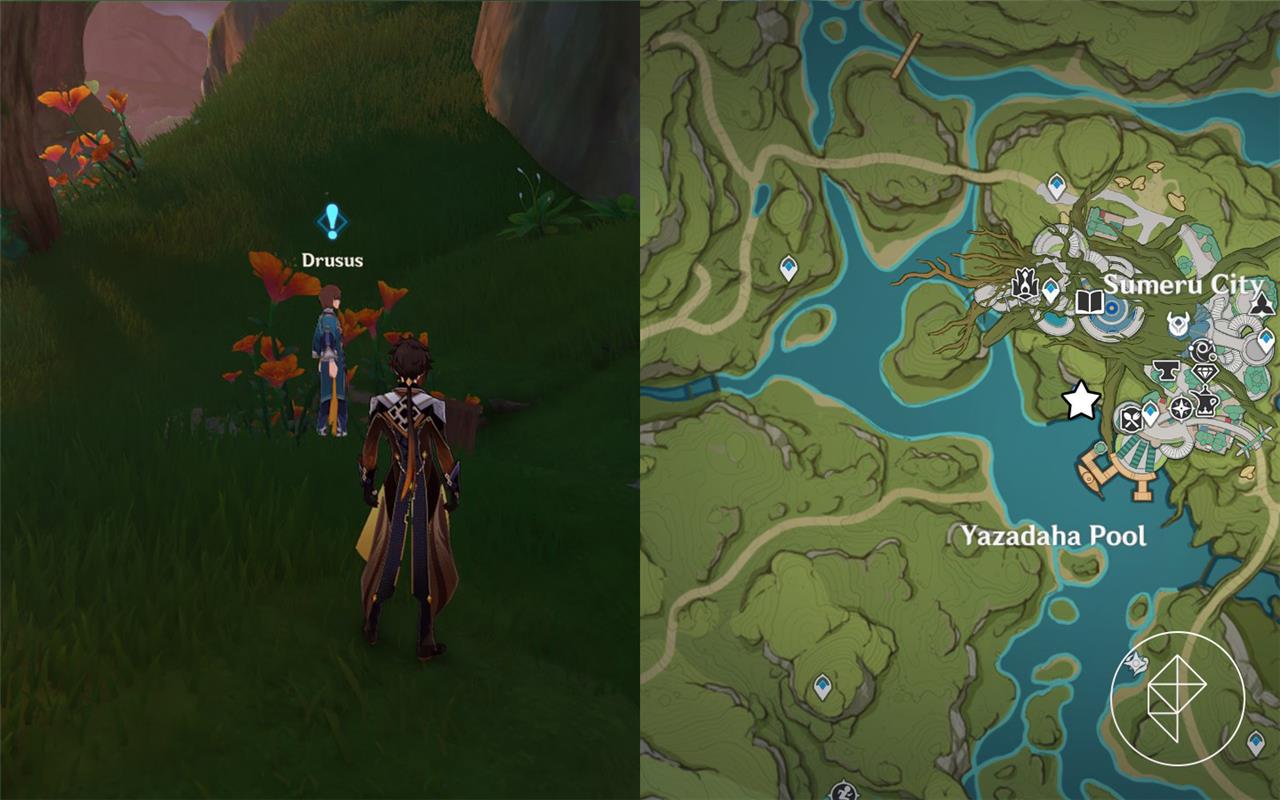
At noon, Drusus will appear near the railings. Talk to him to complete the billboard puzzle sequence.
Finishing this conversation:
-
Grants the “I’ve Got It! I’ve Got It!” achievement.
-
Flags the hidden prerequisite needed to later unlock Treasure of Wisdom: A New Plan (you’ll need to wait for a daily server reset and then meet Drusus by the docks for that quest).
7. Rewards and follow-up
From the billboard puzzle itself you receive:
-
Primogems and Hero’s Wit (small but free rewards).
-
A hidden achievement tied to solving all the riddles.
For the Treasure of Wisdom: A New Plan quest:
-
After completing Drusus’s Riddles, wait for daily reset, then find Drusus near the docks to start the world quest.
-
Completing that later quest gives additional rewards and lore, and counts as one of Sumeru’s hidden/optional world quests.
If you’d like, I can now condense this into a compact checklist (just coordinates-style notes) that you can keep beside you while you run the puzzle in-game.