Deep within the derelict Dreadnaught, a hidden challenge awaits: the ‘Derealize’ Exotic mission is your gateway to the powerful Barrow-Dyad submachine gun in Destiny 2-if you can unlock its secrets and survive the Taken onslaught.
In this Destiny 2 guide, we’ll walk you through how to complete the “Derealize” Exotic mission so you can finally get the Barrow-Dyad Exotic submachine gun.
How to unlock the ’Derealize’ Exotic mission in Destiny 2
To unlock the ’Derealize’ Exotic mission in Destiny 2, you must first locate a hidden Taken portal while participating in The Nether activity within any patrol zone. After entering this portal and following the on-screen instructions to retrieve a fragment, bring it to Eris’ apartment to begin the quest chain. Next, uncover additional hidden fragments in Lost Sectors, complete three curse challenges, and light Hive altars inside the Dreadnaught. Once these steps are finished, the Derealize mission will become available on your Director under The Nether: Explore in The Last City map.
Once you’ve grabbed every Taken Osseous Fragment in “The Taken Path” Exotic quest, the game will ask you to find one more hidden within the bowels of the ship. You’ll then be able to launch the “Derealize” Exotic mission, which you can find in The Last City, which will have you search the Dreadnaught for the final fragment.
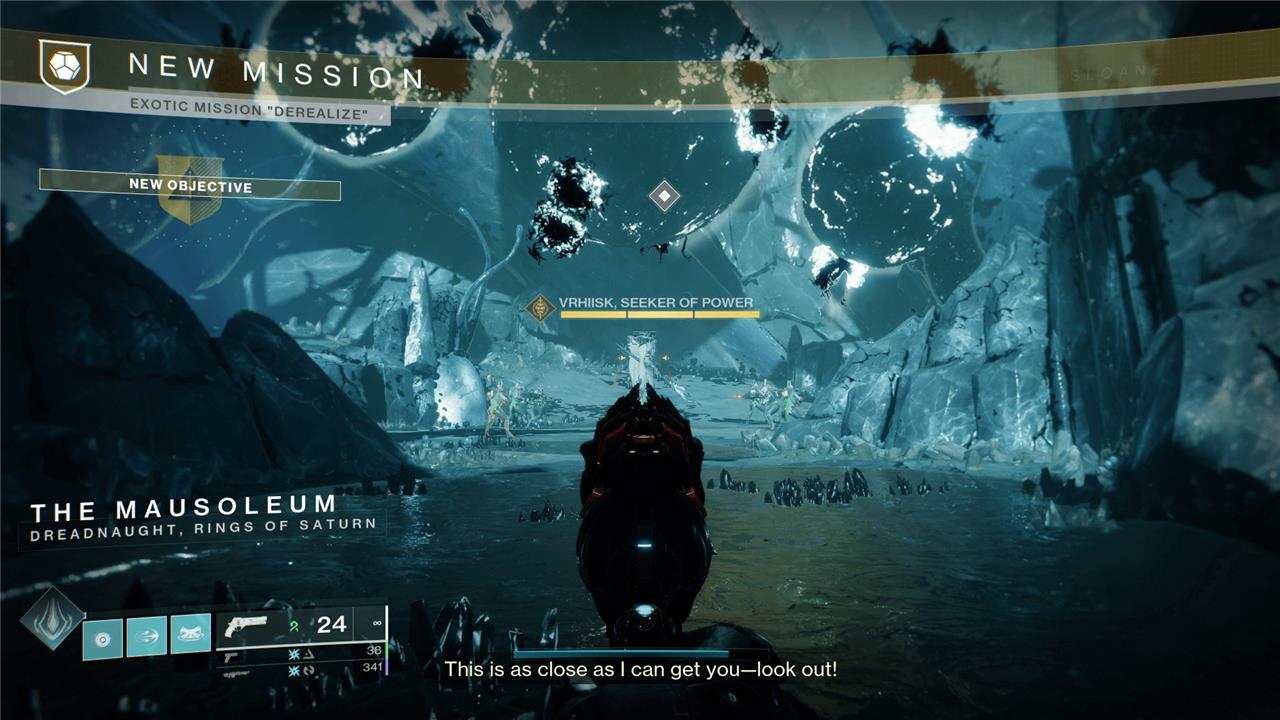
When you first land in The Dreadnaught, just clear the enemies in the immediate area so you can unlock the portal and proceed forward. The first encounter begins once you reach the outside of the ship in the Trenchway.
Defeat the Dread Commander in Derealize
To overcome the Dread Commander in the Derealize Exotic mission, you’ll first battle through waves of enemies and mini-bosses, all while managing the Suffocating Terror debuff caused by massive floating eyes-avoid direct line of sight to clear the debuff. After clearing the initial area and defeating Subjugators and Tormentors, you’ll progress through the mission until you encounter the Dread Commander. This boss fight requires you to adapt quickly, as you’ll face shifting shields and a growing army of minions; prioritize clearing adds and destroying any Taken Blights to maintain control of the battlefield. Once you’ve overcome the Dread Commander, you’ll advance to the next phase and continue your quest for the Barrow-Dyad Exotic SMG.
In this encounter, you’ll need to deal damage to the Subjugator, Vrhiisk, when you can, and then remove their immunity shield so you can continue fighting.
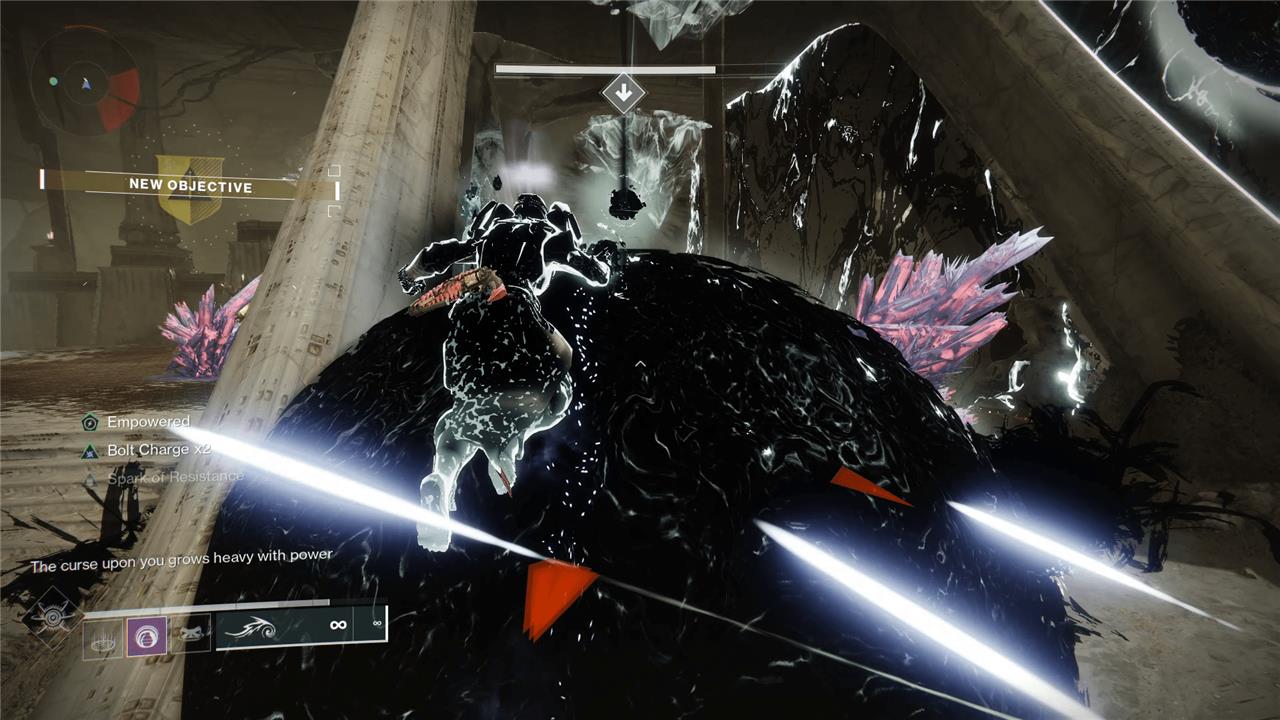
When the boss’ first shield comes up, two ogres will spawn on the ship. Kill them and they’ll drop two Taken relics. Pick one up and empower it by killing nearby enemies. Once it grows “heavy with power,” dunk it in the Blight on the ground. This will cause you to become Torn Between Dimensions, like in the King’s Fall raid.
Pick up the second Taken relic and kill more enemies. Once this one is also empowered, use the special platforms above you to climb over to the floating Taken Blights. Land on the orb to destroy the Taken Blight.
Once you’ve destroyed the two Taken Blights, the boss will lose its shield. Damage it until the shield returns, then repeat the shield breaking process. This will cause the boss to run away and disappear inside a Blighted Cyst. Follow it inside and kill it to reveal the next puzzle section of the mission.
How to complete the compass puzzle in Derealize
To complete the compass puzzle in the Derealize Exotic mission, you’ll activate plates in a specific sequence after defeating the Dread Commander. The correct order is right, up, down, left. Each plate displays a rune symbol-stand on the plate and check the symbol on the rune in front of you. If the symbol matches the next one needed in the sequence, move off the plate in the direction it points (for example, if the plate points right and the symbol is correct, move right). If the symbol doesn’t match, stay on the plate until the timer runs out and you’re teleported to the next plate. Repeat this process until all symbols are matched and the puzzle is solved.
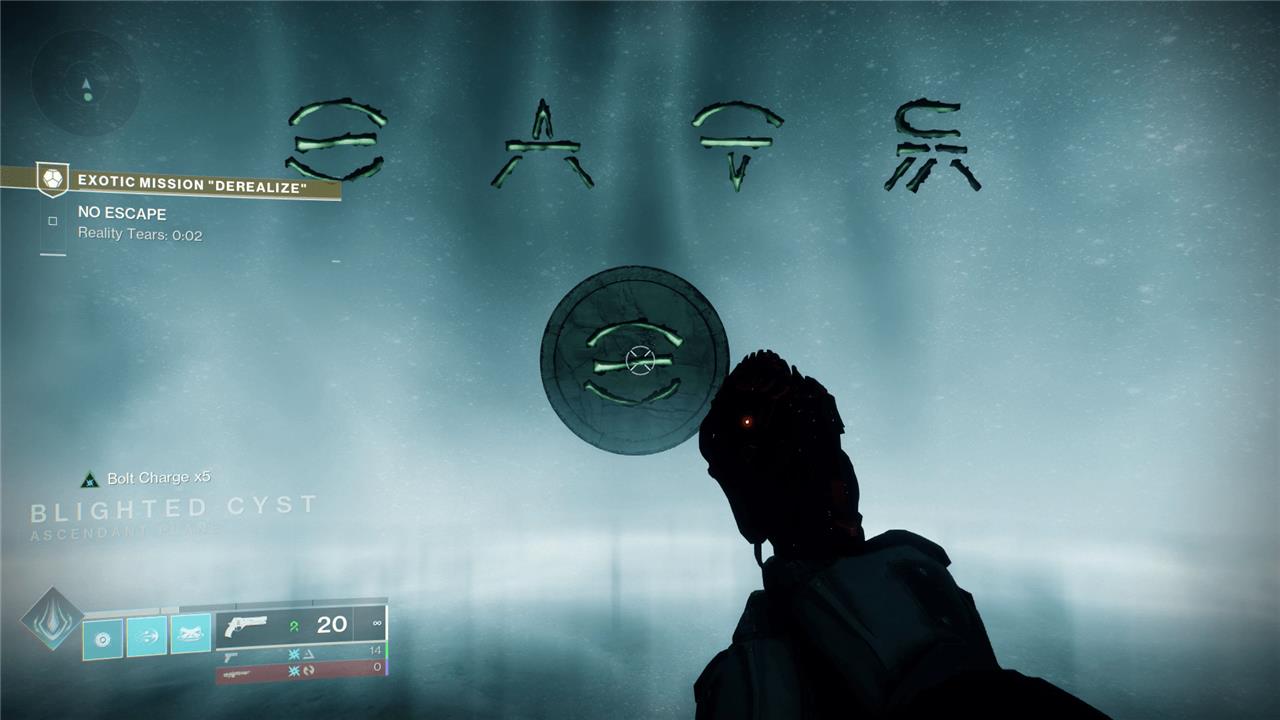
Once the Dread Commander is dead, a rune and plate will spawn on the ground and you’ll get the “NO ESCAPE” objective along with a timer counting down to “Reality Tears.”
To complete this puzzle, you’ll need to activate each plate in order: right, up, down, left.
Look down at the plate in front of you, in the white boss room. The arrow is pointed right, and you’ll notice that the circular symbol will appear on the rune if you look at it. Activate this right plate. This will teleport you to another plate, but don’t step on that one yet.
Wait and look to see which plate it is. If it’s the up plate – as in it wants you to walk forward to complete it – then do so. If not, wait for the timer to tick down. When it hits zero, it’ll teleport you to another plate. Wait until you land in front of the next plate in the sequence (the up plate, in this case) and then activate it.
Repeat this, using the plate when it’s the correct one in the sequence and waiting when it’s not, until you complete the right, up, down, left sequence.
How to reach the final boss in Derealize
To reach the final boss in Derealize, progress through the mission by clearing waves of enemies and defeating mini-bosses like Vrhiisk, Seeker of Power. After completing several combat and puzzle phases-including defeating Blight Sentinels and empowering Taken curses-advance through the Trenchway and solve a jumping puzzle where you must shoot three crystals to open the path forward. This will lead you to the final arena where you can use a Rally banner, collect the Barrow-Dyad exotic SMG, and prepare to face the final boss, Xir-Kuur.
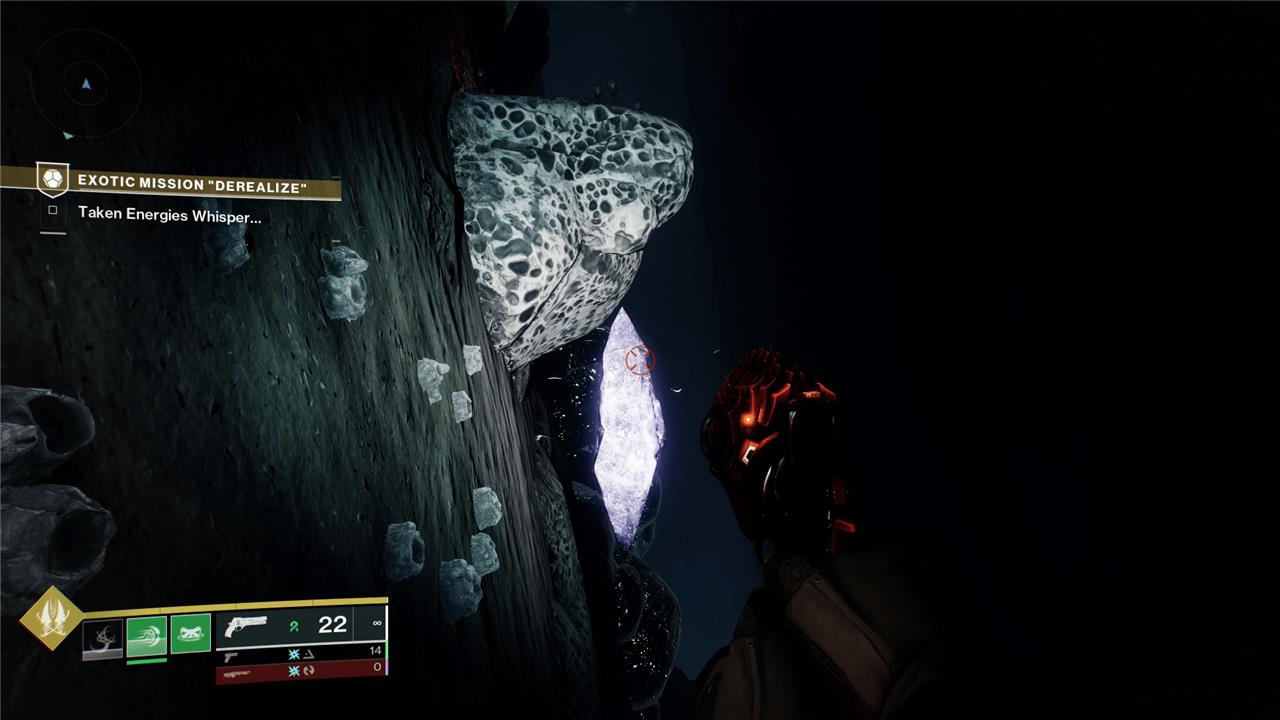
After you finish the puzzle you’ll get ejected back into the Dreadnaught and need to complete a fairly intense jumping puzzle.
Follow the natural path and the objective marker until you reach a room that has two different sides with holes in them – as well as jutting spikes. You’ll need to find three purple crystals here to open a door and get the Exotic.
All three crystals are inside the walls – none are around the machine in the open area. Look for purple glows under platforms to find them. After you destroy them all, head through the gate to reach the final boss room and collect the Barrow-Dyad Exotic.
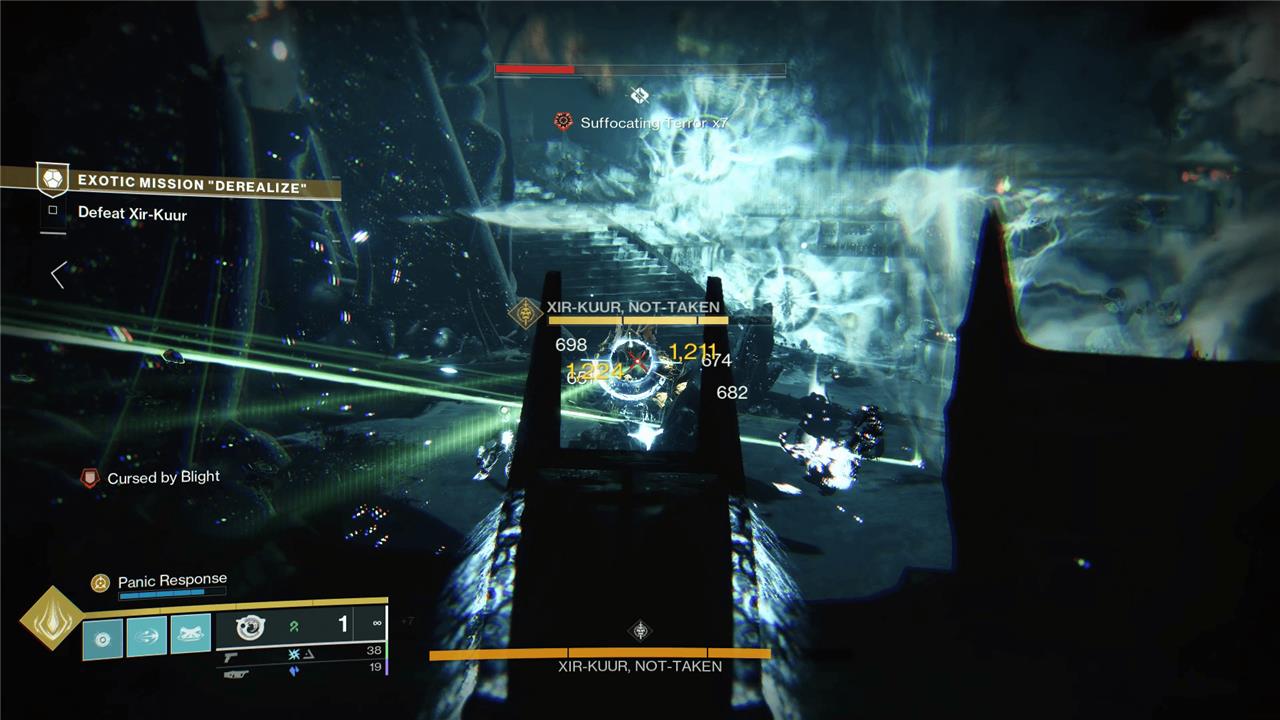
How to defeat Xir-Kuur Not-Taken and Taken in Derealize
To defeat Xir-Kuur, the final boss of the Derealize Exotic mission, you’ll face two forms: one in the normal realm and one in the Taken realm. The boss periodically teleports you into the Taken realm, where you must damage a Taken version of Xir-Kuur. While in the normal realm, focus your fire on the unshielded boss, but be ready to adapt when their shield switches or when minions swarm the arena. Prioritize destroying Taken Blights to return to the normal realm and keep the area clear of adds. Repeat this cycle of damaging the boss and handling mechanics until you’re prompted to escape the room; then, retrace your steps to the entrance and stand on the plate to seal the room and complete the encounter.
(Note: This paragraph is formatted as requested, without the subtitle.)
Collect the “artifact” off the table to get Barrow-Dyad, the Exotic you’re looking for. When you pick it up, you’ll be torn between dimensions. Equip it and use it to destroy the Blights in the area to summon the boss.
This fight is pretty simple, albeit chaotic. Reduce the boss’ health through normal means. You’ll then become Torn Between Dimensions and will need to fight the Taken version of the same boss, while the normal one runs around immune, shooting you. Once the Taken boss’ health has hit the two-thirds point, destroy the Blights with Barrow-Dyad to return to reality and deal damage to the “Not-Taken” boss.
Repeat this process, flipping between realities, until you reduce the “Not-Taken” boss to zero health. At this point, Xir-Kuur will combine his forms and become too powerful for you to handle. Suffocating Terror eyes will also spawn in the arena.
Flee the room back to the door you used to enter the arena. Head outside and stand on the big plate to seal Xir-Kuur’s Super Saiyan form inside. He’ll need to be dealt with later, but for now, you’re done with the quest and the mission, and have access to the Barrow-Dyad Exotic submachine gun.
What secrets does the ‘Derealize’ mission hide behind its stealthy unlock process
The ‘Derealize’ Exotic mission in Destiny 2 is deliberately obscured by a multi-layered unlock process, hiding its true challenge and rewards behind a series of cryptic steps. Players must first locate a hidden Taken portal within The Nether activity’s patrol zones-an element that’s easy to miss unless you’re actively searching for secrets. Entering the portal and following the prompt leads to the initiation of a hidden Exotic quest, “The Taken Path,” which involves retrieving fragments, uncovering clues in Lost Sectors, and completing three curse challenges by activating Hive altars aboard the Dreadnaught.
Only after these prerequisites are met does the mission become available, revealing further secrets: a complex Hive symbol puzzle, unique platforming sections, and encounters with powerful Taken and Hive enemies. The mission’s most notable secret is the Barrow-Dyad Exotic submachine gun, which is awarded after overcoming the final boss and solving the mission’s mysterious mechanics. The stealthy unlock process ensures that only those who dig deep into Destiny 2’s world and its hidden lore will uncover the mission-and its rewards-without guidance.
What hidden challenges make unlocking Derealize so difficult for players
Unlocking the Derealize Exotic mission in Destiny 2 is difficult for players primarily due to its intentionally hidden and multi-step process, which is designed to be easily missed unless you actively seek out secrets and follow subtle clues. Here are the main hidden challenges that contribute to its difficulty:
-
Stealthy Quest Initiation: The mission is locked behind “The Taken Path” quest, which does not appear in your quest log by default. Players must find and interact with a random Taken portal in The Nether activity, an action that can be easily overlooked if you’re not exploring thoroughly.
-
Cryptic Objective Steps: After triggering the quest, players must collect hidden fragments from Lost Sectors, complete three curse challenges, and activate Hive altars within the Dreadnaught. These steps are not clearly marked and require players to piece together clues from the environment and quest text.
-
No In-Game Guidance: Unlike other missions, there is minimal guidance or waypoints, leaving it up to players to figure out where to go and what to do next. This lack of direction can be confusing and time-consuming.
-
Complex Puzzle Elements: Some steps involve solving puzzles or interacting with specific objects in the world, such as lighting Hive statues and defeating mini-bosses that spawn only after certain conditions are met.
-
Environmental Awareness: The mission’s unlock process requires players to be observant of their surroundings, as key elements like the Taken portal or Hive altars blend into the environment and do not stand out.
These hidden and multi-layered challenges ensure that only persistent and observant players will uncover and complete the Derealize Exotic mission.