Jamanra, the Abomination, stands between you and the end of Act 2 in Path of Exile 2-a towering menace wielding lightning, wind, and a gauntlet of deadly attacks aboard the Dreadnought Vanguard. Surviving this two-phase showdown will test your reflexes, your build, and your patience. But if you know his weaknesses-and when to strike-you just might turn the tide against one of the game’s toughest bosses yet.
While you will fight Jamanra briefly earlier on in act 2, the main fight comes at the end of the act when they become the Jamanra, the Abomination. Here their abilities expand greatly beyond what they use during that initial fight, and it consists of two extremely different (and difficult) phases. Make no mistake: Jamanra is one of the hardest bosses up to this point in Path of Exile 2, as they use the elements of lightning and wind while placing lightning pillars into the ground that restrict your movement.
Our Path of Exile 2 guide covers how to beat Jamanra, the Abomination, including how to prepare for the boss fight and how best to handle the onslaught of attacks you’ll face.
Jamanra, the Abomination weaknesses and how to prepare
Jamanra, the Abomination is notably weak to Cold damage, making cold-based skills and spells your best option for dealing high damage during the fight. In contrast, he is resistant to Fire, Lightning, and Physical damage, so avoid relying on those elements if possible. To prepare, equip gear with high Lightning resistance, as most of Jamanra’s attacks deal Lightning and some Physical damage. Make sure your character is at least level 32-36 and that your weapon is up to date for maximum damage output. Stock up on flasks that restore Life and Mana, and consider modifiers that help you gain flask charges quickly, since the fight is long and punishing. With these preparations and a focus on exploiting his Cold weakness, you’ll greatly improve your chances of defeating Jamanra.
Once you make it through Act 2, you’ll face Jamanra. But before that, you want to prepare for the fight and be around level 33-36.
Jamanra is weak to cold damage, so if you are a Sorceress or Monk and have built your loadout around frost abilities, you’ll be in for an easier time. Otherwise, fire damage for any class and poison damage for the Ranger are great ways to deal damage to Jamanra.
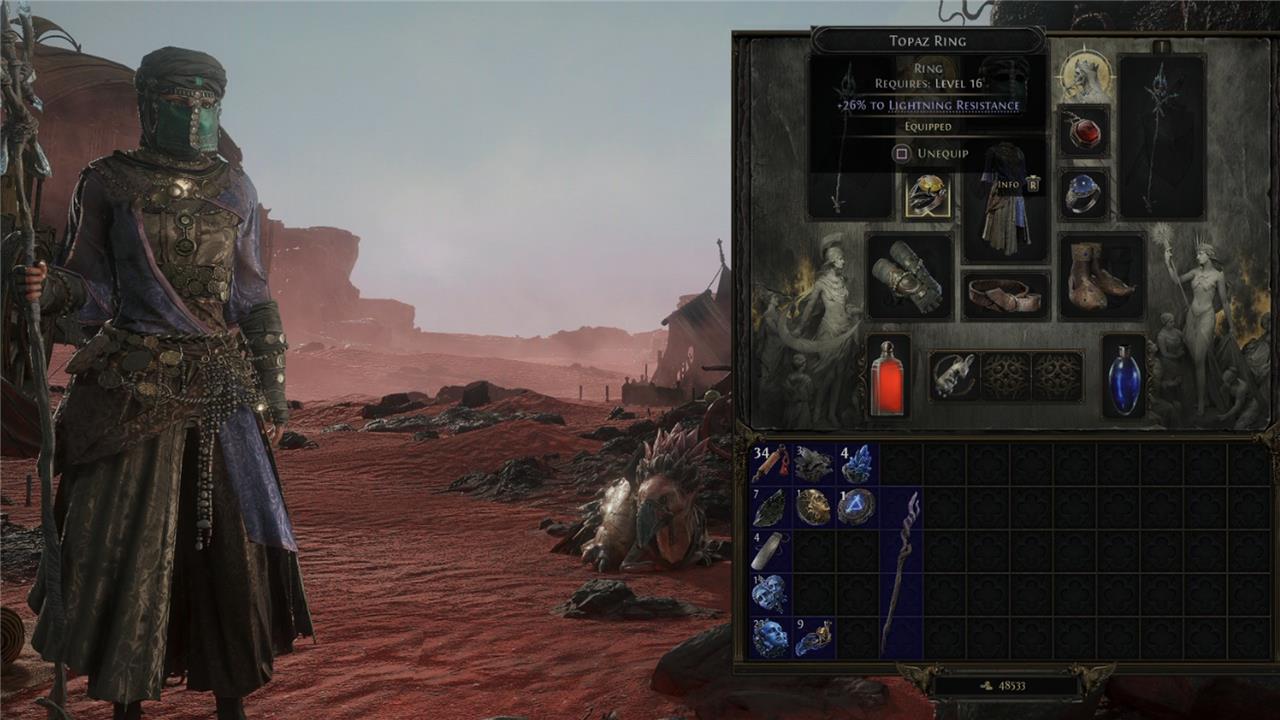
You also want to have as much lightning resistance as possible to negate Jamanra’s powerful attacks. If you picked up the lightning resistance charm in Act 1, you are in luck. Otherwise, you can find one by grinding through the Dreadnought Vanguard and killing enemies until it drops. Although it isn’t too common. You can also find a lightning-resistant Topaz Ring in Act 1 or Act 2, but like everything else, the drops are random.
The final way you can try to boost your lightning resistance is by farming gear in the Dreadnought or Deshar in Act 2 until you get usable gear that suits your build. This involves a lot of luck, and you could be doing this for a while. But, generally, so long as you have either the lightning-resistant charm, the Topaz Ring, and two to three pieces of gear with some kind of lightning resistance, you will be all set to take Jamanra on.
How to beat Jamanra, the Abomination in Path of Exile 2
Jamanra, the Abomination, is the formidable Act 2 boss in Path of Exile 2, fought in a two-phase encounter aboard the Dreadnought and then in the desert. To beat Jamanra, prioritize cold damage, as he’s especially vulnerable to it, while fire and lightning are much less effective. Equip gear with high lightning resistance to mitigate his main elemental attacks, and ensure your character is at least level 32-36 with strong, up-to-date weapons and defensive flasks. In phase one, dodge his wide-area lightning attacks and take cover behind Asala during sandstorms, using this downtime to heal and prepare for the next assault. In phase two, stay mobile to avoid tornados and lightning pylons, and exploit his weak melee by fighting close when safe-his most dangerous moves target players at range. With patience, good positioning, and the right elemental focus, you’ll overcome one of the toughest early bosses in the game.
Jamanra is a gruelling fight that involves dodging dozens of projectiles, dealing with a windstorm, staying aware of your position in the arena, and surviving against hordes of enemies in the middle of the fight. It is a lot, and arguably one of the biggest challenges in the entire campaign.
If you’re able to record the fight to learn Jamanra’s attacks, that’s a great way to learn the attack patterns and which movements telegraph which abilities. With so much going on in the fight, it can be hard to see Jamanra’s patterns in the middle of the fray.
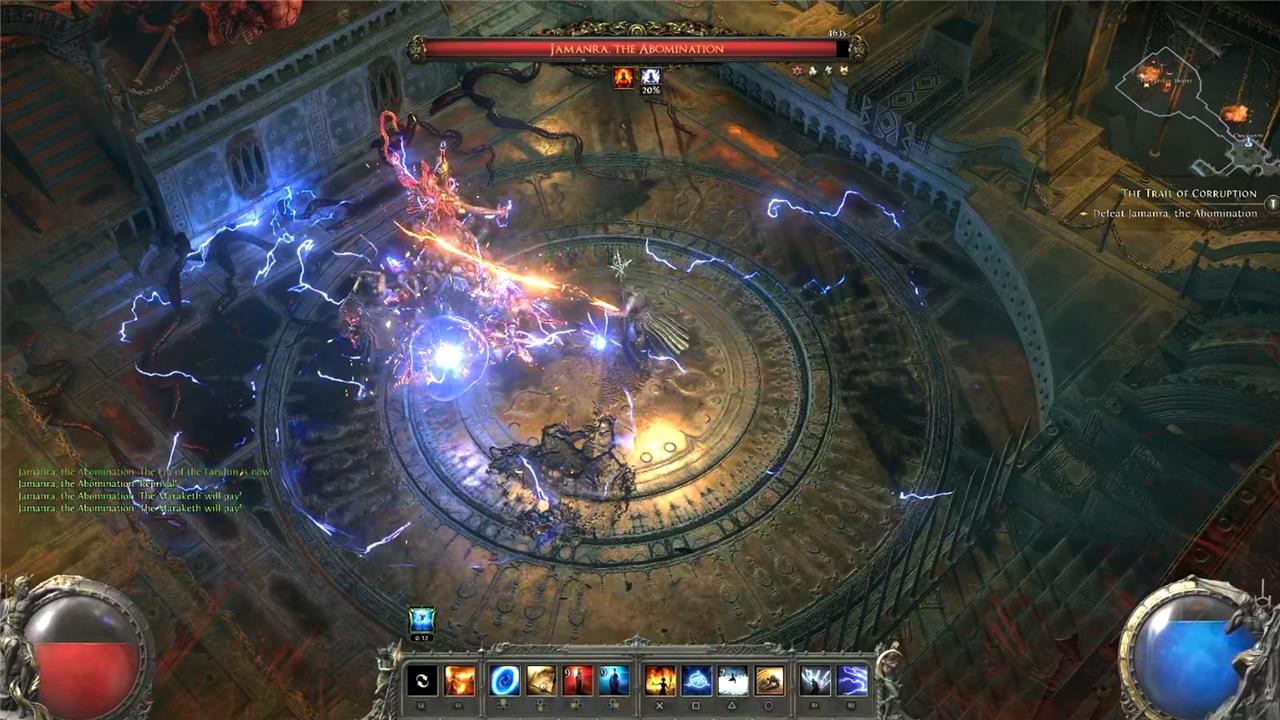
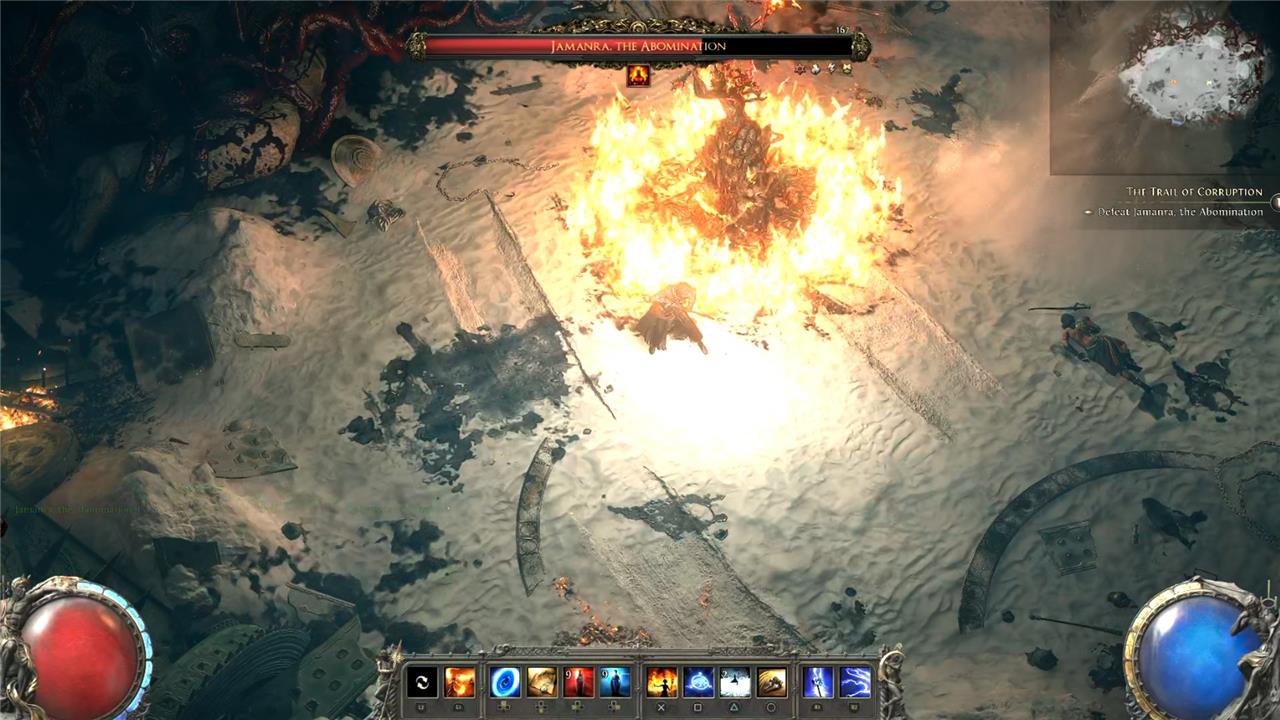
The fight is split into two phases, and the first phase is arguably harder than the second. During this initial phase, you want to remain as close to Jamanra as possible to avoid their spear throws and to keep an eye on the electricity pylons they will suspend and move around the arena. The second phase will happen when they have around 60% health, and blissfully, they perform fewer additional attacks beyond their cyclone projectiles and pylons.
Jamanra, the Abomination boss fight phase 1
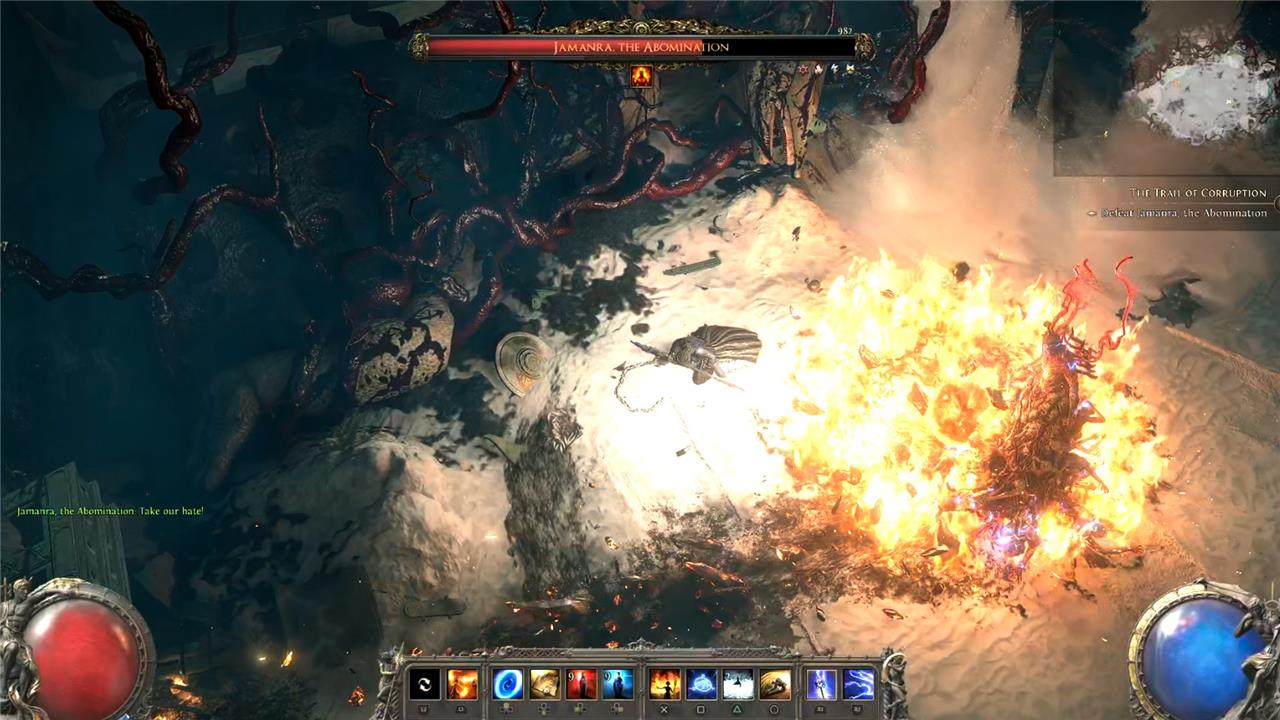
The two main attacks Jamanra has in this first phase are a lightning melee attack that hits directly in front of them and a spear throw when you are fighting at range. The melee attack doesn’t do much damage and has more forgiving timing. You can continuously proc this by just circling Jamanra and placing yourself right next to them.
You will have to fight at range occasionally, and the spear attacks Jamanra uses are hard to dodge. They can use several back-to-back and are telegraphed by spears appearing on either side of their shoulders and them waving their arm forward. To dodge these, you want to dodge just as Jamanra thrusts an arm forward and the spear begins to move. (If you dodge too early, you will be hit by a follow-up spear as you recover.)
This attack is why we suggest keeping as close to Jamanra as possible. While avoiding these attacks, you want to use as many area-of-effect attacks or single-target attacks as you have – either can work. Jamanra doesn’t move around the arena much, and walls of fire, concentrated effects for your spells, totems, poison bottles, frost fields, and grenades can all help to chip away at Jamanra’s health. Similarly, strikes, slams, targeted spells, and attacks which inflict stun can all be useful. Really, you just want to unload as much damage as you can – and want to continue doing so by any means necessary for the entirety of the phase.
After every five or so attacks, Jamanra will then place small electric pylons in the arena that have one of three formations. Whichever formation you get, you want to be on the opposite side of the arena from where they land to give yourself as much time to prepare.
- The first pylon formation is a simple explosion. These are telegraphed by Jamanra suspending the pylons high in the air. They will then create a large explosion, which is why you want to be as far away as possible. Jamanra will often throw these out away from them, allowing you to get behind them and still deal damage.
- The second formation will see the two pylons hover along the ground. These will slowly move randomly around the arena and can be dodged by moving around the lightning field in between them. You can also dodge through them to take less damage. In these moments, you want to attack with your most basic ranged attack to still deal some damage until you can get up close again.
- The third formation is hard to distinguish from the second formation. However, you will spot the pylons move closer together. Once active, they will track you and chase you. This formation only appears once Jamanra is at around 80% health. The best way to dodge these is to actually dodge in a triangle motion tightly. You won’t have to worry about Jamanra attacking you, and you may only face some additional grunts that can be avoided. As the pylons chase you, moving one at a time, they will only track your last position. Therefore, dodging in sharp directions means you will consistently throw them off-course. Save your healing flasks for this moment, however, as you may take some damage anyway due to the unpredictability here.
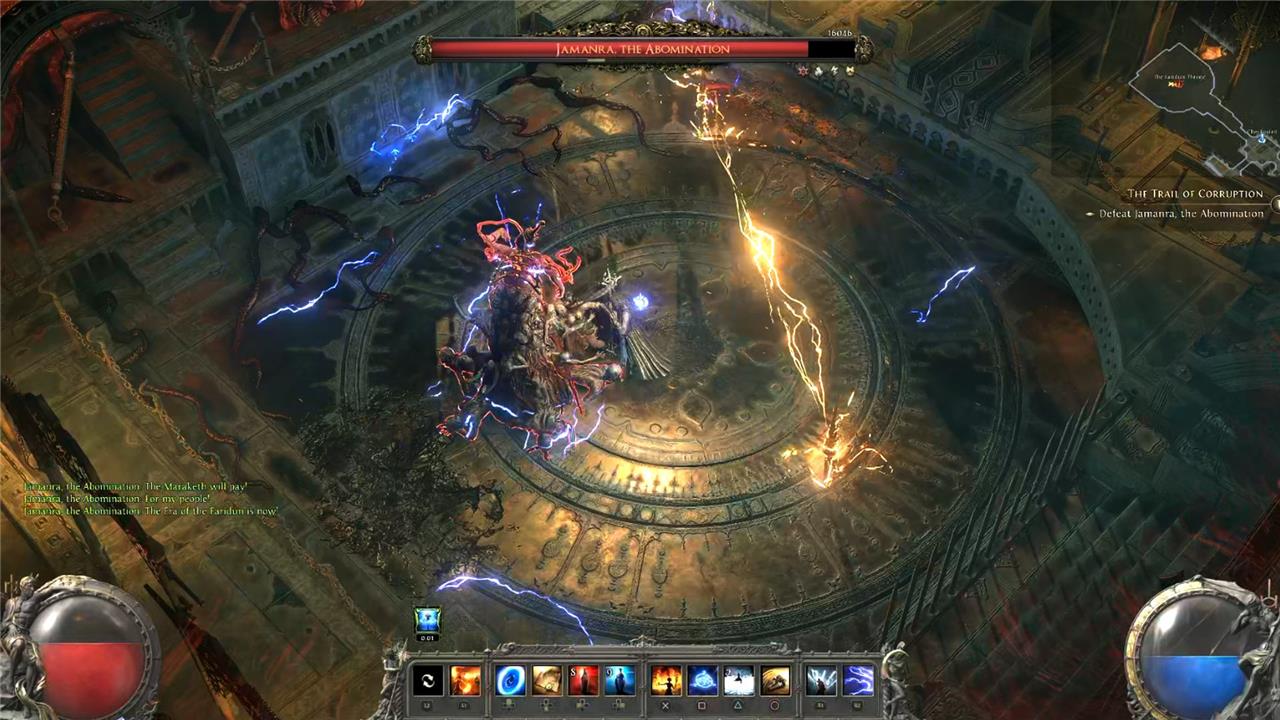
Additionally, Jamanra can hold their two hands together and stand in one spot. They will then spray lightning in a 180-degree forward radius. This can be easily avoided by moving behind them, where the attack doesn’t hit.
The final main attack you will face in the first phase is the sandstorm. When Jamanra calls this in, you want to stand behind Asala, who is in the fight with you. The barrier she projects will protect you. However, you can’t move from directly behind her. Go too far, and you will take damage. Stand in front of her and you will take damage. Move slightly to the side and you will take damage.
This storm lasts for around 5-7 seconds, and dozens of crawling enemies will spawn during it. As you can’t move, you want to spam as many area-of-effect attacks as you have that hit enemies around you, as you can easily get overwhelmed and die. Try to deal as much damage with spells and attacks while healing through any hits you take.
Don’t spam your mana and health flasks, but use as many as you can get away with, as you will need some for the rest of this first phase. (Your flasks reset during the second phase.) You will also need to continue to spam attacks after the sandstorm finishes, as you will not have killed all the additional enemies, and Jamanra will start attacking you again.
That is why using as many spells as possible is important. If a bunch of enemies remain, then you can slowly move circularly around around the arena, dodging Jamanra’s spears and using spells to deal damage and pick off enemies.
Once Jamanra drops to 60% health and goes back to the altar they were on at the beginning of the fight, the cart you are on will be destroyed, and you will have to fight in the sand on your own.
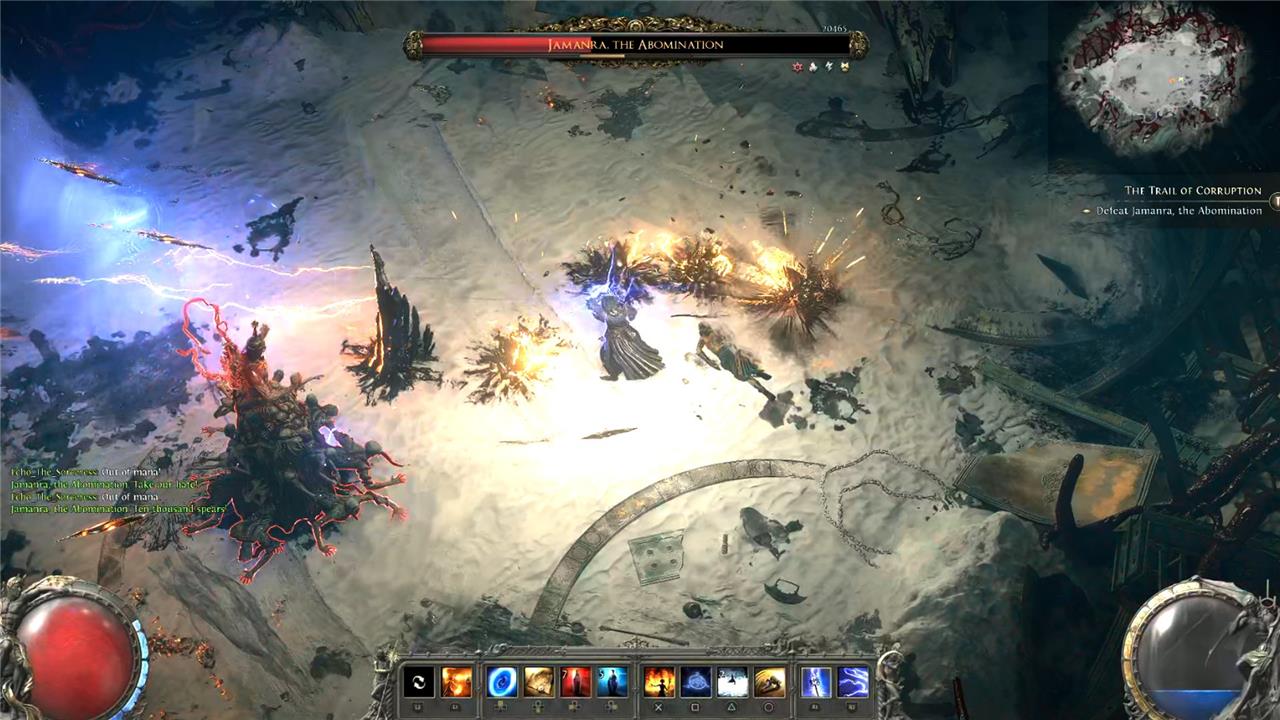
Jamanra, the Abomination boss fight phase 2

The only main attack Jamanra retains between phases is the melee attack. They do have another small melee attack with their arms, but it can be dodged the same way as the primary attack, or by backing off. This phase is more about dodging projectiles than dealing with Jamnra’s own attacks.
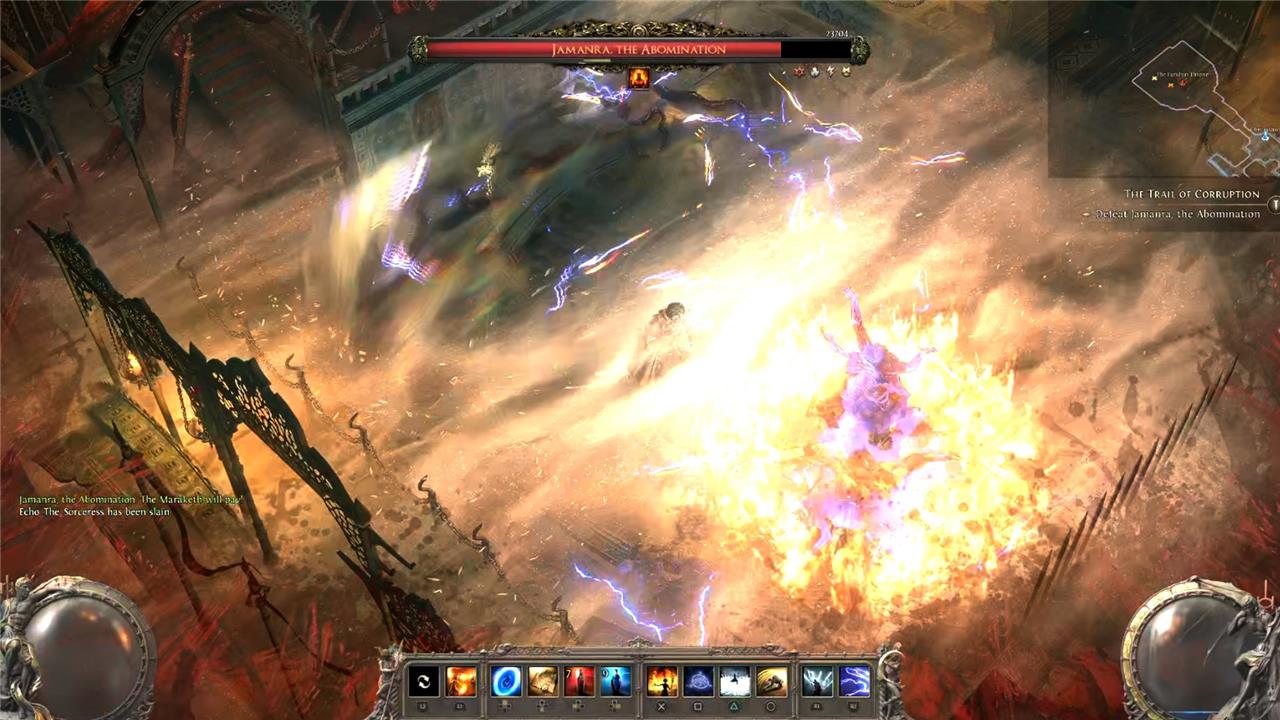
Jamanra will almost always begin the phase by casting a wind cyclone that swirls around the map (as shown in the screenshot above). These will move around the map randomly, and so long as you avoid stepping into them, you will be fine. Jamanra can cast two to three of these at a time.
Jamanra also uses two sword attacks fairly consistently. The first is a slash that will hit the area in front of him. To dodge it, roll into the attack’s direction, which is from Jamanra’s right. It is telegraphed by a lightning strike hitting the spear as they swing it above their head.
The second attack has a longer windup but does more damage. Jamanra will create a huge sword, hold it behind their back, and slam it in the ground after a second of windup. This can be dodged by rolling to the side as they swing the sword above their head. The attack hits in a straight line from Jamanra’s position.
Jamanra is a lot faster in this phase, and as such, area-of-effect attacks are less effective. They are still worth using if you have them, but you want to rely far more on attacks that track enemies or bounce off walls to deal damage. (The Sorceress’ Spark ability is great here, for example.)
To deal damage, simply spam abilities while dodging any cyclones or sword attacks. There really isn’t any trick beyond that. Because the fight isn’t broken up by various attacks that take you away from dealing damage, this phase can go a lot quicker.
After Jamanra drop to about half health, they will start placing lightning pylons into the ground. These work exactly like they did in the first phase. However, they don’t move. Instead they can wall off routes around the arena, restricting your movement or options. Generally, though, the best strategy is to simply move around the arena in a circle, avoiding attacks as and when they happen. This should always leave you with an escape route as Jamanra follows you or allow you to quickly dodge through a cyclone or lightning field if you need to.
These pylons will disintegrate after they have been in the ground for a while.
Once Jamanra drops to around 35% health, they will also fire those pylons at you in a small circle. This is telegraphed by them holding both hands above their head, causing half a dozen pylons to appear above them. Dodge these by rolling just as they fire. These work just like the other pylons and stay in the ground. However, they are formed in a small circle and will fire summon bursts of lightning around them every few seconds, so it is best to just stay away if you can.
The final main attack at this point is a small orb that will move around the arena, dealing pulsating lightning damage as it moves. These are quite fast but easy to see. Simply dodge and avoid them as they bounce around the arena.
Phew, one more attack to run through! When Jamanra is below 20% health, they can also open up a hole in the side of the arena that fires projectiles out of it in a straight line. These can block off parts of the arena if you don’t have good movement options to dodge through or jump over them. They also last for a while.
The most challenging part of this phase is the combination of all of these attacks. There isn’t really any limit in terms of how many projectiles or attacks can be on the screen at once, and trying to manage dealing damage while avoiding the cyclones, the electricity orbs, Jamanra’s own melee attacks, and the projectiles firing out from the wall can be a lot.
Good positioning is key to the fight. Keep ticking away at Jamanra’s health, and the more times you attempt this fight, the better your positioning to avoid these attacks will be.
With the fight completed, you’ll be able to move on to Act 3 of Path of Exile 2 – the last act currently available in early access.
What secret strategies can help me exploit Jamanra’s weaknesses
Secret Strategies to Exploit Jamanra’s Weaknesses
Focus on Cold Damage
-
Jamanra is notably vulnerable to cold damage, while being resistant to fire, lightning, and physical attacks. Prioritize equipping skills, jewels, or runes that grant or amplify cold damage-spells like Frostbolt or Ice Nova are especially effective. If your build isn’t set up for cold, consider respeccing or using items that temporarily boost cold output.
Stay Close-Exploit Melee Weakness
-
Jamanra’s melee attacks are weak, making it safer for both melee and ranged characters to stay close during the fight. This positioning also helps you avoid his more dangerous ranged and area attacks, which are triggered when you move too far away.
Master Dodging and Positioning
-
Many of Jamanra’s most dangerous attacks, such as spear throws and sword slams, have clear telegraphs. Time your dodges precisely-rolling too early can result in getting hit by follow-up attacks. Staying mobile and circling the arena helps you avoid projectiles and lightning effects, especially as the fight progresses and the arena fills with hazards.
Stack Lightning Resistance
-
Jamanra’s most powerful attacks deal lightning damage. Equip gear and flasks that boost your lightning resistance to significantly reduce incoming damage. If you lack resistance gear, consider farming or crafting before the fight.
Use Flask Charges Wisely
-
Your flask charges are fully restored at the start of Phase 2, so don’t hesitate to use them aggressively for healing and mana recovery. Flasks with instant healing or charge gain modifiers are particularly valuable for surviving his relentless attacks.
Exploit Arena Mechanics
-
In Phase 2, Jamanra summons hazards in pairs-tornados, lightning pylons, and more. He never spawns more than two at once, so focus on finding and standing in the safe zones between these effects. Lure Jamanra into these safe spots and attack while avoiding the persistent hazards.
Debuff and Armor Break
-
If you have access to debuffs like the Witch’s Vulnerability, use them to lower Jamanra’s defenses and amplify your overall damage. Physical builds will need around 850 Armor Breaking to penetrate his defenses effectively.
By combining these strategies-focusing on cold damage, maintaining close positioning, stacking lightning resistance, and using flasks and debuffs at key moments-you can turn Jamanra’s strengths into his undoing and secure victory in this challenging boss fight.
How can I exploit Jamanra’s vulnerability to cold damage effectively
How to Effectively Exploit Jamanra’s Vulnerability to Cold Damage
1. Prioritize Cold Damage Skills and Gear
-
Jamanra is particularly weak to cold damage, making cold-based skills and attacks your best option for maximizing damage output. If you’re playing as a Sorceress or Monk, leverage frost abilities like Frostbolt, Ice Nova, or similar cold spells for rapid health reduction.
-
If you’re not naturally specced into cold damage, equip jewels, runes, or gear that add or amplify cold damage to your attacks. Even a modest cold damage bonus can make a significant difference.
2. Use Debuffs to Amplify Damage
-
Spells such as the Witch’s Vulnerability can further lower Jamanra’s defenses, making all incoming damage-including cold-even more effective.
3. Attack During Vulnerable Moments
-
After Jamanra performs large area-of-effect attacks or during his recovery periods, he is briefly exposed. Use these windows to unleash your most powerful cold skills for maximum impact.
4. Stay in Optimal Range
-
Maintain a medium distance: not too close to risk melee retaliation, but not too far to avoid triggering his deadlier ranged attacks. This position allows you to consistently land cold attacks while dodging his abilities.
5. Don’t Overcommit to Cold if Your Build Isn’t Suited
-
While cold damage is highly effective, don’t completely overhaul your build just for this fight unless you can do so easily. Treat cold as a bonus if your setup already supports it.
6. Combine Cold with Crowd Control
-
Cold skills often slow or freeze enemies. Use these effects to limit Jamanra’s movement, giving you more time to dodge and reposition during the fight.
By focusing on these strategies-prioritizing cold damage, using debuffs, timing your attacks, and leveraging cold’s crowd control-you can efficiently exploit Jamanra’s primary weakness and turn a challenging boss fight into a decisive victory.