Step into the infernal depths of Baldur’s Gate 3’s most challenging dungeon: the House of Hope. Hidden within the Devil’s Fee in the Lower City, this mysterious domain holds the key to freeing Hope, a powerful life cleric imprisoned by dark forces. Navigate treacherous puzzles, deadly foes, and the enigmatic Archivist as you seek the legendary Orphic Hammer to shatter her chains-and decide the fate of this tormented soul. Ready to confront Raphael and unravel the secrets of the House of Hope? Your journey begins now.
Our Baldur’s Gate 3 guide explains how to get to the House of Hope, what to do when you get there, how to free Hope, and how to deal with Raphael at the end.
How to get to the House of Hope in BG3
To get to the House of Hope in Baldur’s Gate 3, you must first go to the Devil’s Fee shop located in the northern part of the Lower City. There, speak with Helsik and learn about the Infernal Transposition Ritual. After gathering the required ritual items-a skull, Coin of Mammon, incense, a fire rock, and a diamond-you place them on specific points around the ritual circle upstairs in the shop. Completing this puzzle opens a portal to the House of Hope, which is Raphael’s domain in Avernus. Note that you cannot fast travel back to camp from there and must use the portal again to return, so be prepared before entering.
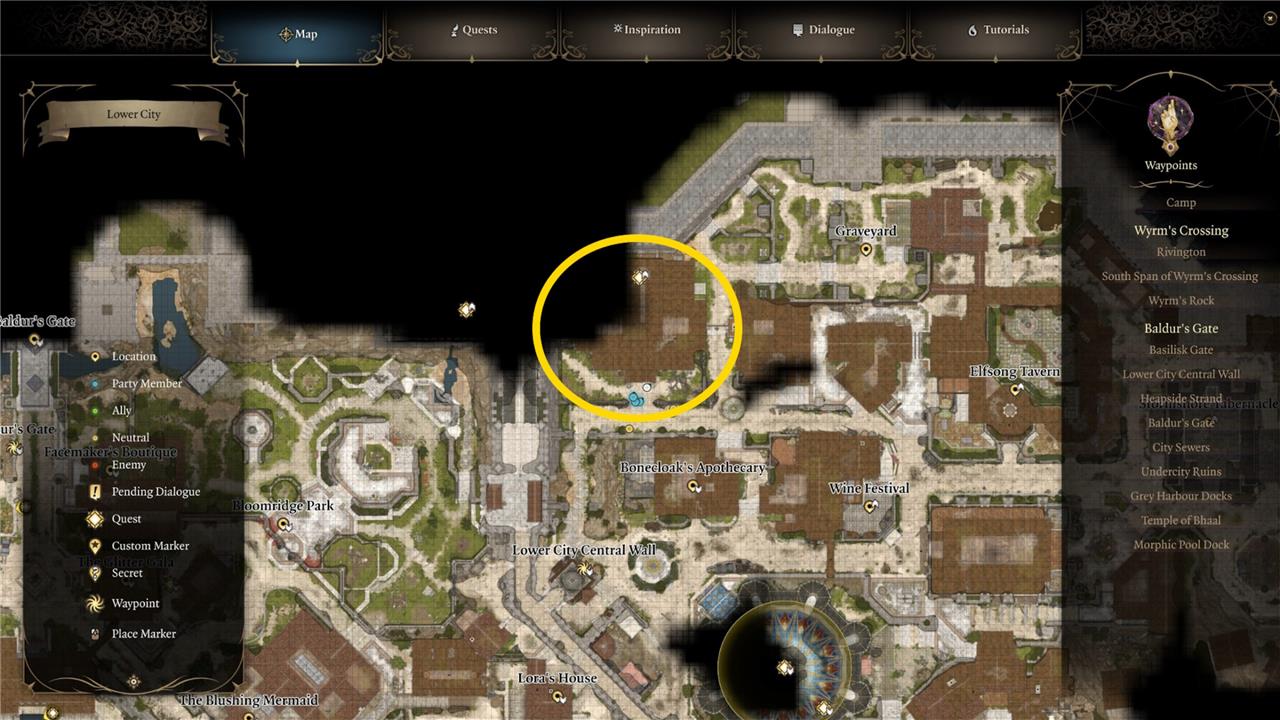
There’s only one way to enter Raphael’s abominable abode, the House of Hope, regardless of whether you accept his deal when you speak in Sharess’ Caress. That’s through a portal to the hells that only one person can open: Helsik the diabolist. Helsik’s shop is in the northern part of the Lower City, next to the Nine Hells Forge. If you leave the graveyard via its southern exit and turn right, Helsik’s shop is the second large building on your right.
Speak with Helsik, and request information. She serves Mammon, lord of money, and won’t spill much juicy gossip for free, though you can pass a persuasion check and get the first piece of info without paying. After that, I asked about Raphael and paid 1,000 gold, and she seemed happy enough, despite insulting me.

Tell Helsik you want to bust into the House of Hope, and she’ll give you a choice: Pay 20,000 gold or promise to get her something from Raphael. She wants the Gauntlet of Hill Giant Strength, a tough item to get in the House of Hope, but a much easier option than raising 20,000 gold.
Make your choice, and she’ll hand over a grimoire explaining how the hell portal ritual works and a pouch containing five materials you need to pull the spell off. She’ll also hand you a key that unlocks the upstairs floor where the ritual’s blood circle is already drawn and disable the trap on the staircase landing.
There’s little of interest in the room, and most of the other doors just lead to balconies overlooking the city. Head to the room’s far end, where the large circle of blood is.
How to start Helsik’s ritual and enter the House of Hope
To start Helsik’s ritual and enter the House of Hope in Baldur’s Gate 3, first obtain the ritual items and the grimoire from Helsik, the shop owner in the Devil’s Fee in the Lower City. After securing the items-a skull, Coin of Mammon, diamond, incense, and infernal marble-head upstairs to Helsik’s room where a blood ritual circle is drawn on the floor. Disarm the fireball trap if necessary, then drop the items from your inventory onto the floor and place them in the correct positions on the circle as instructed by the grimoire: the skull at the top point nearest the altar, the Coin of Mammon clockwise next to the skull, skip one point and place the diamond, then the incense next to the diamond, and finally the infernal marble in the center. Once all items are correctly placed, the ritual circle will glow and open a portal to the House of Hope, allowing you to enter this challenging dungeon.
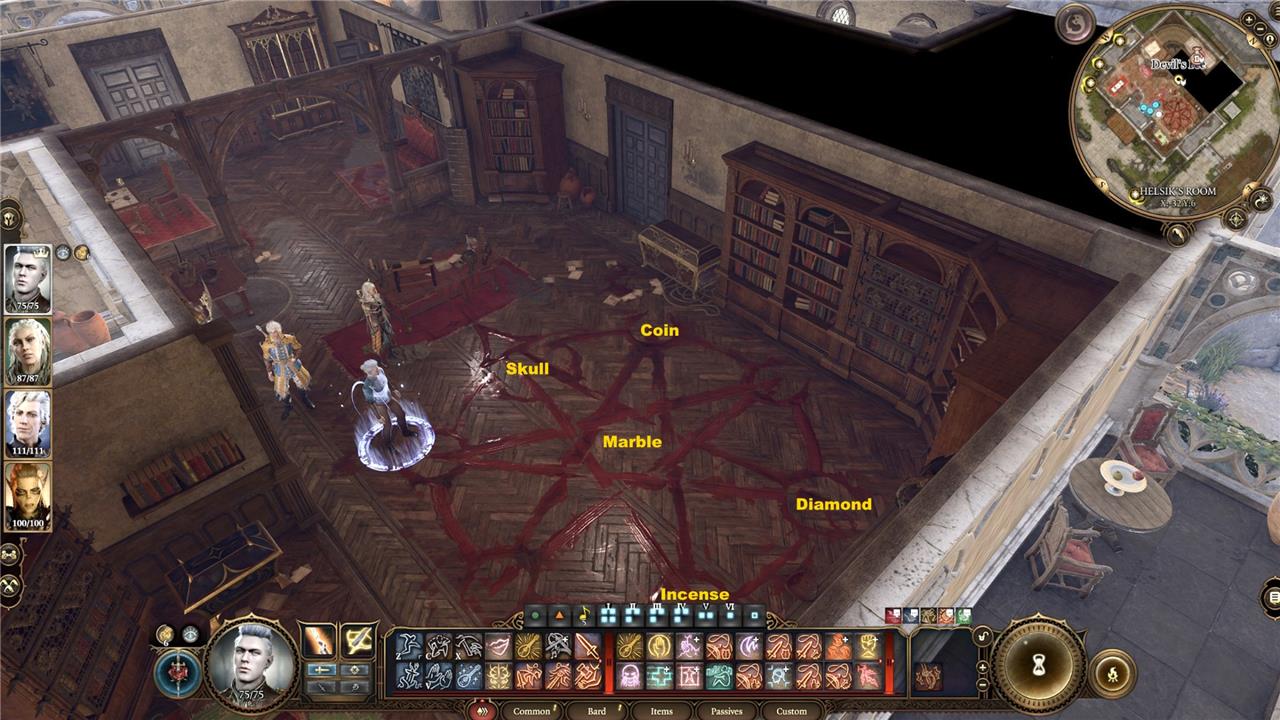
Open the ritual pouch. Place the skull at the circle’s western point, the one that touches the desk. Face away from the skull, and cross the room. Put the diamond on the left point and the incense sticks on the right point. Go back to the skull, and face it. Put the Mammon’s Coin in the spot to the skull’s right and the Infernal Marble in the center. Refer to the graphic above for reference.
The Emperor warns you several times not to go through with the ritual, and while he’s correct that the trials ahead are difficult, entering the House of Hope has no ramifications on your relationship with him or anyone else. Interact with the active portal, and enter the House of Hope.
Before you enter the House, make sure you have a party member who can cast Guidance, plenty of potions, and weapons that don’t deal radiant damage. Arcane Cultivation elixirs are also useful, and if you have anyone who knows the Globe of Invulnerability spell, make sure it’s prepared. You’ll have use of it when you face Raphael.
I recommend leaving weaker party members like Gale and Jaheira at camp for this adventure. In the final battle, your foe can quickly defeat weaker characters and leave you at a big disadvantage.
Where to go in the House of Hope in BG3
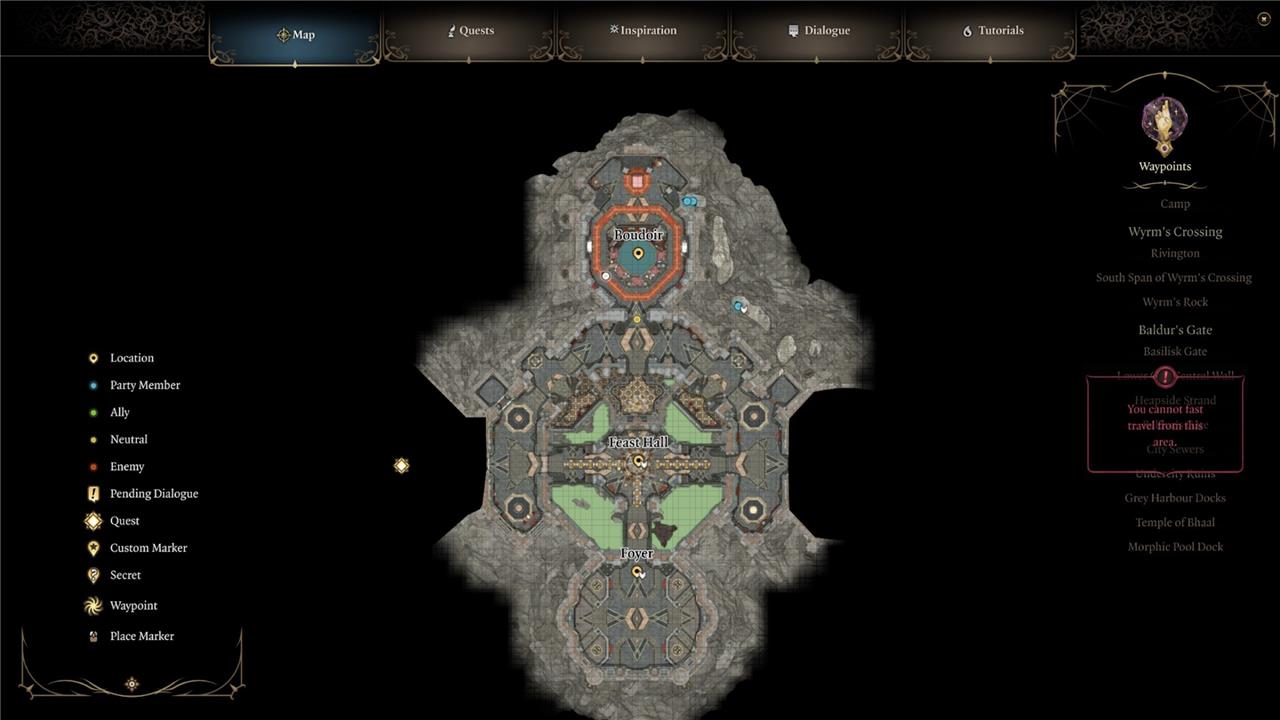
To reach the House of Hope in Baldur’s Gate 3, head to the Devil’s Fee shop in the Lower City and complete the Helsik Ritual by placing specific items on an altar in a set order. This opens a portal to the House of Hope, Raphael’s domain in Avernus. Once inside, you will meet Hope at the entrance, who can give you a Debtor’s Disguise to move safely through the house. Key locations to explore include the Portal Room, the Archive, the Mystic Force Curtain, and Hope’s Prison. To free Hope, you must obtain the Orphic Hammer, either by making a deal with Raphael or stealing it from the Archive, and then use it to break her magical bindings in the prison area. There are two main ways to enter Hope’s chamber: through a metal hatch in the east wing requiring a Strength check or via a secret passageway accessible from the balcony between the Boudoir and Outer Portals. Be prepared for hostile enemies and use ranged attacks to handle dangerous foes like Vengeful Imps and Hell Spheres.
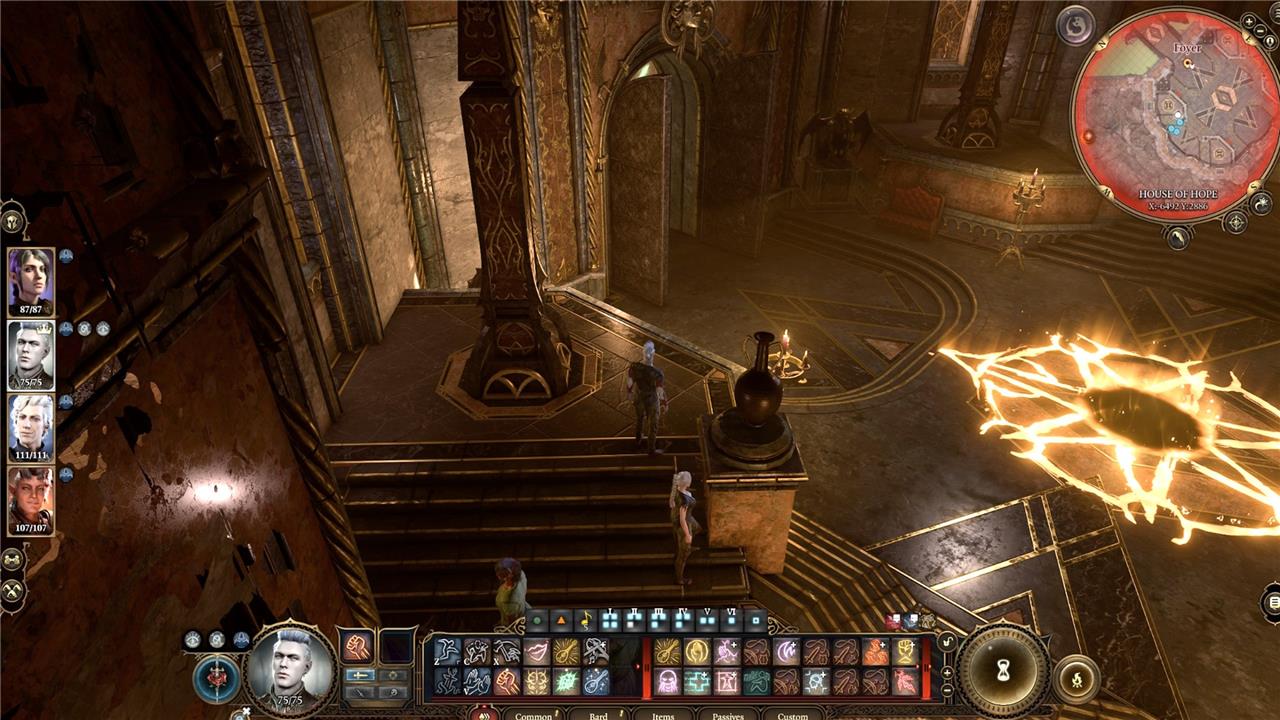
You arrive in a chamber with four soul pillars, but you can’t do anything with them yet. The apparition of a woman named Hope appears as you prepare to exit the room and begs you to help save her. She also gives you Debtor’s Attire, which automatically replaces your camp clothes and overrides your armor as the default visible clothing. Your armor effects remain unchanged, though.
You need to keep these clothes on during your time here, or multiple enemies spawn and everyone turns hostile. Agree to help Hope, and she’ll tell you where to look for the Orphic Hammer. Ignore the prison hatch in the next room, and enter the feasting room. You can speak with the skeletal mason there for some extra lore about Ketheric and Moonrise if you’re interested.

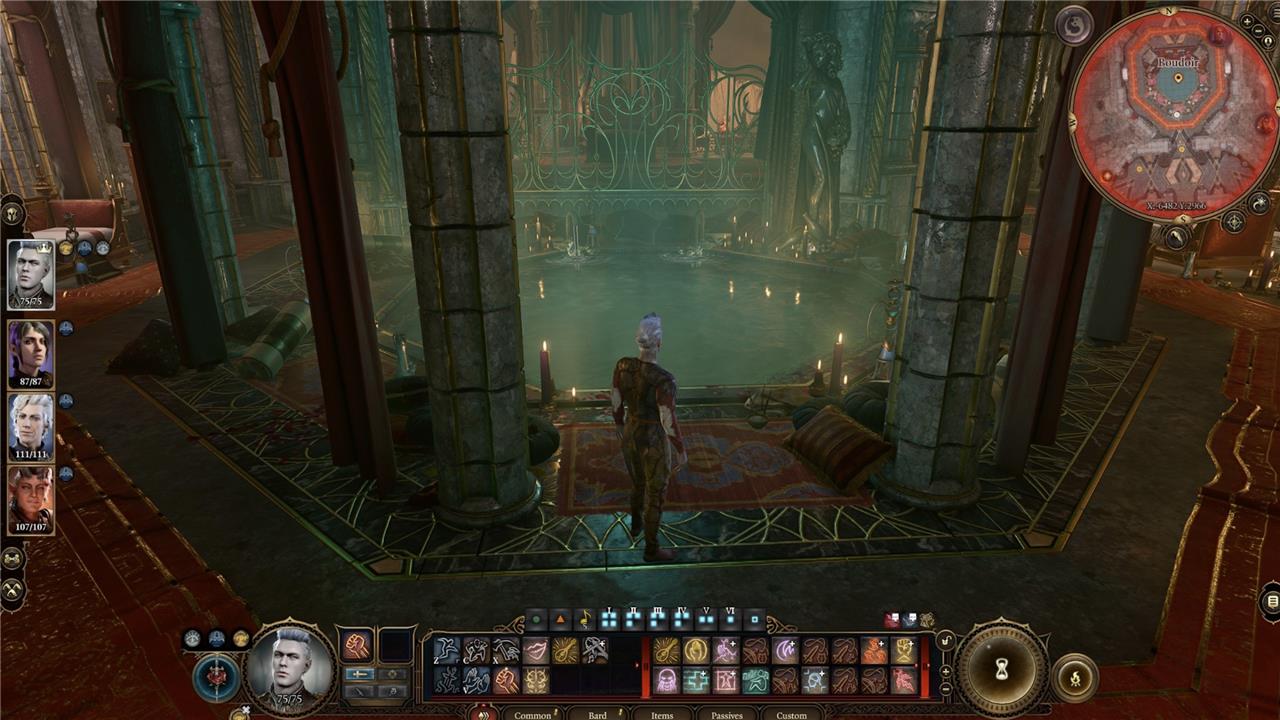
The House of Hope is essentially a giant circle. The main thoroughfare around the feasting room leads you to some balconies overlooking Avernus, and you can chat with the other debtors for some grim background about the house and how Raphael operates.
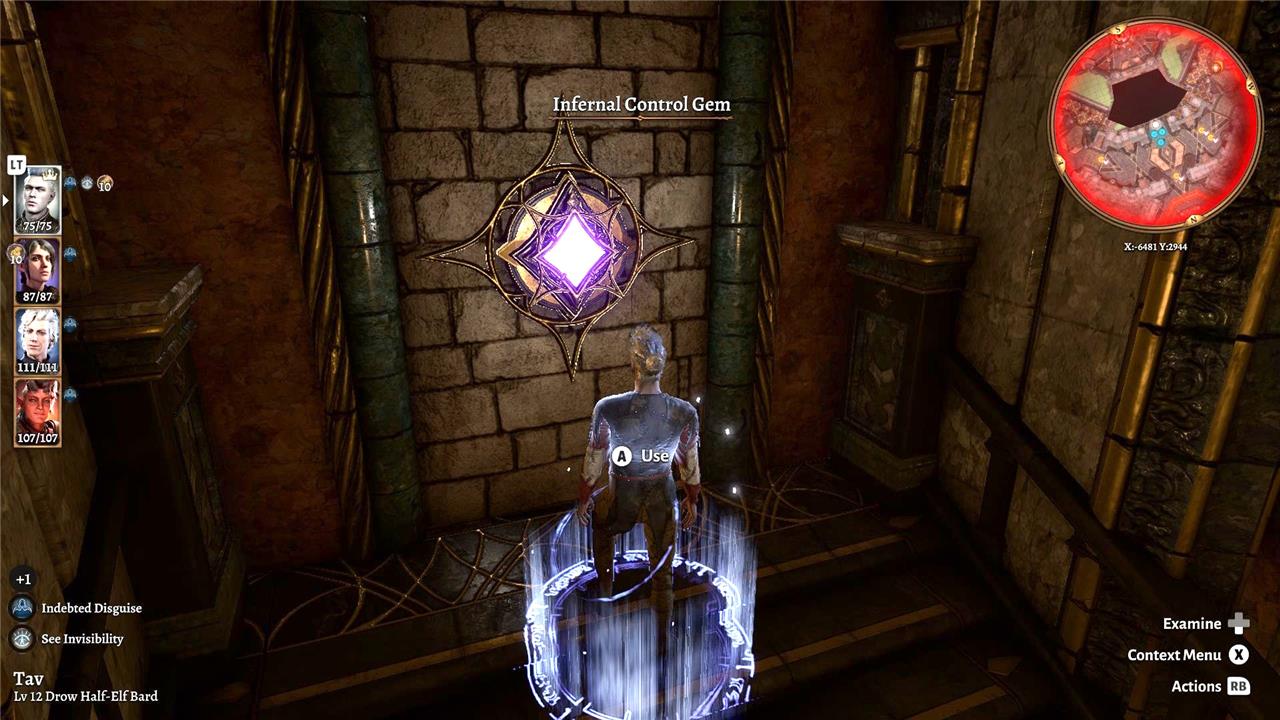
You’ll see an open room blocked by an energy barrier, which you can’t enter for now. Opposite it is an Infernal Gem. If you pass a Wisdom check and an Intelligence check, you can enter the room behind it, which houses some rare items and Mol’s contract. If you want to free Mol from it, you either need to defeat Raphael later or return the contract to her.
At the end of the hallway is the Archive. Hope pops up again and tells you the Archivist is the key to getting the Orphic Hammer, but there’s a catch. You’re not invited.
How to find the Archivist in the House of Hope
To find the Archivist in the House of Hope in Baldur’s Gate 3, head to the western portion of the dungeon where the Archive is located. Here, Hope will inform you about the Archivist, who is initially hostile but can be manipulated by pretending to be Zariel’s inquisitor, Verillius Receptor, as the Archivist fears this figure. Passing a Charisma, Intelligence, or Wisdom check with Hope will reveal this information and give you dialogue options to deceive the Archivist. Successfully impersonating the inquisitor or using persuasion, deception, or intimidation checks can grant you the Boudoir Invitation needed to progress. If these methods fail, you can resort to attacking or pickpocketing the Archivist or using a back route via the northeast balcony to bypass him.
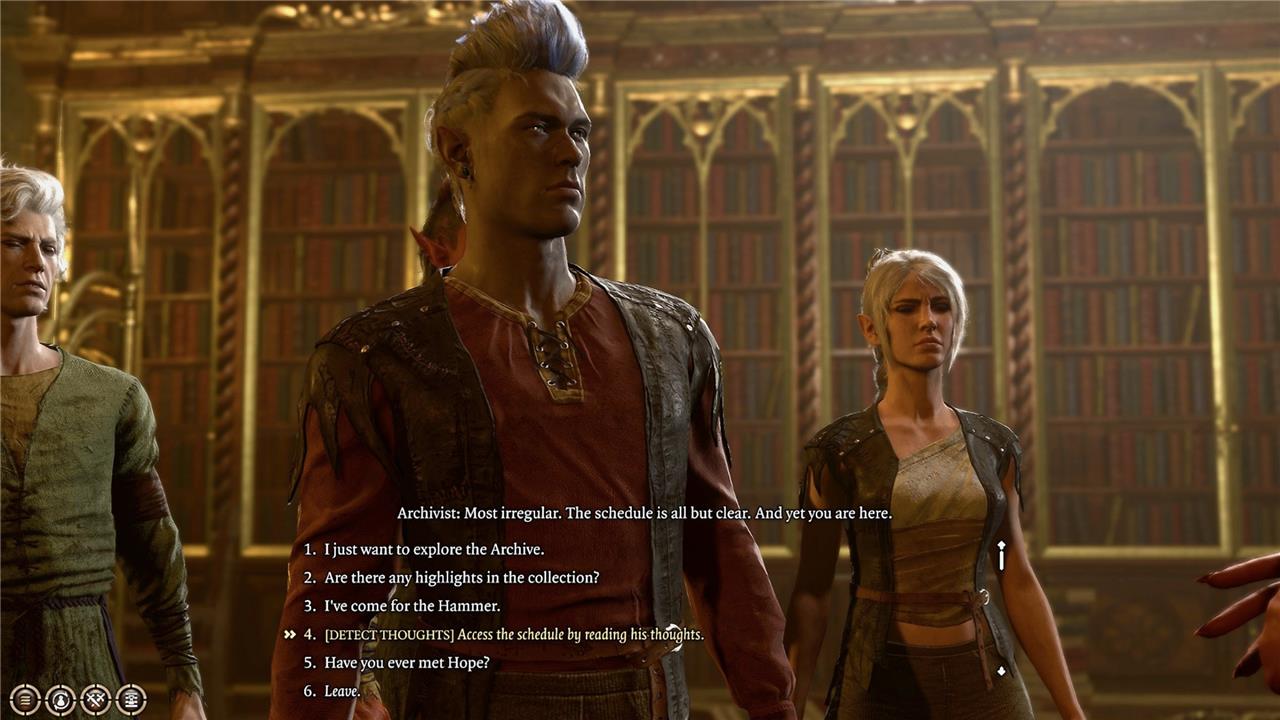
Cast Detect Thoughts or use a potion of mind reading before entering the Archive, and speak with the Archivist. Choose the [Detect Thoughts] option, and pass a Deception check to convince him you’re actually working for Zarial. This method gives you some leeway in the archive, and he’ll give you an invitation to Raphael’s boudoir. You can also use the balcony in the northeastern room to reach some rocky ledges and enter the boudoir without an invitation, but there’s not really a point in doing that. You still have to speak with the Archivist anyway.
What to choose in the Haarlep encounter
When encountering Haarlep in the House of Hope in Baldur’s Gate 3, players face a significant choice with distinct consequences. You can accept Haarlep’s invitation to “play,” which involves surrendering part of yourself-either your body or soul-in exchange for valuable information, including the location of Raphael’s secret safe and its key. This option avoids combat but curses your character with periodic unsettling sensations and may cause tension with your companions. Alternatively, you can reject Haarlep’s offer, triggering a challenging fight against Haarlep and summoned imps. Defeating them rewards you with the Helldusk Gauntlets and the safe key, but you must discover the safe’s location on your own. Both choices have their risks and rewards, so consider whether you prefer to endure combat and maintain your autonomy or accept the infernal bargain for easier access to critical information.
Inside the boudoir is Haarlep, an incubus who lives to gratify Raphael’s carnal needs. They entice you to bed for an intense encounter, and you’ll want to proceed carefully. If you rebuff their advances, Haarlep and a few Cambion friends fight you. This is a valid option, but if you want to avoid a fight, agree to strip down. During the romance scene – which is very NSFW, for the record – choose to retain control of your mind, or you’re in for an unpleasant surprise.
Once Haarlep has what they want from you, they give you the key to Raphael’s safe and tell you where it is – behind the portrait in the room’s northwest corner. You can also take the safe key from Haarlep’s body if you choose to fight them.
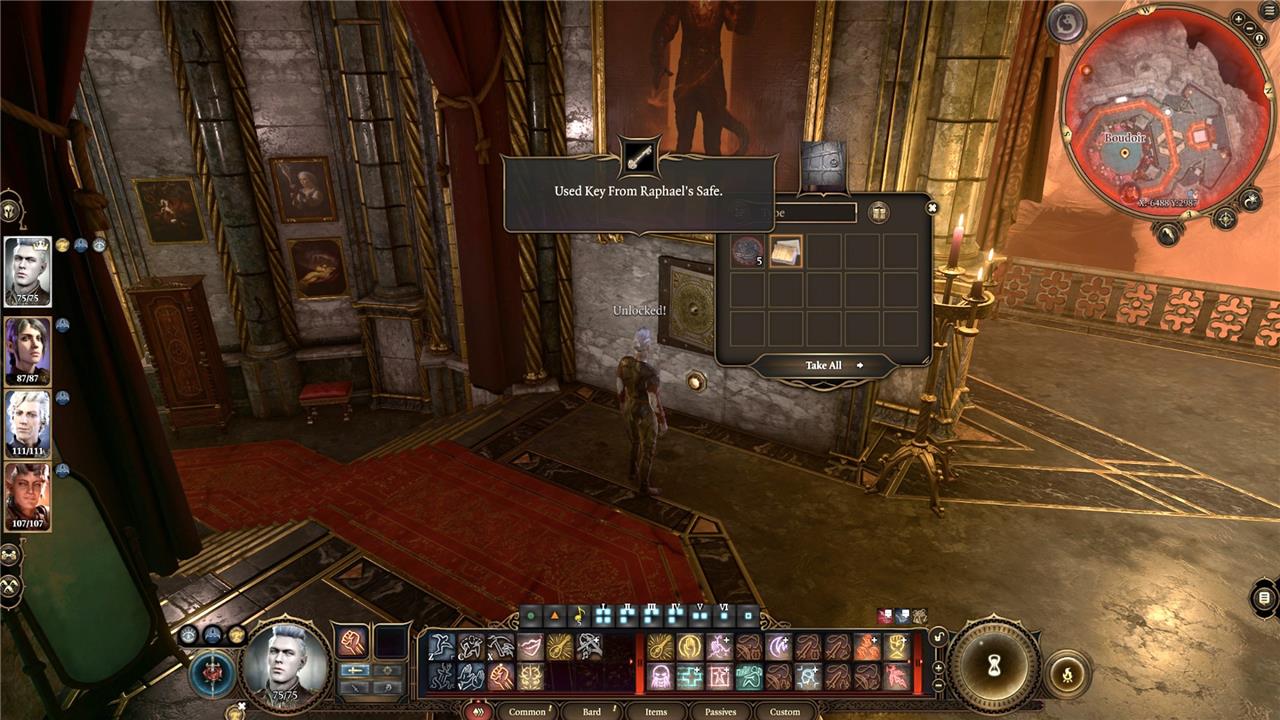
Open the safe, and read the note inside to get the “key” to the Orphic Hammer. Loot the chests in the boudoir for some items you can sell and a Potion of Angelic Slumber, and you can get some unique camp clothes from the wardrobes. Interact with the faucets to restore your health and spell slots if you need to, and if you were intimate with Haarlep, make sure to re-equip your armor and weapons. Things are about to get dicey.
How to get the Orphic Hammer in the House of Hope
To get the Orphic Hammer in the House of Hope in Baldur’s Gate 3, you first need to gain access to Raphael’s domain in Avernus. Start by making a deal with Halsik at Flymm’s Cobblers to learn how to enter the House of Hope. Once inside, navigate to Raphael’s Archive where the Orphic Hammer rests on a pedestal protected by a magical shield. To bypass this, find the passphrase hidden in a safe behind a painting in Raphael’s Boudoir, which may require dealing with an incubus named Harleep. With the password, you can steal the Hammer, but be prepared for alarms to trigger and Raphael to return for a confrontation. It’s advisable to collect other powerful artifacts in the Archive before escaping, as taking the Hammer will make the House hostile and prompt a fight with Raphael and his minions.

Approach the hammer, and use the password you learned from Raphael’s note to deactivate the magic shield. Once you grab the hammer, your Debtor’s Attire falls away, and everyone in the House of Hope becomes hostile. Several imps and a flaming sphere spawn as well. There’s no way around this obstacle, but you can deal with it in a sneaky way if you don’t want to fight.
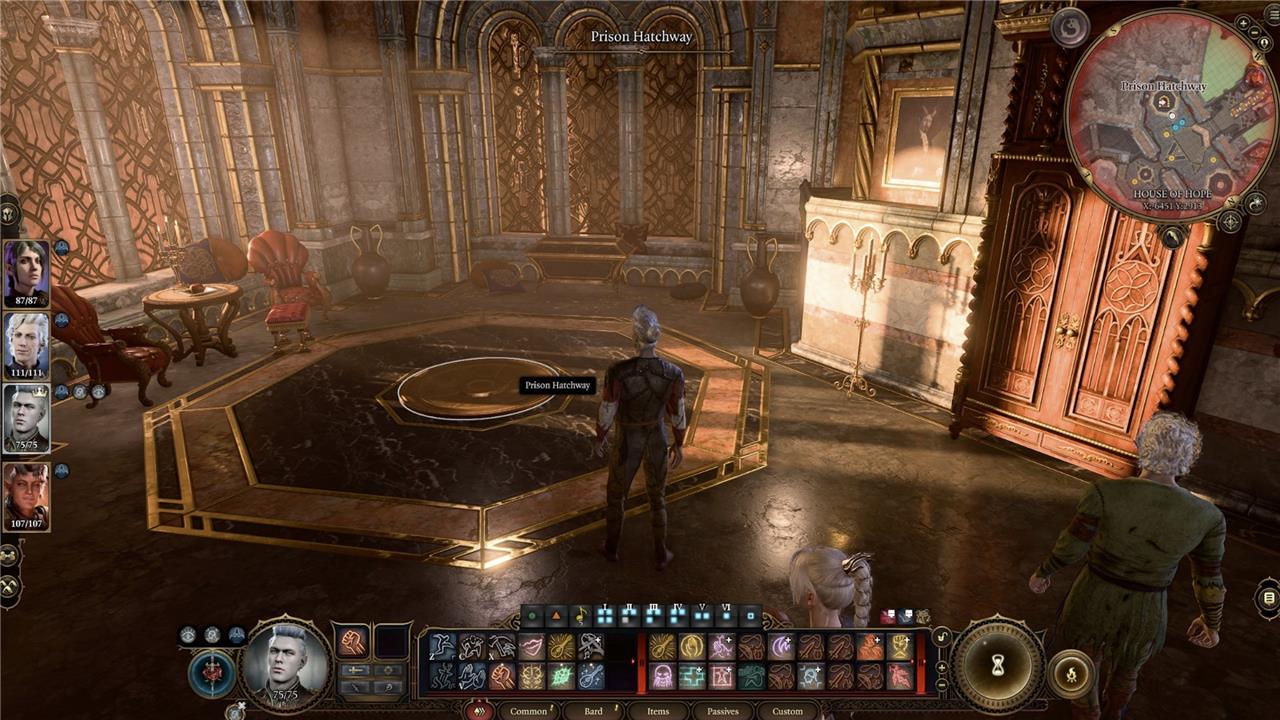
Before you grab the hammer, send three party members to the prison hatch. Pass a strength check to bust it open. Switch back to your party member in the Archives, grab the hammer, and either cast invisibility or use a potion of invisibility. Make sure to swipe the Gauntlets of Hill Giant Strength and the other treasure before leaving.
Since you’re invisible, you should be able to walk through the feast room and arrive at the prison hatch unscathed.
How to free Hope in the House of Hope
To free Hope in the House of Hope in Baldur’s Gate 3, first gain her trust at the entrance by persuading her to receive the Debtor’s Disguise, which allows safe passage inside. Then, acquire the Orphic Hammer, either by making a deal with Raphael or stealing it from the Archives using deception or pickpocketing. Next, access Hope’s prison through a hatch in the east wing or a secret balcony passage. Defeat the guarding Spectators and Vengeful Imps, then use the Orphic Hammer to destroy the two magical crystals binding Hope’s chains. Once freed, Hope joins your party as a powerful Life Domain Cleric, greatly aiding your journey.

Two Beholders and a small army of imps guard the crystals that keep Hope imprisoned. Death Ward and spells or armor that negate fear are helpful here, since the Beholders can easily inflict it on your allies. Avoid approaching ledges, since the imps know Eldritch Blast and can shove you to your death with it.
Area-of-effect spells such as Cloudkill, Cone of Cold, and Chain Lightning are your best bet for dealing with the imps quickly. The Beholders are tough, but squishy. You should be able to take them down in a turn or two.
Once the enemies are no more – and not before, or you run the risk of harming Hope – use the Orphic Hammer to attack the two crystals and free her. Heal, use the angelic slumber potions you nicked from the boudoir, and save. If you have elixirs of fire resistance, use them. Craft them if you don’t.
Leave the prison, and enter the foyer where you first arrived. You have a visitor.
How to beat the Raphael boss fight in the House of Hope
To beat the Raphael boss fight in the House of Hope, start by activating any Fire resistance effects to halve his damage, as most of his attacks are fire-based. Focus on defeating his minions first-Korrilla, Yurgir (who can be persuaded to join you with a DC30 Persuasion check), and the six Vengeful Cambions. Then, destroy the four Soul Pillars in the room, which empower Raphael by increasing his fire damage and Dexterity bonuses. Avoid using Radiant damage against him, as it can cause him to stun and drain your health. Engage Raphael in melee to impose disadvantage on his ranged attacks, keeping your ranged casters protected. When Raphael transforms into his Ascended form after all pillars are destroyed, be ready to retreat from his powerful Hellfire Inferno attack and then close in to finish him quickly using your strongest feats and spells. Defeating Raphael rewards you with legendary armor and allows you to free Hope and potentially recruit Yurgir for your party.
The Raphael boss fight has several moving parts. There’s the demon himself, along with Korilla, and Yurgir from the Gauntlet of Shar. You can pass a tough persuasion check to recruit him, or use Hope’s unique skill to banish him from the field permanently.
Raphael also summons six Cambions who use fire spells, and he gains buffs from the soul pillars around the room.
Your first task is dealing with the Cambions. Fire resistance, absorb elements, and Counterspell are good options for this phase, and you could try Silence as well. With them defeated, turn your attention to the Soul Pillars. Destroy them with weapon attacks.
Now it’s Raphael’s time. Polymorph and Silence can give you a break from his powerful fire spells, and you can use Hope’s intervention skill once to give your party the equivalent of a long rest. Raphael is, like most spellcasters, a bit squishy. Use your strongest melee fighters and attacks to take care of him quickly.
Raphael has a second phase, during which he uses spells more often and can down wounded or weak party members in one hit. Your overall strategy should remain the same, though. Heal and provide support whenever you can, and use your strongest characters to bring him down quickly. A Fighter or Barbarian – or a multiclass with both – is ideal, thanks to their bonus actions and high strength stats.
Want to discover the secret ritual to access the House of Hope in Baldur’s Gate 3
To access the House of Hope in Baldur’s Gate 3, you must perform the Helsik Ritual inside the Devil’s Fee in the Lower City. First, obtain a ritual pouch and guidebook from Helsik by extorting a deal or confronting him. Then, head upstairs to the Ritual Room, where you will place five specific items on a bloody circle according to the instructions: the skull, Coin of Mammon, diamond, incense, and Infernal Marble. Each item must be positioned at precise points around the circle-skull near the altar, Coin of Mammon clockwise next, diamond and incense on the lower points, and the Infernal Marble in the center. Correct placement activates a portal to the House of Hope in Avernus, but beware: you cannot long rest inside, so bring your best-prepared party.
What are the exact steps to perform the Helsik Ritual successfully
To perform the Helsik Ritual successfully in Baldur’s Gate 3 and open the portal to the House of Hope, follow these exact steps:
-
Obtain the Ritual Items and Grimoire
Make a deal with Helsik in the Devil’s Fee in the Lower City to receive the Ritual Pouch containing five items: a skull, Coin of Mammon, diamond, incense, and Infernal Marble, along with a grimoire explaining the ritual. -
Go Upstairs to the Ritual Room
Head to the second floor of the Devil’s Fee, where you will find a blood-drawn ritual circle on the floor. The altar (Helsik’s desk) marks the top of the sigil and is your starting reference point. -
Place the Items on the Ritual Circle
Drop all five items from your inventory onto the floor so you can move them freely. Then place them precisely as follows, moving clockwise starting from the top point nearest the altar:-
Skull: Top-center point of the circle, closest to the altar
-
Coin of Mammon: Next point clockwise from the skull
-
Diamond: Skip one point clockwise after the Coin of Mammon, place on the following point at the bottom right
-
Incense: Place immediately clockwise next to the diamond, at the bottom left
-
Infernal Marble: Center of the blood circle
-
-
Activate the Ritual
When all items are correctly placed, the ritual circle will glow, and a portal to Avernus and the House of Hope will open.
Be prepared for combat challenges ahead, as entering this portal leads you into Raphael’s domain in the Nine Hells.