Glide through the skies and plunge into the waters of Hyrule with style-Link’s Zora Armor isn’t just striking, it’s the key to mastering aquatic combat and swift currents. Here’s how to track down every piece and upgrade your gear to perfection.
Our Tears of the Kingdom Zora Armor guide will help you find all three Zora Armor locations, as well as walk you through the steps needed to complete their corresponding quests.
What is the Zora Armor set?
The Zora Armor set is a special outfit in The Legend of Zelda: Tears of the Kingdom that allows Link to swim faster and ascend waterfalls with ease. It is crafted by the Zora people and consists of three pieces: the Zora Armor, Zora Helm, and Zora Greaves. Each piece offers unique bonuses that enhance underwater mobility and combat performance. Upgrading the set at Great Fairy Fountains further increases its defense, making it one of the most useful suits for exploring aquatic areas and tackling water-based challenges.
You’ll find the first piece of the Zora Armor set during the “Sidon of the Zora” main story quest. The other pieces have their own dedicated side quests to complete after you finish saving Zora’s Domain (again):
- Zora Armor: Allows you to swim up waterfalls.
- Zora Greaves: Increases your swim speed.
- Zora Helm: Gives Link a spin attack while swimming.
The Zora Armor chest piece is fairly easy to obtain – and super useful if you want to get to the Upload Zorana Tower. However, the other pieces take a bit more work to find.
Zora Armor chest piece location
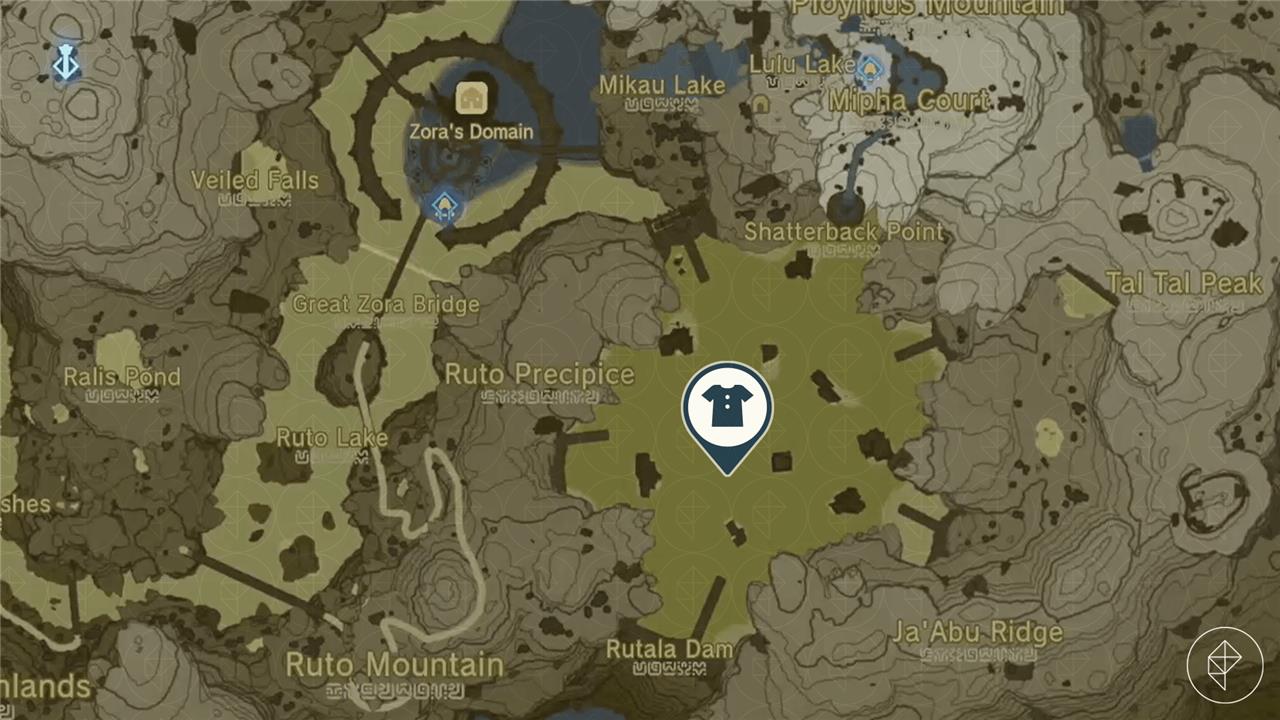
The Zora Armor chest piece can be found in a chest inside Toto Lake, located north of Zora’s Domain. To access it, players need to swim or glide to the ruins under the lake and enter through a broken wall revealing a hidden chamber. Inside, a treasure chest holds the armor, which allows Link to swim up waterfalls after equipping it. This item becomes available during the main quest to restore the Zora’s Domain area.
Once you reach Zora’s Domain, you’ll be able to finish the “Sludge-Covered Statue” main quest and start the “Sidon of the Zora” main quest. When you meet Sidon’s fiancée, Lady Yona, in the Zora’s Domain infirmary, she’ll say she’s got the Zora Armor for you, but needs an ancient arowana to repair it. This starts the “Restoring the Zora Armor” main quest.
You can source this fish either by finding Dento, as Yona suggests, or returning to the Great Sky Island, both of which are outlined in more detail on our ancient arowana locations page.
Wherever you collect the ancient arowana, return it to Yona in Misha’s Court, and she’ll give you the Zora Armor chest piece. This will give you the ability to swim up waterfalls.
Zora Greaves location
Zora Greaves lie in a cave atop Zora’s Domain, near the Skyview Tower on the eastern side of the Lanayru Great Spring. Enter the cave from its northwest entrance, marked by a faint waterfall, and swim through the underwater tunnel to reach the chest. Sidon points you here during the main quest, but fast-travel to the tower for quick access if needed.
After you complete the “Sidon of the Zora” main quest, head to Zora’s Domain and speak with Yona again. She’ll want to give you the Zora Greaves as a reward for your efforts, but she won’t be able to pinpoint where they are – just that they’re in the Ancient Zora Waterworks. This starts the “A Token of Friendship” side quest.
Head to the Ancient Zora Waterworks through the whirlpool in the East Reservoir Lake to the east of Zora’s Domain.
Drop through the hole at the bottom of the waterworks to find a Stone Talus. You don’t have to fight it, but it’ll drop a lot of valuable ore when you defeat it, along with a luminous Stone Talus heart.
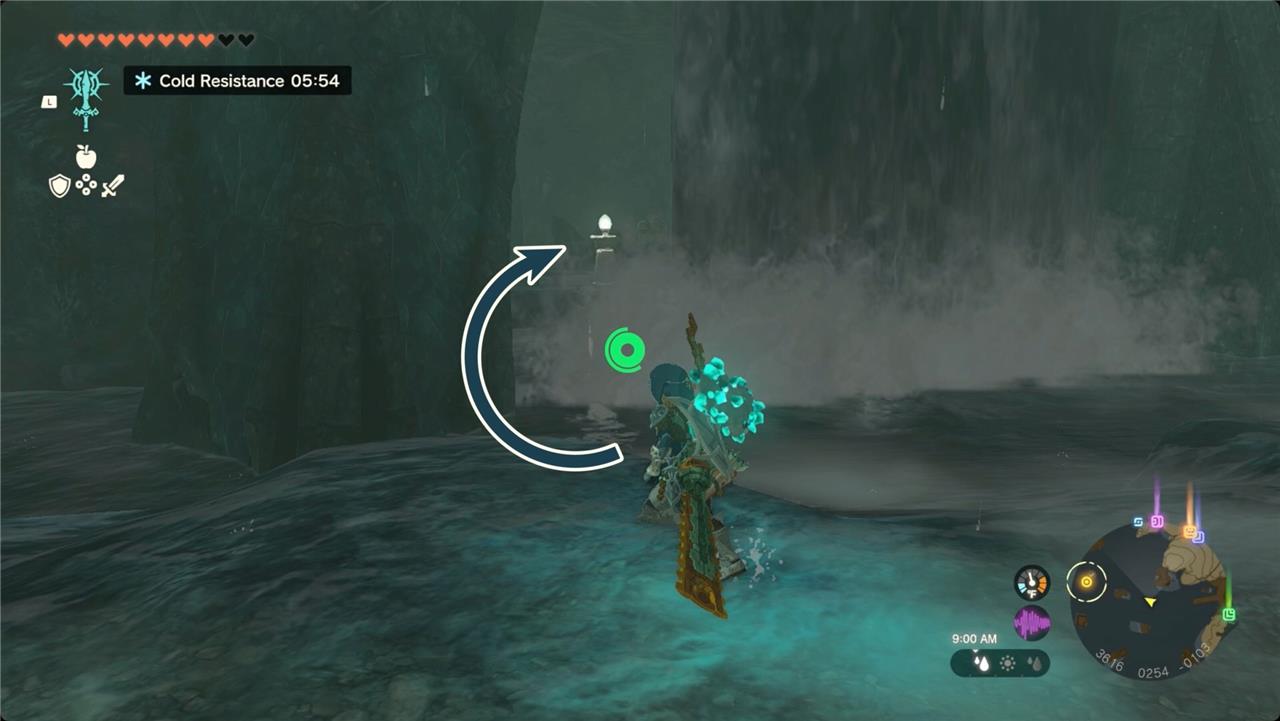
To the southwest of where you fight it, look for a cave behind a waterfall. You’ll find a chest with the Zora Greaves inside up some stairs behind that waterfall at (3585, 0247, -0103). The greaves increase your swim speed.
Zora Helm location
The Zora Helm sits inside the cave at Mikawa Island, off the northwestern coast of Zora’s Domain in Lanayru. Swim to the island from the mainland, then enter the cave through the submerged opening near the base. Sidoh, the dragon inside, drops the helm after you glide from the high platform to land on its back mid-flight. Fuse materials to Zora weapons beforehand for easier aerial combat against the enemies along the way.
Back in Zora’s Domain, you’ll find two Zora named Khira and Chroma in the throne room complaining about being unable to find the Zora Helm. Listening to them starts “The Never-Ending Lecture” side quest.
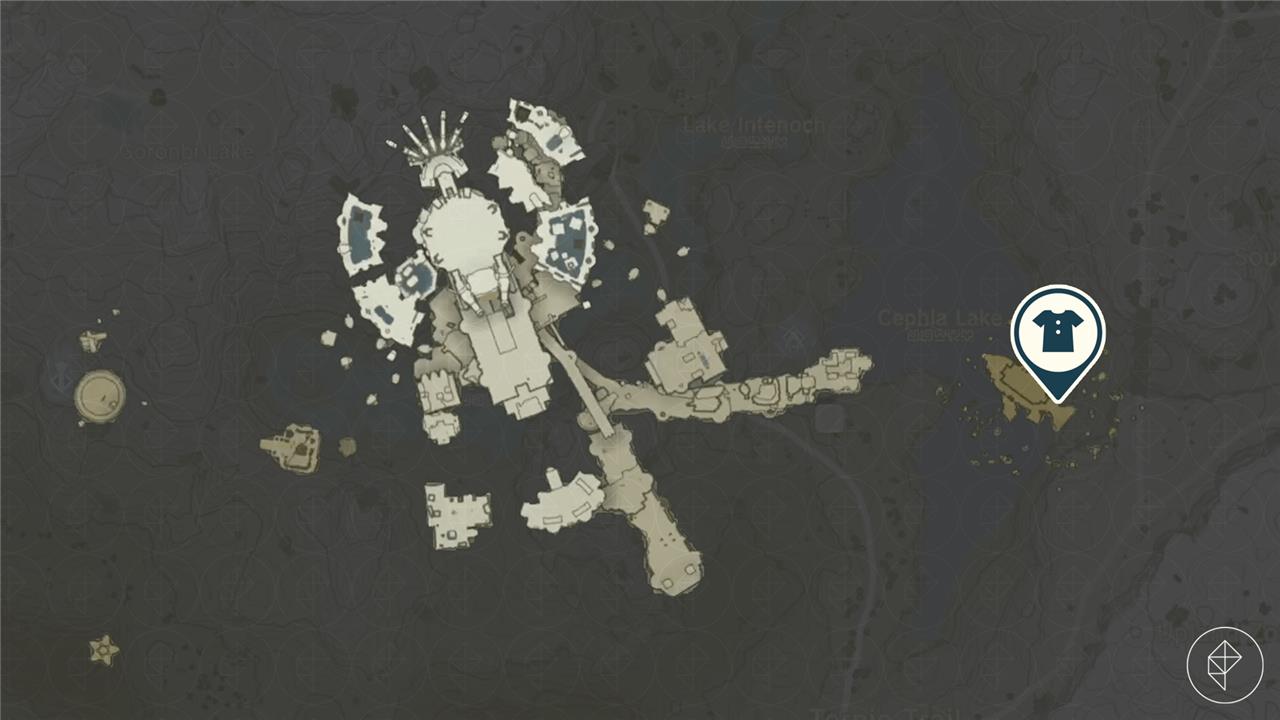
The fish Khira and Chroma were talking about is not an actual fish, but rather a place – specifically the Floating Scales Island that you visited during the “Clues to the Sky” main quest. Fast travel to Ihen-a Shrine and then paraglide east to land on the island.
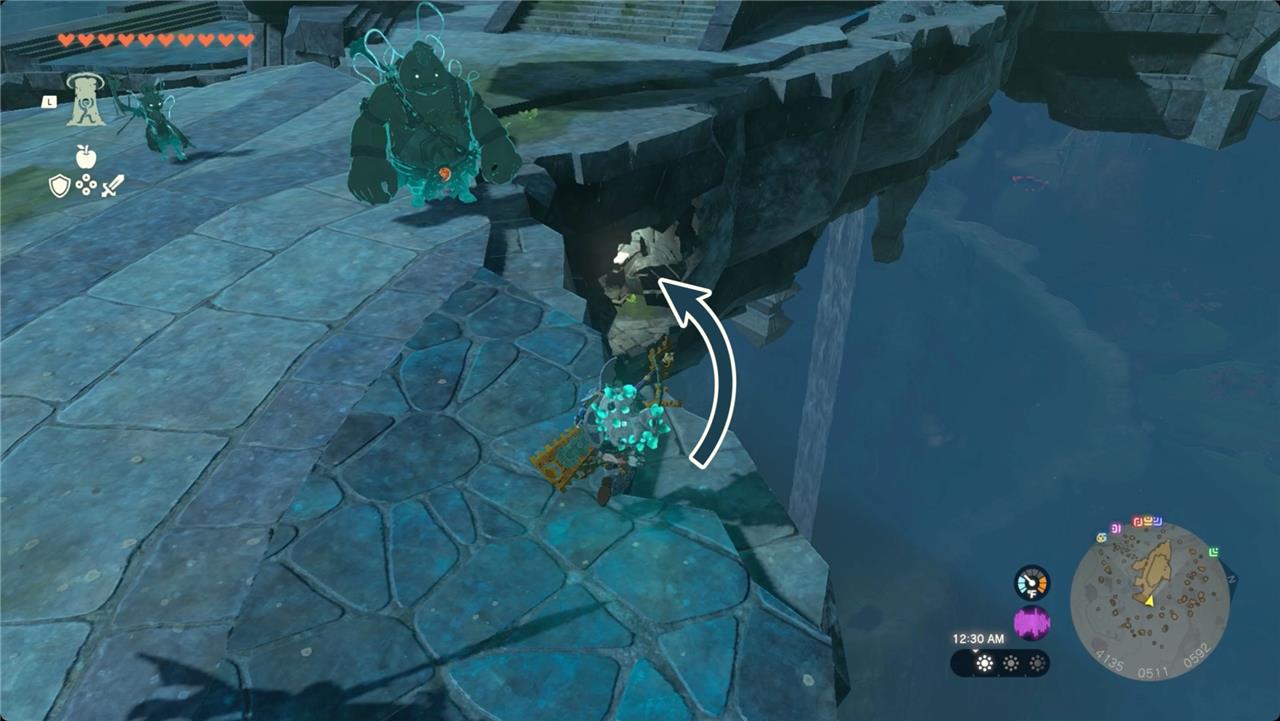
Head southeast to the fish’s tail, and then stand along the edge on the north side. Look back up along the fish’s side to spot a small cave just below the surface. Paraglide (or climb) down into it to find the chest with the Zora Helm inside at (4094, 0529, 0586). The helm adds a spin attack when you’re swimming.
Zora Armor upgrade costs, effect, and set bonus
Upgrading each piece of the Zora Armor from base to level 4 raises its defense from 3 to 20, costing Lizalfos Horns, Lizalfos Talons and Tails, Hyrule Bass, Hearty Bass, Opals, and a total of 2,280 rupees across all three pieces. Any single piece grants Swim Speed Up, while the chest piece also lets Link swim up waterfalls. Wearing the full set and upgrading every piece to at least two stars adds the Swim Dash Stamina Up set bonus, reducing stamina consumption while dashing through water.
Wearing any one piece of the Zora Armor set will get you the Swim Speed Up effect – along with each piece’s special ability we listed above. Wearing multiple pieces of the set will increase the effect’s potency. Once you enhance the entire set to level two and wear all three pieces, you’ll get the Swim Dash Stamina Up set bonus.
You’ll be able to upgrade the pieces of the Zora Armor at a Great Fairy Fountain, in exchange for the following materials:
- 1-star (5 defense): 3 Lizalfos horns, 10 rupees
- 2-star (8 defense): 5 Lizalfos talons, 5 Hyrule bass, 50 rupees
- 3-star (12 defense): 5 Blue Lizalfos horns, 3 Lizalfos tails, 3 hearty bass, 200 rupees
- 4-star (20 defense): 5 Black Lizalfos horns, 5 Blue Lizalfos tails, 20 opals, 500 rupees
To max out all three pieces, it’ll take 9 Lizalfos horns, 15 Lizalfos talons, 9 Lizalfos tails, 15 Blue Lizalfos horns, 15 Blue Lizalfos tails, 15 Black Lizalfos horns, 15 Hyrule bass, 9 hearty bass, 60 opals, and 2,280 rupees.
How to upgrade Zora Armor set at Great Fairies
You upgrade the Zora set like any other armor: unlock Great Fairies first, then pay rupees plus monster parts and fish for each star level of every piece.
1. Unlock Great Fairies and upgrade limits
-
Start the “Potential Princess Sightings!” side adventure at the Lucky Clover Gazette near Rito Village, then do “Serenade to a Great Fairy” at Woodland Stable to unlock your first Great Fairy.
-
Each Great Fairy you unlock adds one more upgrade level (★) you can apply to armor, up to four stars once you have all four Great Fairies.
2. How upgrading works at fountains
-
Talk to any Great Fairy, choose “Enhance,” then select a highlighted armor piece; if it is greyed out, you either lack materials, rupees, or the required number of unlocked Fairies.
-
Each upgrade raises the defense of that piece; upgrading a whole set (like the Zora set) to at least ★★ unlocks its set bonus when all three are worn together.
3. Zora Armor set upgrade costs
From community and guide data, Tears of the Kingdom’s Zora set uses Lizalfos parts, fish, and Opals as you go up tiers.
Typical upgrade path per piece (Helm, Armor, Greaves)
-
★: 3 Lizalfos Horns + small rupee fee.
-
★★: Around 5 Lizalfos Talons and 5 Hyrule Bass plus more rupees.
-
★★★: Lizalfos Tails plus rarer fish like Hearty Bass, higher rupee cost.
-
★★★★: Multiple high-tier Lizalfos parts (e.g., Black/Blue Lizalfos Horns or Tails) and 15-20 Opals, plus a large rupee fee.
The exact numbers can vary by piece, so always check the requirements shown in the Great Fairy menu before farming.
4. Tips for farming materials
-
Lizalfos parts: Farm rivers, wetlands, and Zora-region enemies; higher-level areas give stronger Lizalfos for late-tier materials.
-
Fish (Hyrule Bass / Hearty Bass): Look in lakes, rivers, and Zora’s Domain waters; you can catch them with arrows, bombs, or by swimming and pressing grab.
-
Opal: Break ore deposits in caves and mountains, or loot from enemies and chests in watery or Zora-themed areas.
If you tell me which Zora pieces you have and how many Great Fairies you’ve unlocked, I can suggest a concrete farming route and which upgrades to prioritize first.
Where to find all Great Fairy locations
There are four Great Fairies in Tears of the Kingdom, each next to a specific stable and tied to a musician-sidequest from the “Potential Princess Sightings!” chain.
How Great Fairies work in TotK
-
You must first start “Potential Princess Sightings!” at the Lucky Clover Gazette (the old Rito Stable) near Rito Village; this sends you to stables around Hyrule.
-
Each Great Fairy is unlocked by helping the musical troupe reach her bud from the nearby stable, usually by repairing or escorting a wagon; each one you free adds another potential upgrade level to your armor (up to ★★★★).
Great Fairy Tera – Woodland Stable (Eldin region)
-
Region: Hyrule Field / Eldin border, at Woodland Stable north of Crenel Hills.
-
Quest: “Serenade to a Great Fairy” – fix a wagon and bring the musicians up the hill to Tera’s bud just above the stable.
Great Fairy Kaysa – Outskirt Stable (Hyrule Field)
-
Region: Southwest of Hyrule Field at Outskirt Stable, near the road to Gerudo.
-
Quest: A music-related side adventure from the troupe at the stable; once complete, Kaysa’s bud opens on the nearby hill.
Great Fairy Cotera – Dueling Peaks / Kakariko area
-
Region: Southeast Hyrule near Dueling Peaks, by a stable south of Kakariko (commonly Wetland or Dueling Peaks Stable area depending on your route).
-
Quest: Another wagon/escort performance quest with the troupe that reveals Cotera in the hills east of the stable.
Great Fairy Mija – Rito region
-
Region: Hebra / Rito area, near a stable northeast of Rito Village (Snowfield or Lucky Clover-related stable in the cold region).
-
Quest: Help the troupe reach Mija’s bud on a nearby slope; unlocking her usually requires cold protection and a functioning cart.
If you tell me which stables you’ve already visited or which Fairies you have, I can give you a simple step-by-step route from your current position to the next one.