We’ve loaded into Diablo 4’s open world, but these 13 facts will determine who survives the journey, and who merely observes.
After multiple betas and years of teases, the game is finally available on both consoles and PC. But even if you’re familiar with Diablo 3 or other games in the series, Blizzard has modernized Diablo 4 in some pretty surprising ways, including both MMO and open-world elements.
It can be easy to get lost in all the game’s systems – even if you’re a veteran. So we’ve got tips for you before you start. Stay a while and listen, won’t you?
Try out all five classes
Each class in Diablo 4 offers a unique approach to combat and progression, making the early game an ideal time to experiment with all five. Trying each one helps you understand their strengths, skill trees, and playstyles before settling on a main character. Whether you prefer the Sorcerer’s destructive magic, the Barbarian’s brute strength, or the Necromancer’s command over the dead, experiencing them firsthand gives a clearer sense of what best suits your style.
Diablo 4 lets you create up to ten characters across five different classes: Barbarian, Necromancer, Druid, Rogue, and Sorcerer. Ideally you already know which class you want to play, either because you tested them out in the beta for yourself or you just love a specific kind of fantasy game archetype.
But regardless of which class you choose, you should consider spending some serious time with the other classes as well. Diablo 4 is a long game, and you’re going to spend a lot of time perfecting the loot on a single character. Unless you’re dead set on one class, it’s a great idea to spend a bit of time with all the classes before you get too far in, so you’re able choose and then invest properly in your favorite of the five.
Even if you’re confident that Barbarian is the only class for you, consider trying the others just to gain knowledge of what your co-op friends or random allies of other classes are capable of. And who knows, maybe when you need to roll a new character next season, you’ll try your hand at a Necromancer or Druid instead.
Change your looting options
Adjust your loot filters early to make collecting gear easier and faster. Diablo 4 lets you change which item types appear on the ground, color-code rarity levels, and hide low-quality drops. If you’re grinding for specific legendaries or rare materials, tweaking these settings helps keep your inventory clean and your focus on valuable finds instead of clutter.
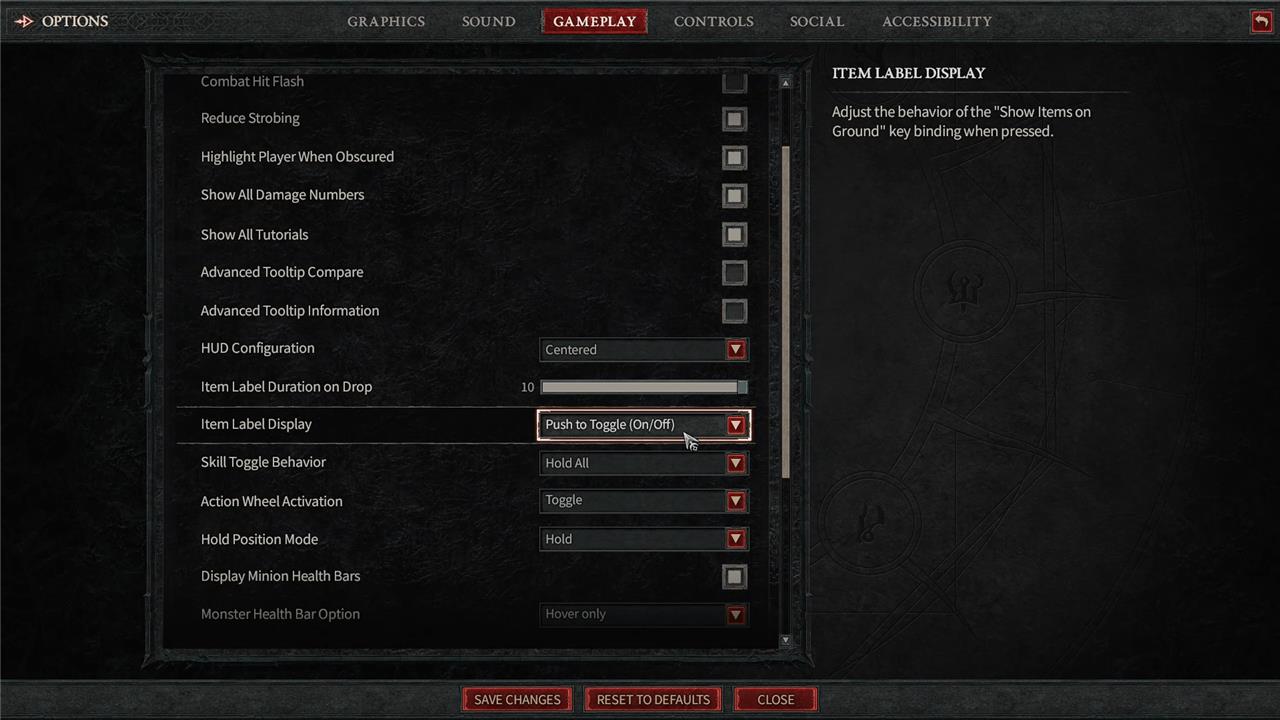
Nothing is more core to Diablo than the loot grind. Finding gear buffs your build, allowing you to effortlessly hack and slash your way through even the beefiest enemies. But in Diablo 4, you may notice that the drops “disappear” off of the floor.
By default, item labels will fade away after being on the floor for 10 seconds, but you can change the display to be toggleable. There will be a lot of moments where you’re fighting against enemies and loot will drop, but the fight will extend past those measly 10 seconds. You’ll “lose” your gear, but in reality, it’s still there on the floor, just not visible. Head over to the “gameplay” tab in your settings, and scroll down to the Item Label Display to set your desired settings.
You have to manually unlock waypoints
You’ll need to manually unlock waypoints as you explore, since they’re not automatically revealed by the map and require you to reach specific locations to activate them.
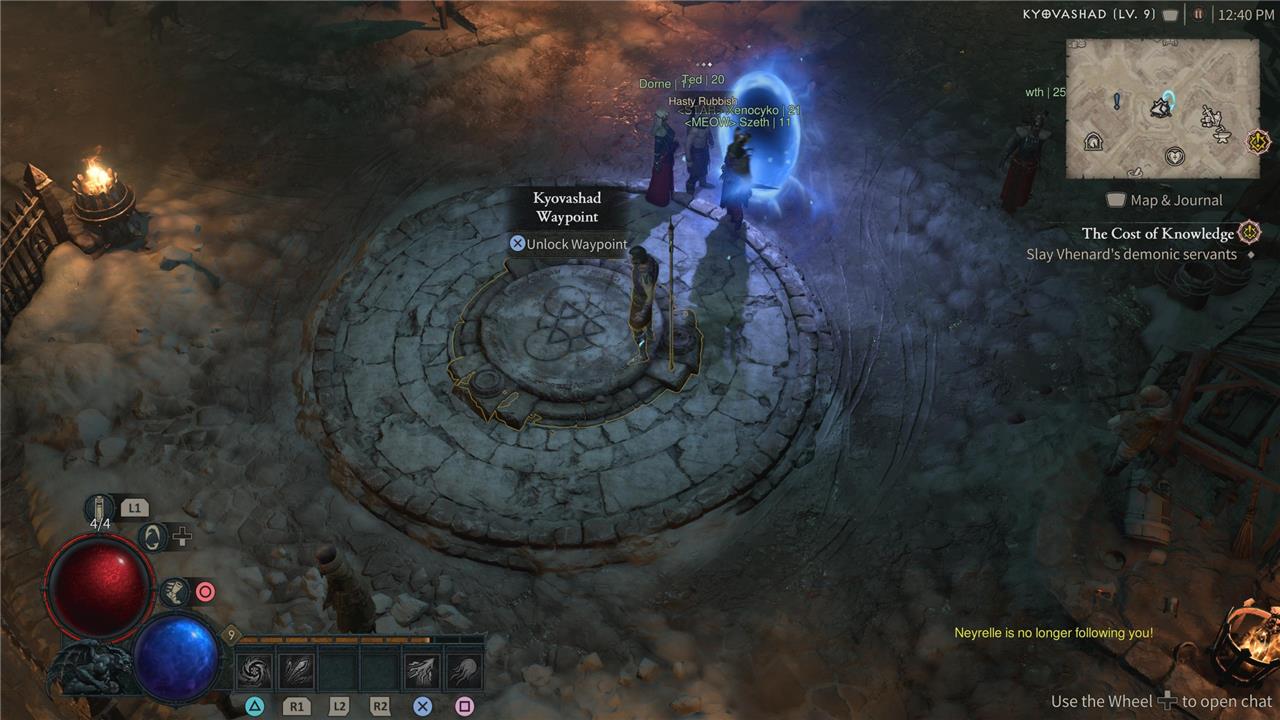
You can fast travel to any waypoint you’ve visited. Thing is, unlike most games, which automatically unlock fast travel spots when you pass them, you have to manually interact with it. The prompt is simple (press “X,” at least on PlayStation) but make sure to do it, lest you find yourself trapped, cold and alone, in the depths of a dungeon, getting repeatedly obliterated by a boss who seriously outranks you.
Use the map’s pin feature to get where you’re going
Using the pin feature on the map makes traveling across Sanctuary much easier. You can set a custom marker on your destination, and a glowing trail will appear to guide you there without constantly reopening the map. This works for both main quests and side activities, saving time and helping you stay focused on your objectives amid the action.
Diablo 4 doesn’t allow you to move while keeping your map open – a staple of the genre – which can lead to a lot of time spent pulling the map up to figure out where the hell you’re going. But there’s an easy solution to all your navigation problems: the pin.
If you pull up your map, you’ll see a control prompt for the pin (square on PlayStation) on the bottom border. Dropping this pin is like creating a waypoint, and your mini-map will display a red line leading you to wherever you want to go. This is great for finding main quest objectives, but it’s especially good for finding the Altars of Lilith scattered around the world of Sanctuary.
Weapons degrade when you die
Dying in Diablo 4 comes with a cost beyond lost time-you’ll find your equipped gear losing durability each time your character falls. If you ignore repairs for too long, your weapons and armor can break completely, reducing their stats and making fights tougher. Visit blacksmiths regularly to fix and maintain your gear, especially before heading into tougher areas or boss battles where deaths are more likely.
There aren’t many drawbacks to dying in Diablo 4 (unless you’re playing a Hardcore character); checkpoints are generous, and respawns don’t take much time at all. Still, there’s one repercussion: Every time you die, your gear will degrade a little bit.
Respec is free – to a point
Respeccing your character in Diablo 4 is easy early on-swapping skills costs nothing until your character gains a few levels. After that, the gold fee starts to rise with each skill change, making frequent adjustments more costly. You can still reset individual skills or entire builds, but keeping an eye on those growing costs encourages careful planning as your character progresses.
There’s no risk in trying out skills you’re unsure about, at least in the early goings. You can respec classes with no repercussion up to level 15. It’s an easy way to see if you like certain parts of the skill tree before committing fully. For example, if you’re playing a Sorcerer, swap builds between ice, fire, and lightning magic in the early goings to see which type of magic you prefer most.
After level 15, you’ll need to pay some gold. But the cost isn’t so expensive that you’ll never be able to swap your build to something else if you’d prefer. So experiment early, but don’t stress if you want to experiment a bit later as well.
Dismantle gear instead of selling it
Breaking down unused gear is often more rewarding than selling it for gold. Salvaging items gives you crafting materials used for upgrading weapons, improving armor, and imprinting Legendary aspects later on. Early in the game, gold isn’t as valuable as the materials you’ll collect from dismantling, so focus on building your supply instead of emptying your inventory for a few coins.
You can automatically mark loot as junk (Square on PlayStation). Selling junk in bulk can earn you a decent chunk of change, but honestly, you’ll naturally earn plenty of gold through defeating enemies and looting chests. You’re better off dismantling your junk gear at the blacksmith. Every time you dismantle an item for the first time (say, an Apprentice’s Wand weapon), you’ll then unlock that item in your transmog wardrobe.
The only caveat here is if you know you’re planning on re-doing your skill tree anytime soon – in which case you can swap to selling your items instead. The beauty of Diablo 4‘s economy is that you can swap between selling and salvaging based on your needs. But if you’re just starting out and want to know which reserves to build up first, you definitely want to start filling your pockets with the magical materials you earn by destroying your gear at the blacksmith.
Don’t sleep on Aspects
Aspects can drastically change how your build performs, so don’t ignore them. These legendary powers can be extracted from items or earned through dungeon completions, then imprinted onto better gear to customize your skills. Pay attention to which Aspects suit your class and playstyle, and store the rare ones you might want later in the Codex of Power. Managing them smartly early on saves you from wasting precious materials or losing strong effects on weak armor.
Aspects are passive abilities that you can add onto your gear to either add an effect or modify an existing one. You gain them by completing dungeons or extracting them from an item you own (more on that in a sec). These passives can upgrade your abilities, increase your damage, bulk up your defenses, or provide your character with more utility. Employing aspects is necessary to make your characters stronger and improve your build to easily take down the mightiest enemies.
While Aspects are mostly important for endgame builds, there’s nothing wrong with spending some resources to get your character going early on in the game – before you reach level 50. These Aspects can create an incredible power spike for your hero, allowing you to speed through some bosses and content that might’ve otherwise given you some trouble.
How to extract Aspects from your gear
Extracting Aspects from your gear lets you keep powerful bonuses for future use. Visit the Occultist in any major town, select the Extract Aspect option, and choose the item containing the trait you want to save. The process destroys the original gear but stores the Aspect in your Codex or as a usable imprint. This system helps you carry forward rare modifiers when upgrading your equipment, ensuring your build stays strong as you find better gear.
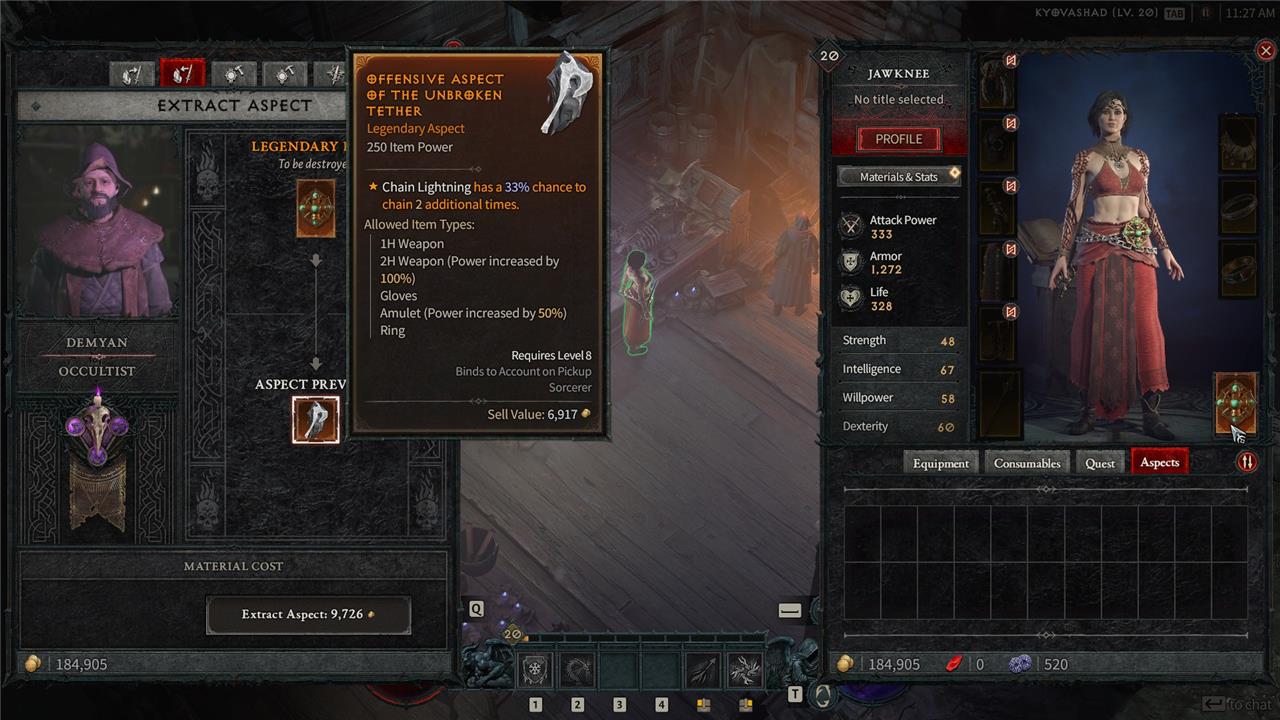
If you have a piece of gear with a passive you really enjoy but find a new piece of equipment with better base stats, you can transfer the passive over to the new gear. Head over to the Occultist in the northwest corner of Kyovashad and extract the passive from your old gear to receive the Aspect (though this will destroy your old gear in the process). You can then imprint the Aspect onto your new gear at the cost of a few rare crafting materials, which you can get by salvaging your unnecessary gear.
The side content is definitely worth it
Side activities in Diablo 4 aren’t just filler – they reward you with valuable gear, crafting materials, and Renown that boosts your core progression. Clearing strongholds, completing side quests, and tackling events can easily match the thrill of main story content. Many hidden dungeons contain powerful enemies and unique rewards that make exploration feel rewarding rather than repetitive. Spending time on these activities pays off with better loot and a stronger character for tougher challenges ahead.
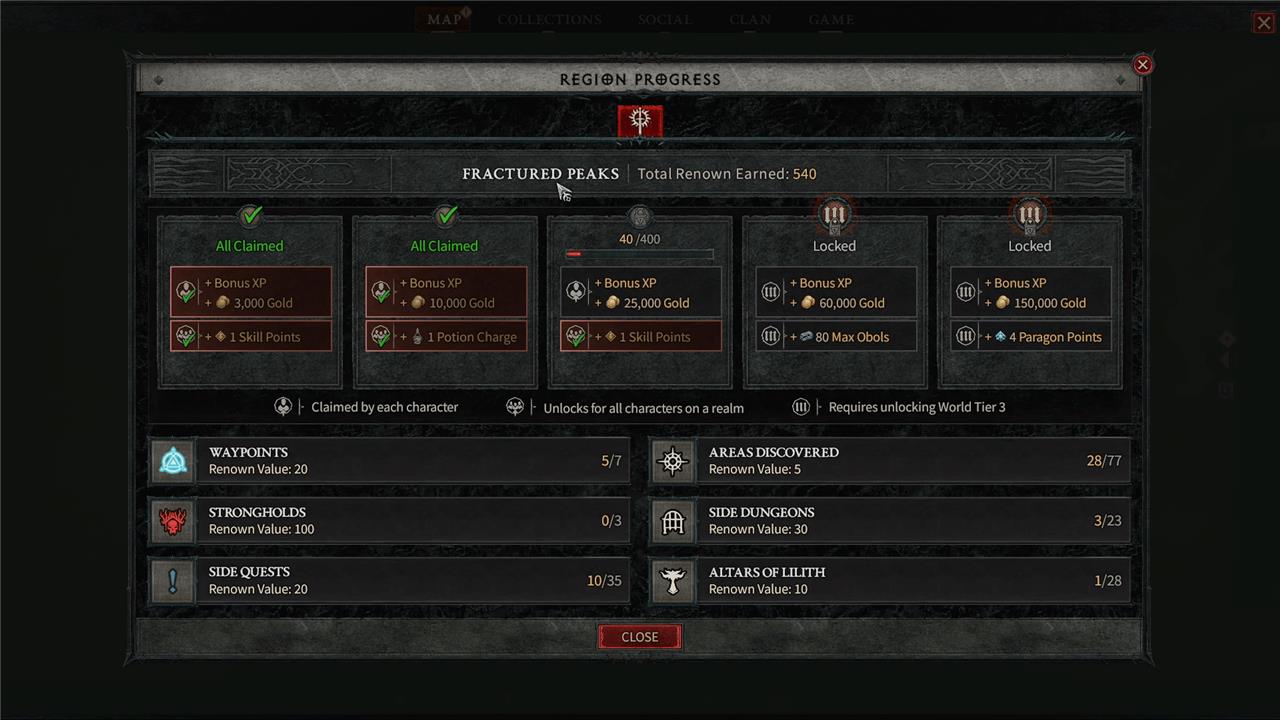
In each region of Diablo 4, you’ll earn Renown by completing a variety of challenges such as clearing Strongholds, completing side quests, and tracking down Altars of Lilith. After you hit a Renown milestone, you’ll receive rewards for either your current character or all of the characters on the realm. Some of the rewards include bonus experience and gold, extra skill points, more potion charges, and even Paragon Points, which will be extremely useful for the late game.
But consider waiting until you unlock your mount
Travel across Sanctuary can feel slow on foot, especially in the early chapters. Mounts become available after progressing through the main story, making movement between zones much faster and less tedious. Waiting until you gain access to your horse before focusing on exploration or side content saves time and helps you avoid backtracking through large regions later.
Diablo 4 finally adds mounts to the series, and they seriously speed up your adventuring around Sanctuary. Unfortunately, you won’t be able to unlock your horse until after you mainline the story for a bit. Consider ignoring the various side activities until you’re able to travel around on the back of your noble steed, which should be when you’re between level 30 and 40.
You may delay some Renown levels if you wait, but you’ll seriously cut down on your walking time in the long run.
Participate in random events around the map
Random events appear across Sanctuary without warning, giving you a chance to earn gold, experience, and rare loot while testing your build in unpredictable situations. These encounters range from rescuing NPCs under attack to defending altars from waves of enemies. Participating not only breaks up the pace of travel but also rewards teamwork, since nearby players can join in for shared rewards. Keep an eye on your map for event markers so you can jump in before the timer runs out.
As you’re exploring Sanctuary, you may see an orange circle on your minimap. These circles indicate that there is an event taking place in the area. These events can range from protecting civilians, eliminating enemies in the area, or escorting a ghostly spirit from one point to another. They may not seem like the most enticing tasks, but these events are an easy way to get gear. A chest will spawn after you successfully complete each event; this guarantees gear (or the occasional unique).
Play on World Tier 1 (at first)
World Tier 1 offers a smoother introduction to Diablo 4’s systems, giving you a fair balance between challenge and progress. Enemies go down faster, healing costs less gold, and leveling feels quicker, which helps you understand your class and skills before tackling tougher content. You’ll still earn quality gear and experience without constant risk of being overwhelmed, making it a smart choice for your first time through Sanctuary.
The World Tiers in Diablo 4 are difficulty levels, but they’re not “easy, medium, hard, and super hard” the way they may seem. Each difficulty level gives bonuses to XP and gold, but they also increase enemy health and damage. They’re designed not only for “good players” but “good players with good gear.”
Even if you’re someone who doesn’t typically like playing games on lower difficulties, you should play on World Tier 1 until you get some solid loot under your belt. Some classes – especially Druid and Barbarian – will really struggle in the first 30 levels or so against some of the campaign bosses on World Tier 2, and you’ll potentially waste a lot of time slamming against them if you still have bad gear.
Best beginner build for Barbarian
The Barbarian is a melee powerhouse in Diablo 4, ideal for beginners due to its straightforward Fury generation and high survivability. A top starter build focuses on Upheaval for massive AoE damage, leveraging easy-to-farm aspects and gear.
Core Skills
Prioritize these for levels 1-25 to clear packs and bosses smoothly:
-
Lunging Strike (Basic): Generates Fury and Vulnerable debuff; swap weapons manually for bonuses.
-
Upheaval (Core): Main spender-build stacks via passives for explosive earth spikes.
-
Ground Stomp (Defensive): Max for Vulnerable and crowd control; 3 points in Tactical for extra damage.
-
Rallying Cry or Challenging Shout (Brawling): Boost Fury and damage reduction.
-
Leap (Utility): Mobility and Vulnerable applicator.
Key Passive: Unconstrained or Walking Arsenal for Fury overflow damage.
| Skill Slot | Recommended Skill | Role |
|---|---|---|
| Basic | Lunging Strike | Fury gen, Vulnerable |
| Core | Upheaval | Primary DPS |
| Defensive | Ground Stomp | CC + Vulnerable |
| Brawling | Rallying Cry | Fury/speed buff |
| Ultimate | Wrath of the Berserker | Boss burst |
Gear Priorities
Focus on early dungeon Aspects like Earthstriker’s Aspect (for Upheaval Overpower) from dungeons-pin in Codex of Power. Temper for Strength, Max Life, Overpower Damage, and Fury on Kill.
-
Weapons: Dual-wield with Life on Hit; prioritize Two-Handed for Arsenal synergy.
-
Armor: Boots for Movement Speed; gloves/chest for cooldown reduction.
-
Jewelry: Attack Speed, Resource Generation; Alchemist for elixirs boosting XP/gold.
Playstyle Tips
Start fights with Lunging Strike + Ground Stomp to Vulnerable enemies, then dump Fury into Upheaval. Use Shouts for sustain during Helltides or events. Respec often at low cost; transition to Hammer or Rend at level 35+. This scales to Torment 1 without rare gear.
Best gear and aspects for early Barbarian leveling
Early Barbarian gearing prioritizes Fury generation, Vulnerable application, and Overpower damage for smooth leveling up to 50. Focus on accessible Aspects from Codex dungeons and stats like Strength, Max Life, and Attack Speed.
Priority Aspects
Unlock these early via specific dungeons (pin in Codex of Power for easy imprinting):
-
Earthstriker’s Aspect (Two-Handed Axe): Upheaval Overpowers on stun-core for burst.
-
Bold Chieftain’s Aspect (Ring): Shouts reduce Core cooldowns, enabling spam.
-
Aspect of Anemia (Gloves): Lucky Hit chance to stun Bleeding enemies, synergizing Ground Stomp.
-
Edgemaster’s Aspect (Weapon): Boosts Core damage at full Fury.
-
Iron Blood Aspect (Chest): Damage Reduction vs Bleeding foes for tankiness.
Stat & Slot Targets
Upgrade weapons first; salvage junk at Blacksmith for materials.
| Slot | Key Stats/Affix | Gems |
|---|---|---|
| Weapons | +Ranks Upheaval, Fury Cost Red, Vulnerable Damage | Amethyst (DoT boost) |
| Helm/Chest | Life, Damage Reduction, Fortify Gen | Ruby (Life) |
| Gloves/Boots | Attack Speed, Move Speed, CC Reduction | N/A |
| Jewelry | Resource Gen, Cooldown Red, Max Fury | Skull (Armor) |
Acquisition Tips
Farm Aspect Dungeons (e.g., Earthstriker’s in Fractured Peaks) post-level 15. Use elixirs from Alchemist for XP during Helltides. Dual-wield 1H + 2H for Walking Arsenal synergy; temper Overpower Damage everywhere. This setup clears World Tier 3 efficiently without rares.