Few games test both patience and tactics like Fire Emblem Engage. Before you send your first unit into battle, learn the systems, quirks, and hidden mechanics that can turn a shaky start into a flawless campaign.
Return to the Somniel often
The Somniel serves as your base between battles, offering plenty of chances to strengthen your team. Visiting frequently lets you manage gear, upgrade weapons, cook meals that boost stats, and build bonds with allies. Many activities refresh after missions, so returning often helps you stay prepared and take advantage of new opportunities that improve your performance in upcoming fights.
The Somniel is your base of operations where you and your allies will relax in between missions. Returning to the Somniel is optional, but neglecting to do so means overlooking a slew of activities that will benefit you and your allies for oncoming battles. Temporarily boost your combat stats at the Training Yard or by eating a hearty meal at the Café Terrace. Bolster your characters’ abilities at the Arena and inherit new skills at the Ring Chamber. Purchase items in the Plaza and upgrade them at the Armory. There’s no shortage of worthwhile tasks scattered around the Somniel, and you’ll be missing out if you ignore them.
Remember the weapon triangle
The weapon triangle is a classic Fire Emblem mechanic that gives certain weapon types an edge over others. Swords beat axes, axes beat lances, and lances beat swords. Attacking with an advantage increases your accuracy and damage, while being on the losing end makes your character more vulnerable. Keep this in mind when positioning units, as a single mismatch can turn victory into defeat.
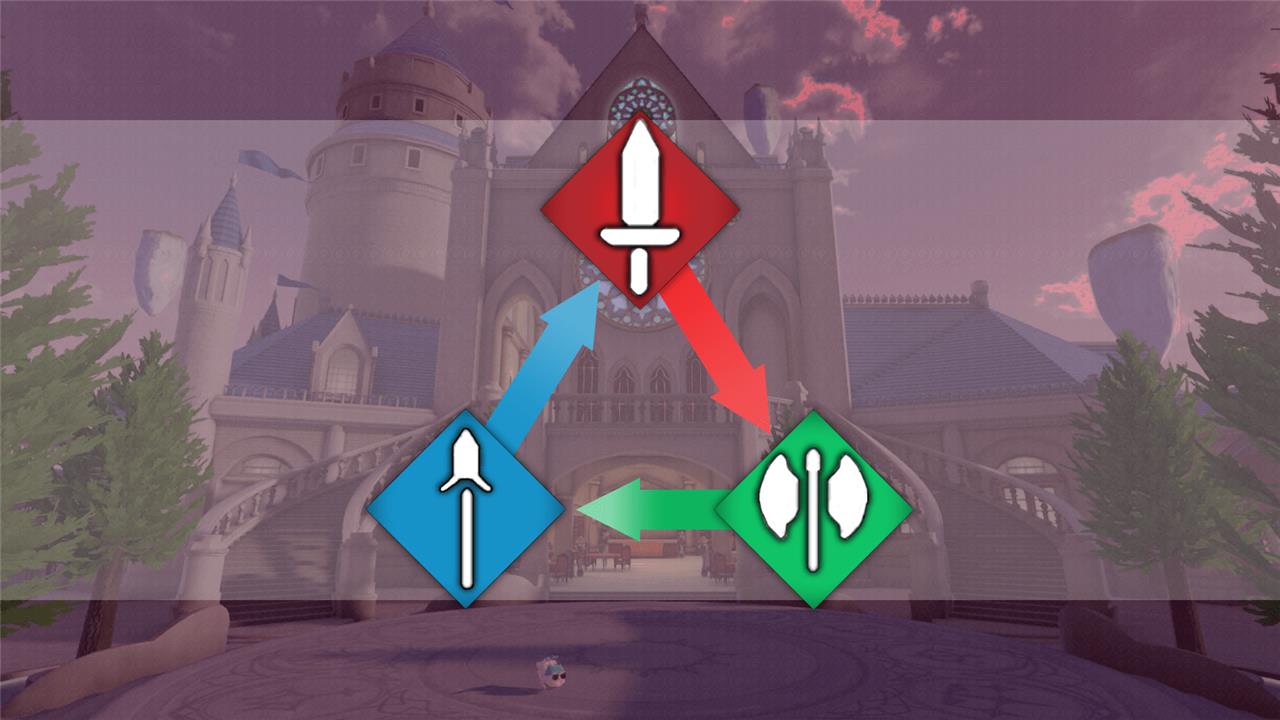
The weapon triangle makes its return in Fire Emblem Engage with the addition of break, which prevents the defender from counterattacking until the next turn. The weapon triangle follows the pattern of previous Fire Emblem games: Sword beats Axe, Axe beats Lance, and Lance beats Sword. In addition to the weapon triangle, Arts have an advantage over Bows, Tomes, and Knives.
Manage your inventory
Keeping track of your weapons, items, and resources is key to staying prepared between battles. Regularly check your convoy and storage to ensure characters have the right gear and are not burdened with extras. Sell or donate unused items to free space and gain funds for upgrades or new weapons. Proper organization makes it easier to respond to different enemy types and situations, giving your team a steady advantage as fights grow more demanding.
As you defeat your enemies and progress through the story, your characters will use their items and pick up more along the way. You’ll end up with more weapons than you’ll ever need because they don’t break in Fire Emblem Engage. Sell the items that you don’t need to get more gold so you can buy better weapons and support items or upgrade your donations at the bulletin board. Don’t forget to occasionally check your characters’ inventories: They may be holding onto an item they can’t even use.
Rewind time with the Draconic Time Crystal
The Draconic Time Crystal lets you turn back the clock during battles, giving you a chance to fix mistakes or test different tactics without restarting a map. You can rewind several turns to redo actions such as missed attacks, poor positioning, or risky choices that didn’t pay off. This tool is especially helpful for trying new strategies or saving key units from defeat. Use it wisely, though-its limited uses per battle mean every rewind counts.
Turns may not go exactly as planned during battles. Maybe you were taken out by a single hit from an enemy, or maybe you accidentally attacked with the incorrect unit. In moments like these, use the Draconic Time Crystal, a relic that allows you rewind time on the battlefield. Undo your mishaps and redo your turn the way you intended. Depending on the difficulty you selected, the number of rewinds you have per battle will change. On Normal difficulty, you have an infinite number of charges, while on Hard and Maddening difficulty, you only have 10 charges.
Give your characters rings
Rings play a major role in strengthening your units, as they grant extra abilities, stat boosts, and new combat options. Make sure to equip each character with a ring that complements their class and fighting style-magic users benefit from Emblem Rings that enhance their spells, while front-line fighters gain from rings that raise attack and defense. Experiment with different combinations to find pairings that enhance your strategy and make each unit more versatile on the battlefield.
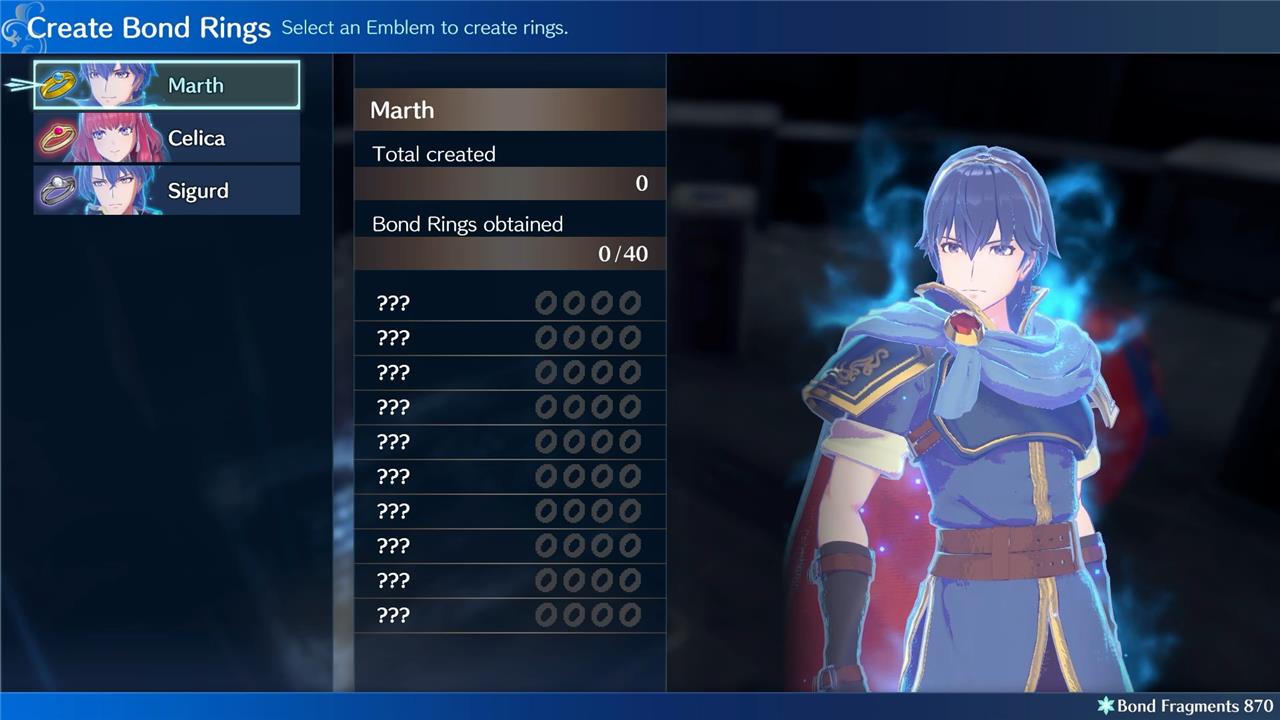
One of the main concepts of Fire Emblem Engage is the use of rings. There are two different kinds of rings: Emblem rings and Bond rings. Emblem rings give a character the powers of Emblems from previous Fire Emblem titles, while bond rings raise the stats of its beholder. Characters must have a ring equipped to gain skill points (SP), a resource used to inherit skills from Emblems, which will make your characters stronger down the road. Create rings at the Ring Chamber using bond fragments, a resource gained from a variety of activities on the Somniel, and equip them on any character heading into battle.
Explore the battlefield
Battles in Fire Emblem Engage blend strategic positioning with terrain awareness, making every move count. Keep an eye on elevation, cover, and enemy ranges to turn the map layout to your advantage. Each environment offers unique tactical opportunities-forests can boost evasion, while fortresses improve defense and recovery. Pay attention to victory conditions and unit placement before committing to an attack, as adapting your strategy to the battlefield often decides whether you win or retreat.
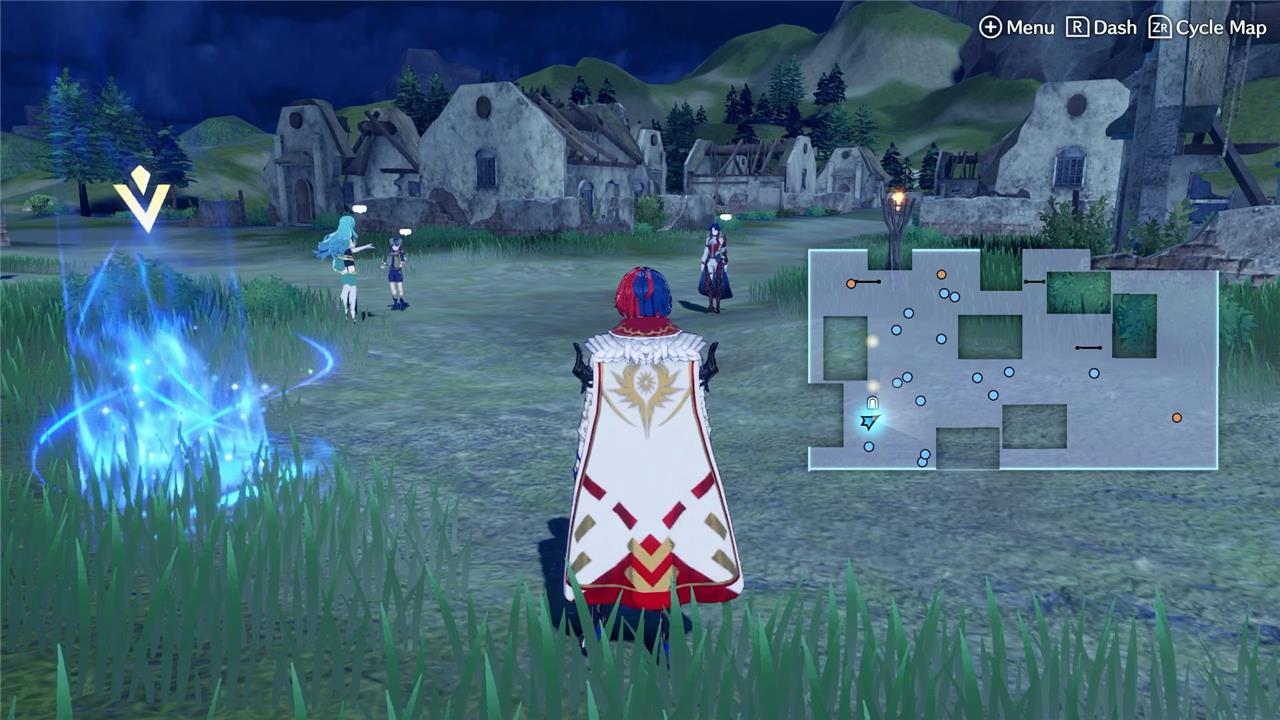
After you complete a mission, you can explore the battlefield to find adoptable animals and valuable resources. These animals, indicated by an orange dot on the map, can be taken back to the Farmyard where they’ll give you more ingredients and goods, but you’ll need to upgrade your donations level at the bulletin board in order to adopt them. Items are indicated on the minimap by a pulsing white dot, so head on over to each dot to find materials to be used around the Somniel.
You can also speak with your allies and other characters once the battle is over. You’ll receive bond fragments after some conversations, but you can leave the area without speaking to anyone to receive all of the bond fragments at once.
Take advantage of the terrain
Use the terrain to gain an upper hand in battle. High ground offers better accuracy and defense, while forests provide extra evasion and protection from ranged attacks. Keep an eye on terrain bonuses shown on the map before moving your units, as smart positioning can turn a tough fight in your favor. Flying units can ignore most terrain effects, so use them strategically to strike enemies hiding in difficult terrain or to secure objectives quickly.
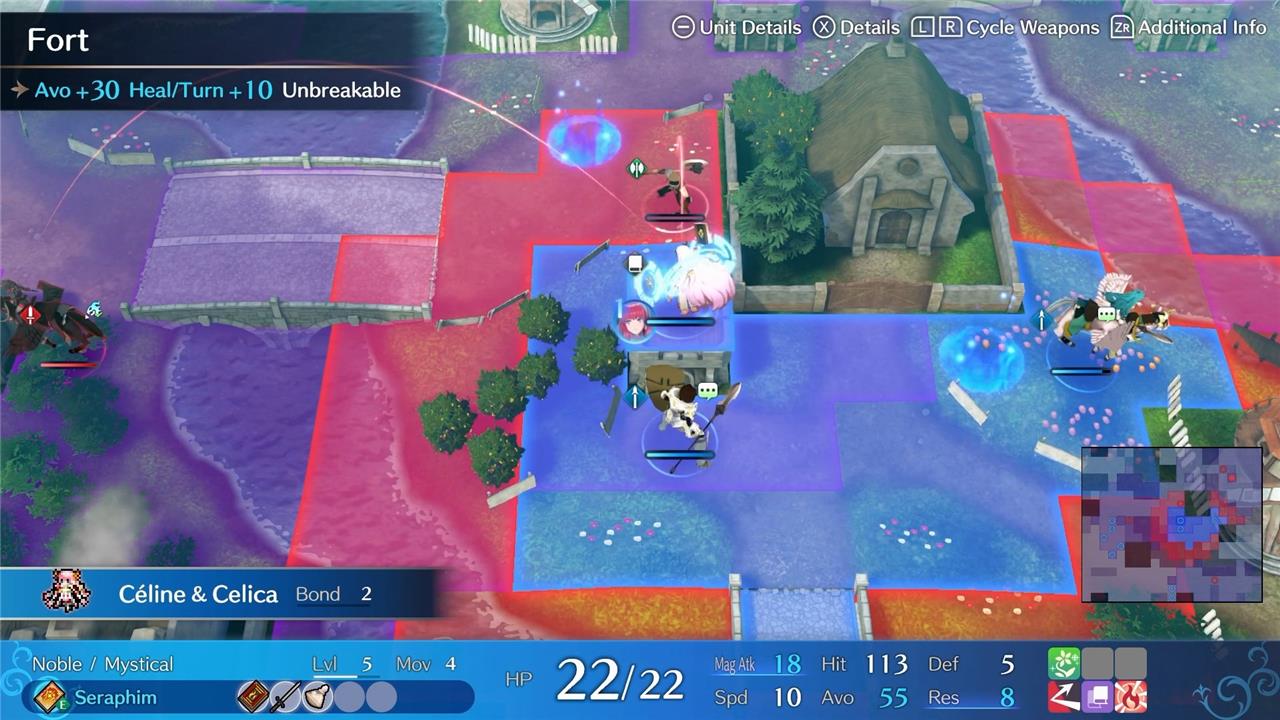
Every map will have some type of terrain that can help or hinder you. Stand in a thicket to gain 30 avoidance, which reduces your chances of being hit. Stand on forts to gain 30 avoidance, heal 10 HP a turn, and gain the unbreakable status, allowing you to counterattack regardless of weapon type. Keep an eye out for all of the different terrain types because they can change how you battle the corrupted enemies and turn the tides of battle into your favor.
Pay attention to the enemies’ attack range
Knowing how far enemies can strike helps you plan safer moves and avoid painful surprises. Highlighting their attack range shows exactly which tiles are dangerous, letting you keep your units just outside harm’s reach or bait an enemy into a trap. Checking these ranges before advancing keeps fragile allies safe and makes setting up counterattacks much easier.
Look at the danger radius during combat to see how far an enemy can attack. Hover your cursor over an enemy to see their radius or press the left trigger (ZL) on your controller to display each enemies radius indicated by purple squares. Rather than rushing into your enemies’ range, lure them out by sending one of your bulkier units just inside their danger radius.
How to best use Emblem Rings and Engages in battle
Emblem Rings and Engages form the core combat system in Fire Emblem Engage, boosting units with stats, skills, and powerful temporary forms. Mastering them involves smart equipping, timing, and synergy to dominate battles.
Equip for Synergy
Match rings to unit strengths: pair sword users like Alear with Marth for avoidance and Lodestar Rush against armored foes, or tanky units like Louis with Ike to leverage Wrath and Great Aether for massive damage after taking hits. Flying units excel with Sigurd for hit-and-run Override attacks, while armored knights benefit from Roy’s Hold Out to survive lethal blows. Always equip Bond Rings on every unit using Somniel fragments for baseline stat/SP gains without Engage cooldowns.
Build Bonds Actively
Raise Bond Levels by having units act in battle (attacking or getting hit) with rings equipped, unlocking better Synchro Skills like Leif’s Quadruple Hit for multi-strikes or Eirika’s Dual Assist for rescues. Visit Somniel to polish rings for faster bonds; higher levels mean stronger passive buffs even unequipped.
Time Engages Wisely
Engage only when the meter fills (after 6 attacks or blue tiles), as it lasts 3 turns with Engage Weapons, Skills (e.g., Ike’s Laguz Friend for magic resist), and Attacks like Marth’s multi-hit rush. Save for clustered enemies or bosses-use blue Emblem tiles to recharge mid-map, and chain with Rewind Ring to test timings.
Inherit Key Skills
Spend SP (from battles/Somniel) to inherit Emblem skills permanently: Vantage + Wrath on low-HP baiters, or Divine Pulse for reliable hits. Prioritize based on unit role, like Gentility on fragile fliers for damage reduction.
Best Emblem Ring for each character class
Emblem Rings in Fire Emblem Engage shine brightest when paired with classes that complement their stat boosts, weapons, and skills, turning good units into powerhouses. Optimal pairings vary by playstyle, but community consensus favors these matches for maximum synergy across common class types.
Sword Infantry (e.g., Swordfighter, Swordmaster)
Marth suits dodge-tanks like Alear or Kagetsu, offering avoidance, multi-attacks via Lodestar Rush, and sword precision against armor. Roy provides HP/Res bulk and Hold Out for survivability on brawlers like Diamant.
Lance Cavalry/Armor (e.g., Paladin, General)
Sigurd excels on mobile tanks like Louis or Fogado, granting high build for terrain ignore, dex/def boosts, and hit-and-run Override. Leif adds flexible counters (best weapon type) for multi-weapon users like Jade.
Axe Fighters (e.g., Warrior, Hero)
Ike fits frontline bruisers like Diamant or Alfred, synergizing Wrath crits on low HP with Sol for self-sustain, plus Laguz Friend magic resist. Roy’s Blazing Aether AoE works as a solid alternative.
Magic Users (e.g., Mage, Griffin Knight)
Celica boosts tomes with mag/res, Warp Ragnarok mobility, and Echo skill doubling on Ivy or Celine; her Recover+ aids hybrids. Byleth adds luck/spd for chain attacks on supports like Clanne.
Bow/Thief (e.g., Bow Knight, Wolf Knight)
Lyn enables long-range Astra Storm sniping for fliers like Chloe or Merrin, with speed/dex for dodges. Lucina pairs evasion boosts on agile covert ops like Yunaka.
| Class Type | Top Emblem | Key Benefits |
|---|---|---|
| Sword Infantry | Marth | Avoid + Lodestar Rush |
| Lance Armor | Sigurd | Build + Mobility |
| Axe Tanks | Ike | Wrath + Sustain |
| Mages | Celica | Warp + Echo |
| Archers | Lyn | Range + Astra Storm |
| Fliers | Eirika/Ephraim | Dual modes + Healing |