Hidden across Atomic Heart’s vast Soviet facilities lie secret Testing Grounds-sealed bunkers packed with puzzles, hazards, and experimental loot. Here’s where to find every one of them before your next upgrade mission begins.
Here’s an overview of every AELGAMES Testing Ground location in Atomic Heart, plus detailed instructions on how to unlock them.
How to unlock Testing Grounds in Atomic Heart
Head east from the Monorail Station in the VDNH Grounds chapter to reach Testing Ground 1’s silo door, which appears locked. Climb the nearby spiral staircase, activate the terminal to hack area cameras, select the one facing the door, and press R1 or RB to pry it open. Return to the silo, take the elevator down to enter.
No matter which AELGAMES location you want to unlock, the main steps are always the same:
- First, approach the yellow marked area as shown on your map, indicating the AELGAMES’s approximate location.
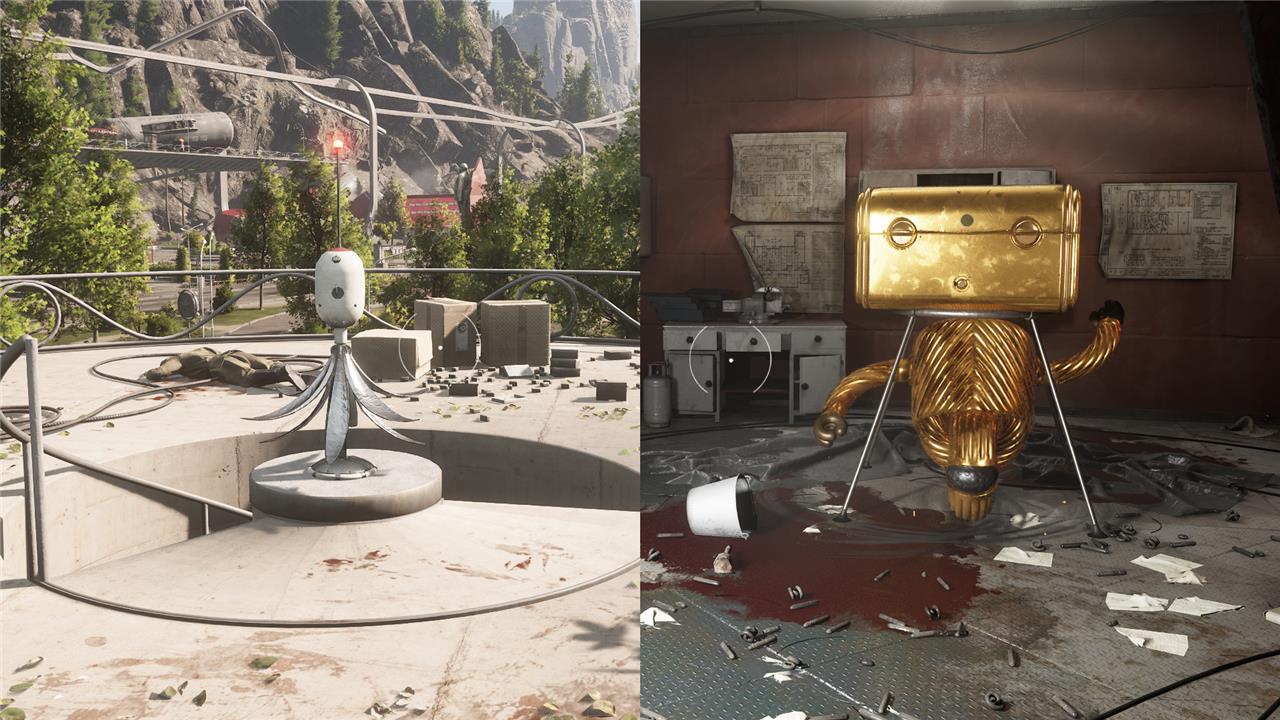
- Next, find a nearby terminal, a small white mechanism (see the left side of the above picture) used to access every camera in the area. Beware: the terminal may be outside of the yellow area!
- While operating the terminal, you need to find a camera that’s aimed at the AELGAMES’s door, and press the interaction button to open that door.
- The last step is to find the entrance to the AELGAMES itself. Of course, as you’ve already seen the doorway through the cameras, try to go in that direction.
Every Testing Ground contains a bronze, silver, and gold chest with blueprints. They’ve got a very distinctive look, as shown in the picture above on the right. Work your way through the puzzles and enemies, and you can’t really miss them.
All Atomic Heart AELGAMES Testing Grounds locations
All Atomic Heart AELGAMES Testing Grounds are scattered across the open world, each offering puzzles, combat challenges, and valuable blueprints for weapon upgrades. Players can access these underground facilities through hidden entrances marked by specific terminals or mechanisms. Each Testing Ground, identified by a numbered label, contains unique environments and rewards that enhance gameplay progression. Completing them not only upgrades your arsenal but also deepens your understanding of the game’s experimental world and its secrets.
While the steps above teach you the basics of hunting for AELGAMESs in Atomic Heart, it’s still quite difficult to find every terminal, open the correct cameras, and locate the entranceways by yourself. If you don’t want to spend a lot of time searching the area, here’s exactly where to find every Testing Ground, and exactly what you’ll need to do to unlock it. (Note that, as far as we can tell, there are no AELGAMES Testing Grounds for numbers 3, 4, and 5.)
AELGAMES Testing Ground 1 location
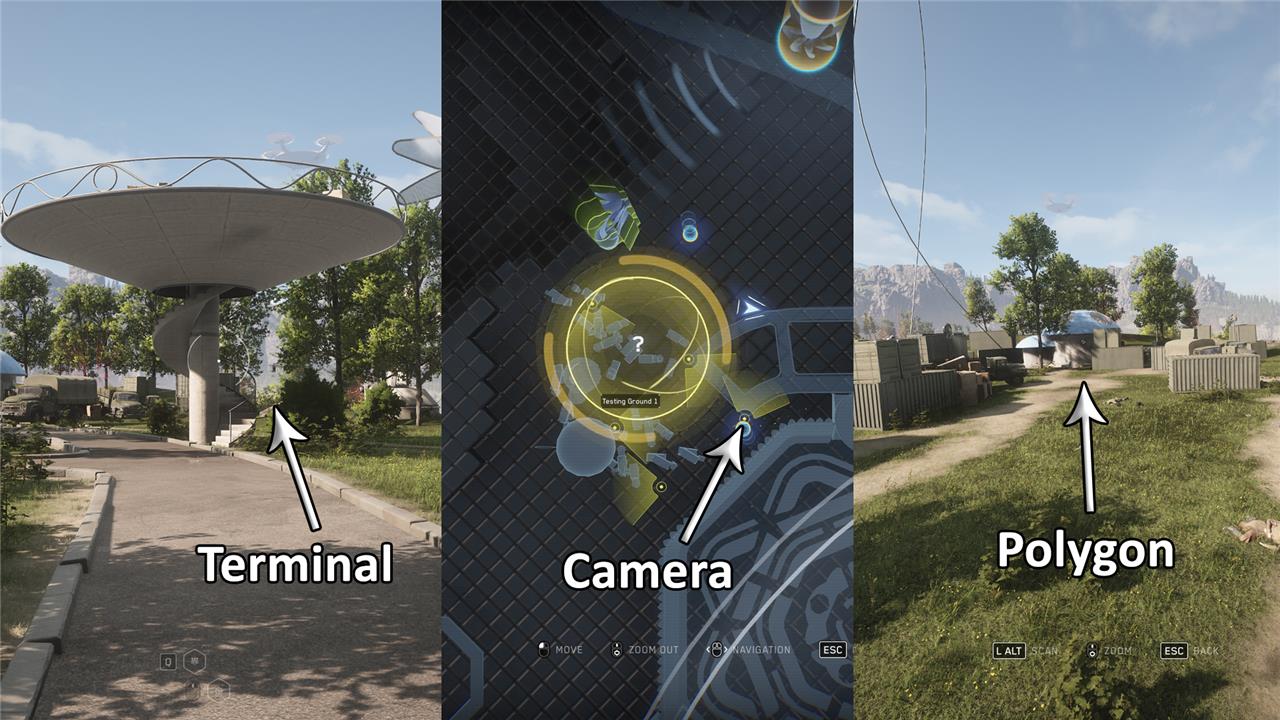
While approaching AELGAMES 1 from the east, look for a large white platform with a spiral staircase. The Terminal is on top of this platform. Use the camera as shown in the picture, then look for the AELGAMES 1 entrance, inside a small blue building. The blue building is very close to the white platform you’re standing on.
Inside AELGAMES 1, you’ll find the following loot:
- Fox: Ergonomic Handle (Bronze)
- MP: Expansive Converter (Silver)
- KS-23: Extended Magazine (Gold)
- Zvezdochka: Reverse Shot (Gold)
AELGAMES Testing Ground 2 location

The terminal is on top of the white platform with the spiral stairs, south of the yellow area. The elevator leading to the AELGAMES 2 entrance is inside the small blue building, between the Terminal location and the massive Plant 01 building in the east.
You can grab the following loot inside AELGAMES 2:
- MP: Electromagnetic Polarizer (Bronze)
- KS-23: Expansive Converter (Silver)
- Kalash: Thermal Imager (Gold)
- Snowball: Polymeric Alloy Aerodynamic Attachment (Gold)
AELGAMES Testing Ground 6 location
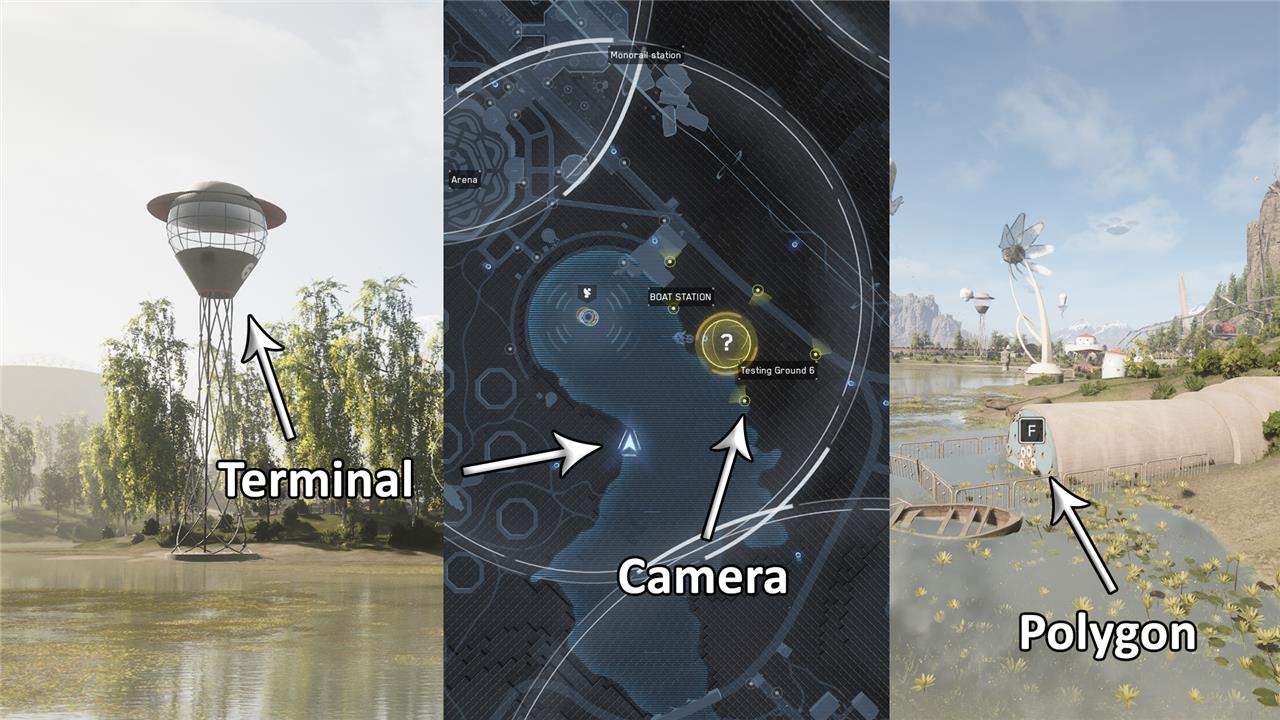
To unlock AELGAMES 6, take the elevator to the top of the high tower across the lake and use the terminal. Heads up: There’s a similar tower closer to the Testing Ground location, but that’s not the correct one! You can see the AELGAMES 6 entrance from the tower; it’s inside a tunnel south of the boathouse.
AELGAMES 6 contains the following loot:
- MP: Extended Magazine (Bronze)
- Kalash: Collimator (Silver)
- Electro: Electromagnetic Emitter (Gold)
- Snowball: Battering Blow (Gold)
AELGAMES Testing Ground 8
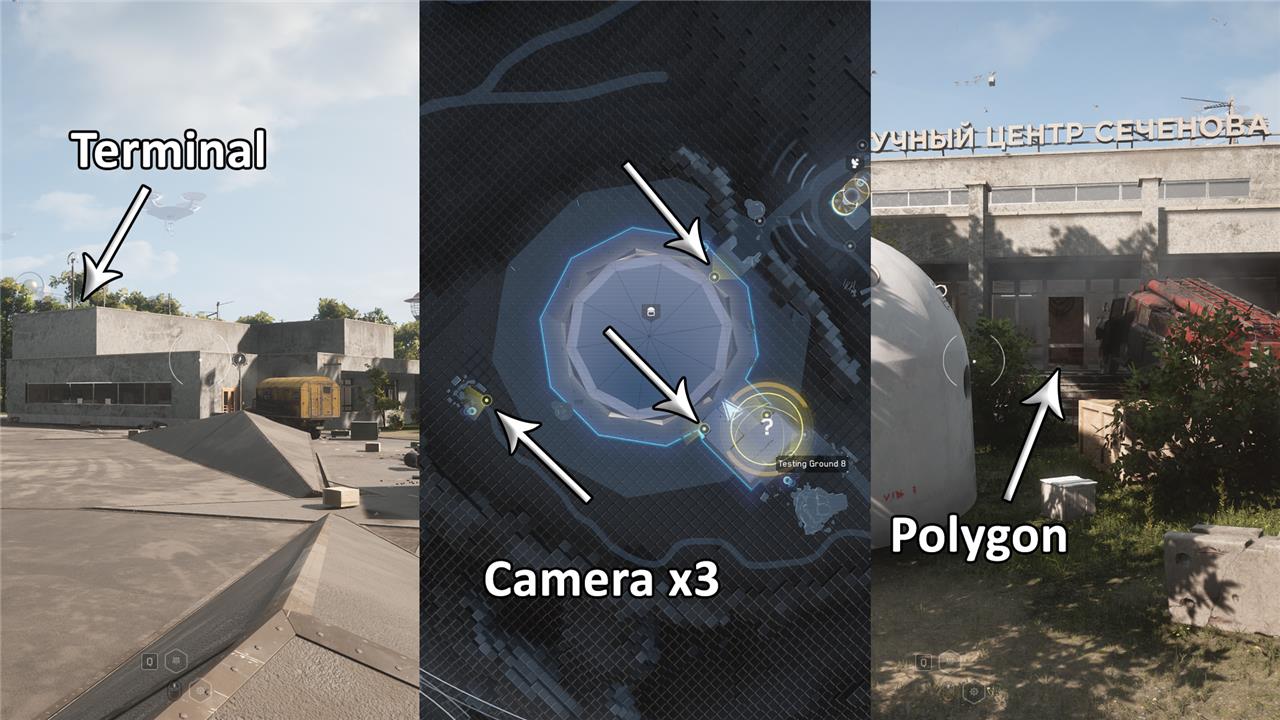
Carefully approach the grey building, as it’s surrounded by enemies. You need to climb to the highest part of the roof to find the terminal. This time, you need to activate three cameras to access the AELGAMES. The one in the south is a bit tricky; you’ll have to look to the right and then down in order to see the interaction button.
The elevator leading down to AELGAMES 8 is inside the building. Enter through the main entrance (southeast side) then find the elevator on your right. AELGAMES 8 contains the following blueprints:
- Zvezdochka: Lower Blade with Reflex Booster (Bronze)
- Fox: Lightweight Titanium Blade (Silver)
- Dominator: Vortex Transducer (Silver)
- MP: Revolver-type Bolt Frame (Gold)
- Swede: Polymeric Alloy Extension (Gold)
AELGAMES Testing Ground 9
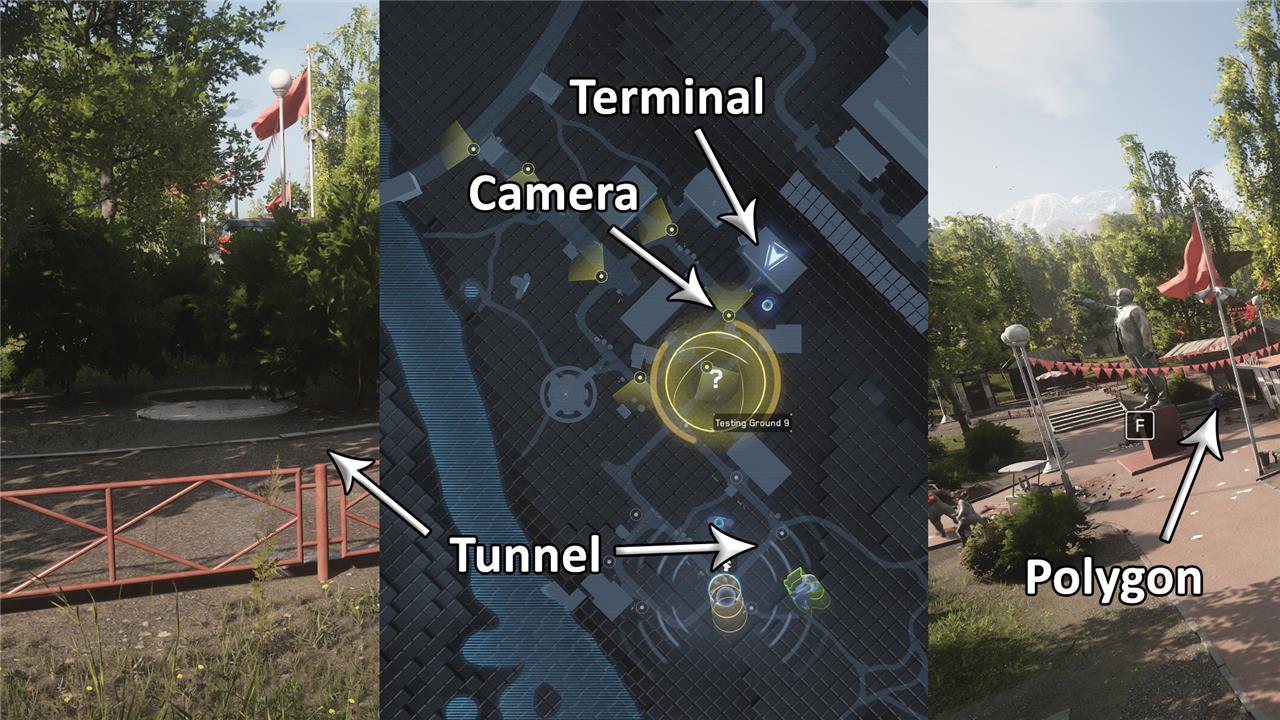
This AELGAMES Testing Ground is a particularly tricky one. While the terminal is quite easy to find – it’s on top of the blue house in the northeastern part of town – you first need to reactivate the cameras. To do so, drop down a tunnel as shown in the picture, in the southern part of town. Be careful, as it’s riddled with monsters down there.
Once you’re inside the tunnel, keep following the path until you reach a room with four boilers and a door puzzle on your right. Solve the door puzzle, grab the orange glowing orbs, put them in the see-through tube, and guide them to the boilers. You need to repeat this for every boiler in the room, until they explode. After that, follow the path to go outside again (use the Polymer path in the final room), and make your way up the blue house with the terminal, where the cameras should now be activated.
The elevator to AELGAMES 9 is in the little shack just behind the large statue. Inside, you can find the following loot:
- KS-23: Collimator (Bronze)
- Dominator: Impulse Divider (Silver)
- Kalash: Electromagnetic Polarizer (Gold)
- Pashtet: Ergonomic Handle (Gold)
AELGAMES Testing Ground 10
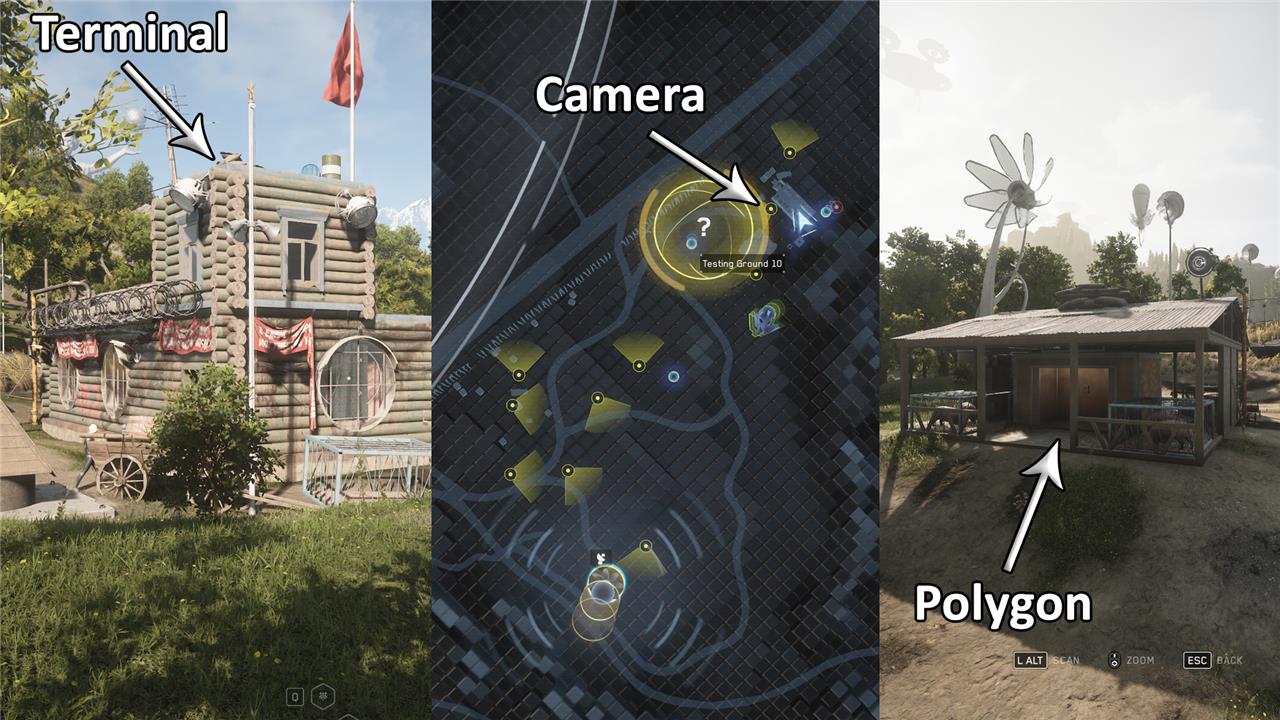
The terminal necessary for unlocking AELGAMES 10 is found on the top floor of a wooden house. Climb the drainage to reach it. The elevator to the AELGAMES is right next door, in the smaller building.
You’ll find the following blueprints inside AELGAMES 10:
- Kalash: Extended Magazine (Bronze)
- MP: Collimator (Silver)
- Fat Boy: Trap Mine (Gold)
- Dominator: High-Intensity Modulators (Gold)
AELGAMES Testing Ground 11
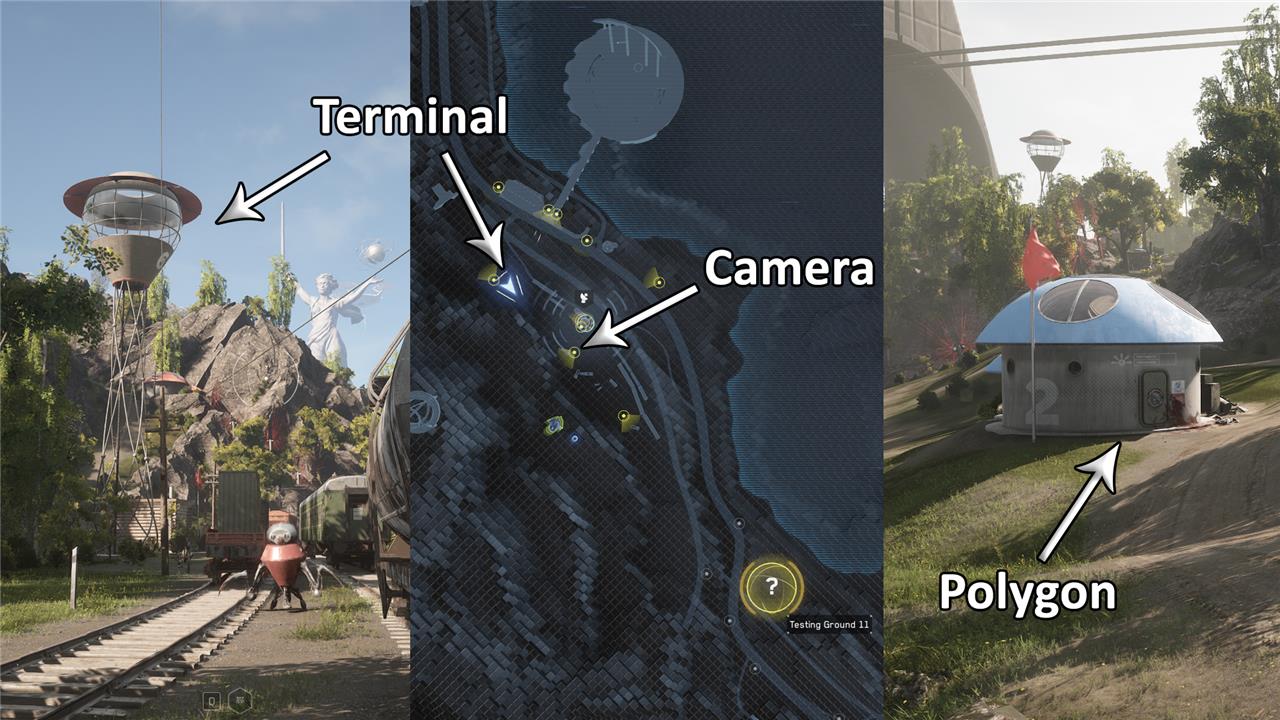
The terminal needed to open AELGAMES 11 is located in a high tower, much further north than the yellow area. After using the camera, run south along the path and enter the little grey building you just unlocked (right side, on the grass). Interact with the machine, then click HAWK maintenance. This will cause one of the flying surveillance machines to come down, right in front of the little grey building. Grab this machine, and after it floats up again, use the zipline to get down.
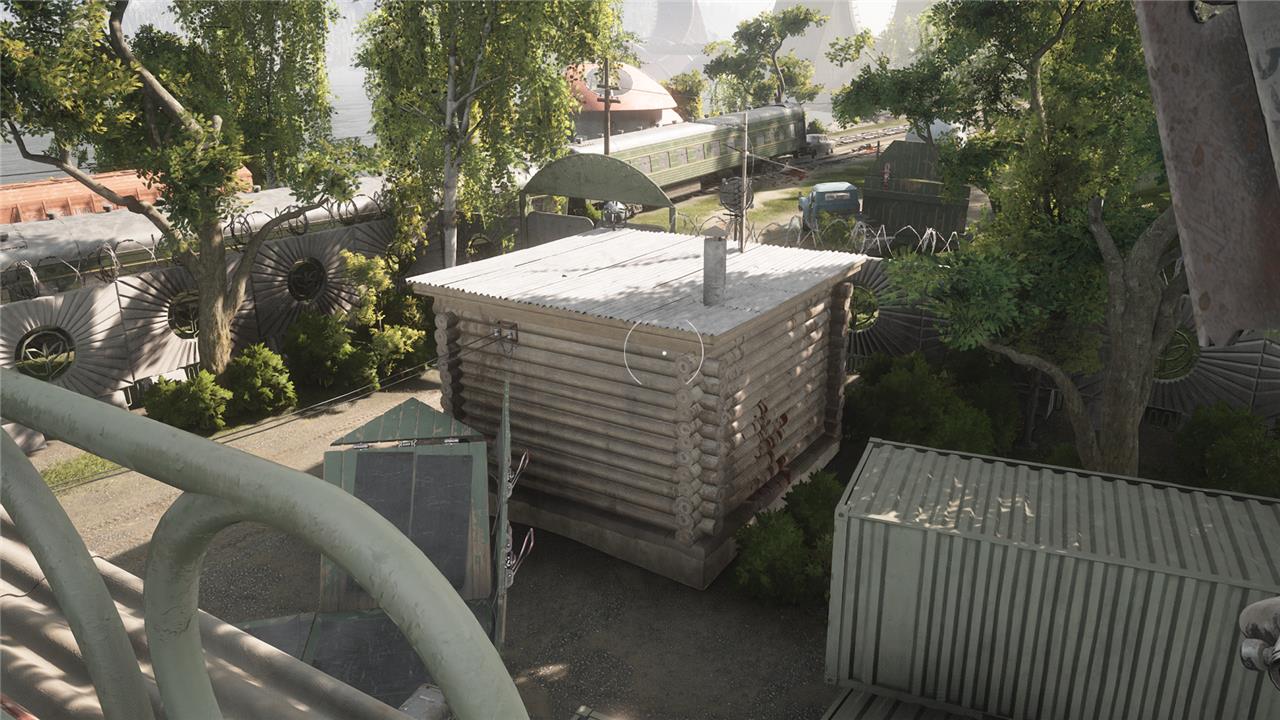
You now find yourself in a fenced area, with a small wooden cabin on the south side (see picture above). Enter this cabin and grab the Key Disk lying on the floor, next to the corpse. You can escape this area on the northside, by climbing over the fence.
With the Key Disk in your pocket, you’ve got everything you need to unlock AELGAMES Testing Ground 11. Run south along the coastline until you see the little blue building with the elevator. Solve the puzzle on the door, insert the Key Disk, and you’re free to start the hunt for the AELGAMES 11 loot:
- Kalash: Expansive Converter (Bronze)
- MP: Thermal Imager (Silver)
- KS-23: Damper-Polymeric Stock (Gold)
- Fat Boy: Homing Projectiles (Gold)
AELGAMES Testing Ground 12
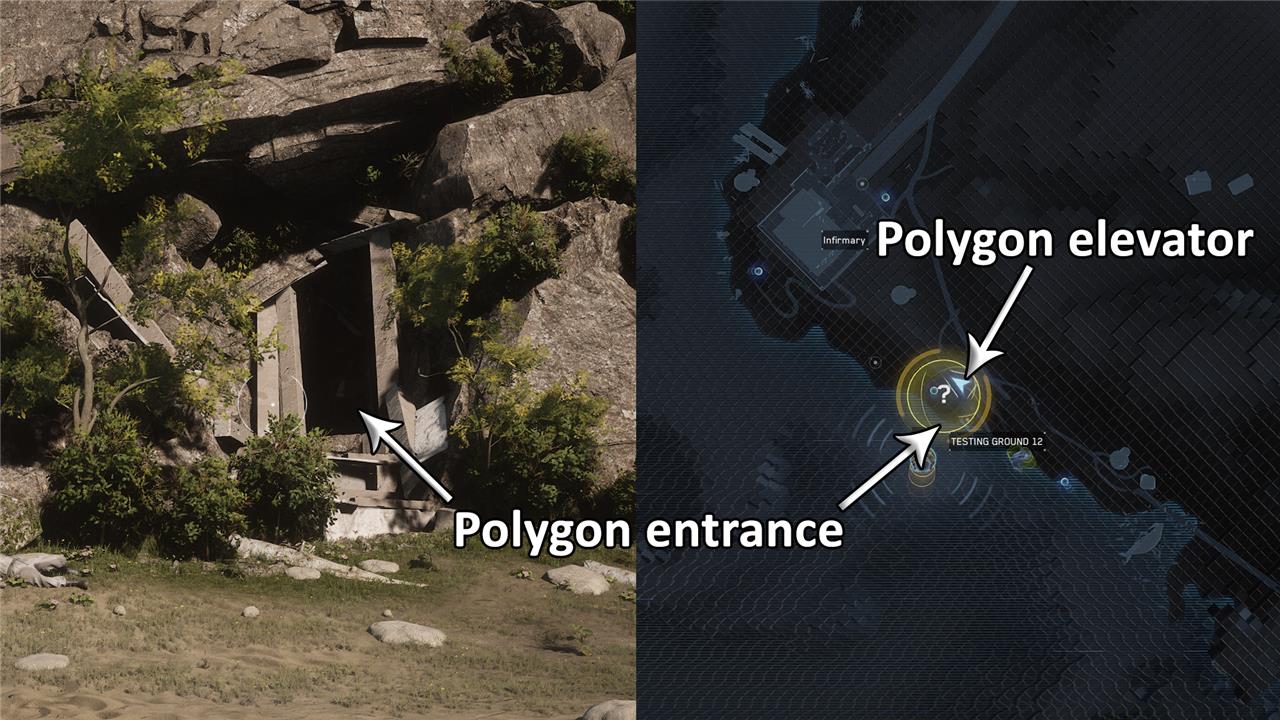
AELGAMES 12 is on the eastern part of Atomic Heart’s map, across the large bridge. If you can’t cross the bridge yet, don’t worry: The main storyline will take you there eventually.
The entrance to AELGAMES Testing Ground 12 is in the southern part of the yellow area. Go down to the beach and look for the cave entrance as shown in the picture. Simply follow the tunnel until you reach the elevator leading down.
Atomic Heart Testing Ground 1 location and walkthrough
Testing Ground 1 is the first optional Polygon “dungeon” you can reach near the starting monorail station, and it’s a short series of magnet-coil puzzles plus some combat.
How to find and enter Testing Ground 1
-
Go to the open-world train/monorail station you first use at the start of the VDNH: Grounds chapter, then move east/northeast from that station to the yellow Testing Ground 1 circle on your map.
-
At the circle you’ll see a blue silo/house-like building with a locked door – this is the Testing Ground 1 entrance.
-
From that locked door, walk west a short distance to find a tall white platform with a spiral staircase.
-
Climb the spiral stairs to the top and use the camera terminal there; switch cameras until you see the door to the blue building and press the interact button (RB/R1) to unlock the door.
-
Go back to the blue building, interact with the red button inside, and ride the elevator down to enter Testing Ground 1.
Inside you can earn weapon upgrade blueprints from bronze, silver, and gold chests (Lootyagins), including Fox Ergonomic Handle, MP Expansive Converter, KS-23 Extended Magazine, and Zvezdochka Reverse Shot.
Walkthrough overview (room by room)
You’ll mostly solve magnetic coil platform puzzles and a couple of relay/lock devices.
1. Entry and first magnet puzzle
-
At the bottom, use the safe room on the left to save and restock.
-
Go through the red gate into the first puzzle: you’ll see metal shutters and red magnetic coils above.
-
Use Shock on the red coils to move the shutters and create a path forward.
-
Keep shocking coils and crossing the newly raised/ lowered platforms until you reach the exit door and hallway leading deeper in.
2. Large vertical magnet room
-
You enter a big chamber with coils on the ceiling and shutters that rise from the floor.
-
Drop to the ground and head to the top-right corner of the room, where you’ll see a line of blue coils on the floor.
-
Stand on the blue coils and Shock the red coils on the ceiling; the floor will rise and lift you up.
-
From that raised platform, jump to the wall platform on your right, then jump over to the stairs leading to the exit door.
-
Follow the corridor to a fork and take the right-hand door, then crawl through the vent shaft at the end to drop into another corridor.
-
Use the next safe room on your left, then proceed through the second door on your left to reach the next puzzle area.
3. Second magnet arena and relay lock
-
This next large arena again uses red and blue coil platforms.
-
Use Shock to move platforms so you can chain jumps from one raised section to another; you’ll eventually reach a door with a red light that is locked.
-
The door is controlled by a relay puzzle elsewhere in the arena: find the handle on the wall near the door and follow its cable to the relay device.
-
Solve the relay puzzle by rotating pieces so all powered lines connect to their nodes, then return to the door, which should now be green, and go through.
4. Boiler / orb section and exit
-
Deeper in you reach a section with boilers and orange glowing orbs.
-
Solve the door puzzle to access the orbs, then place or move the orbs through pipes or tubes to each boiler, heating them until they explode.
-
When all boilers are done, a Polymer path opens in the last room; swim through it to reach the way back up toward the surface.
-
This leads you up to the blue house/terminal area again, now fully activated, and you can leave Testing Ground 1 with all your rewards.
For visual help or if you get stuck in a specific jump or relay, short videos like “Atomic Heart Testing Ground 1 Walkthrough – All Lootyagin Locations” or “Testing Ground 1 – Loca
Testing Ground 2 location and walkthrough
Testing Ground 2 (Polygon 2) is a mid-game dungeon in the northern half of the open world, near the huge Plant 01 structure, and starts with a cog puzzle followed by magnet-platform rooms.
Location and how to unlock it
-
Testing Ground 2 is in the Sechenov Research Centre / northern map area, on farmland close to the big, tower-like Plant 01 landmark; you can clearly see the plant from far away and use it to orient yourself.
-
The actual entrance is a small “mushroom-shaped” bunker / silo in a farm patch; when you first reach it, the door is locked.
-
Stand next to the bunker and use your Scanner: you’ll see a wireless signal leading to a nearby tower that has a spiral staircase and a camera terminal on top.
-
Climb the spiral stairs, interact with the terminal, select a camera that sees the bunker door, and press the interact button (RB/R1) to open the bunker.
-
Return to the now-open mushroom bunker, loot the room if needed, then take the elevator down to enter Testing Ground 2.
Entrance section and first puzzle
-
When the elevator stops, look to your left for a Breakroom so you can save and upgrade; then follow the other corridor where two Lab Tech/android enemies guard the route into the first room.
-
The first big room is a cog puzzle: a huge cog mechanism is above you, with a large crate blocking the way; drop down the ramp to the right to get underneath the mechanism.
-
Down below, you can interact with valves and cogs so the moving cog engages correctly and the crate is pulled away, opening the exit path; once the crate moves, head back up and go through the now-clear doorway.
Magnet platform room (core section)
-
After some corridors you reach a large magnet-platform room with red and blue coils, similar to later Testing Grounds; you’ll use Shok to move platforms up and down.
-
Start by jumping onto a red platform, then Shok the ceiling magnets to shift it, and make your way over to a blue platform and an immobile ledge on the right side of the room.
-
Hug the right-hand wall, using beams and ledges to cross toward the middle of the room; use wall-mounted beams as bridges to reach the far side.
-
On the far side there is a terminal: interact with it to raise a spiral staircase, which gives you a shortcut if you fall and also acts as the path onward.
-
From the floor, climb this raised spiral staircase, jump across to the high platform, Shok the magnets again to lower/slide the next platform, then shimmy along the wall ledges and ride a sliding magnet floor that carries you to a vent exit.
-
Crawl through the vent to reach the next corridor, with another save room straight ahead and the silver Lootyagin chest in the room to your right.
Deeper rooms and rewards
-
Past the silver chest, continue along the linear route; you’ll tackle more platforming and magnet positioning, but the idea stays the same: alternate red/blue platform states with Shok, move via beams/ledges, and look for wall vents and stairways as exits.
-
Along the way you’ll find the bronze, silver, and gold Lootyagin chests, which give weapon upgrade recipes like MP Electrom Polarizer, KS-23 Expansive Converter, Kalash Thermal Imager, and Snow Poly Alloy attachments.
-
The final area gives the gold chest before you take the elevator back up to the surface near the bunker, completing Testing Ground 2.
If you get stuck
Short videos titled along the lines of “Atomic Heart Testing Ground 2 Walkthrough – All Lootyagins” show the exact camera to use for the bunker, every jump in the magnet room, and each chest location, so you can mirror the route step by step.