Atomic Heart throws you into a twisted retro-futuristic USSR where machines have turned hostile and science blurs into madness. Before you fire up your polymer glove, here are eight key things that can save you from an early mechanical demise-or worse.
Learn how to read highlighted items
Highlighted items in Atomic Heart stand out for a reason-they signal useful materials, ammo, or crafting components. Pay attention to the glow color and intensity, as these often indicate rarity or type. Some highlighted objects may also mark interactive elements like containers or devices that can be looted. Quick scanning during exploration saves time and resources, especially in tense combat zones where supplies are scarce.
You’ll constantly scan your environment in Atomic Heart, which helpfully highlights useful stuff in various colors. Blue indicates lootable containers; white indicates NPC or objects you can interact with (like save stations and computers); orange indicates enemies; and purple indicates key items related to the main mission you’re on.
Can you make that jump? Look at your hand
Your glove isn’t just a piece of gear-it’s your lifeline. It lets you scan environments, pull objects with telekinesis, and interact with the strange machinery around you. Before leaping into fights or puzzles, check what your glove can do and upgrade its modules to expand your options. Many areas and enemies depend on how smartly you use its abilities, not just how quick your trigger finger is.
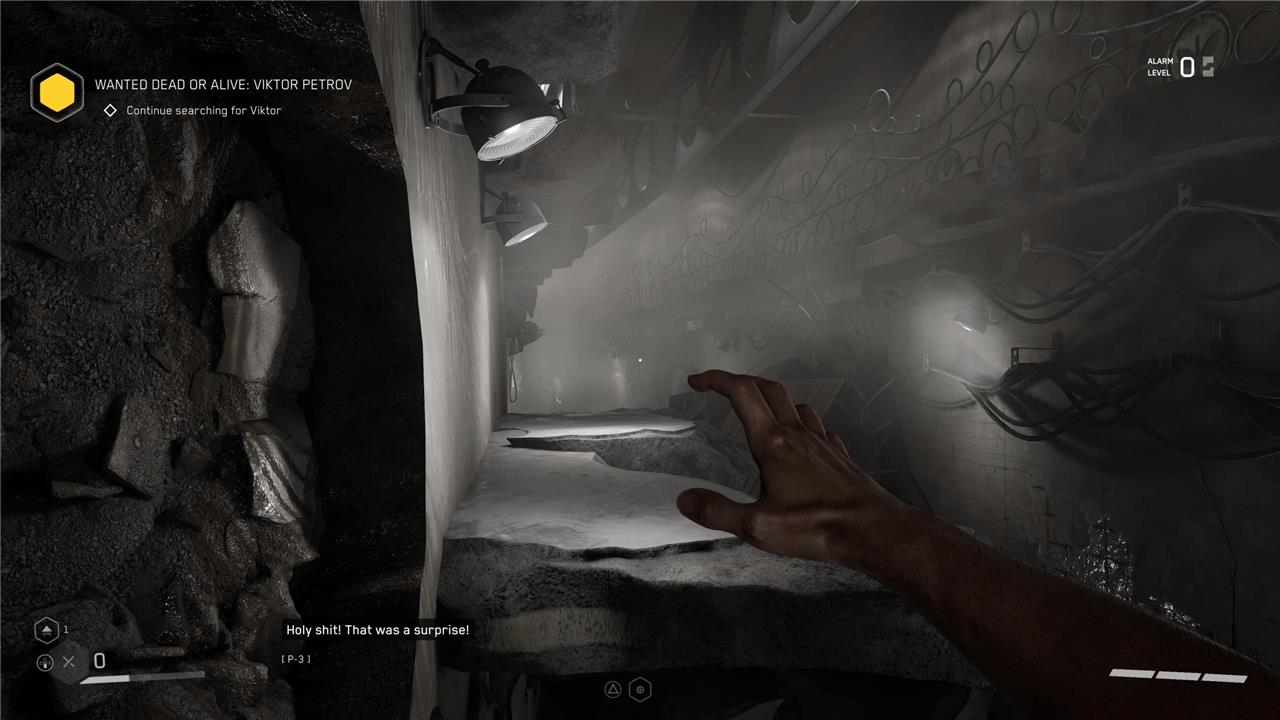
There aren’t many platforming sections in Atomic Heart, but the few that show up are clunky, plodding, and arduous – not the sort of thing you want to repeat. It’s not always easy to gauge whether or not you can make a jump, but there’s one simple tell that works 100% of the time: If your hand is held outward (as seen in the screenshot below), you can make it. If it’s not, you can’t. And yes, there’s fall damage.
You can reset puzzles
If you make a mistake while solving a puzzle in Atomic Heart, don’t worry-you can reset it and try again. This feature lets you start fresh without losing progress in the broader mission. It’s especially useful for complex puzzles involving timing or pattern recognition, giving you the freedom to experiment until you find the correct solution.
Opening locked doors in Atomic Heart means solving rudimentary lock-picking puzzles. These puzzles come in various types; you may have to time a series of button presses, for instance, or rotate an inner ring until its colors match that of an outer ring.
If you’re stumped on one specific puzzle, you can back out, then immediately jump back in to get a randomized variety of the same puzzle. More often than not, I’ve found the second roll easier than the initial one. There is no penalty for resetting, either: Sometimes you might have to solve a multipart puzzle, but in backing out, the game will acknowledge that you’ve solved the first part and start you at the second.
Oh, a heads up: Enemies can attack you while you’re trying to solve a puzzle. Make sure the room is clear first!
Your surplus loot automatically goes into storage
Any materials or weapons you pick up beyond your carrying limit are automatically transferred to storage, saving you the trouble of juggling inventory space. You can access this storage at any safe station or crafting terminal to manage your supplies and retrieve what you need later. This system encourages exploration without punishing you for collecting too much loot, letting you focus on scavenging and upgrading your gear.
You can carry a limitless amount of every resource used for crafting. But you’re restricted in how many consumable supplies – med packs, ammo, that sort of thing – you can cart around. You manage what you carry not through monitoring slots or weight limits but through a derivative grid-style inventory (think: Deus Ex).
The rest goes into your permanent storage, which you can access by interacting with fridge-sized computers, called Nora, near most save stations. When you’re in the middle of a mission, you can clear extra space in your inventory by pressing R3 while tabbing over a specific item you don’t need to carry – that’ll send it to storage automatically. You can only get it back into your inventory by visiting a Nora unit, though.
By the way: The storage menu doesn’t tell you what each object is when you hover the cursor over it. But if you tab over to the “disassembly” view, you’ll be able to see information about what those items actually are.

Focus on one skill
Focusing on a single skill early on helps you master combat and resource management faster. Atomic Heart’s upgrade system rewards specialization, so choosing one ability tree-like telekinesis, frost, or shock-lets you progress deeper into that path and fully understand its strengths. Experimenting is fine, but sticking with one skill first makes enemies easier to handle and ensures your resources aren’t spread too thin.
In Atomic Heart, you can learn a handful of BioShock-inspired elemental skills. But the equipment process is limited (you can only have two equipped at once, and can only switch at Nora stations), and doesn’t incentivize using multiple skills. You’re better off picking one skill you enjoy and making it ridiculously overpowered than you are trying to incrementally power-up a little bit of each one.
You can’t go wrong with the frost skill
The frost skill is one of the most reliable abilities in Atomic Heart, offering strong control over enemies and creating opportunities for heavy attacks. Freezing opponents slows down combat and gives you a chance to reposition or switch weapons without pressure. It pairs well with melee weapons and energy-based guns, letting you shatter frozen targets for extra damage. Whether facing small mobs or tougher mutants, the frost skill consistently helps you stay in control of the fight.
If you’re focusing on one skill, the frost one, Frostbite, is your best bet. By holding down L1/LB, you can freeze enemies in place for a short time with a steady stream of ice. Atomic Heart is at its most difficult when you’re getting overwhelmed by crowds. Frostbite allows you to manage those crowds. (Bonus: When you rank it up, frozen enemies will repeatedly take damage from being frozen.)
Level up the Electro pistol
Upgrading the Electro pistol early gives you a major advantage in combat. Its charged shots can stun robotic enemies, leaving them open for melee attacks or quick follow-ups. Focus on improving its energy efficiency and charge speed to keep your attacks consistent without draining your resources too fast. Combine these upgrades with proper timing, and you’ll turn the Electro pistol into one of the most reliable weapons for both crowd control and boss fights.
Ammo is by no measure abundant in Atomic Heart (not exactly Resident Evil levels of scarce, but still notably less than you’d get in, say, a Fallout game). Energy weapons, like the Electro pistol, don’t use ammo; instead, they operate on a charged meter that recharges fairly quickly. Since the Electro pistol essentially has unlimited ammo, provided you take the time to let it recharge between combat encounters, you’re better off upgrading it over those that rely on how scrupulous you are at scrounging for bullets.
Becoming frustrated? Dial down the challenge
If the difficulty starts to feel more punishing than fun, don’t hesitate to lower it. Atomic Heart offers settings that let you enjoy the story and atmosphere without constant struggle. Experiment with what feels comfortable-less frustration often means more focus on exploring, crafting, and understanding the game’s mechanics. Sometimes, adjusting the challenge keeps the experience engaging instead of exhausting.
Atomic Heart is a maddening game, frustrating in ways that seem like the developers don’t even want you to play it. Switching to easy mode – called “Peaceful Atom” in the game’s parlance – mitigates some of the frustration, making it feel more like a traditional first-person shooter. Also, you’ll worry less about the fact that you can only save at save stations.
Best early skills to prioritize for Polymer Glove
Prioritize these early Polymer Glove skills for strong survivability and crowd control in Atomic Heart’s opening areas. They focus on energy, mobility, and versatile abilities like Shok, leveraging refundable Neuropolymer costs.
Character Basics
Boost essentials first: Neuro-Compression Tactical Backpack (more inventory, 75 polymer), Second Wind (extra dodge charge, 38 polymer), and Energy Density (adds a power cell, 34 polymer). These improve resource management and evasion against early robot swarms.
Shok Branch
Unlock Chain Lightning (69 polymer) and Extended Topology (75 polymer) for multi-target zaps-ideal for robots, as discharges chain and hit extras. Shok is the most reliable early glove power; pair with melee for energy regen.
Frostbite or Mass Telekinesis
Grab base Frostbite to freeze melee mutants for safe finishers, or Mass Telekinesis (with Forced Fall Acceleration, 70 polymer) for hurling groups/objects in tight spaces. Frostbite shines 1v1, telekinesis for crowds.
Slot Strategy
Equip only two actives early-Shok plus Frostbite/Telekinesis-while refunding at NORA to test. Pump leftovers into Musclehead (110 polymer) for health.
How to farm Neuropolymer early in Atomic Heart
Early in Atomic Heart, Neuropolymer drops reliably from defeated robots, especially via repair drones that spawn on kills-each yields one unit, though they don’t respawn endlessly without exploits.
Kill Repair Drones
Target flying repair drones that appear after robot deaths; they always drop one Neuropolymer when destroyed with melee or shots. Clear groups first to trigger multiple spawns, then loot-combine with Shok for quick zaps on clusters.
Activate Drone Dispensers
In “In Hot Pursuit” at the Seed Bank elevator, shock active terminals (glowing ones) to spawn endless drones one-by-one after clearing nearby enemies. Use melee for one-shot kills on easy mode; each drops Neuropolymer plus metal parts. Repeatable anywhere with lit terminals-bypass foes via ziplines for safety.
Testing Ground 1 Exploit
Under the surveillance camera in Testing Ground 1, use Mass Telekinesis + Forced Fall Acceleration to slam grouped enemies for instant kills and drops. Stay in camera view to keep aggression high and waves spawning; reset by stepping out if overwhelmed. Yields Neuropolymer alongside other loot.
Looting and Basics
Search highlighted containers and robots thoroughly, as Neuropolymer hides in interactables. Farm on easy difficulty, save often at NORA terminals, and prioritize Shok/Telekinesis unlocks (from prior guides) to enable these methods efficiently.