Before you fire your first shot in Remnant 2, there are mechanics, secrets, and hidden systems that can make or break your early runs. From class choices that shape your build to traits that quietly decide your fate, knowing what lies beneath the chaos can mean the difference between mastery and frustration.
If you’re a newcomer to the series like me, you may be coming into the game with a lot of preconceived notions about how it combines gunplay and dodge-rolling. Here are a few tips to get you ready to save reality with as few hurdles as possible.
Pick the right starting archetype
Each archetype in Remnant 2 shapes how you approach combat and exploration, so choosing the right one can set the tone for your experience. The Challenger focuses on raw strength and resilience, the Hunter excels at precision and long-range control, the Medic supports survival through healing, and the Handler offers flexibility with a loyal canine companion. Think about your playstyle-whether you prefer taking the front line, supporting allies, or striking from the shadows-and pick the archetype that complements it best.
The first major decision you’ll make in Remnant 2 (unless you get really into customizing how your main character looks) concerns deciding on an archetype. After emerging from the tutorial, you’ll be given a choice between four unique builds (five if you pre-ordered to unlock the Gunslinger from jump), each with different skills and initial loadouts.
- Challenger is a tank-y badass that starts with a shotgun and a skill that lets them power through fatal damage.
- Handler is never alone thanks to a dog that follows them to the ends of the earth and a suite of abilities that play into this bond.
- Hunter is the game’s resident long-range specialist that can extend skill duration with well-placed sniper shots on enemy weak points.
- Medic, unsurprisingly, is all about healing. Its main perk is the ability to recharge the relic (sort of like Remnant‘s answer to Dark Souls Estus flask) after restoring a set amount of health.
You can swap archetypes (but it’ll cost you)
Swapping archetypes gives you flexibility but comes with a price. You’ll need a special item or resource to make the change, and some gear or traits may need to be re-leveled to fit your new setup. It’s a chance to experiment with different playstyles, but plan ahead so you don’t waste materials or lose progress on a build you already invested in.
It happens to the best of us: You made a big decision and regret it. Thankfully, Remnant 2 doesn’t force you to stick with the same archetype throughout the whole game. If you find your starting class unfulfilling or just want to experiment with different playstyles, it’s easy to change things up. Well, provided you have the cash to dole out on the requisite materials, of course.
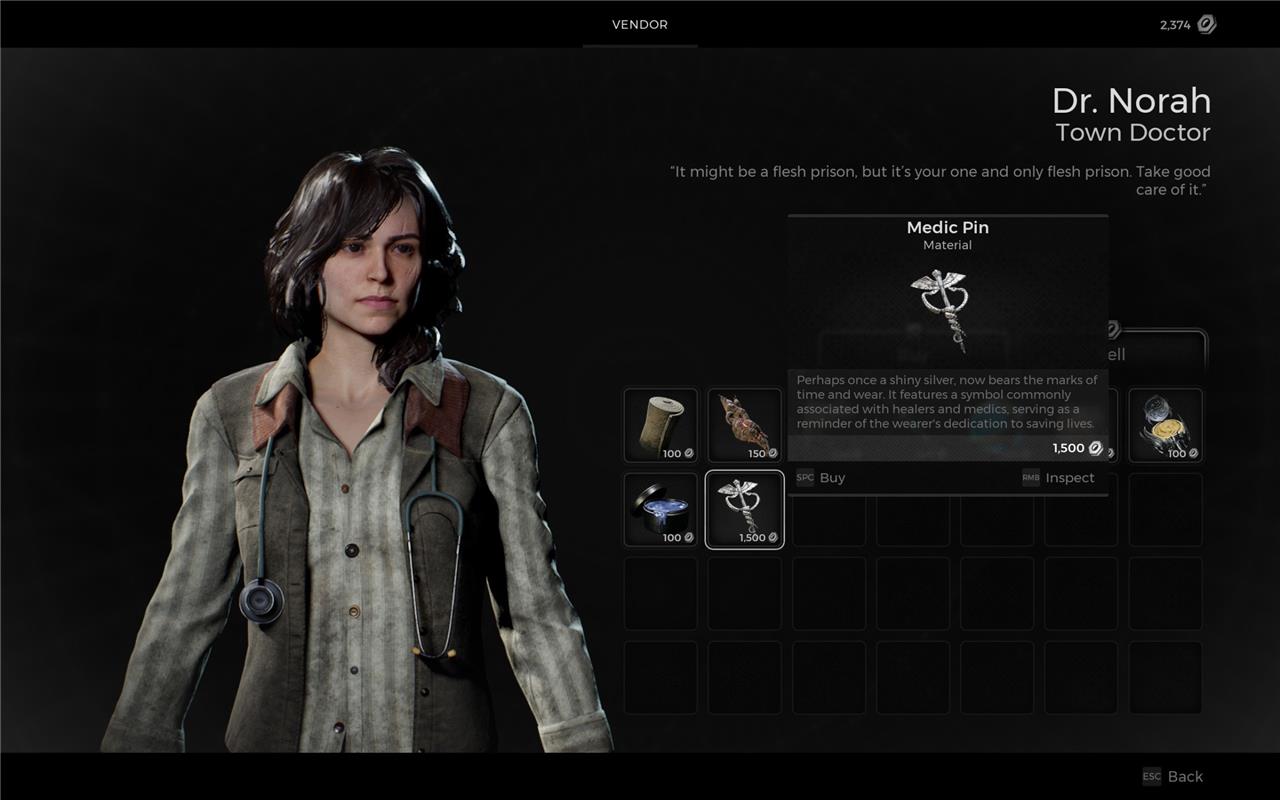
A few notable residents of Remnant 2 hub area Ward 13 sell special items that can be turned into engrams, a fancy word for the tool you slot into the archetype menu to decide your class. Reggie carries the Old Metal Tool that unlocks Challenger, Mudtooth holds the Handler’s Old Whistle, Brabus will hand over the Rusty Medal for the Hunter, and Dr. Norah naturally stocks the Medic Pin.
After spending 1,500 scrap (Remnant 2‘s basic currency) on one of these items, you’ll need to take it to Wallace, the frustratingly vague pseudo-psychic who lives in the crane above Ward 13’s shipyard. He’ll transform them from useless junk to engram for 10 Lumenite Crystals (dropped by elite enemies or found in chests) and an additional 1,000 scrap apiece. From there, all it takes to switch class is to swap out engrams at any time on the archetype menu.
Master the dodge-roll
Dodging is one of the most reliable ways to survive tough encounters, but it depends heavily on your timing and equipment load. A well-timed roll gives you a brief window of invulnerability, letting you pass through enemy attacks unharmed. Keep your armor weight below the heavy threshold to maintain a faster roll and avoid sluggish recovery animations. Practice reading enemy attack patterns and rolling toward or through danger instead of away from it to stay close enough for a quick counter.
While certainly not as vital to survival as in Dark Souls, the dodge-roll mechanic found in Remnant 2 will often be your most potent defensive tool against both the game’s basic enemies and larger-than-life bosses. Dodging makes you invulnerable but only for a handful of frames, so it’s in your best interest to get a feel for how to pass through attacks unscathed. It can be hard to get alone time with a single enemy, but if you ever find yourself in a one-on-one encounter, I suggest creating your own tutorial by taking some time to simply dodge attacks for a couple minutes. You’ll thank yourself when you get further into the game and battles get more deadly.
Pay attention to your armor’s weight
Armor weight affects how quickly you can dodge and how much stamina each roll consumes. Heavier gear offers better protection but slows your movement and dodge recovery, making it harder to avoid enemy attacks. Lighter setups allow faster reactions and longer stamina use but leave you more exposed. Try different combinations until you find a balance that fits your playstyle and keeps your mobility intact during intense fights.
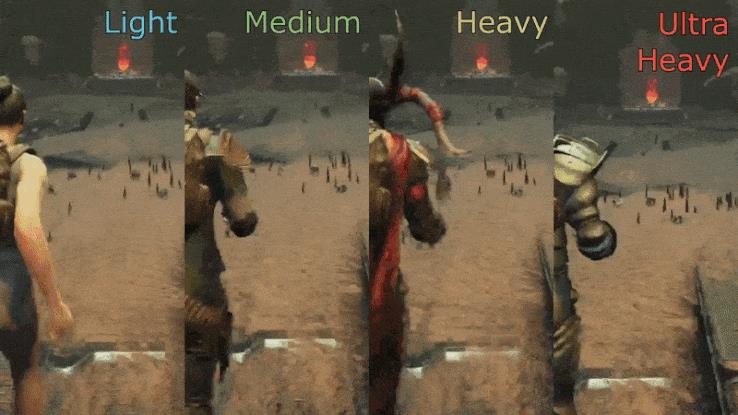
Another important aspect of dodging you need to consider is your encumbrance. Every piece of armor in Remnant 2 has a weight value, and the combined load of your entire outfit can hinder your movement and reduce the invulnerability frames on your dodge roll if things get too heavy.
A quick inspection of the left side of the character menu will tell you all you need to know about your gear weight: a light blue number means your dodge will be as safe as possible, green is a slightly worse but still manageable, yellow is arguably the upper limit of effectiveness, and red means you’ll awkwardly belly flop to the ground instead of rolling.
Armor weight can be mitigated a bit if you’re playing as a Challenger. The archetype comes bundled with a trait known as Strong Back that reduces encumbrance the more points you invest in it. If you plan on sporting some of the more bulky armor sets in the game, don’t neglect Strong Back; it can shave off up to 10 encumbrance at max level.
Keep an ear out during combat
Sound cues play a huge role in surviving fights, as many enemy movements and attacks can be heard before they’re seen. Paying attention to growls, footsteps, or weapon charges can give you precious seconds to dodge or reposition. Some enemies signal heavy hits with an audible wind-up, while others alert you through environmental audio like cracking walls or shifting metal. Wearing headphones or keeping your volume up can make all the difference between getting ambushed and staying one step ahead.
It may be difficult in the fog of battle, but make sure to listen for some telltale sound effects while mowing down the Root, as they’re the key to understanding how the fight is flowing and what to expect from your enemies next.
Did you engage what you thought was one or two monsters only to realize half a dozen of their friends were waiting to strike just around the corner? Well, you should have been listening for something like a deep war horn, which indicates you’re about to be ambushed Left 4 Dead style by a bunch of the area’s basic enemies.
Similarly, a high-pitched ringing means you’re about to come face-to-face with an elite mob, stronger foes with a lot more health and special powers. These jerks can appear just about anywhere, so when you hear the sound effect (it’s difficult to describe but you’ll become intimately familiar with its dangers the longer you play), scan the area and dispatch them as soon as possible.
Use the right gun at the right range
Each weapon in Remnant 2 performs best at a specific distance, so matching your gun to the encounter can make a big difference. Shotguns dominate close quarters, melting enemies that charge straight at you. Mid-range rifles handle most fights with steady precision, while sniper weapons deliver heavy hits from afar. Switching between loadouts based on the area or boss fight keeps your damage output consistent and prevents you from wasting valuable ammo in the wrong situations.
Anyone who’s spent any amount of time with first- or third-person shooters intrinsically understands that certain guns have certain uses. Snipers, for instance, are for taking out targets at long range, while shotguns do better when up close and personal with your enemy. Remnant 2 takes this concept one step further by giving every gun in the game what’s called an “effective range.”
Alongside info like damage, magazine size, and ammo capacity, your guns’ stats include details on their “ideal range” and “falloff range” to give you a sense of how best to use them. The former, obviously, indicates the firearm’s sweet spot while the latter is where you’ll start to see your damage suffer. You won’t get penalized heavily for being one or two meters past a gun’s falloff range, but don’t try to pick off enemies from half-way across the map with, say, a pistol or you’ll experience a dramatic reduction in its effectiveness.
It can be difficult to gauge distance, especially during intense battles, so the quick and dirty way to know if your gun is within its ideal range is to watch the reticle. A small dot in the middle of your crosshairs means you’re good to go.
Upgrade your weapons
Upgrading your weapons makes a noticeable difference in how you handle tougher enemies and bosses. Materials for upgrades can be found throughout the worlds, earned from enemies, or bought from vendors in Ward 13. Keep an eye on your ammo type and weapon mods-some upgrade paths boost mod power or add new effects that can turn a standard firearm into a powerful tool. Balancing upgrades between your main and secondary weapons helps you stay flexible against different enemy types.
Okay, yeah, this is probably pretty obvious to most of you, but don’t neglect upgrading your favorite weapons. While the material and cash requirements soar at higher levels, it’s in your best interest to keep your guns at peak condition as you steadily progress through Remnant 2‘s campaign. Basic enemies, elite mobs, and even most bosses are pushovers if you just take the time to visit the blacksmith every time you return to Ward 13. Much like Dark Souls, success relies much more on the status of your weapons rather than the work you’ve invested in your character’s stats.
Cure that cough
A stubborn cough can ruin your chances of surviving tougher fights, so always keep healing items and status cures within reach. Some enemies spread ailments through their attacks, and neglecting symptoms can drain your health over time. Stock up on consumables that cleanse debuffs, and swap rings or amulets that boost resistance before entering infected zones. Managing these small details keeps your character healthy and your damage output sharp during drawn-out battles.
After completing Remnant 2‘s tutorial and familiarizing yourself with Ward 13, you’ll eventually visit a lush forest known as Yaesha. (Where your adventure begins is randomized so you won’t necessarily travel there off the bat.) But don’t let Yaesha’s beauty fool you: Many of its denizens inflict an annoying status effect known as Root Rot. So annoying, in fact, that you’ll want to make sure you have the requisite healing item on hand to take care of the disease before actually catching it.
Root Rot doesn’t damage you directly but instead causes your character to suffer coughing fits at regular intervals. And while a sore throat may sound negligible when fighting an evil, dimension-hopping hivemind, this cough interrupts just about everything you do and makes you vulnerable for several seconds. Dodge-rolling will help negate some of the effect’s duration, but you may not always have stamina to spare, especially during some of the more hectic combat encounters.
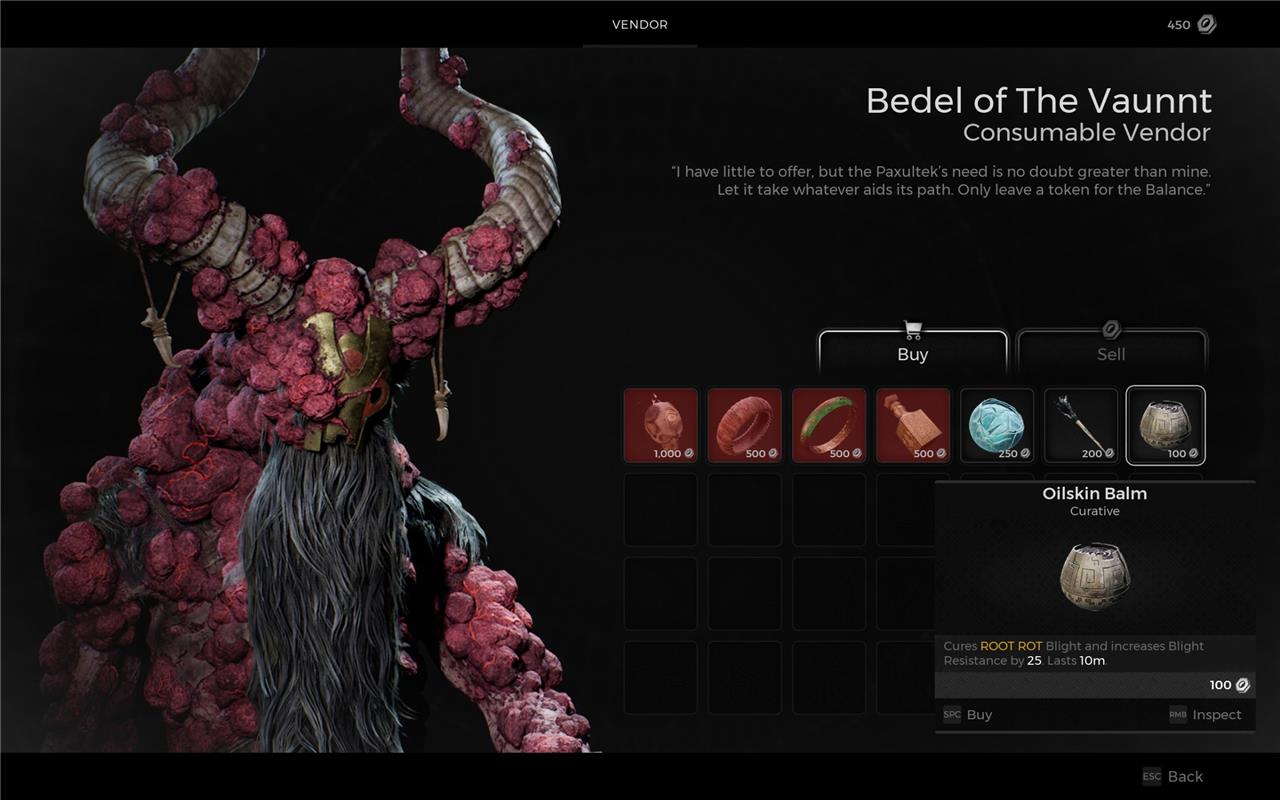
Fortunately, a curative item known as Oilskin Balm is plentiful both in Ward 13 and Yaesha itself. Before leaving the former, visit Dr. Norah to stock up on medicine, and if you’ve already traveled to the latter, a horned figure known as Bedel-he’s hard to miss as he’s literally waiting for you at the beginning of the area-can hook you up. Both merchants stock the item for 100 scrap apiece.
Bedel also sells a Rotward ring for 500 scrap that prevents Root Rot entirely, which may also be an option if you’re having trouble avoiding its effects.
Screenshot everything
Take screenshots often, especially before changing worlds or rerolling campaigns. Hidden paths, random events, and rare loot can appear differently each time you play, making visual notes priceless for tracking locations or puzzle clues. Capturing your gear setups can also help you compare loadouts and revisit successful builds later.
The ability of modern consoles and PCs to screenshot video games with a single button means it’s easier than ever to solve puzzles, and Remnant 2 has some doozies.
When you stumble upon a book or unique environmental fixture, I highly suggest taking a screenshot and keeping it in your digital back pocket. You’d be surprised by what constitutes a clue in Remnant 2, and without a compendium or quest log to scroll through, you’ll want to have as much information as possible on hand so you don’t need to backtrack. I’ve found some interesting loot by simply being aware of the major details of a background story or a series of symbols and pulling up the requisite screenshot for a refresher on something I read half an hour ago.
Best beginner Archetypes and builds
Handler stands out as the top beginner Archetype in Remnant 2 for its forgiving canine companion that tanks damage and deals DPS independently. Pair it with a long gun like the Enigma for ranged attacks and a melee like the World’s Edge, focusing traits on Vigor and Endurance for survival.
Handler Build
Start with Handler for the Reggies dog summon skill, which distracts enemies during tough early fights. Use weapons such as the Bolt Driver (high fire rate) or MP60-R (reliable SMG), upgraded at Cass; equip armor under 20 weight for quick dodges. Prioritize traits like Handler’s First Blood (boosts companion damage) and Survivalist for health regen.
Challenger Build
Challenger excels for melee fans with high health and shield skills like War Stance for tanky play. Equip heavy hitters like the Stonebreaker (melee club) and Nightfall (long gun with AoE), keeping Constitution high. Traits such as Die Hard (damage boost near death) make it resilient for learning boss patterns.
Gunslinger Build
Gunslinger suits gun-focused players with auto-reloads and bullet reserves via Loaded trait. Run the Rune Pistol secondary and MP60-R primary, with light armor for mobility; Vigor traits enhance ammo efficiency. It shines in co-op where friendly fire matters less.
Hybrid Tips
Unlock Engineer or Hunter early for dual-classing-Handler/Engineer adds turrets for passive damage. Spend Trait Points freely on Endurance (dodge) and Vigor (health); farm scraps in Losomn for quick upgrades. Test in Adventure Mode to refine without campaign risk.
Traptrix deck list and beginner combos
Traptrix is a Yu-Gi-Oh! control archetype centered on Plant monsters and “Hole” Trap Cards that disrupt opponents while setting up Xyz/Link plays. It’s beginner-friendly due to resilient starters and reactive combos that punish summons and backrow.
Core Deck List
Run 40 cards for consistency, focusing on Traptrix engines, handtraps, and staples.
Monsters (20-22):
-
Traptrix Myrmeleo x3 (searches Trap Holes on Normal Summon)
-
Traptrix Mantis x3 (searches Traptrix monsters)
-
Traptrix Pudica x3 (searches Traptrix cards)
-
Traptrix Dionaea x2-3 (revives Traptrix from GY)
-
Traptrix Arachnocampa x2-3 (searches Trap Holes from Deck)
-
Parallel eXceed x2-3 (extends into Links)
-
Ash Blossom & Joyous Spring x3
-
Maxx “C” x3 (if legal in your format).
Spells (5-7):
-
Traptrip Garden x3 (Field Spell, summons Traptrix)
-
Pot of Prosperity x1-2
-
Dark Ruler No More x2.
Traps (10-12):
-
Traptrix Holeutea x3 (searches Trap Holes)
-
Infinite Impermanence x3
-
Evenly Matched x2-3
-
Bottomless Trap Hole x1
-
Gravedigger’s Trap Hole x1.
Extra Deck (15):
-
Traptrix Sera x2-3 (Link-1, sets Traps from Deck)
-
Traptrix Rafflesia x2 (bounces cards)
-
Traptrix Allomerus x1-2 (steals monsters, Trap protection)
-
Traptrix Pinguicula x1
-
Traptrix Cularia x1
-
Abyss Dweller x1
-
Number 41: Bagooska x1
-
Divine Arsenal AA-ZEUS x1
-
Traptrix Atypus x1.
Beginner Combo 1: Myrmeleo + Trap Hole
Normal Summon Myrmeleo to search Holeutea; activate Holeutea to Special Summon Dionaea from Deck/GY, which grabs a Trap Hole back to hand. Link into Sera; Sera sets another Holeutea. Xyz into Allomerus or Rafflesia for disruption. Ends on Sera + Trap + backrow pop.
Beginner Combo 2: Pudica + Garden
Normal Summon Pudica to search Traptrip Garden; activate Garden to Special Summon Mantis from Deck. Mantis searches Arachnocampa; Link into Sera. Sera sets Holeutea; activate for Dionaea revival. Overlay Rafflesia to bounce opponent’s card. Strong 1-card starter into 3+ disruptions.
Beginner Tips
Prioritize Sera as your key endboard-she’s unaffected by Holes and generates Traps. Side in Nibiru against combo decks and Cyclone for backrow. Practice resolving opponent interruptions like Ash on searches; bait them early. Run 8-10 Holes for consistency.