Lune’s true potential shines in Act 3, where her synergy with Benisim turns every strike and heal into a calculated act of survival. This build transforms her from a cautious fighter into a relentless force, balancing precision offense with powerful recovery.
Best Lune build overview
Lune shines in Act 3 with a Benisim-focused build that maximizes healing output and team sustain. Pair her core healer kit with Benisim Pictos for amplified recovery on allies during tough boss fights like those in Benisim. Stack defensive attributes through gear like the Healer’s Robe and Twilight Staff to boost her survivability, while skills such as Renew and Cascade ensure constant upkeep. This setup turns her into a reliable backbone, keeping the party alive amid escalating threats without sacrificing damage potential.
More often than not, a single mistake – a missed parry or dodge – can result in an all-party wipe. The goal with this build is to make progressing in the campaign a less punitive process by allowing Lune to heal party members whenever needed. With this build, the difficulty of fights is reduced and mistakes become less punishing, since Lune’s kit includes direct healing skills (one even capable of applying the Regen effect), a resurrection skill, and even an offensive magic capable of recovering the party’s HP.
To make this build work, you want to equip Lune with Benisim, a unique weapon that reduces the cost of healing and ensures access to free healing skill. By not having to spend AP on preventive healing, Lune can instead apply burn to enemies, cause heavy damage, or apply an effect that causes damage and heals that party when it is her turn. This build is meant to create a safe environment for the other party members to stay alive and focus on using their strongest skills.
Best weapon for Lune
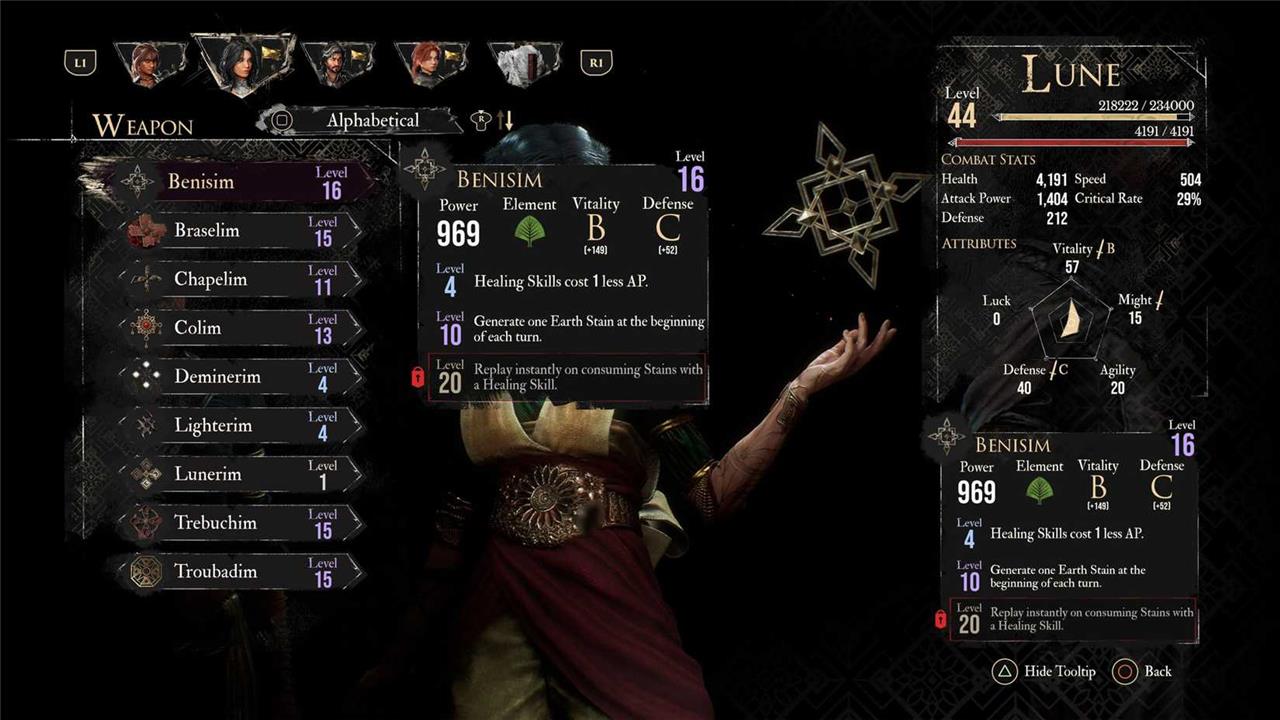
In order to make this Lune support build work, you need the Benisim weapon, which you can buy from the Gestral Merchant in the Forgotten Battlefield.
- Element: Earth
- Scaling: Vitality (B), Defense (C)
- Level 4 effect: Healing Skills cost 1 less AP.
- Level 10 effect: Generate one Earth Stain at the beginning of each turn.
- Level 20 effect: Replay instantly on consuming Strains with a Healing Skill.
Benisim scales with Vitality and Defense, making Lune quite tanky while still being capable of dealing solid damage to support the rest of the party. However, Benisim is a key piece of this build, and the reason why lies in the weapon’s skills. At level four, it reduces the cost of Healing Skills by one AP, allowing you to cast Healing Light for only two AP and Revitalization for four AP. It might not sound like a huge change, but needing one less AP allows more consistent healing and reduces the reliance on accumulating AP through other methods.
When Benisim reaches level ten, it unlocks an update that is extremely important to this build: it generates one Earth Stain at the start of Lune’s turn. With two of these stains, Healing Light costs no AP to cast. The ability to use a single-target heal for free is not only great for keeping the party’s HP topped up, but also lets you save AP for stronger skills to use later in the fight. The Stain mechanic in this build becomes even more important once Benisim reaches level 20, unlocking a passive ability that grants Lune another turn after consuming Stains to cast a healing skill.
Best skills for Lune
The best skills for this build are the healing ones that will maximize Benisim’s passive abilities. In addition, there are two free slots for you to pick skills that best synergize with your current party. We selected two skills as examples based on the characters we will suggest later in this guide to party with Lune, but feel free to experiment.
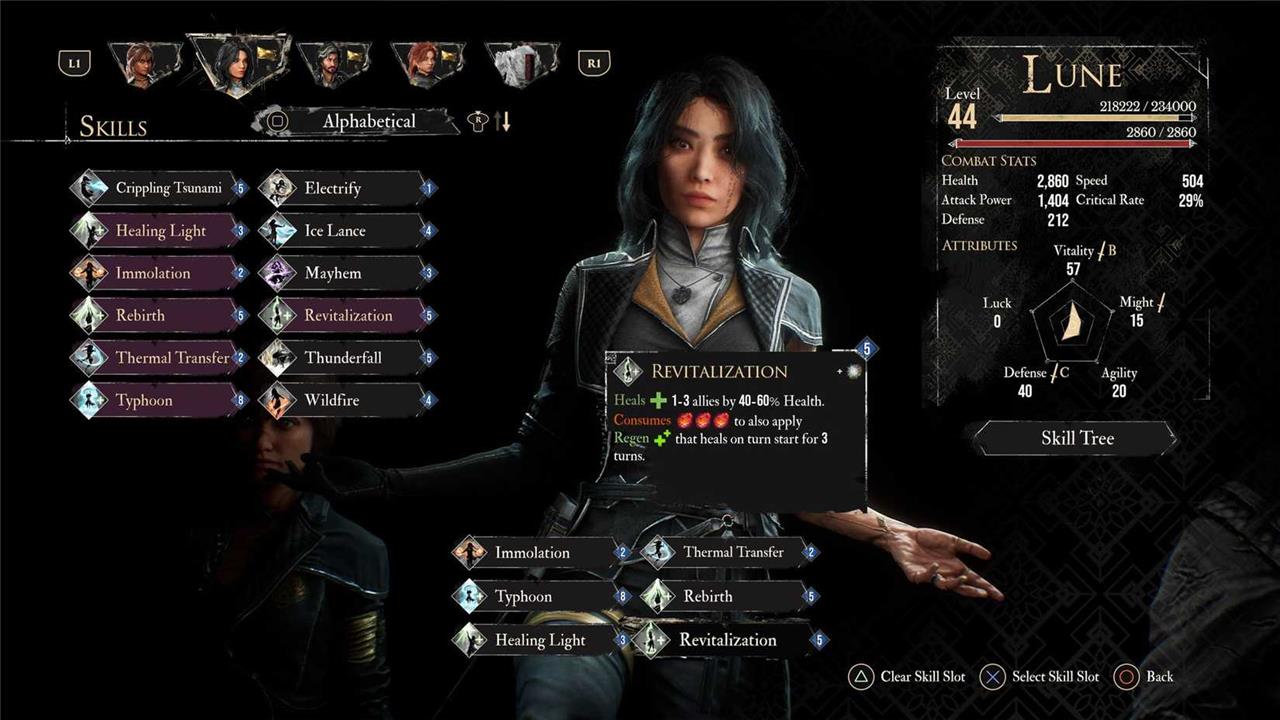
- Healing Light
- Rebirth
- Revitalization
- Typhoon
- Immolation
- Thermal Transfer
The first three skills – Healing Light, Rebirth, and Revitalization – are the core of this build. Healing Light is a single-target healing skill, and being able to cast it for free by using two Earth Stains makes it the perfect preventive healing spell. Revitalization, on the other hand, heals the whole party and can apply Regen, a healing-over-time stack that lasts for three turns, if Lune has three Fire Stains. Because it ensures each character in the party receives some healing on their turns without the needing AP, Revitalization is the right answer to enemy attacks. Lastly, Rebirth resurrects a party member. This is an expensive skill – five AP – but it’s the only one in the game capable of reviving allies.
Typhoon is an offensive skill that offers a weaker Regen to the party. When cast, it deals Ice damage and heals allies, and, for three turns, the skill will trigger automatically at the beginning of Lune’s turn. Although characters need to wait for Lune’s next turn to recover some HP, Typhoon is a solid option to cause damage and keep everyone alive. It’s particularly good if you don’t have the Stains required to trigger the Revitalize’s Regen effect.
We listed Immolation and Thermal Transfer as our two situational skills based on the intention of pairing Lune with Maelle. Immolation is a cheap Fire skill that applies Burn, while the Thermal Transfer is also a cheap Ice skill that generates AP when it hits burning enemies. Burn is an important effect for Maelle and a good damage-over-time stack that hurts enemies at the start of their turn. Additionally, Immolation generates one Fire Stain, which will slowly build the pool of Stains you need to trigger the Regen effect. On the other hand, Thermal Transfer generates Ice Stains – which increases Immolation’s damage – and can grant Lune a second turn if you have two Earth Stains.
Best Pictos for Lune
This build is not heavily dependent on Pictos, so you can run any that has at least Health or Defense as one of their stats. Here are our suggestions:
- Burning Mark
- Energising Start
- Healing Share
The first two Pictos were chosen because of the overall utility they bring to the build. Burning Mark applies Burn when Lune hits a Marked foe, which you will be constantly doing – especially if you have Verso in your party. It serves as a strong secondary option for applying this effect to set things up Maelle. On the other hand, any Energising Start will let you begin with an extra AP. The effect of this Picto is cumulative, so you can equip more than one (there are a total of four in the game), but for this build only one is enough to speed up Lune and put her in a comfortable position to heal the party at the beginning of a fight.
Healing Share is an excellent option to capitalize on every heal performed. With this Picto, Lune will receive 15% of all Heals affecting other characters, reducing the need to waste healing skills on Lune instead of another party member. Lune will also benefit from a heal that she didn’t cast.
Best Luminas for Lune
The best Luminas for Lune must not only help her fulfill her role, but also support Lune by increasing her damage and AP generation. There’s room for you to experiment and see which ones work best for specific fights. Here’s a list of all the Luminas you should run with this build and two optional ones.
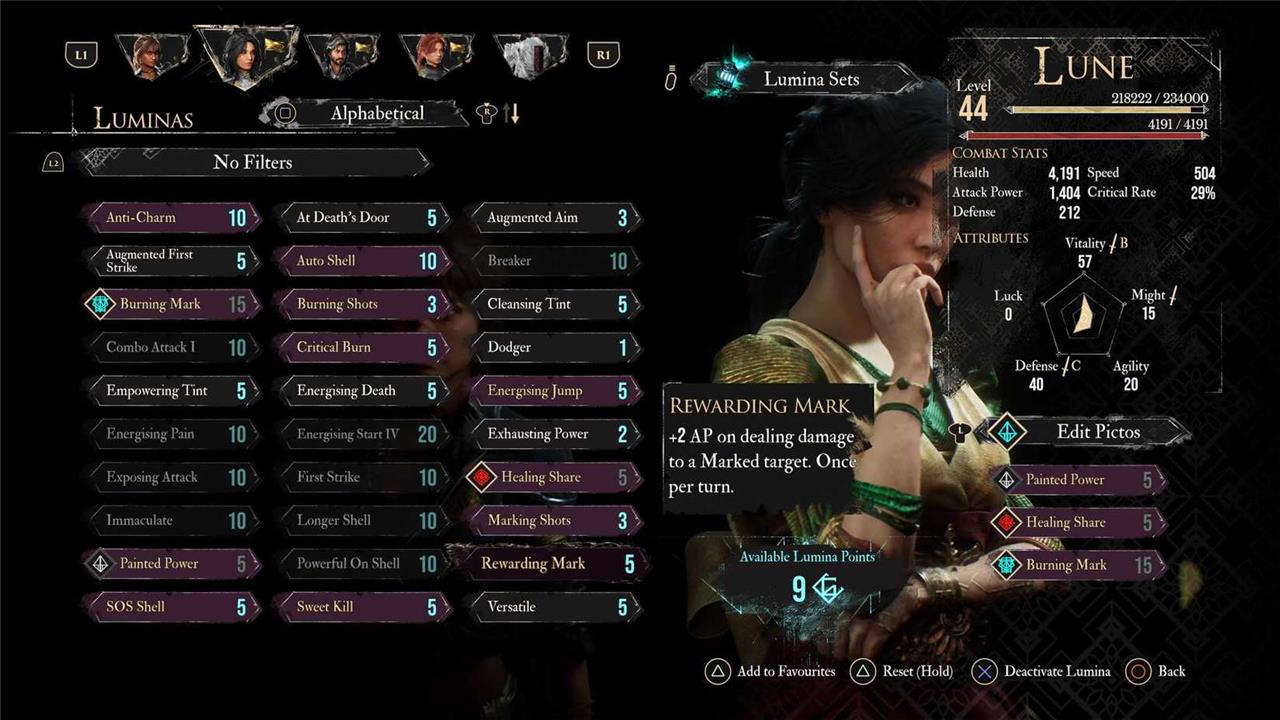
- Rewarding Mark
- Marking Shots
- Burning Shots
- Painted Power
- Auto Shell
- SOS Shell
- Longer Shell
- Energising Jump (optional)
- Energising Pain (optional)
In addition to the three skills obtained through the Pictos mentioned in the previous sections, we want Regarding Mark, Marking Shots, and Burning Shots to make the most of hitting a Marked enemy. With Painted Power, Lune’s attack can hit numbers higher than 9,999 – which is always good.
Meanwhile, Auto Shell, SOS Shell, and Longer Shell are great tools to keep Lune alive longer and let you use all her turns to support the other characters. Because of her weapon, you will focus on Vitality and Defense, making her difficult to get killed, but there are enemies in this game who just hit really hard and the extra layer of protection offered by Shell is welcome.
The two optional Luminas were selected as a suggestion to boost your AP generation and not depend on parrying attacks. Lune can handle a couple of blows and stay alive, justifying the use of Energising Pain, while Energising Jump is a free AP whenever you use a jump counterattack.
How to play Lune
Lune excels through precise timing and flow management, rewarding players who can balance offense with graceful evasion. Focus on reading enemy patterns and chaining her light and heavy attacks to maintain pressure while preserving energy for mobility skills. Use her healing capabilities to sustain through extended battles, especially during boss phases. Proper rhythm and control of her combos significantly boost both survivability and damage output in Act 3 encounters.
As a support, Lune’s gameplay is based on a list of priorities rather than a set rotation. The idea is to analyze each turn and determine what is most important. At the top of your list is healing as many party members as possible and keeping them at least 60% of their health by using a heavy healing skill like Revitalization. This scenario is more common after an enemy’s turn where your party has taken significant damage. Healing the group takes precedence over resurrecting a recently killed party member. The only time you should resurrect a fallen ally before healing everyone else is if you have enough Stains to play a second turn.
If most of the party is healthy, you should prioritize either preventing damage by ensuring the whole party is full HP by casting a free Healing Light, or applying Burn with Immolation. This is also a good opportunity to spend one or two AP on free-aim shots at Marked enemies to generate more AP or to apply Mark.
At the bottom of your list of priorities is casting Typhoon or any other high-damage skill. Since the main goal of this build is to keep the rest of the party healthy and alive, make sure it is safe before spending all your AP on causing damage.
Best supporting party members for Lune
With this build, Lune is a full-on support character and, although capable of dealing solid damage, this is not her primary role. Because of that, the best character to go along Lune is Maelle. While she has a few support skills, Maelle is fantastic at killing enemies and depleting a boss’s health bar. Even before the end of Act 2, when you obtain Painted Power, Maelle is already capable of causing 30,000 damage to enemies with a single skill. You want Maelle alive and attacking all the time – which she can do if Lune is supporting her.
Which Act 3 weapons best scale with Lune’s Agility and Defense
Choralim emerges as the premier Act 3 weapon for Lune that scales with both Agility and Defense, enhancing her speed, survivability, and multi-hit skill damage like Lightning Dance.
Top Agility/Defense Weapons
These Act 3-accessible options prioritize the dual scaling for hybrid DPS-healer builds:
| Weapon | Scaling | Key Passives (Lv10/Lv20) | Acquisition | Best For |
|---|---|---|---|---|
| Choralim | Agility/Defense | +Multi-turn Pictos/Lumina efficiency; +Damage ramps (up to 100% on unhit turns), auto-Burn on crits | Defeat Chromatic Lzando (Siren’s Dress) | Burn/Genesis nukes, late Act 3 superbosses |
| Contorso | Defense/Agility | Lightning affinity; Stain synergies on multi-hits | Act 3 Lightning zones | Speedy AoE Thunder builds |
| Cultam | Defense/Agility | Dark damage; +AP on Stain consume | Act 3 Dark enemies | Sustain with Scaverim-like play but tankier |
| Lighterim | Defense/Agility | Wildfire buffs, AP cost reduction | Early Act 3 upgrade | Fire Stain ramp-up |
Build Synergies
Prioritize 99 Agility/99 Defense for Choralim to hit 100% crit with 4+ Stains (Lv4 passive), enabling Burn spread and ignoring crit gear. Pair with Benisim as a secondary for pure healing (Vitality/Defense scaling, -1 AP heals). This setup excels in Benisim-style sustain while chaining Elemental Trick into Genesis.
Which Act 3 weapons grant the highest Agility scaling
Choralim provides Lune with the highest Agility scaling among Act 3 weapons, boasting primary Agility scaling paired with Defense for rapid multi-hit skills and crit ramps.
Highest Agility Scaling Weapons
Act 3 weapons emphasizing Agility excel in speed-driven stain generation and Genesis combos for Lune:
| Weapon | Primary Scaling | Secondary Scaling | Key Lv10/Lv20 Passives | Acquisition |
|---|---|---|---|---|
| Choralim | Agility (A) | Defense (A) | Multi-turn efficiency; 100% damage ramp on unhit turns; auto-Burn crits | Chromatic Lzando (Siren’s Dress) |
| Contorso | Agility (A) | Defense (B) | Lightning multi-hits; Stain gen on chains | Act 3 Lightning zones |
| Lighterim | Agility (B) | Defense (A) | Wildfire AP reduction; Fire Stain buffs | Early Act 3 upgrade path |
Optimization Tips
Max Agility to 99 for Choralim to unlock 100% crit at 4+ Stains via Lv4 passive, bypassing crit Pictos entirely. This setup synergizes with Defense for tanky speed, outperforming pure Might scalers in sustained Act 3 fights like superbosses.