Forge the might of your squad: iron, grit, and a plan that turns the fortress into a blazing hornet’s nest.
In this Dwarf Fortress military guide, we’ll explain everything you need to know about setting up military squads, equipping them for battle, training them up, and giving them orders.
Before you begin making a Dwarf Fortress military…
Before organizing your fortress’s defenders, make sure you have a steady supply of food, drink, and weapons ready. A hungry or unarmed squad won’t last long against goblins or beasts. Assign a barracks for training, set up weapon and armor stockpiles, and have a manager or militia commander appointed. Preparing these basics ensures your dwarves can focus on discipline and combat skills rather than running off to fill personal needs mid-drill.
Even the help menu will tell you that it’s important to set up a military (relatively) early so you’re prepared for whatever dangerous curveballs the game throws your way. But you can’t start one right away – you’ll have to wait until your fortress is pretty well established and you have some infrastructure built up.
First, you’ll need some spare dwarves who aren’t actively participating in the labor force. With some clever scheduling (more on scheduling below), you can have dwarves in the military that perform typical jobs in their off months, but it’s much easier to keep everyone dedicated to one thing at a time.
You’ll also need to equip those dwarves, so setting up armor and weapons manufacturing is necessary (or you can trade for them, but that’s much slower and less reliable). Let’s talk a little more about armor, weapons, and their manufacture.
Make armor and weapons (set up your infrastructure)
Forge the basics: designate workshops for weapons and armor, assign dwarf labor where smiths and leatherworkers focus on gear, stockpile ore, ingots, hides, and wood for crafting tools, and establish a steady production schedule to keep your military well equipped.
Technically, you can just train up your military with whatever the dwarves are wearing and using when you recruit them. You don’t need to assign weapons or armor, but, to be effective, your military is going to need weapons to fight with and armor to protect themselves.
Like most things in Dwarf Fortress, making armor and weapons is a multi-step process. Let’s break them down.
Armor
Since Dwarf Fortress is all about the details, it shouldn’t be a surprise that armor (and clothing in general) has a lot of subsections. A full set of armor includes gear on the head (caps and helms), upper body (armor and breastplates), hands (gloves and gauntlets), lower body (leggings and greaves), and feet (shoes and boots), along with a shield.
Broadly speaking, armor is either leather or metal. (It’s possible to make armor out of bone or shell at a Craftsdwarf’s Workshop, but let’s focus on leather and metal since those more readily available.)
Making leather armor
The simplest armor for your military uniforms (more on this in a minute) is leather armor. The first two steps of making leather armor are automated by default, so you just have to build the Workshops.
- Leather comes from the hides of dead and butchered animals, which you get through butchering your livestock, hunting, or killing things that attack you. Set up a Butcher with Build (b) > Workshops (o) > Farming (f) > Butcher (b). It’s a good idea to put your Butcher behind a door since it sometimes generates miasma.
- Those hides then have to be tanned. Set up a Tanner with Build (b) > Workshops (o) > Farming (f) > Tanner (t).
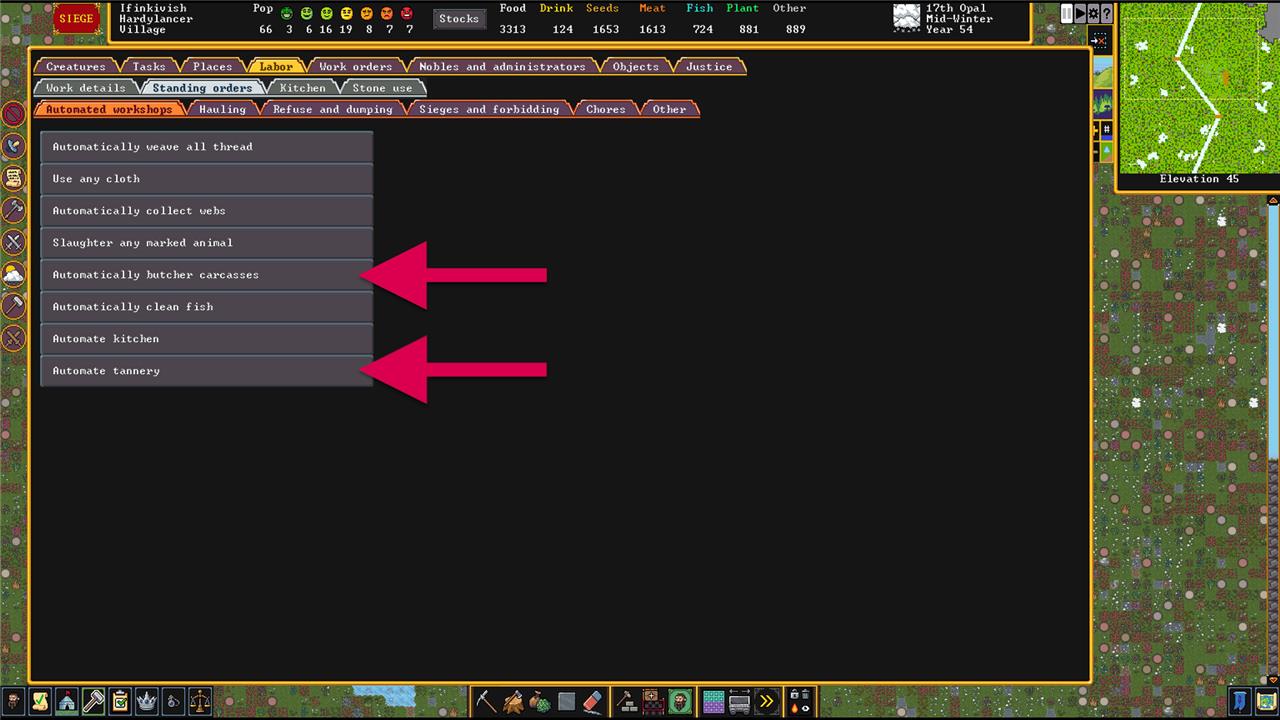
In the Labor (y) menu, click on the Standing Orders tab. You’ll see a list of jobs that just happen automatically. The two we’re talking about here are Automatically butcher carcasses and Automate tannery. They should be on by default, but this menu is where you’ll make sure. This means you’ll constantly turn carcasses in to hides and hides into leather whenever you have any.
With the leather in your stocks, it’s time to turn it into armor. Build a Leather Works with Build (b) > Workshops (o) > Clothing and Leather (l) > Leather (l). Click on your Leather Works to add new tasks (or set up work orders) for leather helms, armor, gloves, leggings, shoes or boots, and bucklers or shields. One note here: gloves and boots are made one at a time and each dwarf requires two, so order twice as many as everything else.
If you plan on using crossbows (more on this below), also create some leather quivers.
Making metal armor
Making metal armor takes about the same number of steps, but the materials are a little harder to come by in bulk. You’ll need:
- Lumber to turn into charcoal at a Build (b) > Workshop (o) > Furnaces (u) > Wood Furnace (f) or either bituminous coal or lignite to turn into coke at a Build (b) > Workshop (o) > Furnaces (u) > Smelter (l). This creates one bar of charcoal per unit of lumber, nine bars of coke per unit of bituminous coal, or five bars of coke per unit of lignite.
- Metal ores. These are the byproduct of mining, so you’ll probably find some naturally as you expand your fortress. If you need more, try digging deeper and branching out from there. There are 16 kinds of metal ore, so we won’t get into them all here. The most common ones you’ll find are tetrahedrite (silver and copper), hematite and magnetite (iron), and maybe even native silver or copper (silver and copper, respectively).
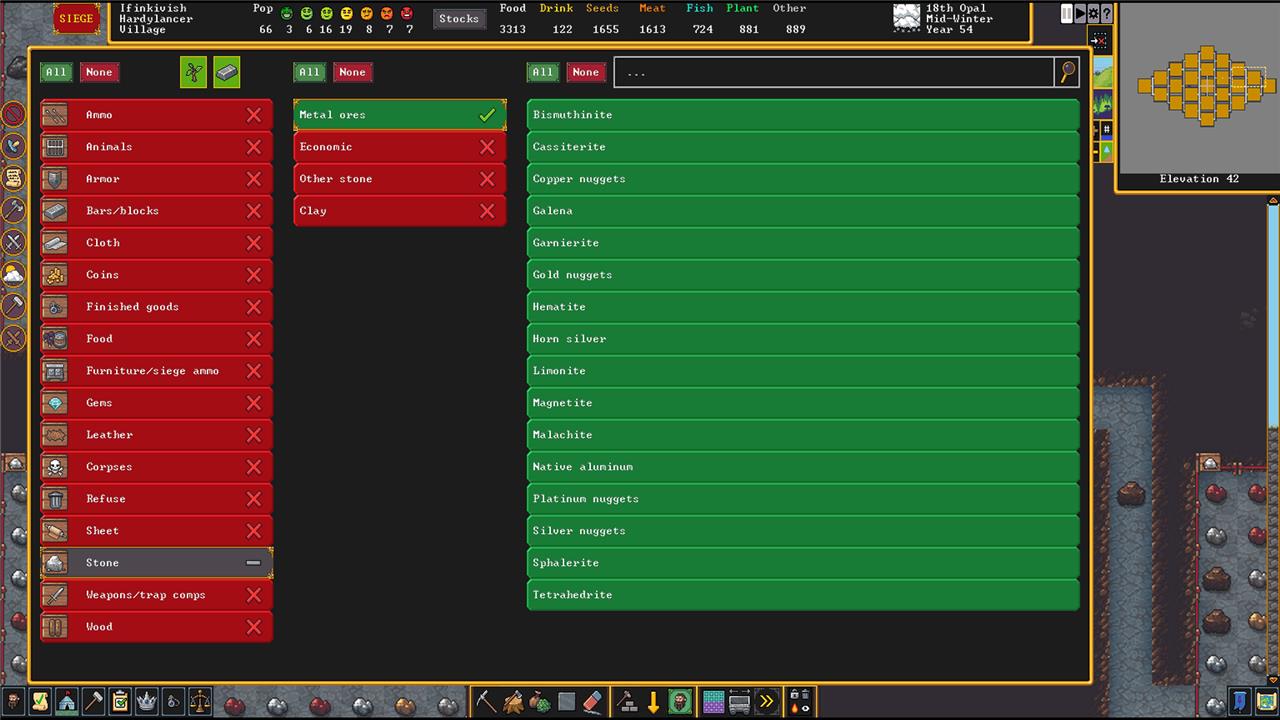
(A quick aside: metal ore is stored in Stone Stockpiles. If you want to create a dedicated stockpile just for ores, create a Stockpile (p) and set it to Stone. Before you close the menu, click on Custom. In the next menu, set Economic, Other Stone, and Clay to none. That will leave only Metal Ores active in your stockpile.)
With charcoal or coke and some metal ore in hand, you’ll need to smelt it and then work it.
- At a Smelter, create a job (or a work order) to smelt [whatever metal ore you have] ore. This consumes one metal ore and one bar of charcoal or coke to produce four bars of metal.
- At a Build (b) > Workshops (o) > Metalsmith’s Forge (i), click on Add New Task, Armor, and then whatever metal you just smelted. Set up whatever combination of armor you like (see above).
Training Weapons
Before we get to the weapons your squad will use in combat, let’s talk about the weapons they’ll use to train up their skills during scheduled or ordered training (below). Dwarves won’t train with their regular weapons, only (blunt) wooden ones.
At a Build (b) > Workshops (o) > Carpenter’s Workshop (p), order some wooden training axes, spears, or swords. We’ll get back to these later.
Weapons
Melee weapons are a lot more straightforward than armor – they’re only metal, so you just need to follow the process for metal armor above to smelt your metal and then create them at a Metalsmith’s Forge. Melee weapons include battle axes, short swords, spears, picks, maces, and war hammers.
Ranged weapons are a little more complicated. The only kind of ranged weapon you can make are crossbows (but you can trade for bows). Wooden and bone crossbows are made at a Build (b) > Workshops (o) > Bowyer (b). Metal crossbows are made at a Metalsmith’s Forge. Ammunition (bolts) for your crossbows can be made of wood or bone at a Craftdwarf’s Workshop or metal at a Metalsmith’s Forge.
Matching weapons to enemies
Each type of weapon has strengths and weaknesses against the various types of enemies you’ll encounter.
- Battle axes and short swords work best against medium-sized, unarmored enemies.
- Maces and war hammers work well against both unarmored and armored enemies.
- Spears, picks, and crossbows work well against armored enemies, but also work well against animals and megabeasts.
Beyond size and armor, the various kinds of metal have their own strength rankings. Weapons made of stronger metals have an easier time going through armor made of weaker metals.
From weakest to strongest, the metals are: silver at the bottom, copper, iron, and then steel at the top. Making steel requires an extra step, though.
Making steel for weapons and armor
Steel is an alloy of iron and carbon (from coke or charcoal), but it’s not quite that simple. Once you have some iron, everything happens at a Smelter.
- Make Pig Iron Bars. Pig Iron is an alloy of one iron bar, one flux stone (Calcite, Chalk, Dolomite, Limestone, or Marble), and two bars of coke or charcoal.
- Make Steel Bars. Steel requires one iron bar, one pig iron bar, one flux stone, and two more coke or charcoal bars. This produces two bars of steel.
Making steel is a little resource intensive, so it’s quicker and easier to stick with iron if you have it.
Appoint a Militia Commander
Select a capable dwarf through the military screen and assign them as the militia commander. This position acts as the foundation of your army, allowing the formation of squads for training and defense. Choose someone with strong leadership or combat skills to ensure morale and coordination during battles. Once assigned, you can create additional squads under their command to expand your military structure and prepare for threats.
Now that you have your infrastructure built and you’re manufacturing armor and weapons, it’s time to (finally) set up your military.
There are two military (or military-adjacent) roles in your Nobles and Administrators menu (n) – the Captain of the Guard and the Militia Commander. The Captain of the Guard (and his squad if and when you create one) are dedicated to internal conflicts and justice (and beatings) – they’re basically the police of your fortress. The Militia Commander and their squad are outward-facing and deal with monsters, invasions, and sieges.
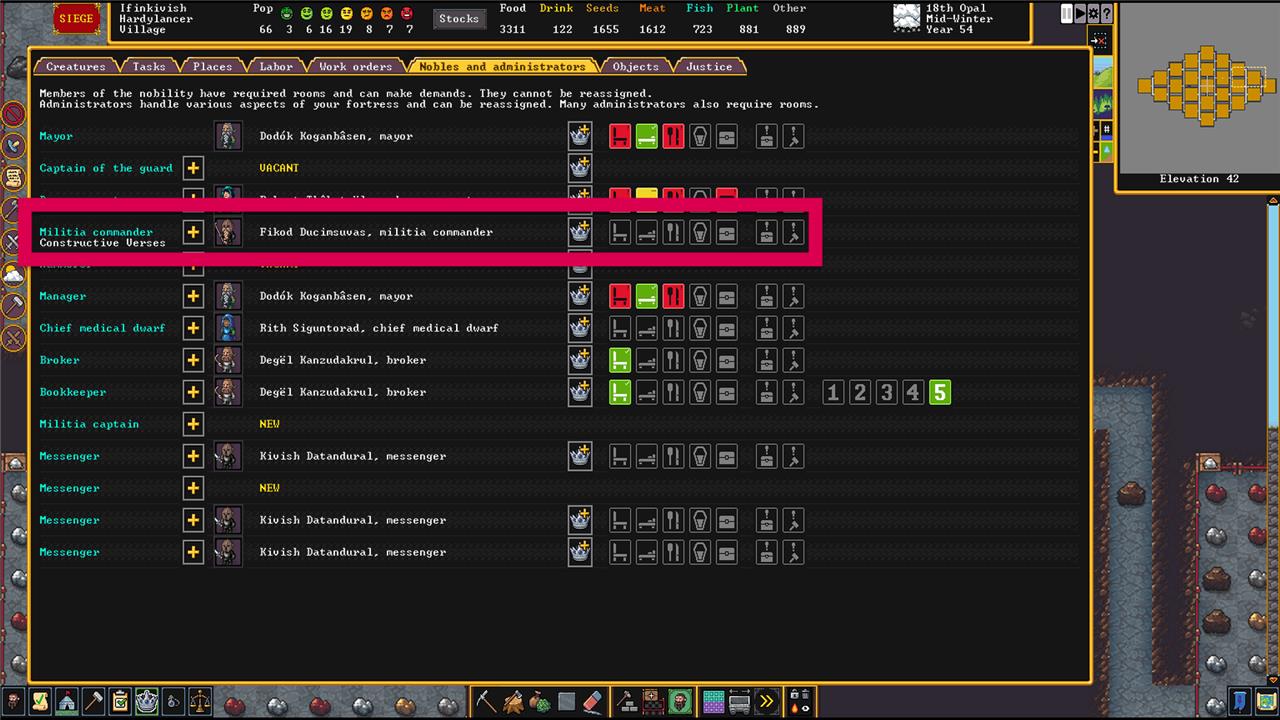
To appoint a Militia Commander, look for is a dwarf with leadership skills. They don’t even need a dedicated office, dining hall, or bedroom. Once you have your Militia Commander picked out, a new Noble and Administrator option will appear: Militia Captain. You’ll need to assign new Militia Captains for each new squad you want to create beyond the first one.
Pick a dwarf with the appropriate skills (or just pick someone with no particular skills or job) and you’re ready to set up your first Squad.
Create a Squad and assign Uniforms
Creating a squad begins through the military interface by assigning a leader, usually a dwarf with some combat experience, and then filling the remaining positions with available citizens. Once the squad is formed, you can assign uniforms that match their intended role-metal armor for melee fighters, lighter gear for marksdwarves, or specific weapons for specialized units. Uniforms can be customized to include individual pieces or complete sets, and deciding whether dwarves replace their civilian clothing helps balance readiness and comfort.
With your Militia Commander in place, you can set up their squad. Click the the banner button in the lower right of the screen to open the Squad (q) menu, and click the Create new squad button. Next, you’ll have to pick whose squad to create. If you only have a Militia Commander, this’ll be an easy choice.
The next choice you’ll get is to assign a Uniform with choices for leather, metal, and archer (or none). Leather and metal uniforms are for melee, and archer is leather armor plus a ranged weapon.
With the uniform picked, you can further customize the squad’s gear by selecting the squad out of the menu, clicking Equip at the bottom of the menu, and then clicking on Details.
Your squad of dwarves will head off to pick up as much armor and any weapons they need to match the uniform you assigned.
Determine Positions
Assign each dwarf a position within the squad based on their skills and equipment. Axedwarves, speardwarves, and marksdwarves should be distributed according to your combat plans, ensuring a balance of melee and ranged roles. Commanders and captains go at the top of the chain to manage discipline and training. Keep weaker or less experienced dwarves in reserve positions to gain experience without risking the squad’s combat strength.
In the Squad menu, there are a series of icons and buttons for each squad. From left to right, these are: the squad’s icon (which you can edit), the squad’s leader’s information, the positions button, and a button to edit the squad’s name. Click the generic dwarf head button to open up Positions.
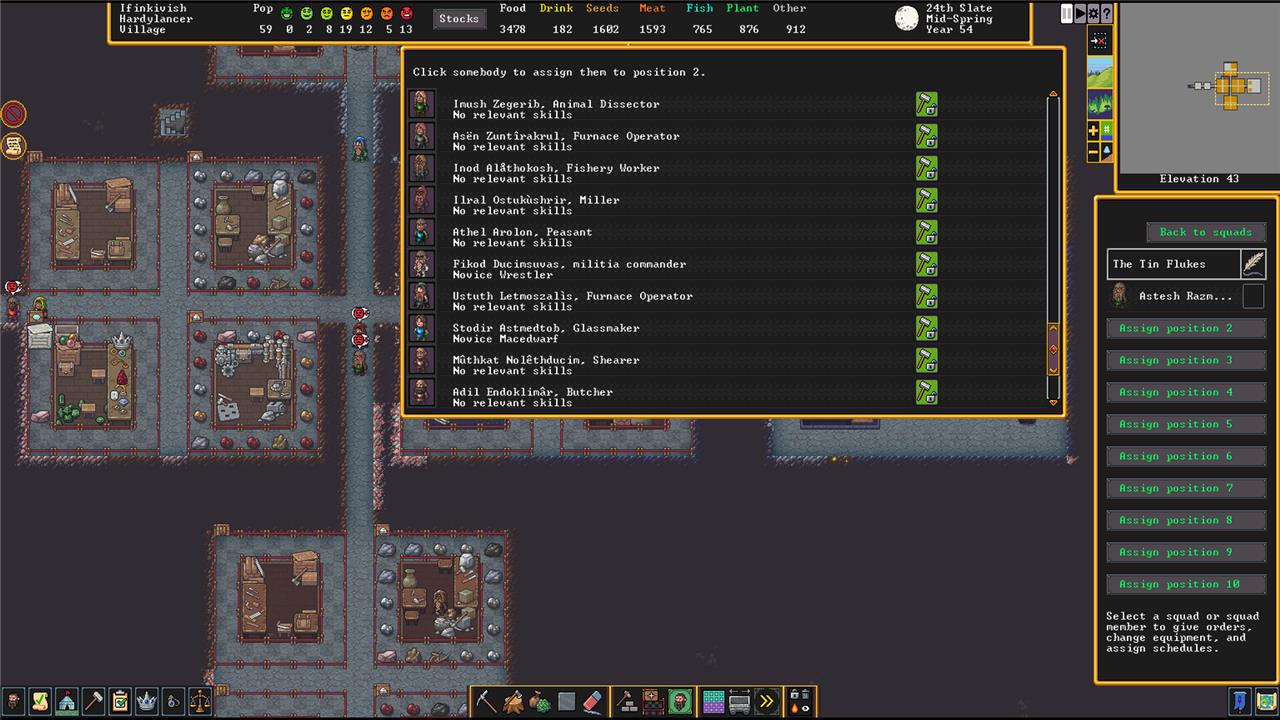
Here, you can assign the remaining nine positions in the squad. Positions doesn’t refer to physical locations, just slots in the squad.
Click on a position, and you’ll see a list of all the dwarves in your fortress. Look for recruits with no job and some military skill first, but, really, anyone will do. Every dwarf you add inherits the uniform you selected.
Create a Barracks
Building a barracks lets your dwarves train and rest between patrols. Designate a room from a bed, armor stand, or weapon rack and assign it to a specific squad through the military screen. This area becomes their training ground, sleep quarters, and storage space for equipment. Make sure it’s large enough for drills and has chests or cabinets for gear organization, so your soldiers stay prepared and disciplined.
Next, you need a place for your squad to hang out. Create a Barracks by opening the Zone (z) menu and selecting Barracks.
Once you draw your zone and accept it, click the banner and plus button to assign a squad to that barracks. In the next menu, you’ll be able to choose if this barracks is for sleeping, training, or storage (or all of the above).
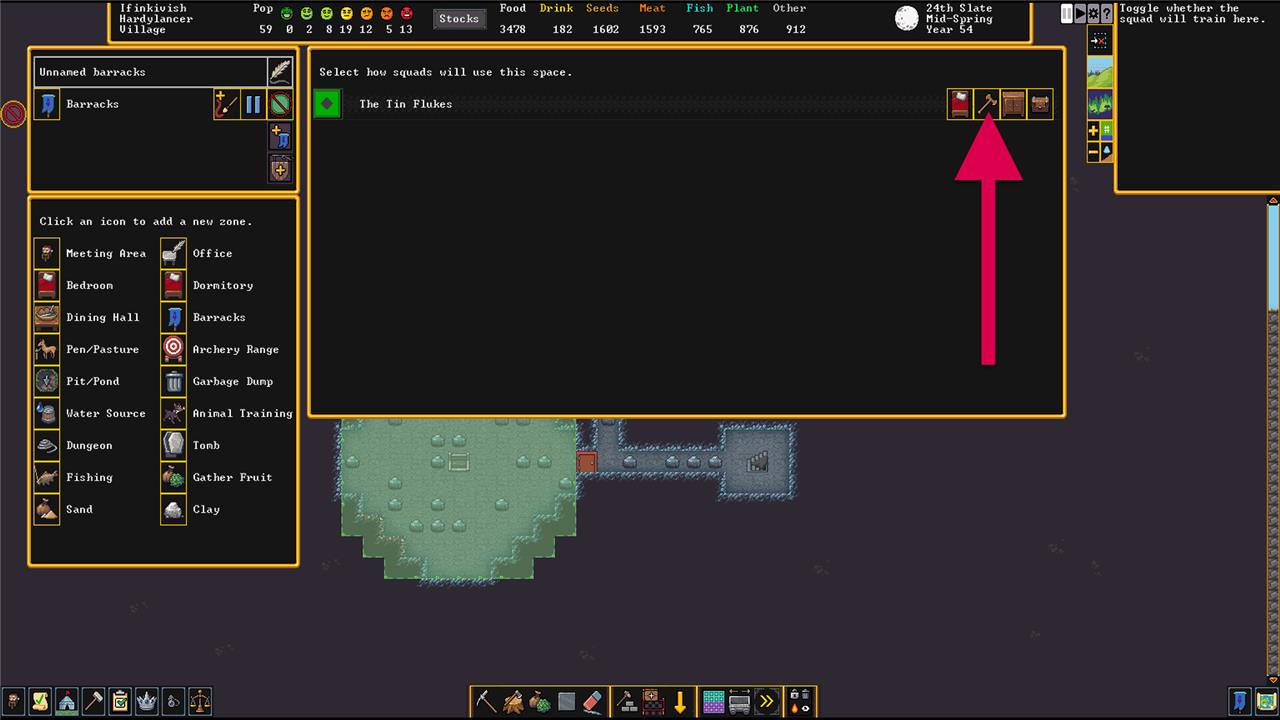
The most important one here is training – they can sleep and store their stuff anywhere.
Come up with Orders and a Schedule
Assign each squad a clear set of duties through the military screen, such as patrolling, guarding key areas, or training during off-duty months. Use the monthly schedule to balance combat readiness and rest, adjusting active and inactive months to prevent burnout. Customize alerts to control which dwarves respond during an attack, ensuring a quick and organized defense. Regularly review orders and schedules to keep the military coordinated and responsive to threats around the fortress.
There are two ways for you to control what your squad does on any given day: Schedule and Orders. Schedule is a calendar of what they should do in the absence of any direct orders (from you); Orders are those direct orders.
Orders
Orders are easier to understand than Schedule, so let’s break that down first. When you click the checkmark next to a squad in the Squad menu, six buttons appear across the bottom of the menu. These allow you to (immediately) order a squad to:
- Attempt to kill a target you designate.
- Station themselves at a position you choose, where they’ll wait and attack any enemies that get too close.
- Patrol a path you lay out.
- Defend a Burrow you assign them to. Burrows (U) are like a special kind of zone. Normally, a Burrow is an area your dwarves will attempt to stay within the Burrow they’re assigned to. You can activate and deactivate them, though, so it’s a good way to make a panic room that your squad will defend.
- Train in their Barracks (with the training option selected). Training increases their skills with their (uniform’s) armor and weapons.
- Cancel an order and return to their Schedule.
Schedule
Scheduling (by clicking on the Schedule button) opens up a new menu that lets you schedule (obviously) what your dwarves should be doing any time you haven’t given them a direct Order (above). This is a, frankly, confusing menu.
The four default Scheduled routines are here, but these are just the default examples. In fact, confusingly, clicking on any of them doesn’t actually assign your dwarves to do anything – they’re just names. You’re free to delete them and add more as necessary.
Click on a Routine and you’ll see it update in the Squad menu under Routine. From there, click the Edit button. At the top of the Edit menu, there are two buttons that decide when your squad wears their equipment (always or only while on orders) and where they sleep (their room or the barracks). Below that, things get more interesting.
First is the minimum number of soldiers to follow new order that defaults to 10. What this controls is how many dwarves need to show up in the barracks before the order goes into effect. Since it’s very rare that all 10 dwarves in a squad are in there at the same time, set it to something more reasonable (like three or four).
Below that is a list of all the dwarves in your squad with a checkbox next to their names so you can select them individually for orders (or just click the checkbox at the top to cover everyone).
And, at the bottom, you’ll see the controls for giving the actual scheduled orders.
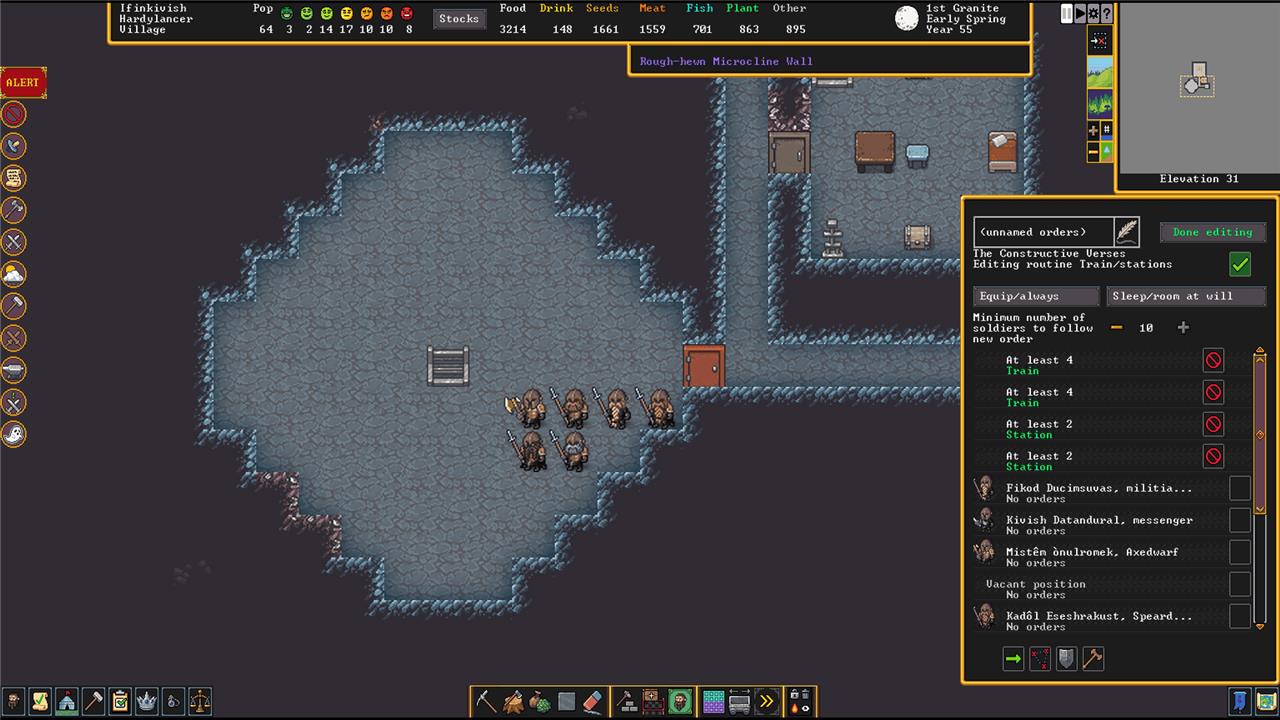
In the screenshot above, we’ve created a schedule routine called “Train/stations.” Under that routine are six orders. (Below the orders you can see the list of dwarves in the squad saying they have “no orders” – this doesn’t mean they’re not getting the orders, it just means they don’t have any individual orders specifically for them.) There are two orders to Train whenever at least four dwarves show up in the barracks, and four Station orders that trigger when at least two dwarves are around.
If you want to get even more granular about it – and do things like give your dwarves time off – click on the view monthly schedule button in the Schedule menu. This lets you assign Scheduled orders on a month-by-month basis. And, if you want to get really granular about it, you could even assign each individual dwarf orders for each month.
How to equip military squads with weapons and armor
To equip military squads in Dwarf Fortress, produce weapons and armor first, then assign uniforms via the squad menu so dwarves automatically haul and wear matching gear.
Produce Gear
Build workshops like Metalsmith’s Forge (b > W > f) for metal weapons (e.g., axes, swords, maces) and armor (helmets, breastplates, greaves), or Leather Works for leather sets. Smelt bars at Smelter first; prioritize steel or iron for effectiveness-maces/hammers crush armor best, axes/swords slice unarmored foes. Stockpile gear near barracks to speed equipping; use one dedicated armor/weapon stockpile to avoid junk mixing.
Assign Uniforms
In Squads menu (s or flag), select squad > Equip > Uniform, choose leather (basic melee), metal (heavy melee), or archer (ranged with quiver). Dwarves grab highest-quality matching items automatically; customize details for specifics like shield or helm.
Equip Settings
Edit squad schedule (bottom of Squads menu) > Edit: Set “Always wear uniform” (not just on duty) and “Replace clothing” initially to swap civvies, then toggle back to layer over. Add weapon/armor racks/stands to barracks for storage; assign squad to barracks zone (i > b).
Troubleshooting
If dwarves won’t equip, check stockpile access, forbid/return junk gear (k), or individually select items in equip details-ensure no pathing blocks or low-quality conflicts. Training uses wooden dummies/weapons, not real gear.
Best weapons and armor materials for squads
Steel is the top material for both weapons and armor in Dwarf Fortress squads due to its high density, sharpness, and toughness balance. Adamantine excels for elite squads if accessible, offering unmatched protection and cutting power but requiring dangerous mining.
Weapon Materials
Prioritize steel for slashing weapons like axes and swords (best vs. unarmored foes, cause bleeds/limb loss); silver or bismuth bronze for blunt weapons like hammers/maces (crush armor/shells effectively). Spears favor steel or iron for piercing internals on beasts/armored enemies; avoid for undead where blunt dominates. Bronze or copper suffice early-game but underperform long-term.
Armor Materials
Steel provides optimal coverage without excessive weight; full sets (breastplate, greaves, helm, gauntlets, boots, shield) in steel block most threats. Adamantine is superior for heavy armor but rare/fragile to produce; bronze beats copper for density early on, though iron edges it slightly. Layer leather underneath for basics if metal is scarce.
Squad Recommendations
Mix squads: one steel axe squad for goblins, hammer squad for megabeasts/undead, crossbows (steel/wood bolts) for ranged support. Stockpile high-masterwork steel gear near barracks for auto-equip; upgrade as skills improve.