Hidden high above the Hebra Mountains, the Ijo-o Shrine tests your balance, timing, and precision. This guide walks you through every step-from finding its remote sky island location to solving its clever puzzles for swift completion.
When you’re done, our shrine locations page or interactive Hyrule map can direct you toward something else to do.
Ijo-o Shrine Location
The Ijo-o Shrine sits on the Great Sky Island at coordinates (0499, -0337, 2049), inside a cavern accessed through a breakable rock wall on the southern cliffside. Players reach it early in the game after obtaining the Paraglider and crossing from the Room of Awakening. Enter by smashing the cracked stone with a nearby boulder or Fuse ability, then descend into the cave to activate the Fast Travel point. This shrine unlocks the Fuse combat skill from its monk.
The Ijo-o Shrine is found within the West Hebra Sky Archipelago in the Hebra Mountains Sky region. You can find the shrine located on an island floating at a very high elevation. The exact coordinates are (-3863, 2684, 0702).
It’s a large island, so it’s possible there are multiple ways to access it. We got there by riding a prebuilt hot air balloon located on an island just south of the shrine’s location at these coordinates (-3833, 2486, 0566).
When you find the air balloon, activate it and keep riding it up until you see the bright neon-green swirl of the shine located north of the platform. Wait until you are up high enough, and glide down to the island the shrine is on. (For context, we used up about two full charges of energy cell to get there, so if you go this route, make sure it’s upgraded to at least that, or grab a couple of extra Zonai batteries to attach to the balloon).
Ijo-o Shrine walkthrough
Ijo-o Shrine centers on using precise movement and control of small platforms to reach higher areas. Begin by manipulating the moving platforms to cross the central gap, then use Ultrahand to position stone slabs as ramps or bridges. The main puzzle involves stacking and rotating these slabs to create a stable path toward the shrine’s exit. Watch the motion patterns closely, as timing plays a key role in progressing safely. After solving the final platform section, the altar room becomes accessible for completing the shrine.
This shrine requires you to solve all sorts of puzzles that involve shields. It’s pretty straightforward, but we got you covered in case you have any questions.
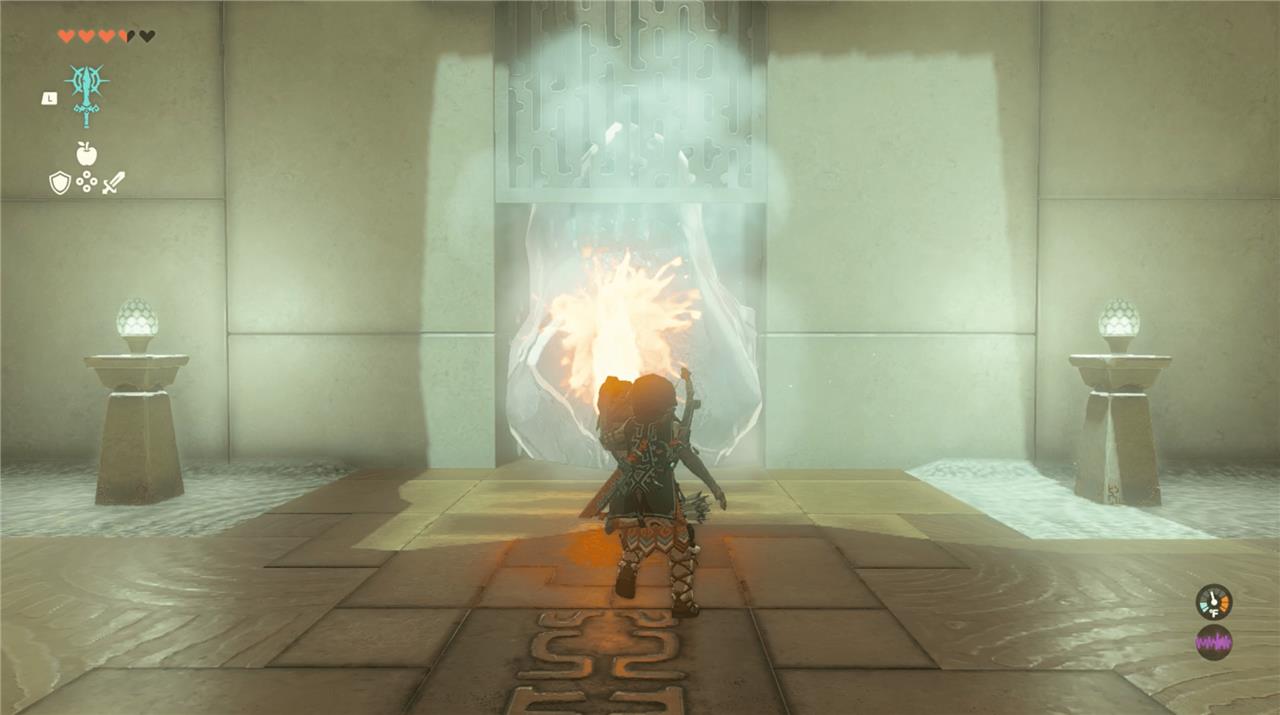
1. Walk forward into the shrine and defeat the Construct on your right. It will drop a flame emitter shield. Pick it up and equip it.
2. Straight ahead of where you entered, you’ll see a pathway blocked by a large chunk of ice. Use the Fused flame emitter shield to melt the ice and open the path ahead.
3. Walk through the hallway and enter the next room. Defeat another Construct to your left; it’ll drop a stone-slab shield that Link can pick up.
4. Before you continue to the next area, there is a block of ice across the room from where you defeated the second Zonai Construct. Walk across and melt the ice to reveal a chest containing a bundle of five arrows.
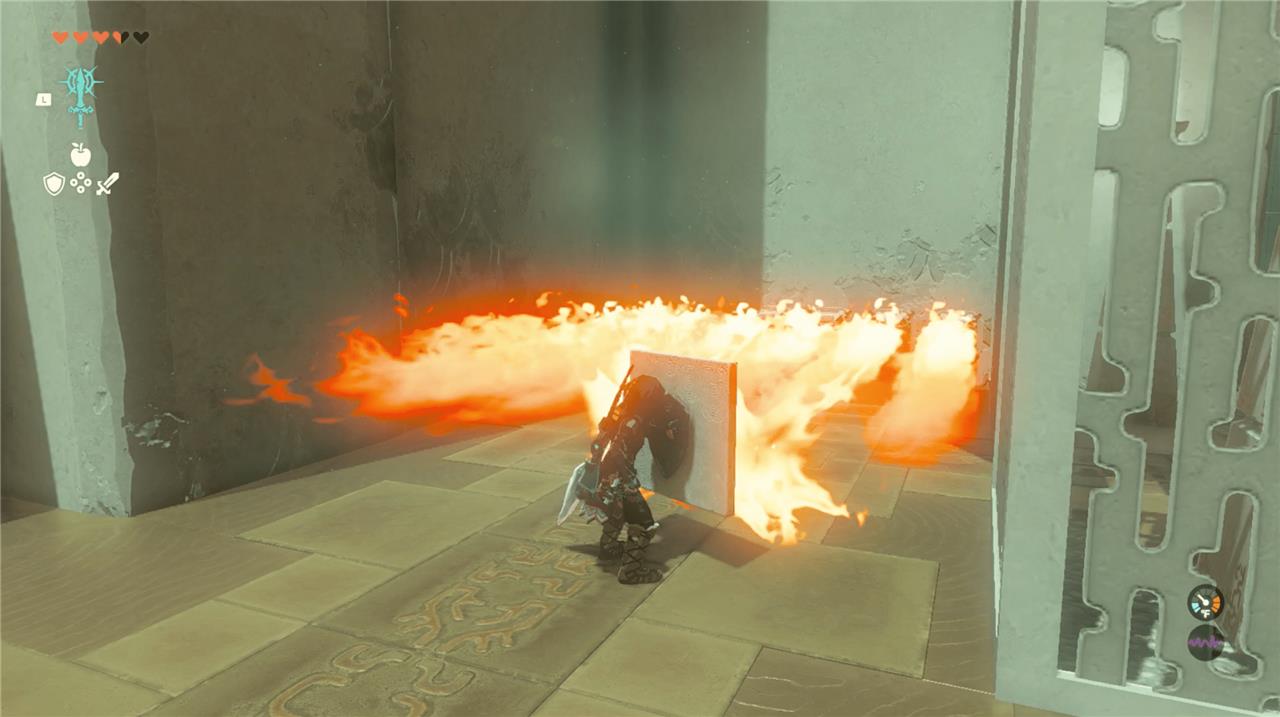
5. Grab the stone-slab shield and equip it. Then walk toward the line of flamethrowers in the room. As you approach the flamethrowers, hold out your shield – as if you would defend against an enemy – and use it to block the flames so you can safely walk through to the next area.
How to get Tulin’s ability for Hebra Sky shrines
To get Tulin’s ability for navigating Hebra Sky shrines like Ijo-o in The Legend of Zelda: Tears of the Kingdom, complete the main quest “Tulin of Rito Village.” This grants his wind gust Vow of Tulin, essential for gliding across sky islands in the cold Hebra Mountains Sky region.
Quest Start
Begin in Rito Village by speaking to Tulin at the flight platform after progressing the regional story “Rito Village.” He’ll join you temporarily, providing early wind drafts during the quest, but his permanent ability unlocks later.
Key Steps
Follow these to obtain the ability:
-
Climb the Hebra Mountain Climbing Path north from Rito Village, burning thorny roots with fire arrows or fruit, and activate Rospro Pass Skyview Tower for the map. Optionally complete Sahirow Shrine nearby.
-
Locate Tulin in Hebra South Summit Cave (coordinates approx. -3981, 2652, 0451): Use wood platforms or Ascend through cracks to reach him, defeating Ice Keese and Bokoblins en route.
-
Escort Tulin to sky ruins above Hebra Peak: Glide using his temporary gusts, shoot Aerocudas to retrieve his bow, and use Ascend/Paraglider on protruding platforms. Activate Mayaumekis Shrine (-4083, 2639, 0615) as a checkpoint.
-
Enter the Wind Temple (above Hebra Peak at -4517, 3157, 1131) via sky islands, using Tulin’s gusts to activate turbines and progress puzzles. Defeat Colgera boss to clear the temple.
Using the Ability
Post-quest, access Vow of Tulin in your Key Items to summon his avatar, who generates wind gusts on command (low cooldown). Aim upward while gliding for boosts to reach distant islands-crucial for Ijo-o Shrine (-3622, 2679, 0702). Upgrade with 4 Sage’s Wills at Goddess Statues for stronger attacks. Wear cold-resistant armor or elixirs for Hebra’s freezing temps.
Wind Temple boss fight strategy
Colgera Strategy Overview
Colgera is the Wind Temple boss in The Legend of Zelda: Tears of the Kingdom, a massive flying insect fought entirely in the air above Hebra Peak. Use Tulin’s gust ability extensively for mobility, and stock arrows (ideally 100+), Aerocuda Wings for extra glide control, cold-resistant armor or elixirs, and healing food. The fight has two phases: expose and destroy four weak points (glowing blue spots under armored shells) on its body.
Preparation Tips
Equip a bow for bullet time (slow-motion aiming midair) and consider the Glide Shirt from nearby caves for better stamina-efficient gliding. Fuse arrows with Keese Eyeballs, Bomb Flowers, or Silver Lynel Horns to one-shot weak spots from afar. Maintain height with Tulin’s gusts to avoid falling.
Phase 1: Basic Attacks
As the fight begins, dive below Colgera to expose its underside weak spots-spiked shells launch ice blasts upward, so dodge by diving sideways or using Tulin’s gust. Enter bullet time, shoot the armored shell twice (or once with a multi-shot bow) to crack it, then hit the glowing weak point underneath. Repeat for all four spots; dive through the exposed spot for bonus damage if positioned well. It retreats into a portal after each hit, re-emerging from another.
Phase 2: Tornadoes Added
At half health, Colgera summons tornadoes alongside ice blasts-dive under the tornadoes immediately or use Tulin to burst sideways through gaps as they spread. Position below again, wait for spikes to fire (creating openings), then bullet-time the weak spots as before. Portals become more aggressive; anticipate it bursting from below and dive horizontally to evade. Stay patient, heal midair, and prioritize dodging over attacking.
Victory Rewards
Defeating Colgera clears the Wind Temple, permanently unlocks Tulin’s Vow ability, grants a Heart Container, and advances the main story. Use the nearby Goddess Statue for upgrades afterward.