Hidden high in the Eldin mountains, Kamatukis Shrine challenges players with a clever gear-and-ball puzzle that tests timing and precision. This guide covers how to reach the shrine, solve each section, and claim your reward with ease.
Our guide will help you find the Kamatukis Shrine location and solve its “A Precise Strike” puzzle to collect the chest and Light of Blessing. It’s a good shrine to check out while you’re in the Death Mountain area, just northeast of the peak. If you’re looking at the map, you should notice the skull marking Skull Lake – the shrine is just east of it.
When you’re done, our shrine locations page or interactive Hyrule map can direct you toward something else to do.
Kamatukis Shrine location
Kamatukis Shrine is found in the northeastern section of the Eldin Region, located on a high ridge east of Death Mountain. Its coordinates are roughly (2855, 3565, 0080), placing it close to the Skull Lake area. Reaching the shrine may require heat-resistant gear or elixirs, as the surrounding terrain is hot and filled with lava flows. A convenient route is to glide from a nearby sky island or ascend from lower ground using the surrounding cliffs for height.
The Kamatukis Shrine is found in the Deep Akkala area of Hyrule, northeast of Death Mountain. I soared over to the area to explore after completing the Fire Temple; it’s fairly convenient from there. Look out for the skull markings for Skull Lake on your Tears of the Kingdom map and aim there – the shrine is at the bottom, eastern corner of the skull. The exact coordinates are (3431, 3355, 0071).
Kamatukis Shrine ‘A Price Strike’ walkthrough
Inside Kamatukis Shrine, titled “A Price Strike,” the challenge revolves around using the large hammer mechanism to launch metal balls at targets. Hit the bullseye to open gates and reveal the next section. Precision and timing matter, as the correct strike angle controls the ball’s path. Once every target is cleared, a platform to the final chest and exit appears, completing the shrine’s puzzle.
The “A Precise Strike” puzzle for the Kamatukis Shrine requires you to strike a ball to hit a target – but the catch is that the ball has to soar across a major gap. You likely won’t get it on your first try, but that’s OK: With a little help, we’ll help get you into position.
1. Head straight and you’ll see a block, a Zonai switch, a long handle hanging from the ceiling, and a ball. First, attach the block to the handle using Ultrahand.
2. Pull the block back using Ultrahand, then let it go so it hits the ball and sends it soaring over to the target across the gap. This is the tricky part; if the aim is off, the ball won’t make the target. This is the aim that worked for us:
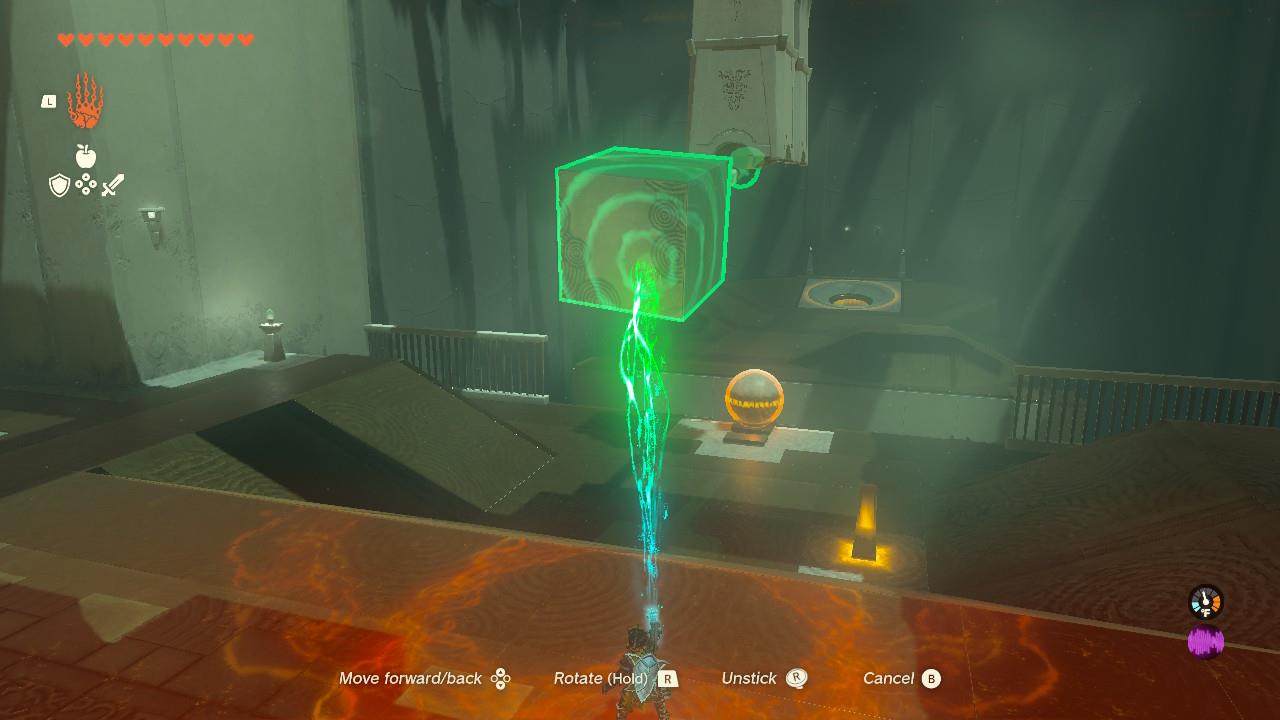
3. If you miss, don’t worry. Hit the glowing yellow Zonai switch to reset the ball. When you get it, the target will turn green and the gate will open.
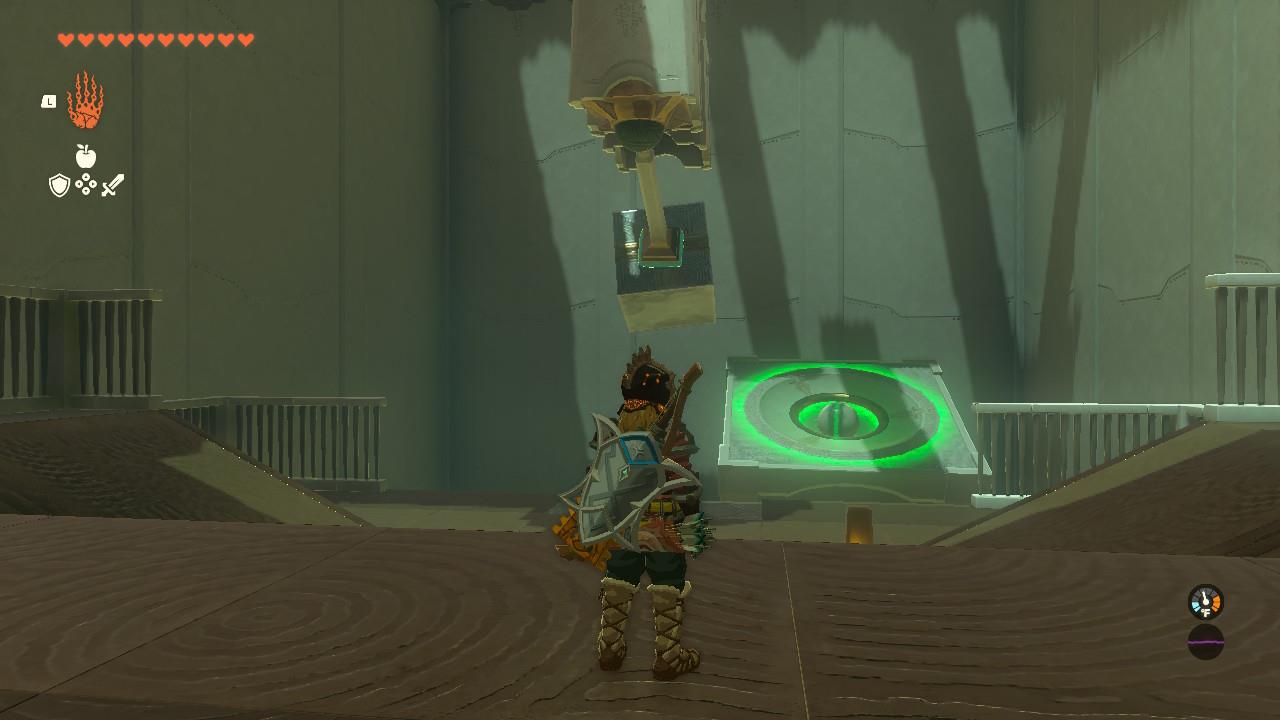
4. Once you’ve hit the target, head left. There’s another room with another block, hanging handle, ball, and Zonai switch. Attach the block to the handle.
5. The target in this room is moving, so you’ll have to time the release of the block carefully. Pull the block back with Ultrahand and release it just before the target lines up with the ball. The target will turn green when you hit it, then open a gate to the left of the handle. (If you missed, you can reset the ball using the Zonai switch.)
How to reach Skull Lake from Ulri Mountain Skyview Tower
Ulri Mountain Skyview Tower provides an ideal launch point for reaching Skull Lake, located northwest in the Deep Akkala region. Launch from the tower and glide northwest toward the skull-shaped lake, which sits north of the tower near coordinates 3321, 3424.
Travel Steps
Activate the Skyview Tower if not already done by defeating nearby Aerocudas and returning their device terminal. Launch skyward, then glide northwest, using stamina food or elixirs for the extended distance-multiple stamina wheels help reach the lake’s spire.
Landmarks and Tips
Aim for the tall spire in Skull Lake’s center; the cave entrance is via a hole at its top, accessible by gliding from sky rubble northwest of the lake. Pass over Tempest Gulch and Kamatukis Shrine en route, avoiding enemies below like Bokoblins on bridges. On foot as backup, head north from South Akkala Stable past Akkala Span, then northwest.
Best route to Skull Lake Cave from Ulri Mountain Skyview Tower
Ulri Mountain Skyview Tower offers the fastest route to Skull Lake Cave via aerial launch and glide. The cave entrance hides at the top of the central spire in Skull Lake.
Step-by-Step Route
Launch from the tower and glide northwest toward Skull Lake at coordinates 3321, 3424, 0178-stock stamina food or elixirs for the distance. Locate sky rubble northwest of the lake at 3220, 3626, 0218; use Recall to ride it upward, then glide southeast over the spire’s hole and drop in.
Key Landmarks
Pass Kamatukis Shrine in Tempest Gulch below during the glide; the skull-shaped lake marks your target north-northwest of the tower. Avoid ground travel due to enemies at Akkala Bridge-gliding skips hazards entirely.