Leon’s path grows darker in Chapter 4 as the Church’s secrets stir and the lake hides more than just ripples. From the eerie Boat House to the echoing Quarry tunnels, this part of Resident Evil 4 Remake tests your aim, your wits, and your nerve at every turn.
Our Resident Evil 4 remake Chapter 4 walkthrough will make sure you don’t miss any items and survive from the beginning of the chapter through the Boat House, Mural Cave, Large Cave Shrine, Lake, back to the Lakeside Settlement, Forest Altar, Small Cave Shrine, Quarry boss fight, and (finally) the Church to the end of Chapter 4.
Throughout this walkthrough, we’re not going to mention every item that anyone (or anything) you shoot drops – if you kill something, look for a loot drop.
Also, there’s a little randomness to the contents of crates based on your inventory and weapons, so you probably won’t find the exact same things listed below. The crates and barrels themselves will always be in the same locations, though. And all other items – keys, collectibles, and resources not found in crates – should be the same.
Boat House // Find the key to the church
After acquiring the Insignia Key, head to the Boat House and use the small boat to travel across the lake. Defeat the lake monster to continue past the wreckage and explore the surrounding caves, where a brief detour leads to hidden treasures. Navigate through the Quarry to reach the Church area and use the key to open its gate, gaining access to Ashley’s location and triggering the next major story event.
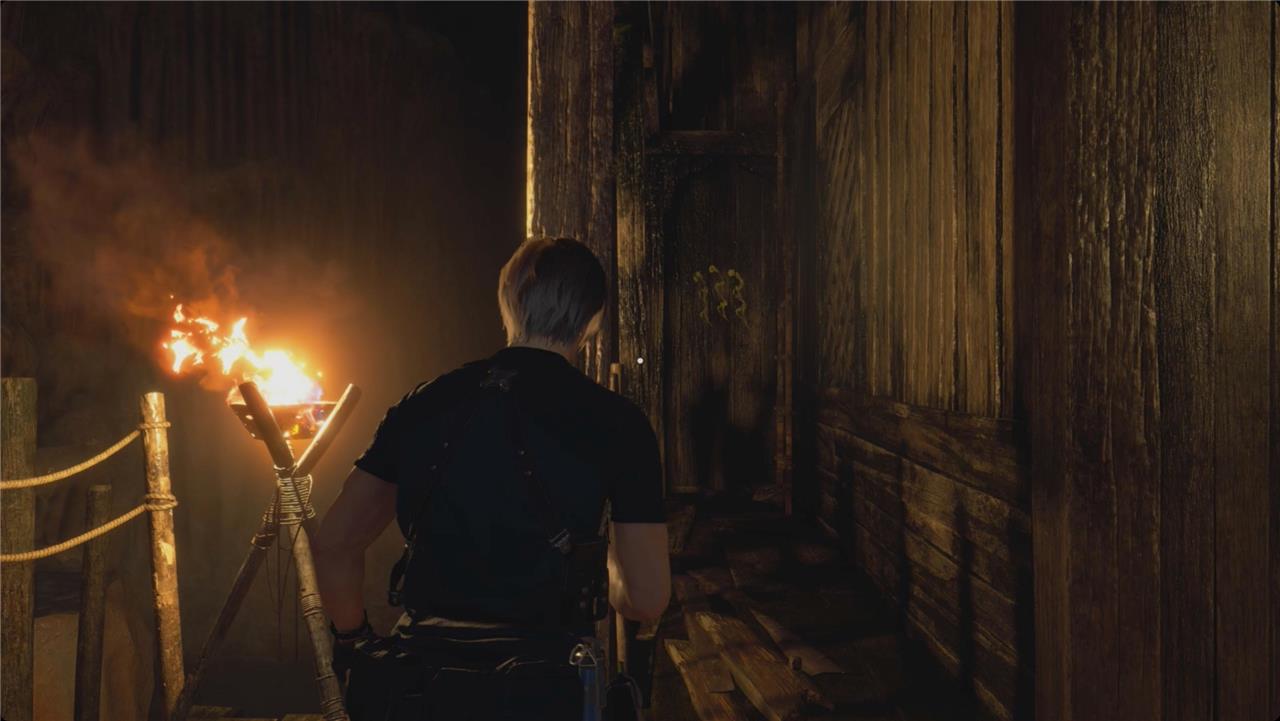
Chapter 4 opens with Leon waking from his nap; the cutscene will lead you the Boat House you spotted back at the binocular vista.
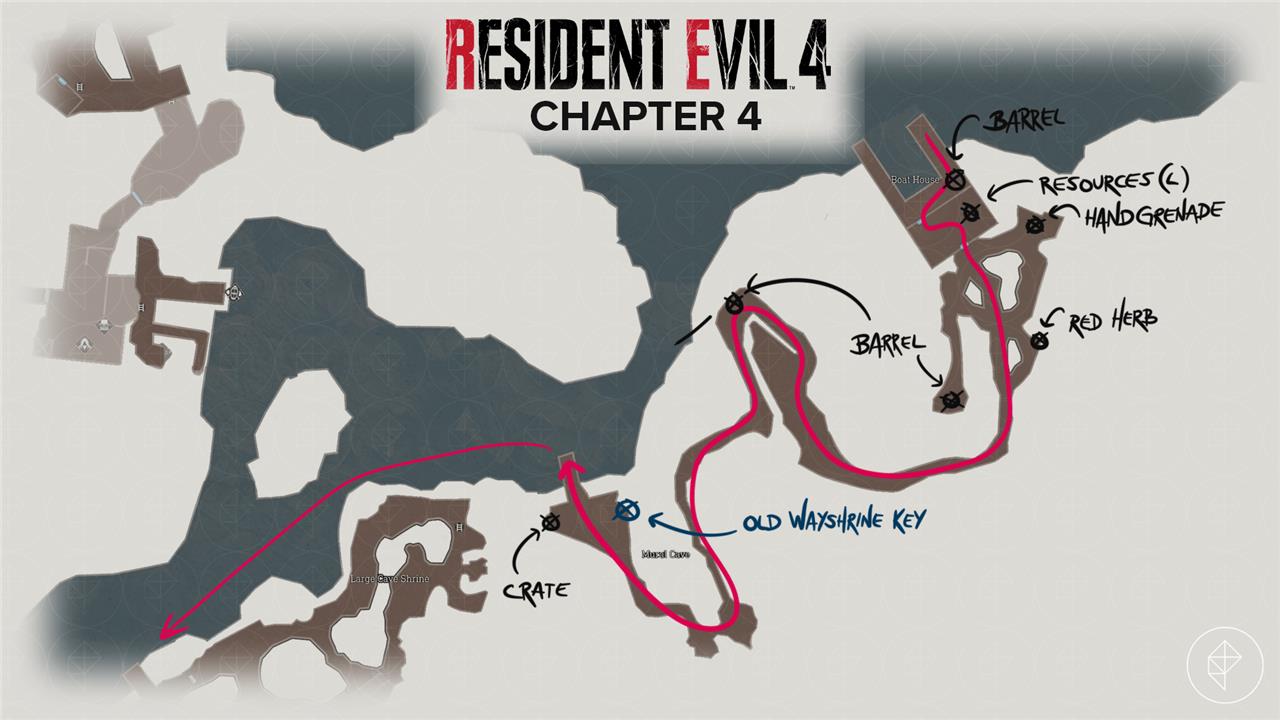
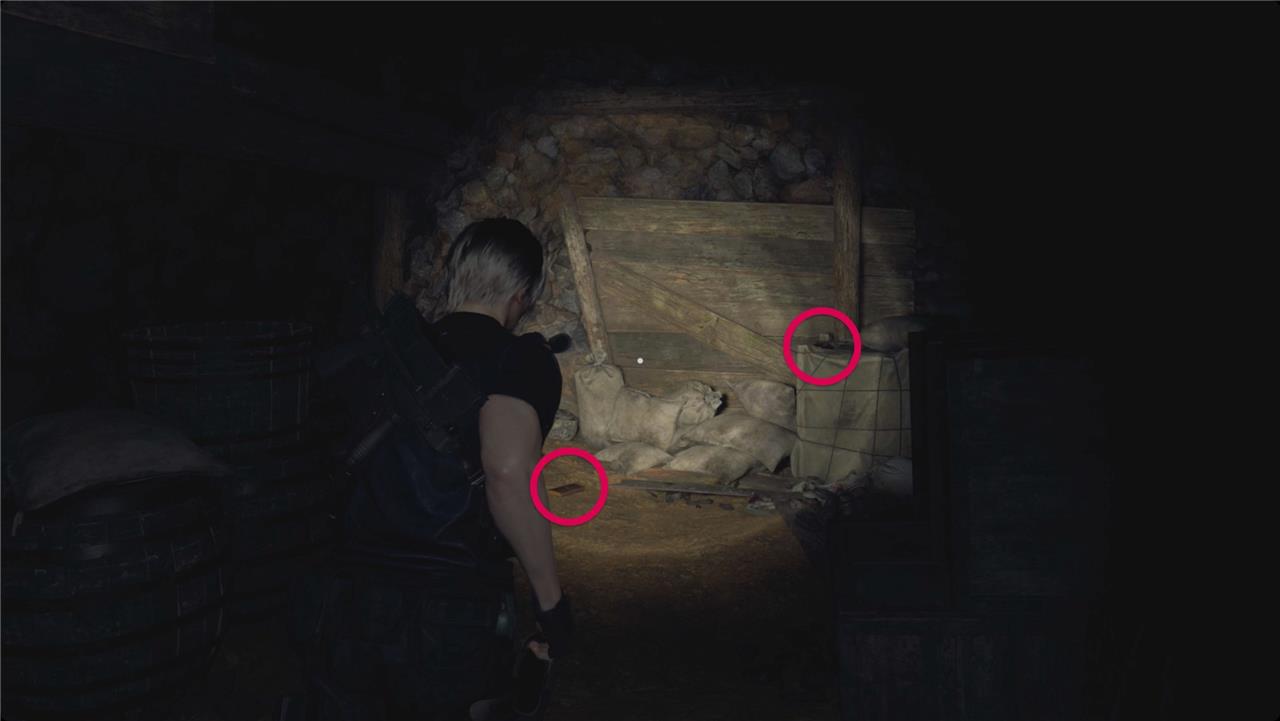
Smash the barrel ahead of you for some handgun ammo, and then go through the door. Pick up the Tattered Officer’s Cap file from the not-creepy-at-all table, and then head left for some resources (L) in the cabinet. Go through the next door.
Outside, take a left and smash the barrel by the woodshed for a hand grenade. Head back across to the right and follow the dead end path south for a barrel with more resources (L).
Back along the center path, watch along the left side for a red herb. Keep heading south toward the chanting.
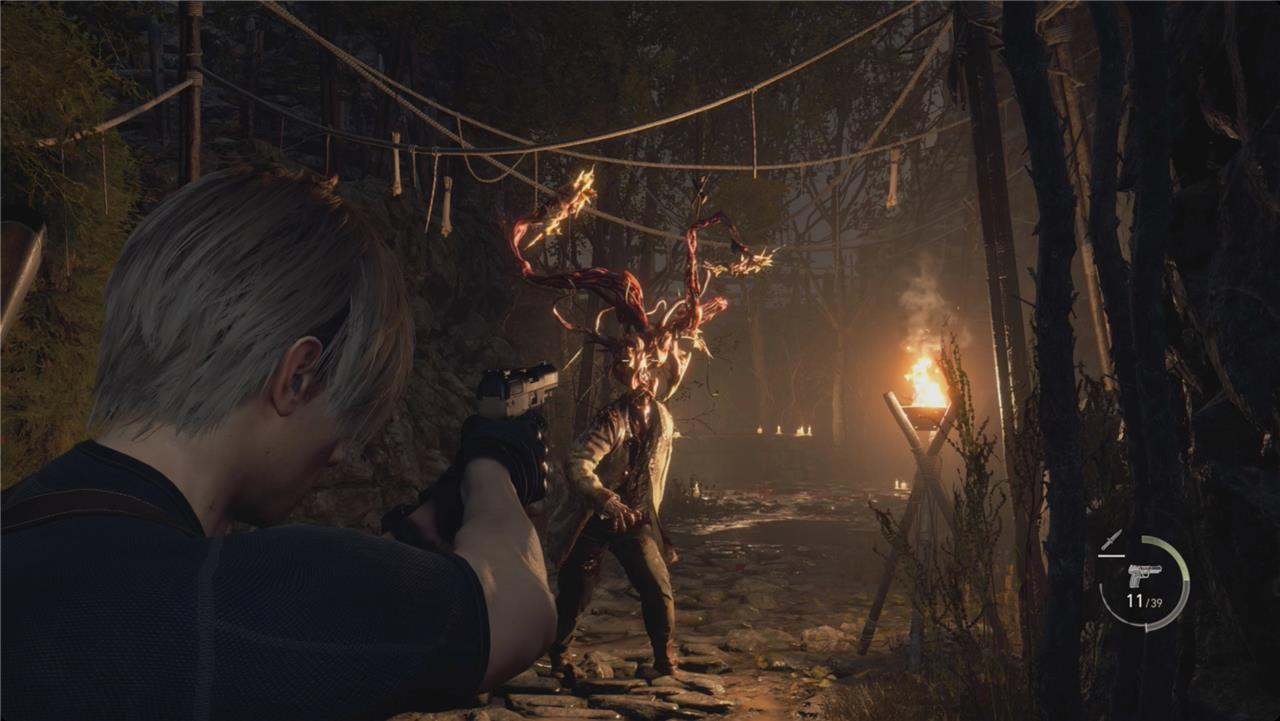
When you come out of the tunnel, you’ll meet a new type of villager. Put him down and then deal with his friend. Ignore the altar and head up the stairs. At the top, smash the barrel for some pesetas.
Keep following the walkway and tunnel into the Mural Cave.
Mural Cave // Investigate the two locations
Search both mural sites to progress the puzzle tied to the Church insignia. The first mural lies within the Cave’s main chamber, where you must interact with the carvings to reveal their pattern. The second location is accessible by boat across the lake, hidden inside a smaller cave marked on your map. Examine each symbol carefully and match them correctly to obtain the item needed for the Church key.
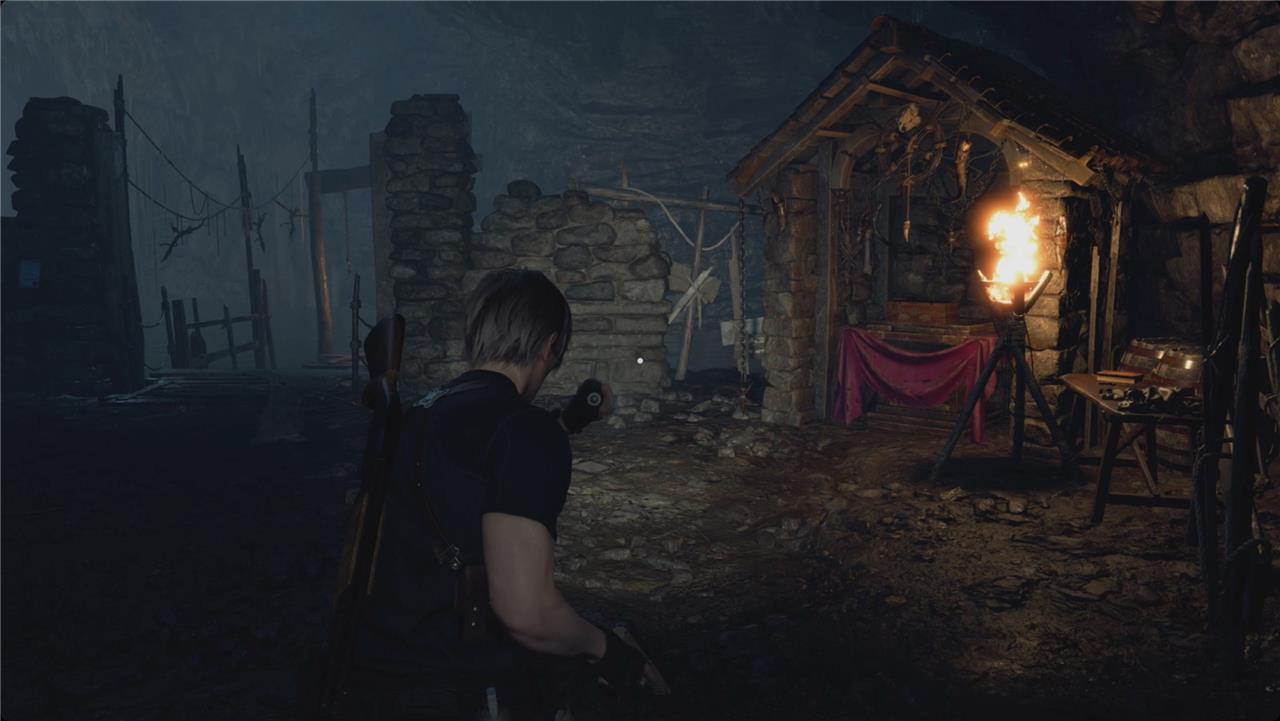
After Leon’s comment identifying the cave as a shrine, walk up to the altar between the stone hands. The Church Key is here, but we can’t get it yet.

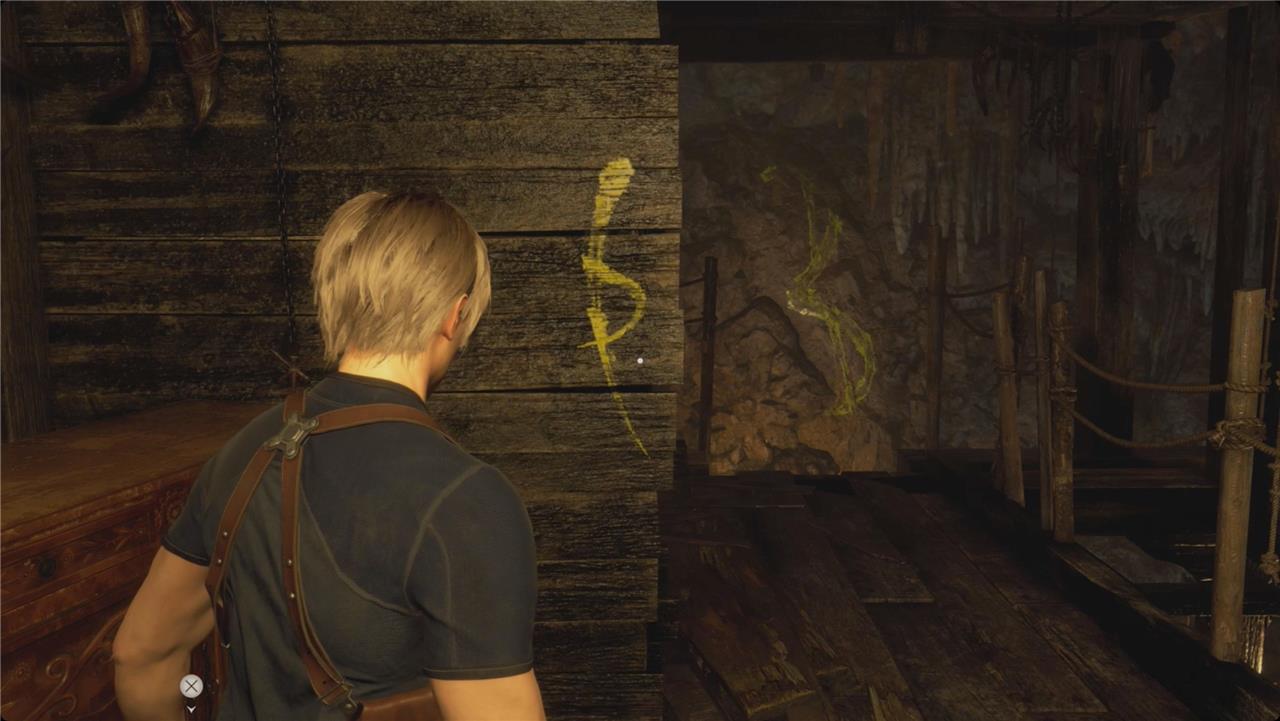
Take a right. Check the mural on the wall behind the pile of heads to update your map. Take another right and follow the tunnel.
At the other end, open the case ahead of you for the Old Wayshrine Key. Cut left and smash the crate from some pesetas. To the right, grab the Egg Hunt Blue Note Request.
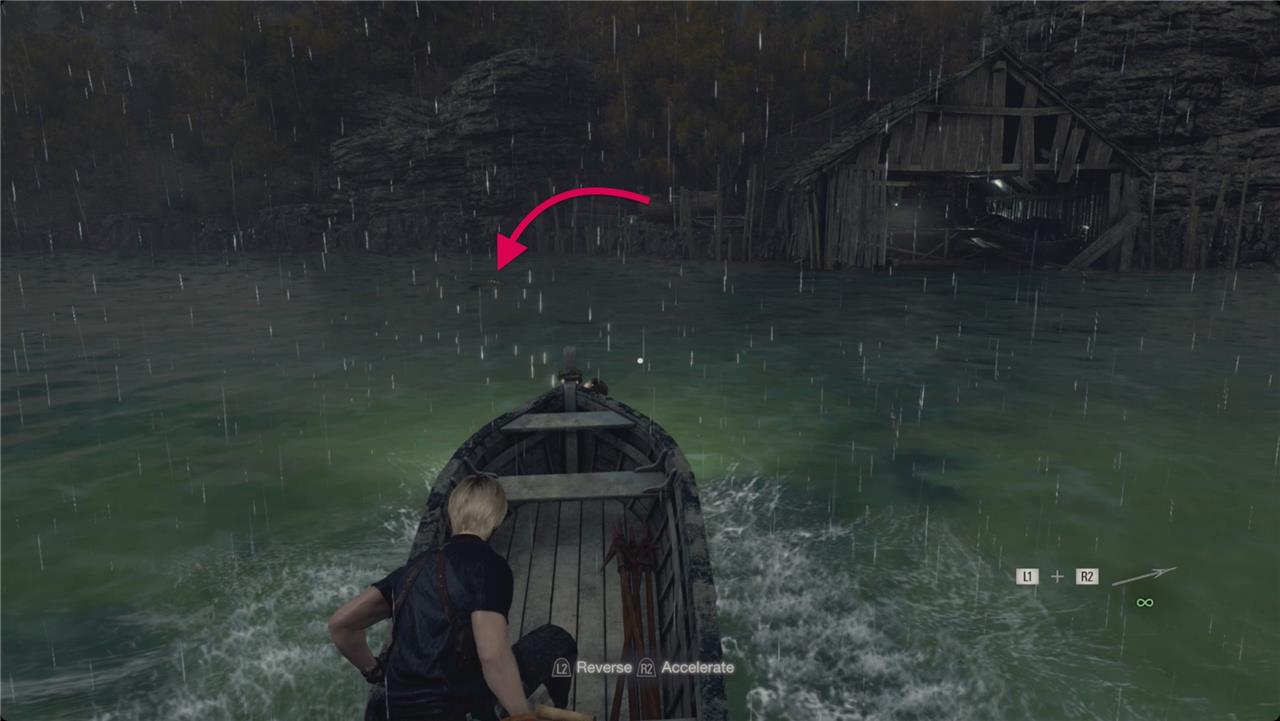
Step onto the dock and into the waiting boat. While you’re boating, watch for barrels – tossing a harpoon will smash them and get you the contents, or you can just run them over.
Large Cave Shrine
The Large Cave Shrine sits across the lake and requires the Insignia Key to access. Inside, you’ll find puzzles similar to the Small Cave Shrine, with symbols carved into the walls that must be matched on the pedestal to progress. Solving it grants one of the Hexagon Pieces needed to complete the dial at the quarry. Watch out for enemies in the area, and make sure to collect the treasures before leaving by boat.
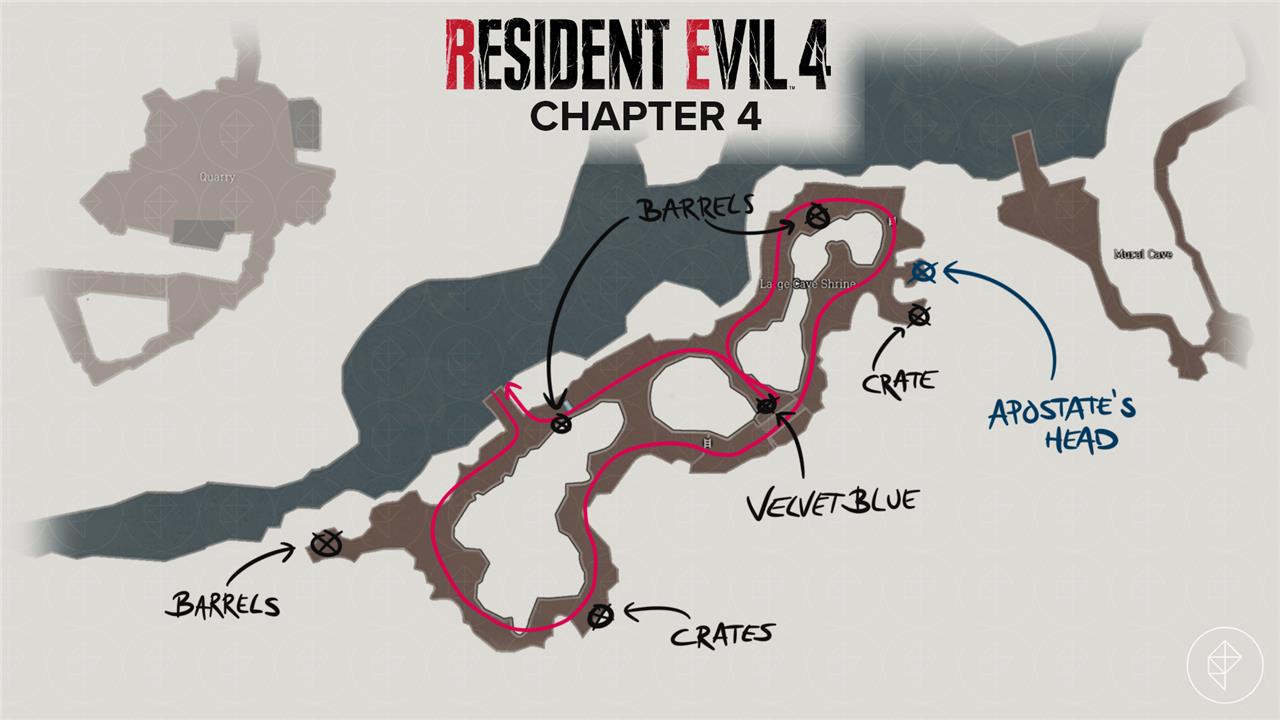
Once you’re on the dock, take a right and follow the path all the way west to the dead end. Smash the barrels there for handgun ammo and pesetas. Turn around and take the first right toward the shouting villager.
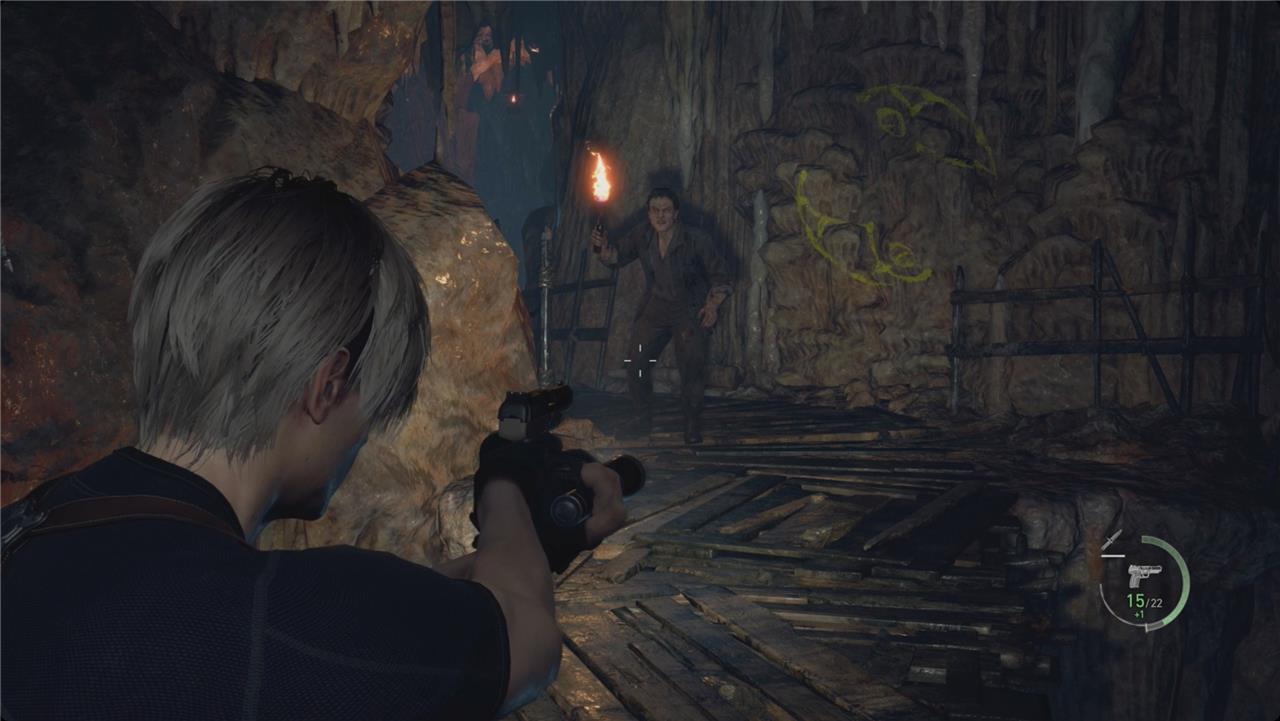
Smash the crate as you pass for a flash grenade. Around the corner, there are two locals. One has dynamite and, if you’re quick, you can shoot it to take them both out. Another few will come running at you from around the corner.
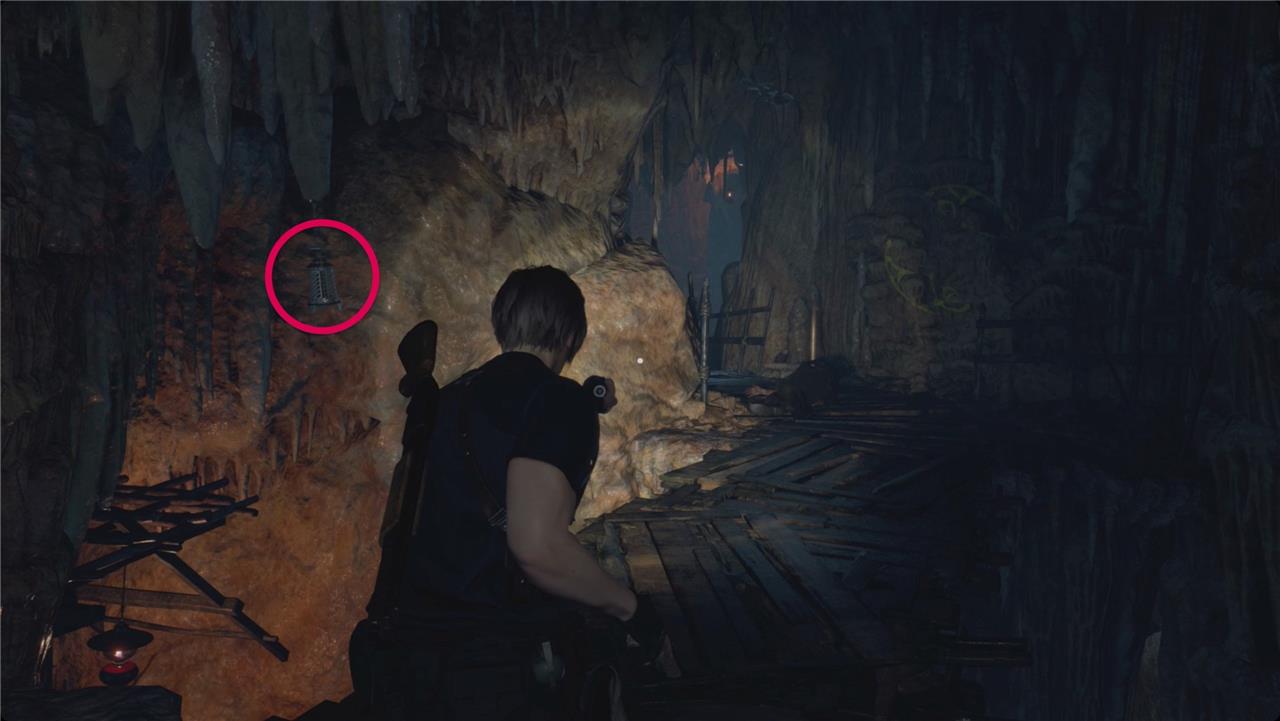
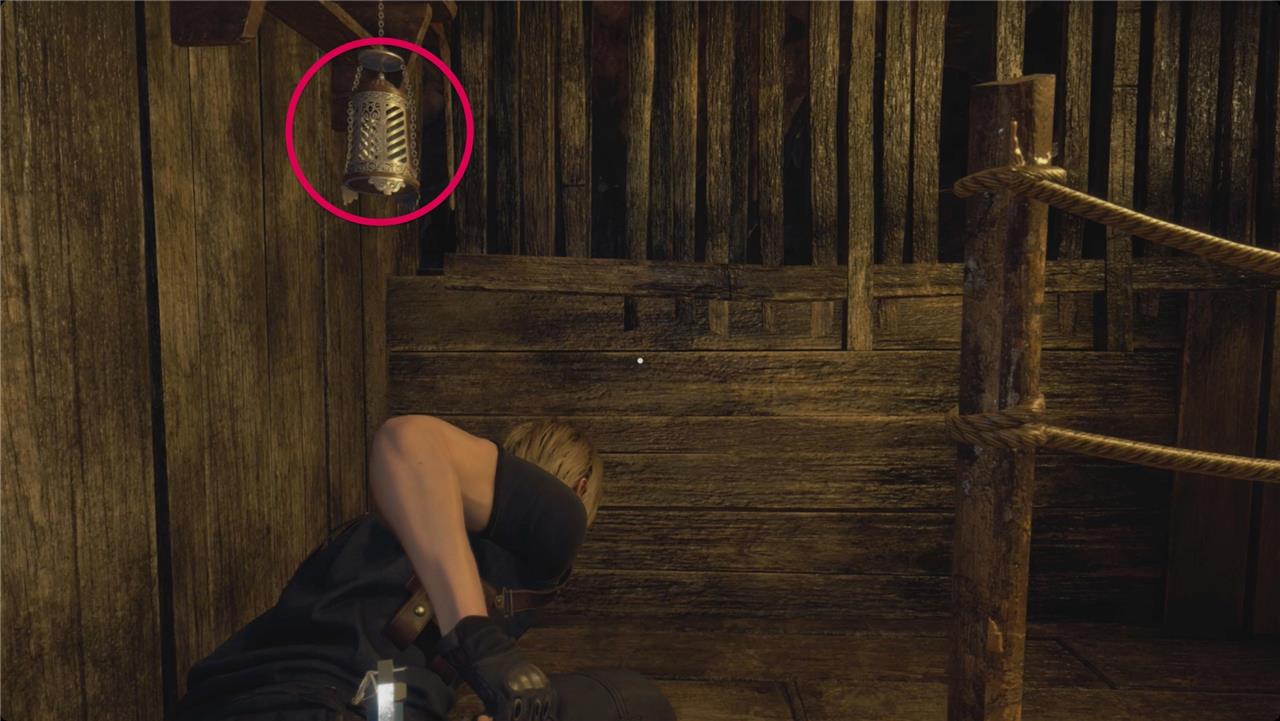
Keep following the cave. Take the right path at the intersection, and climb the ladder. You’ll meet some more locals – including a pair that come up the ladder behind you. Just before you step onto the wooden bridge, look to your left for a lantern. Shoot it down – we’ll grab the prize inside in a second.
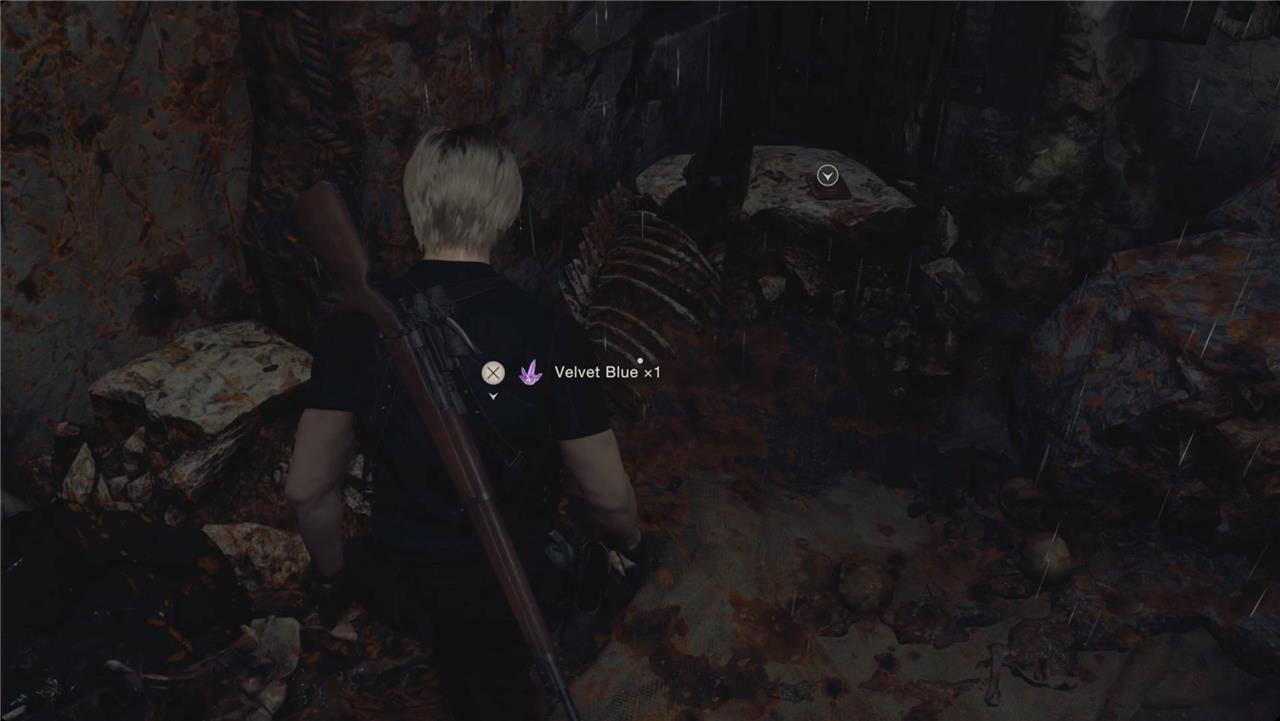
Cross the bridge and follow the path to the right. You’ll spot a locked metal door and the Stone Dias lock puzzle. Turn to the right to find a crate with a Velvet Blue inside.
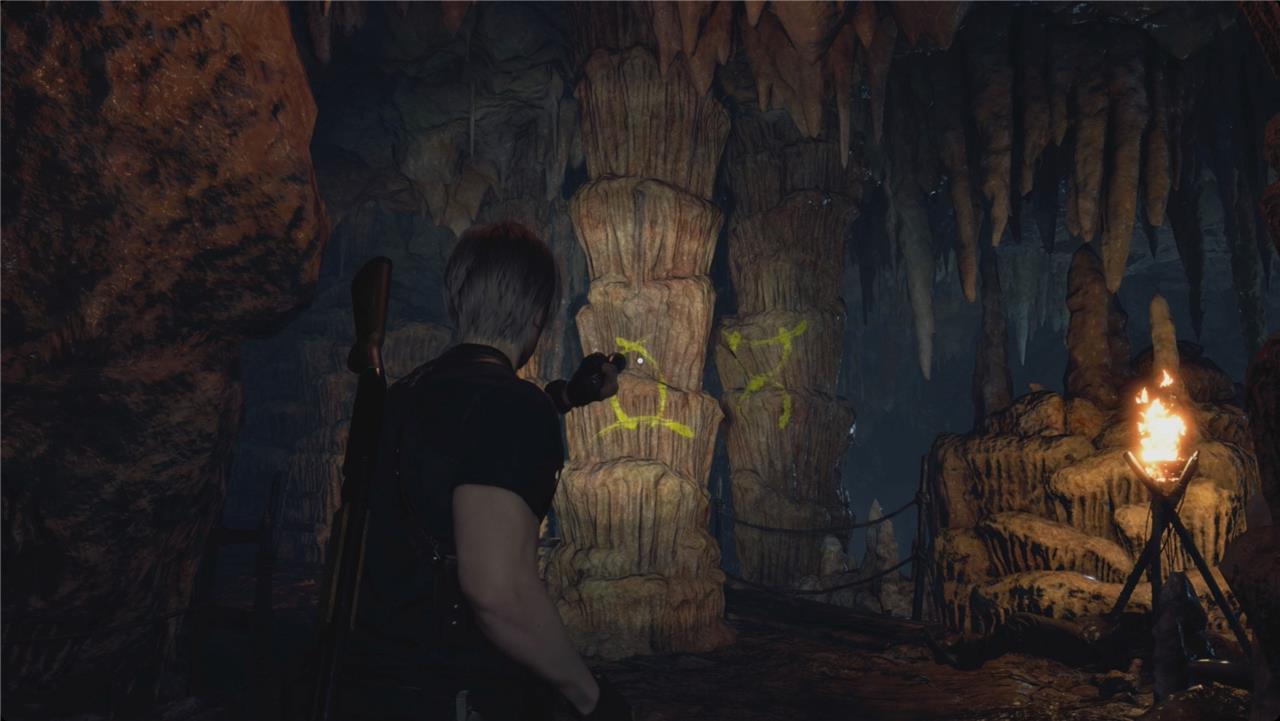
To unlock the door, you have to push the three symbols corresponding to paintings you’ve seen in the cave. You passed one just after the bridge. If you turn around from the Stone Dias, you’ll spot another. The third is to the left of you – drop down the ladder and smash the barrels there for some handgun ammo and pesetas. Turn around and look back the way you came to spot the third symbol.
On the Stone Dial, counting clockwise from the top, the symbols are 2, 5, and 8.
Inside the room you open, grab the Apostate’s Head key item. The fact that the statue bleeds probably doesn’t mean anything. Don’t worry about it.
Head back toward the dock, dealing with any villagers you find. Take the first left to go retrieve that treasure we shot down a second ago – a Velvet Blue.
Keep heading toward the dock. Unlock the gate you come to and get back in the boat. Look left for a barrel with some pesetas.
Wayshrine 1
The first Wayshrine is located near the Lakeside Settlement, close to where Leon gains access to the boat. You’ll need the Old Wayshrine Key to open it, which can be found later in the chapter, so make a note of its position for a return trip. Inside, you’ll find a valuable item that can be sold or used for trading with the Merchant, making it worth revisiting once you’ve obtained the right key.
Boat along the cave-tunnel to the left (west) for a bit. You’ll pass three barrels with pesetas inside.
At the bend in the tunnel, hop out onto the dock. Before you go anywhere, look all the way up above you and a little right.
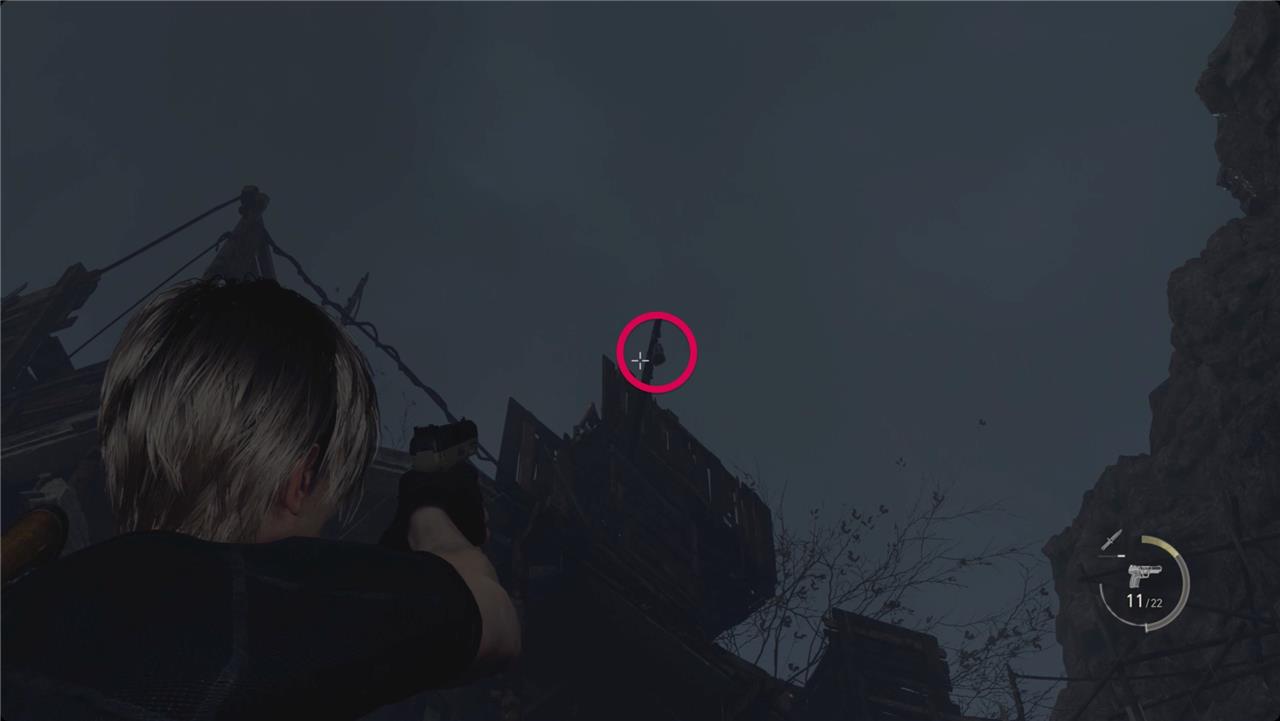
You’ll see the treasure lantern we couldn’t reach before on the way to the Quarry. Shoot it down.
Walk into the tunnel below the wooden bridge to find a couple barrels with pesetas.
Climb the ledges to the left to reach a Wayshrine. Use the Old Wayshrine Key we picked up to open it for a Splendid Bangle. Keep an eye out for square-cut gemstones (like emeralds or alexandrite) to inlay.
Cross the wooden bridge to the right to go pick up the treasure we shot down – an alexandrite (how convenient).
Get back in the boat and follow the tunnel north, steering for barrels as you go – there are a bunch of them and they’re worth 100 pesetas each.
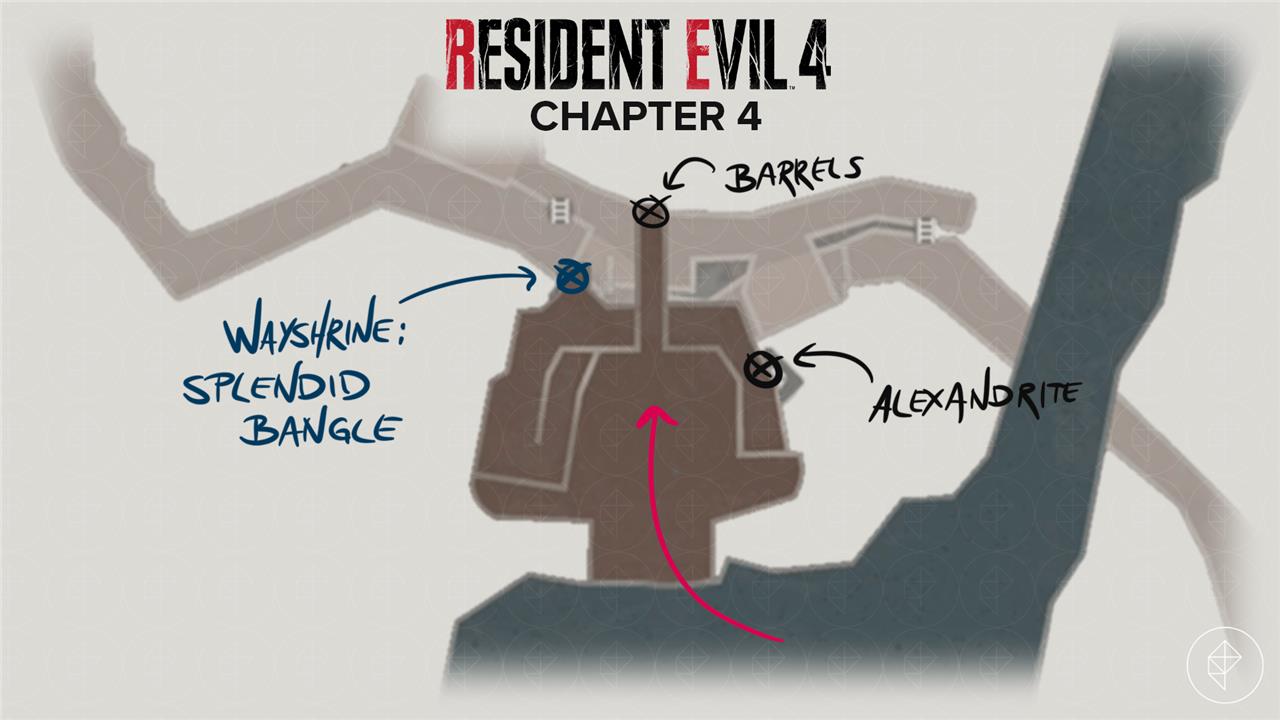
Wayshrine 2 // Lakeshore Settlement
After clearing the shoreline of enemies, follow the path west from the Boat House to reach the Lakeshore Settlement. Here, you’ll find the second wayshrine near a small dock surrounded by wooden huts. Use the Wayshrine Key obtained earlier to open it and claim the reward inside. Check the nearby houses for ammo and herbs before heading back toward the lake to continue your route.
When you exit the tunnel, follow the shore to the left and all the way up to the Lakeshore Settlement. When you get out on the dock, head into the house. Use your Small Key on the drawer inside for a Gold Bar.
Go back through the back rooms and drop into the tunnel where you met Luis in Chapter 2. Where you found him, you’ll find the Old Man’s Journal file and a Red Gemstone Ring.
Head back outside and go to the right.
There’s another Wayshrine at the back of the house with a Pearl Bangle inside.
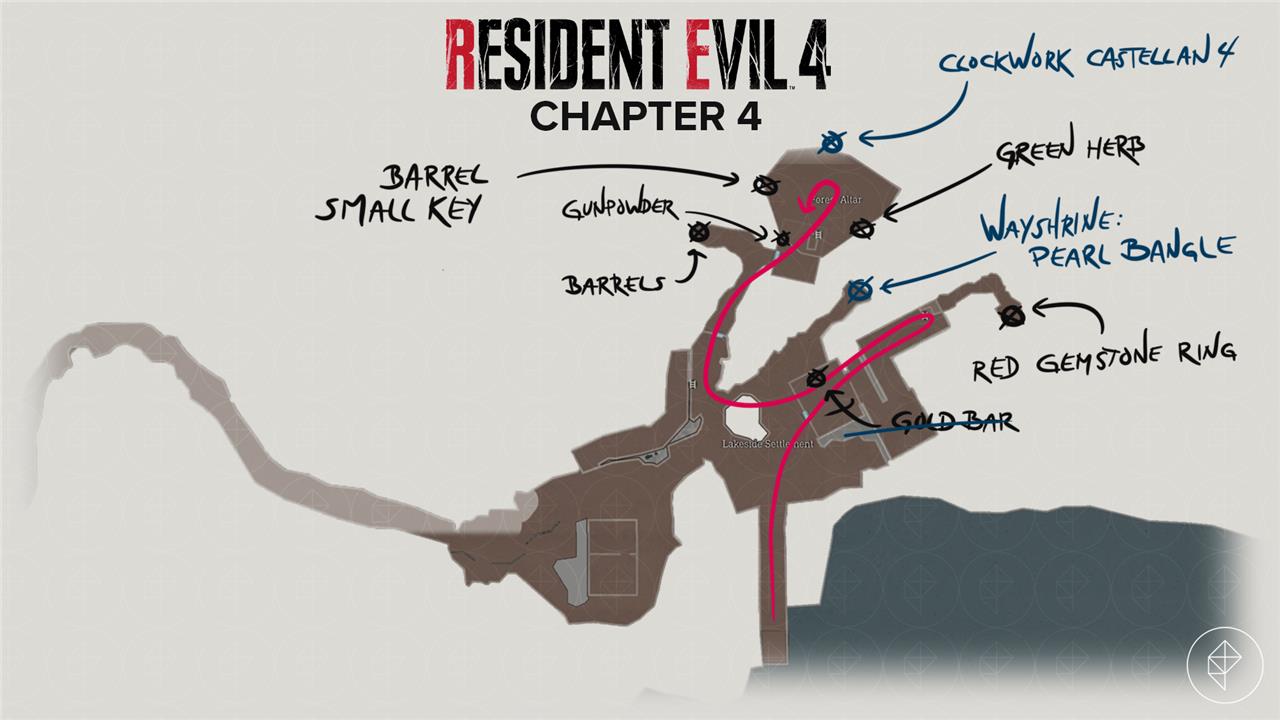
Walk away from the house and take the first right. You’ll find another Door with Insignia to the right of the ladder. Use the Insignia Key to open it, and follow the tunnel to the left. Smash the barrels there for pesetas and handgun ammo, and then grab the Catch Me a Big Fish Blue Note Request.
Head to the right and through the door. Check on the chained up person, and then head left for some gunpowder. Climb the ladder to find the Forest Altar.
Cut right to find a green herb and left for a barrel with handgun ammo and a small key on the wagon.
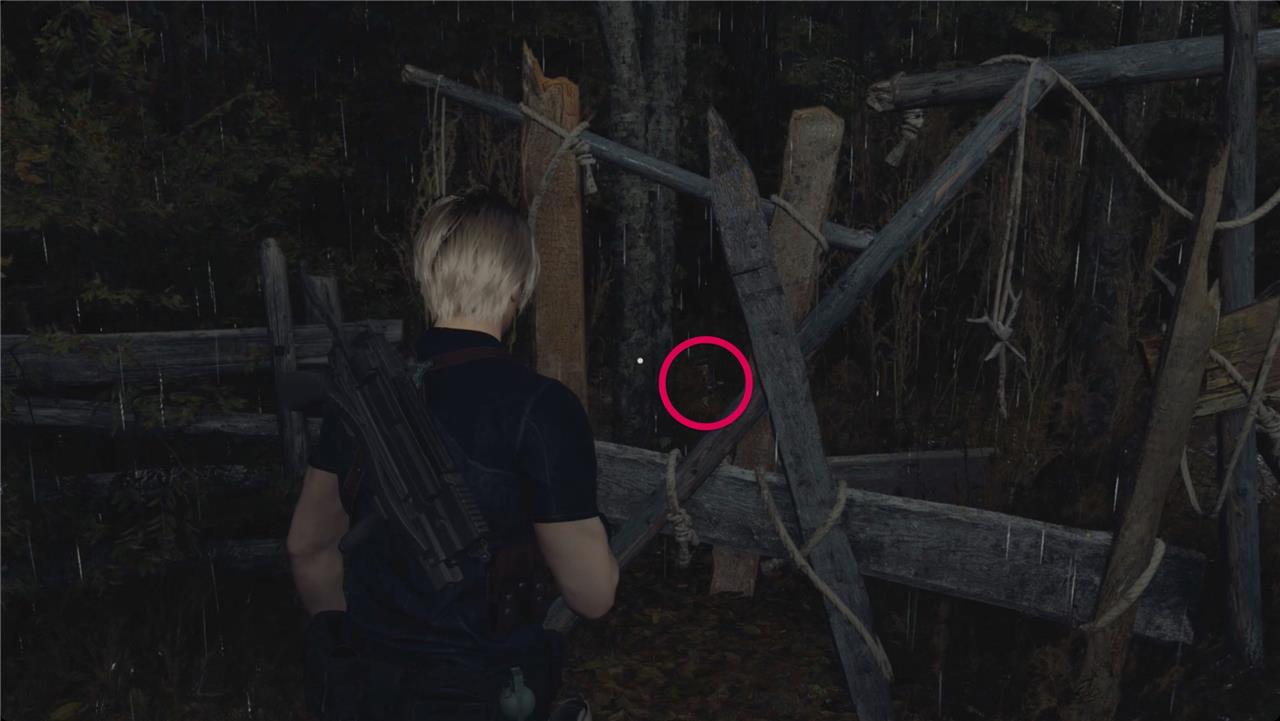
Turn right from the wagon and follow the fence until you reach a couple boards in an X shape. Stand just left of them and look behind the tree there for Clockwork Castellan 4 of 16.
When you go back through the Door with Insignia, you’ll meet some villagers and an exciting new kind of colmillo. Deal with them all and head back to the boat.
Shipwreck
After securing the Church, Leon moves toward the lakeside where a wrecked fishing boat drifts among floating debris. Searching the shoreline reveals supplies and clues about the creature responsible for the destruction. Once the motorboat is repaired with fuel from the nearby shed, Leon can cross the water and face the monstrous threat that awaits beneath the surface.
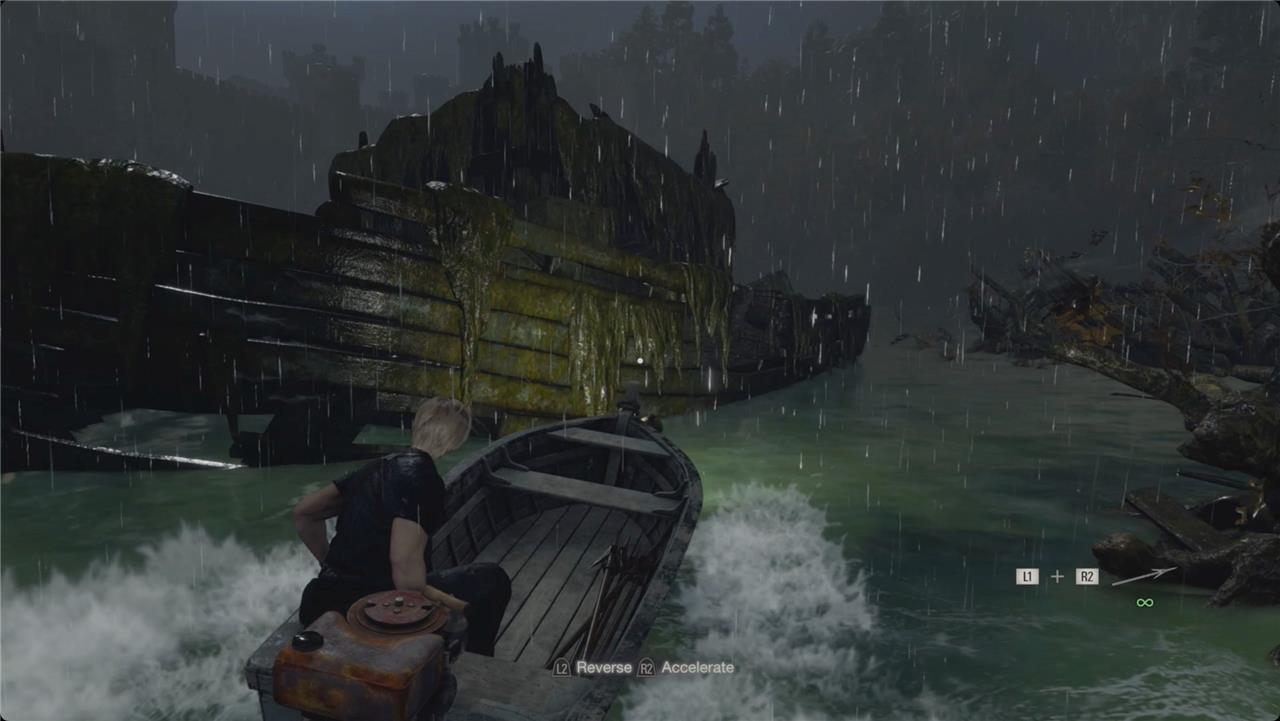
After the Lakeshore Settlement, head straight to the center of the lake and dock at the shipwreck. Inside, there’s a barrel on the right with some resources (S) and a chest with another alexandrite. (Put the two alexandrite you’ve collected into the Splendid Bangle to get the value up to 19,200 pesetas.)
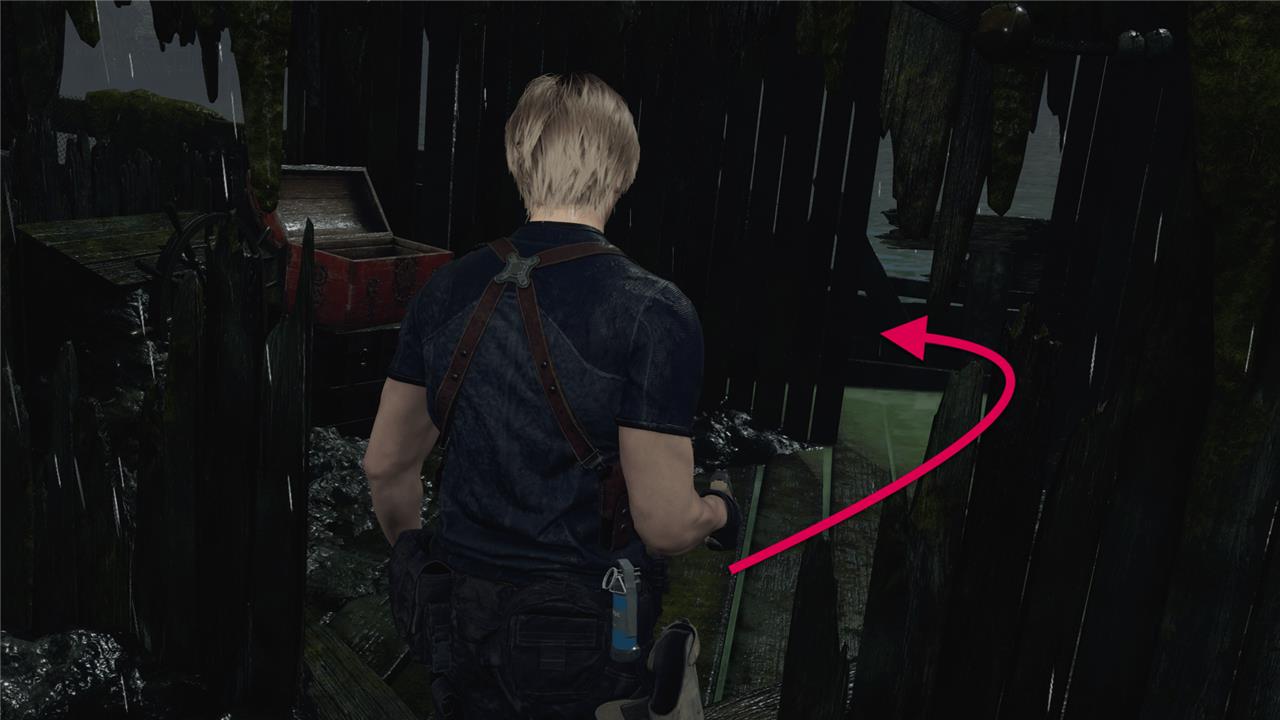
Facing the ship’s wheel, turn right to find a hole in the wall. Step through and turn left toward the bow. There’s a very fancy chest against the wall to the cabin with the Red9 handgun inside. This is the best gun in the game. (If you miss it here, you can buy it later.)
Gold Chicken Egg
Gold Chicken Egg: A rare, gleaming find that rewards careful exploration and precise timing as you navigate the Church, Boat House, and Quarry, helping you stock up on high-value resources before moving onward.
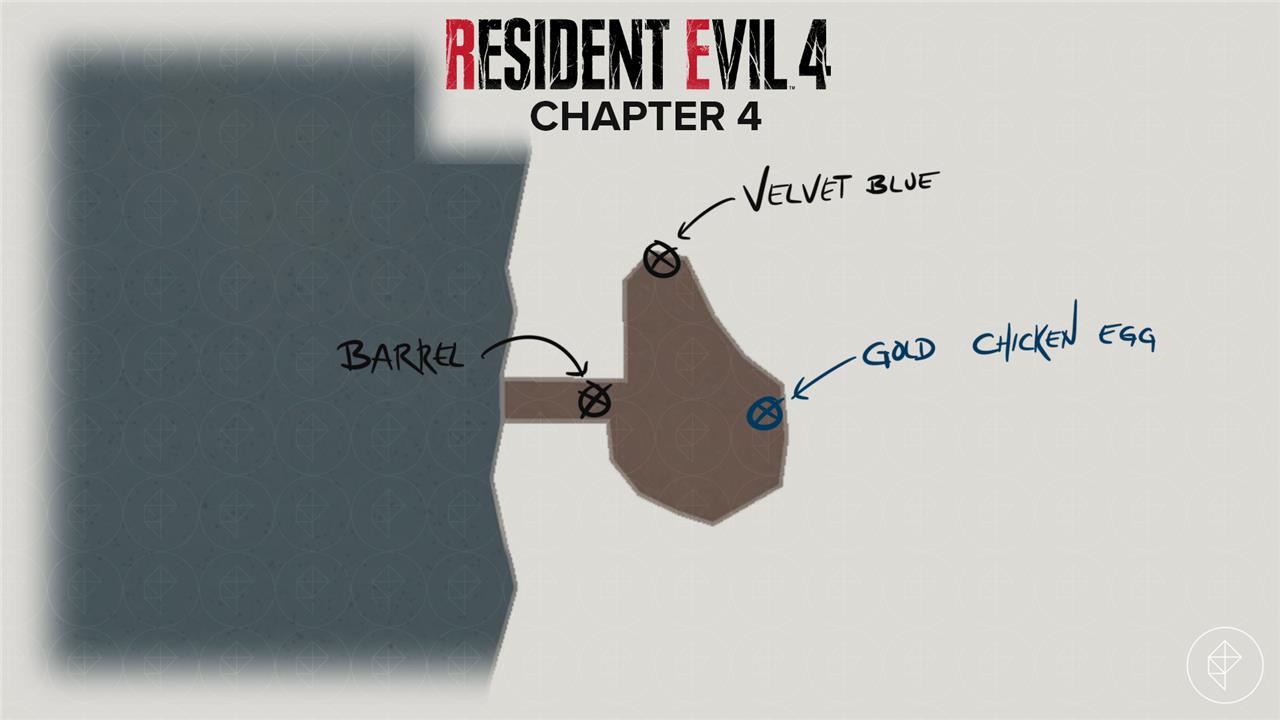
Continue straight east across the lake to another dock. There are an alarming number of chickens here. Smash the barrel on the dock for some gunpowder, and then head left to find a Velvet Blue.

Loop around to the back of the bushes at the far eastern edge of the area to find the Gold Chicken Egg and complete the Blue Note Request. Collect any other eggs you pass, and head back to the boat.
Lunker Bass
The Lunker Bass is a large fish found in the lake area after gaining control of the boat. Catching it provides a valuable item that can be sold to the Merchant for a good amount of pesetas. To catch the Lunker Bass, aim the harpoon from the boat while circling the creature until it surfaces, then throw multiple harpoons before it dives again. Bringing the catch back to shore contributes to your resources and can help you progress more smoothly through Chapter 4.
South of the chicken dock, head back toward the Boat House where the chapter started.
When you see it, look to the left. You should spot a huge Lunker Bass swimming on the surface. Harpoon and collect it for the Catch Me a Big Fish Blue Note Request.
Wayshrine 3 // Merchant
This wayshrine is near the Merchant’s area by the Quarry, accessible once Leon has obtained the Wayshrine Key. Inside, you’ll find a small treasure chest containing a valuable item that can be sold to the Merchant for a good price. Be sure to visit him afterward to sell your finds, upgrade weapons, and check for any new deals before moving on toward the Church.
Facing the Boat House, turn a little right and go into the tunnel at the south end of the lake. Take the first right, and you’ll find another dock – this is the area by the Shooting Range from Chapter 3.
On the dock, head to the left and past the ladder. Use the Small Key you have to open the drawer for a Brass Pocket Watch.
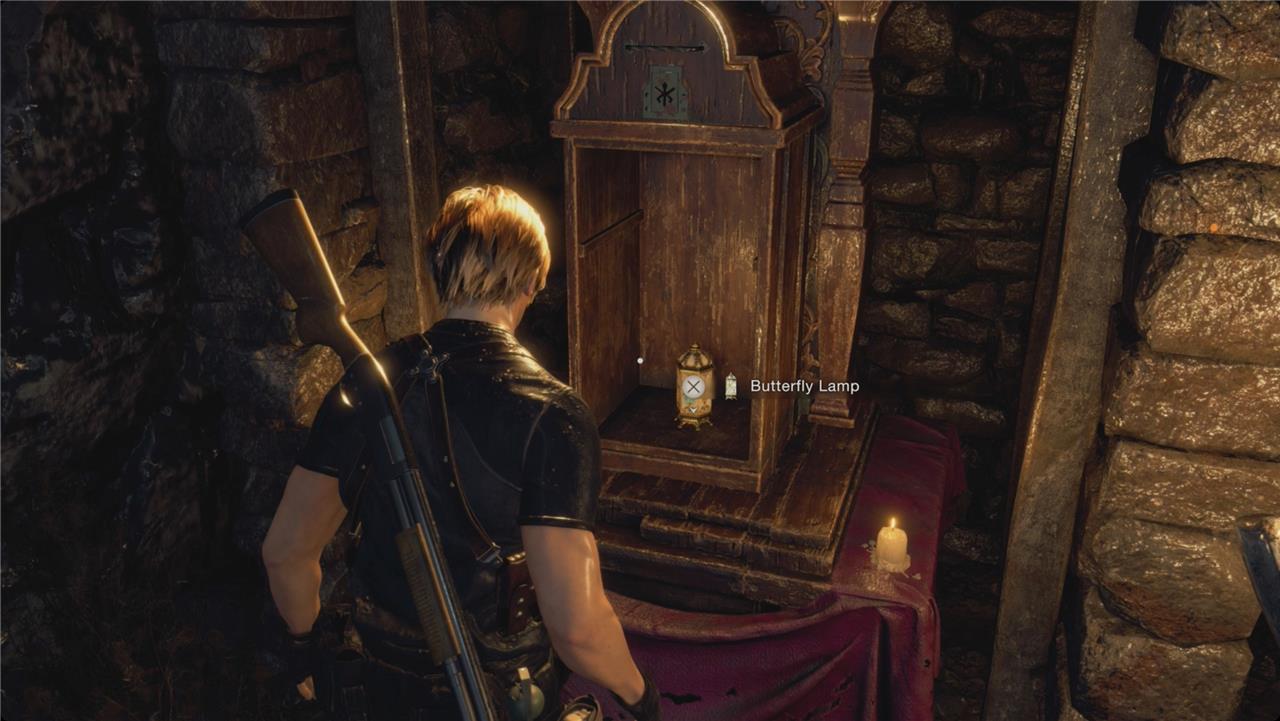
Upstairs, go past the merchant and backtrack to the Wayshrine we passed on the way in. Open it for the Butterfly Lamp. If you have three round-cut gemstones, you can easily get the price up above 20,000 pesetas.
Visit the merchant to cash in your Blue Medallion Blue Note Request and sell off the Pearl Bangle, Splendid Bangle, Red Gemstone Ring, Gold Bar, Butterfly Lamp, Brass Pocket Watch, Gold Chicken Egg, Lunker Bass and any Velvet Blue you have – you should get roughly 100,000 pesetas for them all. While you’re at it, you can also now sell the Insignia Key for an extra 2,000 – we’re done with it.
He’s got some new items to buy and trade spinels for. You’ll even have enough for the Rocket Launcher, but hold off on that for now. Buy the Case Upgrade (8×12) for 20,000 pesetas and the Recipe: Attachable Mines recipe for the Bolt Thrower.
You’ve got some options for what to trade your spinels for. There’s a new gemstone and an Elegant Mask treasure if you need some extra cash (meh), a new rifle scope, and a stock for the TMP submachine gun. You can also buy a new Attache Case that will increase resources (L) drops. We went with the handgun laser sight because we use the handgun so much.
Spend some more cash on any tuning up you’d like, and then hit the typewriter. Visit the Shooting Range again if you’d like a distraction or more Charms.
Stone Dias 2 // Small Cave Shrine
The Stone Dias 2 can be found inside the small cave shrine, accessible after obtaining the boat. Inside, you’ll encounter a stone pedestal puzzle similar to the one near the Church. Rotate the stone pieces until the engraved patterns align, then place the correct Hexagon Piece into the slot to complete it. Solving this rewards you with a valuable item needed for progression and ties into the other shrines around the lake area.
With all that treasure hunting out of the way, head for the castle at the northeast end of the lake. There’s a tiny tunnel that will lead you to the final dock.
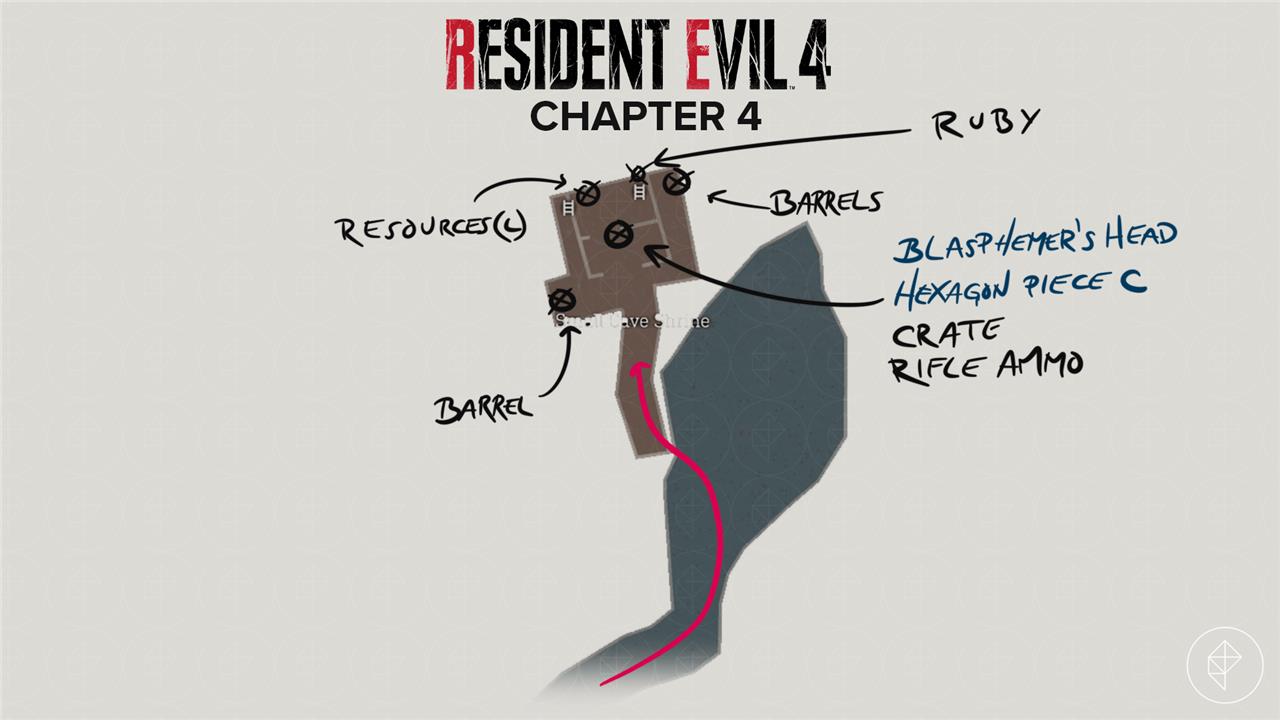
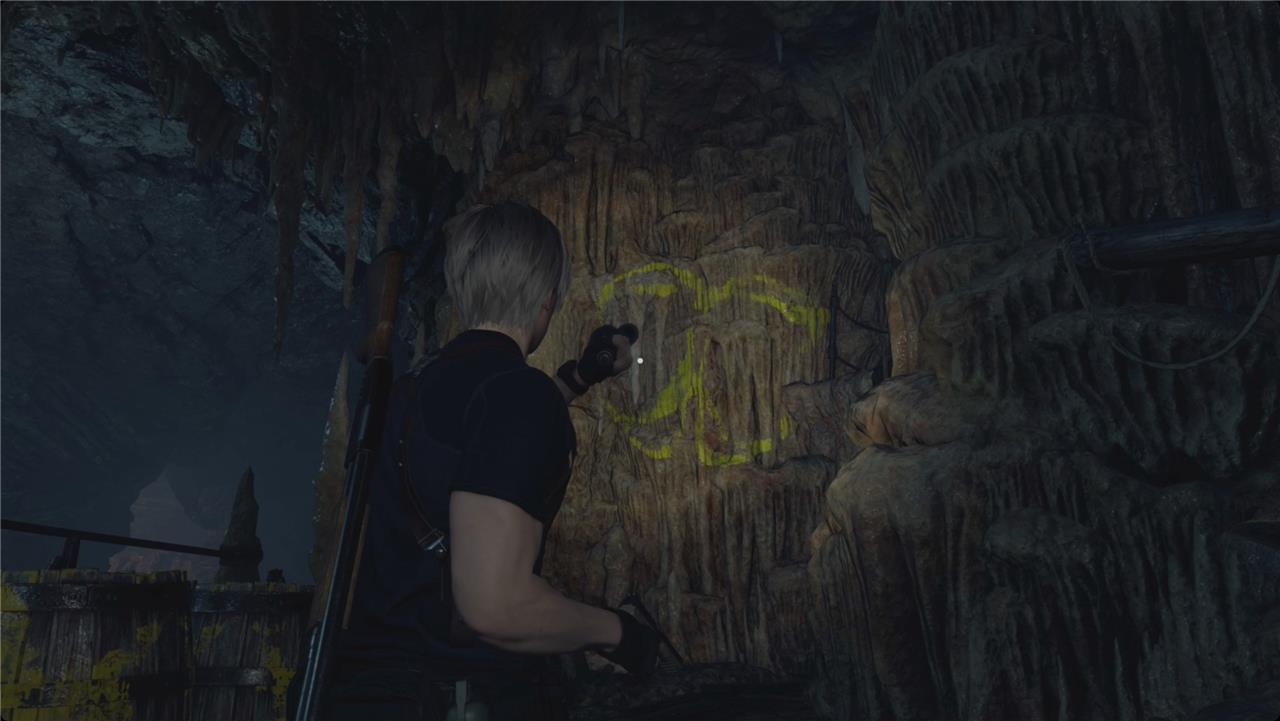
Before you head inside the shack, go smash the barrels on the right side for some pesetas and gunpowder. There is another barrel on the left containing a hand grenade, and if you look to your right, you’ll see the first symbol for this dock’s Stone Dias puzzle. Approach that symbol and climb the ladder on the outside of the shack.
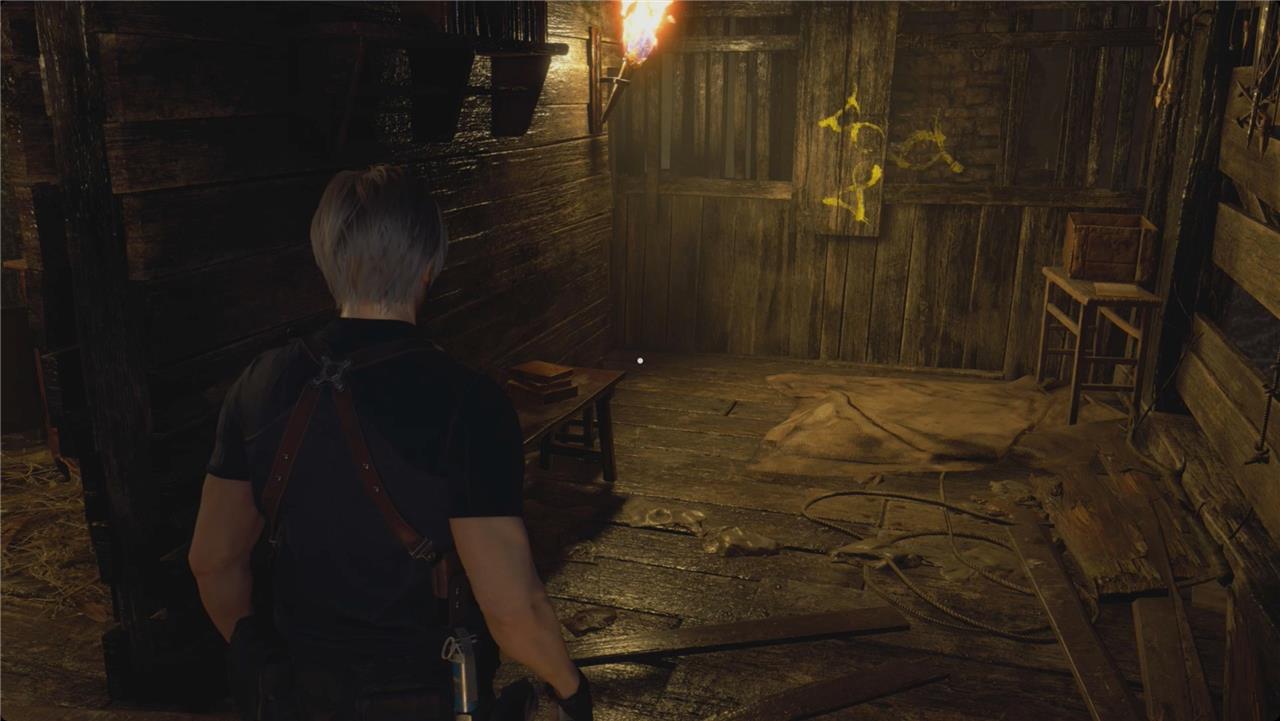
Take a couple steps forward and turn to the right to spot the second symbol. Open the cabinet there for some resources (L).
A few steps to the right, line up the markings inside the window with the marking outside for the final symbol.
Drop back down and head inside. Counting clockwise from the top, the symbols you need are 4, 6, and 7. When the door unlocks, grab the Hexagon Piece C from the case on the right, smash the crate on the left for some pesetas and handgun ammo, and pick up the rifle ammo in the corner. Pick up the Blasphemer’s Head key item, ignore the blood, and then climb the ladder.
Slash the lantern at the top for a ruby, turn right, and unlock the gate for a quick return to your boat.
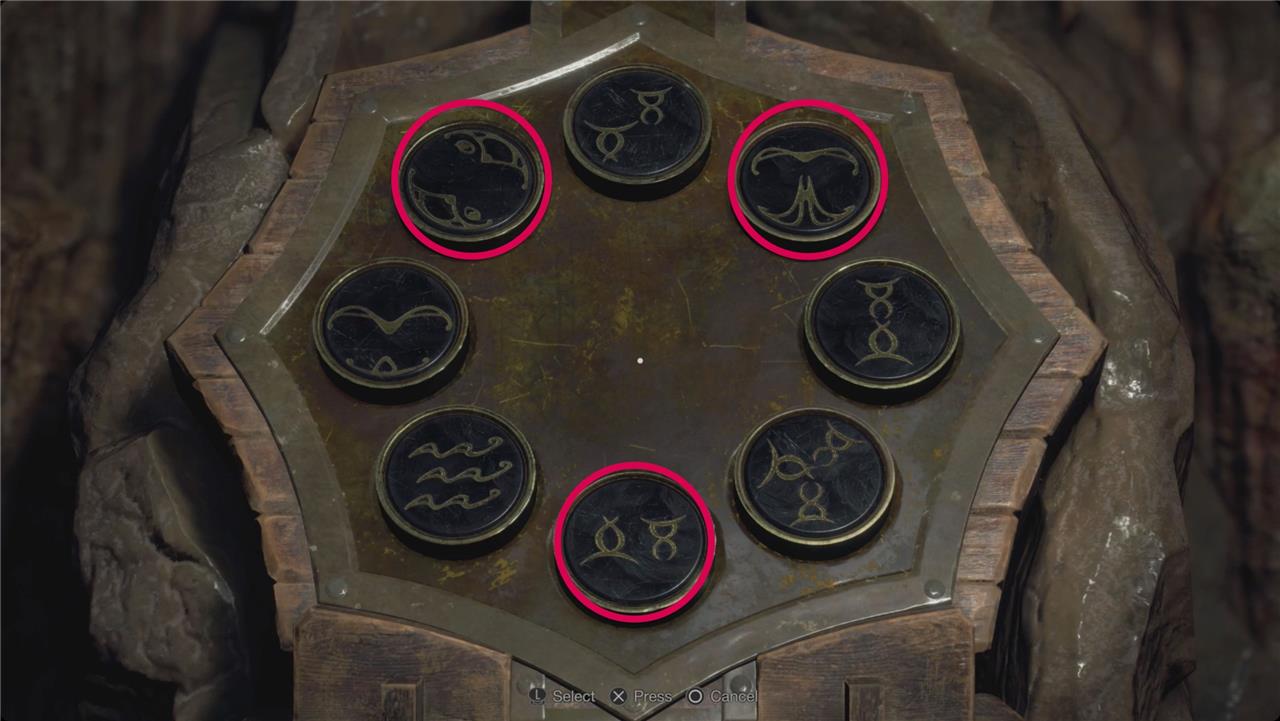
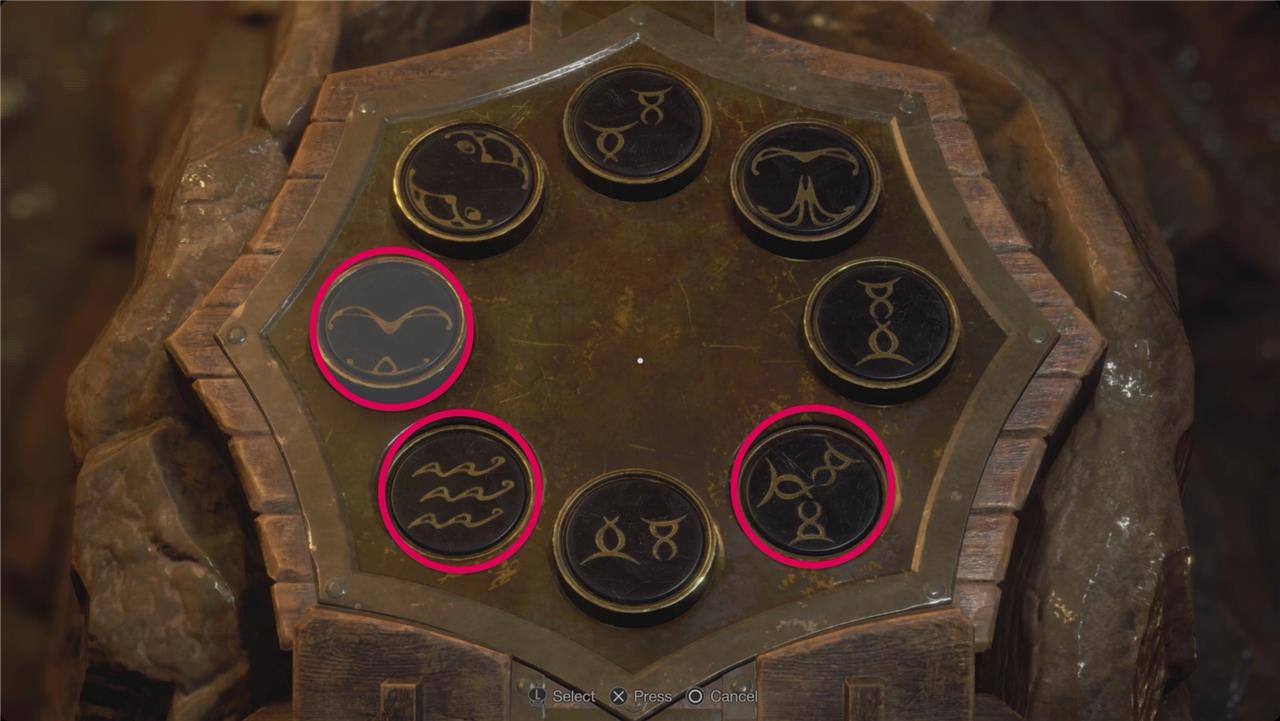
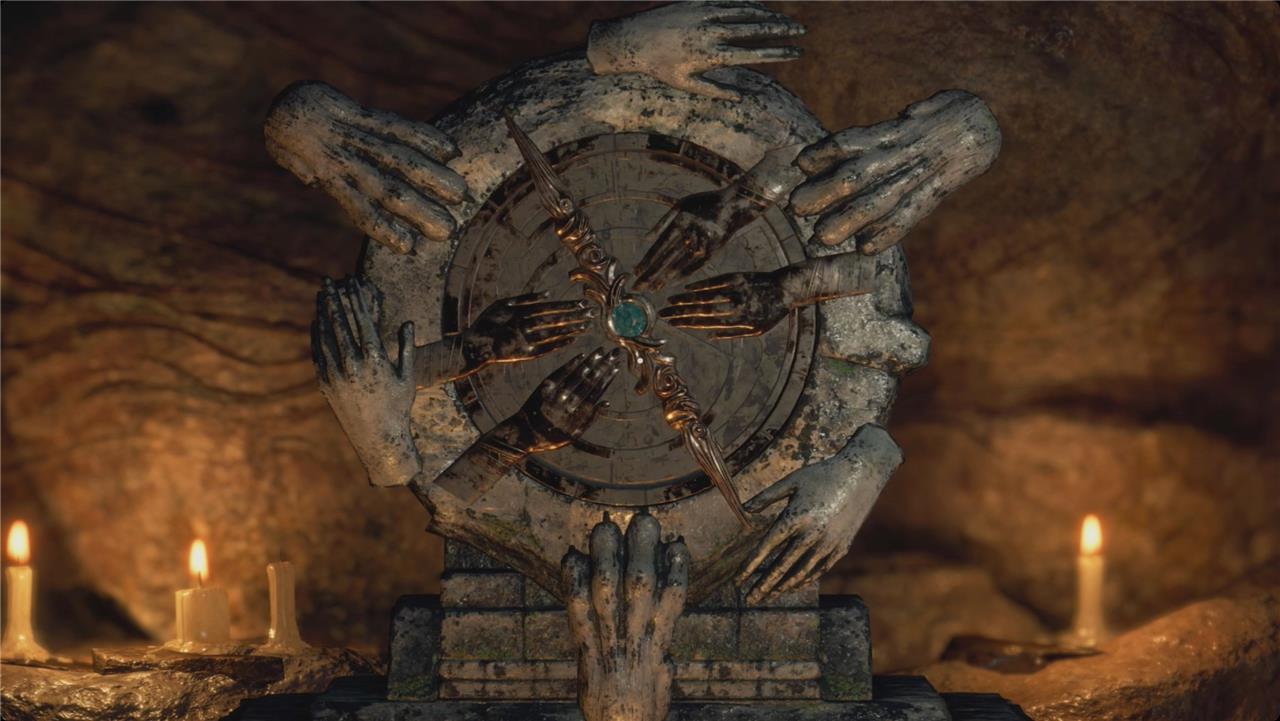
Stone Pedestal puzzle
The Stone Pedestal puzzle is found near the lake after retrieving the Hexagon Pieces scattered around the area. Once all three pieces are collected, place them into the pedestal to form the correct pattern. Rotating the outer and inner rings until the design matches the central emblem completes the mechanism. Solving it grants access to a hidden treasure that helps you gather more valuable resources for the next section.
Now that we have the final piece for the Stone Pedestal puzzle, let’s take it over. Head to the dock in the southwest of the lake – close to the Fish Farm. Place Hexagon Pieces B and C in the Stone Pedestal.
When you (try to) solve this puzzle, you’ll move the Hexagon Pieces three at a time, so it’s not as simple as just rotating each piece individually.
- Select the three in the lower left and rotate them once.
- Select the three at the top and rotate them once.
You’ll get the Depraved Idol.
Church Insignia
The Church Insignia is the key item needed to access the church where Ashley is held. After collecting it from the cave shrine, return to the church area and insert the insignia into the circular slot on the main door. This triggers the mechanism that opens the entrance, allowing progress into the sanctuary and advancing the search for Ashley.
Take both statue heads back to the Mural Cave and place them in the stone hands with the Blasphemer on the left. You’ll pick up the Church Insignia key item.
Head back to the merchant and sell the Depraved Idol and save. From there, backtrack to the Quarry where all that foreshadowing finally pays off.
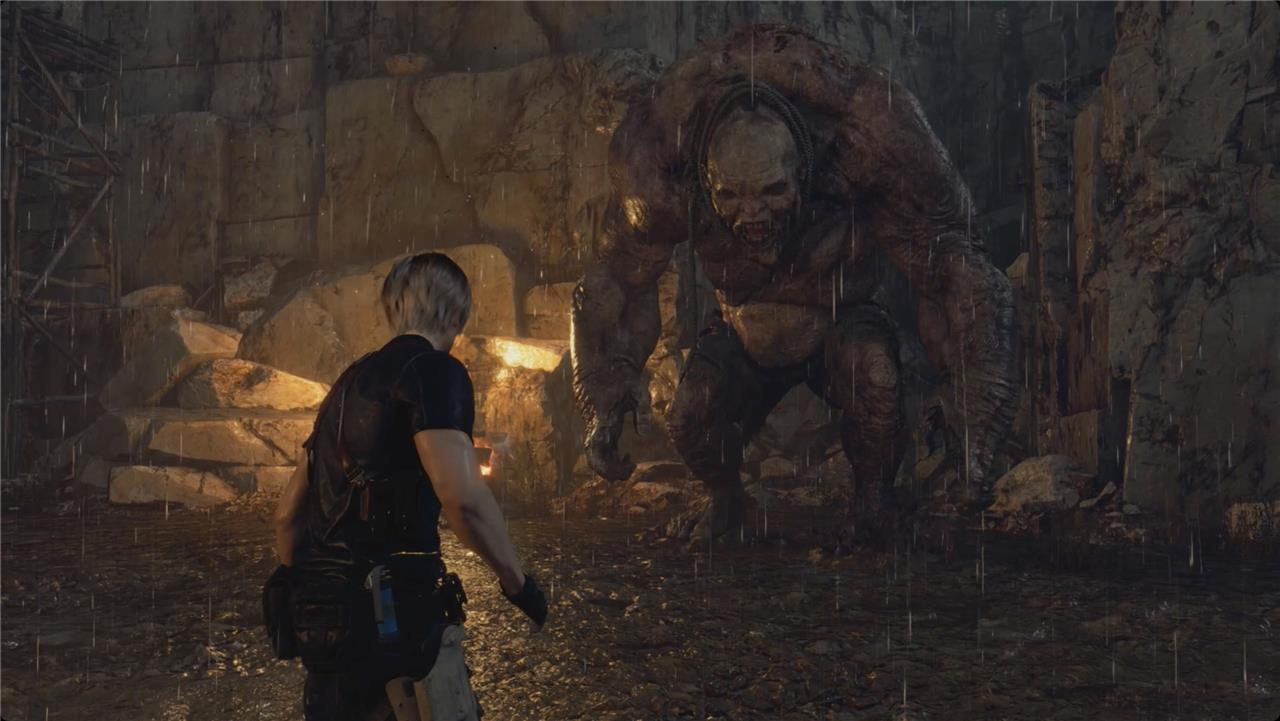
The only real trick to this boss fight is having enough ammo. Throughout the battle, check the edges of the Quarry and the shacks the giant smashes for various crates, herbs, and ammo.
Throughout the fight, the giant will try to grab you or jump on you. Just keep an eye out for the quick time event – press B/circle to (attempt to) dodge. We struggled with this since there’s a delay between aiming and shooting, and Leon reacting to the dodge prompt. It’s not too bad, though, so long as you have a knife. When you get grabbed, start mashing R2 to stab his hands and break free.
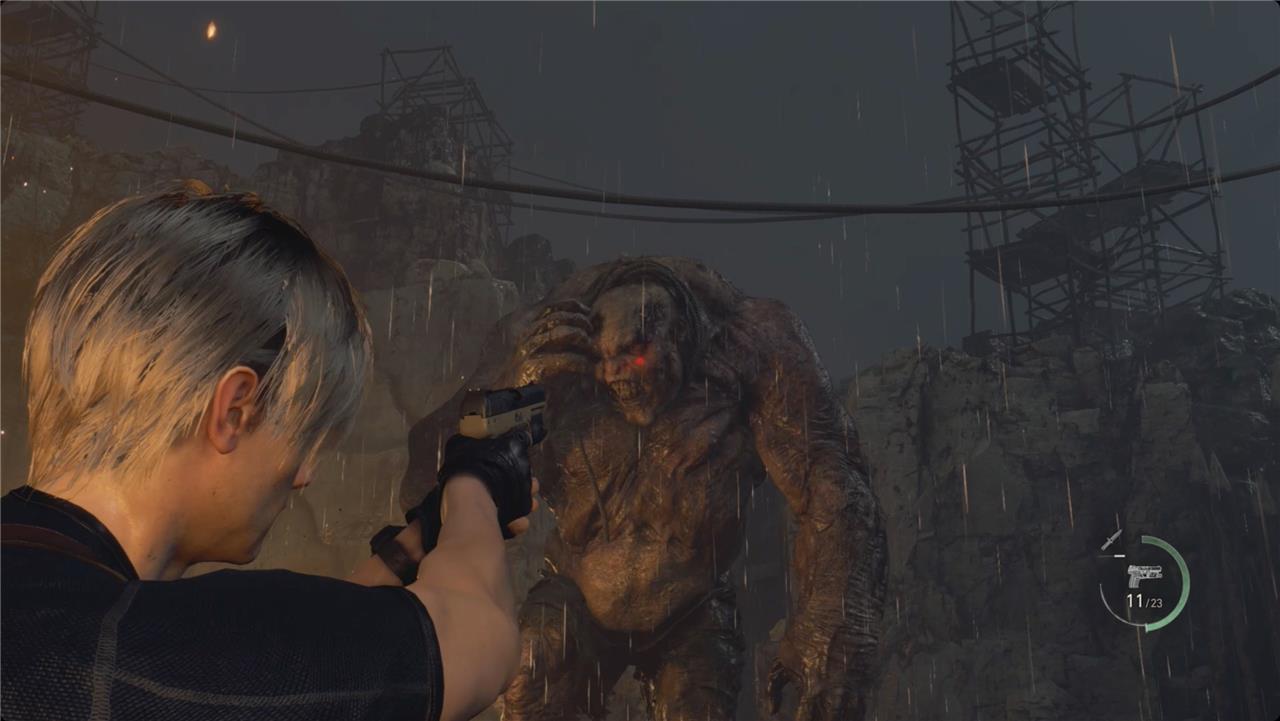
At the beginning of the fight (we hesitate to call it a phase 1), your goal is to deal enough damage to get the giant’s parasitic tentacle to pop out. Damage is damage here, but he really seems to hate getting shot in the head (relatable).
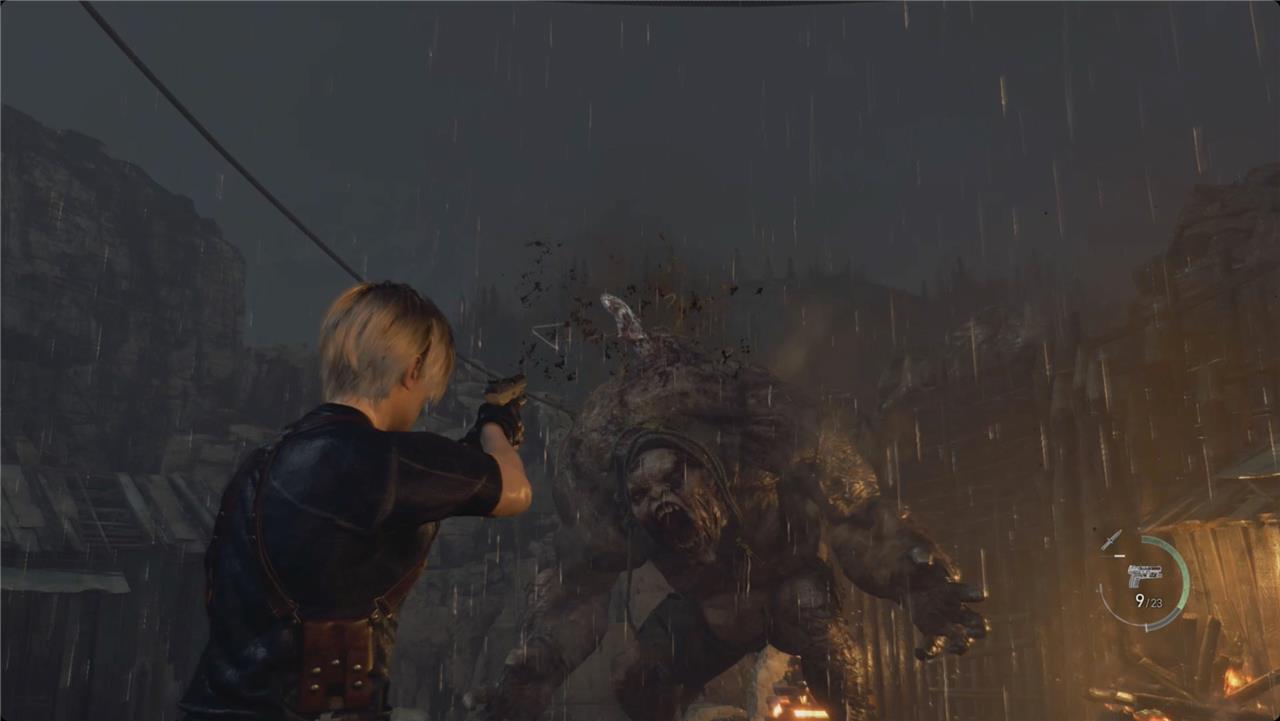
Once the tentacle pops out, turn your attention to that – that’s your job for the rest of the fight.
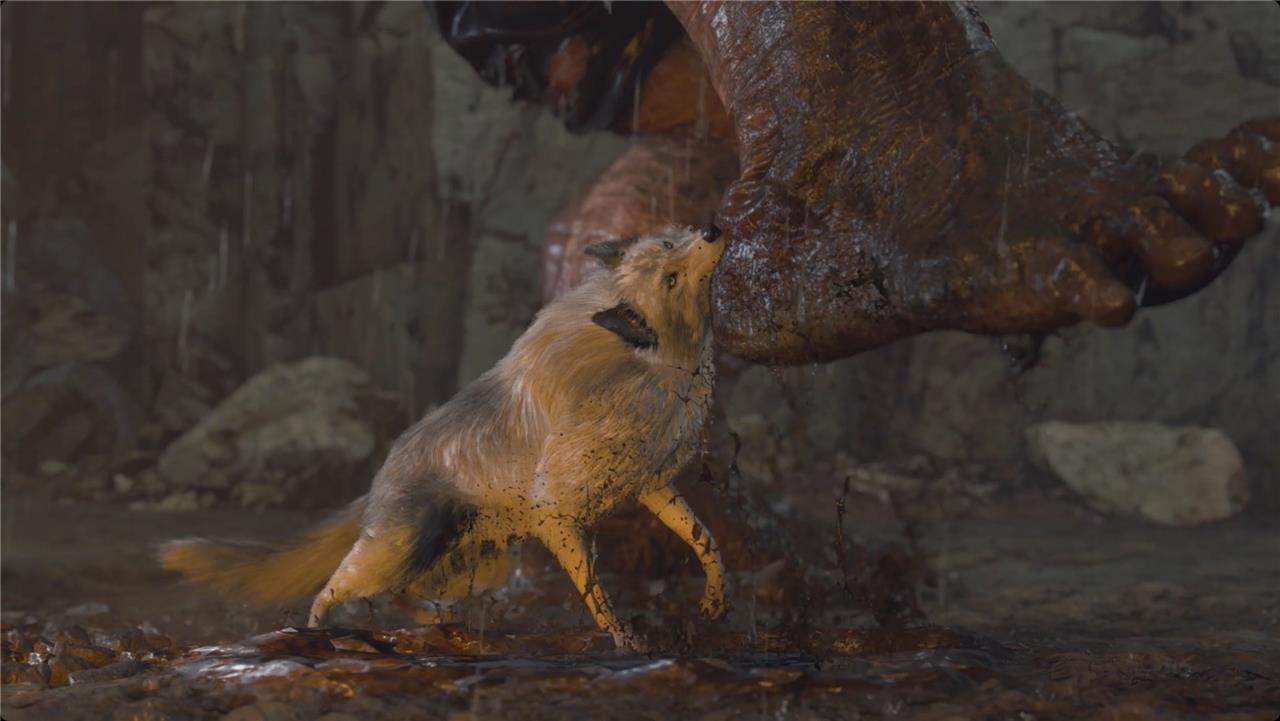
After a bit, that wolf you rescued from the trap back in Chapter 3 will come to your aid. They’ll help keep the giant distracted so you can go collect ammo and deal more damage.
Once he’s dead, the giant will drop a Yellow Diamond. Look in the northwest of the Quarry arena for a small area that was closed off before. Inside you’ll find the Rearing Log file and a Blue Velvet. Sweep the rest of the Quarry for any other items that you’ve missed, and then move on.
Head for the church // Look for Ashley in the church
After leaving the quarry and reaching the church, use the key you obtained earlier to open the main door. Inside, clear out any enemies and explore the area for supplies. The church’s interior is quiet but tense; examine the surroundings to trigger the next objective. Once you reach the balcony and spot Ashley trapped above, the story progresses toward rescuing her in the next section.
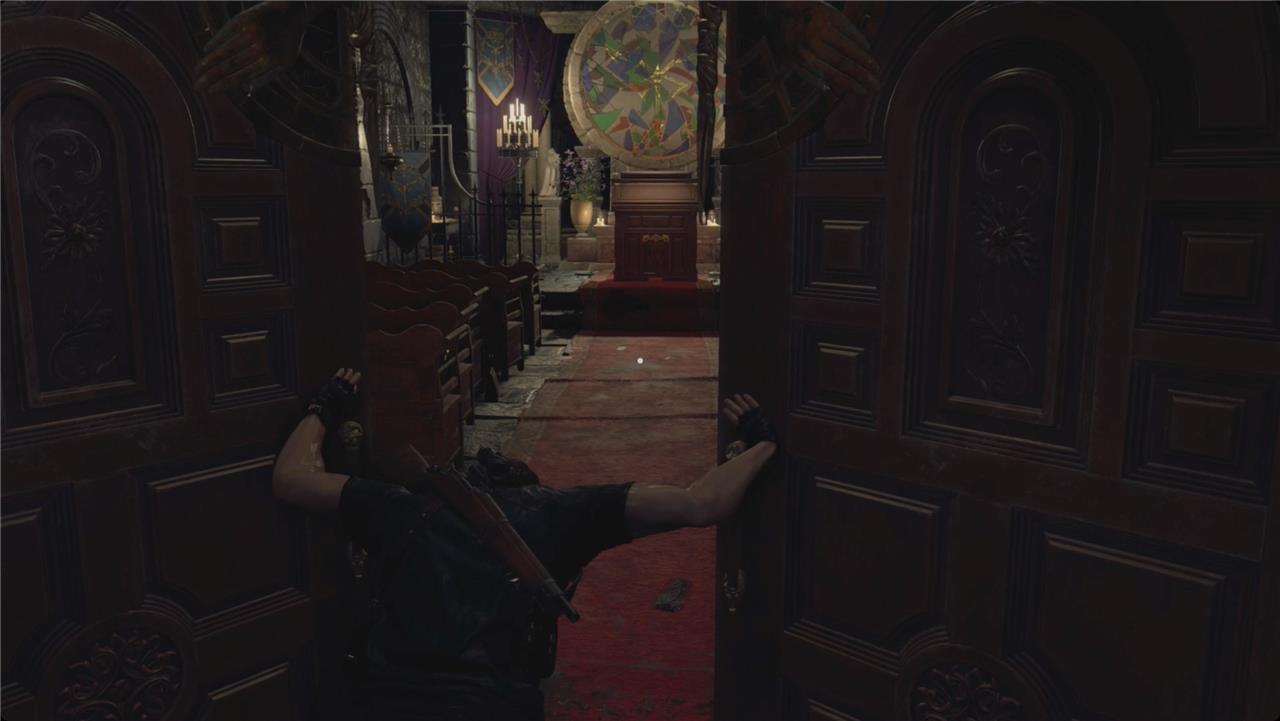
Backtrack all the way to the Church and use the Church Insignia on the front door. Head inside.
There’s a green herb immediately to the left and behind the door.
To the right, open the cabinet in the corner for some submachine gun ammo. Smash the two barrels for some shotgun shells and pesetas. Check the cabinet in the back corner for the blue dial key item.
In the center of the church, walk along the pews and watch for some bolts on the left. Up at the front, behind the pulpit, look on the right side for a Small Key, and then pull the switch on the left side.
Church Pulpit puzzle solution
The Church pulpit puzzle requires aligning the stained-glass pieces to match the colors and symbols in the center. Rotate each section until the blue, green, and red fragments fit neatly into the pattern forming the church’s insignia. Once the sections align correctly, the mechanism triggers and opens the door leading to Ashley’s cell.

Place the Blue Dial in the Pulpit puzzle that opens.
- Rotate the green (center) dial first. Line up the point in middle of the insignia with the middle piece of green glass.
- Rotate the red (right) dial next. Line up the wing(?)tip in the upper left with the red glass.
- Rotate the blue (left) dial next. You’re mostly just filling in the gaps, but there are a couple points to help you get your bearings.
That will open a door on the left side of the church. Head through it and up the ladder.
Follow the path around to the right and smash the barrels for some gunpowder. Go past the door and loop around to the northern corner to find the Broken Cell Phone file.
Go back to the door and open it.
All treasures and collectibles in Chapter 4 Lake and Quarry
Chapter 4 of Resident Evil 4 Remake features the Lake area (including Mural Cave, Small Cave Shrine, Large Cave Shrine, and Lakeside Settlement) and the Quarry, with numerous treasures, gems, key items, and other collectibles. Prioritize using the boat to explore all docks and wayshrines, and check barrels, crates, and enemy drops. Sell treasures to the Merchant or combine gems for higher value.
Lake Treasures and Gems
These are primarily found via boat exploration around the central lake.
| Item | Location | Value (Pesetas) | Notes |
|---|---|---|---|
| Alexandrite | Ruined boat in lake center (blue/gold chest) | 6,000 | Village Treasure 22 |
| Red9 Handgun (weapon/treasure) | Ruined boat front (ornate chest) | 7,000 (sellable) | Upgradable pistol |
| Velvet Blue | Small eastern land patch (barrel) | 2,000 | Village Treasure 24; near Gold Egg |
| Gold Egg | Small eastern land patch (chicken coop) | 10,000 | For Egg Hunt request |
| Lunker Bass | Lake waters (fishing) | Varies | For Catch Me A Big Fish request |
| Red Gemstone Ring | Lakeside Settlement basement (box behind Luis spot) | 6,000 | Village Treasure 28 |
| Depraved Idol | Large Cave Shrine area | 10,000 | After enemies |
| Splendid Bangle | Large Cave Shrine path | 8,000 | Check crates |
| Ruby | Small Cave Shrine nearby | 5,000 | In barrel/crate |
Key Items (Lake)
-
Old Wayshrine Key: Mural Cave shrine room (unlocks chests).
-
Blasphemer’s Head: Small Cave Shrine (puzzle solution).
-
Apostate’s Head: Large Cave Shrine chest (with Old Wayshrine Key).
-
Church Insignia: Mural Cave shrine (combine heads).
Quarry Collectibles
Accessed after Lake via Merchant dock and tunnel.
| Item | Location | Value (Pesetas) | Notes |
|---|---|---|---|
| Butterfly Lamp | Wayshrine in quarry tunnel | 6,000+ (combine) | Village Treasure |
| Yellow Diamond | Post-El Gigante fight (building) | 5,000 | Weak point exploit |
| Gold Bar | Locked drawer (Small Key needed) | 10,000 | Near Merchant path |
Other Collectibles
-
Clockwork Castellan #4: Lakeside Settlement (near bear traps).
-
Hexagon Piece C: Lake exploration (combine for door).
-
Small Key x2: Various spots (unlocks Gold Bar, etc.).
-
Merchant Requests: Egg Hunt (Gold Egg), Catch Me A Big Fish (Lunker Bass).
Combine gems like Alexandrite into lamps/bangles at Typewriter areas for max value. Explore thoroughly before progressing to avoid backtracking.
Chapter 4 Clockwork Castellan locations
Resident Evil 4 Remake Chapter 4 has one Clockwork Castellan (the fourth overall), located in the Forest Altar area accessible from the Lakeside Settlement.
Accessing the Area
After defeating Del Lago and gaining free use of the boat in the Lake area, sail back to the northern dock at Lakeside Settlement (from Chapter 1). Use the Insignia Key (obtained in Chapter 2’s Village Chief’s Manor) to unlock the gated cave entrance near the palisade wall.
Exact Location
Enter the cave, proceed through, and climb the ladder at the end to reach the Forest Altar. From the ladder top, walk straight ahead past the altar (with the sacrificed girl’s body). Look left through a gap in the broken wooden fence- the Clockwork Castellan is hidden on the ground next to a tree in the woods beyond, making a faint ticking sound.
Shoot it to destroy it (counts toward the Primal Knife unlock after all 16). Note: Returning here spawns new Ganados and Colmillos in Lakeside Settlement.