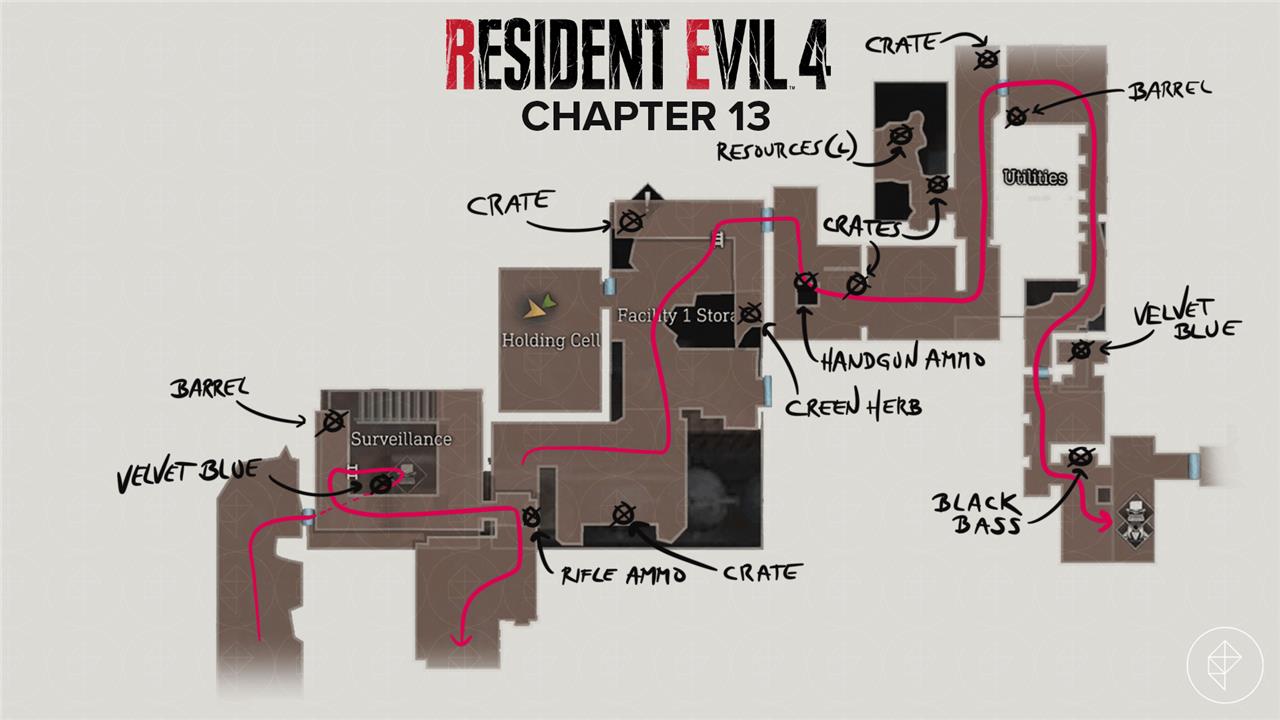
Steel nerves and steady aim are your best allies in Chapter 13 of Resident Evil 4 Remake, where the eerie Wharf and the grim Incubation Lab hide dangers that punish hesitation and reward precision.
Our Resident Evil 4 remake Chapter 13 walkthrough will make sure you don’t miss any items from the beginning of the chapter through the Wharf, Surveillance, Facility Storage, Utilities, Dissection, Freezer, Systems, Incubation Lab, and Holding Cell.
Throughout this walkthrough, we’re not going to mention every item that anyone (or anything) you shoot drops – if you kill something, look for a loot drop.
Also, there’s a little randomness to the contents of crates based on your inventory and weapons, so you probably won’t find the exact same things listed below. The crates and barrels themselves will always be in the same locations, though. And all other items – keys, collectibles, and resources not found in crates – should be the same.
Go after Ashley
After clearing the Wharf, follow the path leading toward the Incubation Lab to continue your pursuit of Ashley. Defeat any Ganados or creatures blocking your way and collect supplies along the route. Stay alert for hidden treasures and documents that reveal more about the island’s experiments. Once you reach the lab area, prepare for close-quarters combat and watch for ambushes as you move deeper inside to find Ashley’s location.
When you get control of Leon on the beach, start climbing the rocks ahead of you. You’ll come to a binocular vista on the other side.
Follow the path into the tunnel on the right. Around the corner, you’ll run into your first laser sensor and auto-turret. If you cross the laser, you’ll get shot. A lot.

Since you can’t do anything about it, keep to the right. Cross the bridge and take the first right. At the end of the path, look at the headstone to get the Eroded Cave Epitaph file. Climb the rocks on your left to find two crates with pesetas, a heavy grenade, and handgun ammo.
Follow the path back and take the next right (to the north) to find the Merchant.
You can sell the Cubic Device now, and the Lip Rouge from Salazar is worth 24,000 pesetas.
The Merchant is selling a new magnum, the Killer7, and there’s a new Case Upgrade (9 x 13). Definitely pick up the case upgrade if you can, and consider selling the Broken Butterfly to buy the Killer7.
Wharf
The Wharf section drops you into a tense nighttime boat ride through foggy waters, pursued by massive sea creatures that lunge from the depths. Grab the Shotgun Shells on the dock crates right away, then man the mounted machine gun to shred the beasts closing in. Steer clear of their attacks while aiming for weak spots like glowing eyes, and pick up the Attache Case from the water after sinking the first wave. Push forward to the lab entrance once the path clears, conserving ammo for tougher fights ahead.
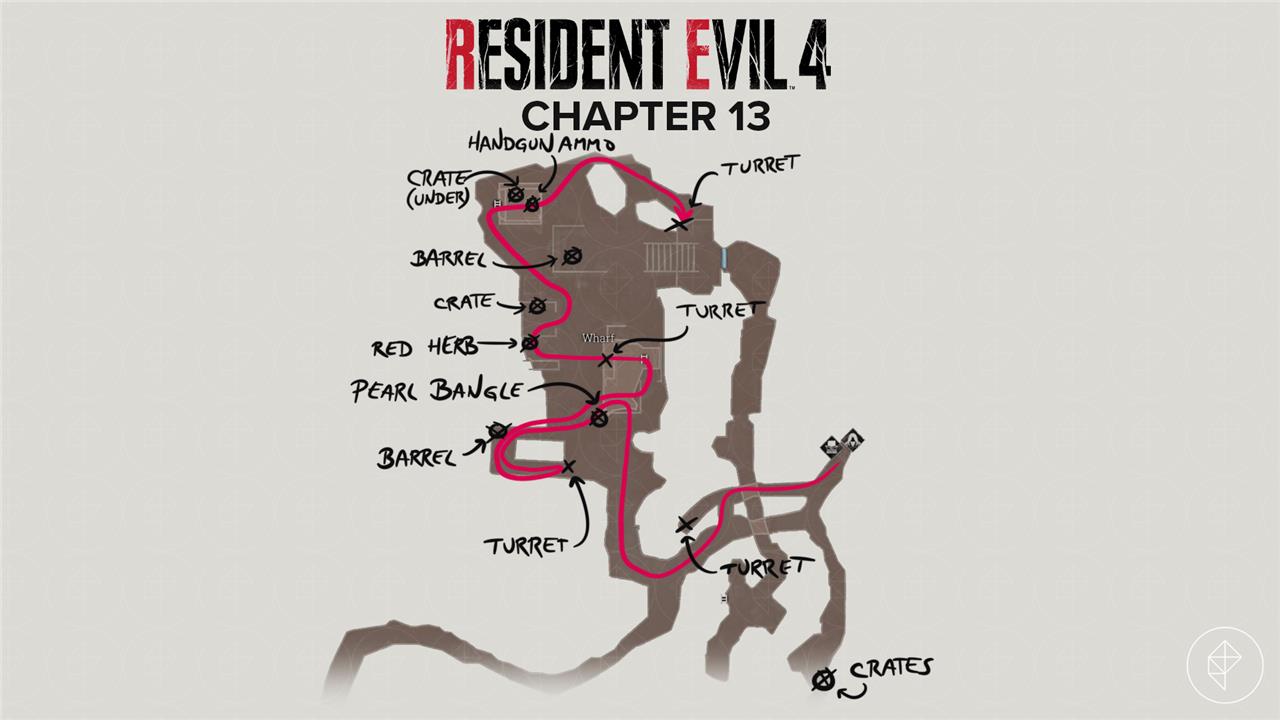
When you leave the Merchant, take the next right. Follow that tunnel to the end to turn the auto-turret so you can pass. Head back and drop into the lower tunnel to do so.
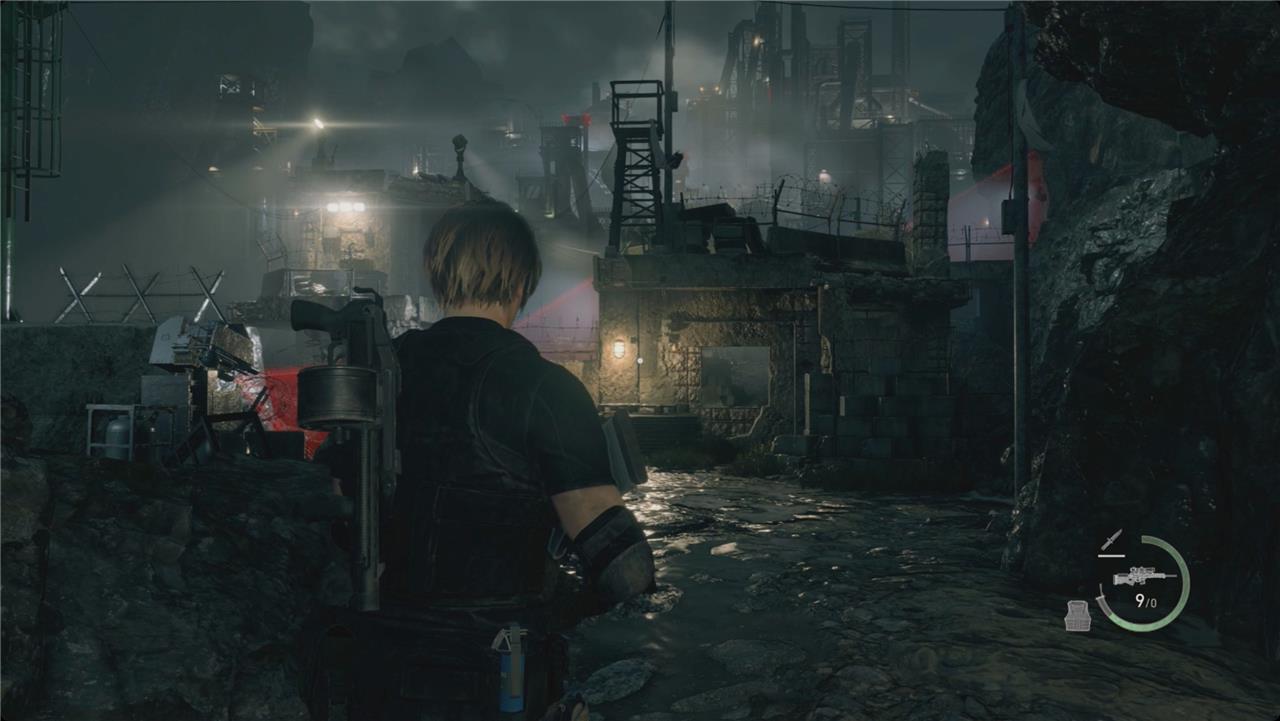
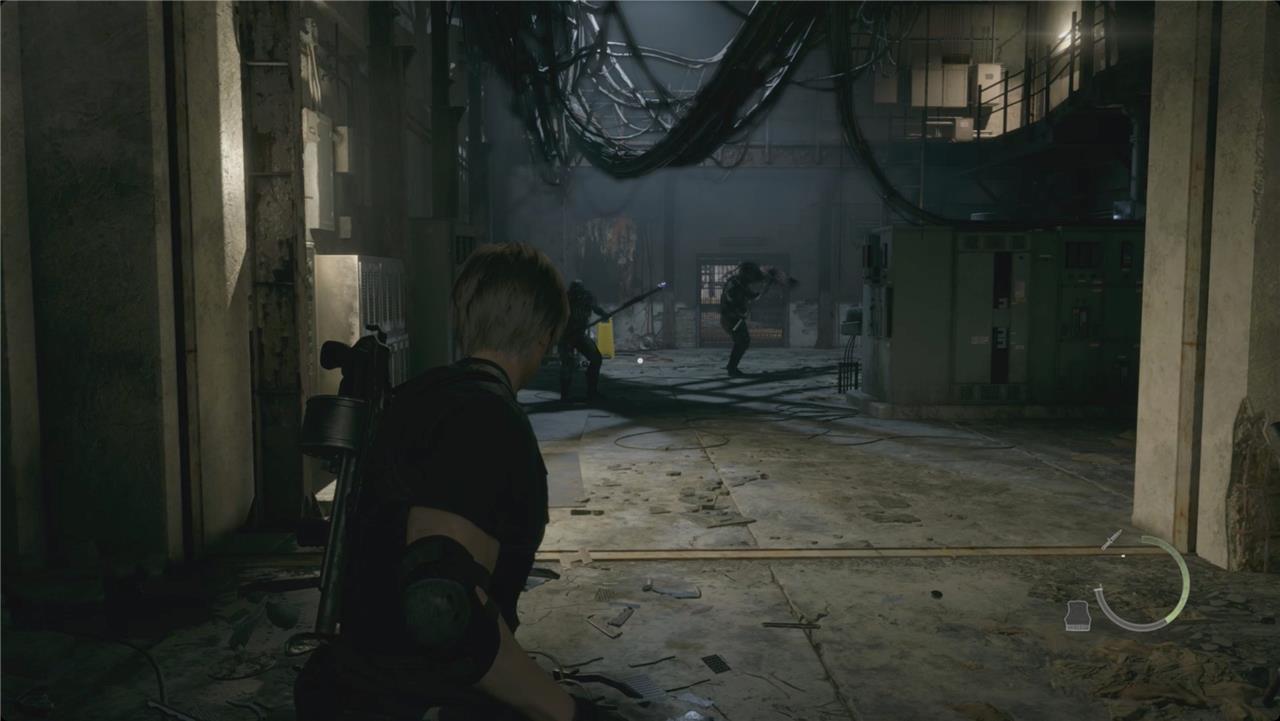
When you get to the beach, things get a little interesting. There are a series of auto-turrets and spotlights to deal with, and there are a handful of (basically zealot) soldiers who can also spot you. Ideally, you’d sneak through the Wharf without getting spotted – and it’s possible if you have enough rifle ammo to snipe the soldiers from a distance. But it’s more likely you’ll get spotted, so, instead, let’s talk about what happens when it goes wrong.
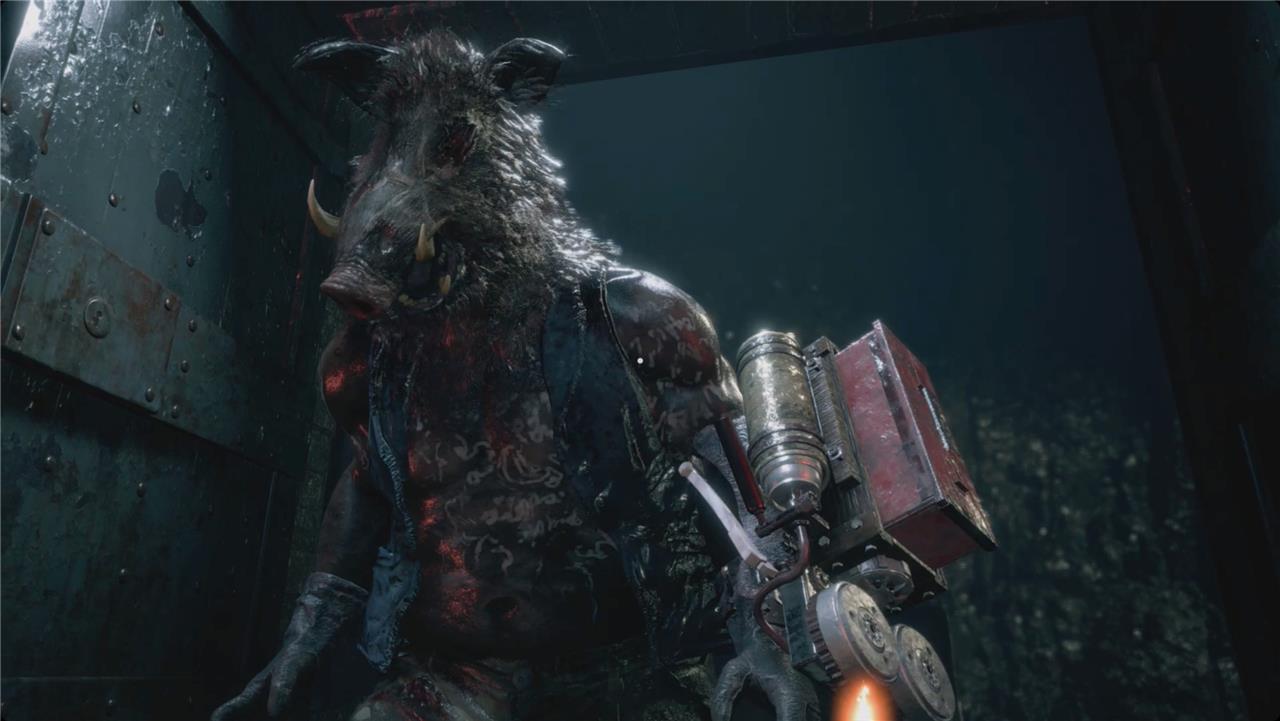
First, the alarms will sound and you’ll get a quick cutscene of a boar-headed brute with an automatic crossbow on his left arm. And then, a lot of soldiers are going to come attack you.
The best place to take on this attack is right at the beginning of the Wharf – there’s only one way to get to you and you’ll have good angles to deal with the soldiers. Most of the soldiers will stream in from directly ahead of you – including the brute – and climb through the window, creating a good choke point. You will need to watch for two pairs of soldiers (one arbalist and one with Molotovs) on the roofs to your left.
When the dust settles, walk forward and vault the window to get inside that first building (or you could walk around to the right, but that’s no fun). Take a left and snake back toward the shore where you’ll find a barrel with handgun ammo.
Take a left and loop back the first auto-turret, then hit the button to redirect it. On your way back to the first building, open the chest (the auto-turret was pointing at it before) for a Pearl Bangle. Climb the ladder to the roof of the first building.
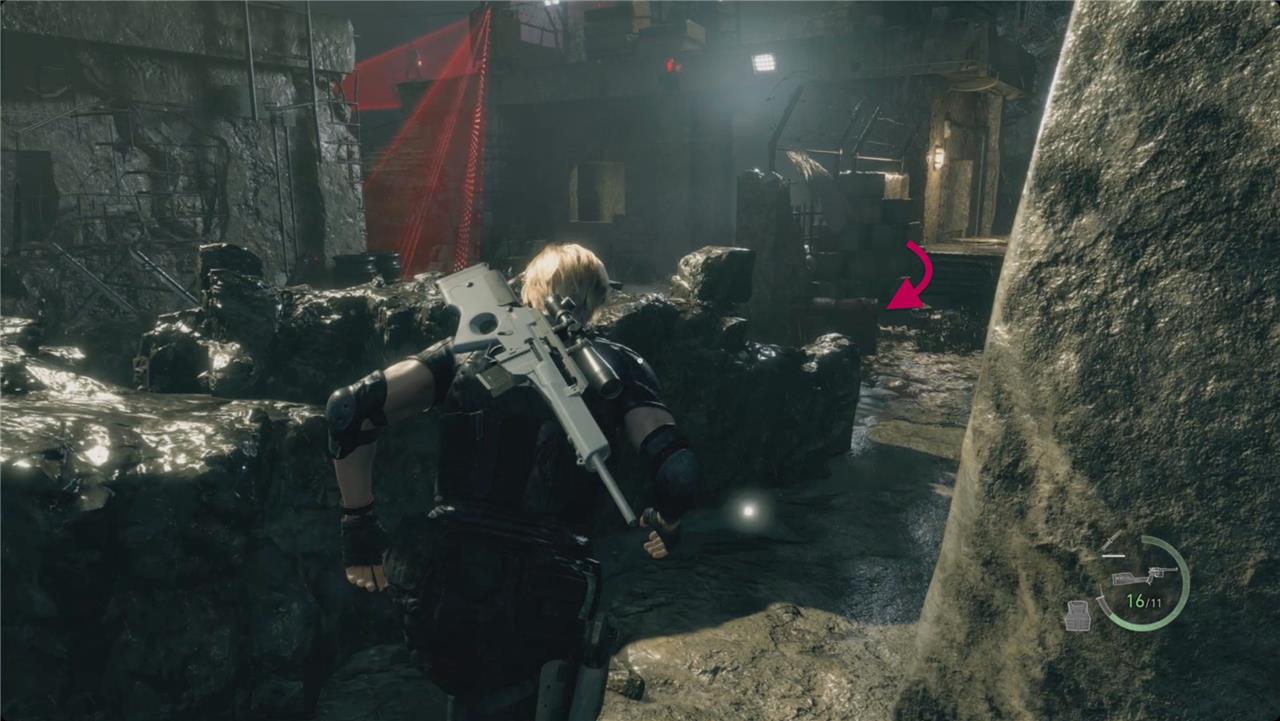
Redirect the auto-turret on the roof with you. Look above it to see the pair of spotlights on the roof of the building across from you. Shoot them – make sure you hit the face and not the casing – to save yourself some trouble later. Drop off the roof and cross the street to grab the red herb there. Vault the window on your right and smash the crate inside for some rifle ammo. Outside, there’s another barrel in the middle of the Wharf on a raised platform with more handgun ammo.
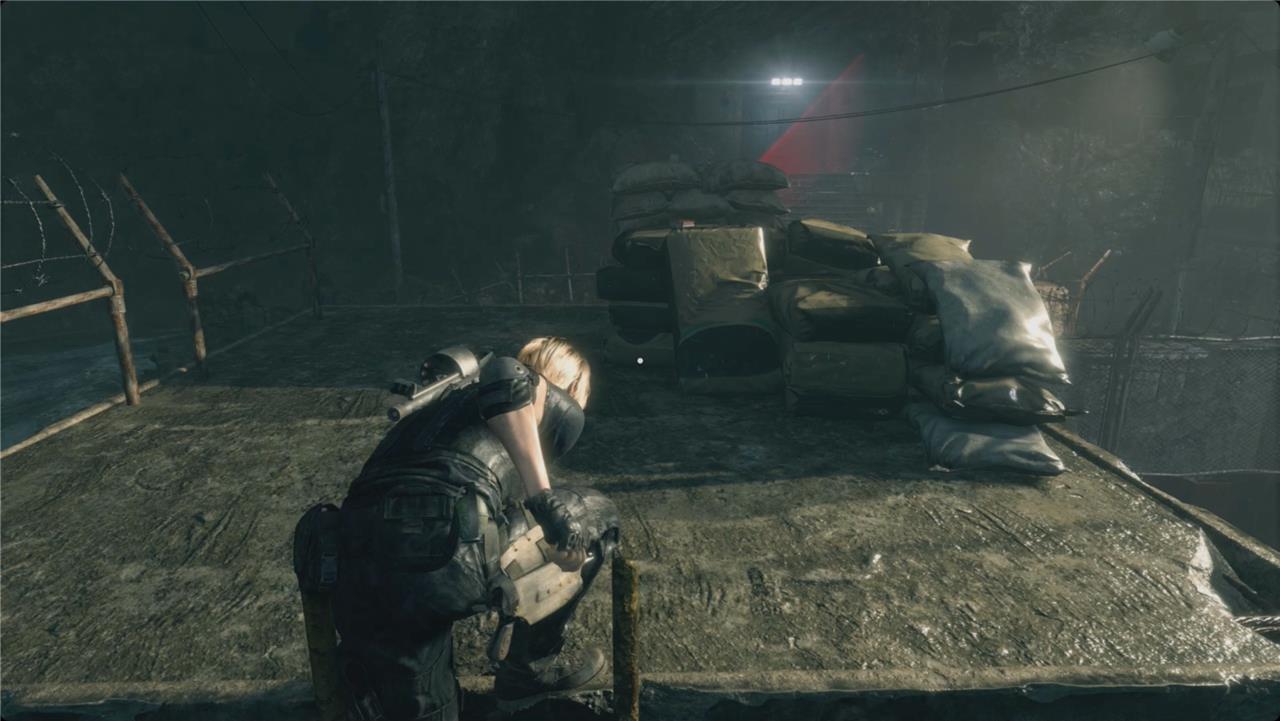
Cut to the left and stick to the wall. The path will lead you around to the back of a building. Climb the ladder to the roof and pick up the handgun ammo on the sandbags there. Drop off and duck into the building to find a crate with more handgun ammo.
Outside, stick to the left and follow the path to another auto-turret to move.
Backtrack along the same route all the way back to the beginning. With the auto-turrets moved, you’ll be able to take the right path out of that first building and up the stairs to exit the Wharf. Push through the doors.
Surveillance
Security cameras track your movements throughout the Wharf and Incubation Lab, allowing enemies to anticipate your approach. Watch for console monitors displaying live feeds-these hint at enemy positions and reveal upcoming encounters. Pay attention to camera placements, as they often indicate key objectives or hidden dangers nearby. Keeping an eye on what’s being recorded can give you a strategic edge before stepping into the next zone.
Inside, follow the tunnel right. You’ll run into a pair of soldiers and then find two barrels with handgun ammo.
Keep following the path through some more soldiers. When you come to an intersection, go straight to find a crate with pesetas. Turn around and climb the ladder on the left.
At the top, you’ll have to deal with a patrolling soldier arbalist. Go smash the barrels on the left for pesetas and handgun ammo.
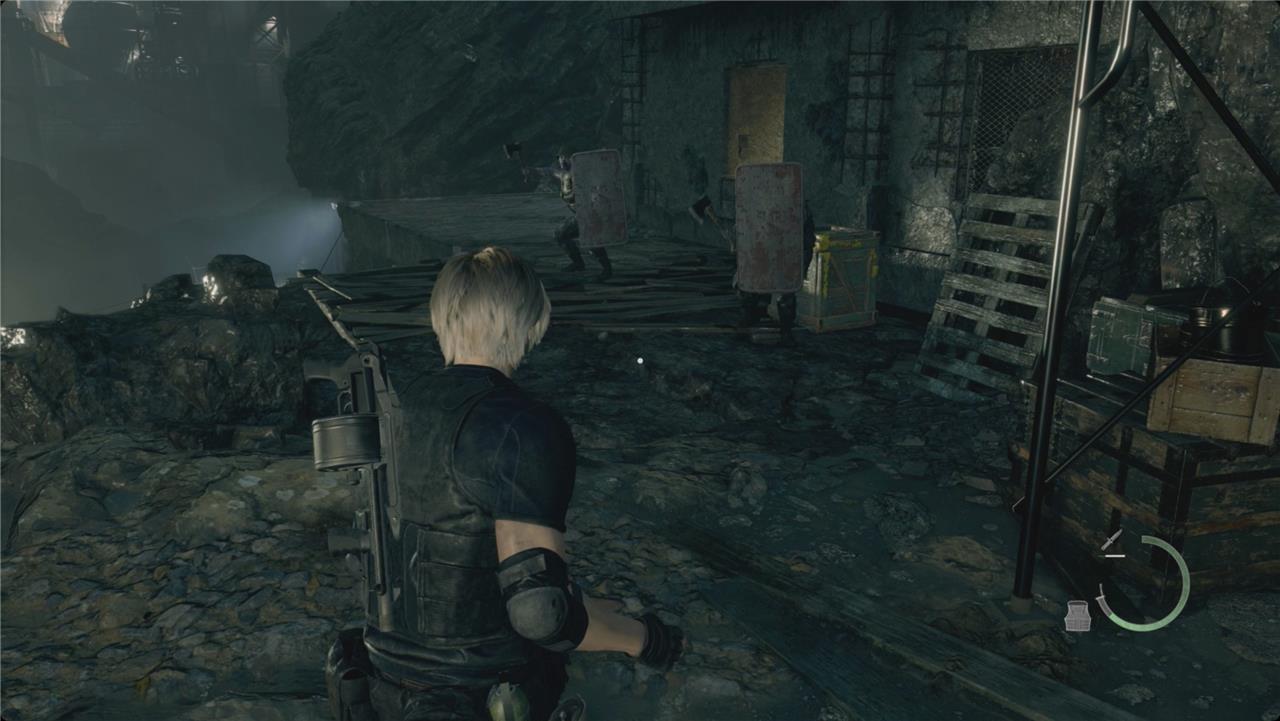
To the right, you’ll have to deal with some better equipped zealots called soldiers. They’re carrying metal riot shields that you can’t destroy and some are wearing metal helmets. For the shield-bearers, either drop a grenade behind them or wait for them to attack you and parry it. For the ones in helmets, kneecap them, and then follow up with a melee attack.
Smash the crate by the window for some pesetas and vault through the window. Grab the handgun ammo ahead of you. Take the tunnel just to the right of the table and then take the left at the intersection for a yellow herb.
Turn to the right fork and shoot the barrel there to clear some rubble. Open the treasure chest for a Golden Lynx.
Head back to the cliff and follow it right. You’ll get spotted by a soldier with a rocket launcher.
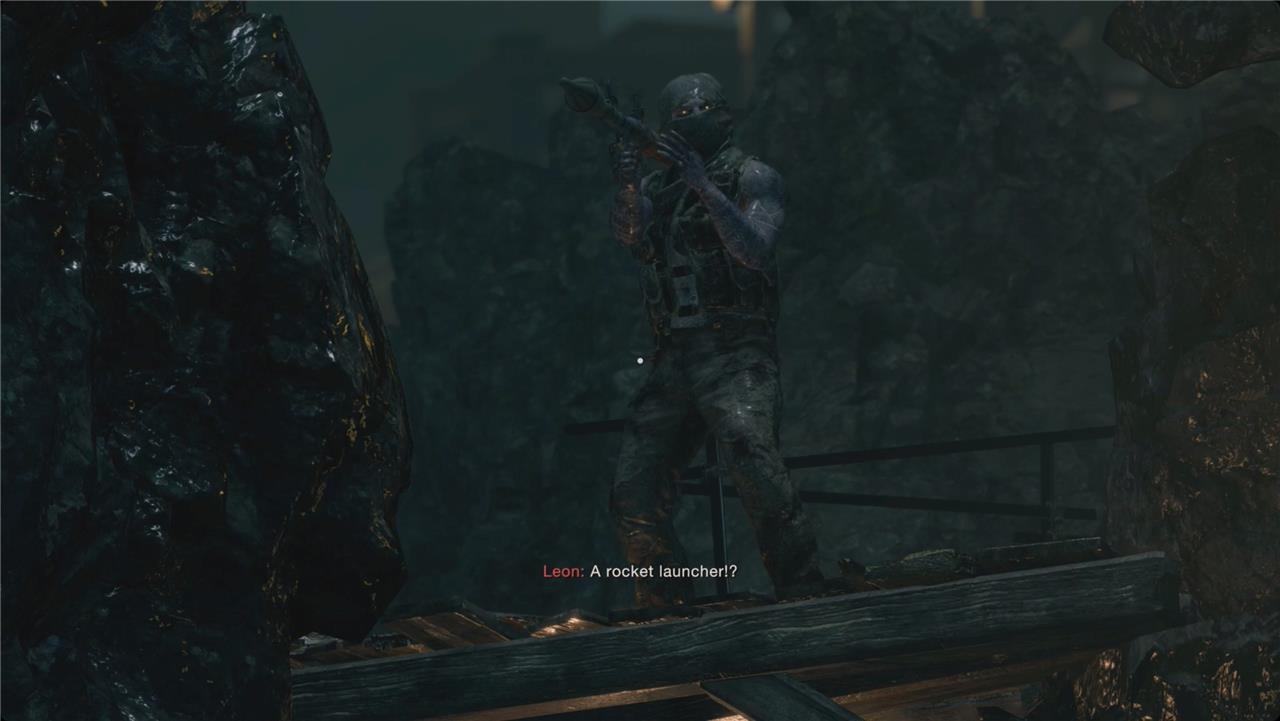
Duck behind the cinder block wall (or backtrack around the corner) to deal with the crowd of soldiers who rush you. Wait for him to reload, and take out the rocket launcher soldier. Smash the crates and barrels around the area for pesetas, handgun, and rifle ammo.
Take the tunnel to the left up to the bridge. Take the tunnel to the dead end to find a crate with shotgun shells.
Backtrack and drop off the bridge. There’s a small cave under the bridge with a crate holding some rifle ammo. Continue up the slope and deal with another pair of soldiers. Push through the doors.
Follow the tunnel down. At the bottom, head to the right and then turn left (north). You’ll be able to see another rocket launcher soldier in the distance. Take him out now to save yourself the stress later.
Cut back to the left and follow the path around. Take a right and go down the stairs to where the rocket launcher soldier was. To the right of the giant doors, smash the crates for pesetas and shotgun shells.
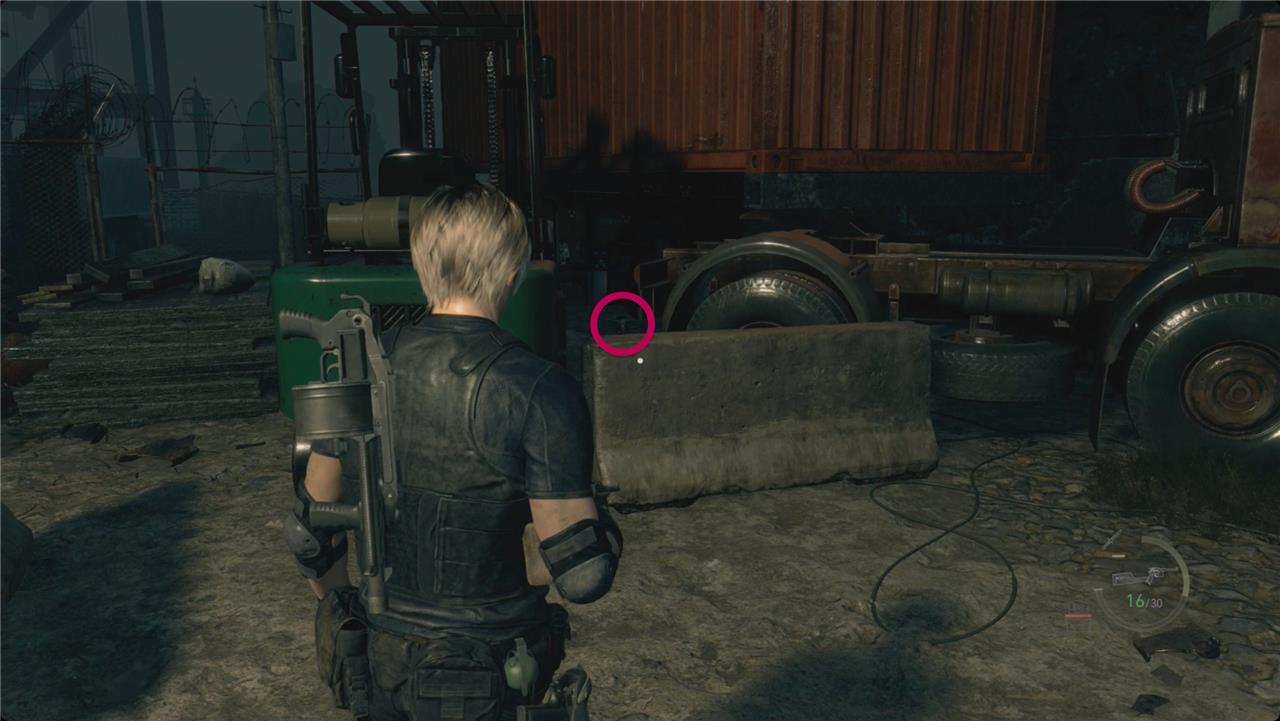
Cross the open area heading south to find a chest with an Elegant Crown inside. Turn left and take a few steps to the left. Between the red truck and the green forklift, you’ll spot Clockwork Castellan13 of 16 under the truck.
Head all the way back up the stairs and follow the path around to the right. Disable the tripwire at the door, and head through.
Inside the Surveillance room, open the case ahead of you for a velvet blue. Hit the typewriter to save.
Climb the ladder and turn right to find a barrel with shotgun shells. A few soldiers will attack from around the corner behind you. Deal with them, and go disarm the tripwire by the stairs.
Head through the open door on the second floor. Check the locker ahead of you for some rifle ammo, and then head left. Push the big red button to unlock the door downstairs.
Head down and through it. You’ll get a quick cutscene.
Facility Storage
In the Facility Storage area, players access locked crates and shelves packed with handgun ammo, rifle rounds, and herbs after solving the nearby power puzzle. Smash the barrels near the entrance for extra resources like grenades or magnum bullets. Check the typewriter for typewriting save and grab the yellow diamond key item from a high shelf using a ladder. This room serves as a quick restock point before pushing toward the Incubation Lab elevator.
Drop off the platform to your right. Before you smash the crate, there’s a soldier and a brute to your left to deal with. Smash the crate for rifle ammo.
In the room to the left, climb the ladder in the back right corner. Turn left and smash the crate for some pesetas. Follow the walkway around to the right for a green herb.
Push through the door in the northeast corner.
Utilities
Utilities in this section of the chapter let you manage resources wisely. You’ll find barrels, lockers, and storage cases throughout the Wharf and Incubation Lab containing ammunition, healing items, and crafting materials. Be sure to combine herbs and craft ammunition whenever possible, since enemies in these areas can quickly drain your supplies. Also, keep an eye out for the merchant’s requests and nearby typewriters for saving progress and organizing your inventory before tougher encounters ahead.
Deal with the trio of soldiers to the right, and grab the handgun ammo from the boxes (AC unit?) there. Follow the room left for a crate with pesetas, and then go through the door.
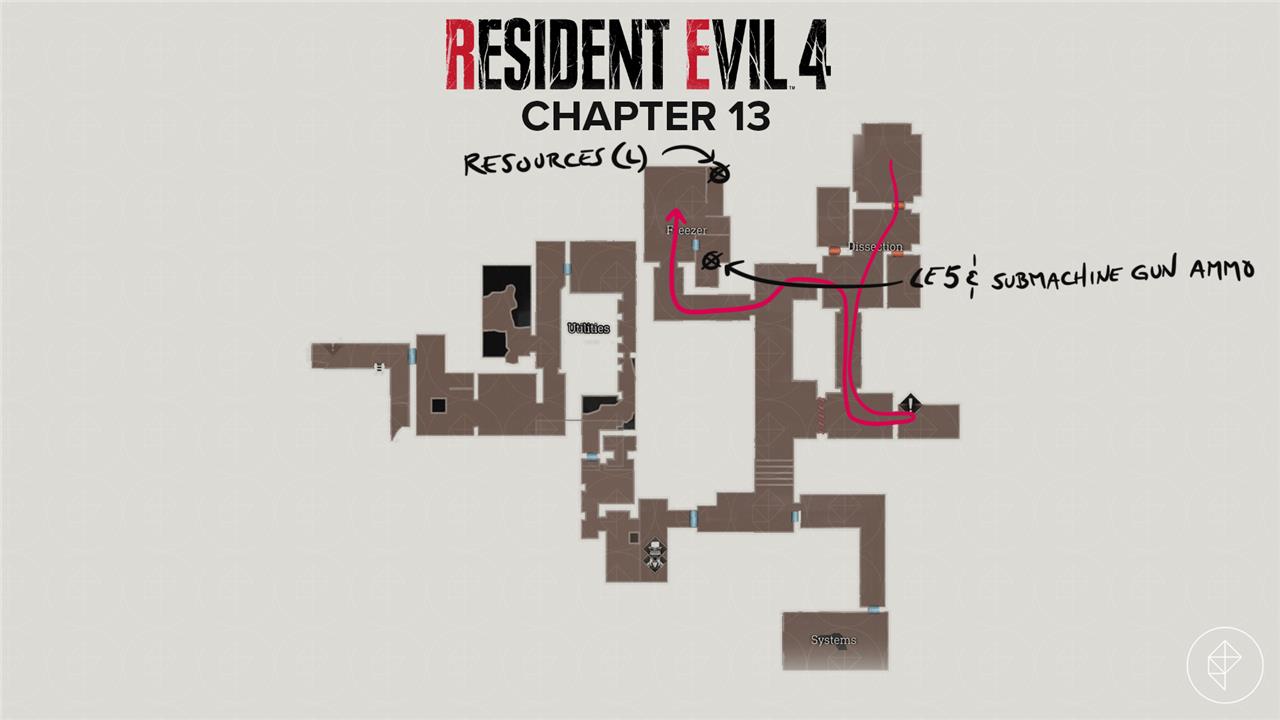
Follow the hall and take the first left. Smash the crate for some pesetas and then go grab the resources (L) from the case on the table. Head back out and follow the tunnel to the red light for another crate with pesetas.
Go through the door and into the kitchen (with terrible tiles). Take an immediate right for a barrel with pesetas. Follow the hall at the back to the south and through the next door.
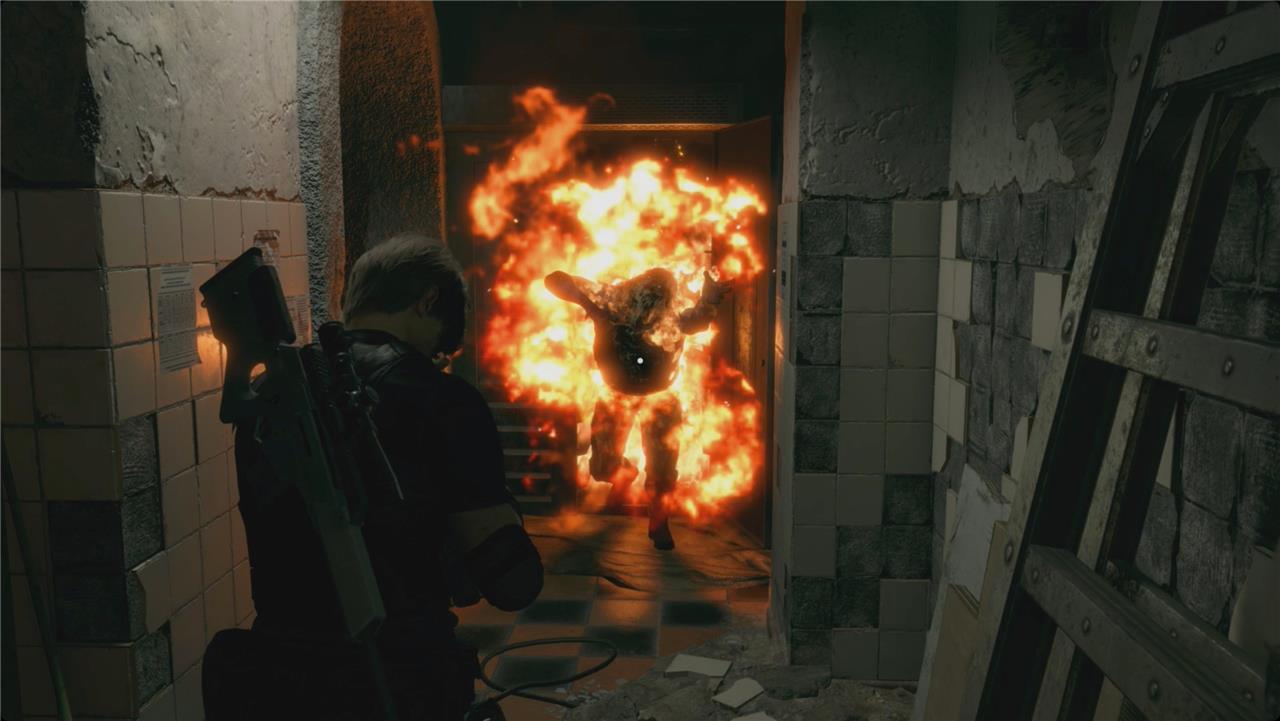
Loop around to the left to find a case with a velvet blue. When you head back out, a soldier will burst out of the oven(?) on fire and try to grab you – shoot him before he can.
Around the corner, check the refrigerator on your left for a black bass (good for healing or worth 1,500 pesetas). Head right to find the Merchant.
Merchant
The Merchant stocks unique items in the Wharf area, including the Black Bass for the Typewriter challenge and grenades for Lab enemies. His cache unlocks after clearing the initial fight and powering the lift, letting you buy exclusive Chicago Typewriter parts and stock up on ammo. Grab the Punisher upgrade nearby to boost piercings against clustered foes ahead.
Inlay gemstones in the Golden Lynx and Elegant Crown. (We were actually low on gemstones, so we only did the Golden Lynx for now.)
He’s not selling anything new, but there’s a new Treasure Map: Island and another Exclusive Upgrade Ticket on the Trade tab (but we spent all our spinels on the Matilda for the Ramon Salazar boss fight).
Save at the typewriter, check for any chicken egg healing items on the floor, and smash the barrel to the left for some pesetas. Head out through the hall to the left of the typewriter.
Dissection // Level 1 Keycard
In the Incubation Lab, grab the Level 1 Keycard from the dissection room table after clearing Ganados. Use it at the nearby security panel to open the east door. This grants access to the next hall and a typewriter for saving. Watch for enemies emerging from side rooms during the push forward.
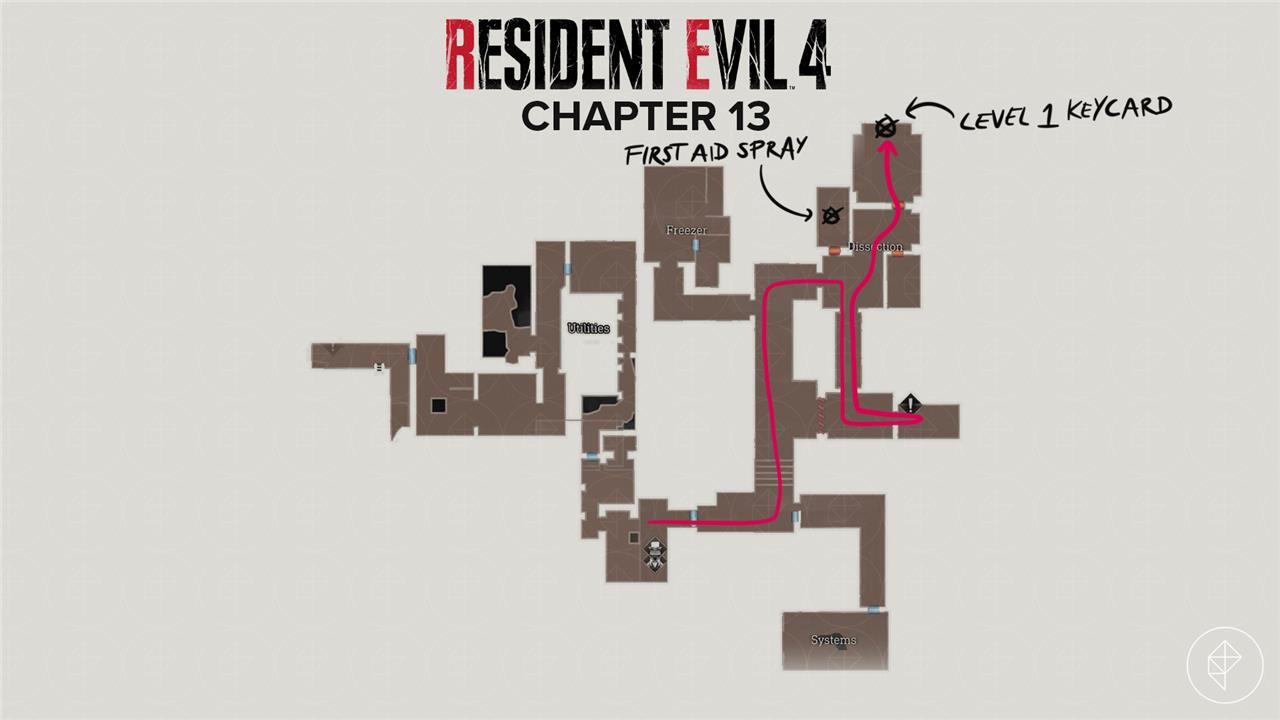
Take the first left and head up the stairs. Keep going north and follow the hall around to the right. Take a left when you enter to grab some first aid spray from the room there. Turn around and head south.
You’ll catch a glimpse of a gross new friend. Follow him to the left. Inside the room in the southeast corner, grab the Laboratory Notice file, and then throw the switch on the wall.
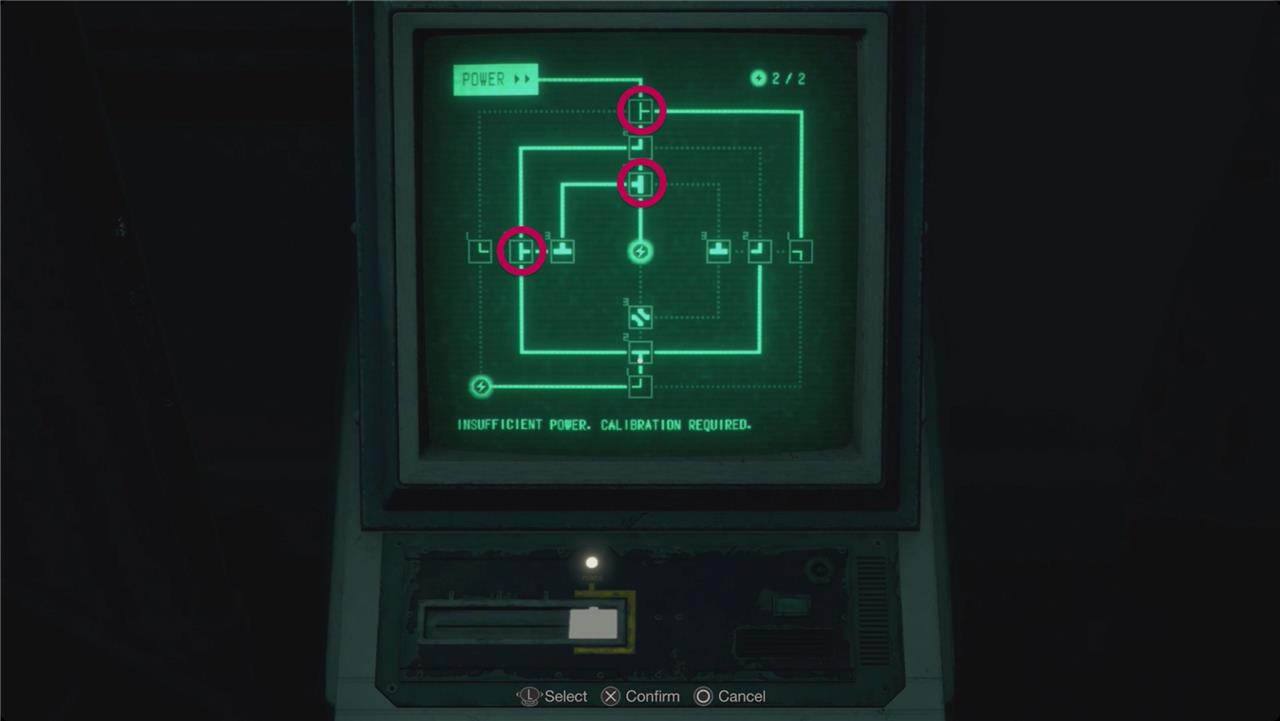
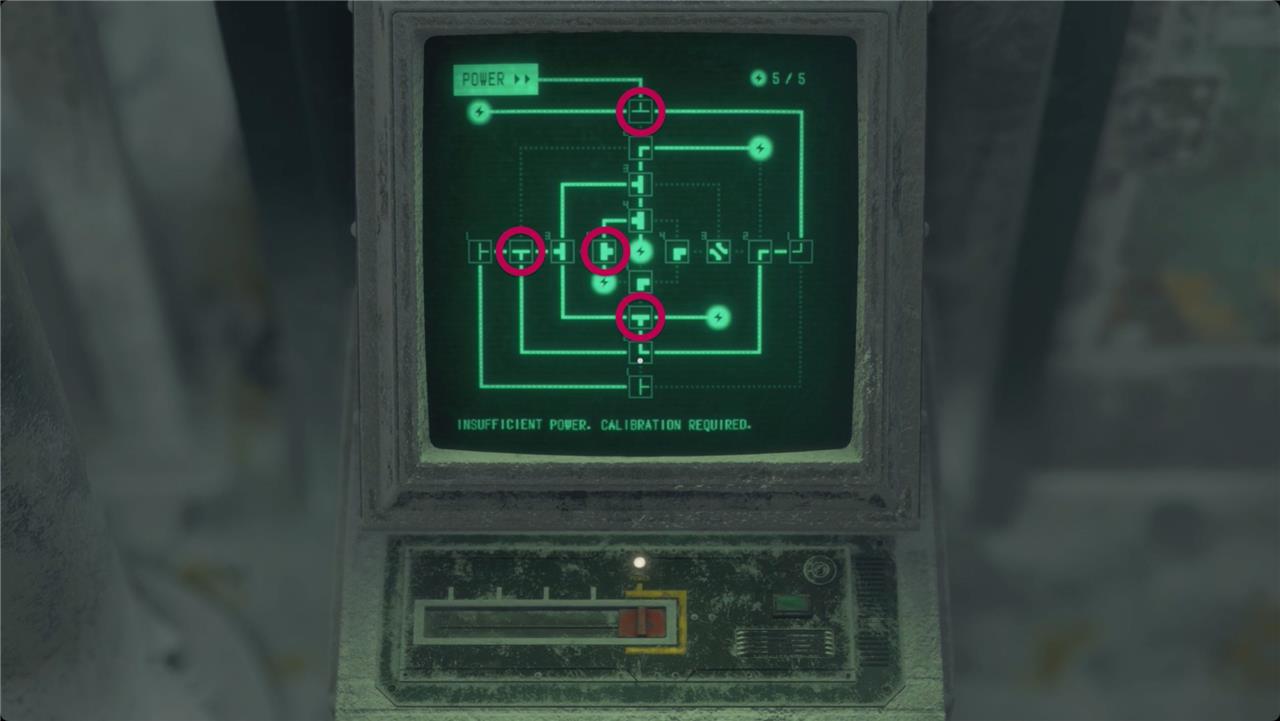
Head back out and all the way to the north to find the Electronic Lock Terminal. You need to adjust three rings of junctions to get power to both a node in the center and a node in the lower left.
- Look at the topmost junction, and flip it so the leg of the T shape is pointing right like this ⊢.
- Hit right to select the next ring of junctions. Look at the one on the left and make it match the top one – flip it so it’s pointing right like this ⊢.
- Hit right again, and look at the top junction. Make this T point to the left like this ⊣.
- Hit right one more time and confirm your selections.
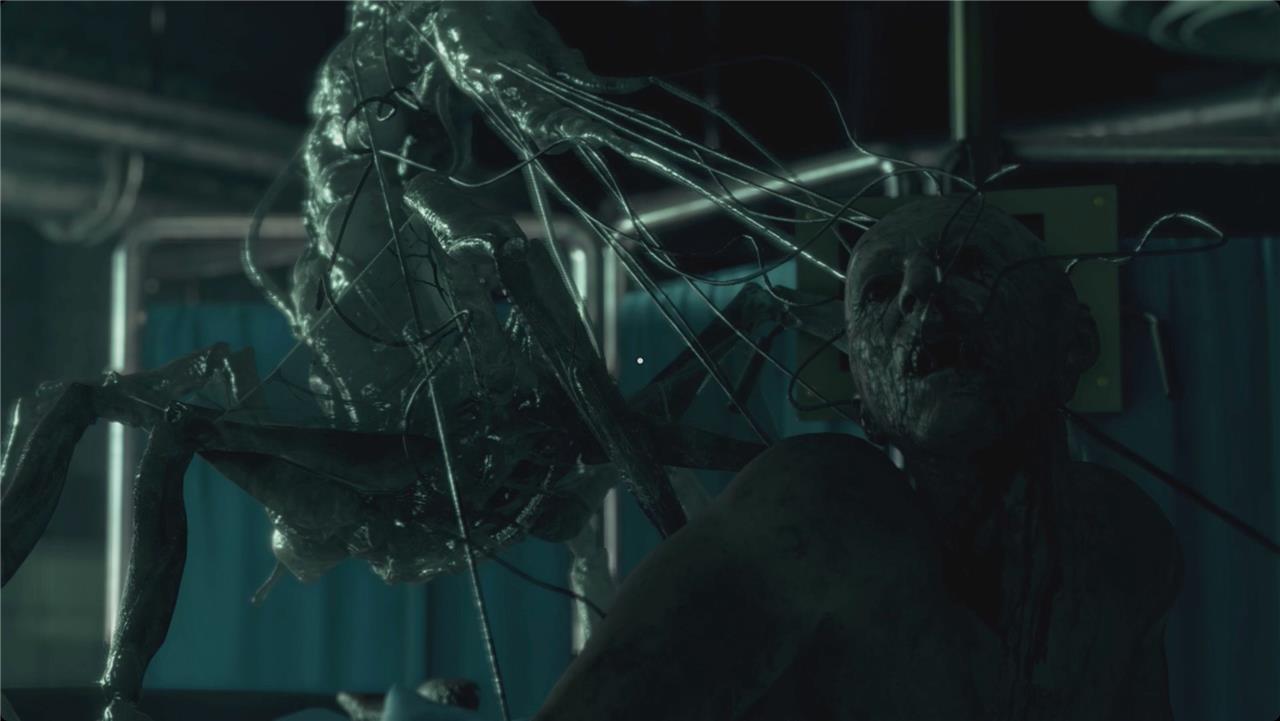
You’ll get a System Restored message and the door to your right will open. Ignore the horror show on the table ahead of you (or interact with it for a closer look, you weirdo).
Grab the Subject Analysis: Regenerador file from the gurney to the right (the last page of which is really just an evergreen description of every Resident Evil game).
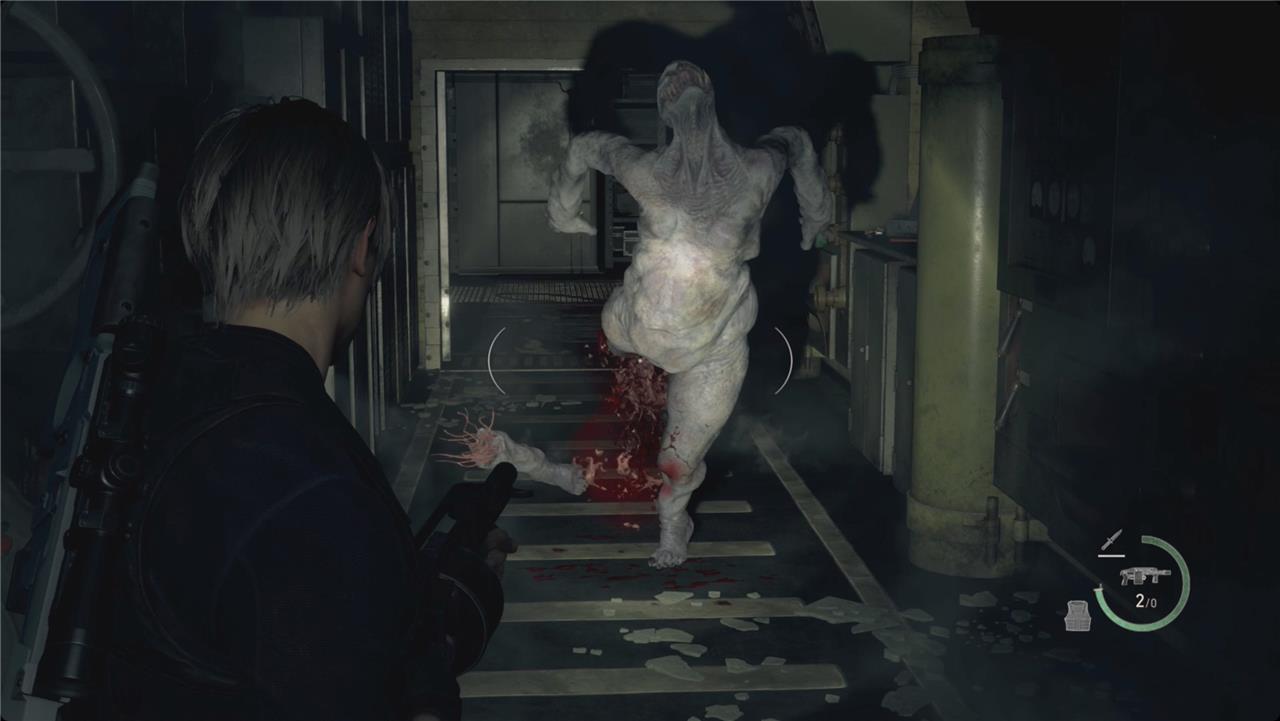
The Level 1 Keycard is at the back of the room. When you (try to) exit the room, you’ll meet the Regenerador mentioned in the file. Since you explicitly can’t kill him, just put him down the best you can and run away. A shotgun blast to the legs seems to work very well.
Freezer // LE 5 submachine gun // Level 2 Keycard
The Freezer area holds the LE 5 submachine gun, one of the best weapons for clearing groups of enemies. To access it, disable the cryogenic trap by rerouting power using the nearby terminal. You’ll need the Level 2 Keycard from the Incubation Lab to open the weapon case, so make sure to upgrade it at the keycard terminal before heading here. Once the system is restored and the cold mist subsides, grab the LE 5 from its container-it’s perfectly suited for handling the Regeneradors in the following section.
Run all the way to the south and go throw the Power Control Switch – this will redirect power to the Freezer, which is where we’re heading next. We’re going to give you the turns all at once since you’ll be running for your life here: When you exit this room, turn right, left, a dogleg left then right, and right.
Use the keycard to enter the Freezer. Turn right to solve another Electronic Lock Terminal puzzle with five nodes this time.
- On the first ring, flip the top junction so it’s an upside-down T like this ⊥.
- On the second, flip the left junction so it’s a right-side up T like this ⊤.
- On the third ring, flip the bottom junction so it’s a right-side up T like this ⊤.
- On the fourth, flip the left junction so the T is pointing to the right.
- Hit right one more time and then confirm.
Duck through the door to find the LE 5 submachine gun and smash the crate to the right for some submachine gun ammo.
In the back right corner of the room, open the cabinet(?) for some resources (L).

Head to the terminal in the back of the room to upgrade your keycard. It takes several seconds, though, and (of course) another Regenerador drops out of one of the bags hanging behind you.
Use your new LE 5 SMG to keep it at bay – shooting the legs off and running away – until you hear the machine beep. Go grab your new Level 2 Keycard.
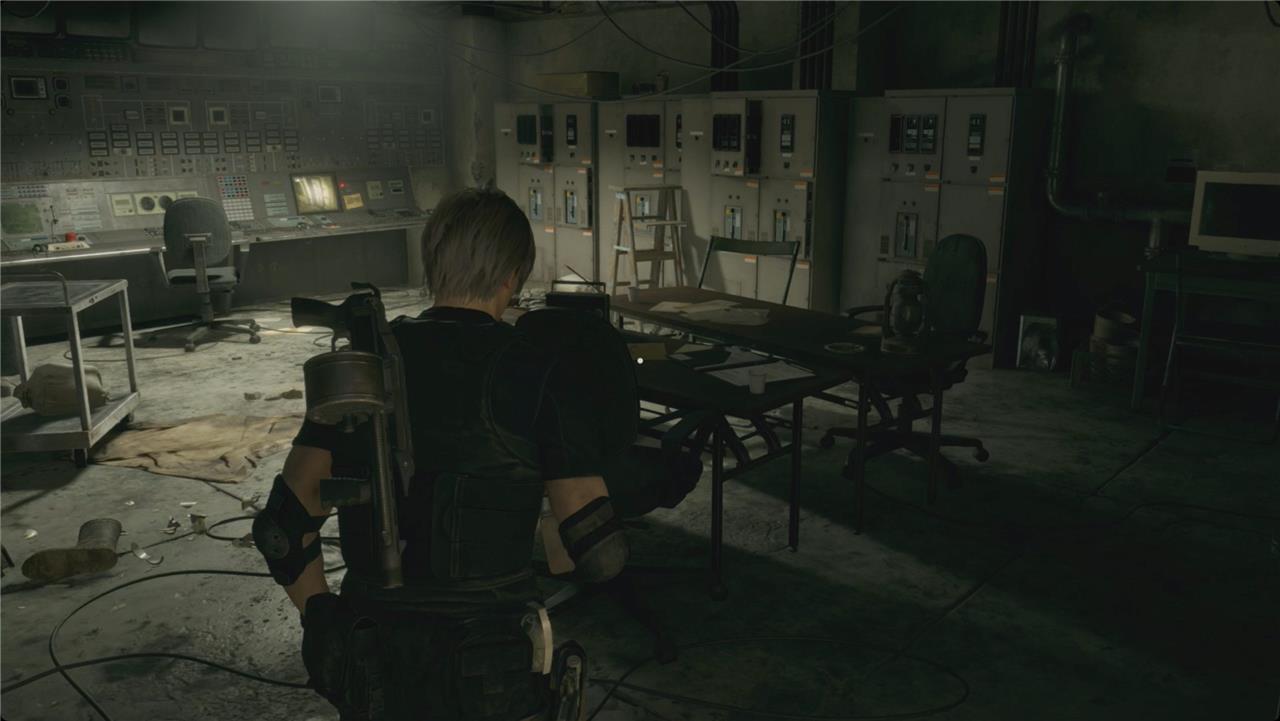
Systems
The Systems section covers merchant services, typewriters for saving, and inventory management in Chapter 13. Use typewriters at the safe spot after the initial Wharf fight or inside the Incubation Lab to store progress. Merchants appear early on the Wharf dock and later in the lab; buy shotgun shells, rifle ammo, and the TMP from them to handle clustered enemies. Check the attache case often to rearrange items, prioritizing grenades and healing herbs for swarm encounters ahead.
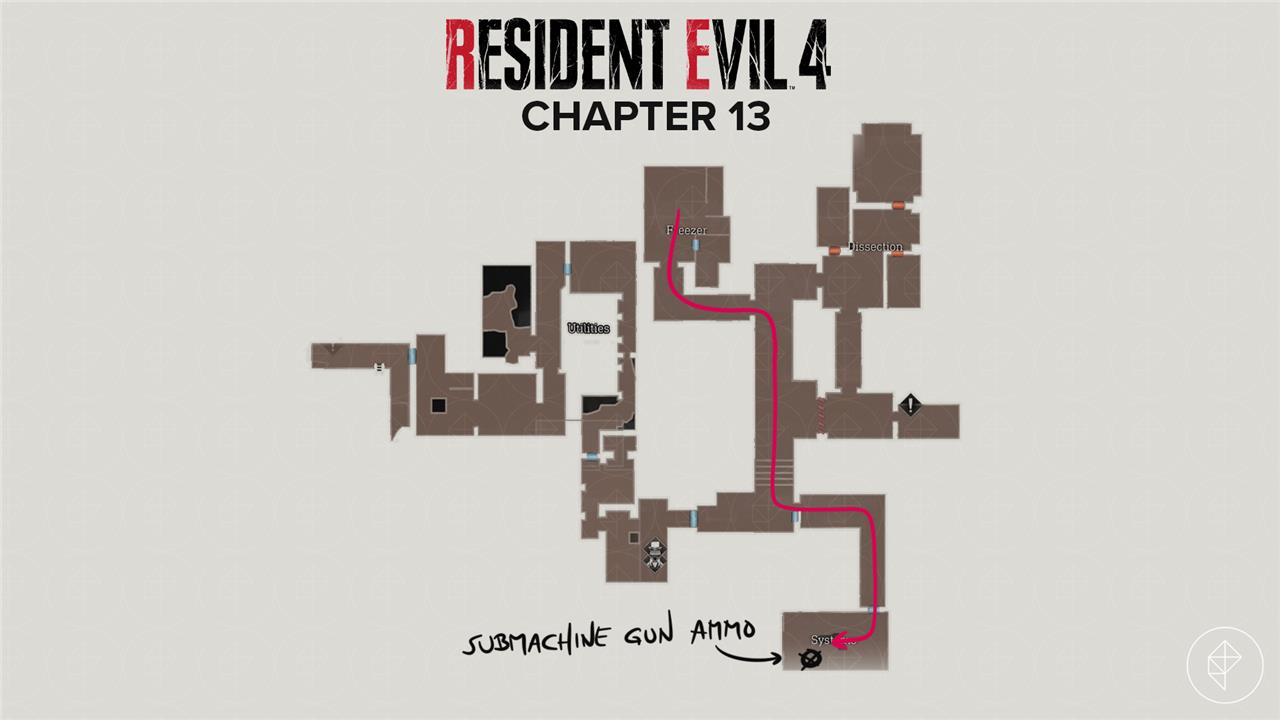
We’re heading for a new area – the Incubation Lab – for the last keycard upgrade. Once again, you’ll be running away, so when you exit the Freezer, turn: left, right, and then run straight to the end of the hall. At the bottom of the stairs, turn left to find a Level 2 Keycard Lock. Use your keycard and go through.
There’s nothing to pick up here, so just run through and to the right. When you reach Systems, smash the crate for some submachine gun ammo and head down the stairs.
Deal with the trio of soldiers at the bottom, and then head under the stairs to find some gunpowder on the shelves to the north and a yellow herb in the southeast corner. (If you’ve been following along, this is the last yellow herb you need to full upgrade your health.)
Smash the crate to the left of the door for more submachine gun ammo, and then head out to the Incubation Lab.
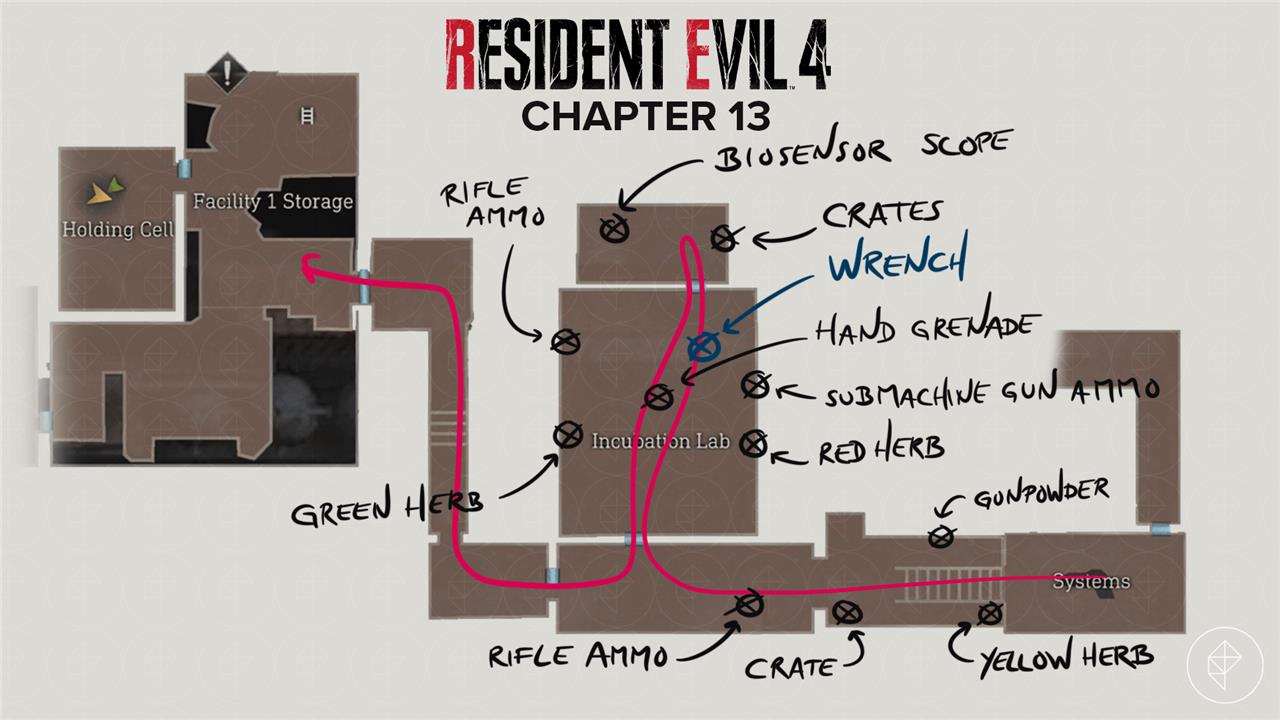
Incubation Lab // Level 3 Keycard
Grab the Level 3 Keycard from the control room desk in the Incubation Lab after defeating the Garrador. It opens the path forward past the operating theater and locked doors leading to the extraction point. Head through the now-accessible corridors, avoiding or eliminating Regenerators along the way, until you reach the final elevator.
Grab the rifle ammo from the machinery ahead of you when you enter. Take the first right into the lab itself. There’s a green herb and some rifle ammo to grab on the left, and a red herb and submachine gun ammo under the hoods on the right. Grab the hand grenade from the cart in the middle of the room.
Head into the back room and smash the crates on the right for shotgun shells and gunpowder. Head left to find the Case 2002-f: Escaped Test Subject file and Biosensor Scope from the table.
Equip the Biosensor Scope on your LE 5 (in your Inventory, select the LE 5 and then Parts) or any other scope-able weapon. We like the LE 5 because it’s new and shiny, but the Stingray also works if you want to be a little more precise.
If you try to interact with the Overwrite Terminal on the north wall, Leon will point out that he needs a wrench to get it open – that’s the tool mentioned in the Escaped Test Subject file.
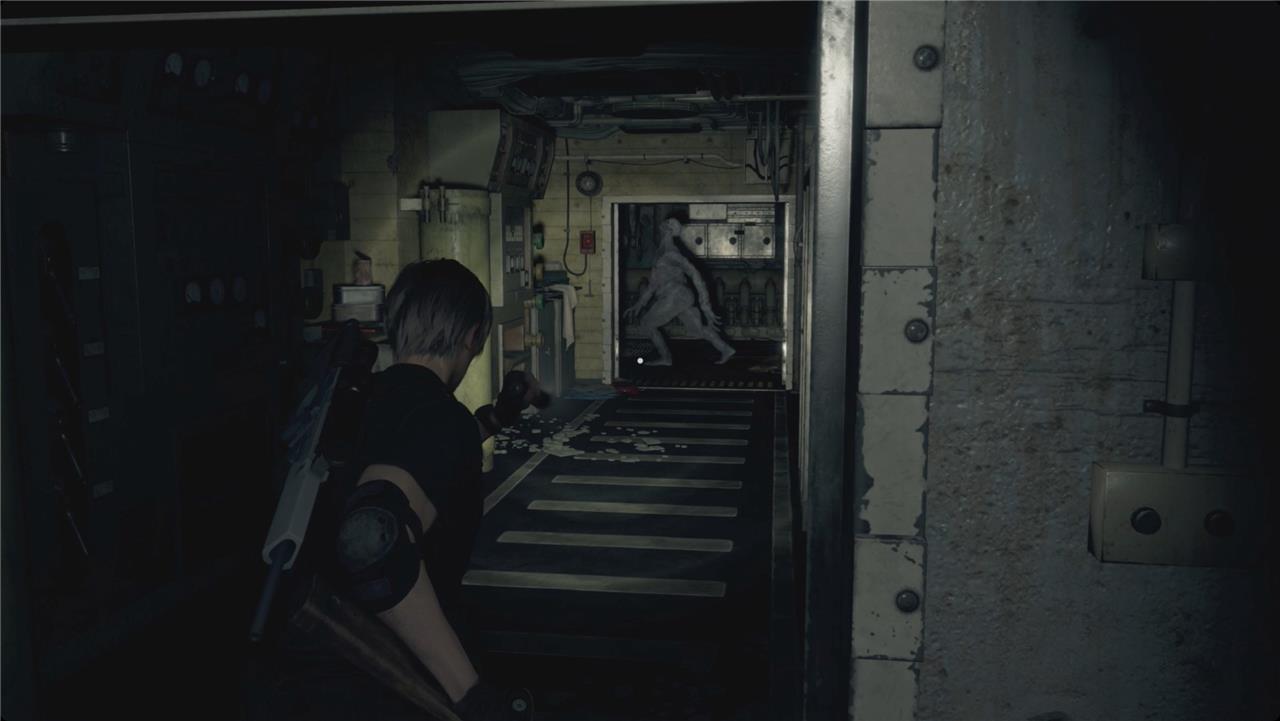
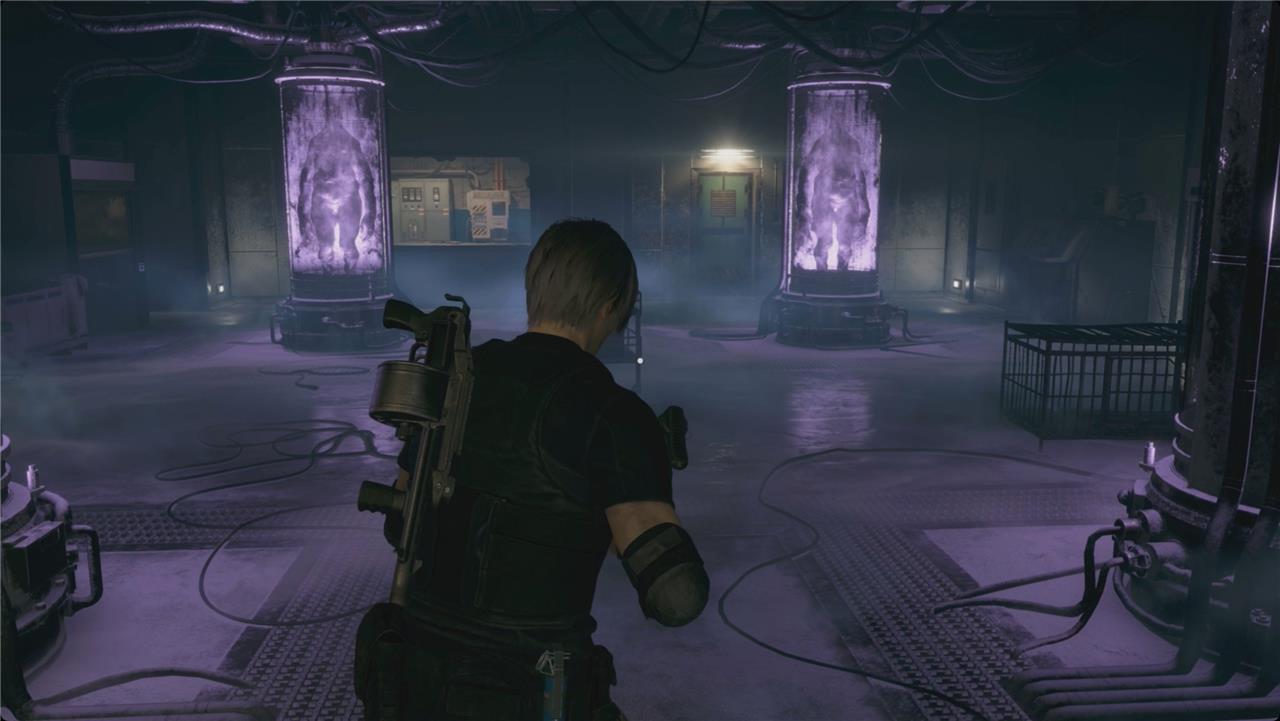
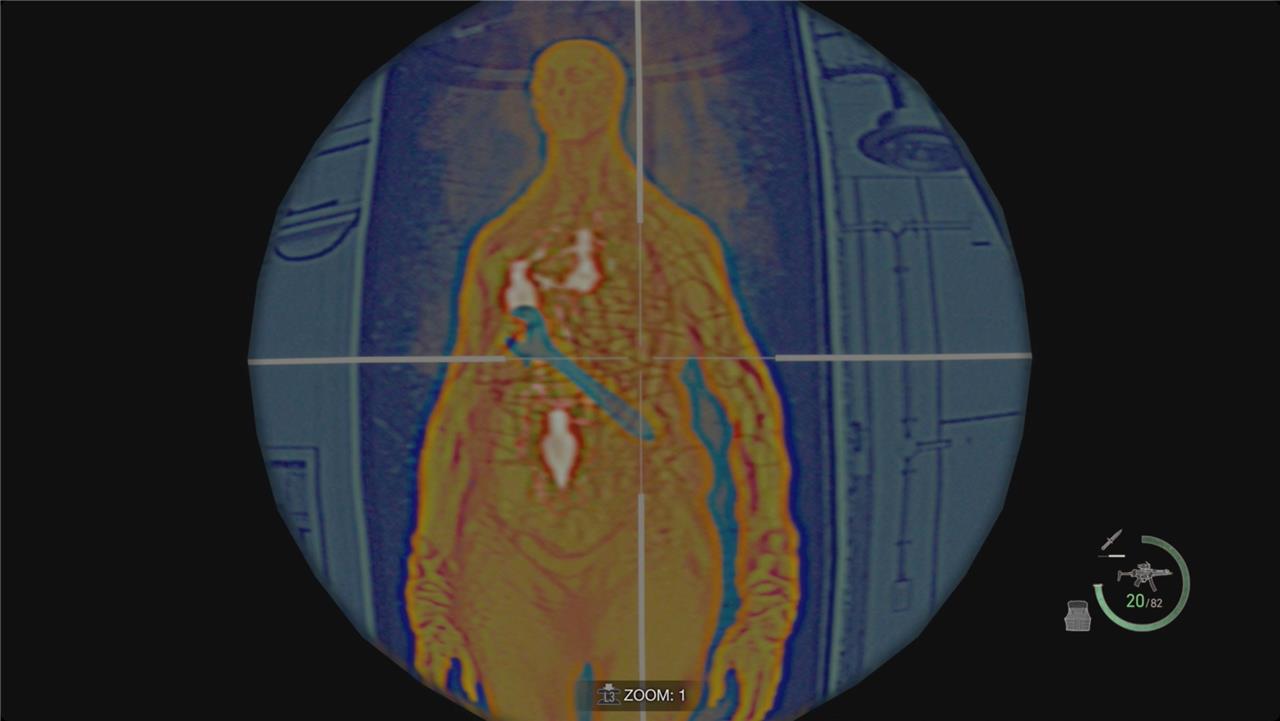
Head back into the lab. The wrench is inside the stomach of the first Regenerador on your left. Ideally, you’d use the Biosensor Scope to pinpoint the three parasites inside of it and take them out surgically with the LE 5. Failing that, we found that a few grenades and some magnum rounds to the torso also does the job.
Depending on how accurate you are, you might also accidentally free the other three Regeneradors. If you do, deal with them the same way – shoot their parasites by using the Biosensor Scope, or just unload on them and hope.
Pick up the wrench from the first Regenerador and head back to the Overwrite Terminal to use it (at which point Leon turns the bolt the wrong way). While it’s upgrading, a handful of soldiers will rush the room, but thankfully no Regeneradors. Deal with them until the machine beeps and you can retrieve your card.
Holding Cell // Rescue Ashley
After entering the holding cell area, grab the key from the nearby table to unlock Ashley’s cage and free her from the Ganados’ grasp. A short cutscene plays as she reunites with Leon, then quickly move to the exit while fending off pursuing enemies with shotgun blasts or grenades to thin their ranks. Watch for the Iron Maiden emerging from the shadows-aim for its single eye with a rifle or magnum to stagger and destroy it fast. Once clear, proceed through the door to the next section, keeping Ashley safe amid the chaos.
Outside of the lab, turn right and use the keycard to open the gate. Follow the hall north and smash the crate at the next turn for some handgun ammo. There’s also an Ashley-sized locker right here that sure feels like foreshadowing.
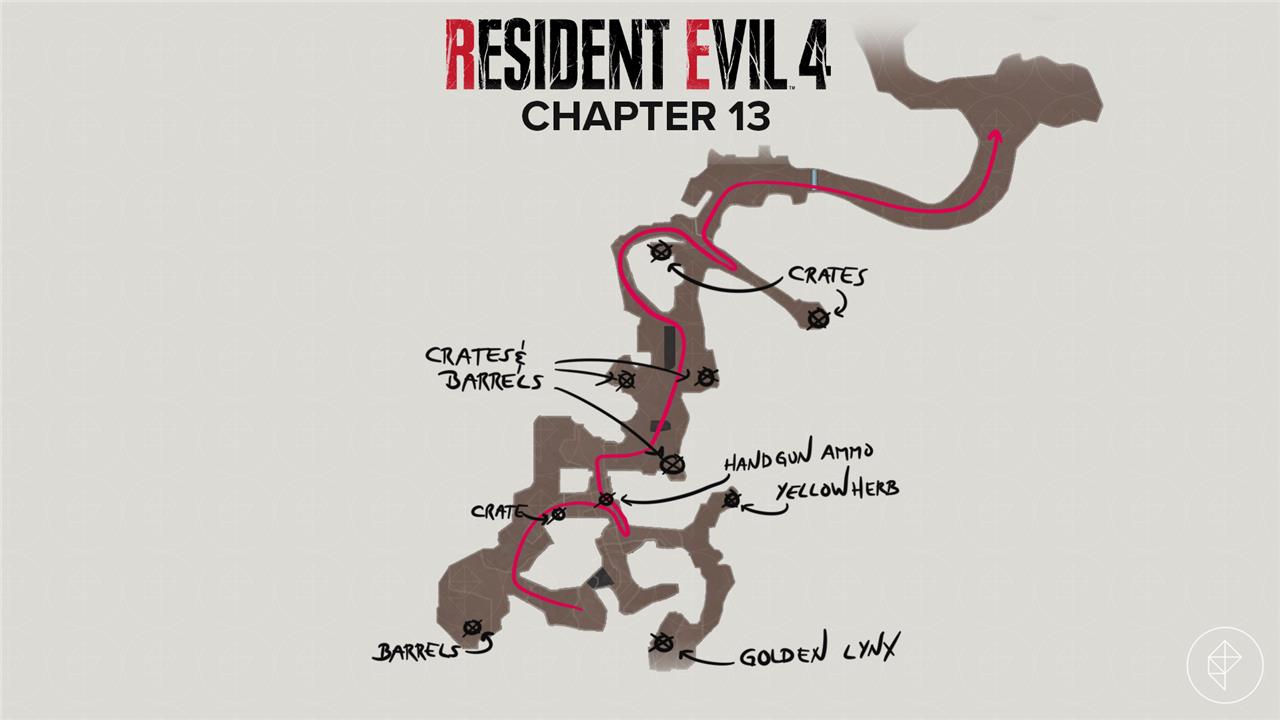
Chapter 13 all treasures and collectibles locations
In Resident Evil 4 Remake Chapter 13, there are 24 Island-type treasures, 1 Clockwork Castellan, plus Treasure Map: Island, a weapon, and a Merchant Request tied to this chapter. Below is a compact, ordered list of all treasures and key collectibles you need for 100% on the Island.
1. Early Wharf / Merchant area
These are the first collectibles you’ll hit when you land on the Island and reach the Wharf.
-
Treasure Map: Island
-
Buy from the Merchant at the Wharf (costs 5 Spinels).
-
-
Treasure: Pearl Bangle
-
In the Wharf area, go left past the first turret and open the chest on the ground.
-
-
Treasure: Golden Lynx
-
In the Wharf warehouse, look for a chest on the upper catwalk near the main hall.
-
-
Treasure: Elegant Crown
-
In the same warehouse area, open the chest on the right side of the room (near Castellan 13).
-
-
Clockwork Castellan 13
-
In the Wharf warehouse, destroy the Castellan on the upper level; it’s near the Elegant Crown chest.
-
2. Utilities / Systems area
After you head into the lab and pass the first junction, you’ll enter the Utilities and Systems sections.
-
Treasure: Velvet Blue (first)
-
In the “Surveillance”-style room right after the first upper-floor door, open the silver briefcase on the right.
-
-
Treasure: Velvet Blue (second)
-
In the Utilities area, just before the second Merchant, turn back from the Merchant and grab the silver briefcase on the “dishwasher”-style unit.
-
-
Treasure: Silver Ring
-
In the Utilities corridor, open the chest in a side room off the main hall.
-
-
Treasure: Silver Bangle
-
In the Systems room (below Incubation Lab), open the chest near the card-rewriter area.
-
Chapter 13 all merchant requests and rewards
In Resident Evil 4 Remake Chapter 13, there is one Merchant Request tied to this chapter, plus a second request that starts here but is completed later in Chapter 14. Below is a clean list of all Merchant Requests that appear on the Island (Chapter 13) and their rewards.
Merchant Requests in Chapter 13 (Island)
Request #17 – The Wandering Dead (Part 1)
-
Location: Island / Wharf area (Merchant at the Wharf).
-
Objective:
-
You are told to kill an Iron Maiden on the Island.
-
The actual fight happens in Chapter 14, inside the Incubation Lab (after you get the Wrench).
-
-
Reward: 8 Spinels (given when you talk to the Merchant after killing the Iron Maiden).
Request #19 – Destroy All Blue Medallions 6
-
Chapter: 15, but the blue note is first found on the Island in Chapter 13.
-
Location: Cliffside Ruins area (Island), note appears on the wall near the Merchant in that section.
-
Objective:
-
Find and break 5 blue medallions scattered around the Cliffside Ruins.
-
-
Reward: 5 Spinels (given when you talk to the Merchant after breaking all five).
How to track and finish them
-
Talk to each Merchant on the Island (Wharf and later Cliffside Ruins) to pick up the blue notes; you must talk again after completing the objective to receive Spinels.
-
Completing all 19 Merchant Requests in the game unlocks the Jack of All Trades trophy/achievement and 1,000 Completion Points for the Extra Content Shop.
If you tell me whether you want only Chapter-13-relevant requests or a full 19-request checklist, I can give you a short table listing every request by chapter, objective, and reward.