Leon enters the castle’s shadowed halls, where cultists chant, traps creak to life, and every corridor hides a deadly surprise. Chapter 7 raises the stakes with brutal ambushes, shifting arenas, and the notorious Water Hall-a gauntlet that tests precision, planning, and calm under pressure.
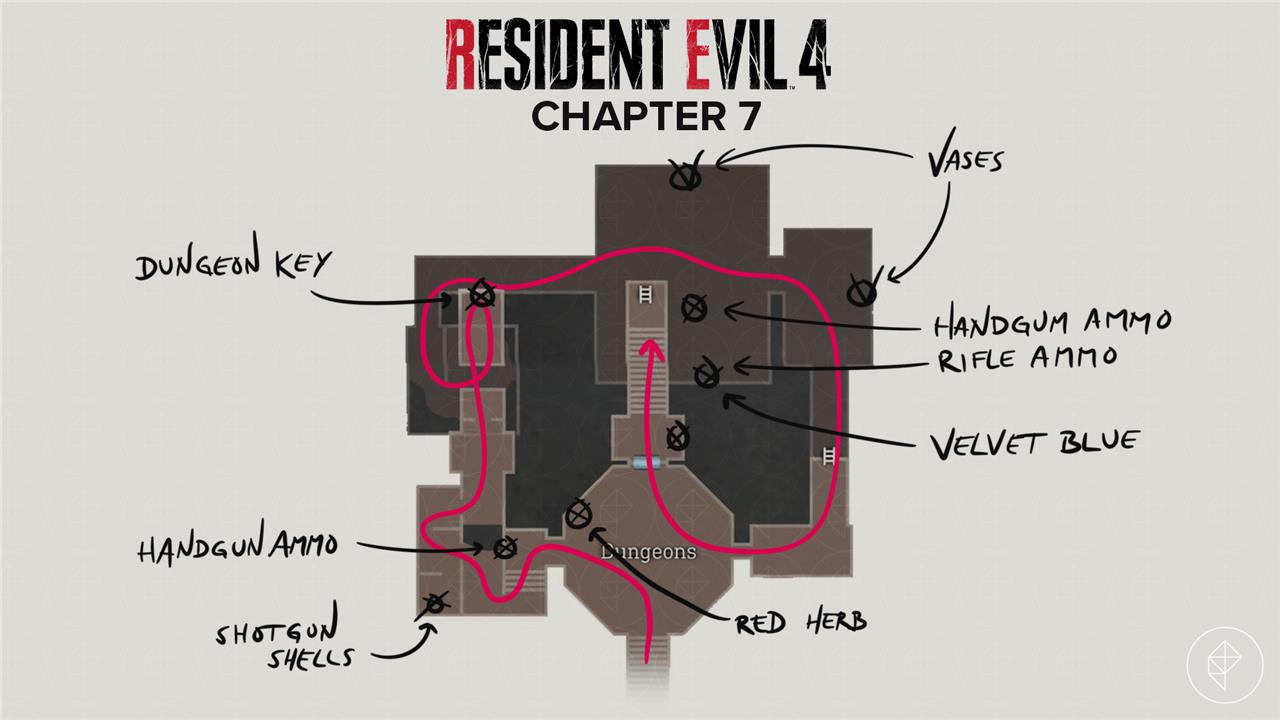
Our Resident Evil 4 remake Chapter 7 walkthrough will make sure you don’t miss any items from the beginning of the chapter through the Chapel, Castle Gate, Audience Chamber, Dungeons, Treasury, and the (much easier than the original) Water Hall.
Throughout this walkthrough, we’re not going to mention every item that anyone (or anything) you shoot drops – if you kill something, look for a loot drop.
Also, there’s a little randomness to the contents of crates based on your inventory and weapons, so you probably won’t find the exact same things listed below. The crates and barrels themselves will always be in the same locations, though. And all other items – keys, collectibles, and resources not found in crates – should be the same.
Head for the courtyard // Merchant
After leaving the Audience Chamber, move toward the courtyard where the Merchant sets up his stall near a blue torch. This is a good moment to sell treasures collected so far and upgrade your weapons before facing the challenges ahead. Check his new stock – especially the Riot Gun or the TMP – as both can make upcoming fights easier. You can also trade Spinels here for rare items like treasure maps or weapon attachments.
After a phone call from Luis, you’ll automatically get the Quarterly Findings – Excerpt file. Continue forward until you’re a little deeper inside.
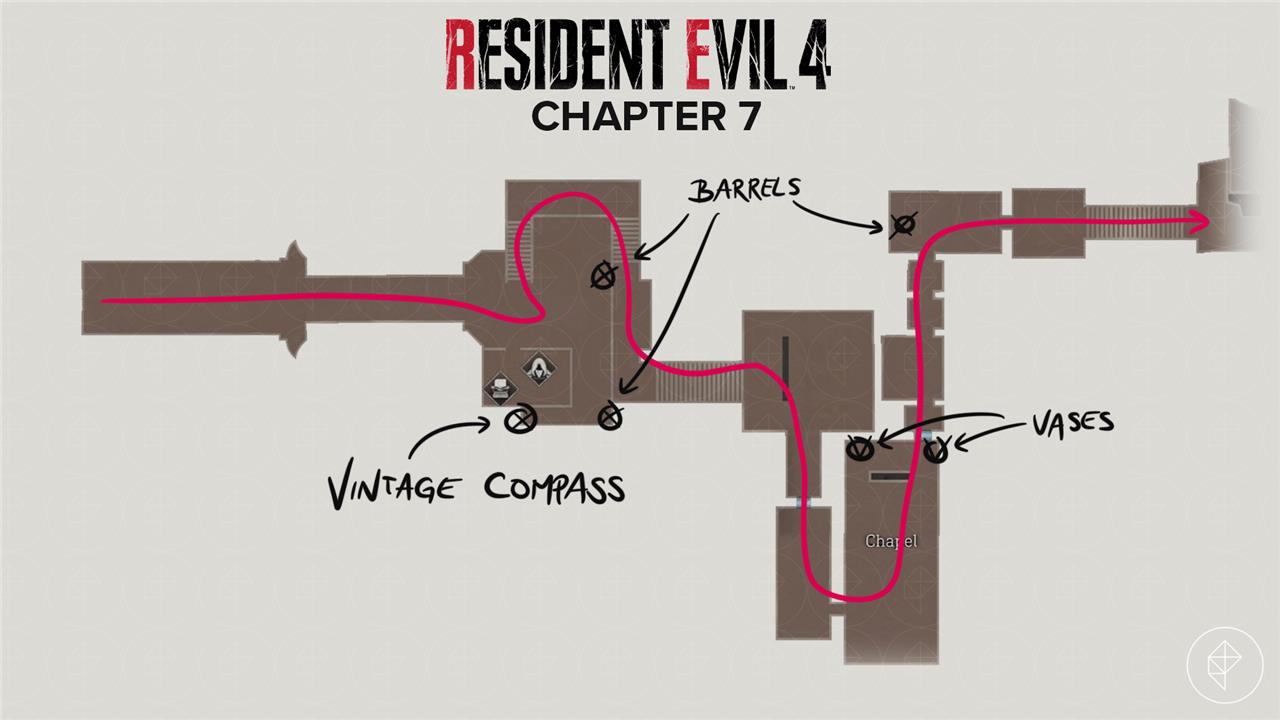
When you reach the ruined wagon and the stairs on your left, head around the left side of the wagon for a barrel with handgun ammo. Turn right and head to the corner to find two more barrels with gunpowder. Turn right again, and you’ll see a chest through the hole in the wall. Open it for a Vintage Compass.
Loop back around to the back of the wagon and turn right to find the Merchant. Turn to the right to find the Merchant Tip: The Handgun for You! file on a ladder against the wall.
Sell off that Vintage Compass and Mendez’s False Eye – you’ll get a 20,000-pesetas haul for them.
The Merchant has some exciting new weapons and items:
- Blacktail handgun
- Stingray rifle
- Broken Butterfly magnum
- Recipe: Magnum Ammo
- Resources (L)
The magnum is on sale the first time you see it and it comes bundled with Recipe: Magnum Ammo for free, so it’s not a bad idea to pick it up. We’re also a big fan of the Stingray rifle – we sold the M1903 to pick up both guns. We also sold the Bolt Thrower to make room in our inventory for the Broken Butterfly.
There are also some new Trade items:
- Attache Case: Leather – increases the drop rate of red herbs
- Treasure Map: Castle – marks treasure locations in the Castle (but we’ll point out every one of the treasures in these walkthroughs)
- Exclusive Upgrade Ticket – a one-item use item that gets you a bonus upgrade for any weapon.
We only grabbed the Treasure Map: Castle for now (so you don’t have to!) since we’re still saving up for that Red9 Stock.
Once you’re done, hit the typewriter to save, and head back outside.
Chapel
The chapel section introduces a new layer of tension as Leon faces tougher cultist enemies and complex puzzles. Inside, players must locate and turn three stained glass windows to match the colors correctly, revealing a hidden passage. Enemies will attack during this process, so keeping a safe distance and using the shotgun or rifle to thin their numbers helps maintain control. Collecting valuable loot and ammo scattered around the benches and corners is worth the effort before moving to the next area through the opened door.
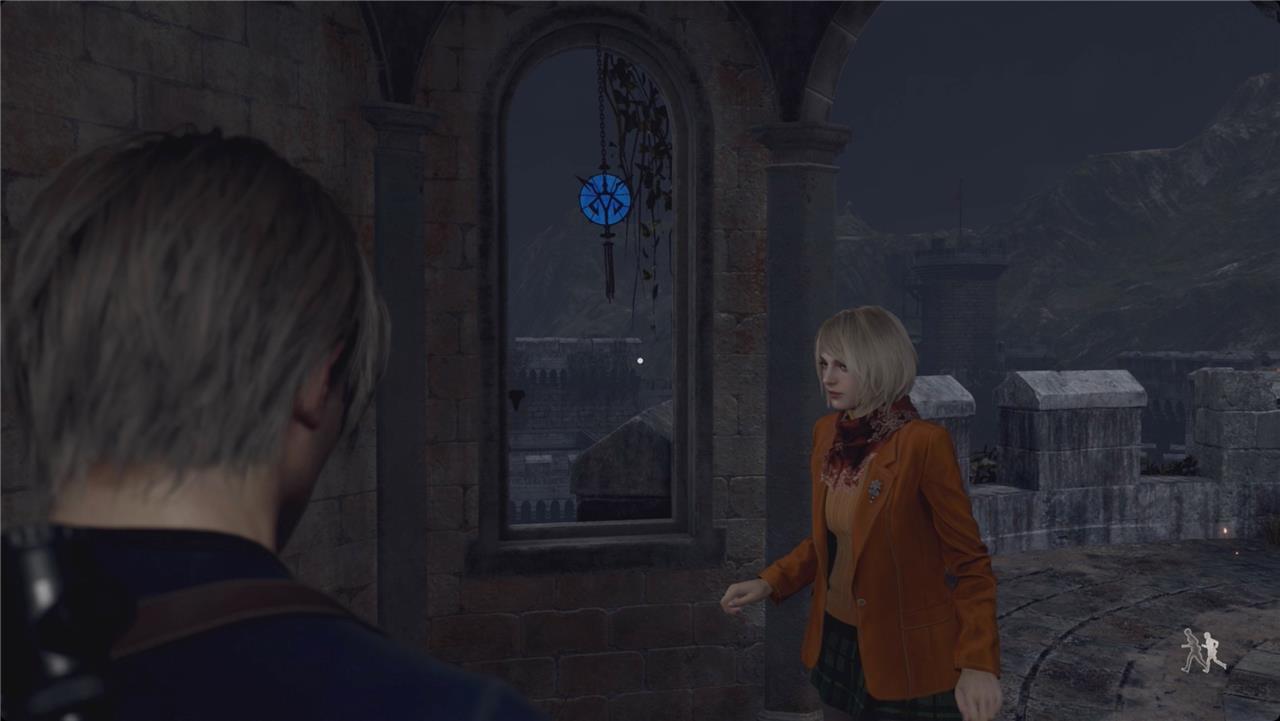
Back outside, climb the stairs and take a right to find another binocular vista – this one has three points of interest.
Take a right and follow the walkway inside. There’s nothing in the next room you come to, so just take the hallway on the right to find your way into the Chapel.
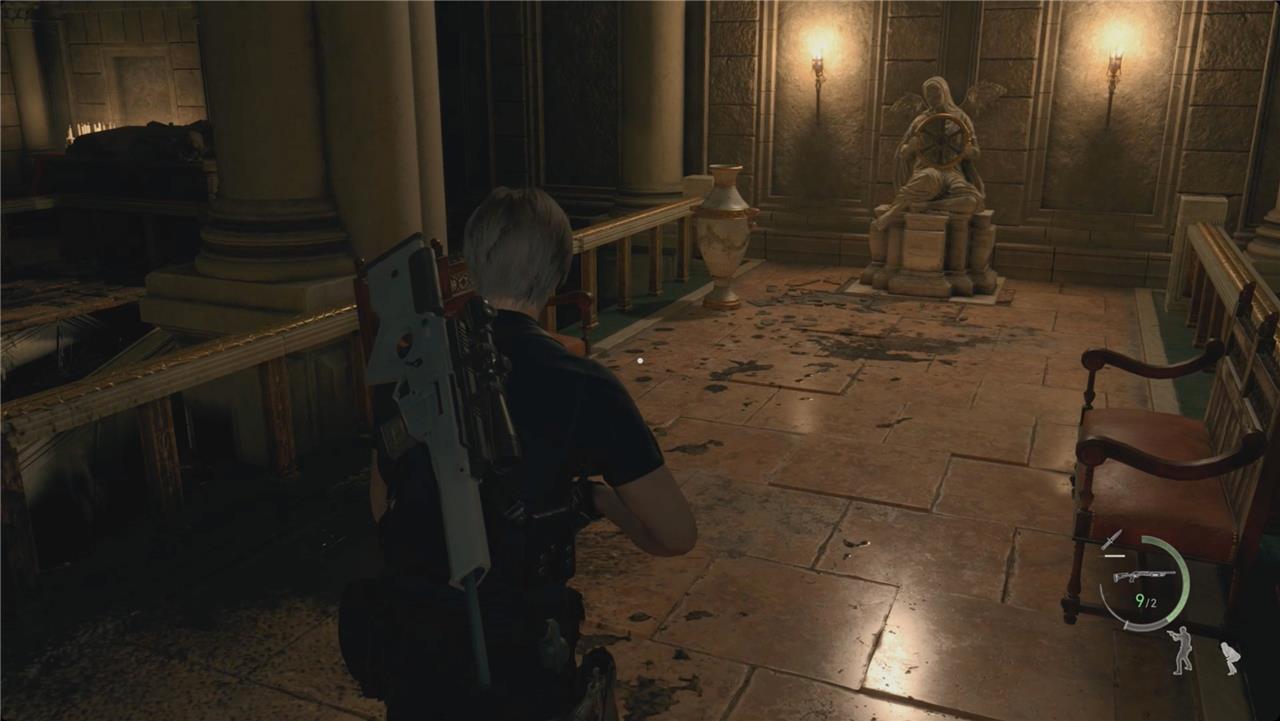
When you enter, you’ll meet a beefier version of the tentacle villagers. Behind the altar, smash the two vases for some pesetas. Head through the door in the back right corner.
At the next turn, smash the two barrels for some pesetas and gunpowder.
Outside, you’ll be spotted by a few crossbow-wielding zealots (hey, I learned a new word – crossbow users are called arbalists!). It’s a great excuse to test out that new Stingray rifle and pick them off from a distance.
Continue up the stairs and smash the barrel for some gunpowder. Take a right at the wall and follow the stairs up.
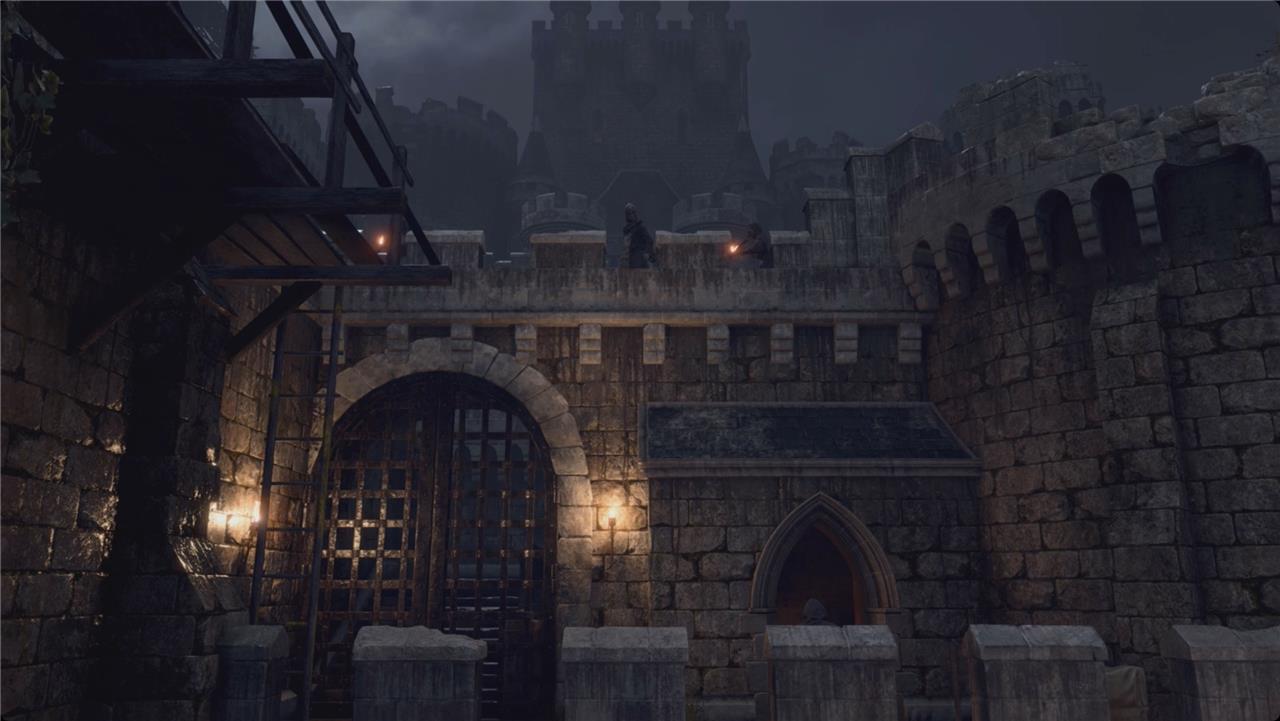
Castle Gate
A tense ascent leads you through the Castle’s stone corridors toward the Water Hall, where the murk of the flooded chambers hides dangers around every corner and every torch casts shifting shadows on damp walls.
Near the top, you’ll start getting attacked by a catapult (technically an onager, really). You’re out of range, though, so pull out your rifle and look to the left of the catapult.
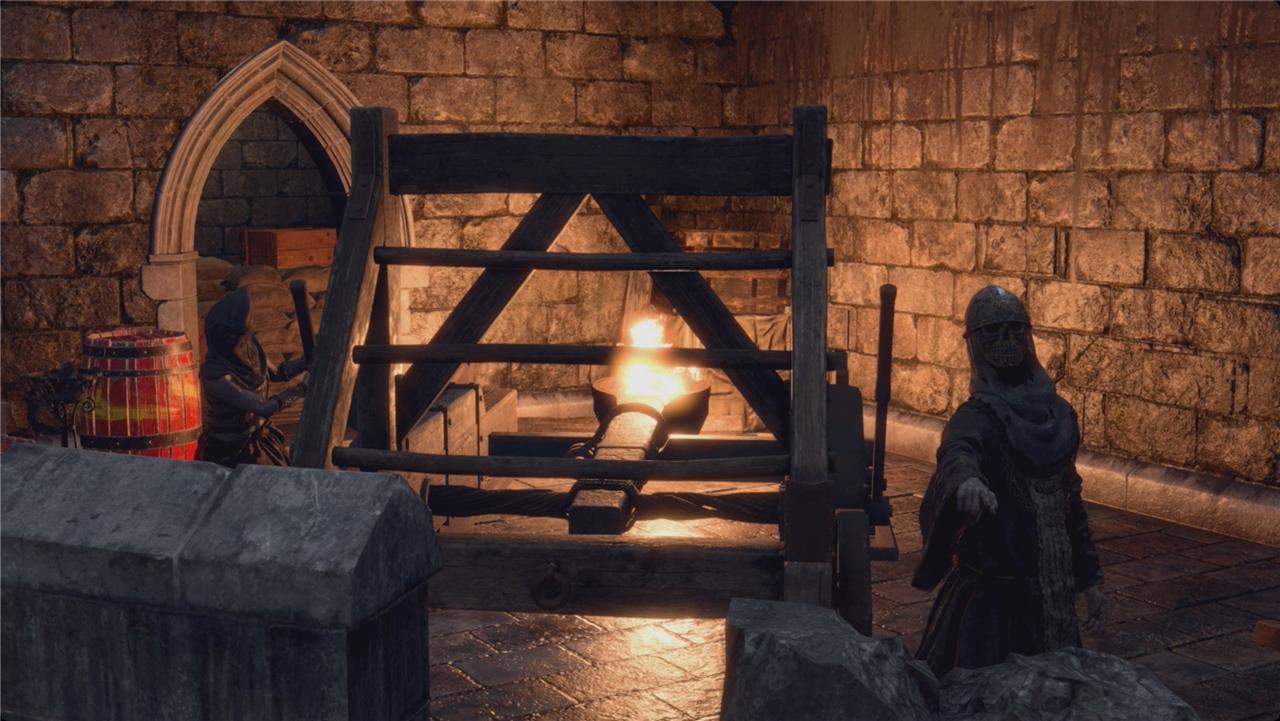
There’s an exploding barrel to shoot that will shut down the siege engine.
Head forward and take the stairs up. You’ll meet a zealot about halfway up, and then another will come up behind you (we only noticed him when Ashley got grabbed).
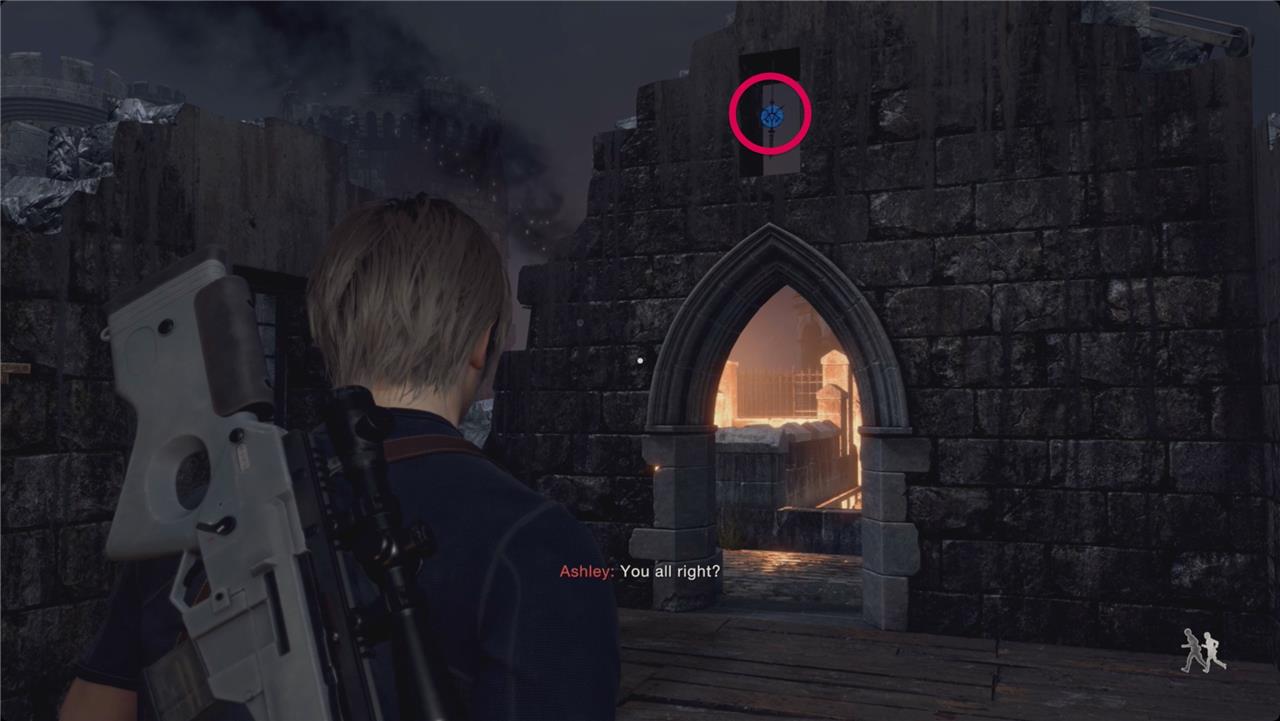
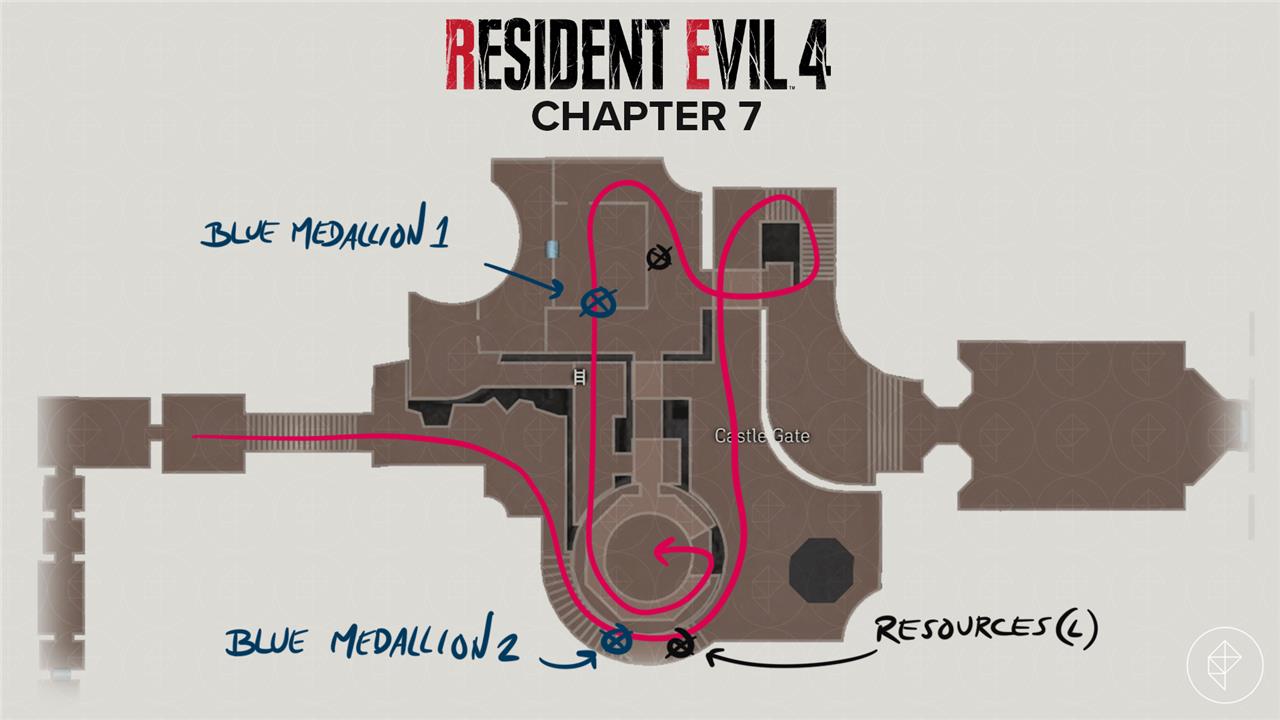
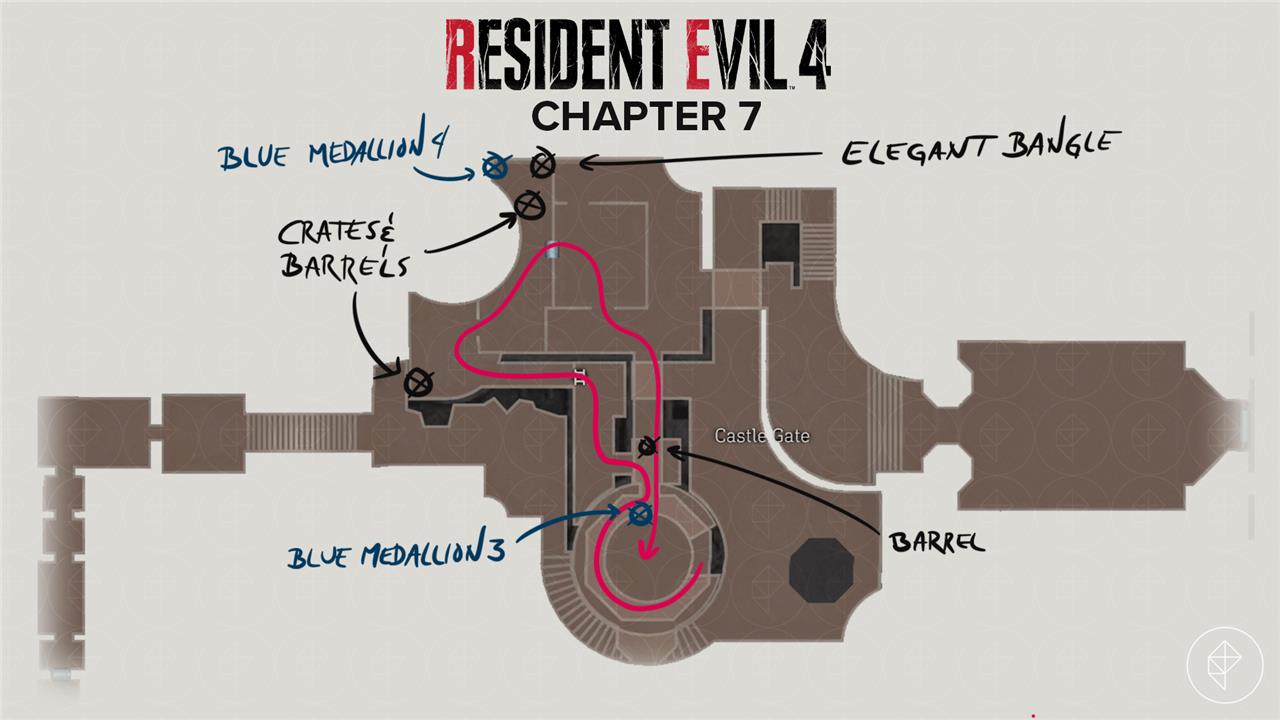
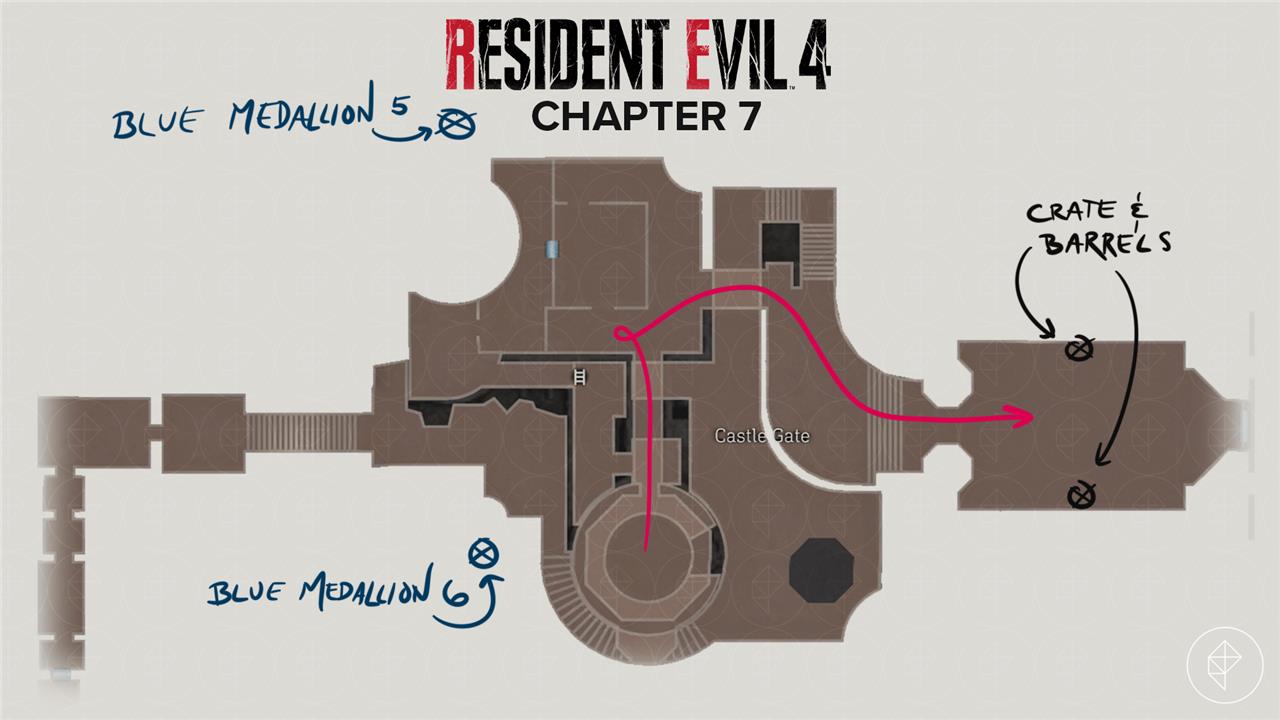
At the top, there’s another catapult firing from the right, but you can’t get an angle on it yet. Take a right. At the end of the short bridge, there’s a barrel with resources (L) and a zealot hiding behind the wall. Look above the doorway ahead of you to spot Blue Medallion 1 of 6 (for a Blue Note Request we haven’t picked up yet).
Wait for a gap in the bombardment and then sprint across the bridge to the south. On the far side of the circular platform, there’s a half dome-shaped gazebo (parapet? battlement? cupola?). Inside, you’ll be protected for a moment. Grab the resources (L) while you’re in there, and look to the west side (to the right as you enter) for Blue Medallion 2 of 6.
Facing out of the shelter, take a right, and drop off the ledge.
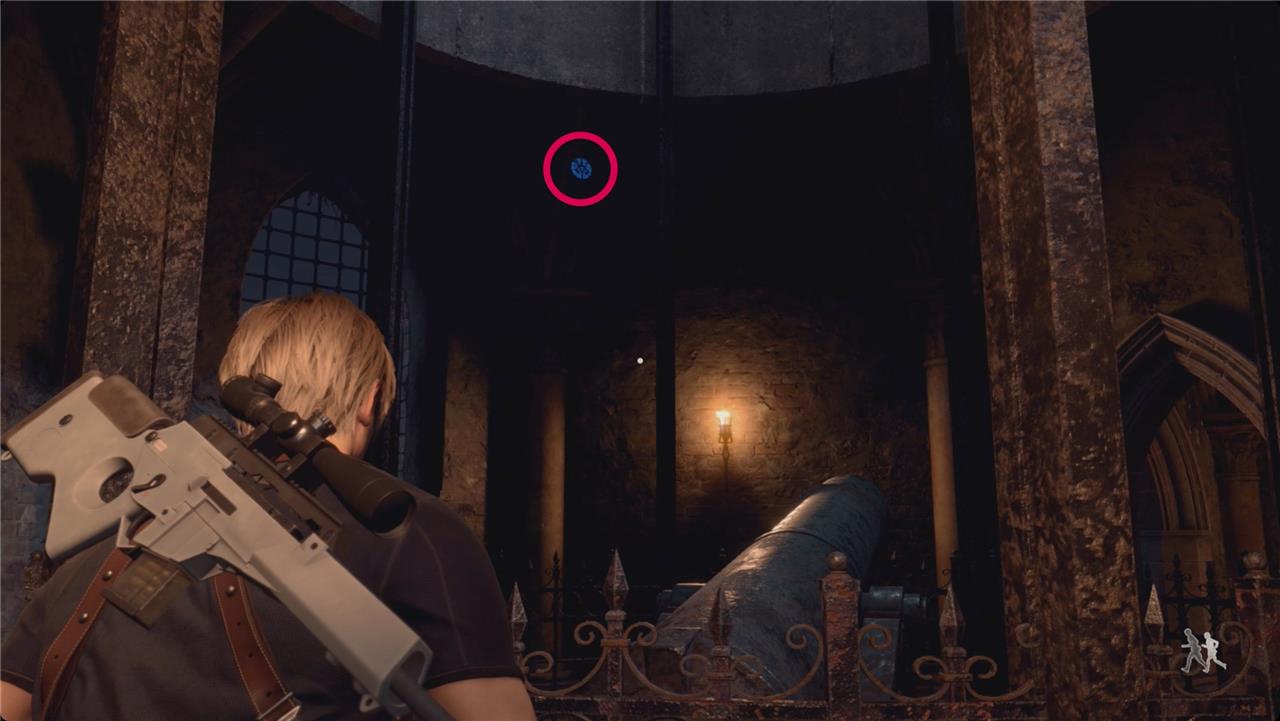
When you land, look above the cannon’s barrel and to the left for Blue Medallion 3 of 6. Loop around to the other side and interact with the weight to raise the cannon.
Head through the door to the left and smash the barrel for some rifle ammo. Step outside, take a right, and climb the ladder.
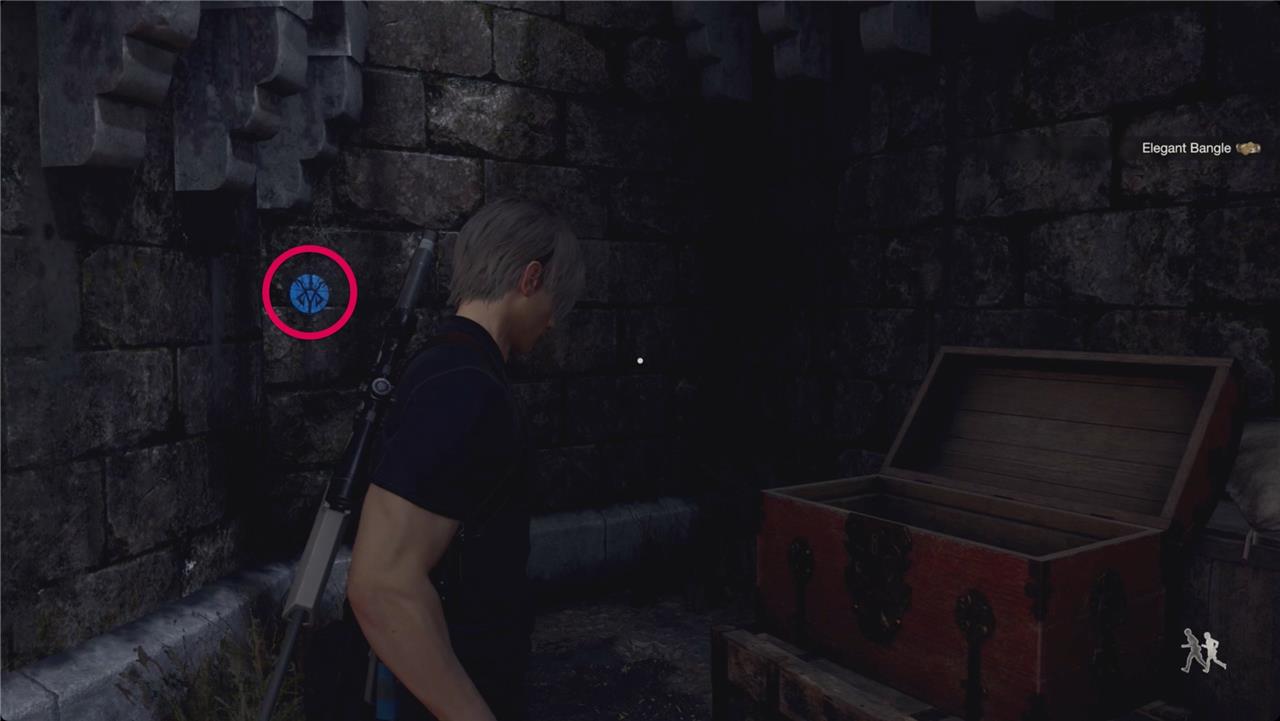
Smash the crate and barrel for rifle ammo and shotgun shells, and then turn right to drop off the ledge. Take a left and smash the barrels for pesetas and more rifle ammo. Open the chest for an Elegant Bangle, and then turn left to see Blue Medallion 4 of 6.
Back up a couple steps and open the door. Be careful, though, because you’re in the line of fire from (at least) one of the catapults. Run across to the cannon you just raised and interact with the back end to aim it.
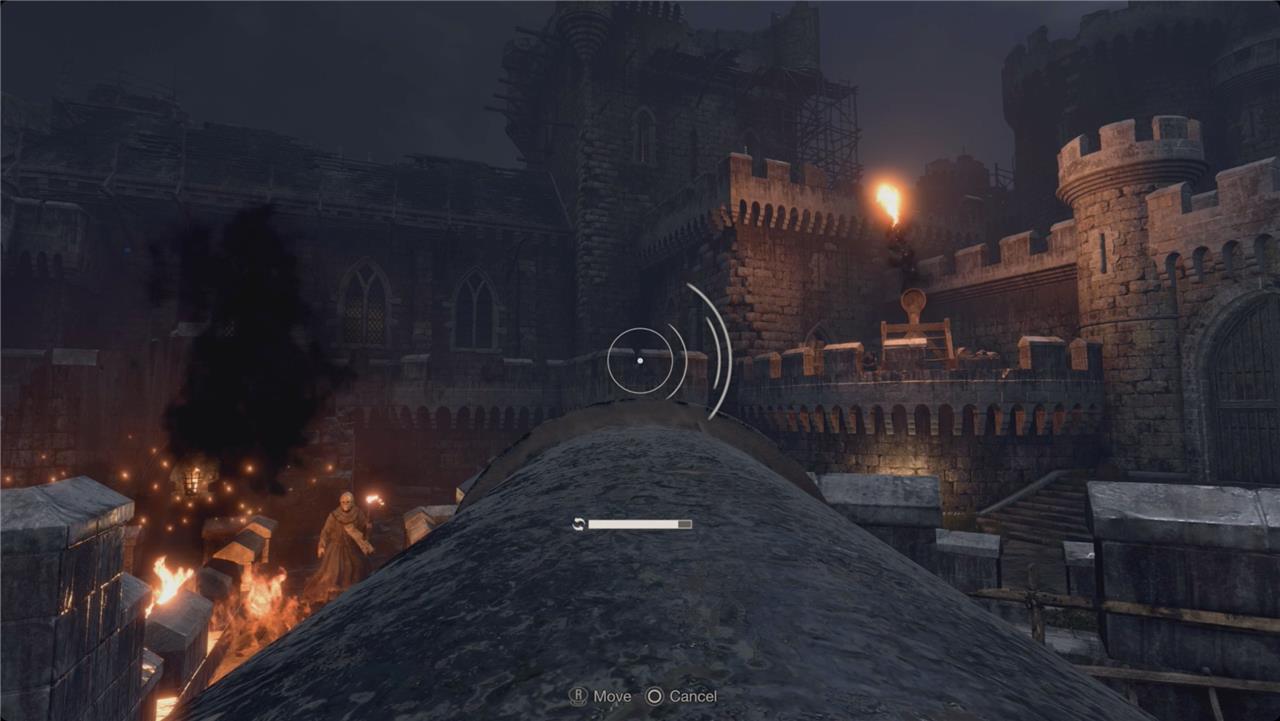
Fire it at the three catapults (and then a zealot for the Overkill achievement or trophy), and then aim it at the big doors to your right.
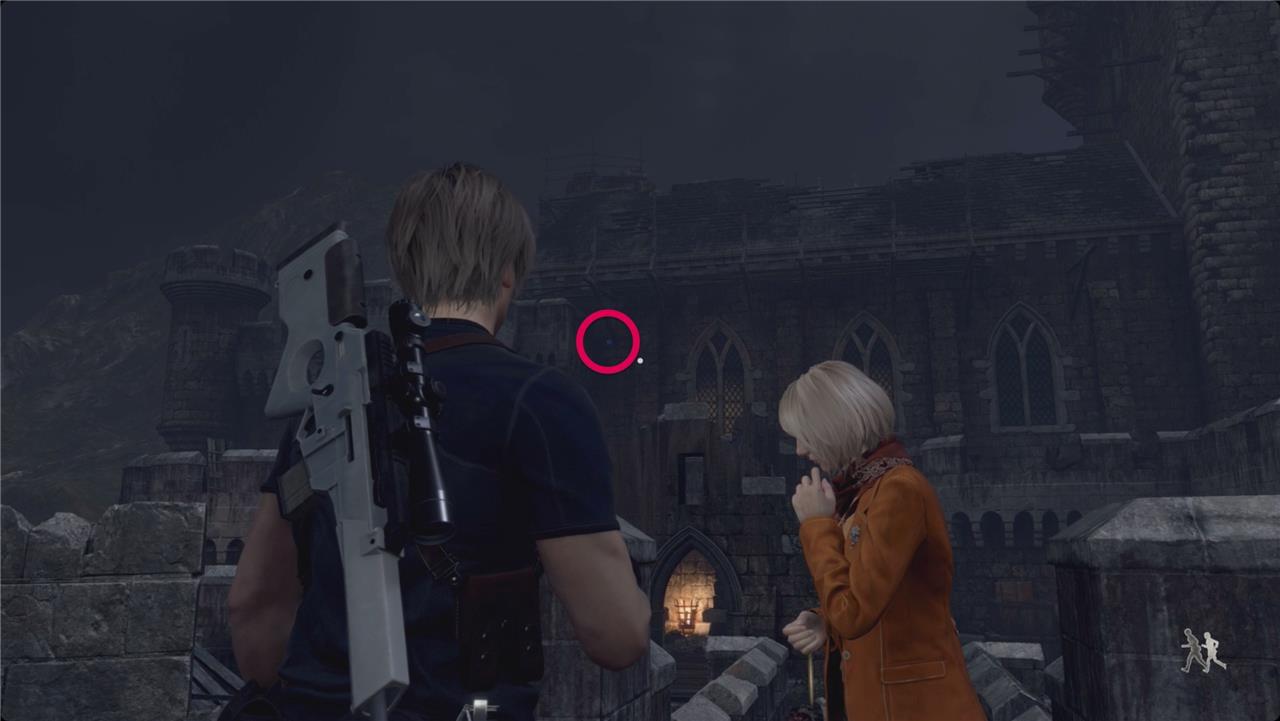
Once the dust settles, look back the way you came. High on the wall and little left, you’ll see Blue Medallion 5 of 6.

When you go back across the bridge heading north, the door you just forcibly opened will be to the right. Instead, turn left and look over the parapets. Way off below you, Blue Medallion 6 of 6 is hanging from a tree to the southwest
Cross over and go through the door you just forcibly opened. On the right, smash the barrel for some gunpowder. On the left, there’s a barrel and crate with pesetas. To the right of the door, you’ll find the Destroy the Blue Medallions 3 Blue Note Request (if you weren’t following along with us).
Push through the big doors at the end of the hall, ignore the creepy chandeliers, and cut to the right to find the Merchant and a typewriter.
Merchant
The Merchant appears near the start of the castle section, giving you a good chance to sell loot and upgrade weapons before the tougher enemies ahead. Check his new inventory for updated gear, including the Riot Gun and TMP upgrades. It’s smart to invest in power and reload speed for your main weapon, as enemy armor becomes more common from this point. Don’t forget to trade spinels for treasure maps-the Castle Map reveals hidden valuables that can greatly boost your funds later.
Inlay a couple round-cut gemstones into that Elegant Bangle we grabbed earlier and sell that off.
When you turn in the Destroy the Blue Medallions 3 request, you should have enough spinels for the Red9 Stock. Get it.
Tuning up is getting expensive now, so you probably won’t have a lot of options. Repair your Combat Knife, and then grab what you can.
Hit the typewriter to save.
Audience Chamber
The Audience Chamber introduces a mix of ranged enemies and armored knights that require quick reactions and smart use of cover. Keep your distance from the zealous cultists, and prioritize archers on the upper balconies before dealing with melee attackers. Use the environment to your advantage-explosive barrels and chandeliers can thin the crowd. After clearing the room, check for items and ammo near the altar before progressing through the next gate.
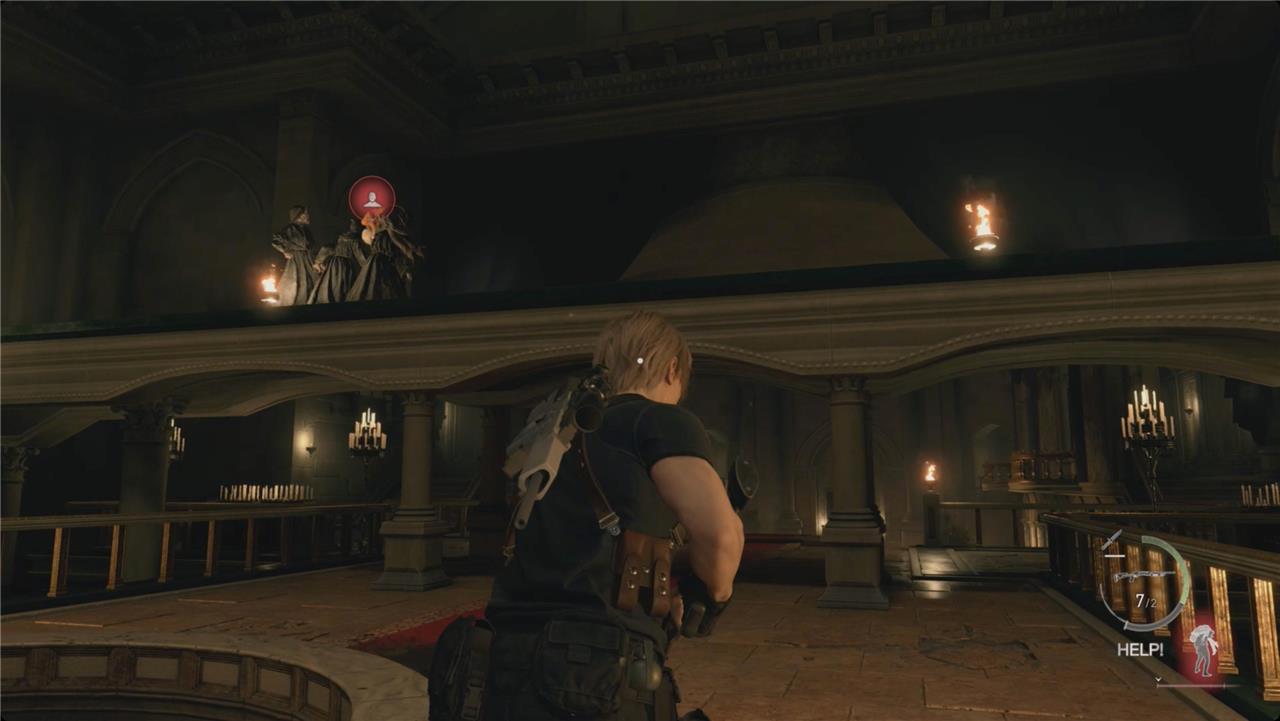
Head up the stairs into the large hall. You’ll make another new friend during the cutscene that follows.
You’ll have to fight off a handful of zealots at this point. A couple will have shields you’ll have to get around (you can damage and destroy them), a couple will have scythes, one has a flail, and the last one has a helmet (which protects him from headshots).
A flash grenade will make short work of this fight. Once it goes off, stab the two with shields to take them down, then turn your attention to the rest. The final one that hangs back is wearing a helmet – so aim for his legs.
After the fight, head back to the stairs by the merchant. There are two vases on the left and one on the right. Smash them for pesetas and shotgun shells. Check the cabinet in the back right corner for a yellow herb.
The main doors out are locked, and checking them will give you a new objective.
Look for another way around
After you reach the gate blocked by the armored enemies, search the area carefully for alternate paths. Look for passages or stairways that loop around, giving you a way to flank enemies or reach switches otherwise out of sight. Keep an eye on doors that appear locked at first; some can be opened after defeating a nearby enemy or triggering a mechanism. Exploring methodically often reveals shortcuts and safer routes through the castle’s dangerous corridors.
In the back left corner of the Audience Chamber, boost Ashley over the wall to unlock the nearby gate for you. Take a left and smash the vase for some pesetas. There are two more vases with pesetas to the right.
Continue along the right and around the corner to reach a chest with an Elegant Perfume Bottle.
Backtrack to the crack in the wall and squeeze through. Turn left. Destroy the two wooden screens, and open the cabinet for some shotgun shells. Look above you for a lantern containing a ruby. Take the other hall out to find a super fun new room.
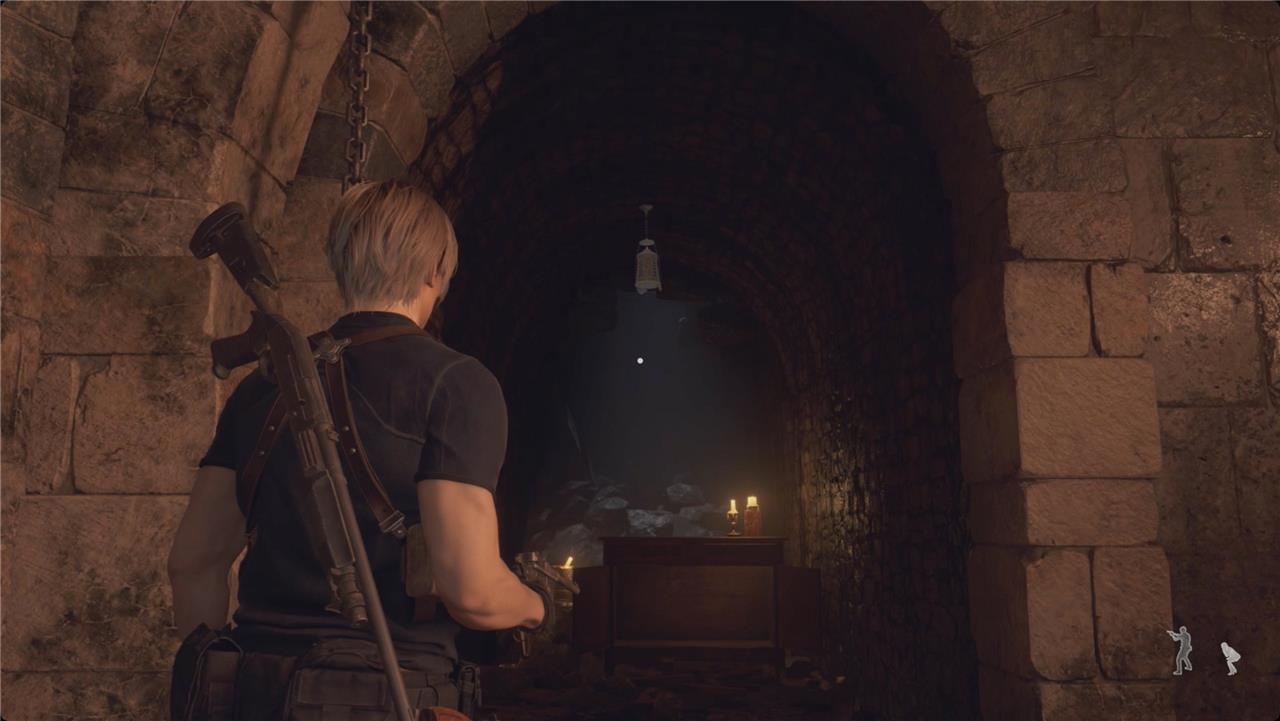
Dungeons
The dungeons beneath the castle are dark and oppressive, filled with echoing moans and the clatter of chains. Here, Leon faces stronger enemies in tight corridors, making every encounter tense and punishing. Players should rely on the shotgun or handgun for close combat and use the environment for cover. Keep an eye out for hidden treasures and keys that open shortcut paths before advancing toward the Water Hall.
On the far side, grab the Caretaker’s Note file on the rack, and get the red herb from the guillotine on the left.
Step through the door on the left and grab the handgun ammo from the window. Keep walking down to the cells. Take the first left, and get the shotgun shells from the cell on your left.
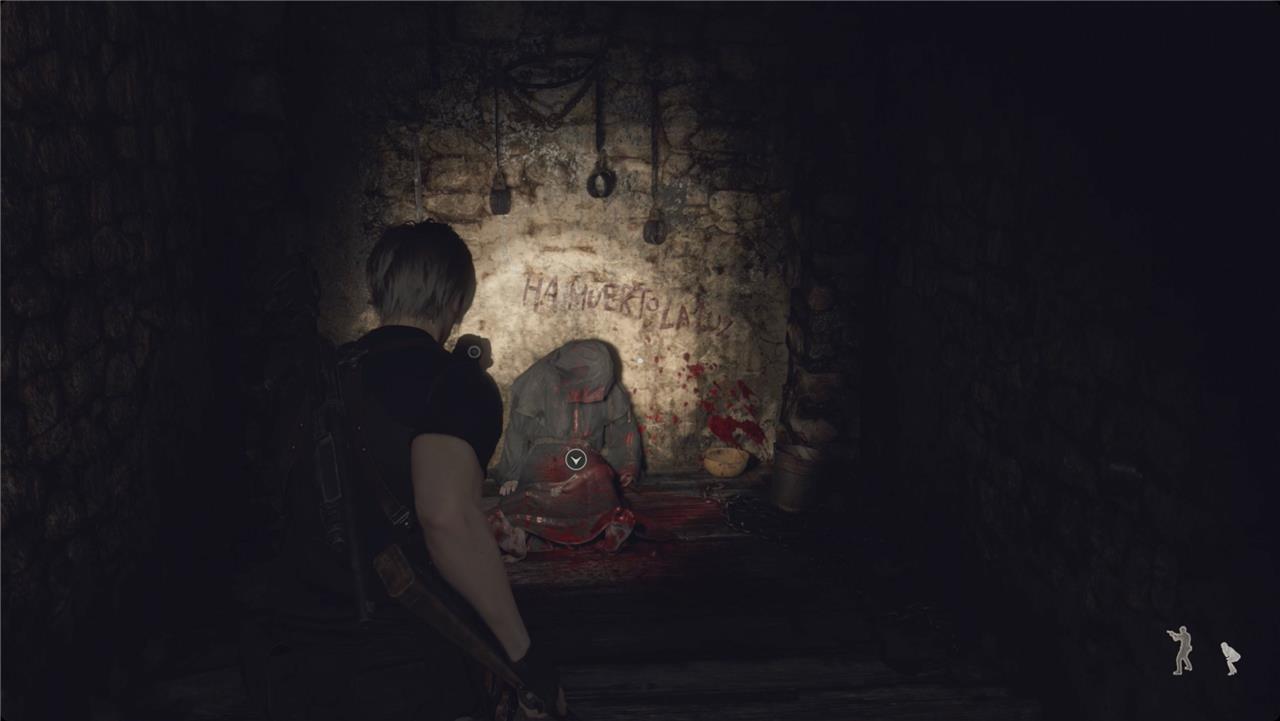
Keep walking toward the horrifying sounds to the right because Leon’s never seen a horror movie before. The corpse against the wall has the Dungeon Key. When you turn around, you’ll fall through the floor and meet the friendly man in the basement named Garrador.
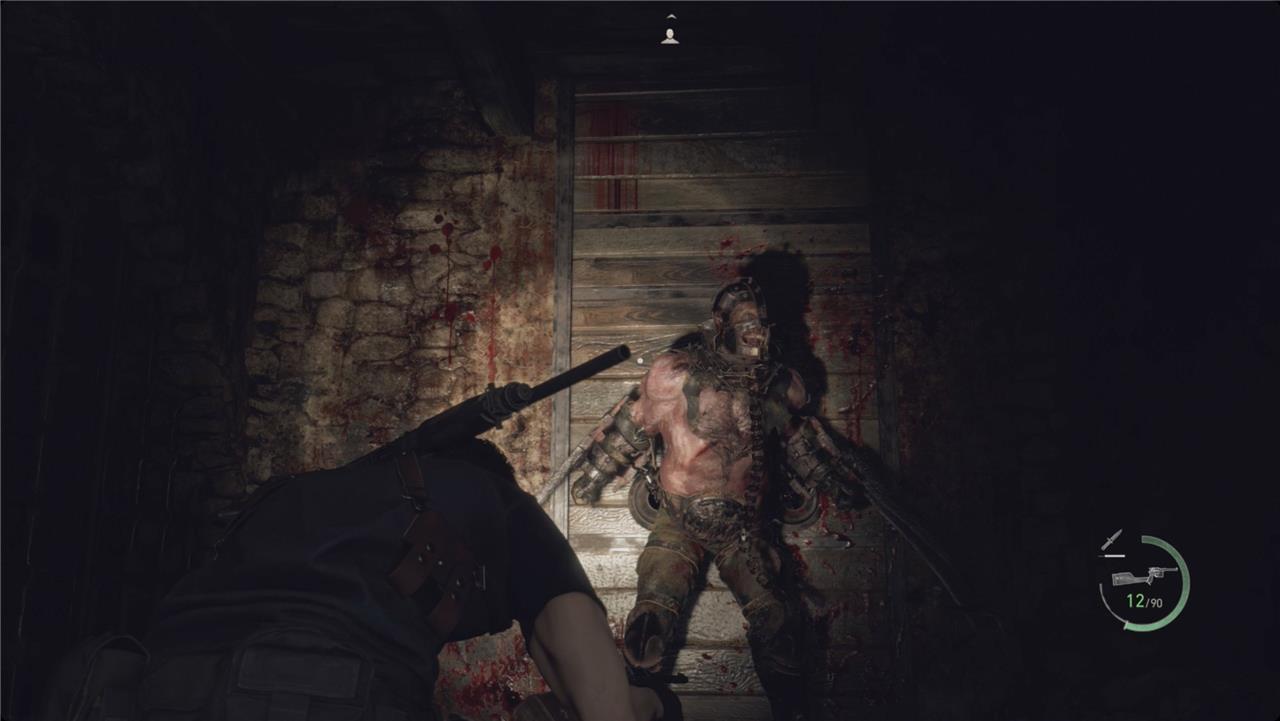
When you round the corner, you’ll have to try to weave through some chains so he doesn’t hear you. It probably won’t go well, though, and he’ll break free to attack you. That’s OK, actually. The Red9 and the Broken Butterfly will make pretty short work of him. When the parasite pops out of his back, focus your aim on that. He’ll drop a red beryl gemstone.
Follow the hall around the corner. In the next larger room, smash any vases you see for pesetas, grab the handgun ammo along the right wall, and look for some handgun ammo behind the screens on the right. Use the crank at the far end to open the gate.
In the next room, smash the vase for some rifle ammo, and continue right to a ladder. Climb out, and follow the hallway to the end. You’ll open the door and find Ashley waiting for you in the relaxing torture room. Use the Dungeon Key on the door to your right. Just inside, smash the barrel on the right for a velvet blue.
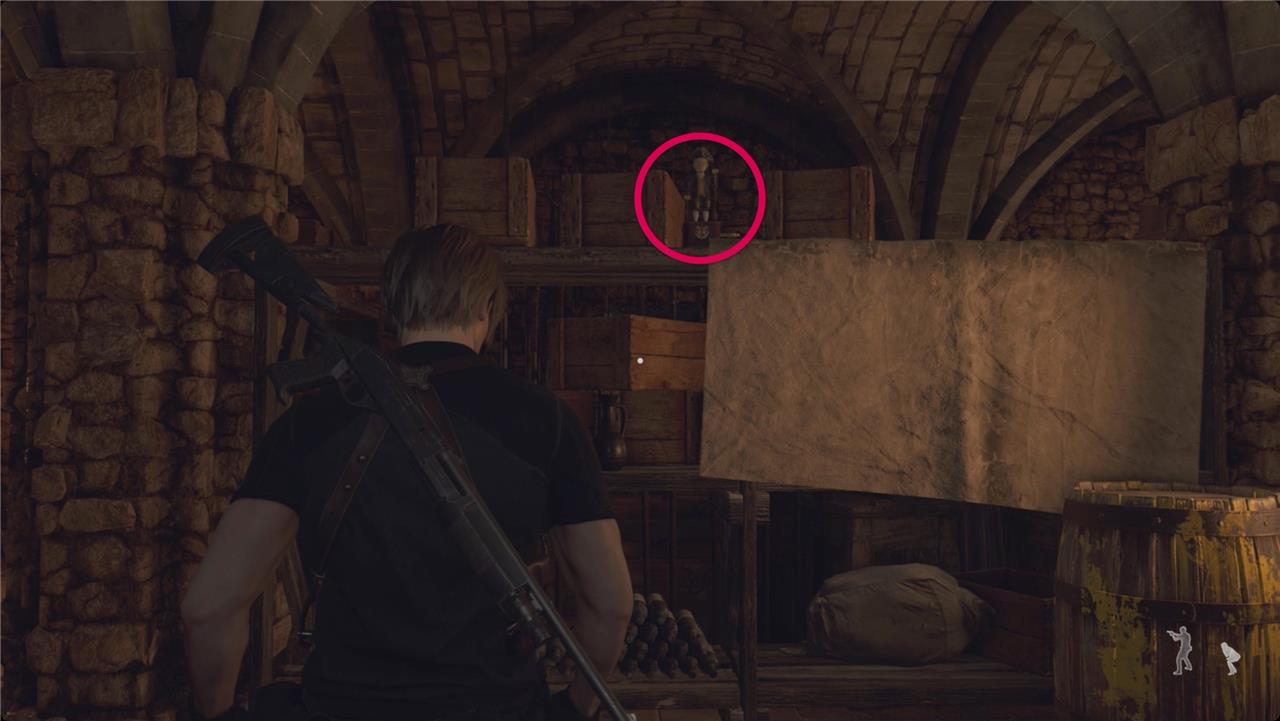
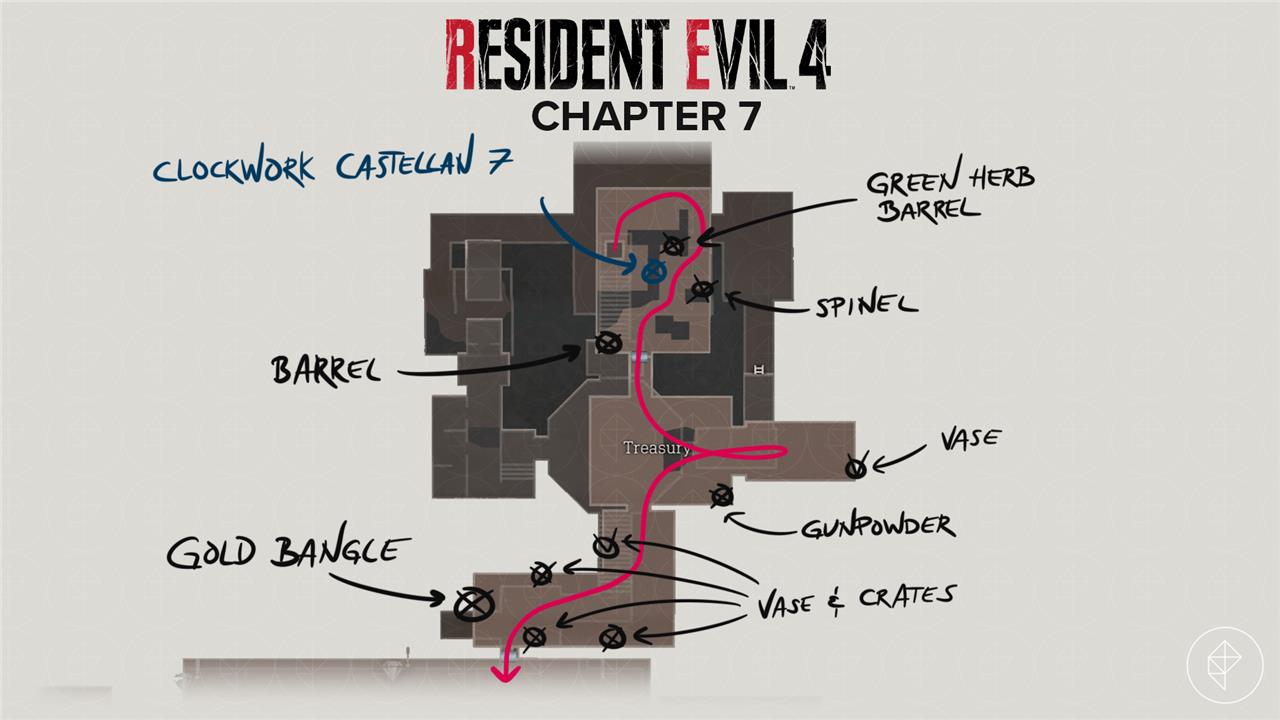
Head up the stairs and climb the ladder. Walk around the room clockwise. When you pass the shelves, pick up the spinel from the cabinet ahead of you, and then turn right to grab the green herb and smash the barrel for some pesetas. Look on top of the shelves in the center of the room for Clockwork Castellan 7 of 16.
Continue around and smash the barrel in the back corner for more pesetas. Head through the door and into the Treasury.
Treasury
The castle treasury holds several valuable items that can boost your funds for future upgrades. Keep an eye out for ornate treasures hidden in chests, on pedestals, or inside breakable objects. Combining gems with certain treasure pieces before selling them maximizes their value, so save your jewels until you find matching slots. Some valuables require solving simple puzzles or defeating enemies to access, rewarding thorough exploration and persistence.
On the far wall, grab the Golden, Iron, and Rusted Swords. Check the cabinet to the left for some gunpowder.
Examine the lock on the gate to the left to see an eagle, stag, and snake.
To the left of the door, pull the chain to ring the stag gong – you’ll see it light up on the lock as well. The others are on the other side of the gate.
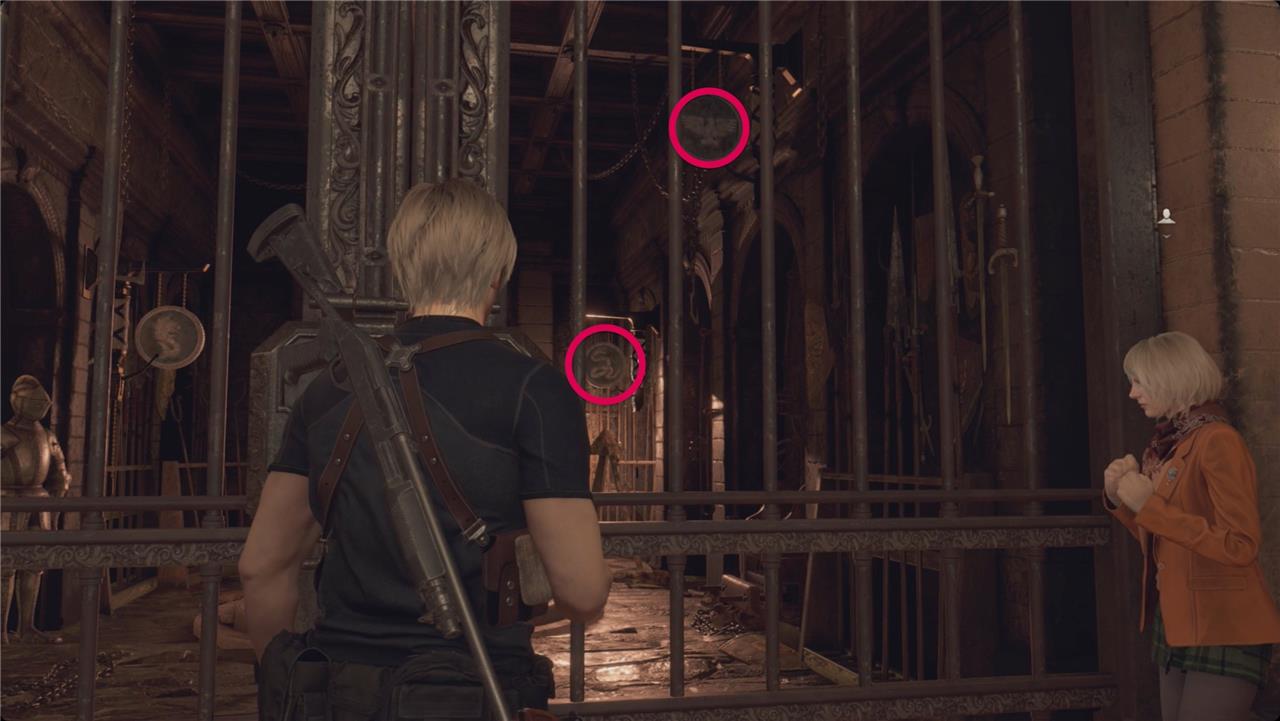
Ashley will point out that you could just shoot the other gongs. Do so. The eagle and the snake are both on the right side.
In the next room, grab the Bloodied Sword from the statue and smash the vase at the back of the room for some pesetas.

Now you have to place the four Swords into the reliefs on the wall to tell a story. From left to right, place them in this order: Iron, Golden, Bloodied, and Rusted.
Set into the new room that opens. Smash the vase and the crate on the left for pesetas and a hand grenade. Continue around. The next crate on the left holds a viper, and the two after that – one on the left and one on the right – have pesetas. Open the chest at the end of the room for a Gold Bangle.
Step through the door to return to the Audience Chamber on the second floor walkway.
Audience Chamber (second floor)
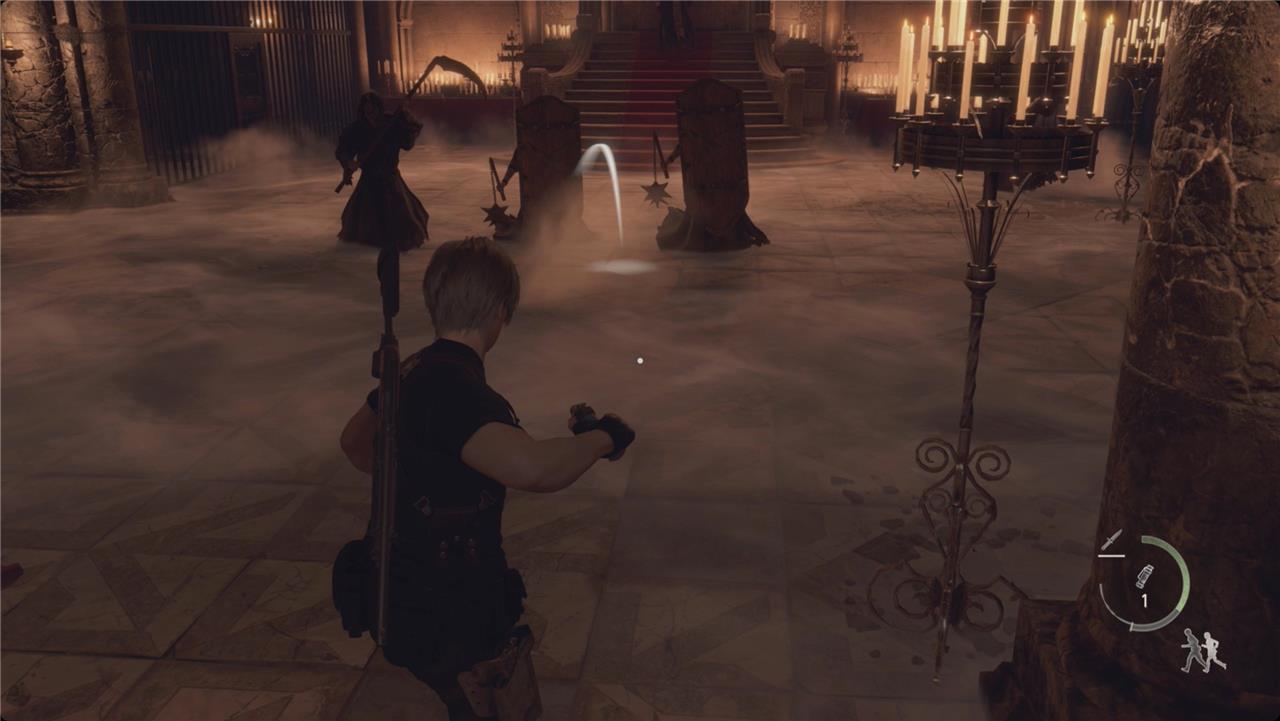
The Audience Chamber on the second floor introduces tougher encounters with zealots armed with shields and crossbows. Keep moving to avoid being surrounded and use the environment to your advantage-explosive barrels and elevated positions can help manage the crowd. Watch for enemies chanting near the throne area, as some will summon reinforcements if left unchecked. After clearing the chamber, search the room for valuable items and keys before proceeding toward the Water Hall section ahead.

Take a left to find another gong lock. This one is a fish and a snake. The fish gong is immediately to your right.
Turn around, and go all the way to the end of the walkway. Smash the vase for some pesetas, and then kick down the ladder on your left.
Turn to the left – back the way you came – and stop at the first gap on your right. Hit the prompt, and Leon will use the chandelier to cross the room. Smash the vase to the left for some pesetas and then drop through the hole to the right. Open the chest for a Golden Hourglass.
We’ll be back for the last couple locked treasures in this room later. For now, head back to the merchant.
Sell him the Dungeon Key, Gold Bangle, Golden Hourglass, Elegant Perfume Bottle, and velvet blue you picked up – you’ll get 31,700 for them. Repair your knife (as always) and buy any tune ups you want.
Save at the typewriter. Use the ladder you kicked down earlier to climb back up to the second floor. Head to the middle of the walkway and turn right toward the center of the chamber. Use the chandelier to cross the room again. The snake gong is to your left. Go through the gate and over the stairs. Smash the vase on the other side for some pesetas.
At the far east end of the chamber, push through the doors at the top of the stairs.
Water Hall
The Water Hall is one of the trickiest areas in the castle, filled with cultists attacking from multiple levels while you operate the cranks to raise the platforms. You’ll need to protect Ashley as enemies swarm from both sides, making timing and positioning critical. Use crowd control weapons like the shotgun or rifle to thin out groups and keep an eye out for shielded foes approaching from the balconies. Once the platforms are fully raised, regroup with Ashley and make your way across to the exit to move on to the next section.
Take an immediate right for some resources (S). Head down the stairs on the left. Smash the vases for some pesetas and gunpowder.
Push through the door on the south wall – opposite the stairs you just came down. Smash the barrel to the left of the door for some gunpowder. At the back of the room, grab the Parasites and their Ecology Vol. 2 file (all real things, by the way). Save at the typewriter here for good measure.

The other door in this room is locked, so head back out. Take a right, and then another right. Smash the vase for some more gunpowder and then push through the doors to your left into the Water Hall.
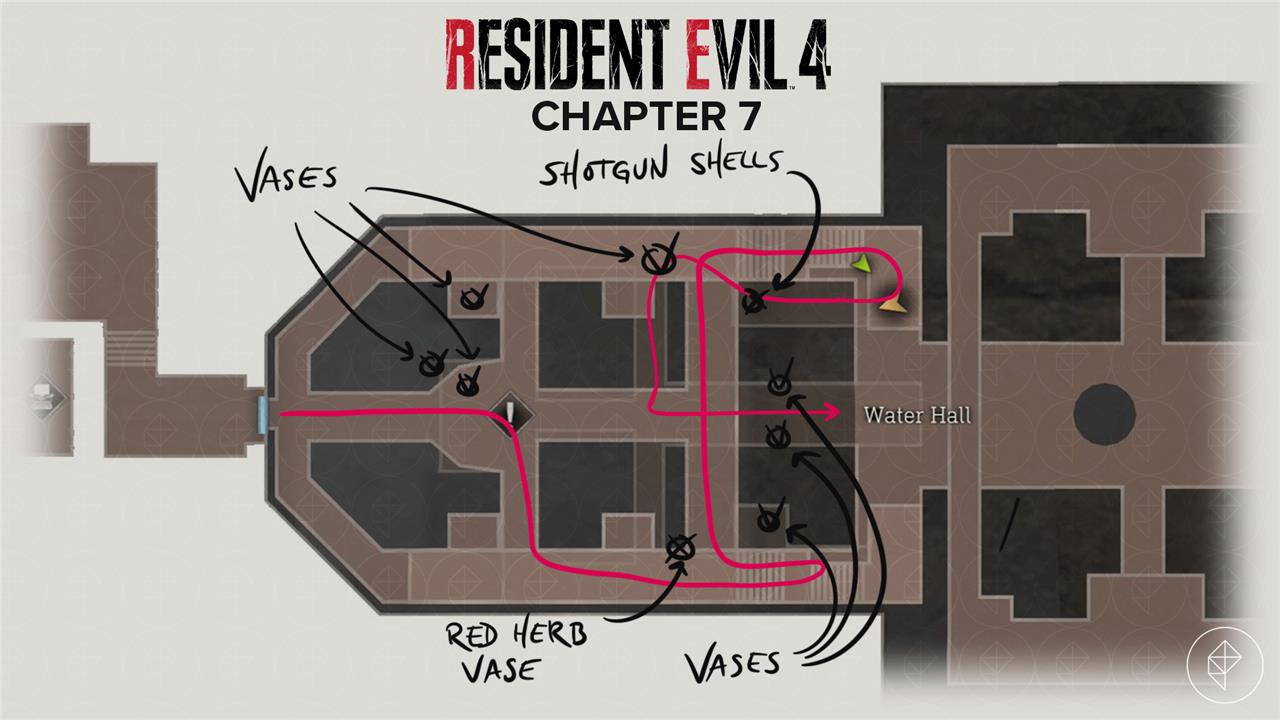
The Pedestal straight ahead of you has a keyhole, but we’ll have to do some exploring first. Smash the vase nearby for some gunpowder.
There’s a zealot arbalist at the far end of the hall on the right that you can snipe with your rifle. Before long, a crowd of zealots will show up. Once again, a flash grenade (or two) will save you a lot of trouble.

At the end of the hall, take a right for a red herb and a vase with handgun ammo. There are stairs down to a dead end on the right side, but if you look back the way you came from the lower landing, you’ll spot an explosive barrel. Shoot that – it’ll save you a lot of trouble later.
Head back upstairs and over to the left side of the room for a couple vases with rifle ammo and shotgun shells.
Head down the stairs on the left for another vase with more shotgun shells. If you have the ammo, this is a good place to snipe at the zealots on the floor below you. When you’re ready, drop down.
There are some shotgun shells on the sarcophagus on your right. Deal with the rest of the zealots down here with you, and then head for the northwest corner to find a vase with a hand grenade inside. The center of that wall has a vase with rifle ammo in it. There’s a vase in the corner across from where you entered with some gunpowder.
In the middle of the room, smash the vases for shotgun shells and rifle ammo as you approach the statue. Grab the Halo Wheel.
Place it on the Pedestal down here with you, but don’t turn it yet. As soon as you place it, a bunch of zealots (including arbalists) will show up upstairs. Snipe any you can spot from down here – you won’t be able to get them all.
When you’re ready, go turn the wheel – you’ll get the Halo Wheel back. Even more zealots (arbalists included) will show up upstairs. Retreat back down to deal with the melee ones first, and then use your rifle to deal with the rest.
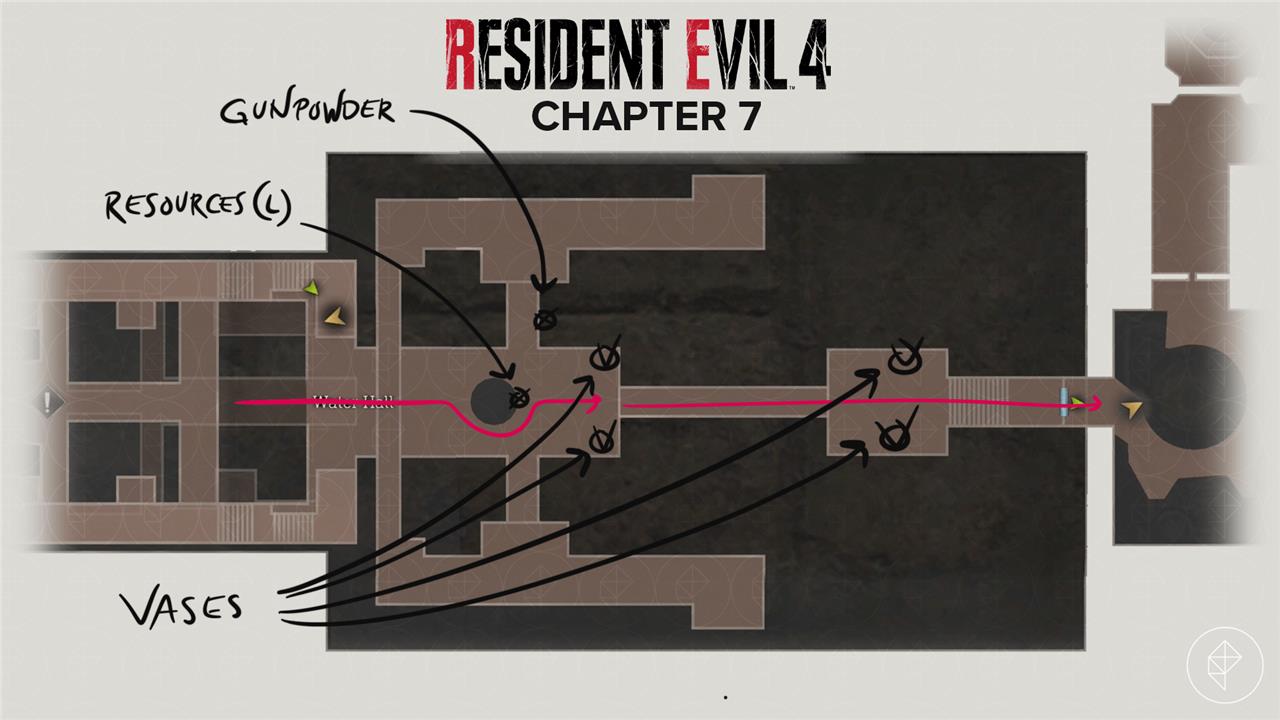
Take the Halo Wheel to the first pedestal and lower the next set of stairs. Head up and past the gross well. There are resources (L) on the far side of the well, and some gunpowder on the railing to the left. Smash the two vases for shotgun shells and resources (S). Use the wheel to raise a hidden platform.
Over on the left, boost Ashley up to the second floor. She’ll go turn the next crank. Use your rifle and handgun – preferably the Red9 with its new stock – to cover her and keep the zealots at bay. You’ll also have to deal with a handful that come after you. While dealing with them, Ashley will inevitably get taken. Just shoot the zealot out from under her and she’ll get back to work.
Cross the new bridge, and smash the two vases for rifle and handgun ammo. Push through the big doors. Loop around the garden and smash the crates for pesetas and some gunpowder.

How to defeat Garrador in Chapter 7 Castle
Resident Evil 4 Remake Chapter 7 Garrador Guide
The first Garrador fight occurs in the Castle Dungeon after grabbing the Dungeon Key, dropping Leon into a dark arena with this blind, claw-wielding Plaga host that detects noise.
Stealth Basics
Crouch-walk slowly to minimize sound; avoid sprinting or bumping dangling chains, which alert it. Hide behind wooden pillars for cover when it charges or slashes wildly, using them to block deadly claw combos. Parry incoming swipes with precise knife timing if cornered.
Combat Strategies
Sneak behind for repeated knife backstabs (ideal for “Never Heard It Coming” trophy on lower difficulties; higher ones need more hits). Alternatively, shoot or shotgun its back to expose the parasite tentacle, then blast it with magnum, rifle, or flash grenade for massive damage. Distract with thrown objects or bolt thrower shots (silent, mine-enhanced).
Skip Option
Lure it near the exit crank, flash grenade to stun, then turn the wheel before it recovers-run silently back to Ashley. Stock flash grenades beforehand for reliability.
Rewards and Tips
Defeating it yields loot like Emeralds; save ammo by prioritizing stealth. On Standard, 18 shotgun shells suffice; reload at the nearby typewriter post-fight.
How to skip the Garrador fight in Chapter 7 Dungeon
To skip the Garrador fight in the Chapter 7 Dungeon of Resident Evil 4 Remake, use a quick stun-and-run tactic at the exit gate.
Primary Skip Method
After falling into the arena, crouch-walk quietly past the Garrador toward the exit crank (avoid chains and sprinting to stay undetected). Lure it near the gate by tapping chains or making noise from a safe distance, then immediately throw a flash grenade at it while standing by the crank-this blinds and stuns the beast long enough (about 5-10 seconds) to fully turn the wheel and escape to Ashley without engaging.
Alternative Skips
-
Proximity Mine: Fire a bolt thrower explosive mine at the Garrador’s initial position (near its cell door), then sprint silently to crank the gate as the blast draws and injures it, buying time on higher difficulties like Professional.
-
No-Glitch Lure: Lead it back to its cell with noise, attack to stagger (shotgun or melee), then dash to the crank-flash grenade optional for extra safety.
Note: Skipping forfeits the Red Beryl reward but conserves ammo and knife durability. Stock flash grenades beforehand via crafting (flash + grenade).