Hidden across Hyrule, Sage’s Wills hold the power to strengthen your allies beyond their limits. Here’s where to find each one, how to use them, and what upgrades they bring to your sages in The Legend of Zelda: Tears of the Kingdom.
The Sage’s Wills are on the sky islands and they allow you to power up one of the Sage abilities for every four you spend. You’ll need to choose wisely about which ones you power up first, since not all Sage’s Wills are easy to find, and some are locked behind very difficult enemy encounters.
If you stumbled upon a Sage’s Will, but the term “Sage abilities” means nothing to you, play some more of the main story and come back here later (unless you’re OK with some gameplay spoilers below).
Before you head off to go get Sage’s Wills, we recommend having a collection of Zonai devices at your disposal, as well as Tulin’s wind ability. Lots of these islands are high up and annoying to get to, and you’re best off using powered-up wings and balloons to get there.
Below, we list where to find all 20 Sage’s Wills and what they do.
How to use Sage’s Wills
Offer Sage’s Wills at any goddess statue in exchange for a permanent upgrade to one Sage companion’s vow, trading four Wills at a time to boost that ally’s attack power. Prioritize the Sage you rely on most in combat, such as Tulin for ranged support or Yunobo for breaking enemy defenses, because each Sage can only receive this upgrade once. Since these choices cannot be reversed, plan ahead so your upgrades match your preferred playstyle and usual party setup.
When you have four Sage’s Wills, you can exchange them at agoddess statue to improve one of your Sage abilities. They’ll turn the “Vow” item in your key item inventory into a “Solemn Vow.”
Once you upgrade an ability, that’s it. You cannot trade, swap, or downgrade the upgraded abilities, so make sure you improve the ones you want first. You can upgrade all of them, as there are 20 Sage’s Wills in the game, but some of them are locked behind King Gleeok boss fights, which can be really tough.
Once upgraded, the Sage will deal more damage, though we don’t know the specifics surrounding how much more damage they do. Regardless, you should prioritize the characters you rely on the most.
Sage’s Will locations
Sage’s Will can be found across the skies in Zelda: Tears of the Kingdom, usually inside treasure chests on remote Sky Islands tied to each Sage. These locations often require solving short puzzles or completing traversal challenges using abilities like Recall and Ultrahand. Each Sage has four Wills connected to their spirit, so exploring all corresponding Sky Islands ensures you gather every piece needed for full upgrades.
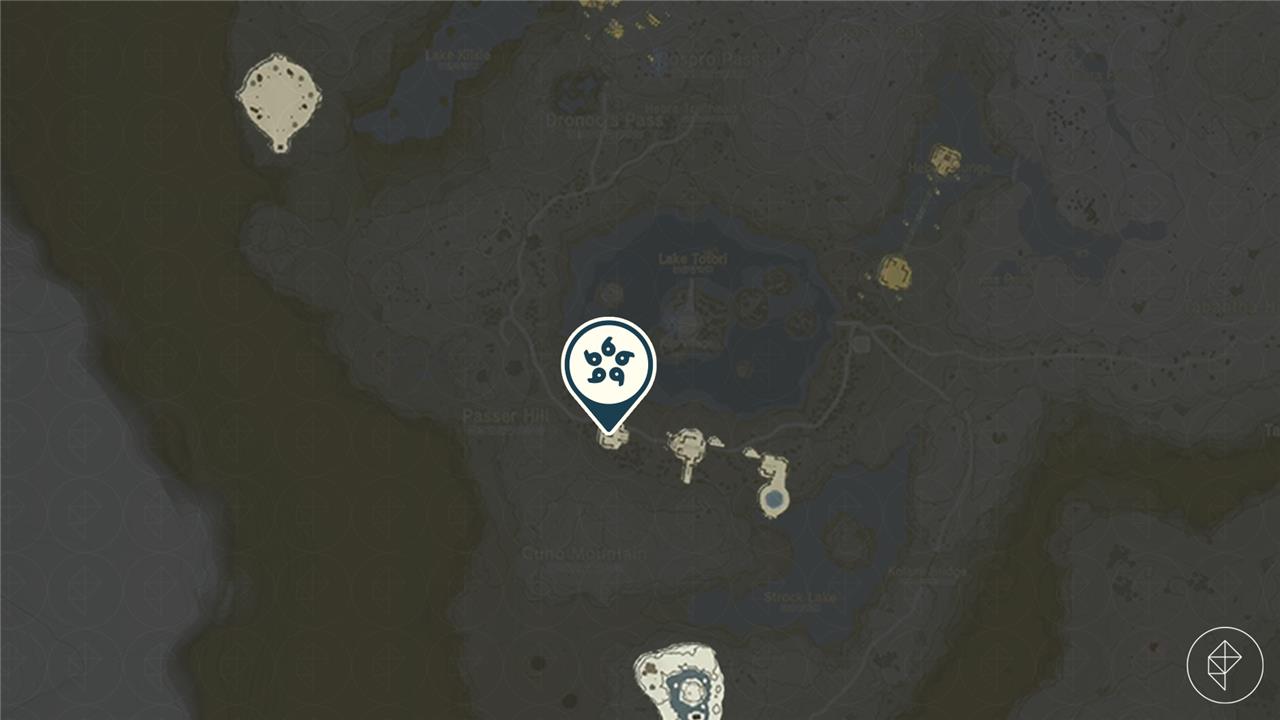
South Hyrule Sky Archipelago (-0950, -1751, 1013)

Among these islands are two connected sky islands with ponds on top.
The higher-up pond has a chest with a magic staff and the lower pond has the Sage’s Will you’re looking for. To drain the water in the ponds, raise the barriers up with ultrahand and hold them there for a moment. Drop them back down, cast Recall on them, then grab the loot from the chests in the middle while the pool is momentarily empty.
You can also fuss with tree logs and the like to create a post to stick the barriers to, but using Recall was easier for us.
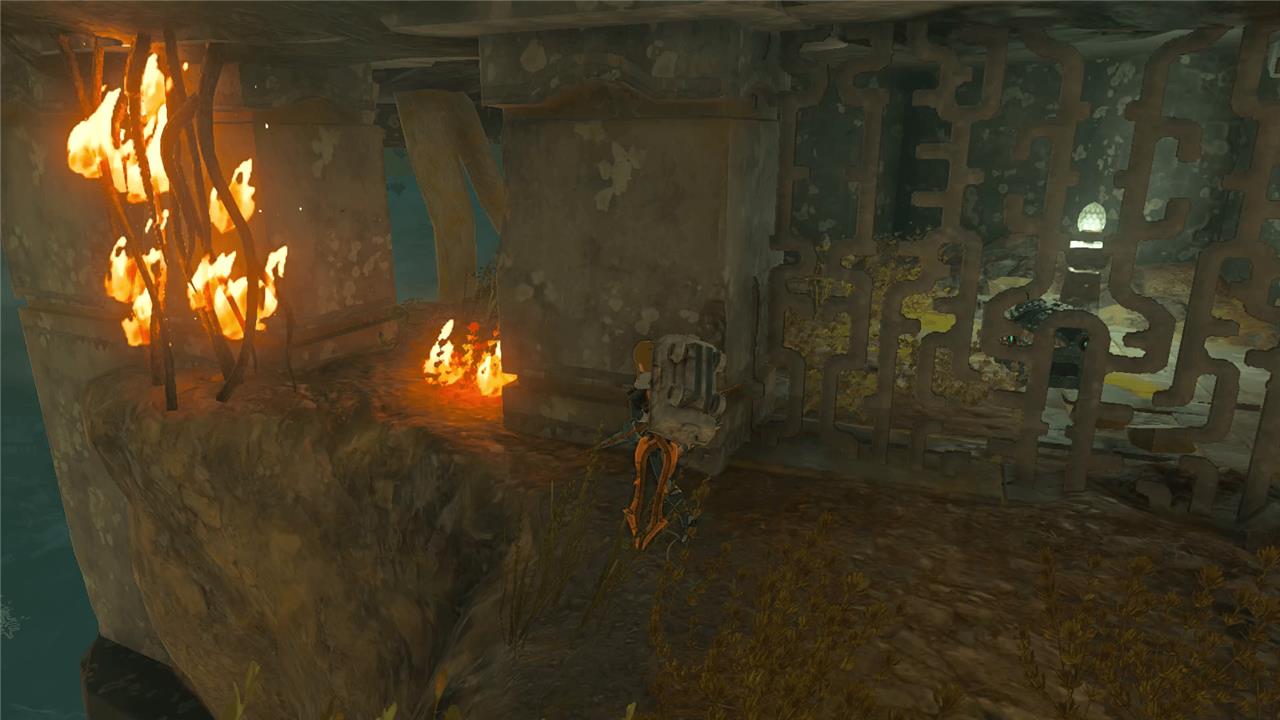
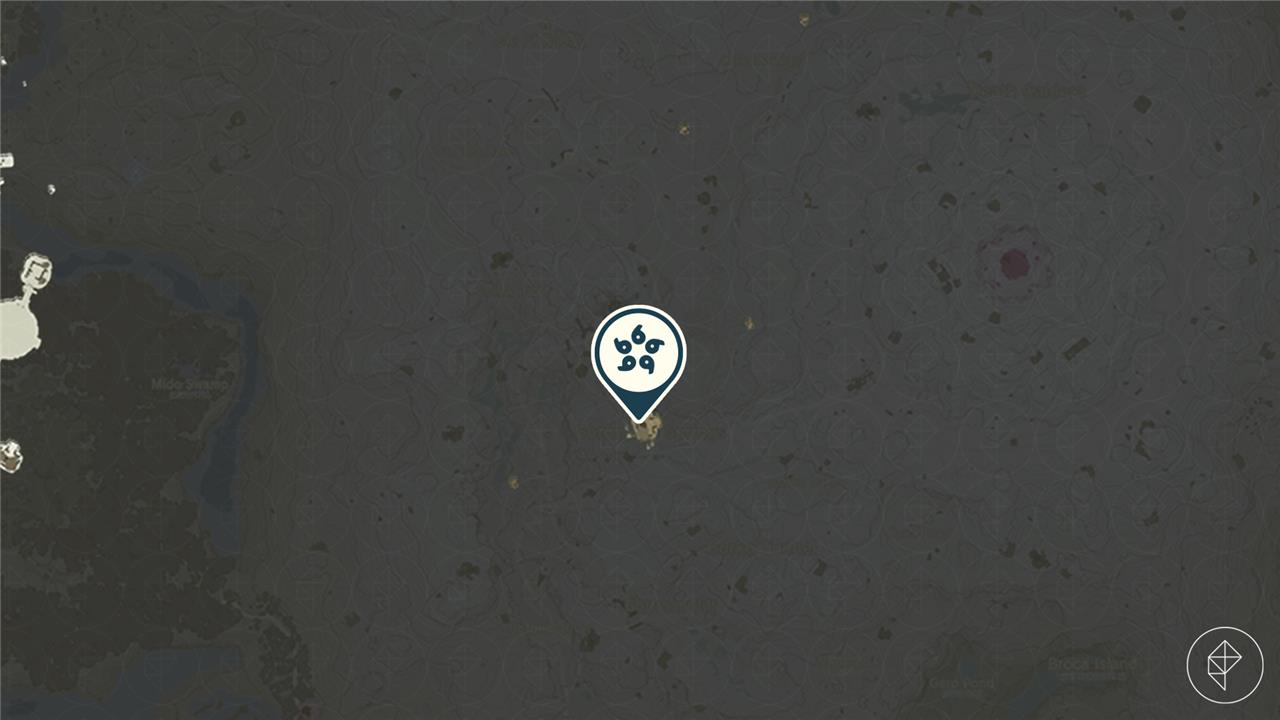
South Eldin Sky Archipelago (1781, 0972, 1226)
Head to the island in the middle of the three connected with mine cart rails. From where the mine carts put you (at the bottom level of the island), Ascend up. Burn or slash (with a sword or ax) these vines to grab the Sage’s Will:
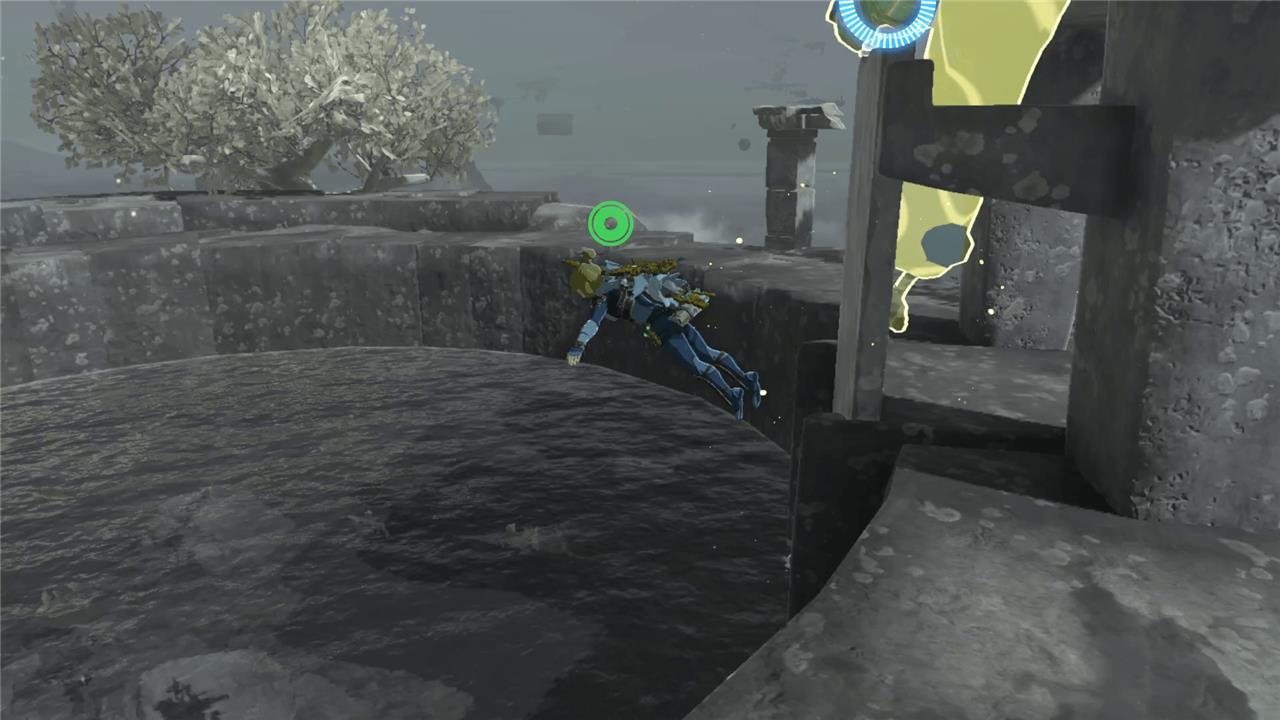
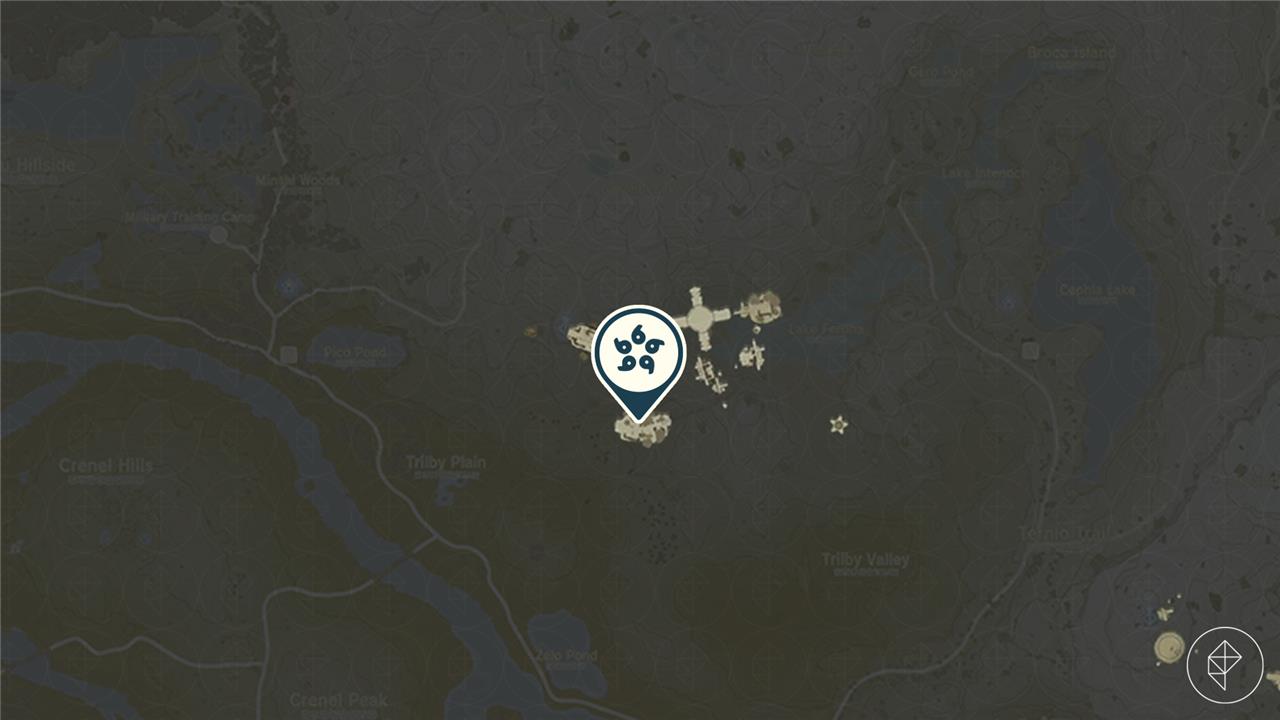
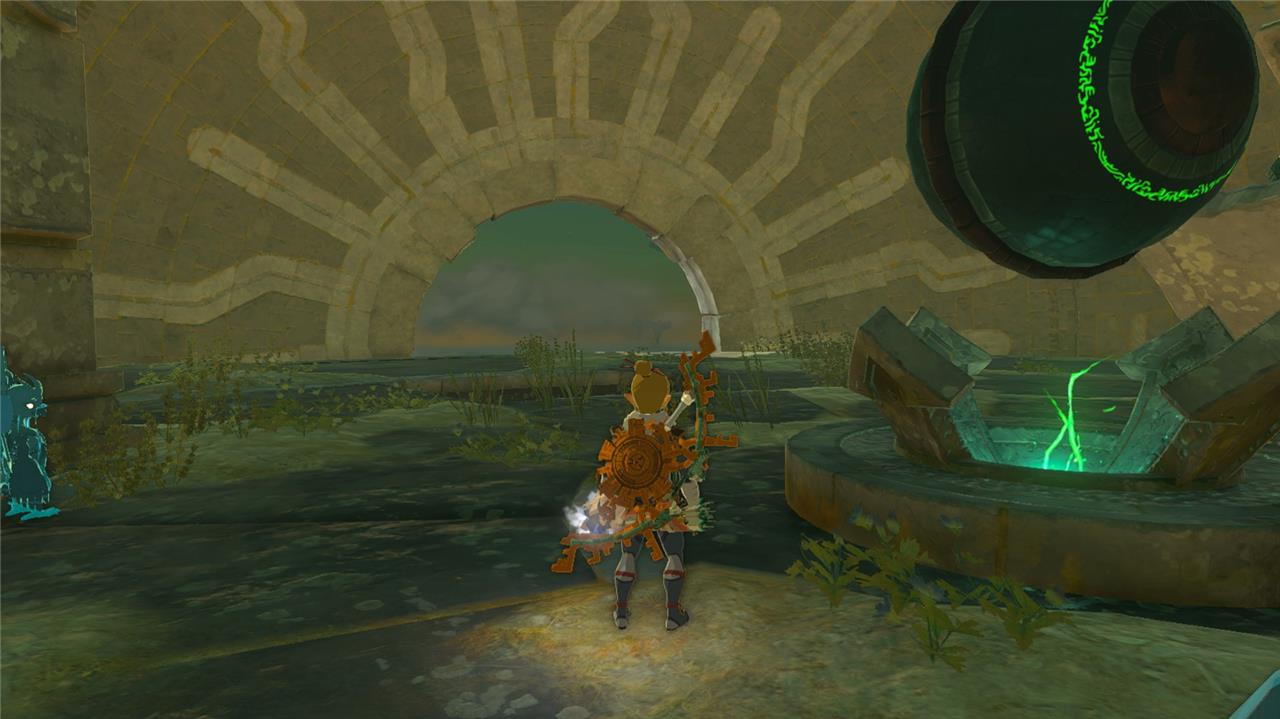
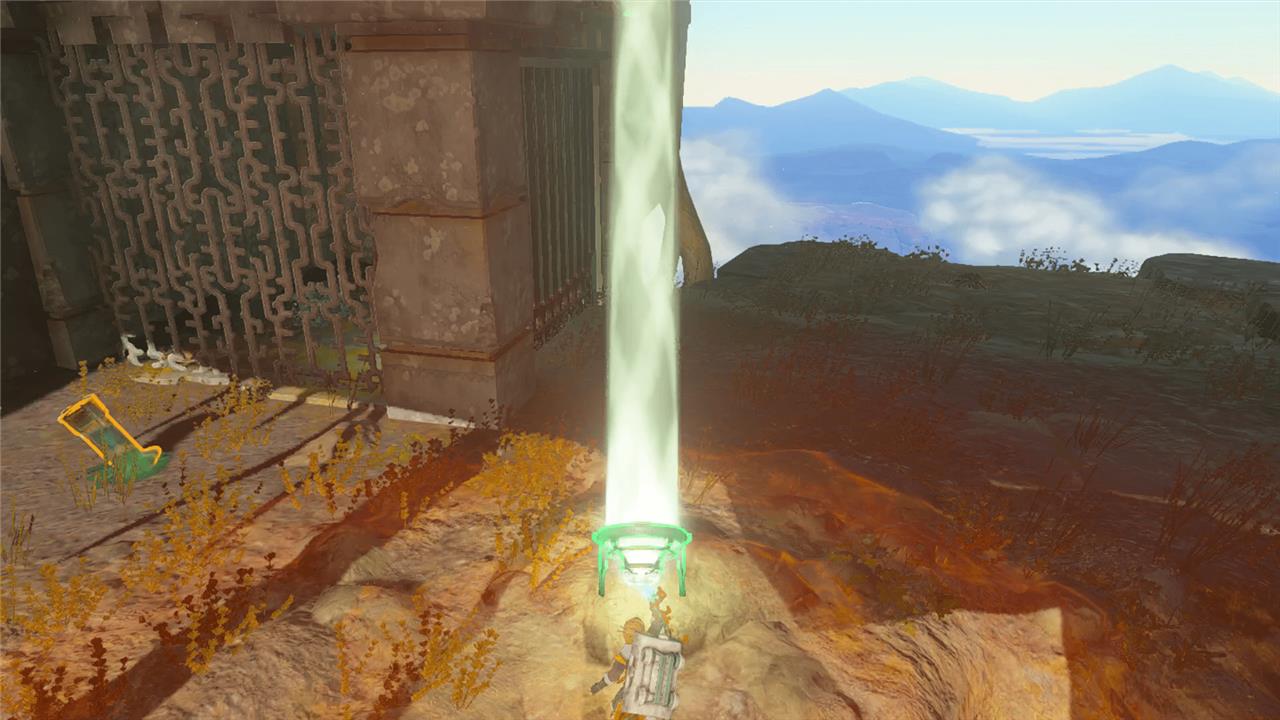
Eldin Sky Archipelago (1765, 2266, 0827)
This one is particularly far from other islands, making it a challenge merely to reach. We used a wing with fans and a steering stick attached and flew in from the top of Death Mountain.
Once you get there, take out the single Construct on the island and head into the small ruins to claim your Sage’s Will.
Starview Island (-3457, -0263, 1939)
Inside this orb is a light puzzle. Solving it will unlock Mayasiar Shrine, but almost solving it and doing something different on the almost-last step will give you the Sage’s Will.
To solve the puzzle, start by rotating the crank in the middle until the light hits a mirror. Then keep following the light, rotating the cranks so they keep illuminating new mirrors. Before you aim the final crank toward the center, aim it at the horizontal light mechanism in front of the small ruins. This will open the ruins, allowing you to grab the Sage’s Will from the chest. Here’s a view of our light setup, from above the device dispenser:
Lanayru Great Spring Sky (2910, 0525, 0929)
Inside this rotating orb, you’ll need to detach the fan from the crank in the center and then rotate the crank so that the opening to the orb is about halfway open like this:
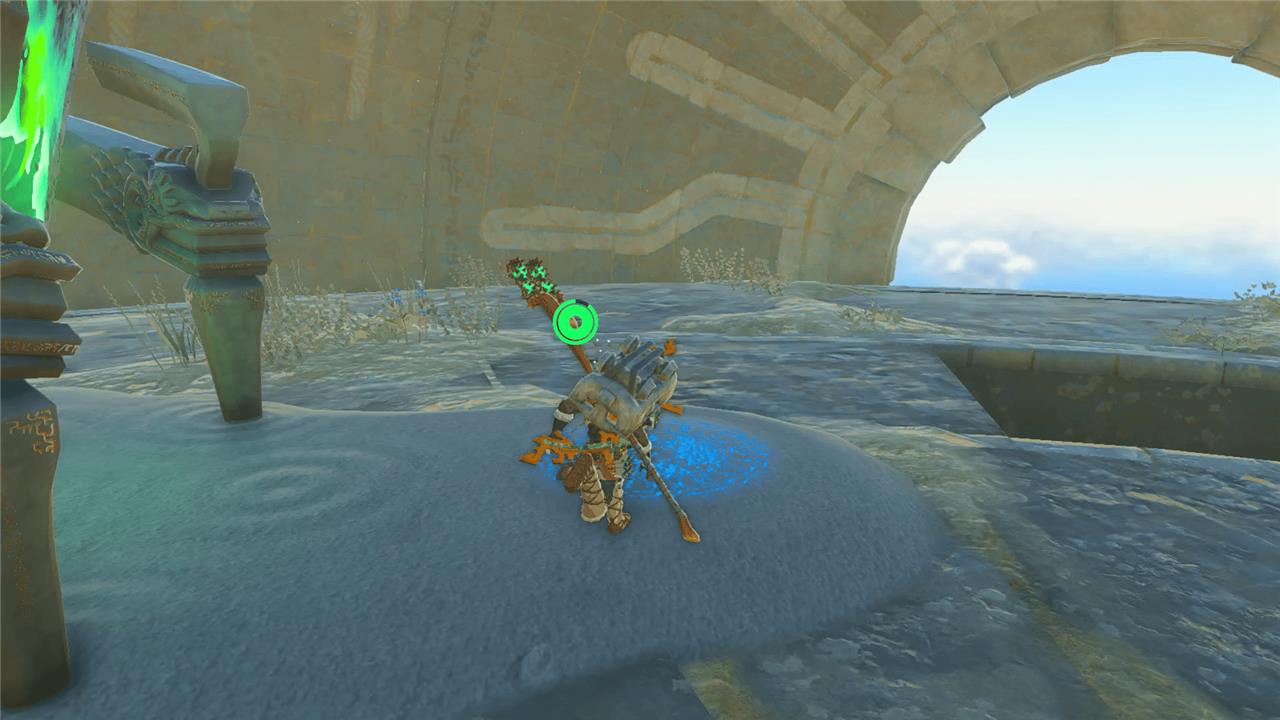
Once that’s done, you can jump out of the hole and U-turn, with your paraglider, back into the bottom floor of the orb, which is where the chest with the Sage’s Will is.
Sokkala Sky Archipelago (3810, 1580, 1144)
This one is, again, on the bottom half of an orb-shaped structure. Ultrahand the ball device in the middle so that the opening circle is a semi-circle as shown below. Once it’s in this position, jump out of the hole and U-turn (with your paraglider) back into the bottom part of the orb to claim the Sage’s Will.
East Gerudo Sky Archipelago (-1959, -1812, 1140)
If you landed on the very top of this island, jump down and glide to the bottom. The chest with the Sage’s Will is on the bottom tier of the island, but it needs to be opened using light and a mirror.
If you don’t have any spare mirrors in a capsule, Ascend up to the middle floor to grab some and drop them down to the bottom floor. (But be careful to not just throw them off the sky island entirely.)
You’ll need to use sunlight to activate the light fixture on the bottom floor. We built a campfire, waited until morning, and aimed a mirror like this to access the chest:
South Hebra Sky Archipelago (-3075, 2150, 0647)
If you landed on the bottom part of these two islands, you’ll need to use the hooks and wood to create a gondola. The gondola can’t go upward across the line because of gravity, so we attached two fans like so, which took us up successfully:
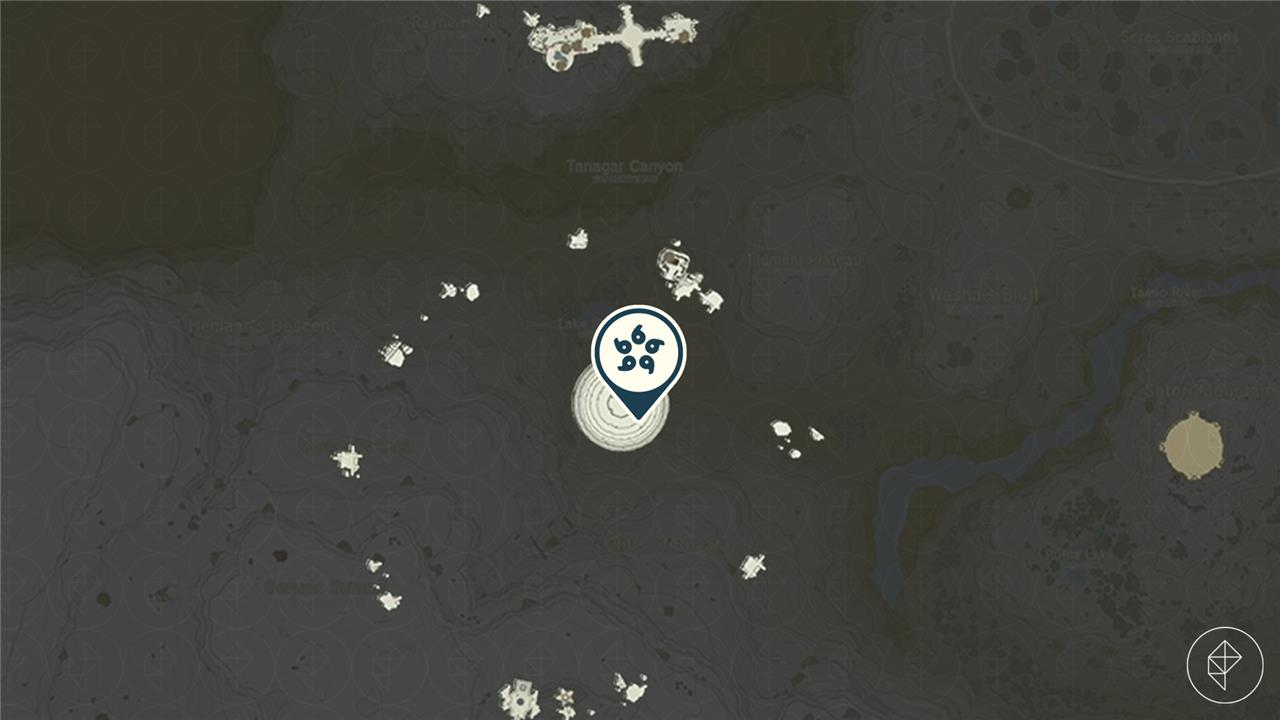
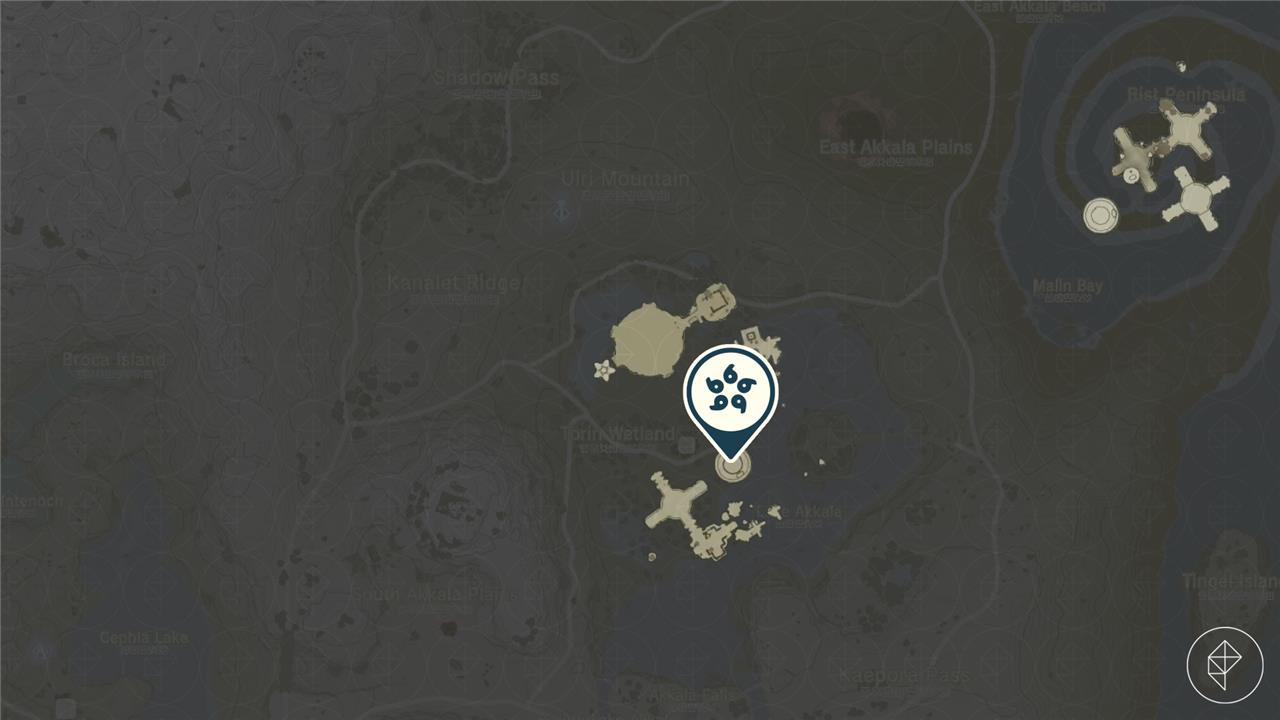
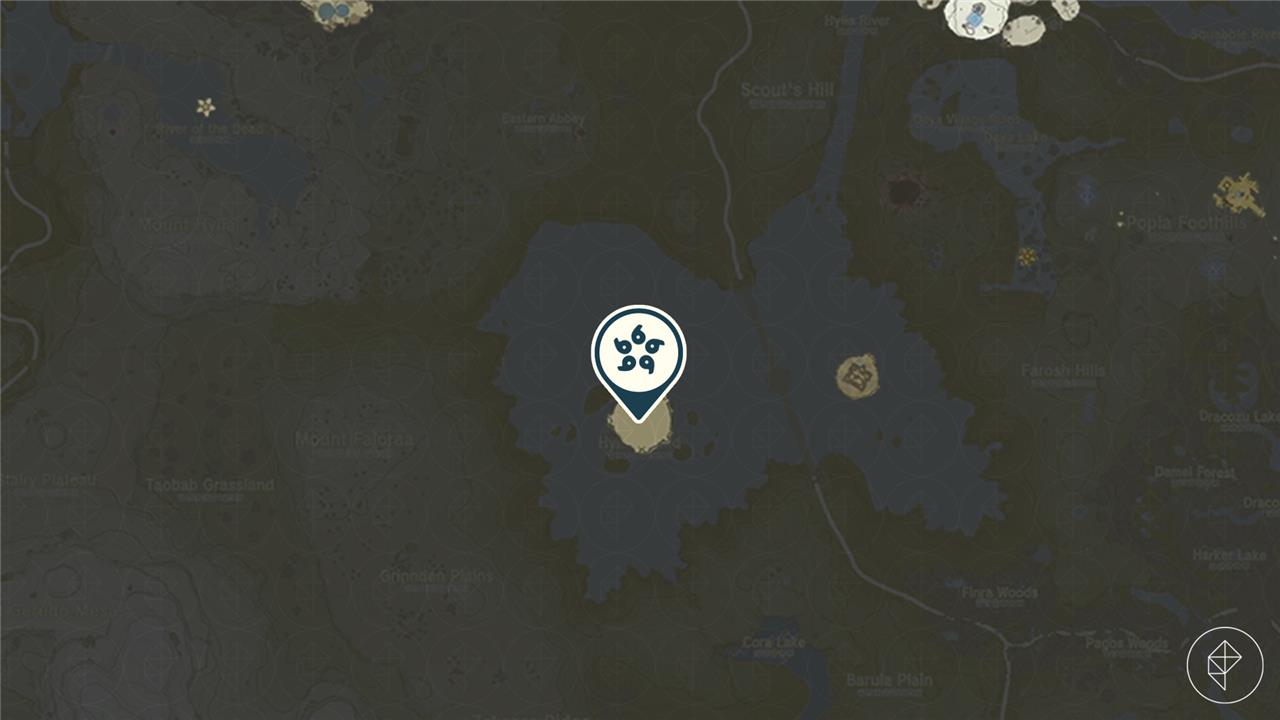
Thunderhead Isles (0967, -3307, 0846)
These islands are accessible even in the beginning of the game, but we recommend waiting until you can complete the “Secret of the Ring Ruins” quest, which will remove the storm cloud from the area.
There’s always a thunderstorm happening in Thunderhead Isles, so we recommend making some elixirs with sticky frogs or lizards to help you scale the area’s slick surfaces.
The Sage’s Will is in a small building shown in the above map. You’ll need to access it by destroying the rocks blocking the entrance, which faces west, so it can be hard to see:

Dragonhead Island (1309, -3210, 0459)
This Sage’s Will is on the bottom “lip” of the dragon’s head on these Sky Islands. Just like the above island, we strongly recommend clearing the “Secret of the Ring Ruins” quest to clear up the storm cloud from the area. It’s accessible without doing so, but it’ll be hard to see, as it’ll be covered by a cloud on the map.
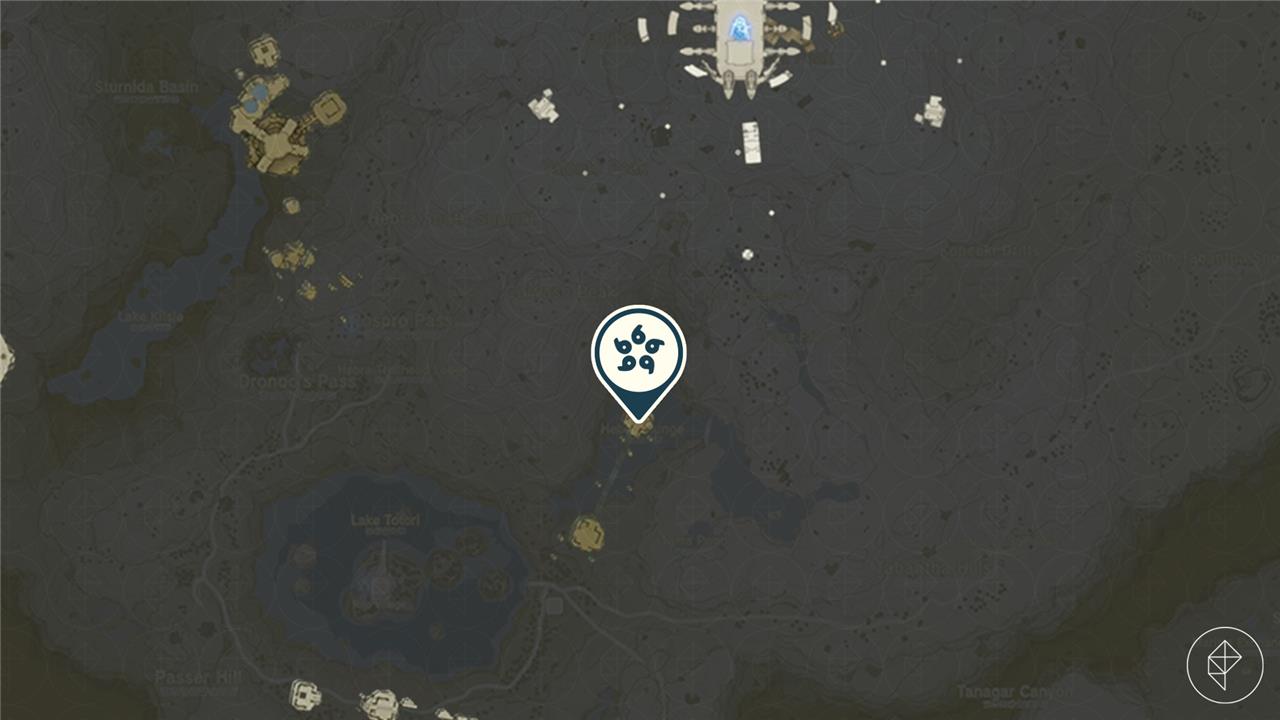
North Tabantha Sky Archipelago (-3780, 1572, 1238)
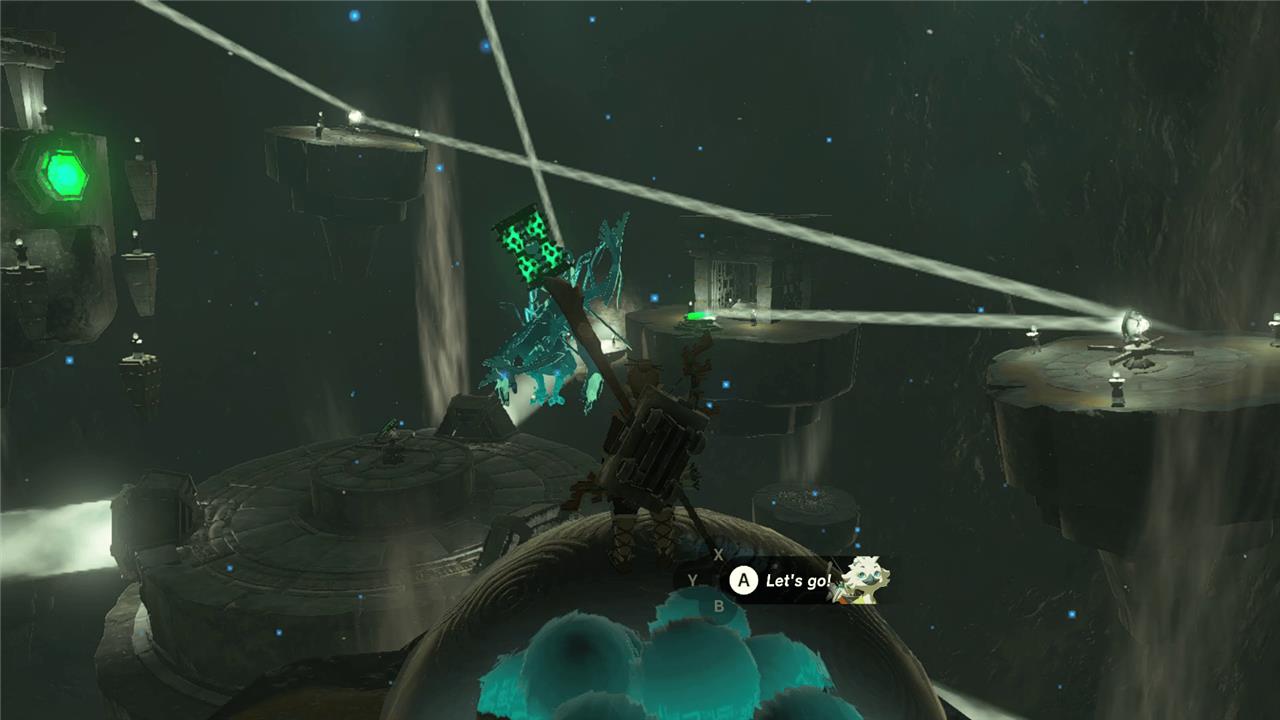
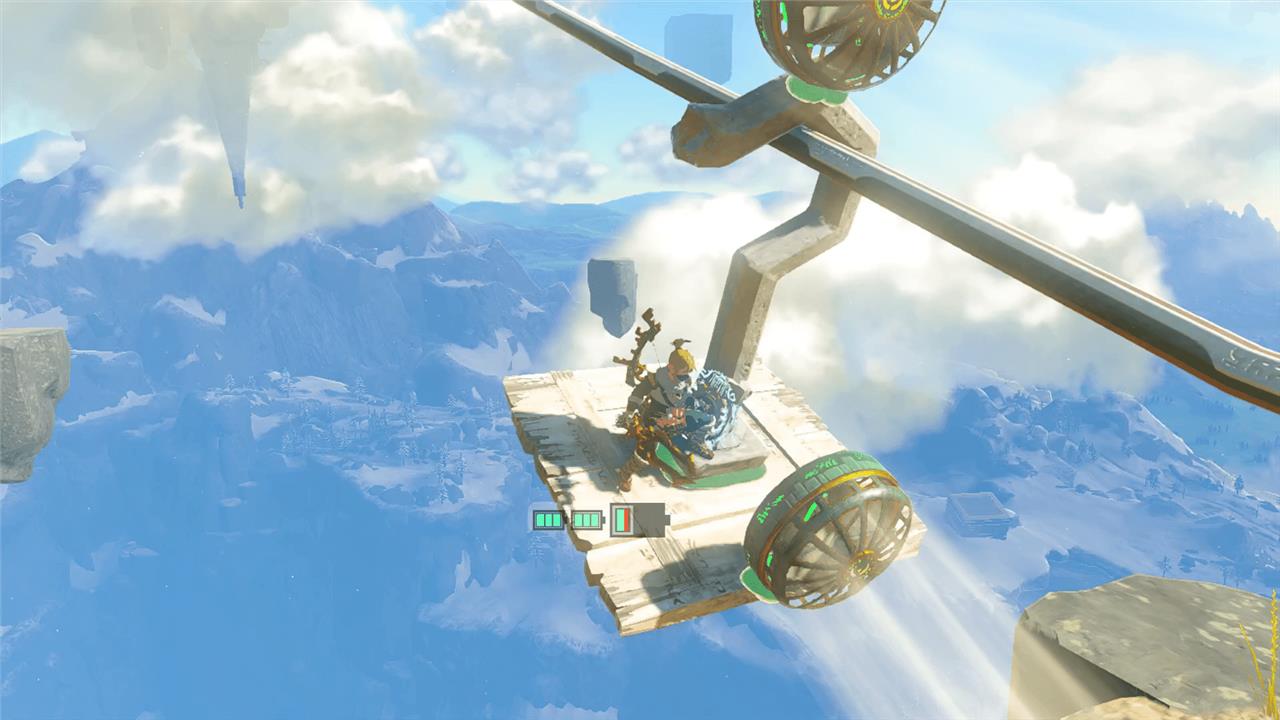
This Sage’s Will is at the end of a trail of several islands connected with broken mine cart tracks. The islands themselves are reachable from the surface level by swimming up a very big waterfall using the Zora armor. Once on the islands, you can attach rockets to the carts and glide off of them using Tulin’s wind ability.
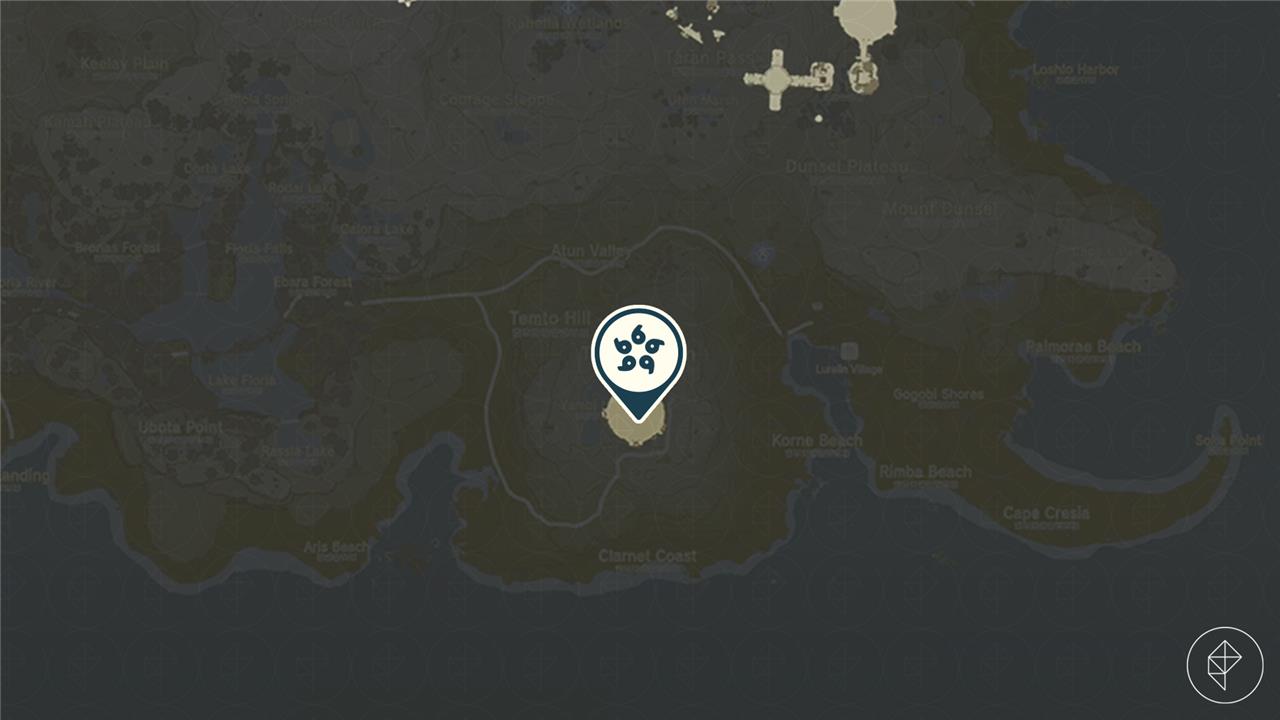
North Necluda Sky Archipelago (1934, -1063, 0961)
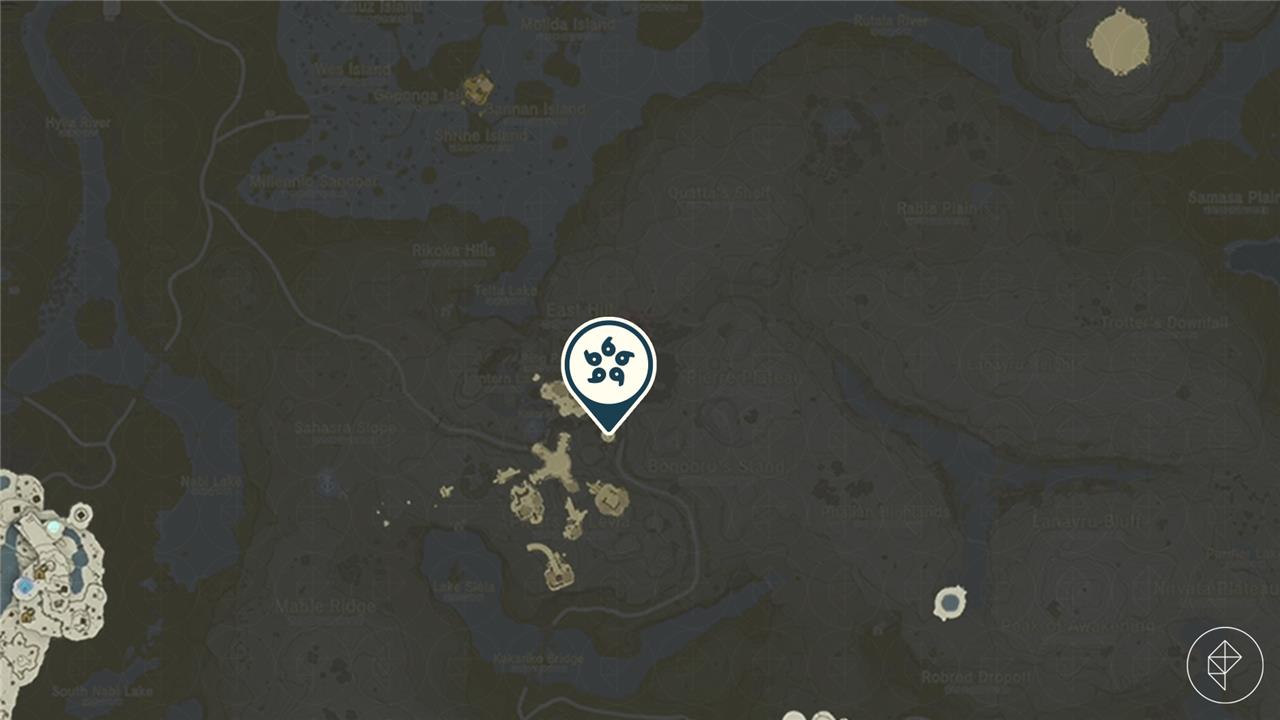
The chest with the Sage’s Will is on a small island in this archipelago that’s covered in luminous stone.
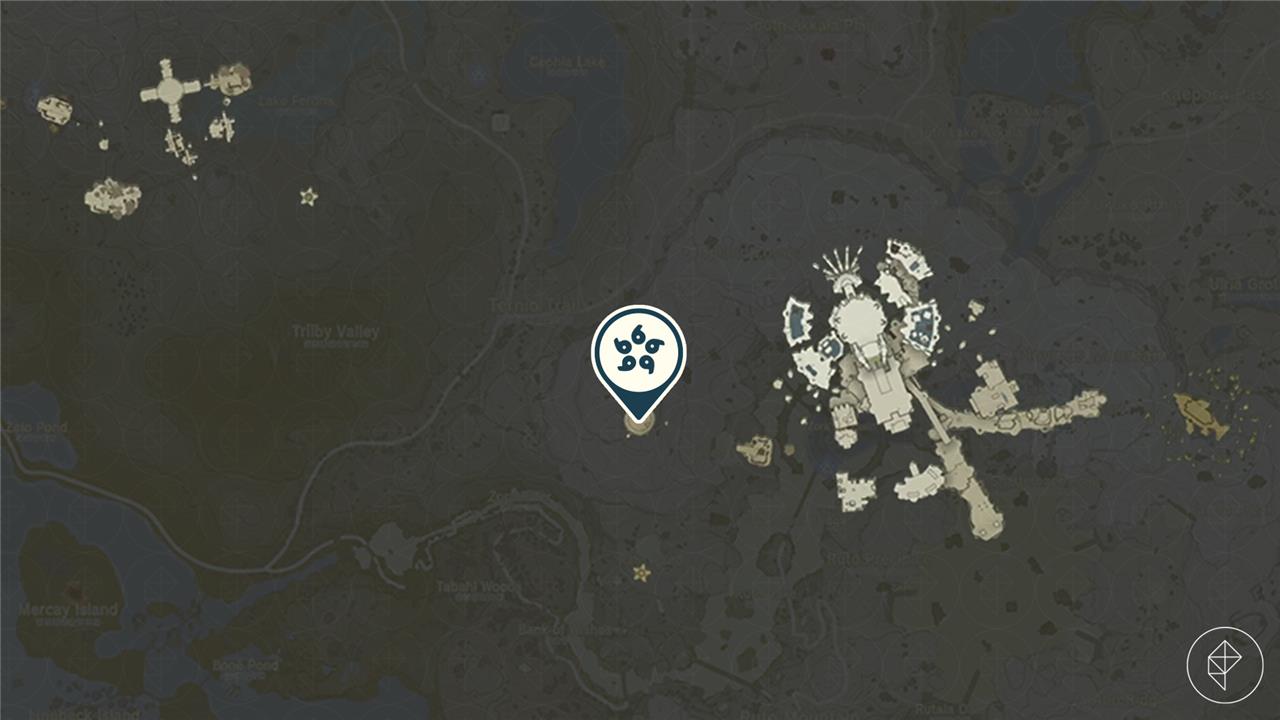
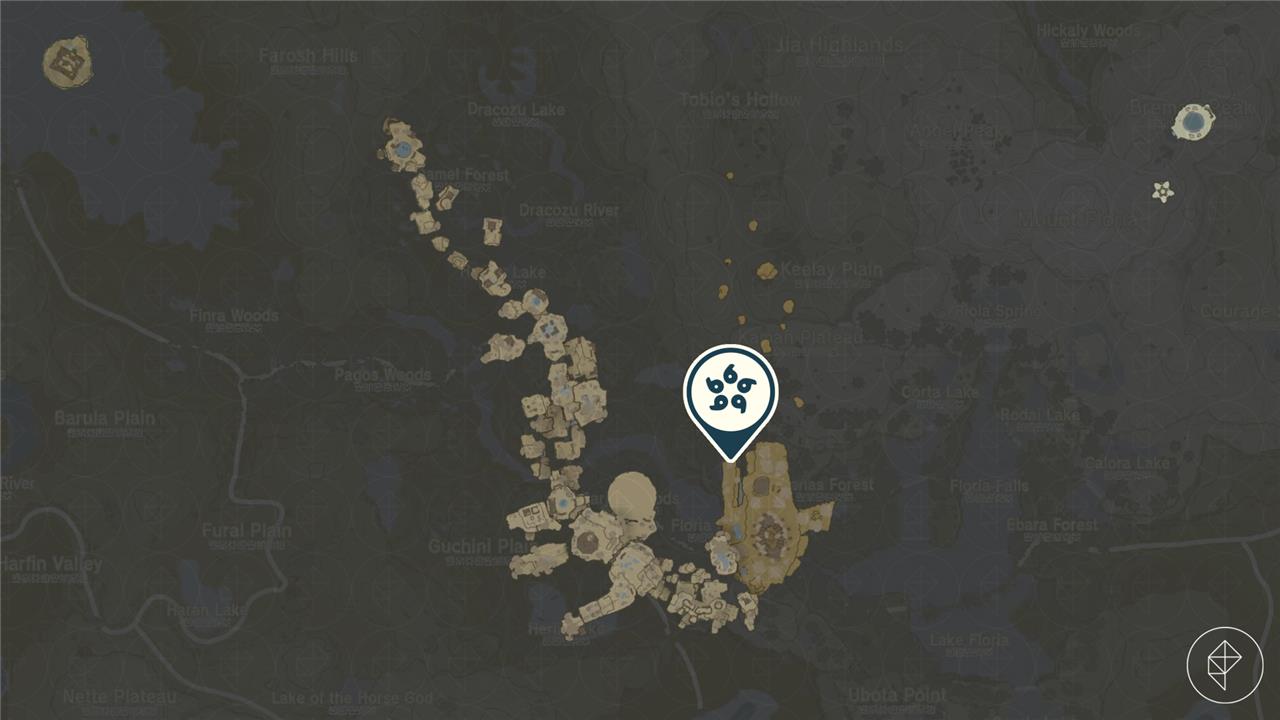
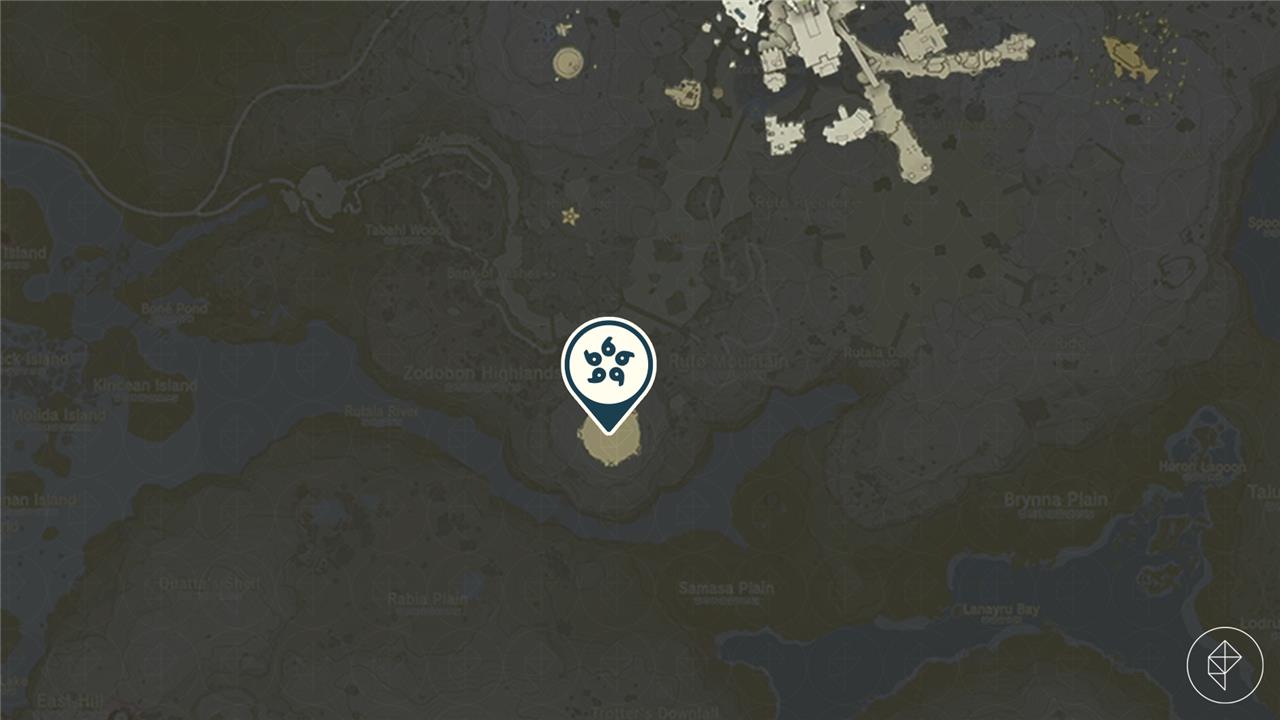
Wellspring Island (3378, 0624, 1290)
This is actually an island that’s part of the “Sidon of the Zora” quest line, and it’ll be hard to get here without doing the quest, so make sure you’ve gotten to this point before you try to fly here on your own.
The chest with the Sage’s Will is actually attached to the Flux Construct II boss here. You can just wiggle it off (the same way you detach your creations using Ultrahand), open the chest, and leave, if you don’t feel like actually fighting the boss.
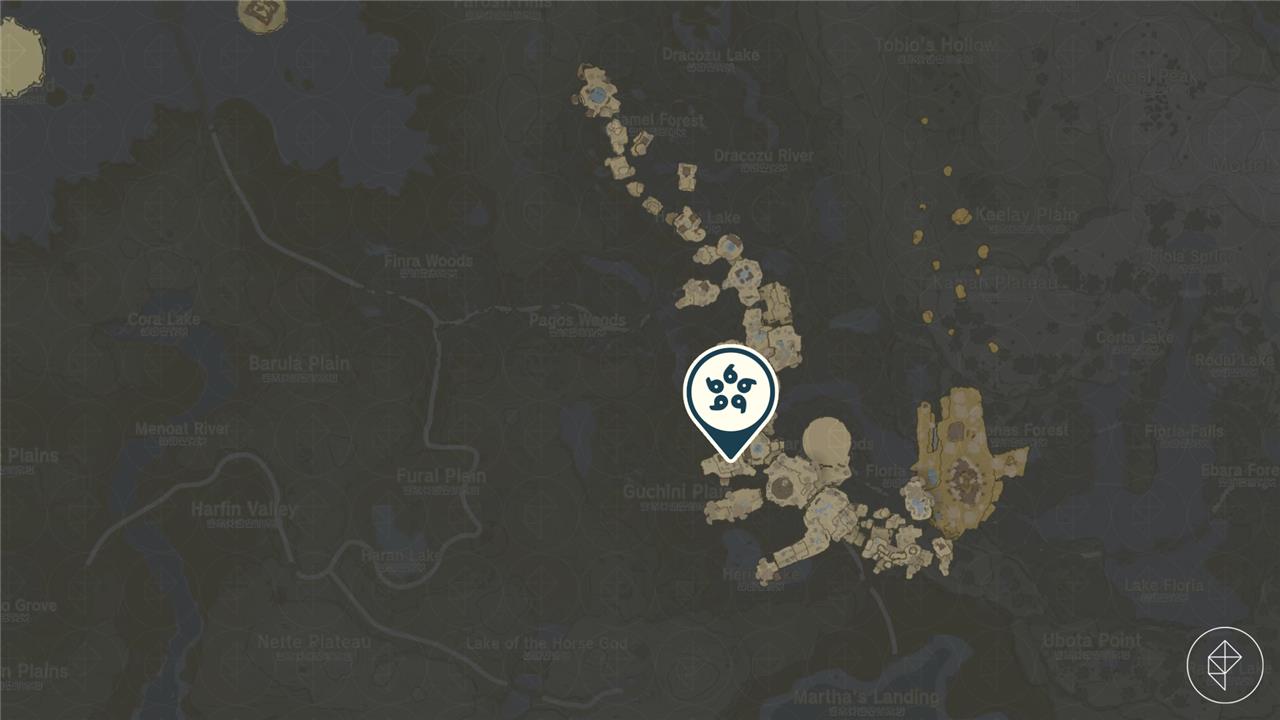
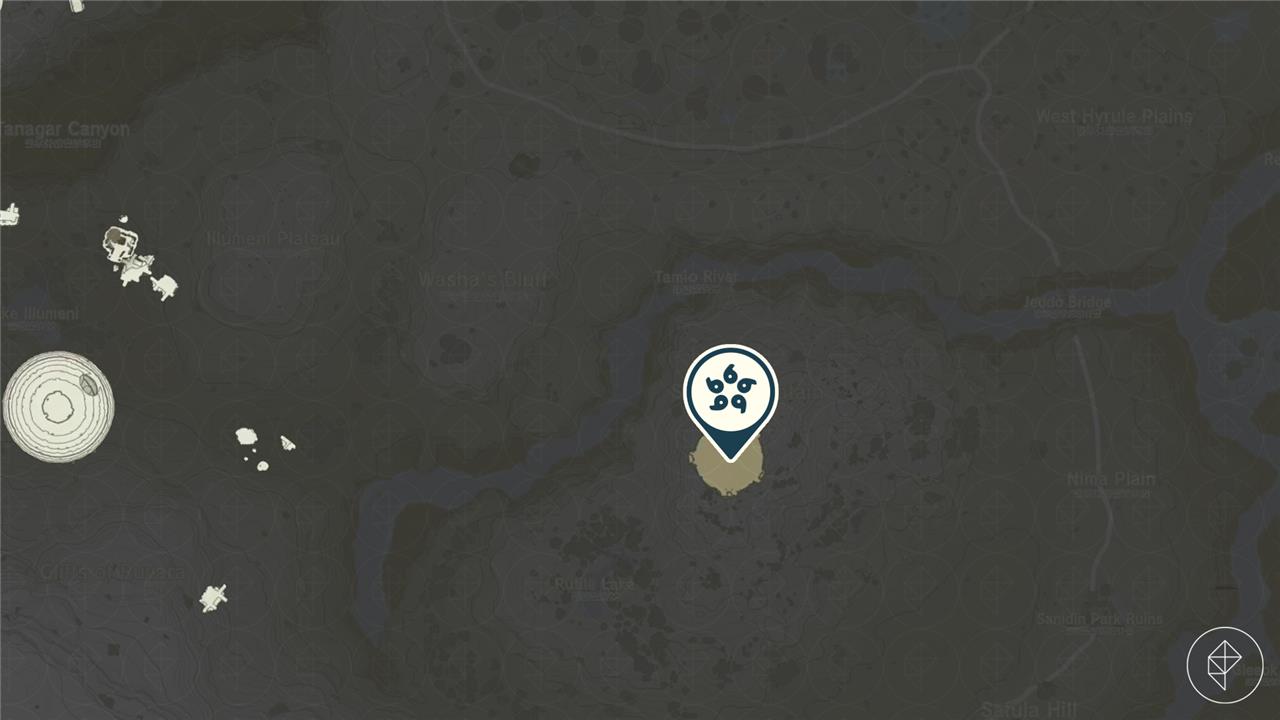
Faron Sky Archipelago (-0360, -2586, 0894)
Just like all the other Flux Construct bosses guarding Sage’s Wills, you can just yoink the chest off of this Flux Construct III, open it, and leave.
South Necluda Sky Archipelago (2567, -3612, 0894)
Again, you can choose to fight this Flux Construct III or you can Ultrahand the chest off of it, take the Sage’s Will, and leave (if you want).
Lanayru Sky Archipelago (3016, -0286, 0894)
This is another Sage’s Will stuck to a Flux Construct II. Yank the chest off with Ultrahand if you want, or fight it.
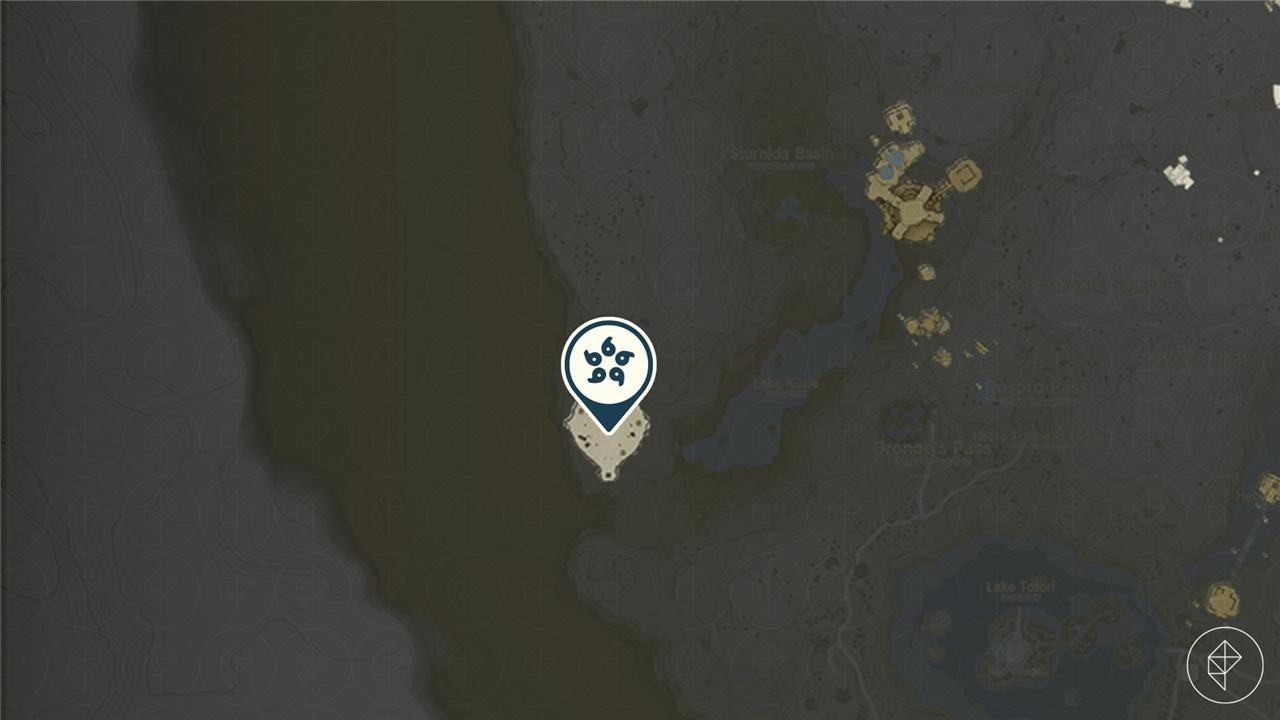
West Hyrule Sky Archipelago (-2292, -0412, 0894)
This arena island is home to another Flux Construct III boss. Detach the chest with Ultrahand, or fight the boss to your heart’s content.
West Hebra Sky Archipelago (-4470, 2175, 1252)
This island is home to a King Gleeok, which you have to defeat to open the chest behind it. The King Gleeok is a tough opponent, and if you don’t have high-level armor and weapons, it’s going to be a rough fight.
To take it out, you’ll want to use Keese eyes on your arrows to nail the heads quickly. Once all three heads are stunned, you can attack it freely. You can also take the updrafts it creates to activate Link’s bullet time with his bow and arrow, giving you a better chance to aim your shots at its head.
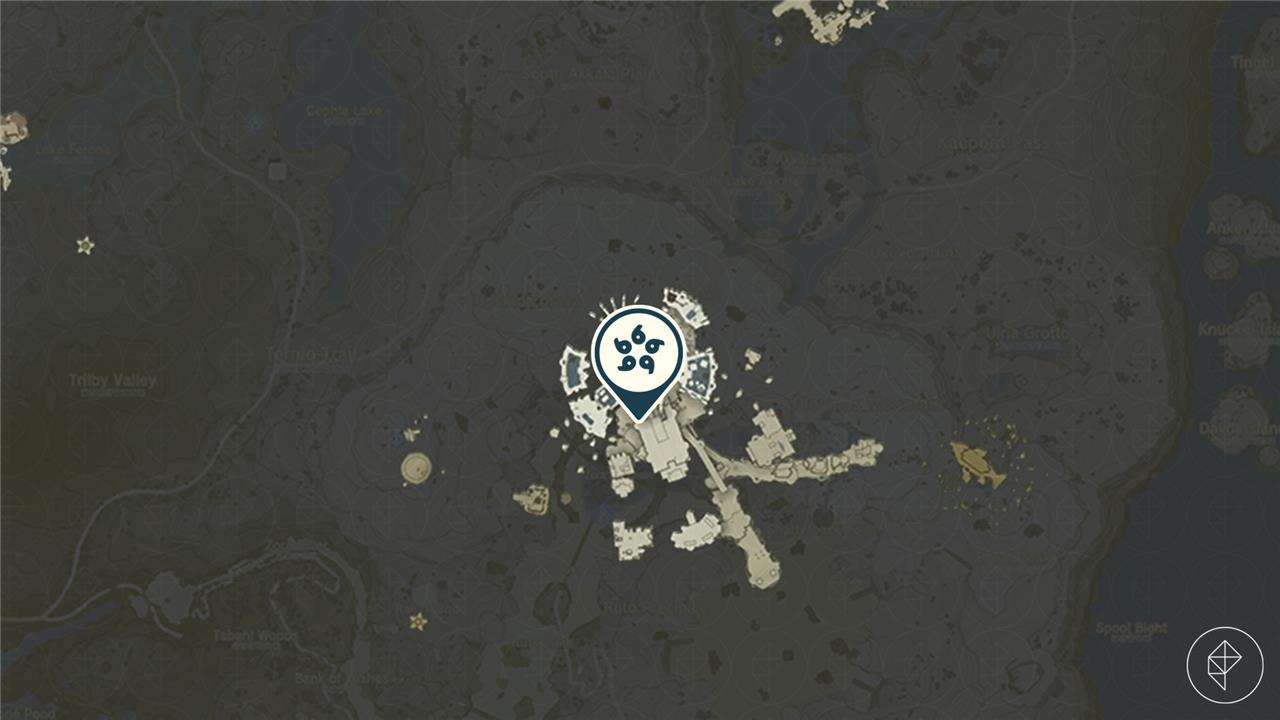
Unnamed island above Eventide Isle (4652, -3827, 1065)
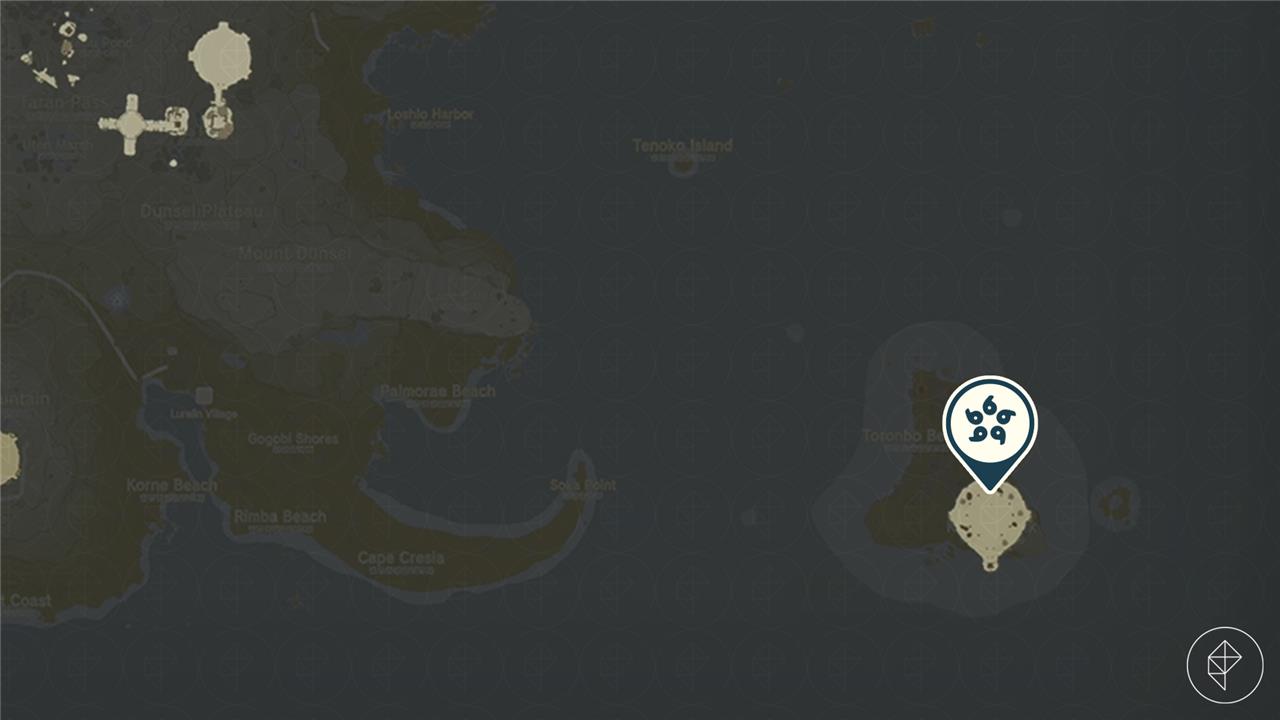
All the way in the southeast corner of Hyrule is Eventide Isle, a lone island that you will need to use some kind of high-power vehicle (either through the sky or ocean) to get to. Above it sits an unnamed sky island that’s home to yet another King Gleeok.
We made it to this island by using a flying vehicle with a large battery Zonai device attached, soaring in from the closest islands in the Necluda Sky Archipelago.
Once you reach the Gleeok, you’ll need to defeat it to get to the Sage’s Will.
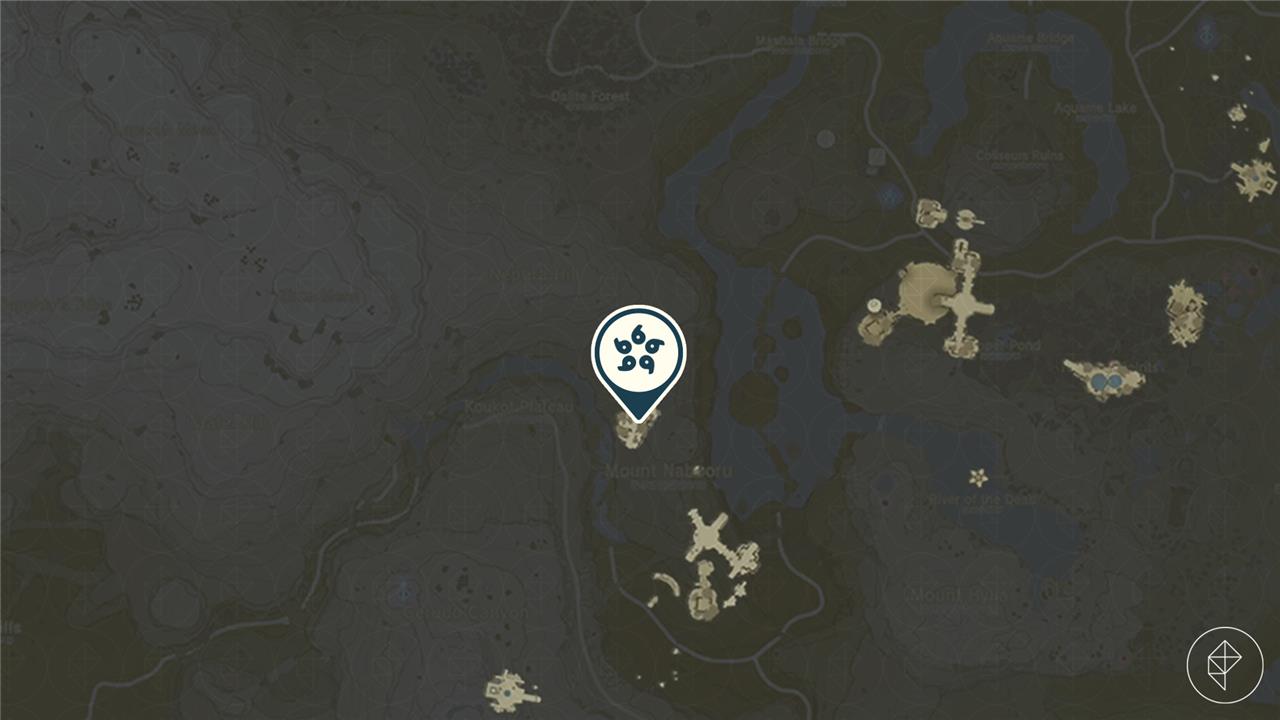
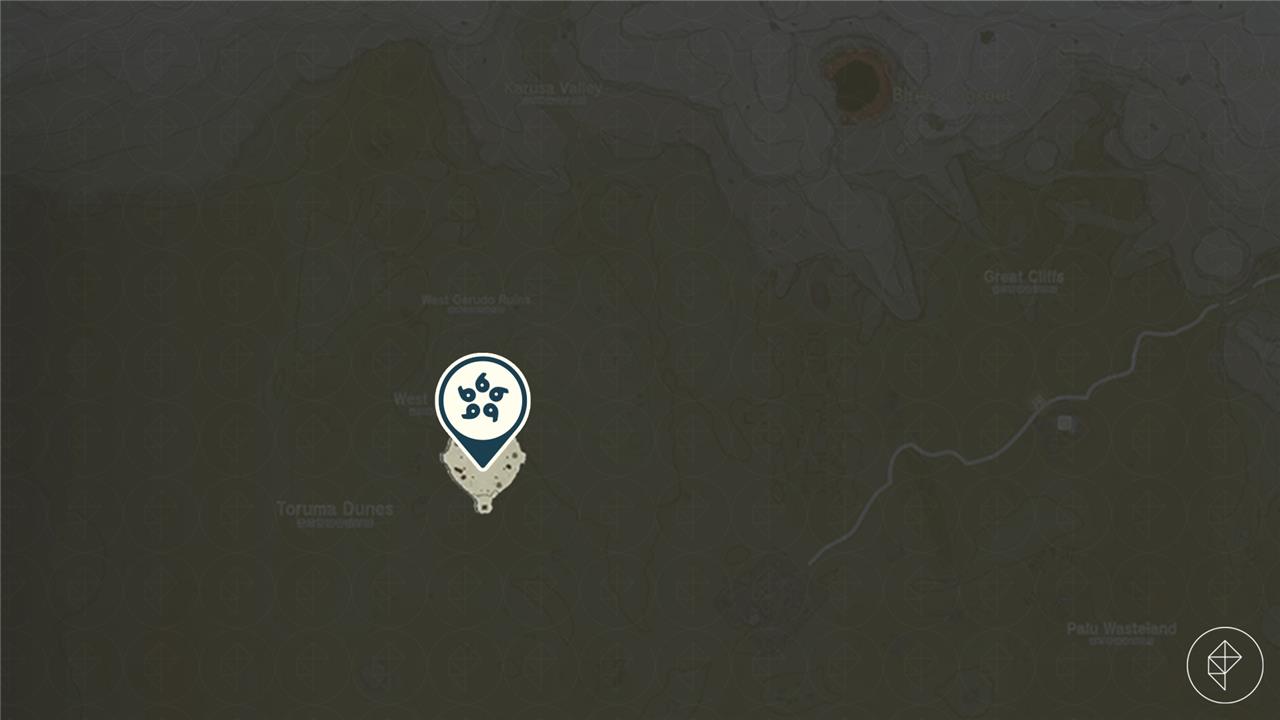
Unnamed island in Gerudo Sky (-4447, -2730, 1419)
Best order to upgrade Sages with Sage’s Wills in TOTK
The optimal order for upgrading Sages with Sage’s Wills in The Legend of Zelda: Tears of the Kingdom prioritizes utility in exploration and combat over raw damage alone. Tulin tops most lists due to his wind gust enabling longer glides across Sky Islands and Depths, making early collection easier.
Recommended Upgrade Order
Upgrades provide a 1.8x damage boost and Solemn Vow transformation, but each Sage gets only one permanent enhancement using four Wills.
-
Tulin first: Boosts his wind for traversal; headshots hit harder too.
-
Yunobo second: Roll charge excels against groups and Lynels.
-
Sidon or Riju third: Sidon’s water shield pairs well with melee; Riju’s lightning clears mobs.
-
Mineru last: Her Construct shines late-game with Zonai charges, post her unlock.
Why This Sequence
Tulin aids reaching the 20 Wills fastest, many on tough Sky Islands with bosses like King Gleeok. Later Sages benefit combat more once accessible; pair with Champion helmets for temporary double boosts. Adjust for playstyle-swap Sidon early if swimming often.
Best sage upgrade order for combat in Tears of the Kingdom
Upgrading Sages for combat in The Legend of Zelda: Tears of the Kingdom focuses on their damage output, attack frequency, and synergy with Link’s weapons. Prioritize ranged attackers like Tulin and Riju first, as their abilities hit weak spots and clear groups effectively after the 1.8x Solemn Vow boost.
Recommended Combat Order
Each Sage receives one permanent upgrade using four Wills at a Goddess Statue, amplifying their AI-driven attacks.
| Priority | Sage | Key Combat Strength |
|---|---|---|
| Tulin | Rapid-fire arrows target weak spots for massive DPS | |
| Riju | Lightning AOE stuns and shreds mobs | |
| Yunobo | Roll and hammer knockups enable combos | |
| Sidon | Water shield orbs for melee defense | |
| Mineru | Mech fusions scale late-game with Zonai |
Combat Optimization Tips
Stack upgrades with Champion helmets for temporary double buffs, pushing Tulin’s bow to 50+ damage per volley. Use Riju on open fields for chain lightning; Yunobo excels against Lynels via stagger. This order maximizes clearspeed in shrines, Depths, and bosses.