Mask Shards are the key to surviving Silksong’s brutal challenges, each one edging Hornet closer to greater resilience. This guide reveals every shard’s hiding place-from hidden alcoves beneath mossy ruins to treasures guarded by ruthless foes.
All Hollow Knight: Silksong mask shard locations
Mask Shards in Hollow Knight: Silksong are hidden pieces that increase Hornet’s health by forming new masks once enough are collected. Each shard is tucked away in challenging areas or behind puzzles, requiring careful exploration and skill to reach. This guide lists every location, detailing how to find them, the obstacles you’ll face, and what abilities may be needed to access each shard.
There are 20 mask shards for you to find in Hollow Knight: Silksong, which means you can increase your total health to ten masks. As Silksong is a nonlinear game, we’ve listed out the most likely order that you’ll run into each of these mask shards. Below, you’ll find the location of each mask shard and what abilities you’ll need to reach them.
Mask shard #1 – Bone Bottom
Hidden deep beneath the Marrow pits, the first Mask Shard rests among a heap of brittle bones and hollow shells. To reach it, descend through the Bone Bottom caverns, where fragile platforms crumble underfoot and lurking crawlers guard the narrow paths. Players must time their jumps carefully and use the shifting bone piles to reach a small alcove at the cavern’s base. There, the shard glows faintly beside a cracked idol, half-buried in dust.
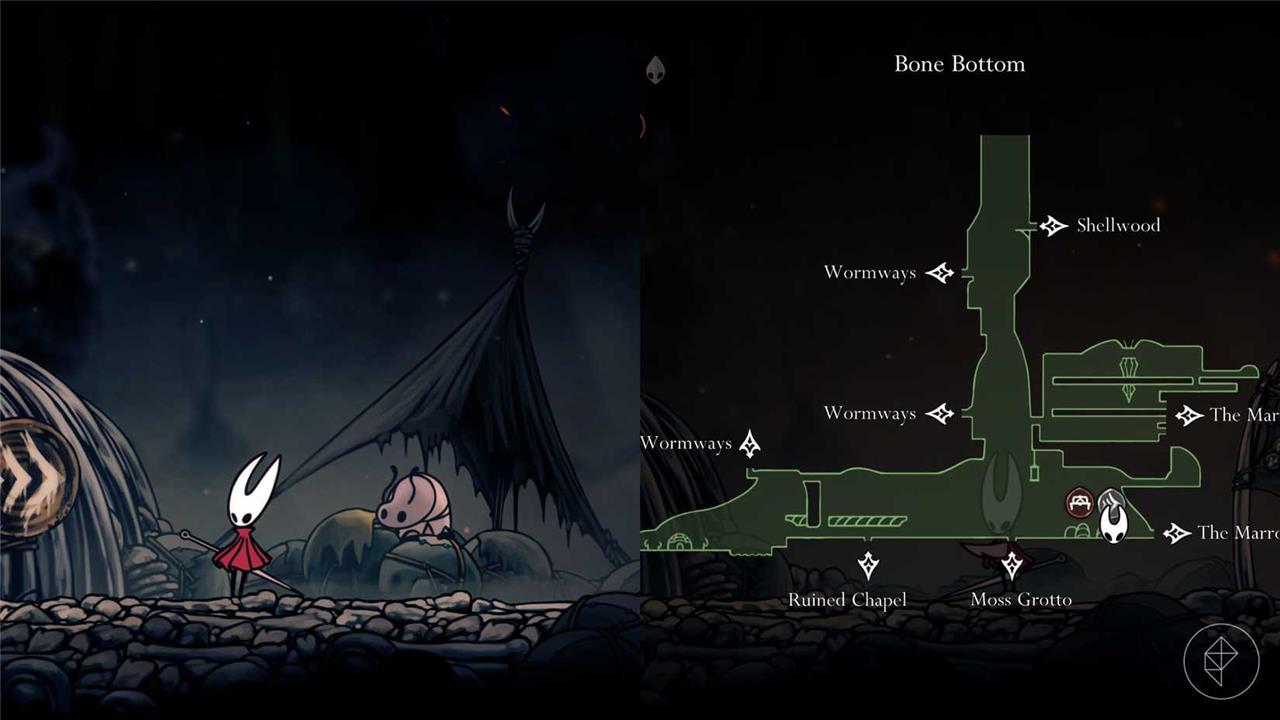
The first mask shard can be purchased from Pebb in Bone Bottom for 300 rosaries.
Mask shard #2 – Wormways
Hidden deep within the twisting tunnels of the Wormways, this shard rests behind a narrow passage blocked by brittle roots. Use the new traversal ability gained in the area to reach the upper ledge, then defeat the armored larvae guarding the chamber. Breaking the crystal pod reveals Mask Shard #2, rewarding careful exploration through the caverns’ winding paths.
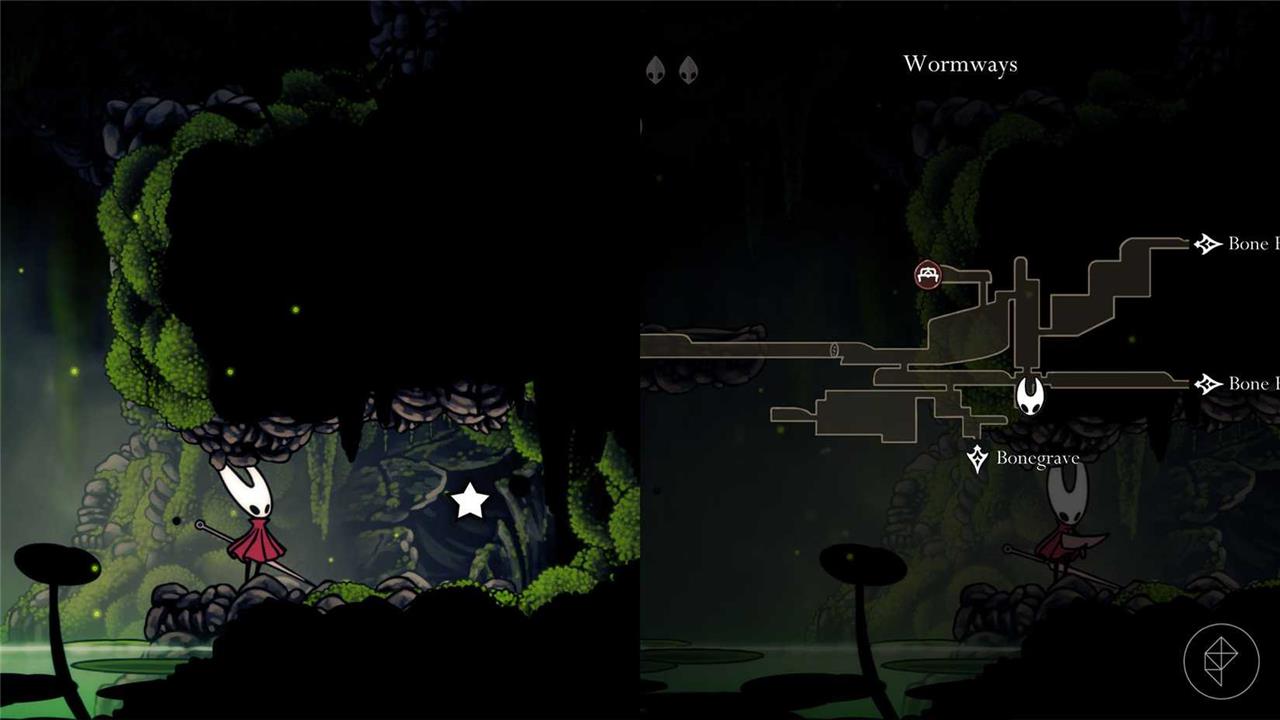
For this mask shard, you’ll need to unlock the Swift Step abilityin the Deep Docks. Afterward, make your way to the left end of Mosshome, just beside the hanging cages. Dash jump across to the other side and sprint across the long corridor with the huge acid-spitting bug. Go through the exit on the left to find yourself at a locked door. Rather than open it, drop down the hole below and break the destructible wall on the right. Inside, you’ll find a mask shard.
Mask shard #3 – Far Fields
Across the Far Fields, you’ll find Mask shard #3 tucked behind a wind-swept ledge, guarded by a subtle platforming path that rewards careful timing and precise jumps.
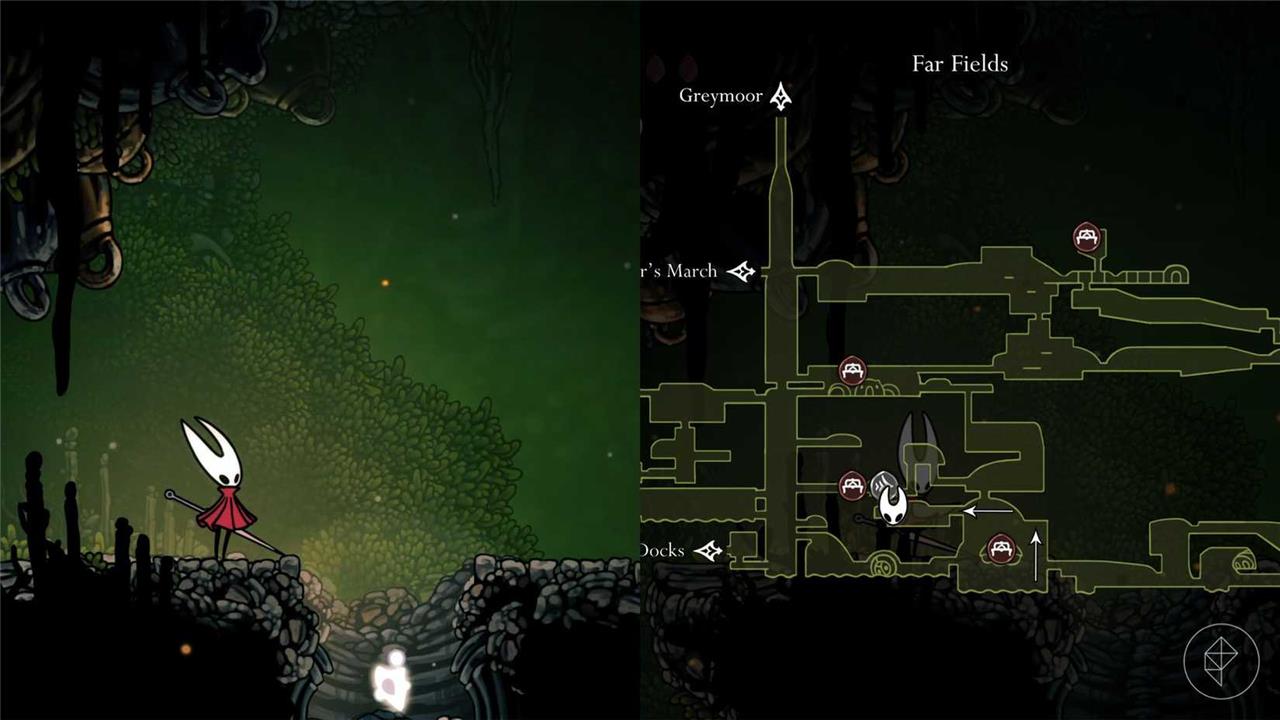
For this mask shard, you’ll need to unlock the Drifter’s Cloak by completing the “Flexile Spines” quest in Far Fields. Afterwards, head to the right of the Seamstress’ house and ride the air currents upward. In this section, you’ll find stone platforms with air currents and explosive rocks. Make sure to hit the explosive rocks to release more air currents, and glide your way to the opposite side. Head into the room and hit all of the explosive rocks inside to reveal a mask shard hidden in the ground.
Mask shard #4 – Shellwood
Hidden deep within Shellwood’s dense undergrowth, this shard rests behind a breakable wall guarded by a group of Mossfly Sentinels. After clearing them out, use the wall-jump ability to reach a narrow ledge above a pool of acid. The Mask Shard sits at the end of the path, faintly glowing among the roots-a small reward for those who explore every corner of this overgrown area.
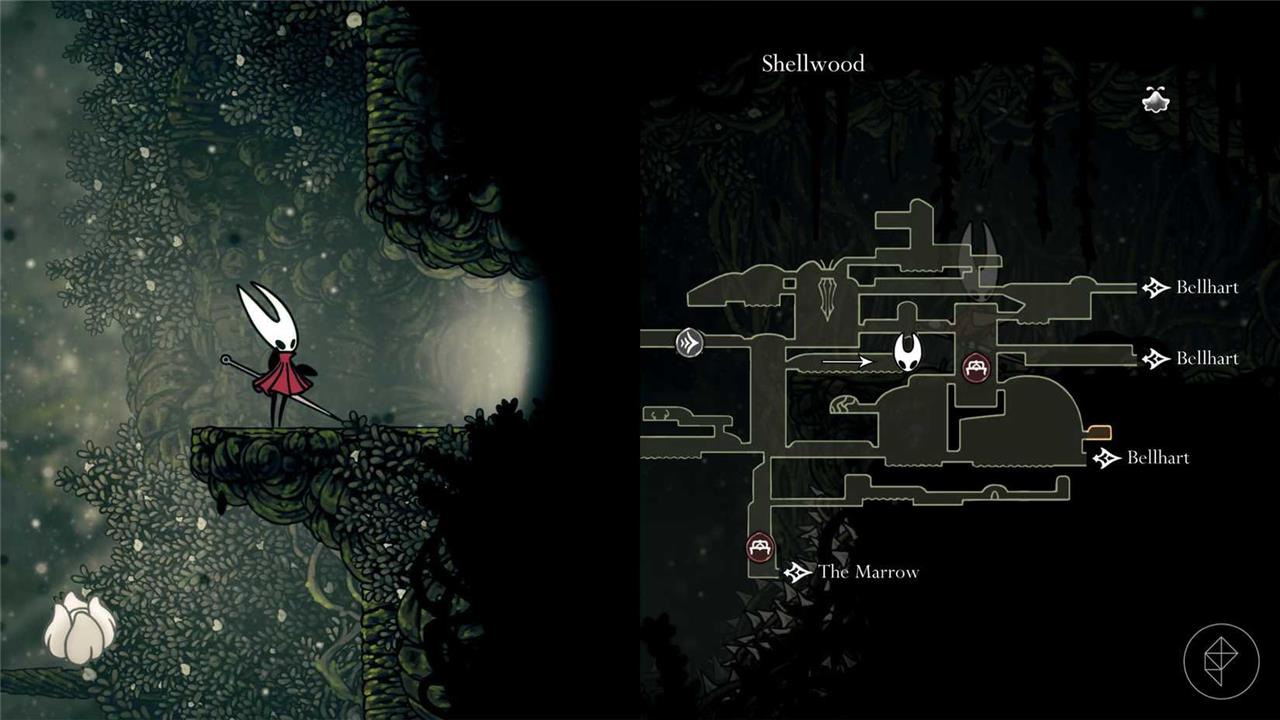
Starting from the Shellwood Bellway station, head right into the next room. The path downward is split into two sections: left and right. Glide over to the path on the right, and you’ll find an exit directly at the top of the path. Go inside and use your platforming skills to pogo your way across the enemies and plants ahead. At the end of the path, you’ll find a mask shard.
Mask shard #5 – Deep Docks
Hidden deep within the flooded chambers of the Deep Docks, Mask Shard #5 rests behind a series of narrow tunnels patrolled by mechanical sentries. Reaching it requires careful timing to avoid crushing gears and a precise leap across collapsing platforms above steaming vents. A faint glimmer marks the shard’s resting place on a rusted platform near an old lift mechanism, rewarding players who brave the dock’s lethal machinery with another piece of precious protection.
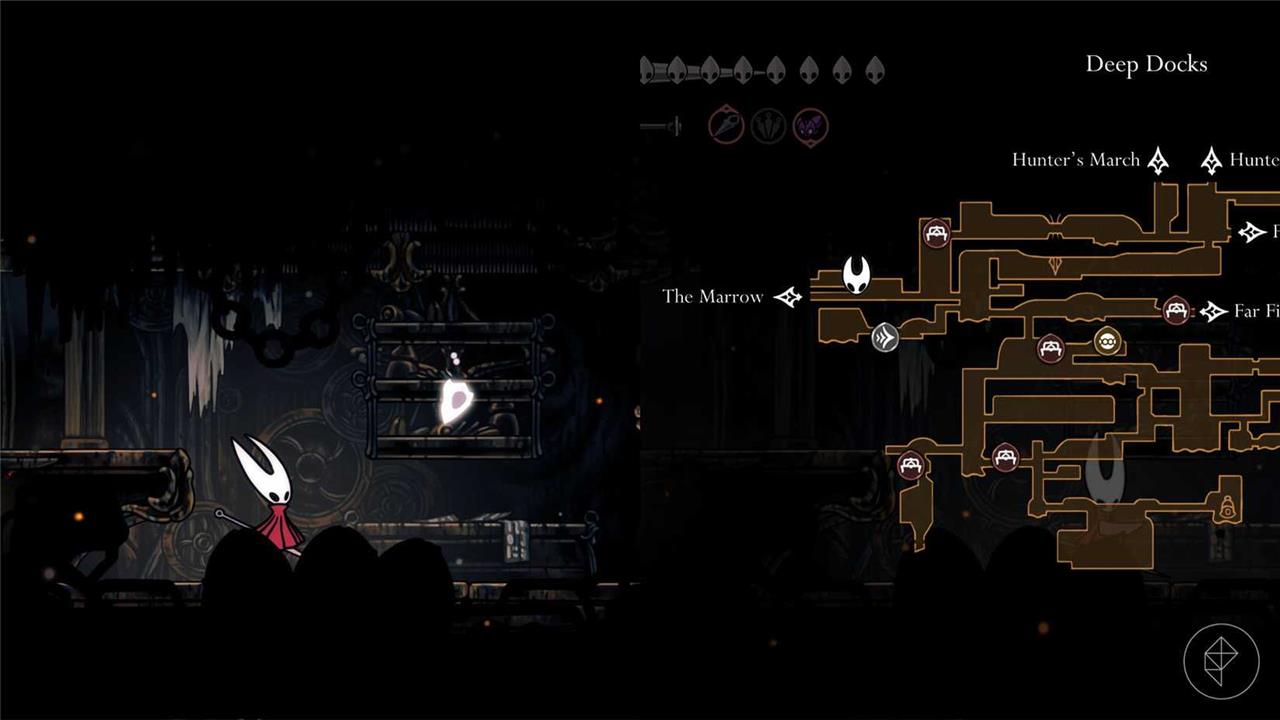
You’ve probably seen this mask shard as you rode the elevator up to the bench as soon as you entered the Deep Docks, but you can only grab this mask after you’ve unlocked the Cling Grip ability. This mask shard is found in the Deep Docks, but you’ll actually need to start in The Marrow. Make your way to the left side of the bottom right room of The Marrow, but don’t drop all the way to the bottom. Instead, take the upper path and continue to the right to find a vertical wall that you can climb. Jump across the platforms to the right to enter the Deep Docks, where you’ll encounter a gauntlet of enemies. After you defeat them, continue to the right to collect the mask shard.
Mask shard #6 – Weavenest Alta
Hidden in the upper sections of Weavenest Alta, this shard rests behind a high wall covered in sticky threads. Use the area’s silk platforms to reach a small outcropping guarded by a group of Weaverlings. Defeat them carefully, then use a midair dash to grab the shard from a narrow alcove above the arena. The climb can be tricky, but the reward is worth the risk for those seeking more health.
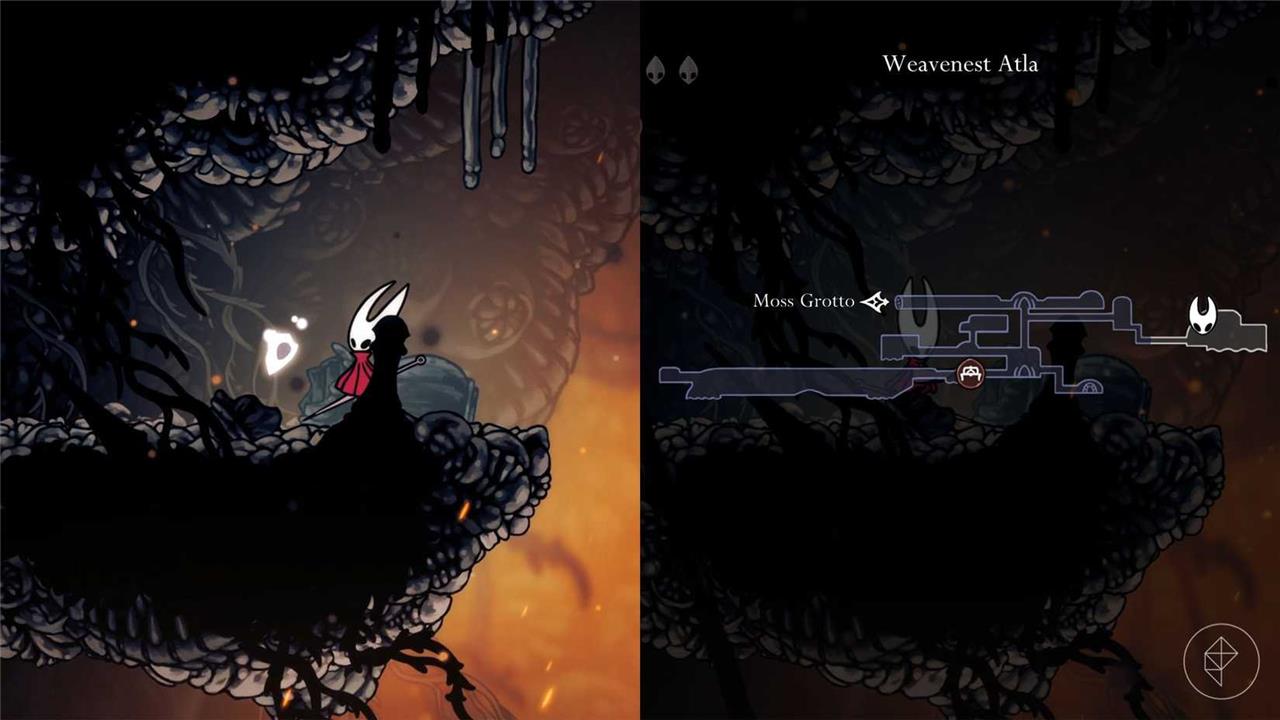
After unlocking the Needolin, return to the bottom right corner of Moss Grotto to find a door with a weaver’s face etched onto it. Play your Needolin to unlock the door and head inside. Power up Weavenest Alta by hitting the two silk spools in the far right room, and return to the glowing platform in the center of the hallway. If you step on it, you’ll be teleported to the bottom of Weavenest Alta. Use Cling Grip to jump up the wall on the right and onto the platform to your left. Climb up the open shaft and enter the first opening on your right. This will take you to a secret area of Weavenest Alta where your pogo skills will be put to the test.
After you make it past the lava and pogo challenge, you’ll find a mask shard in the top left corner of the room.
Mask shard #7 – Cogwork Core
The Cogwork Core shard sits behind a rotating set of gears in a hidden mechanism room, requiring careful timing to align the platforming sequence and open the final grate.
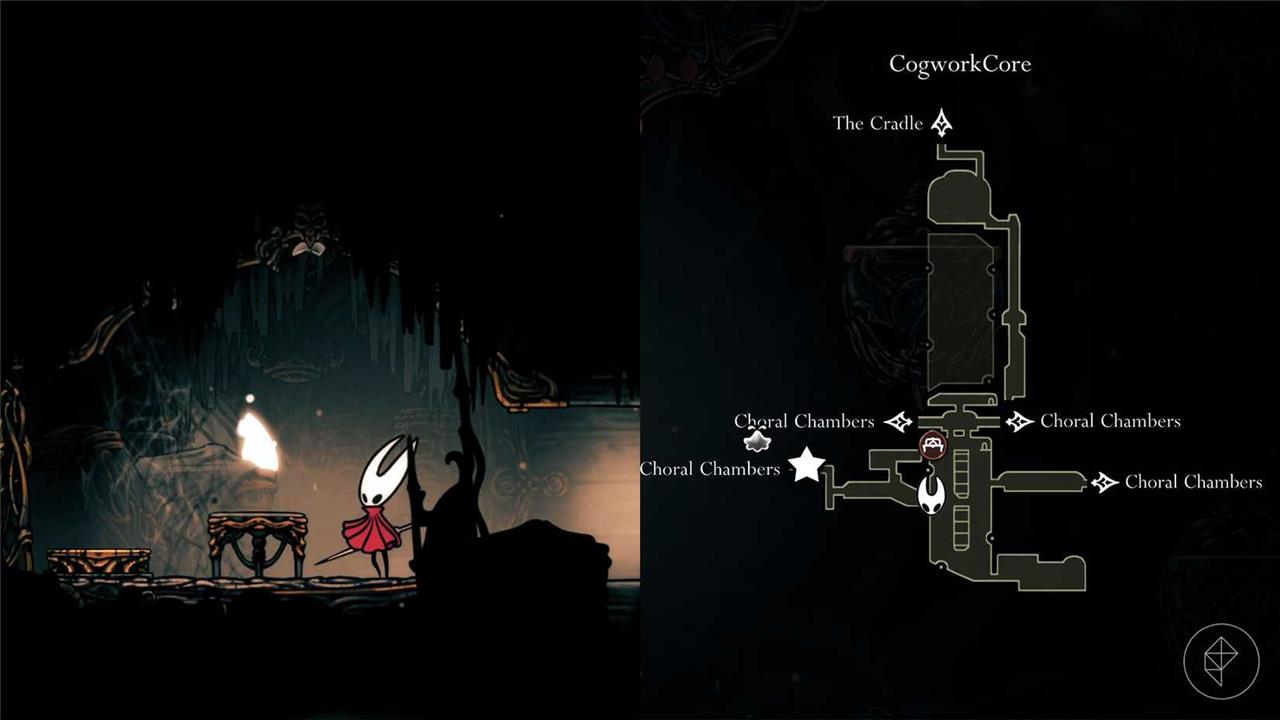
To get this mask shard, you’ll first need to defeat the Cogwork Dancers in the Cogwork Core in Act 2. After you defeat them, drop into the holes below and carefully descend your way through the spinning cog death trap. On your way down, look for an exit on your left. This will take you through more spinning gears and a gauntlet of robots. After you defeat the waves of enemies, hit the switch on the left and follow the path upward to find a mask shard.
Mask shard #8 – First Shrine in Songclave
Hidden within the First Shrine in Songclave, this mask shard rests behind a series of echoing platforms and singing sentinels. Players must use precise timing to move through shifting sound traps that trigger with each note of the shrine’s tune. A concealed alcove near the final bell chamber holds the shard, rewarding careful observation and mastery of the area’s rhythm-based mechanisms.
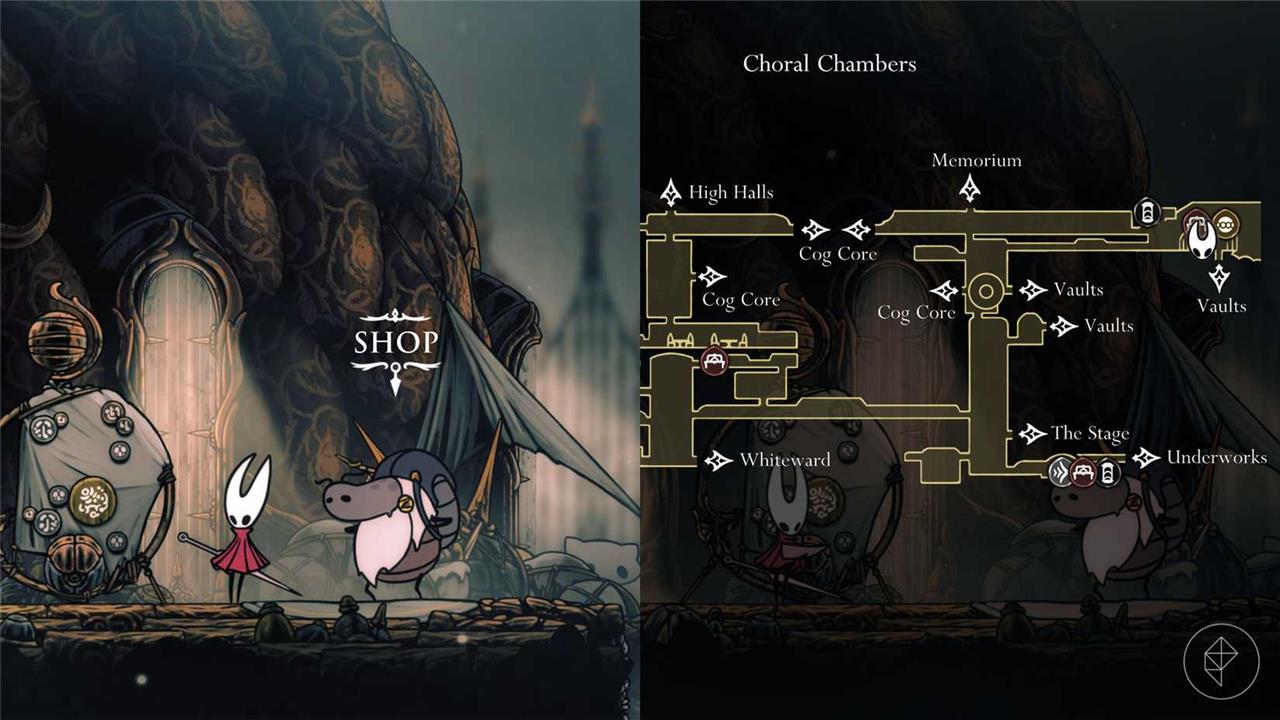
A mask shard can be purchased from Jubliana at the First Shrine in Songclave for 750 rosaries. However, to find Jubliana at the First Shrine, you’ll first need to complete the “The Wandering Merchant” quest, which is found on the wishboard nearby. After you complete the quest, she’ll make her way to the First Shrine and stand beside the wishboard.
Mask Shard #9 – Savage Beastfly Grand Hunt
A Mask Shard rests within the Savage Beastfly Grand Hunt, hidden deep in a hive-like battleground swarming with aggressive flyers. To claim it, players must defeat waves of Beastflies led by a massive matriarch that charges and summons reinforcements. Timing dodges and striking between its lunges is key, as wide attacks leave little room for mistakes. Once the swarm is subdued, the shard appears at the center of the arena, marking a hard-won reward for those who survive the chaos.
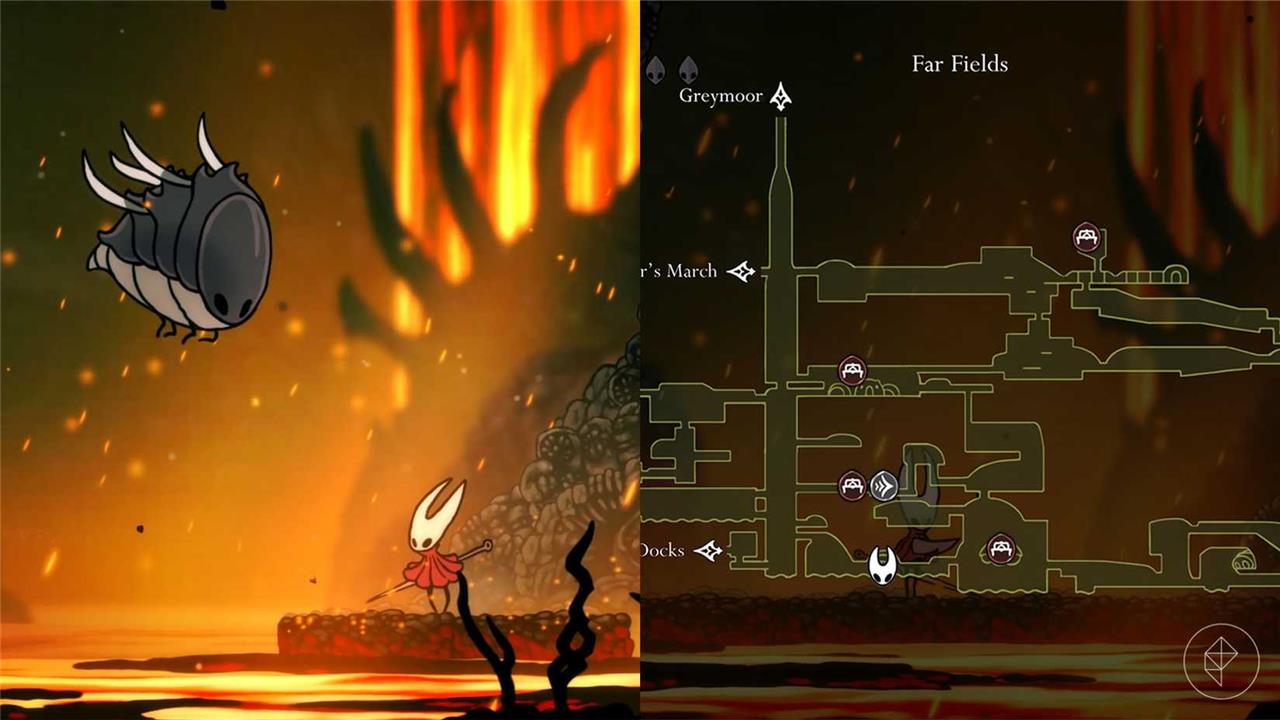
To unlock this mask shard, you’ll need to complete the following prerequisites:
- “The Threadspun Town” quest in Bellhart
- Defeat the Savage Beastfly in the Chapel of the Beast in Hunter’s March
- Defeat the Cogwork Dancers in Cogwork Core
Afterward, return to Bellhart to find the Savage Beastfly Grand Hunt on your wishboard. You’ll find the Savage Beastfly in the same area you fought against the Fourth Chorus in Far Fields. After you defeat them, return to the Bellhart wishboard to earn a mask shard as a reward.
Mask shard #10 – Whispering Vaults
Hidden deep within the Whispering Vaults, this shard waits behind layers of echoing machinery and shadowed passageways. To reach it, light the dormant spires scattered through the chamber and follow the pulsing resonance they create. The final corridor houses a silent guardian that tests your timing and precision-defeat it to claim this shard piece.
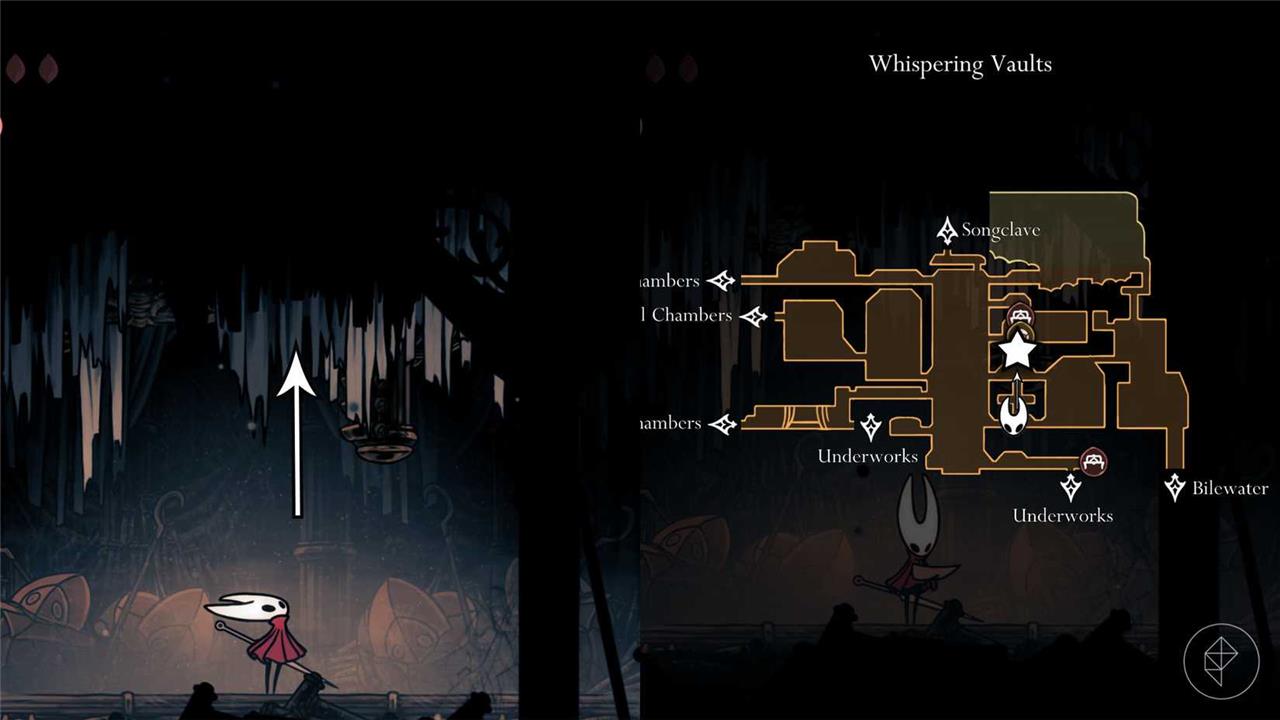
Head to the hallway just one layer above the very bottom (if you’ve gone through the Underworks), to find a suspicious object hanging from the ceiling. Hit it to release it, which will reveal a hole that you can climb up. As you proceed up, hit the ceiling to push the wooden block upward and continue jumping up the wall. Make your way to the very top to find a mask shard.
Mask shard #11 – Far Fields
Hidden deep in the Far Fields, this Mask Shard rests inside a weathered watchtower surrounded by swaying reeds and wandering sentries. To reach it, players must ride the wind currents between crumbling platforms and use precise timing to avoid the patrolling archers. A small bell mechanism inside the tower reveals a secret alcove where the shard waits, shimmering faintly against the fading light.
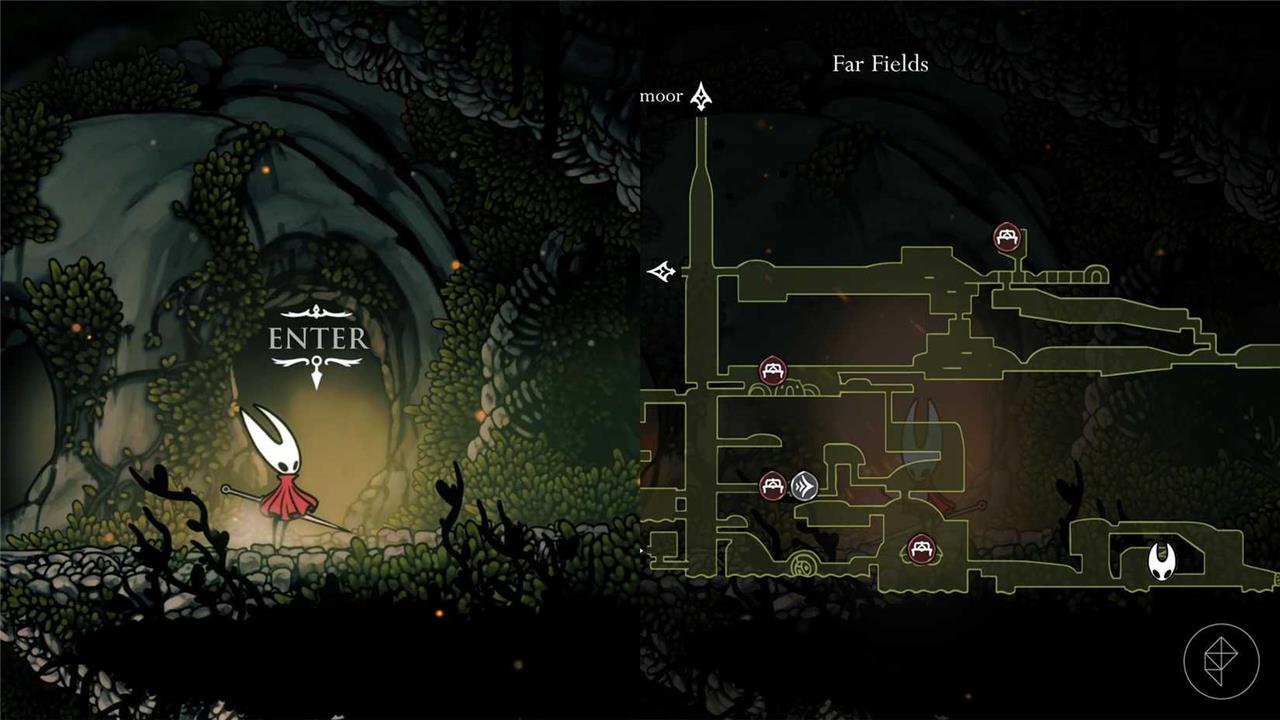
In the bottom right region of Far Fields, you’ll find a house that seems to be unreachable and a few hanging rings. Use your Clawline to grapple to the rings and jump up to the house. Once inside, the doorway behind you will cave in, making the hole in front of you the only way to go. Carefully glide down the hole and avoid all of the spikes until you reach a room with an explosive rock. Before you hit this rock, you should know that it will make the floor disappear and reveal a bed of lava and two destructible platforms. To make things worse, you’re going to have to battle your way through a gauntlet of enemies with only the two platforms and the walls to aid you. We recommend getting the Cogfly so you can focus on dodging, and using the Magma Bell just in case you fall into the lava.
After you successfully complete the gauntlet, the lava will start to rise and you’ll have to outrun the lava as you platform your way back to the top. If you fail and perish in the process, you will have to start over from the beginning – gauntlet and all. At the top, you’ll find a mask shard waiting for you.
Mask shard #12 – Mount Fay
In Mount Fay, Mask Shard #12 sits directly above the “Mount Fay” label on the map during a parkour sequence over frozen water. Knock down the nearby square platform into the water below, stand on it, and perform Silk Soar to launch upward into the hidden area containing the shard. This spot demands precise timing and traversal skills like Silk Soar to access from the lower frozen section.
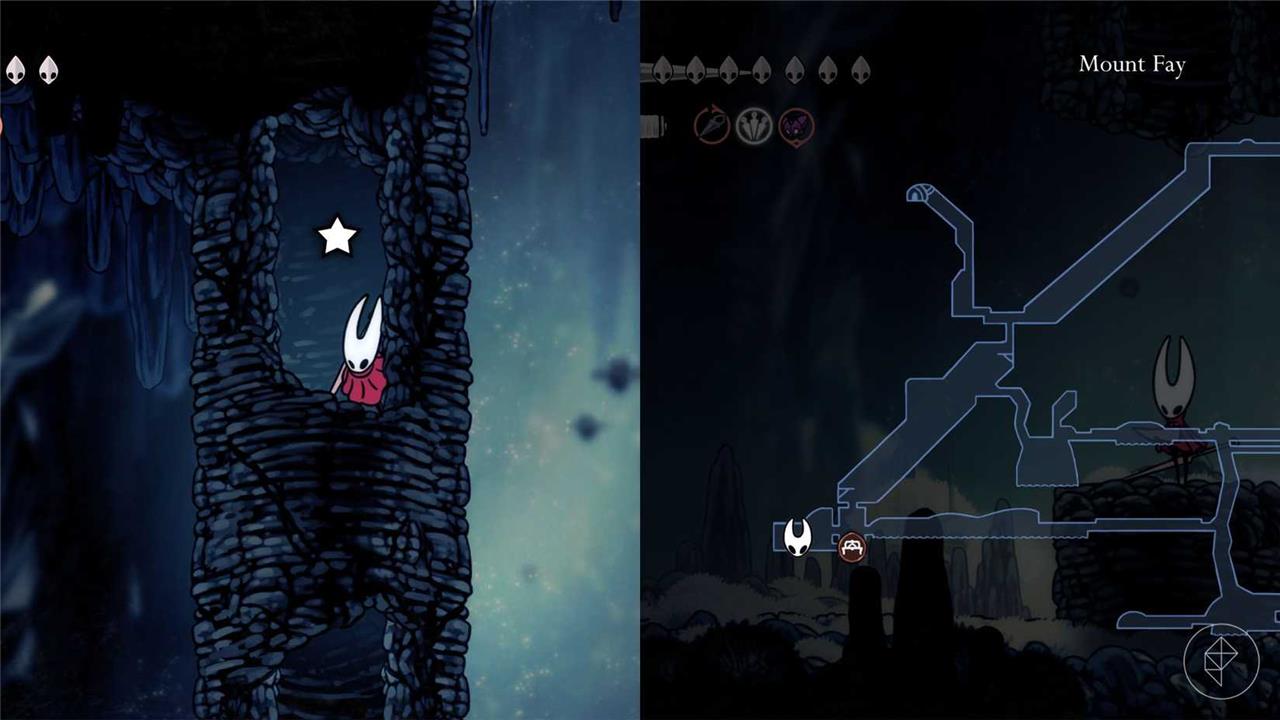
The mask shard in Mount Fay can be collected after you unlock the Faydown Cloak at the top of the mountain. Afterward, slide down the snowy mountainside and hop over the spikes until you reach the bottom left corner of the area. In this room, you’ll find a hollow pillar that you can double jump into, which just so happens to contain a mask shard.
Mask shard #13 – Blasted Steps
From the broken platform after the explosion, drop down the right side and hug the wall while falling. Land on the small ledge below to grab Mask shard #13. Watch for the blast hazards above that can knock you off course.
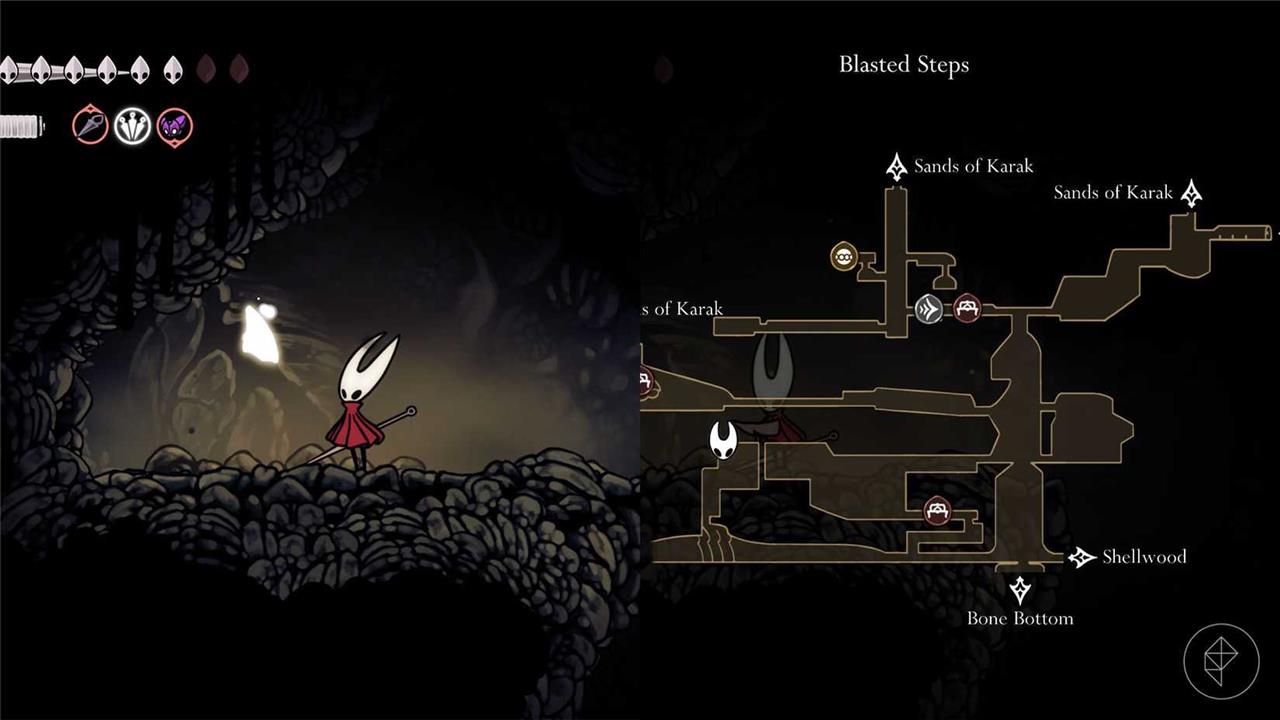
The mask shard in the Blasted Steps will require Clawline and Faydown Cloak. Make your way to the bottom left corner of the Blasted Steps and stop on the last stone platform on the ground. If you see platforms in the air, you’ve gone too far. From the stone platform, sprint jump to the left, use your Clawline midair, and double jump using your Faydown Cloak to reach the platform above. To reach the next platform, you’ll have to do something similar. Sprint jump off, use your Clawline, and glide over to land on the platform.
Proceed upward to enter another room with more bugs crawling up and down the walls, rocks falling from the ceiling, and spikes on the floor. Cautiously navigate your way through the room to find a mask shard in the top left corner.
Mask shard #14 – Wisp Thicket
In Mask shard #14 – Wisp Thicket, you’ll uncover the shard tucked beneath a fallen log near a cluster of glowing wisps, guarded by an evasive foe that lingers between the shadows.
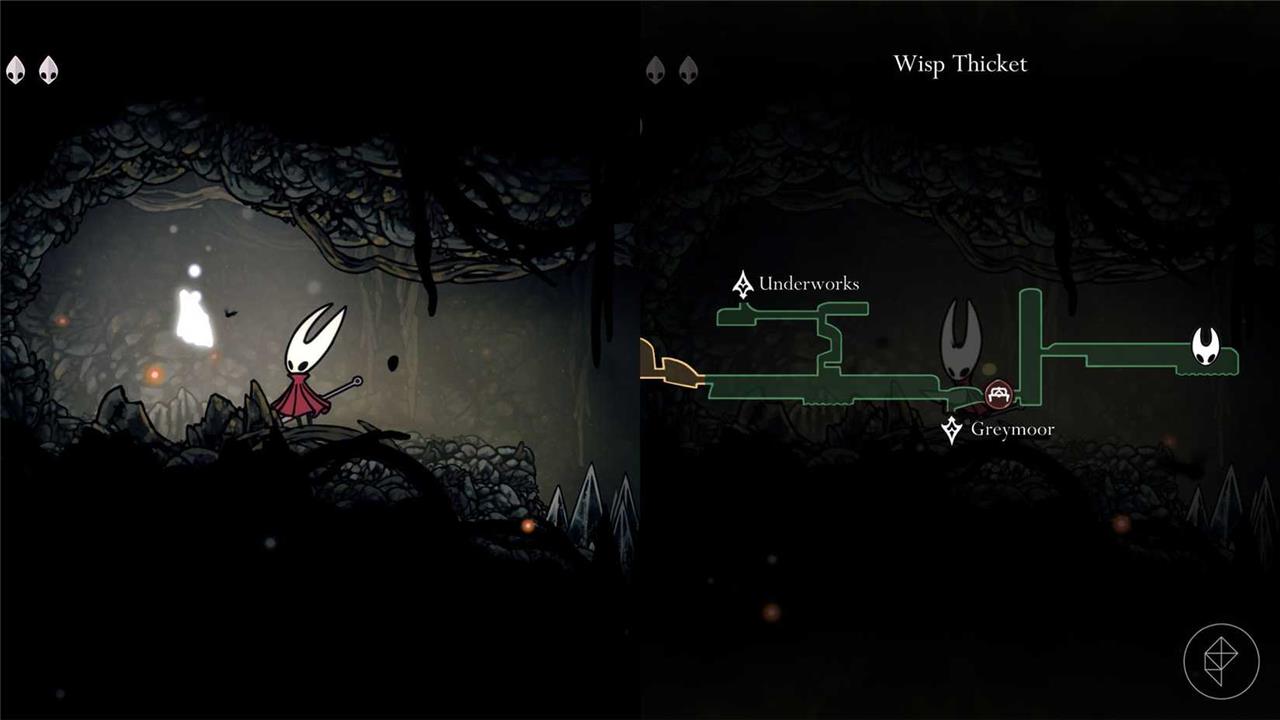
For this mask shard, make your way to the Wisp Thicket, whose entrance is found in the top left corner of Greymoor, but first, unlock the Faydown Cloak as you’ll need double jump to enter the area and collect the mask shard.
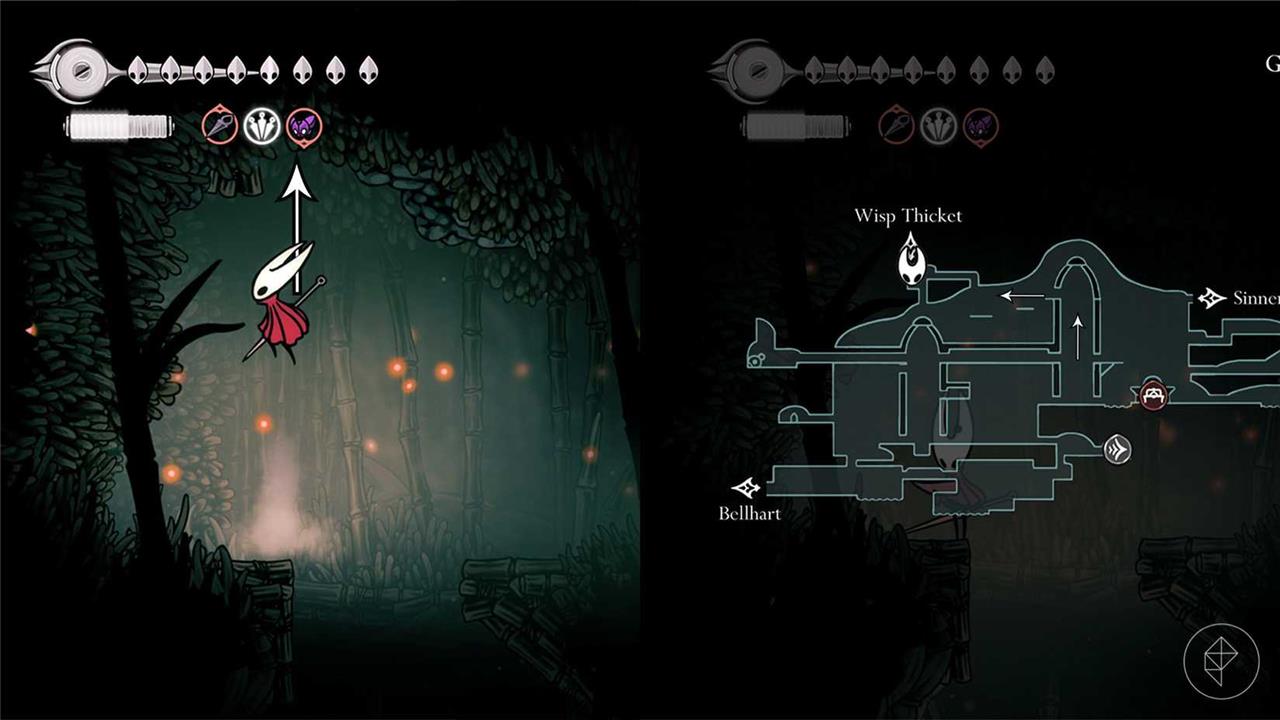
After you enter Wisp Thicket, head to the right, where you’ll find a bench in a sac hanging from the ceiling. Break open the sac to drop the bench, and rest on it just in case anything goes wrong during the upcoming platforming section. In the next room, pogo off of the hanging red balloons and use your Clawline to grab onto the walls. As you’re climbing up the room, take the first exit on the right. In this section, there are a few fire-spewing enemies, but you can just speed past them. Use your Clawline and pogo skills again to reach the end of the path where you’ll find a mask shard.
Mask shard #15 – Bilewater
Hidden deep within the murky channels of Bilewater, this shard rests inside a corroded chamber patrolled by leech-like enemies. To reach it, use the nearby lift mechanism to drain part of the toxic pool, then follow the lower pipe system until you reach a fragile wall concealing a small alcove. Breaking through reveals a platforming section filled with dripping acid streams-timing your movements carefully will lead you to the shard’s resting spot.
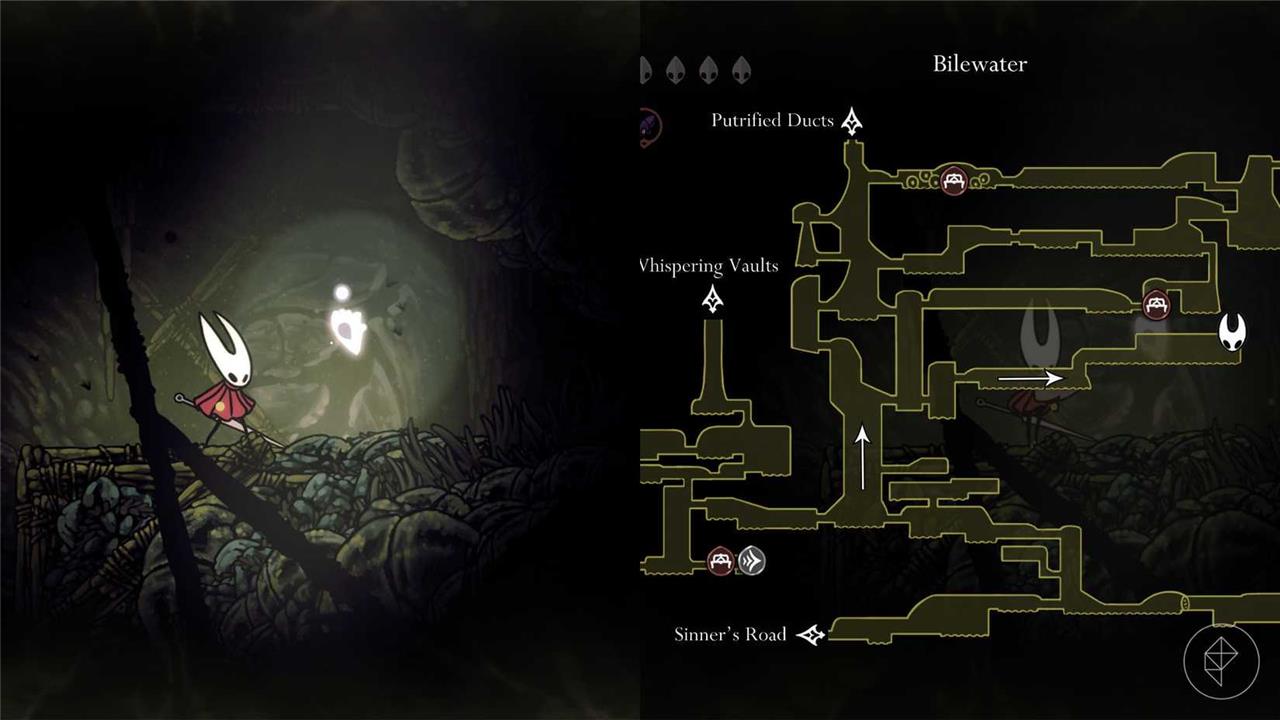
The mask shard in Bilewater will have you platforming over mucky waters full of disgusting grubs. To make it even worse, the benches in Bilewater are extremely far apart, forcing you to make long treks if you do end up dying along the way. To get this mask shard, make sure you have Clawline and Faydown Cloak, as they’re necessary to progress further into Bilewater.
From the Bilewater Bellway, enter the upper exit on the right side and continue to the right until you enter a tall chamber. Double jump up and climb up the wall above. For this section, you’ll need to zigzag your way up, using your Clawline and Faydown Cloak whenever possible. Along the way, you’ll encounter bloatroaches, which are huge flying bugs that spew bile at you. Use cover to wait until they’re done puking and quickly pass them to avoid being spit on. Enter the third exit on the right and continue to the right in the next room. From here, you’re going to follow the path to the right until you reach the mask shard, but watch out for the slubberlugs in the water as they’ll jump out as you’re passing by and drag you into the grub-infested waters.
Mask shard #16 – The Slab
Hidden deep within the Forsaken Slab, this shard rests inside a weathered stone chamber guarded by crystalline sentinels. To reach it, follow the upper quarry tunnels and use the wall latch to scale the broken pillars. Watch for falling debris from the ceiling and timed crusher traps near the chamber’s entrance. Once cleared, the Mask Shard sits on a pedestal surrounded by faint echoes of past miners.
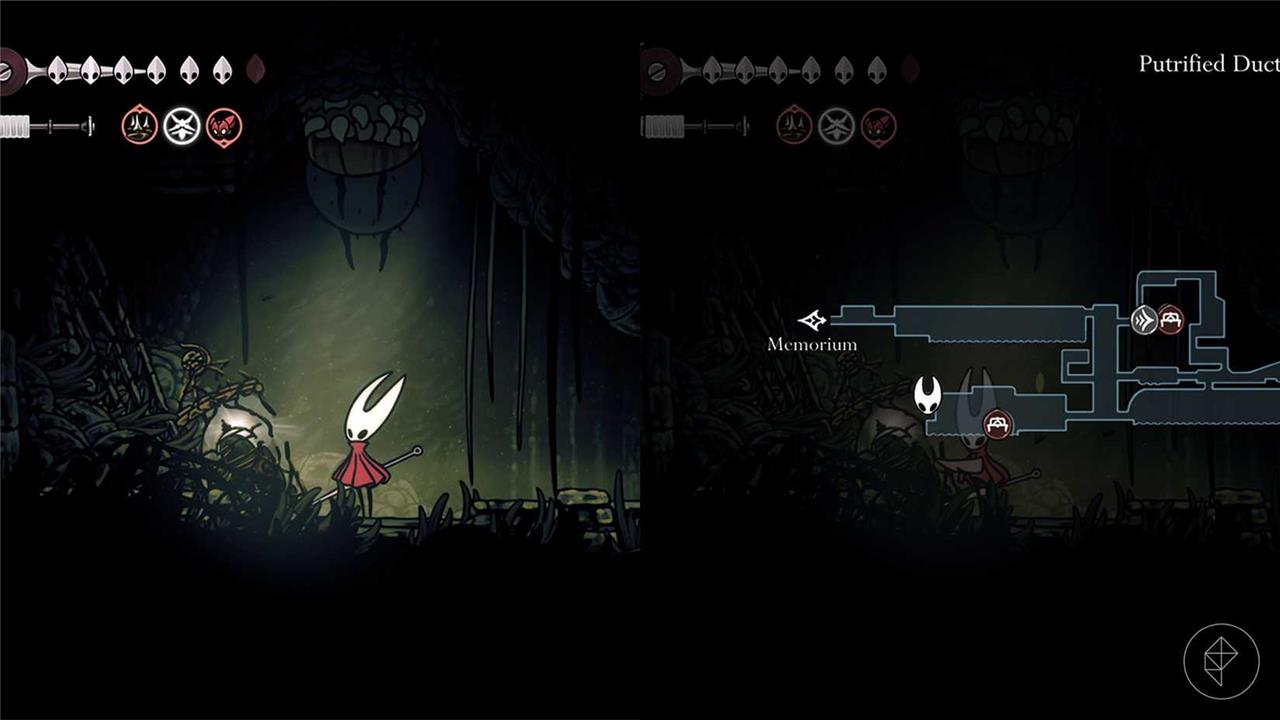
Before you head to The Slab, you’ll need to grab the Key of Apostate, which is located in the Putrified Ducts. The key can be found in the bottom left corner of the area, as seen in the image below:
Now that you have the key, head to The Slab through the Choral Chambers entrance. If you haven’t been to The Slab before, we recommend progressing through the area and collecting the Key of Indolent and the Key of Heretic to unlock gates along the way. Once you’ve done that, head to the top of the central chamber and unlock the door on the right with the Key of Apostate.
In this room, you’re going to need to put your pogo skills to the test as you’ll be pogoing off a moving gear. You’ll need to follow the gear all the way to the top where you’ll find a mask shard in the top left corner. If you lose track of the gear or it moves out of range, you will unfortunately need to start over from the very beginning.
Mask shard #17 – ‘Fastest in Pharloom’ wish in Far Fields (Act 3)
Hidden in the Far Fields during Act 3, this shard is granted by completing the “Fastest in Pharloom” wish. The challenge pits you against swift mechanical foes in a timed arena near the windmills. Defeat them all before the clock runs out to earn the shard as your reward. Keep an eye out for movement cues and use quick attacks to stay ahead of the timer.
To get this mask shard, you’ll need to start Act 3. Head to the top right corner of Far Fields by going through the secret area, which can be accessed by using Silk Soar in front of the statue in Hunter’s March.
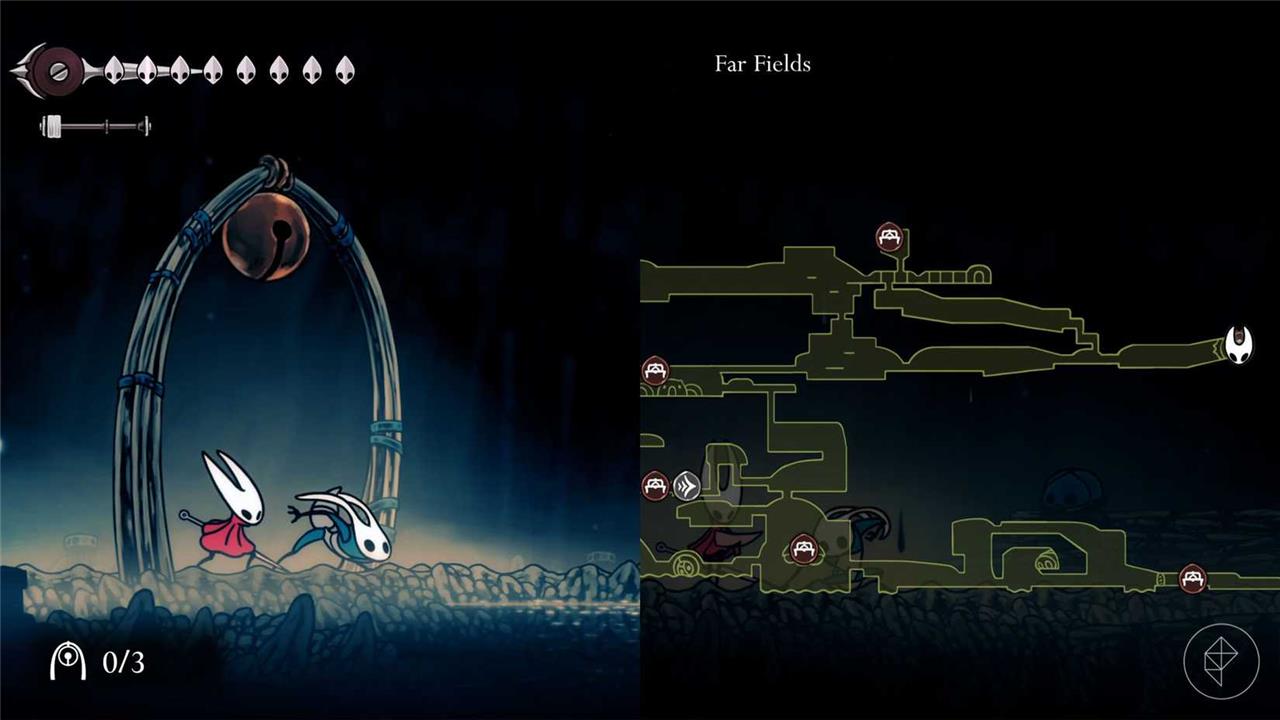
Once you make it to the top right corner, you’ll find Sprintmaster Swift, and he’ll challenge you to see who is the fastest in all of Pharloom. You’ll need to win three races, with the difficulty getting harder after each race. After you beat Swift three times, you’ll get a mask shard as a reward.
Mask shard #18 – ‘Dark Hearts’ wish in Bellhart (Act 3)
Hidden behind the sealed courtyard in Bellhart, the eighteenth mask shard sits near the old wishing fountain tied to the “Dark Hearts” request. Completing the wish requires defeating the shadowy Bellkeeper that appears after placing the Black Token in the fountain. Once the foe is defeated, the fountain’s glow fades, revealing the shard among the cracked stones. The area is guarded by flying Sentinels, so precise movement and quick strikes help secure the reward safely.
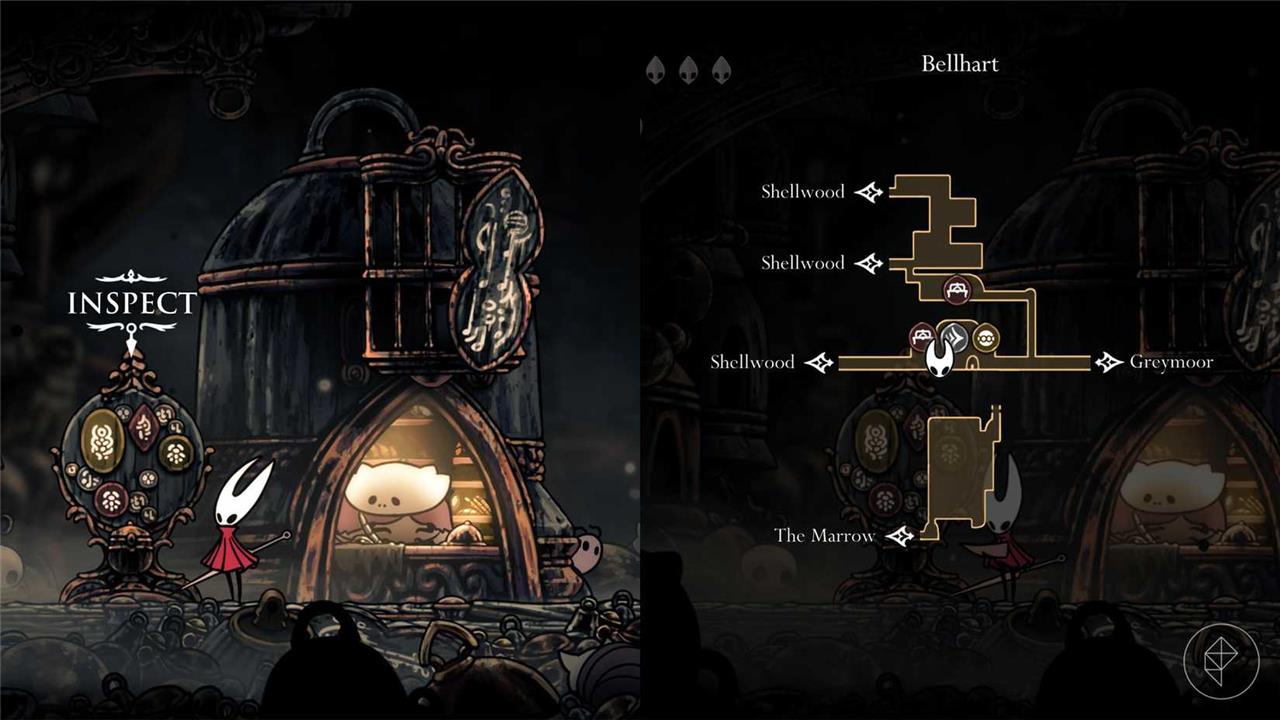
Head to the Bellhart wish board in Act 3 to find the quest called “Dark Hearts.” For this wish, you need to destroy 12 void masses throughout all of Pharloom. Void masses look like a clump of enemies held together by void strings. As a reference, here’s an image of a void mass in Shellwood:
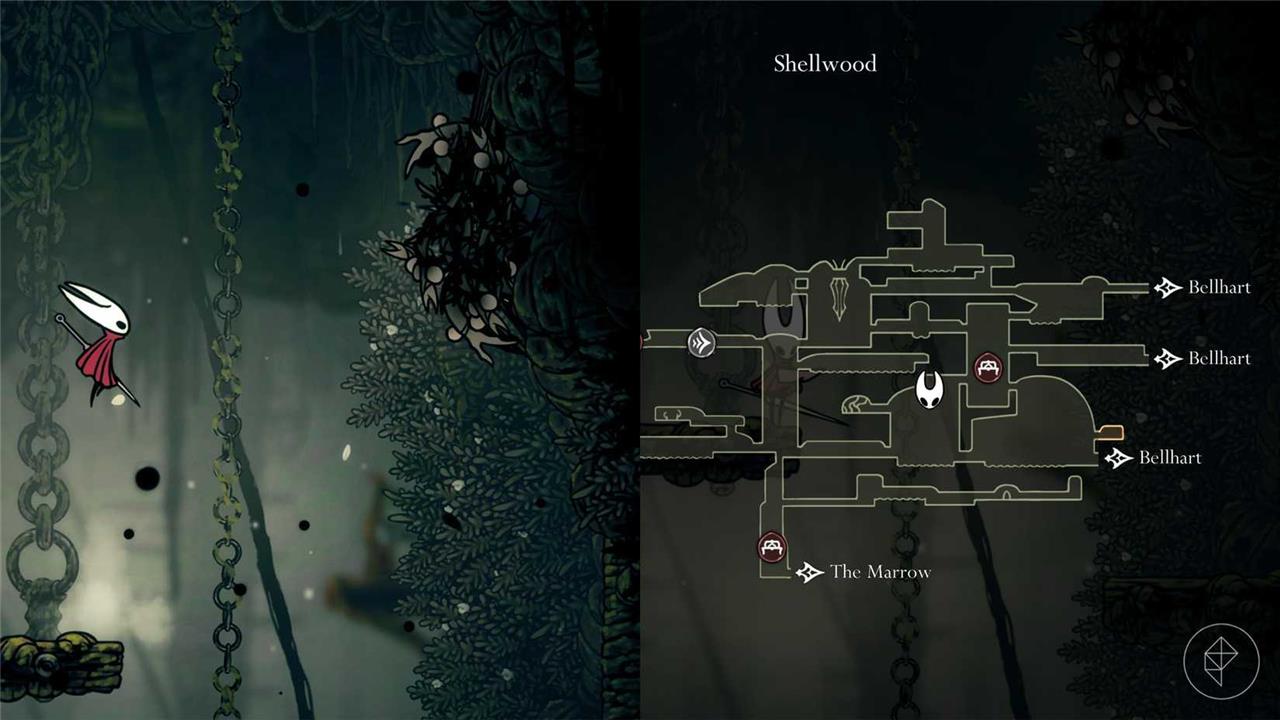
Luckily, there are more than 12 void masses scattered around the map, and you’ll naturally run into a lot of them as you explore Act 3. If you’re looking for more void mass locations, consider checking out our interactive map, which has all of the void mass locations marked for you.
After you defeat 12 void masses, turn in the wish to receive your mask shard.
Mask shard #19 – Mount Fay (Act 3)
Hidden deep along the icy ridges of Mount Fay, this shard lies beyond a narrow passage filled with brittle icicles and circling wings. Players must scale frozen ledges and strike crystal blocks to reveal a hidden alcove where the fragment rests. Sharp reflexes and careful timing are needed to avoid the freezing winds and enemies that guard the area. Collecting it brings you one step closer to completing your next mask.
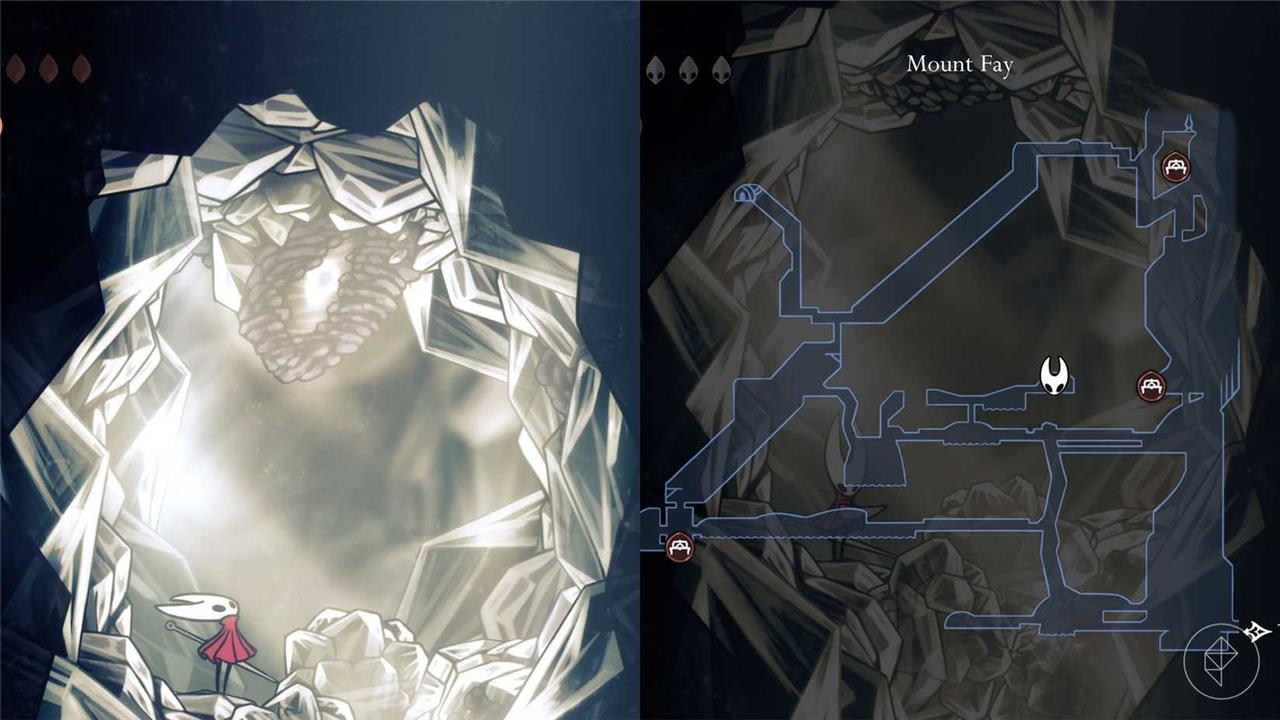
To get the Act 3 mask shard in Mount Fay, you’ll need to use Silk Soar to reach a secret area. Climb Mount Fay until you reach the hallway in the center of the map.
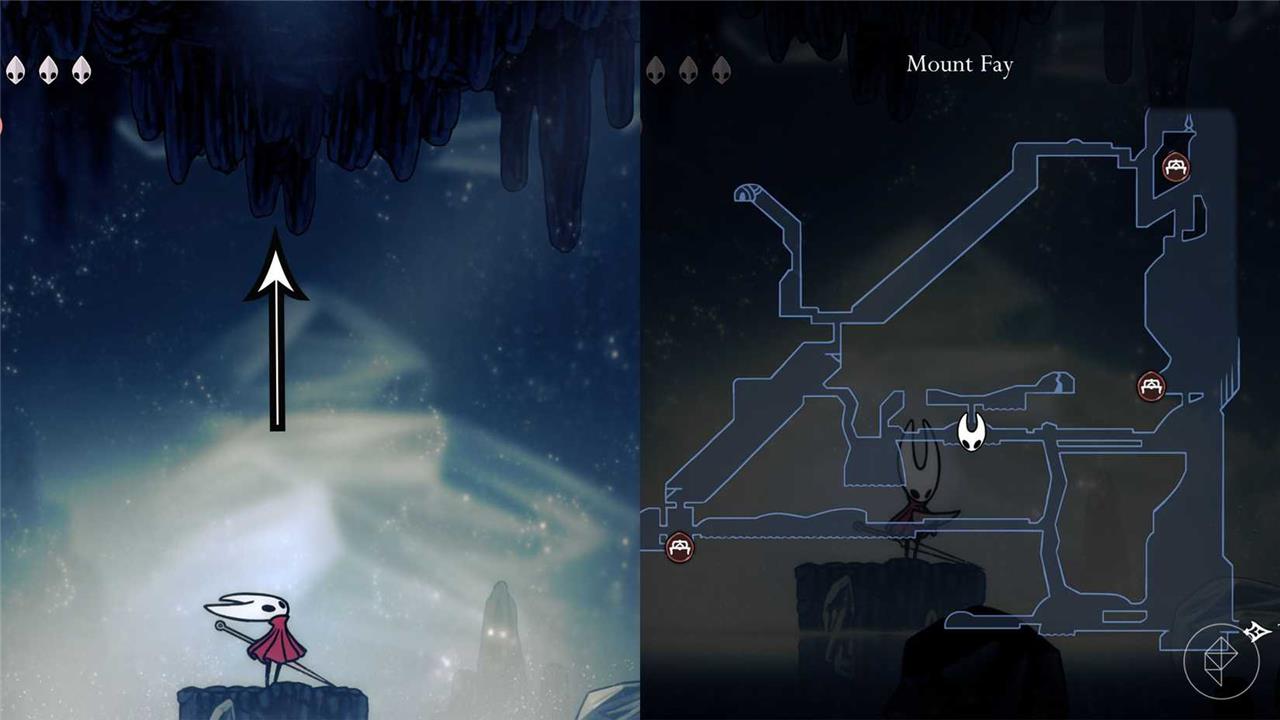
During the portion where you need to use your Clawline to grapple onto the flying crystal bugs, you’ll land on a small platform in the water. Use Silk Soar to go up the hole in the ceiling and follow the path to the right. Break through the ice to make it to the bottom right corner of the room, and use Silk Soar again to reach the exit in the top right corner. Enter the hidden cave to find yourself in another difficult platforming challenge.
To reach the top and collect the mask shard, you’ll need to use your Clawline to its maximum potential by hooking onto the mnemonords, which are huge versions of the flying crystal bugs that you’ve seen around Mount Fay. You’ll also need to hook onto the walls and stand on ice crystals to give yourself a boost. Once you’ve made it to the top, use Silk Soar again to find the mask shard.
Mask shard #20 – ‘The Hidden Hunter’ wish in Bellhart (Act 3)
This shard is tied to the Hidden Hunter’s wish, found deep within Bellhart during Act 3. After completing the whispering roots near the central plaza, follow the sound of chimes to a concealed alcove behind a moving platform. Defeating the spectral form of the Hidden Hunter reveals a small shrine-interact with it to claim Mask Shard #20 as your reward.
For the last mask shard, you’ll need to accept the “The Hidden Hunter” quest on the wish board in Bellhart in Act 3. In this quest, you’ll need to track down Gurr the Outcast and defeat them.
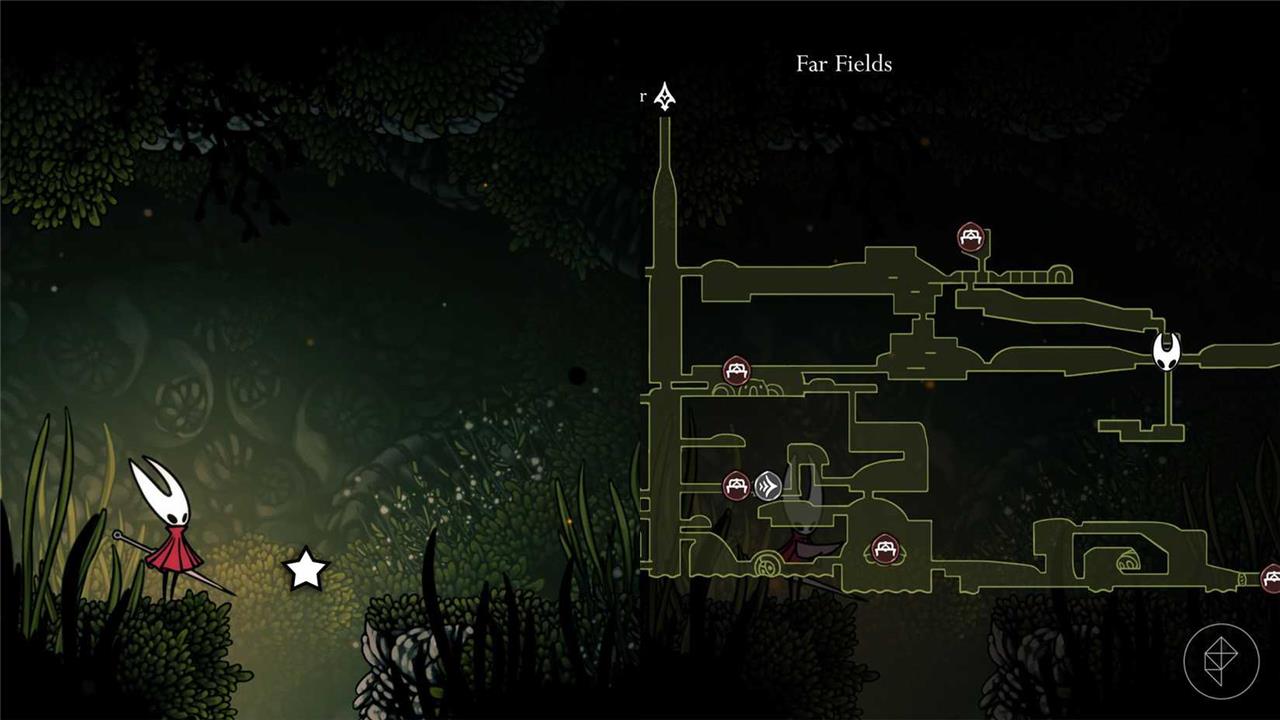
Rather than have you track down Gurr and deal with all of the traps they left behind, head over to the far right section of Far Fields, just before the area with Sprintmaster Swift. In this location, you’ll find the Gurr’s last tracks, and if you interact with it, you’ll be trapped inside of a cage and dragged down into an arena with Gurr. As you can already tell, Gurr loves traps and this battle mainly focuses around Gurr throwing the traps you’ve seen along the way and a few spikes popping out of the ground. To easily defeat Gurr, wait for them to land on the ground after they’ve thrown their traps and land a few hits.
Once you defeat Gurr, head into the room on the left and collect the Grass Doll in the top left corner, but watch out for the trap in the top left corner. There is a platform that will activate a swinging axe if you step on it, so be quick or jump over it. Bring the Grass Doll back to the wish board to collect your mask shard.
Map with all Mask Shard coordinates for Silksong
Interactive maps for Hollow Knight: Silksong provide visual markers for all 20 Mask Shards across Pharloom’s regions, though exact pixel coordinates are rarely listed due to the game’s expansive, non-grid design. Sites like TheSilkSongMap.com and HollowSilkSongMap.com offer zoomable, filterable overlays with precise shard pins tied to areas like Bone Bottom, Far Fields, and Mount Fay.
Key Interactive Maps
Use these community-driven tools for clickable locations with progress tracking:
-
TheSilkSongMap.com: Covers all shards, benches, and bosses; filter by “Mask Shards” for pins in Moss Grotto, Deep Docks, and Greymoor.
-
HollowSilkSongMap.com: Detailed Pharloom overview with secret spots and Act-based shard unlocks.
-
Additional options include AS.com’s map for shards, crests, and fleas.
Coordinate Alternatives
No universal X/Y grid exists publicly, but video timestamps approximate paths (e.g., YouTube guides mark shards at 00:32 Bone Bottom, 07:22 Far Fields Act 3). Check wiki.fextralife for static images with region-specific markers.[ from prior]
Download a high-resolution Silksong mask shard map image
High-resolution maps of Hollow Knight: Silksong with Mask Shard markers are available for direct download from community sites. The clearest option is a 7680×5376 PNG (10MB) from MapSilkSong.com, suitable for printing or offline reference.
Download Instructions
Visit https://mapsilksong.com/download to grab the full Pharloom HD map image featuring all 20 Mask Shards as pinned markers across regions like Far Fields, Mount Fay, and Deep Docks. Credit the source for personal use only-no commercial resale.
Alternatives
-
TheSilkSongMap.com: Interactive version with filters; screenshot high-res sections if needed.
-
Fextralife Wiki: Static images per area with shard overlays, printable via browser tools.
-
Steam Guide: Direct map URLs with pins; right-click save for high-res files.
These resources update regularly post-launch, ensuring accurate Act 1-3 shard positions.
