Getting sturdy chitin in Hytale can be tricky-it’s a rare material dropped by certain creatures, and crafting with it opens paths to stronger armor and tools. Here’s how to track it down and make the most of this valuable resource.
Where to find sturdy chitin in Hytale
Sturdy chitin drops from armadillos, turtles, scorpions, and wasps in the Howling Sands, Zone 2’s desert biome marked by yellow and orange on the map. Armadillos and scorpions appear more often in savannah patches, while turtles stick to coastlines and wasps fly across open areas. Coastal savannah spots with armadillos and turtles offer the safest collection since they stay passive.
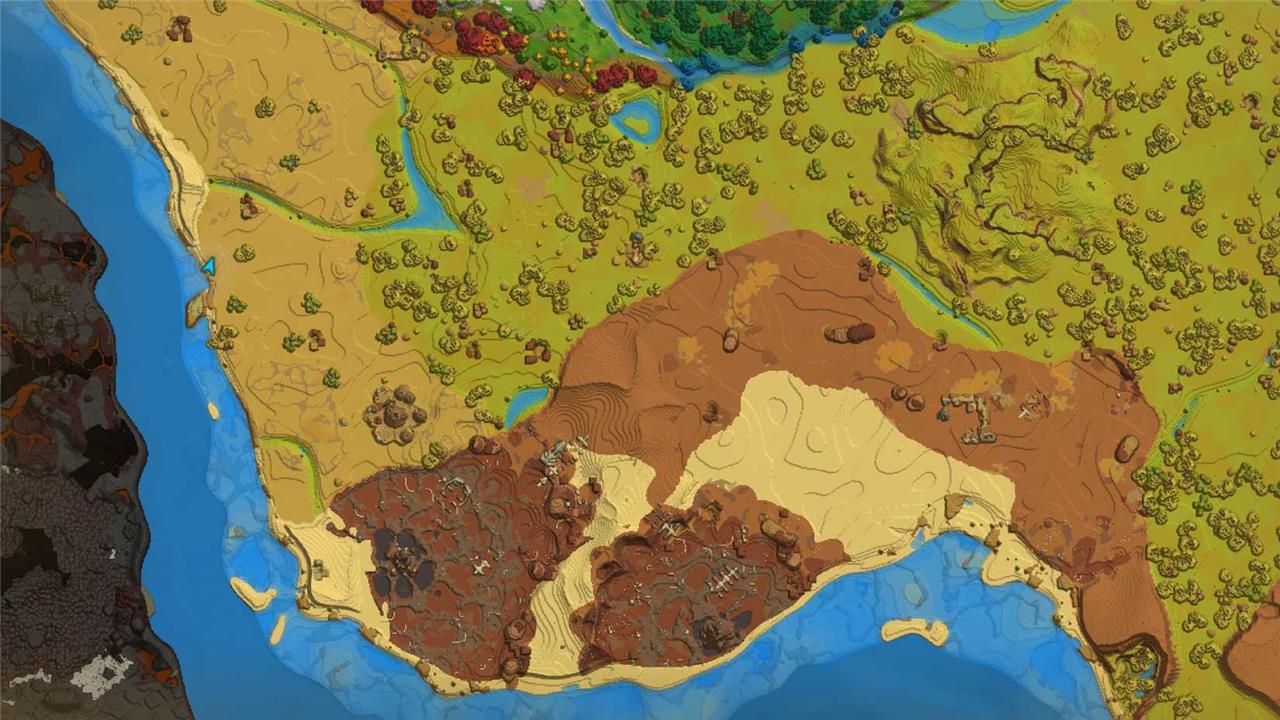
Sturdy chitin is a resource dropped by creatures in the Howling Sands region (Zone 2) upon defeat. To find this region, head to the yellow- and orange-colored parts of the map:
Sturdy chitin is dropped by the following Hytale animals:
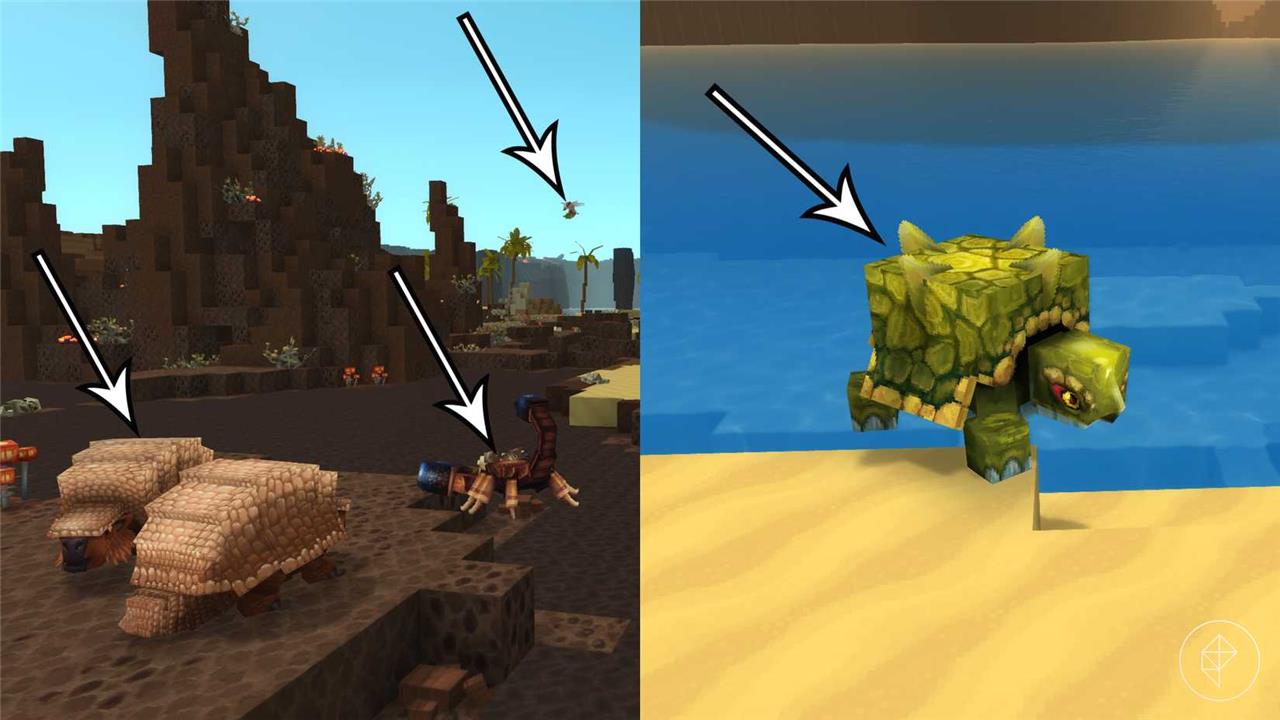
- Armadillos
- Turtles
- Scorpions
- Wasps
Armadillos and scorpions tend to spawn in the savannah rather than the open desert, making it a bit easier to farm sturdy chitin in the more vegetated parts of the Howling Sands. Wasps spawn everywhere in the Howling Sands, but since they’re airborne, you must use a ranged weapon (bow or staff) to defeat them. Turtles only spawn along the coastline.
Beware that scorpions and wasps are quite dangerous. But whereas they attack you on sight, turtles and armadillos won’t fight back. The safest way to farm sturdy chitin is therefore to find a savannah coastal region with lots of armadillos and turtles.
Hytale‘s sturdy chitin resource is especially useful if you plan to upgrade your armorer’s workbench. After reaching tier 2, which requires copper ingots and unlocks both thorium and cobalt armor sets, you must offer 40 pieces of sturdy chitin, along with voidhearts and shadoweave scraps, to reach tier 3. Doing so will unlock adamantite and mithril armor sets.
Best weapons and armor for farming sturdy chitin in Howling Sands
For farming Sturdy Chitin in Howling Sands, you want solid mid-game gear with good poison resistance, mobility, and at least one ranged option for wasps.
Weapon recommendations
-
Use a fast melee weapon (sword, mace, or axe tier 2 or better) for armadillos, tortoises, and Scaraks in tight caves so you can dodge and burst them before they swarm.
-
Bring a bow or magic staff as your secondary for flying wasps and for safely pulling Scaraks in nests instead of face-tanking whole packs.
-
Prioritize weapons with on-hit effects (bleed, poison, or knockback) to control groups of Scaraks and scorpions in nests and narrow tunnels.
Armor and defenses
-
Aim for at least tier-2 armor from your Armorer’s Workbench (e.g., thorium/cobalt equivalents) before diving deep into Scarak nests; this tier is expected around the time you start serious Sturdy Chitin farming.
-
Stack poison/DoT mitigation where possible, since scorpions apply venom and long fights in nests make chip damage dangerous.
-
Favor armor with a balance of physical defense and stamina/energy so you can block or dodge repeatedly while clearing dense nests.
Playstyle by target
-
For armadillos and turtles (passive), even modest melee gear works; focus on movement speed to run quick surface loops since they rarely fight back.
-
For scorpions and wasps, armor that helps you survive venom plus a reliable ranged weapon significantly speeds up farming without constant healing breaks.
-
For Scarak nests, use your tankiest armor set, a strong melee main hand, and ranged pulls so you fight Scaraks in small groups instead of getting surrounded.
If you tell me what tier your current weapons and armor are, I can suggest a concrete upgrade path and a sample Howling Sands loop tailored to your power level.
How to find and clear Scarak nests in Howling Sands
Scarak nests in Howling Sands are large underground hives beneath desert dunes and Scarak-heavy areas; you find them by following Scaraks on the surface and watching for distinctive mound entrances or cave openings that lead down into hive tunnels.
How to find Scarak nests
-
Roam the Great Dunes areas of Howling Sands, where the desert looks more like endless sand seas with fewer rocks and trees; these regions often hide Scarak hives under the surface.
-
Look for surface Scarak patrols (workers, warriors, tanks, and locusts) clustered around odd sand formations, bone piles, or partially sunken structures; these usually mark a nearby hive entrance.
-
Watch for large sand mounds or sinkholes with sandstone or slime edges, cave mouths, or tunnels leading downward; these are common Scarak nest entrances into the underground hive.
What’s inside a Scarak nest
-
Nests are underground cave networks made of sandstone and heated sands, often with magma or magma-heated areas deeper down.
-
You will see Scarak eggs, larvae, workers, warriors, tanks, and locusts inside, plus bone piles and other signs of victims dragged into the hive.
-
Deep in the hive, the Scarak Broodmother or other elite Scaraks may appear, heavily guarded and significantly tougher than regular workers.
How to clear a Scarak nest safely
-
Clear the hive slowly and methodically: pull a few Scaraks at a time with a ranged weapon instead of rushing into rooms packed with eggs and guards.
-
Prioritize killing locusts (flying) and warriors first so you are not attacked from multiple angles while dealing with tanks and workers.
-
Break or loot around egg clusters quickly; lingering near eggs can cause more larvae or defenders to aggro at once.
Recommended preparation
-
Bring mid-tier armor and weapons suitable for Howling Sands (strong physical defense plus some way to handle insect mobs and possible poison/DoT).
-
Carry plenty of healing items and stamina/energy food, because fights inside narrow tunnels are prolonged and you have limited room to kite.
-
Have at least one ranged option (bow or staff) to safely pick off locusts, pull groups, and deal with enemies on ledges in vertical cave chambers.
When to stop and reset
-
If you see signs you are approaching the Broodmother’s chamber (large egg fields, many tanks and warriors, distinct central cavern), consider whether your gear and resources can handle a mini-boss-style fight.
-
When low on potions, food, or durability, retreat the way you came and reset the hive later instead of pushing deeper and risking a wipe in cramped tunnels.
If you share your current level and gear tier, I can outline a step-by-step nest-clearing route (entry to exit) tailored to your power level.