Expeditions in Arc Raiders challenge players to rebuild progress, adapt to shifting missions, and survive against relentless threats. Here’s how resets shape your adventure, what carries over between runs, and the smartest ways to advance through each expedition tier.
What is an expedition in Arc Raiders?
An expedition in Arc Raiders acts as a voluntary prestige option unlocked at level 20 through the projects menu. Players gather resources over roughly eight weeks across six stages to construct a caravan, enabling their raider to depart the Rust Belt permanently. This resets most progress like inventory, skills, and workshop upgrades, while retaining cosmetics and granting carryover benefits such as bonus skill points, inventory space, and account advantages that persist until the next cycle.
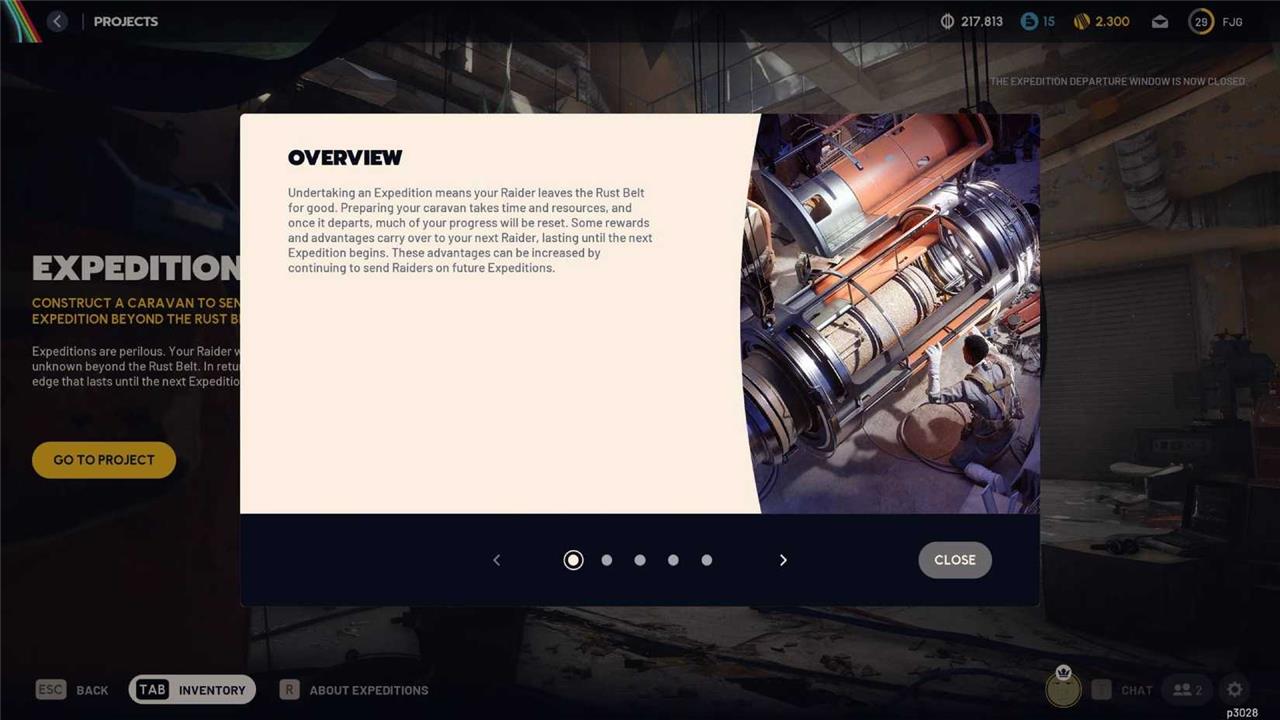
An expedition is described in-game as “sending your raider off on an expedition beyond the Rust Belt,” taking “all their possessions into the unknown.” It’s essentially Arc Raiders‘ version of a wipe, which acts like a new game plus and resets the progress of your character. However, where they (used to) happen on a fairly regular basis in other extraction shooters like Escape from Tarkov, expeditions are very much on an opt-in basis.
However, you cannot just go on an expedition at the click of a button. Instead, you’ll need to build your caravan by gathering a ton of materials. In return, you’ll earn a bunch of rewards like bonus skill points, extra stash space, and more.
How to unlock expeditions in Arc Raiders
Reach level 20 with your Raider to gain access to the Projects tab, where the Expedition project appears. From there, contribute materials across five stages-Foundation, Core Systems, Framework, Outfitting, and Load-to construct the caravan. Once finished, register during the departure window to send your Raider out, resetting character progress while carrying over account bonuses.
Expeditions are unlocked at level 20, as the final feature of the game available via leveling up. You can’t commit resources to expeditions before then, so focus on going topside and acquiring materials and items for upgrades in the meantime.
Arc Raiders expedition schedule
Expeditions in Arc Raiders run on a rotating schedule, giving players specific time windows to participate in challenges and earn seasonal rewards. Each expedition resets after a fixed cycle, ensuring new objectives and refreshed enemy placements. Planning your playtime around these rotation periods helps you maintain steady progression and avoid losing progress during a reset. Keeping track of upcoming expedition windows is key for maximizing rewards and staying aligned with your squad’s goals.
The first expedition window began on Oct. 30, when Arc Raiders launched. The finalization phase will open on Dec. 17 and last until Dec. 22, with the departure date starting on the next day, Dec. 23. Expeditions roughly operate on an eight-week schedule, and while it isn’t confirmed yet, we’re expecting the next expedition to begin shortly after the current window closes, so our educated guess would be Dec. 24. That would, in theory, run until Feb. 18, 2026.
Arc Raiders expedition materials required
Expeditions in Arc Raiders require specific materials that determine how far a squad can progress. Players need to gather crafting components, energy cells, and recovered gear pieces from previous runs to prepare for tougher missions. These materials can be found during exploration or earned through successful raids. Managing inventory is key, as limited space forces players to prioritize rare components needed for upgrades and survival tools before heading into the next expedition.
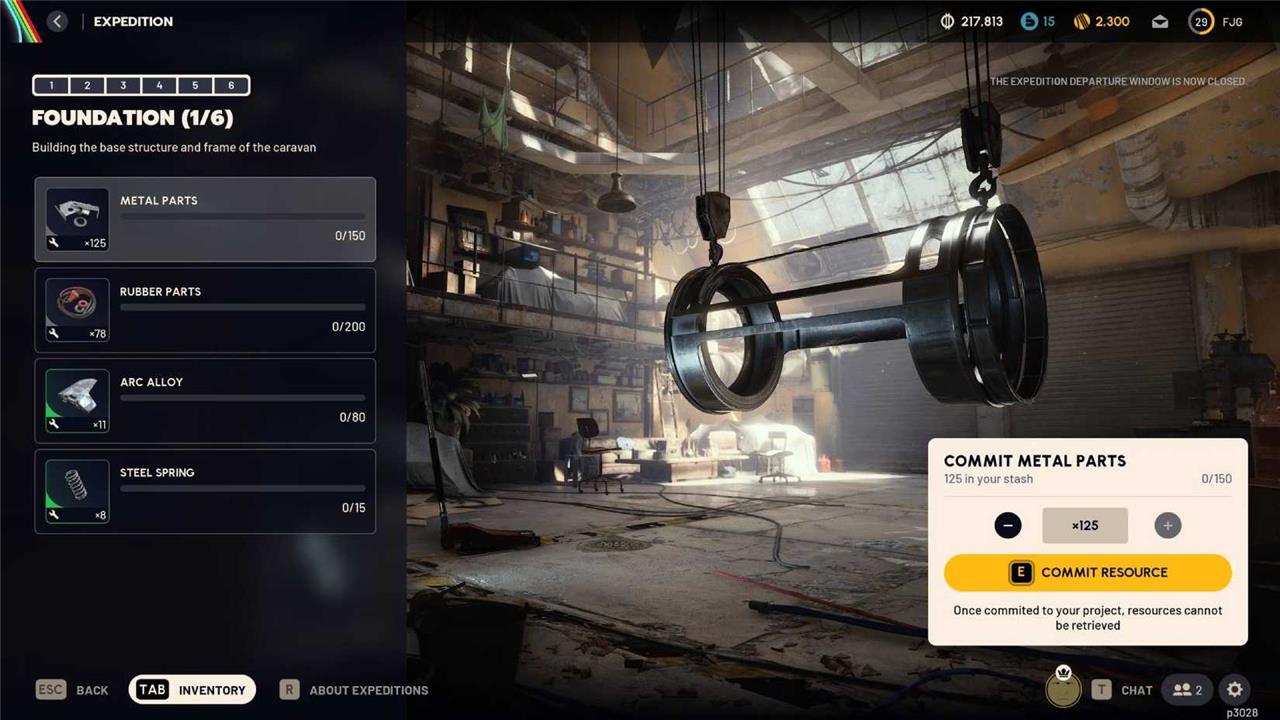
To go on an expedition, you’ll need to first construct your caravan, which needs a lot of materials. Here are all of the materials you need for each step of the caravan construction process:
| Stage | Materials |
| Foundation | 150 Metal Parts, 200 Rubber Parts, 80 Arc Alloys, and 15 Steel Springs |
| Core Systems | 35 Durable Cloths, 30 Wires, 30 Electrical Components, and 5 Cooling Fans |
| Framework | 5 Lightbulbs, 30 Batteries, 20 Sensors, and 1 Exodus Module |
| Outfitting | 5 Humidifiers, 5 Advanced Electrical Components, 3 Magnetic Accelerators, and 3 Leaper Pulse Units |
| Load | 250,000 coins worth of combat items, 100,000 coins worth of survival items, 180,000 coins worth of provisions, and 300,000 coins worth of materials |
| Departure | N/A |
Everything you keep and lose on an expedition
Expeditions in Arc Raiders are high-risk missions where gear, consumables, and collected materials play a major role in your success. Everything you carry has value, but failure means losing most of what you brought along, creating real tension during every encounter. Completing an expedition successfully lets you extract loot, resources, and experience, which feed into your progression, while a misstep can set you back significantly. It’s a constant balance between greed and caution – pushing deeper for better rewards or retreating before the dangers overwhelm you.
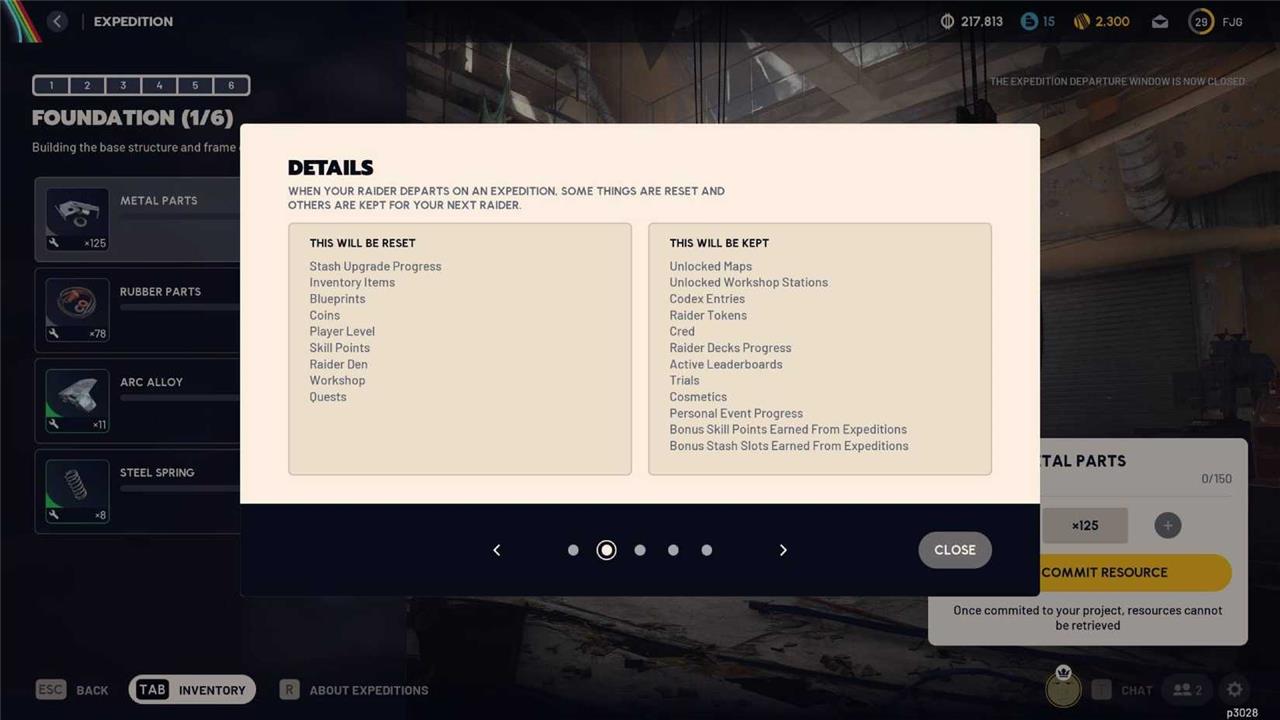
As an expedition in Arc Raiders functions as a wipe for your character, you’ll naturally lose a majority of your progression. However, there are some things that carry over.
Here’s everything you keep when you complete an expedition project and carry forward into the next window:
- Maps
- Workshop stations
- Codex entries
- Raider tokens
- Deck progress
- Active leaderboards
- Trials
- Cosmetics
- Event progress
- Skill points and stash slots earned from prior expeditions
How to prepare my caravan for the current Expedition cycle
To prepare your caravan for the current Expedition cycle in Arc Raiders (which runs through late February 2026, with departure February 17-24), reach level 20 and access the Projects tab in your Raider menu to start committing non-retrievable resources across 5-6 stages.
Access Requirements
Unlock the Expedition Project at Raider level 20 via the Raider menu’s Projects tab. Progress persists across sessions, so you can contribute gradually during the 60-day build phase without deadline pressure.
Stage-by-Stage Materials
Complete stages sequentially by donating from your stash. Here’s a breakdown of key requirements:
| Stage | Materials | Quantities |
|---|---|---|
| 1: Foundation | Metal Parts, Rubber Parts, ARC Alloy, Steel Spring | 150, 200, 80, 15 |
| 2: Core Systems | Durable Cloth, Wires, Electrical Components, Cooling Fan | 35, 30, 30, 5 |
| 3: Framework | Light Bulbs (or similar), other mid-tier items | Varies; craft where possible |
| 4: Outfitting | Humidifier, Advanced Electrical Components, Magnetic Accelerators, Leaper Pulse Units | 5 each |
| 5: Load Stage | Provisions (nature items like Lush Blooms), Exodus Modules | Farm-focused; upgrade Scrappy for efficiency |
Preparation Tips
Prioritize stash upgrades, Scrappy enhancements, and Security Breach skill tree for farming efficiency on maps like Stella Montis or Lush Blooms events. Hoard rares early (Steel Springs, Cooling Fans, Humidifiers), craft items like Durable Cloth at refiners, and run quick raids for exchangeable gear. No rush-unfinished progress carries over, and skipping incurs no penalty.
Best routes and maps to farm Metal Parts fast
Dam Battlegrounds stands out as the top map for fast Metal Parts farming due to its high concentration of mechanical loot containers in low-to-medium risk areas. Focus on Scrapyard and Primary Facility’s Loading Bay first, as these spots consistently yield Metal Parts from vehicle debris and crates.
Best Maps
Dam Battlegrounds leads for efficiency and safety, with quick access to extractions. Spaceport’s Vehicle Maintenance offers higher yields but faces heavier ARC patrols, suiting advanced players. Blue Gate provides solid alternatives like Warehouse Complex during night runs to dodge PvP.
Top Farming Routes
Follow these optimized paths for maximum Metal Parts per run:
-
Beginner Dam Route: Scrapyard (vehicles/containers) → Water Treatment Control (lower floors) → Primary Facility Loading Bay (3-4 drops typical) → Extract at Raider’s Hatch. Completes in 10 minutes.
-
Advanced Dam Loop: Add Water Tower crates and Electrical Substation for mechanical focus, then Formicai Outpost near exit.
-
Blue Gate Night Route: Warehouse Complex → Adorned Wreckage → Checkpoint. Yields metals alongside springs/oil with low player traffic.
Efficiency Tips
Use Safe Pocket to secure loot early, run at night for fewer rivals, and upgrade Scrappy for better farming output. Multiple short runs beat long risky ones, as spawns randomize-expect 20-30 Metal Parts per hour on Dam.