Cal Kestis’s survival hinges on every stim canister he carries. Here’s how to expand his supply, track down hidden upgrades, and push your healing capacity to its limit across the galaxy.
Stim are pretty effective: Each time you use one, you’ll fully restore your health, at least until you get a few health upgrades. However, you only start out with two stims – not nearly enough to tough it out on some of the more arduous bosses, like the rancor on Koboh. You can increase how many stims BD-1 can carry by tracking down stim canisters. Here’s where to find stim canisters in Star Wars: Jedi Survivor.
Stim Canister 1 – Coruscant > Undercity Meats
On Coruscant, head to the Undercity Meats area in the southern section of the map. Enter the meat-processing facility and use BD-1’s Electro Dart to power the door panel. Inside, defeat the droids and climb the wall to the upper platform. You’ll find the Stim Canister in a chest near the suspended carcasses, adding another heal to your inventory once recovered.
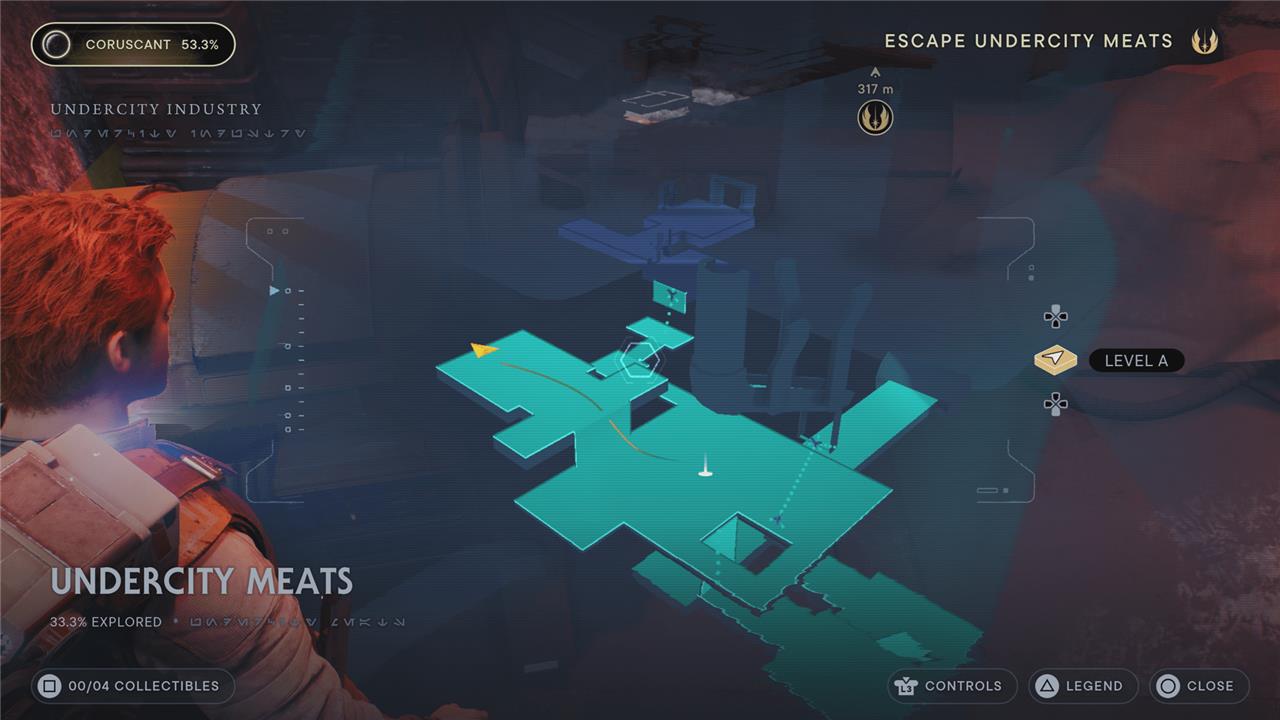
After reaching the area’s meditation point, look to the left and wall-jump up the wall. You’ll see a security droid. Defeat it, then open the chest it was guarding to get a stim canister.
Stim Canister 2 – Koboh > Basalt Rift
From the Basalt Rift Meditation Point on Koboh, head down the slope past the first group of enemies. Cross the narrow stone bridge and climb the wall at the end. After defeating the droid enemies on the ledge above, turn left and use the nearby wall to run across to a small alcove. The Stim Canister chest sits here, guarded by a Bedlam Raider. Open it to increase your maximum Stim capacity by one.
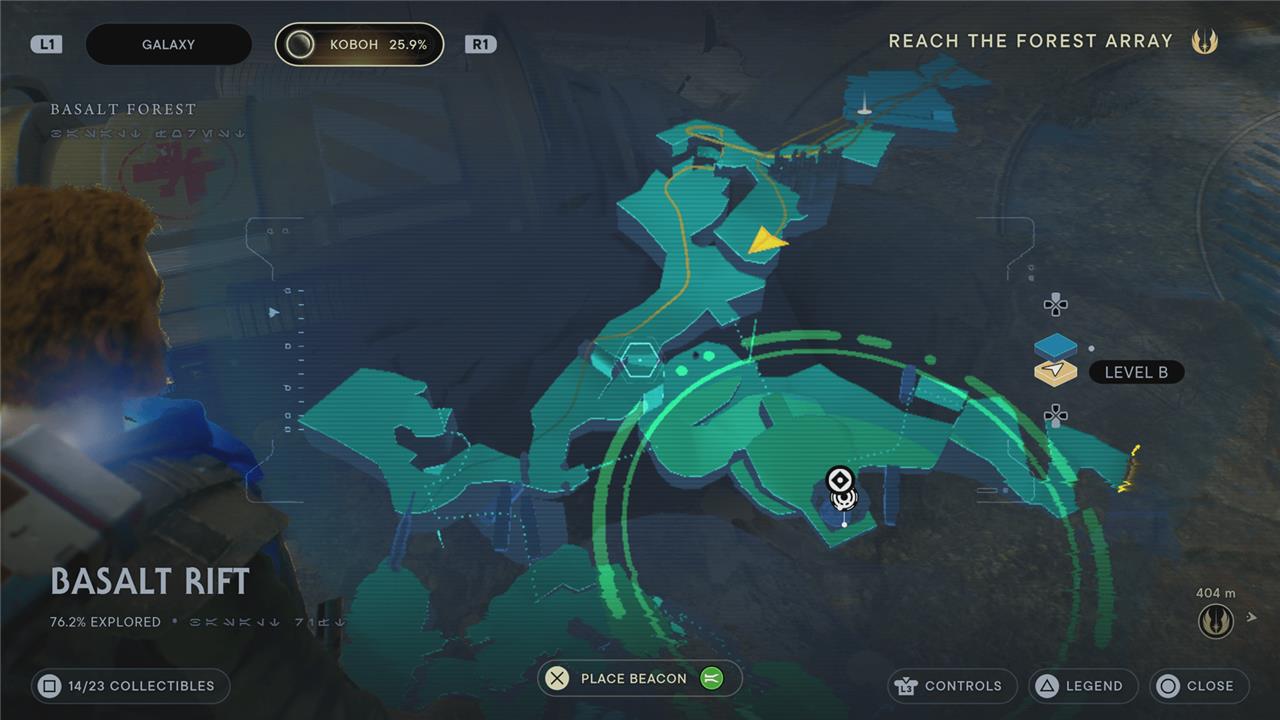
You’ll head into the Basalt Rift as part of the “Reach the Forest Array” main story objective. A little way in, you’ll see a mogu kill a stormtrooper. Fight it or run past it – your call – then use the walls behind it to wall run up the cliff. At the top of the slope, you’ll see the entrance to the Rift Passage region. Instead, take the first right to find a chest with a stim inside.
Stim Canister 3 – Koboh > Doma’s shop
After reaching Koboh, head to Doma’s Outpost in Rambler’s Reach. Inside Doma’s shop, you can purchase the stim canister from the display case on the left side of the room. You’ll need ten Priorite Shards to buy it, so explore the surrounding areas and caves to gather enough before returning. Once purchased, Cal’s maximum stim capacity increases, making combat and exploration a bit easier from this point on.
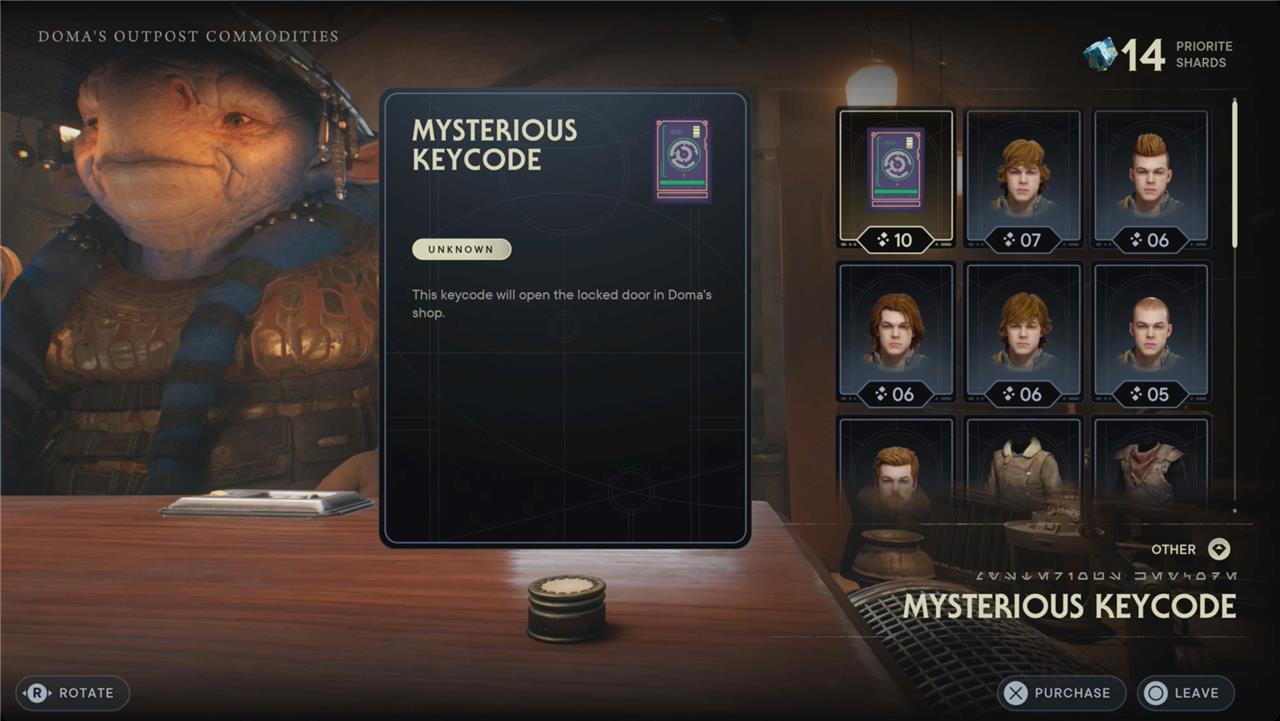
Shortly after you reach Rambler’s Reach Outpost on Koboh, you’ll be able to buy items and cosmetics from a vendor named Doma in exchange for priorite. It’s well worth forking over 10 priorite for the Mysterious Keycode. Behind the door it unlocks – located to the left of Doma’s point-of-sale – you’ll find a chest with a stim canister.
Stim Canister 4 – Jedha > Sheltered Hollow
From the Meditation Point in Sheltered Hollow on Jedha, head toward the rocky path leading to the hidden crevice on the left side of the area. Use the Force to move the obstructing rocks, then wall run and jump across the narrow gaps until you reach a small cave. Inside, you’ll find a chest containing the Stim Canister. Collecting it increases your maximum stim capacity by one, allowing BD-1 to heal you more often during battles.

You’ll find the third stim canister automatically while playing through the main campaign. After finding shelter from the dust storm on Jedah, and weathering the ensuing cutscene, you’ll find yourself in a tunnel. A chest containing a stim canister is on the path out.
Stim Canister 5 – Shattered Moon > Assembly Staging
You can find the fifth Stim Canister on the Shattered Moon inside the Assembly Staging area. After entering the zone, use the nearby wall runs and grapple points to reach the upper platforms. Defeat the droids guarding the section and proceed to the far side of the room where a yellow chest awaits. Open it to claim the extra Stim upgrade, which increases your healing capacity for future battles.
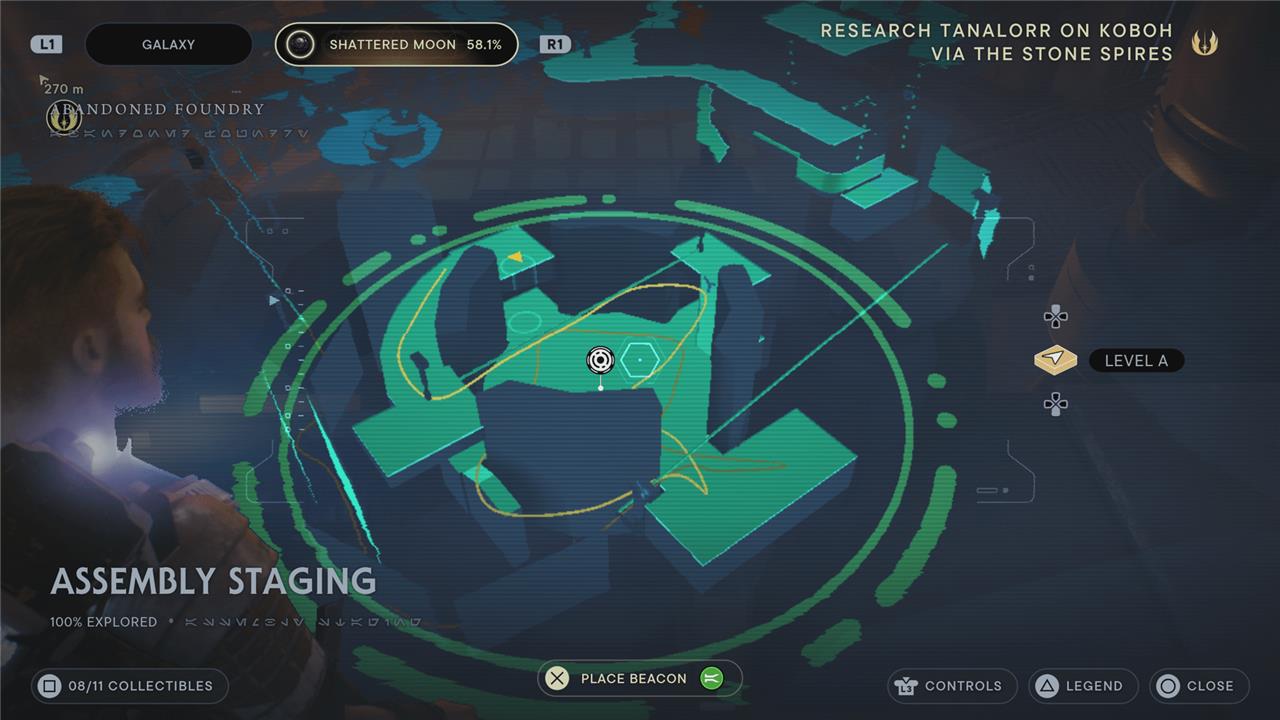
During the “Research Tanalorr” main objective, you’ll meet a maintenance droid who gives you the “Investigate the Factory Lower Levels” rumor. To reach the lower levels, you’ll have to drop off of a zip line that leads between the Automated Forge and Assembly Staging area. When you reach the rumor marker, use the Ascension Cable up to get to the ledge on the right, and then zip line (and double jump over the electrified spot in the middle) across the room. Take the right on the far side and follow the walkway around to a chest with a stim inside.
Stim Canister 6 – Jedha > Crypt of Uhrma
Inside the Crypt of Uhrma on Jedha, you can find the sixth Stim Canister. To reach it, locate the stone wall puzzle that blocks your path and push the correct panels to open the way forward. The canister sits in a small chamber beyond the puzzle room. Collecting it increases Cal’s overall health recovery capacity, giving you another precious stim for tougher fights across Jedha and beyond.
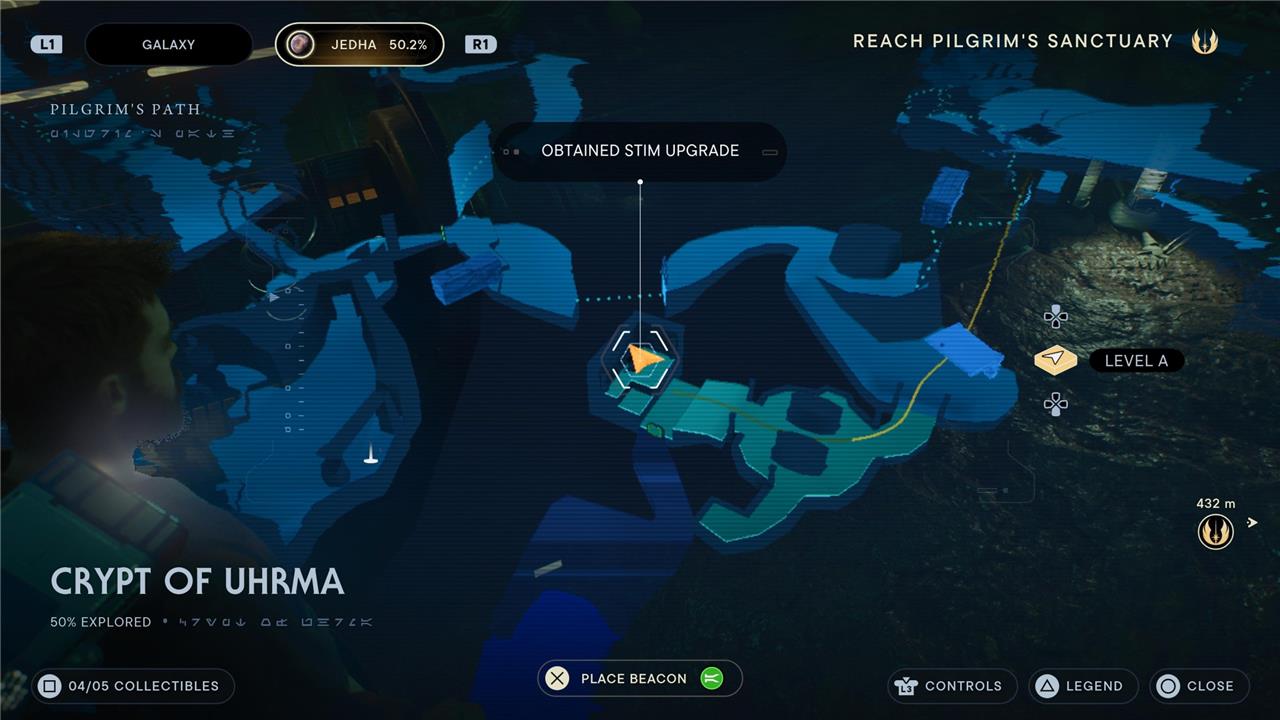
You’ll find another stim canister in Jedha, when you’re en route to Pilgrim’s Crossing. Halfway through the platforming segments, you’ll be able to briefly detour into the Crypt of Uhrma. The back of the crypt contains a door with eight prongs you can Force Push or Pull. From the left, you’ll want to Pull the first and fourth in the top row, and the second and third in the bottom row. The door should look like this:
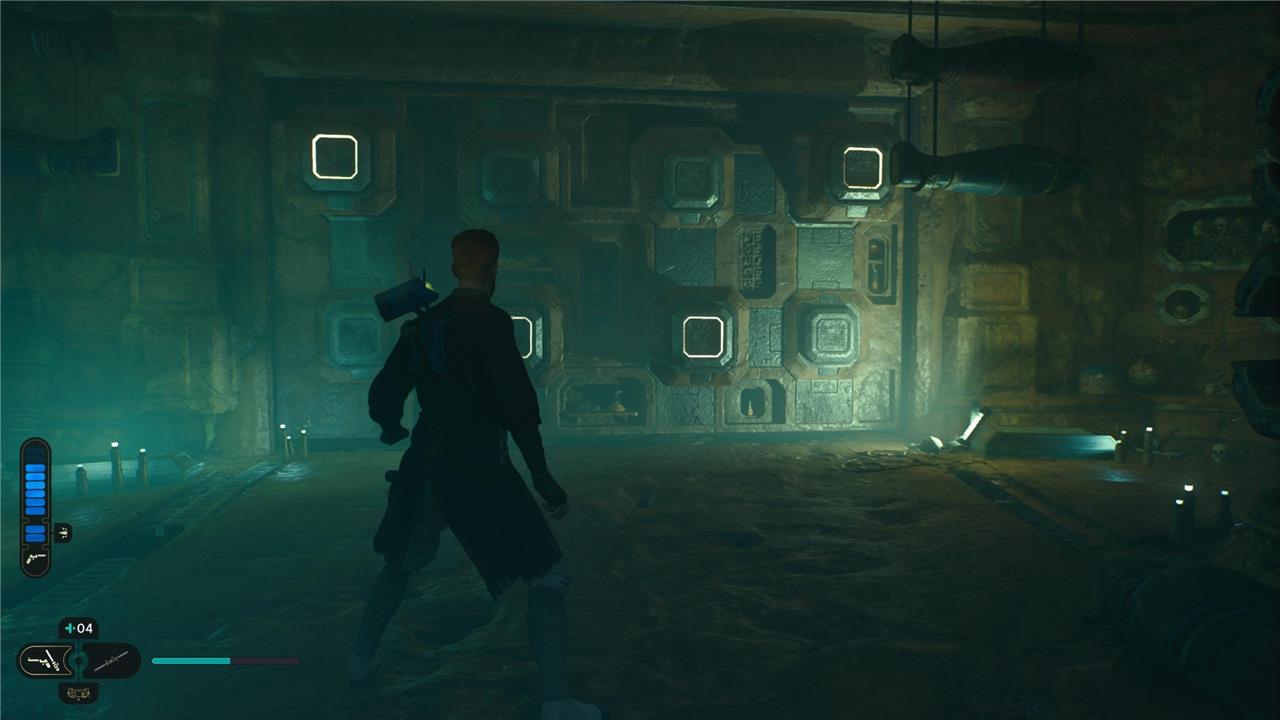
Enter the chamber to find a chest with a stim canister, plus a Force echo.
Stim Canister 7 – Koboh > Viscid Bog
You’ll find Stim Canister 7 in Koboh’s Viscid Bog behind a breakable wall near the raised platform; break it, then destroy the vines to access the canister and add it to your inventory for a quick stimulant boost.
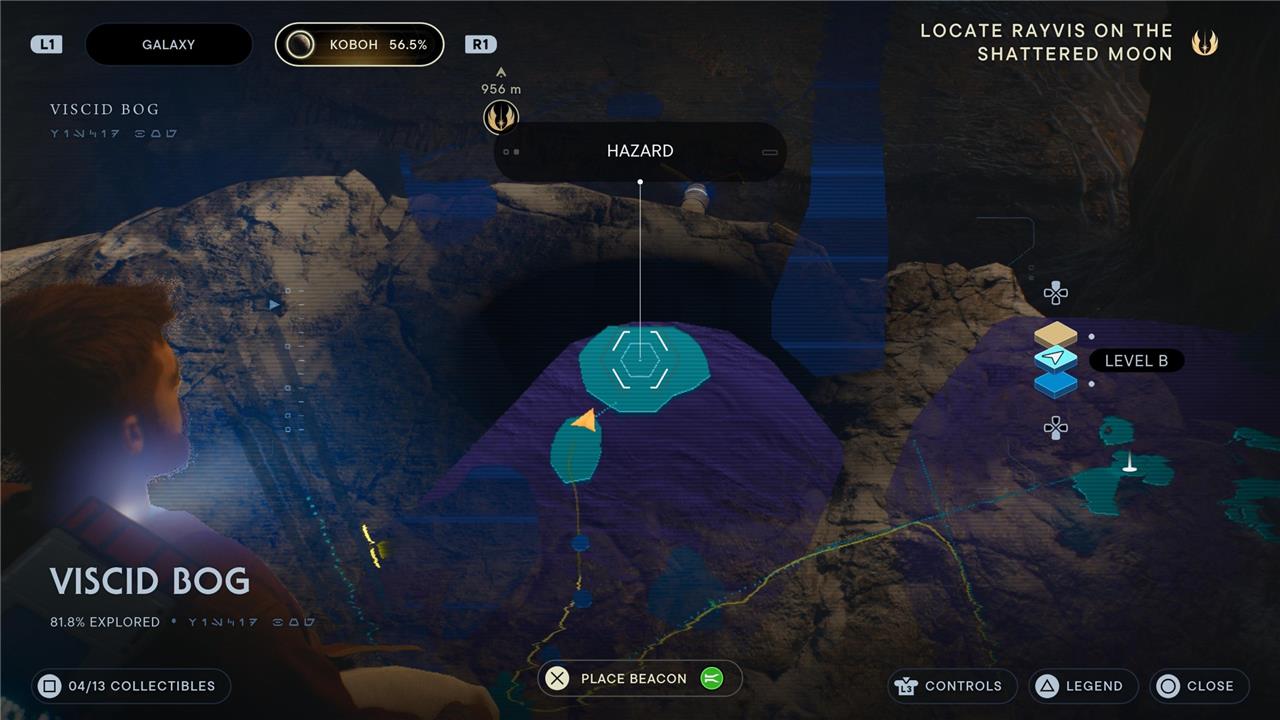
You’ll be able to find another stim canister shortly after you finish the mission in the Lucrehulk ship in the Viscid Bog area of Koboh. It’s available after you take the escape pod. Before you take the lift out of the subregion, you’ll see three stone spires you can Force Lift to create a path through the muck. Follow the path to an arena with a mini-boss fight against a big mogu and an even bigger mogu called the Mire Terror.
Use Force Confuse on the slightly smaller mogu. Then, while the duo is distracted, fighting each other, run over to the chest in the far corner to open it while the two giant beasts go at it – and grapple out of the arena before they come to their senses. Or, y’know, just take them both down.
Stim Canister 8 – Koboh > Derelict Dam
This Stim Canister can be found near the Derelict Dam area on Koboh. From the Meditation Point, head toward the dam and use BD-1’s Electro Dart to power a door on the right side of the main path. Inside, defeat the enemies and wall run to the upper ledge to reach a small alcove. The chest with the stim upgrade sits at the end of this short path, adding one more slot to Cal’s total healing capacity.
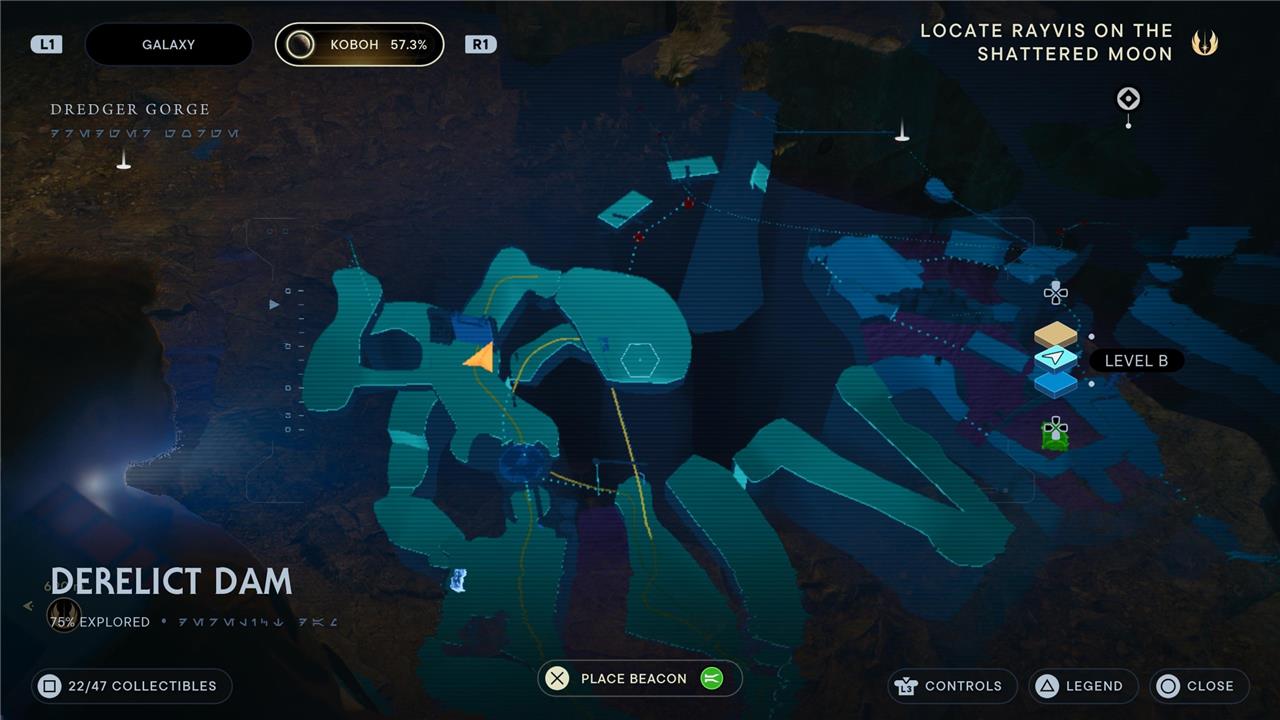
You need the Force Lift ability before you can get Derelict Dam’s stim canister. Head to the workbench in the area, then take the elevator to your right. Once you get to the top, Force Lift the door to your right. You’ll come to an arena that’s home to the Matriach Gorocco mini-boss. Don’t expect the same cakewalk as you did with the Mire Terror: Since there are no enemies you can use as a distraction, you will have to defeat this one before you can open the chest and grab the stim canister.
All stim canister locations on Koboh
Koboh hosts 7 of the 10 stim canisters in Star Wars Jedi: Survivor, each increasing your max stim capacity by one when collected from specific chests. These require story progress, abilities like wall-running or Force Lift, and often combat or puzzles.
Rambler’s Reach Outpost
Buy the Mysterious Keycode from Doma for 10 Priorite Shards to unlock the door on his left; the chest is inside. Accessible early after reaching the outpost.
Basalt Rift
From the meditation point, head west past a Mogu enemy near wall-run walls, climb vines, and follow the path right to the chest overlooking the area. Early-game spot near story path.
Foothill Falls
After taming animals (post-Forest Array), ride a Relter across the gap to the Abandoned Shack rumor area. Use a Nekko mount to reach a ledge, slice a terminal for a roller mine, and shoot it into the shack roof to access the chest.
Viscid Bog
Post-Lucrehulk escape, before the exit lift, Force Lift three tar pillars to cross to an arena; defeat the Mire Terror (large Mogu duo) for the chest. Needs Force Lift ability.
Derelict Dam
From the work-in-progress meditation point, ride the elevator up and Force Lift the right door to enter; defeat the Matriarch Gorocco mini-boss for the chest. Late mid-game.
Crypt of Uhrma
At the Crypt meditation point, enter the chime cave (backtrack if needed past droids), solve the wall puzzle combination to open the path to the chest. Requires puzzle knowledge from guides.
Observatory Understructure
After grappling past a fan and ambushing a Raider, slip through a gap, kill a trooper, toss a balloon platform out the window, grapple back to the upper floor, defeat Stormtroopers, and open the chest. Late-game area.
How to get Derelict Dam stim canister on Koboh
To get the Derelict Dam stim canister on Koboh in Star Wars Jedi: Survivor, you need the Force Lift ability, obtained during your third story visit in the Generator Underbelly. From the Derelict Dam meditation point (in Dredger Gorge), head to the nearby workbench, then ride the elevator up to the right.
Access Steps
Force Lift the door on your right to enter an arena with the Matriarch Gorocco mini-boss. Defeat it-dodge charges, parry slams, and attack during openings-then open the chest inside for the stim upgrade, increasing your max capacity.
Preparation Tips
The area may require a roller mine shortcut (slice terminal near meditation point, Force Pull/Push it to blow a tar wall) if not already unlocked. This mid-to-late Koboh stim is tougher than early ones like Basalt Rift due to the solo boss fight.