Leon’s fight in Chapter 10 takes a chilling turn as the ornate Ballroom becomes a gauntlet of enemies and traps, leading to one of the game’s most terrifying encounters-the Verdugo boss fight, where patience, precision, and quick thinking are your only lifelines.
Our Resident Evil 4 remake Chapter 10 walkthrough will ensure that you don’t miss any items from the beginning of the chapter through the Library (again), into the Ballroom, Antechamber, Depths, and Underground Laboratory.
Throughout this walkthrough, we’re not going to mention every item that anyone (or anything) you shoot drops – if you kill something, look for a loot drop.
Also, there’s a little randomness to the contents of crates based on your inventory and weapons, so you probably won’t find the exact same things listed below. The crates and barrels themselves will always be in the same locations, though. And all other items – keys, collectibles, and resources not found in crates – should be the same.
Head for the Throne Room
Move through the upper halls until you reach the large doorway leading toward the throne room. Take out any cultists and armored enemies as you go, using cover and precise shots to avoid being overwhelmed. Keep an eye out for treasures and resources on the side paths-they can help later against tougher foes. Once the area is clear, approach the ornate doors to trigger the next section of the chapter.
Now that Leon’s been freed, it’s time to go grab the things we couldn’t as Ashley. From the no-longer Headless Statue, head south into the Library. Any treasures you picked up as Ashley will be waiting at the door – specifically the Elegant Perfume Bottle, emerald, and sapphire.
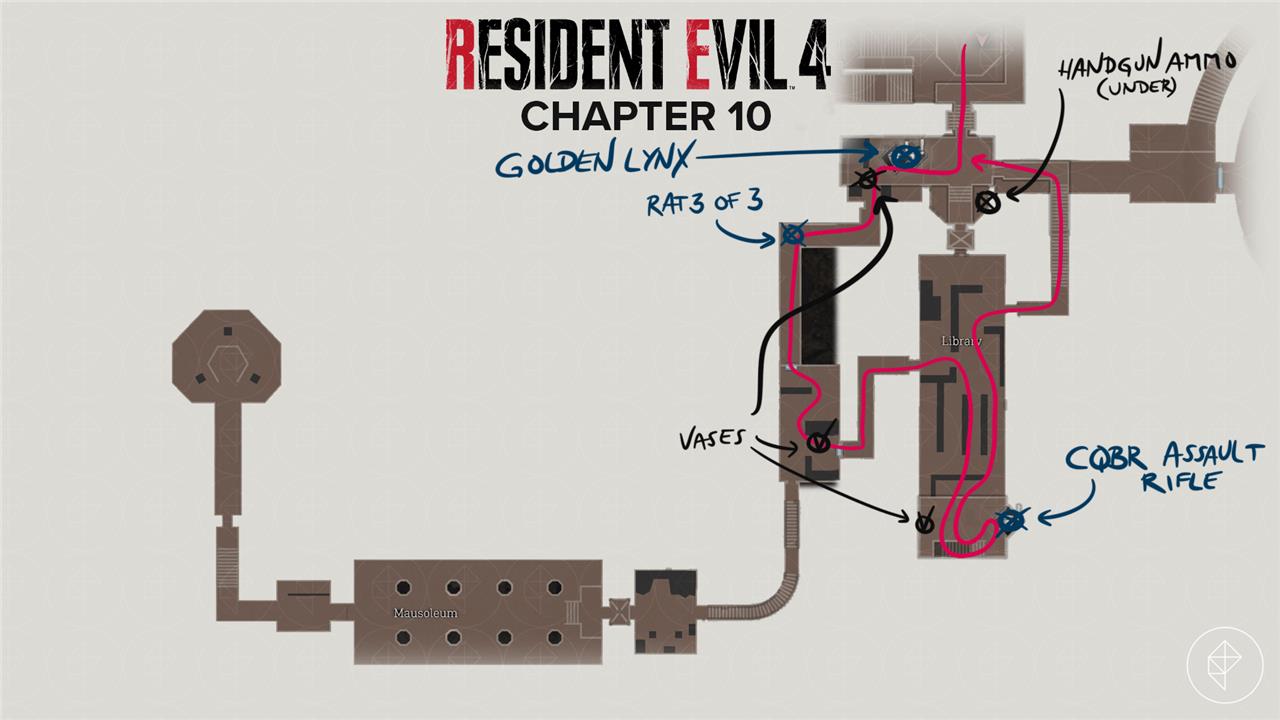
In the first room, grab the handgun ammo on the left and the Merciless Knight Blue Note Request on the right. Head through the door on the right.
In the dogleg hallway, shoot the Rat 3 of 3 to finish out the More Pest Control Request. In the next room, watch on your left for a vase with resources (L). Continue left into the Library proper. Deal with the Living Armor (Armadura) to your left, and then head to the right. At the south end of the Library, there’s another armadura to deal with. Head up the (secret) stairs.
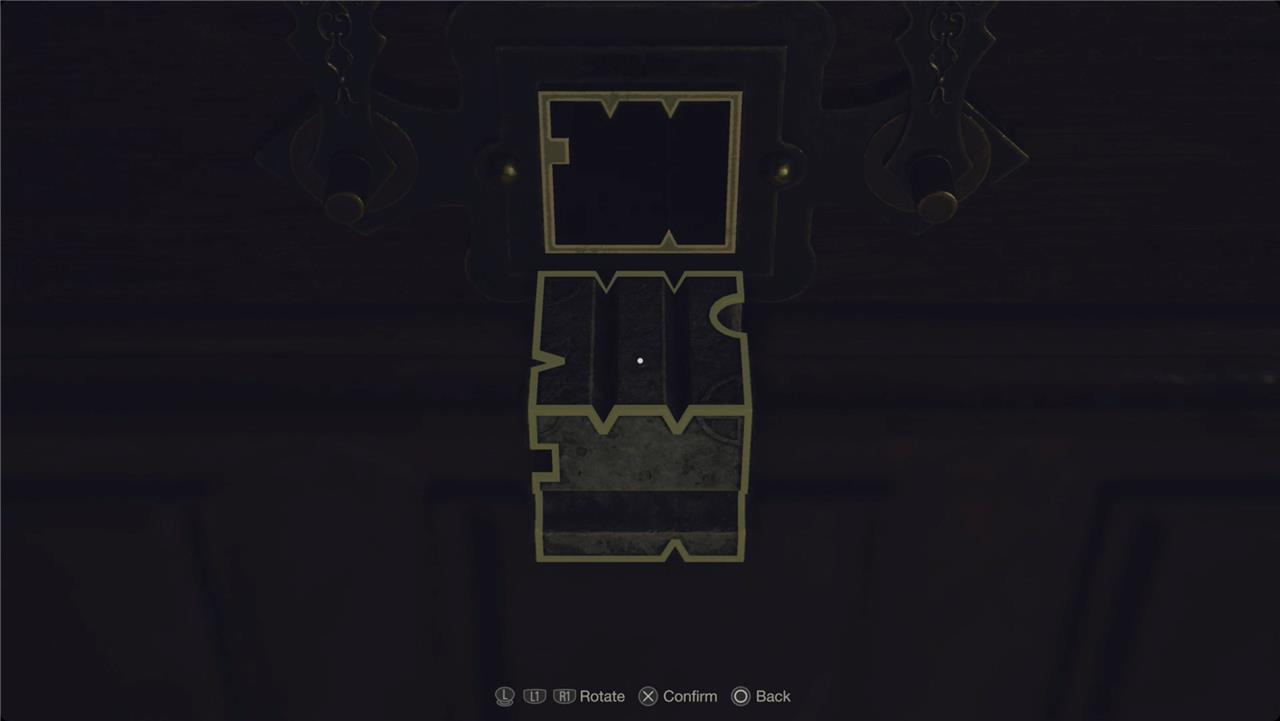
Loop around at the top of the stairs and smash the vase for some resources (L), and then turn around to find a Square Lock Box wall safe. Rotate the Cubic Device once left with L1, spin it once left (with the thumbstick), and then once down. You’ll get the CQBR Assault Rifle.
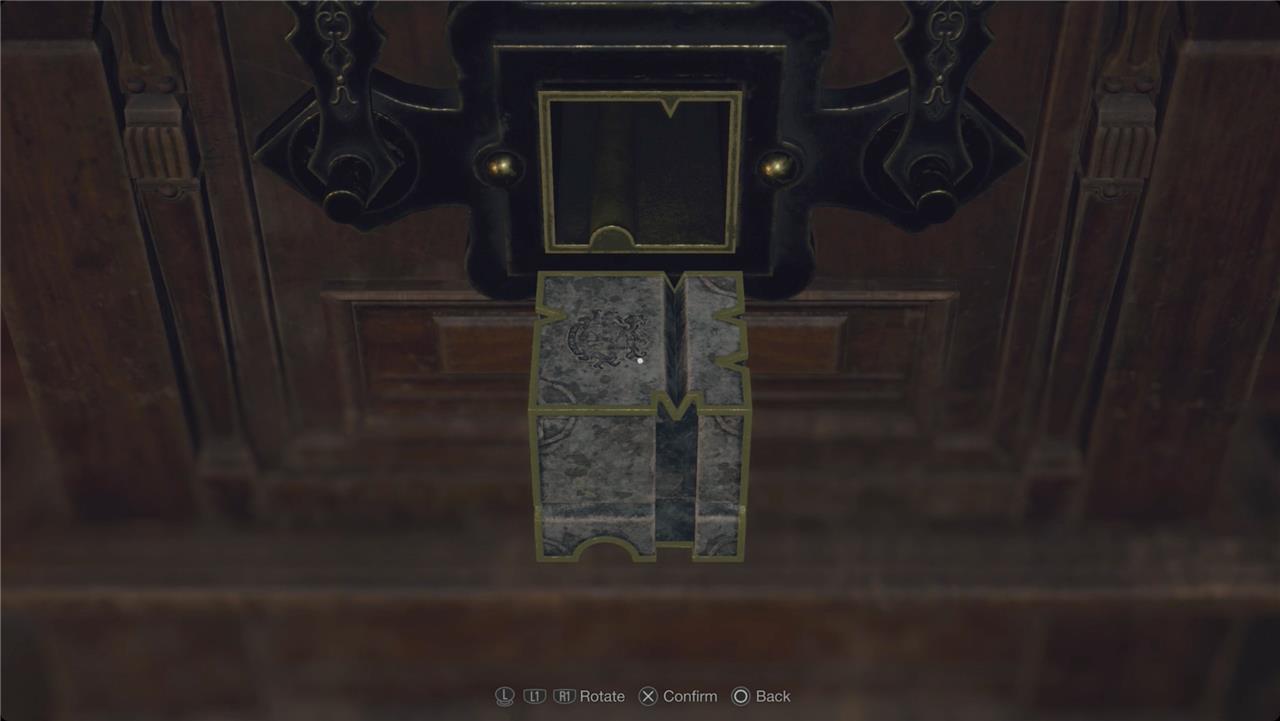
Back downstairs, head to the northeast corner of the Library and go upstairs. Solve the Square Lock Box here with the Cubic Device as well. Rotate the cube once to the right with R1. and that’s it. You’ll find a Golden Lynx inside.
Just past the treasure, look for a vase on your left with some gunpowder. Head out through the door overlooking the Grand Hall and loop around to kick down the ladder, and then head back into the Library.
This time, retrace Ashley’s path down to the Mausoleum. Just before the elevator, watch on your left for a vase with pesetas inside.
After the elevator, take an immediate right to find a vase in the corner with a hand grenade, pesetas, gunpowder, and magnum ammo. There’s a matching vase on the left with a spinel, more gunpowder, and pesetas.
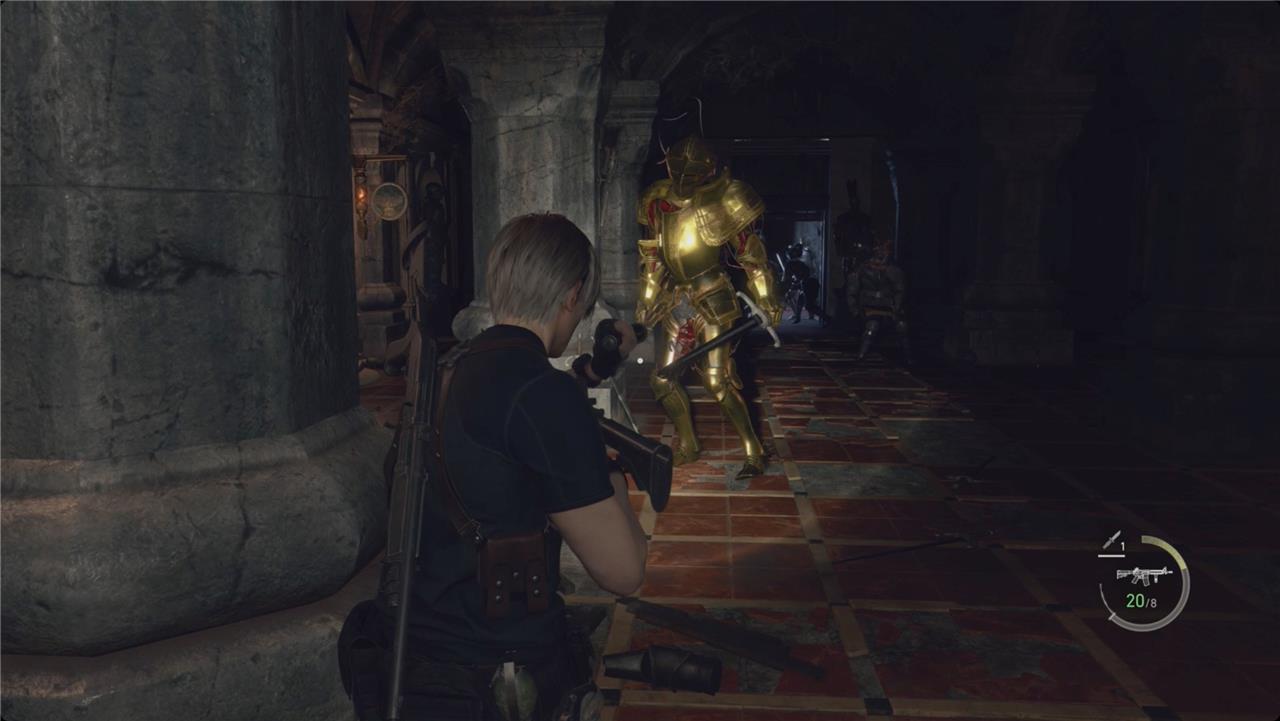
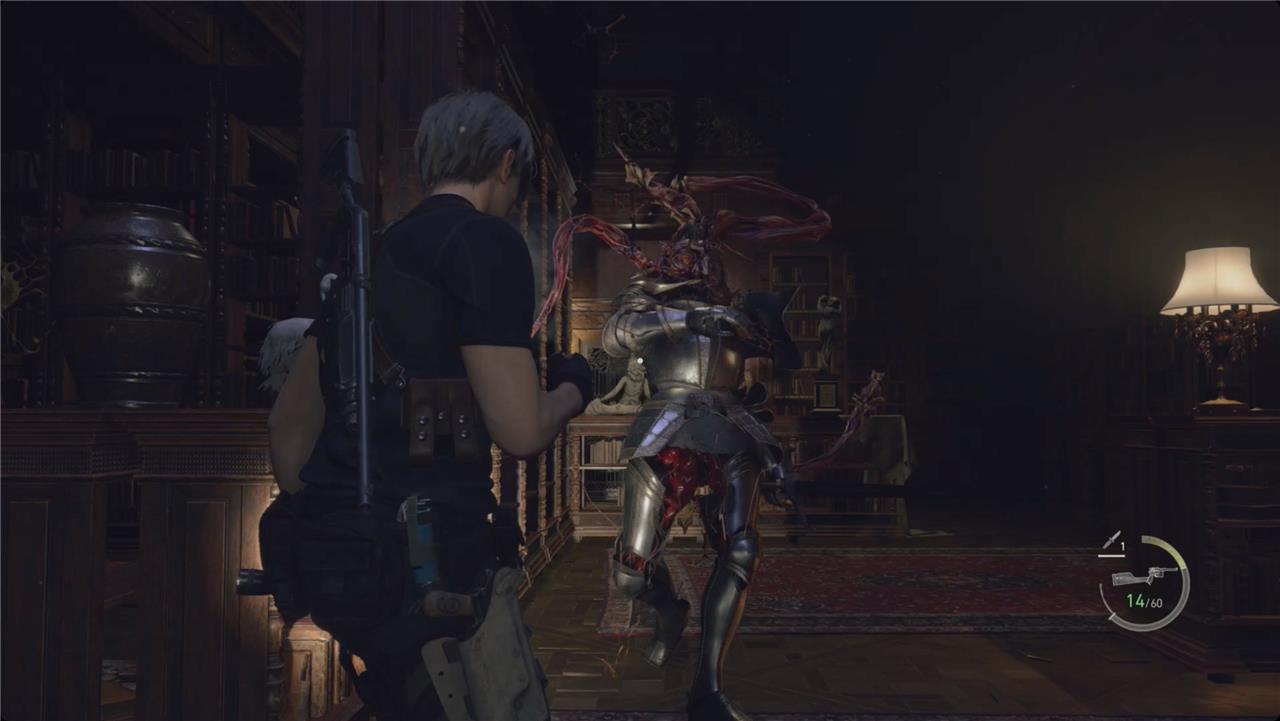
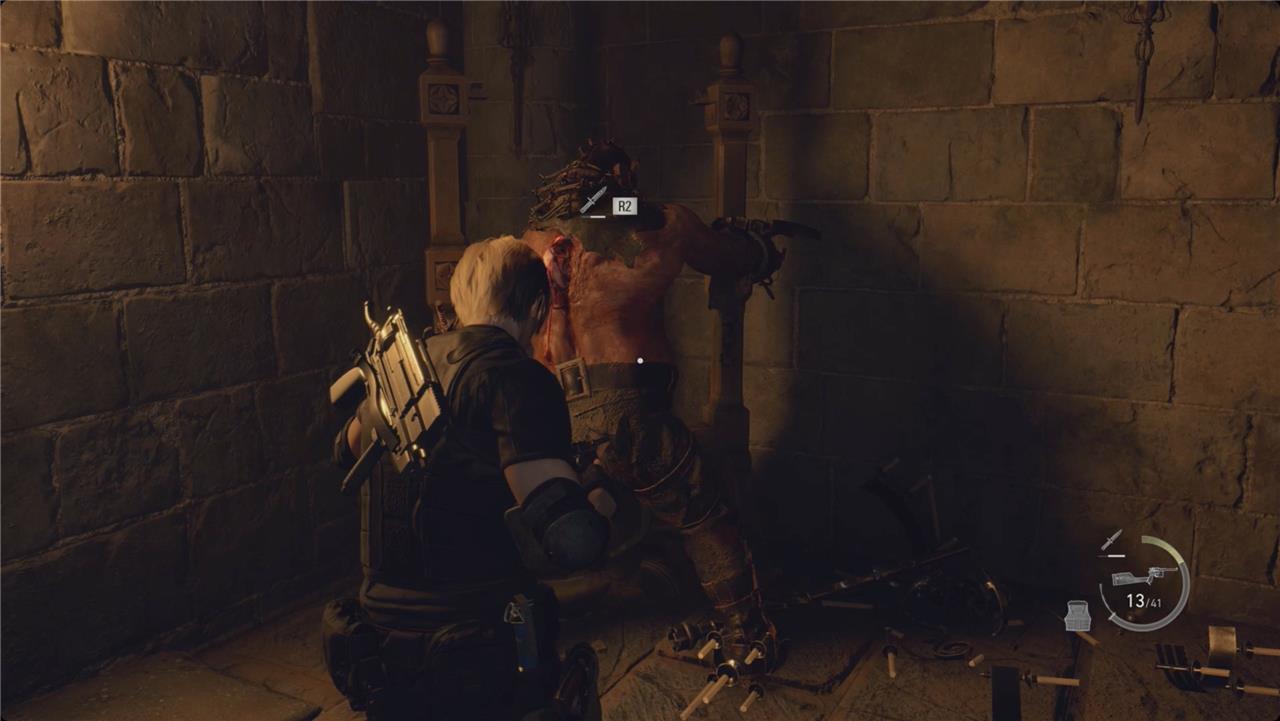
When you head a little deeper in, you’ll gets spotted by two armaduras and the Merciless Knight – another armadura in gold armor.
Deal with the normal ones first in the same way you have been – block their attacks until you can melee their helmet off and then destroy the plaga. The Merciless Knight is a little tougher. Run around behind it to see the plaga clinging to the back of the suit of armor. Get a few shots in to stun it, and then you’ll be able to knock the helmet off. Your new assault rifle will finish it off quickly.
Grab the yellow diamond the Merciless Knight drops and any other gemstones you see. Head all the way back to the Merchant in the Grand Hall.
Merchant
The Merchant appears near the start of Chapter 10, giving you a chance to restock before the upcoming fights. This is a good time to buy more ammo recipes, upgrade your weapons, and sell any treasures you’ve found in the previous areas. It’s worth tuning up the shotgun or rifle, as both will help against the tougher enemies ahead. Don’t forget to check his new inventory-some powerful gear becomes available at this stage.
At the Merchant, you’ll turn in three Requests for 16 spinels, and, with inlays, you should be able to sell your various treasures for over 80,000 pesetas.
He’s selling a few new things now – the Striker semi-automatic shotgun, the Recipe: Heavy Grenade, and resources (S). There’s nothing new in the Trade tab, but you’ll have quite a few spinels to spend – maybe pick up a new Attache Case if you want.
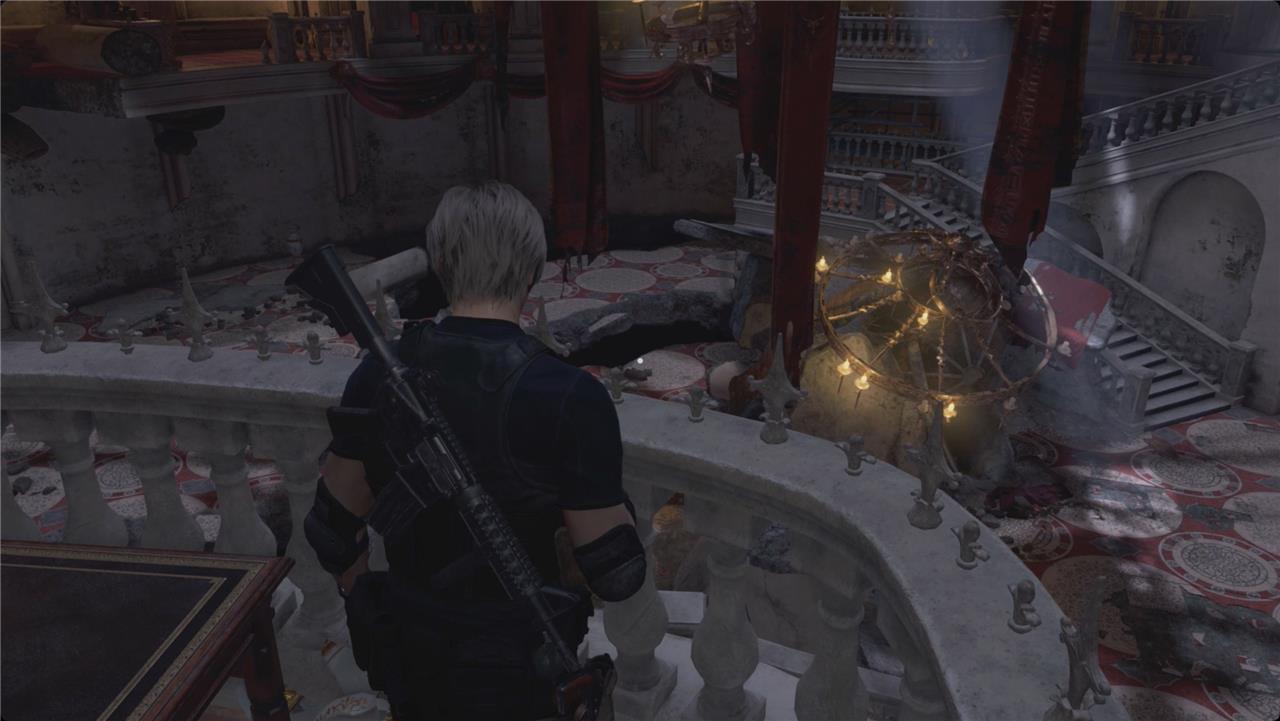
Ballroom
In the Ballroom of Salazar Castle, Leon and Ashley navigate a tense standoff against armed zealots guarding the elevated clock tower. Use the chandelier hoist to reach the upper level, then shoot the glowing eye on the ornament atop the clock to open the path ahead. Zealots swarm from side doors-prioritize headshots and grenades to clear them fast. A merchant waits below for upgrades, and crates hide extra ammo. The room leads straight to the sewers, where the Verdugo stalks in icy shadows.
When you’re ready, head back to the Headless Statue one more time. In the first room leading to the Library, take a left and push through the big doors.
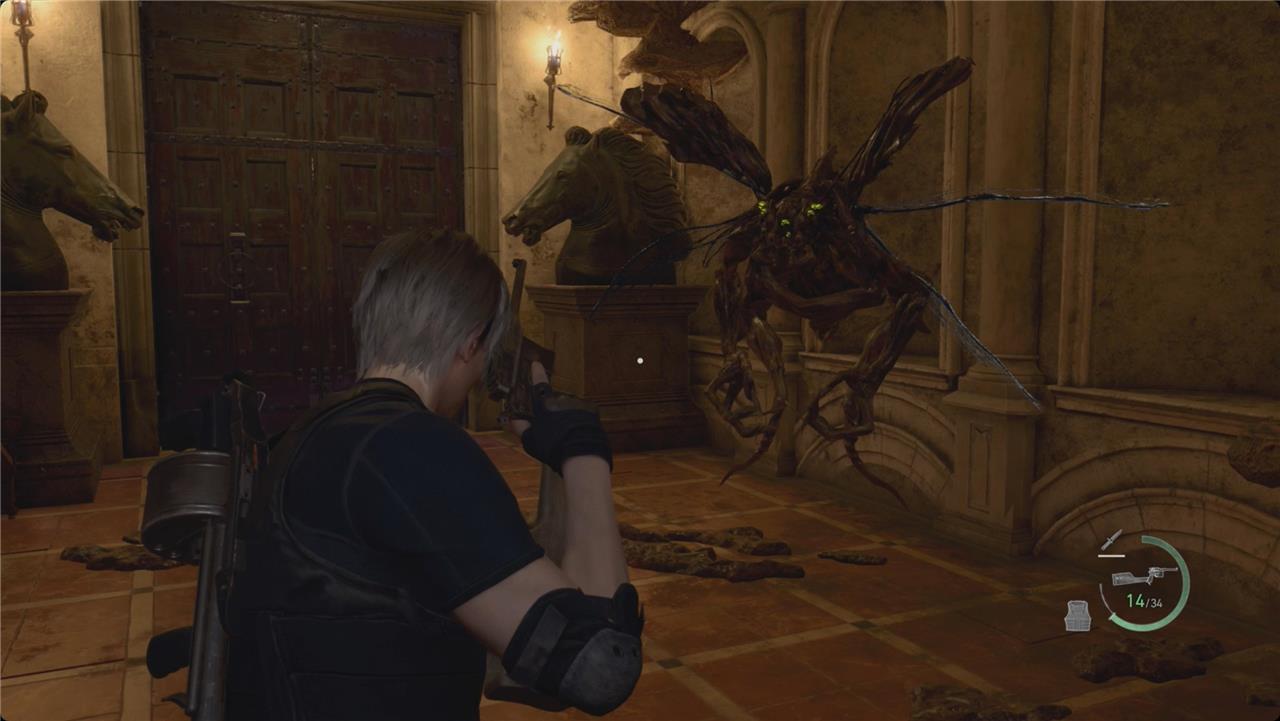
You’ll meet a couple new enemies at the end of the hall – the insect-like novistador.
The doors at the end are locked, so hop the railing on your left – at which point you’ll be attacked by two more. Take the stairs up and go through the door.
Smash the barrel just inside the door for some resources (L) and then turn left. Grab the gunpowder from the cabinet by the bed and smash into the other cabinet for some first aid spray.
Pick up the Chronicles of Pursuit 1 file from the table at the end of the room, and then head right to the next door.
Inside the Ballroom, grab the gunpowder on the table ahead of you, and then smash the vase for some resources (L). Take a right and go down the stairs. You’ll be attacked by a swarm of novistador and another pair will show up on your right as you get to the bottom.
At the bottom of the stairs, take a right and smash the vase for some pesetas. Turn left and unlock the big doors there – this leads back to that first hallway off of the Library.
Continue around counterclockwise until you pass a crate with some pesetas. You’ll get jumped by a pair of novistador on your left. Head into the middle of the Ballroom and snake around to the vase at the base of the stairs you just came down. Smash it for a hand grenade, resources (S), and pesetas.
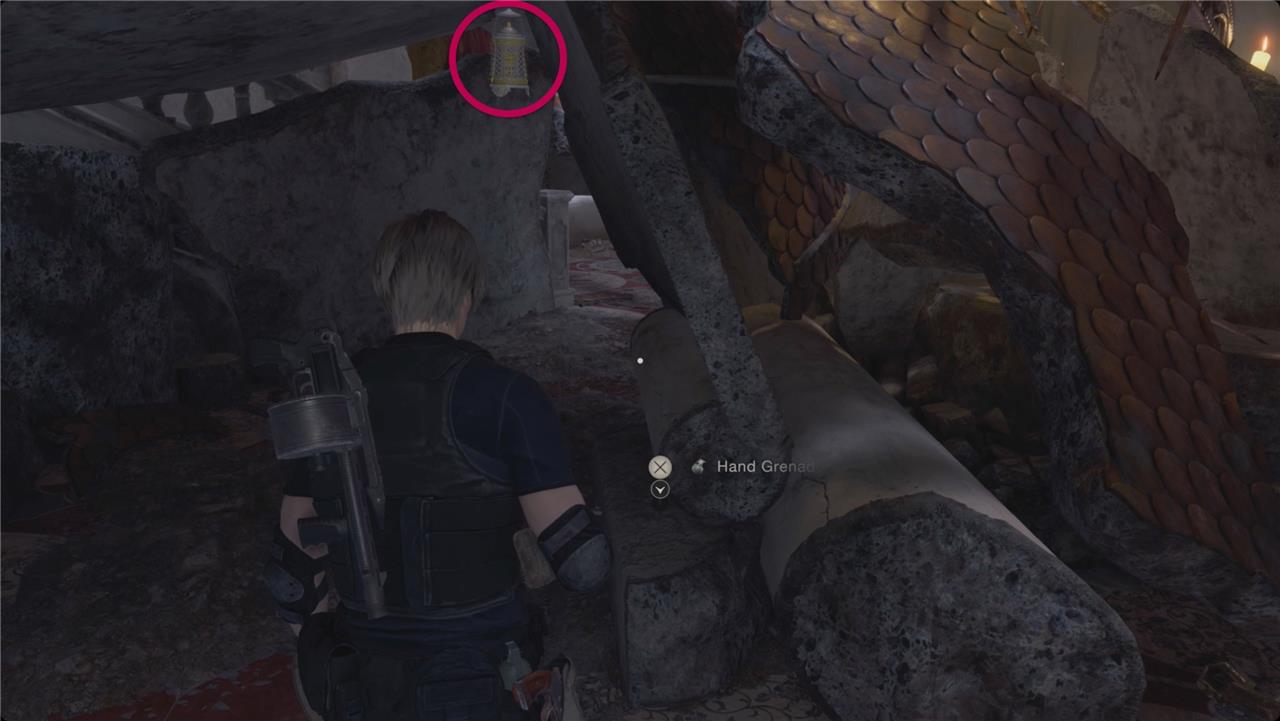
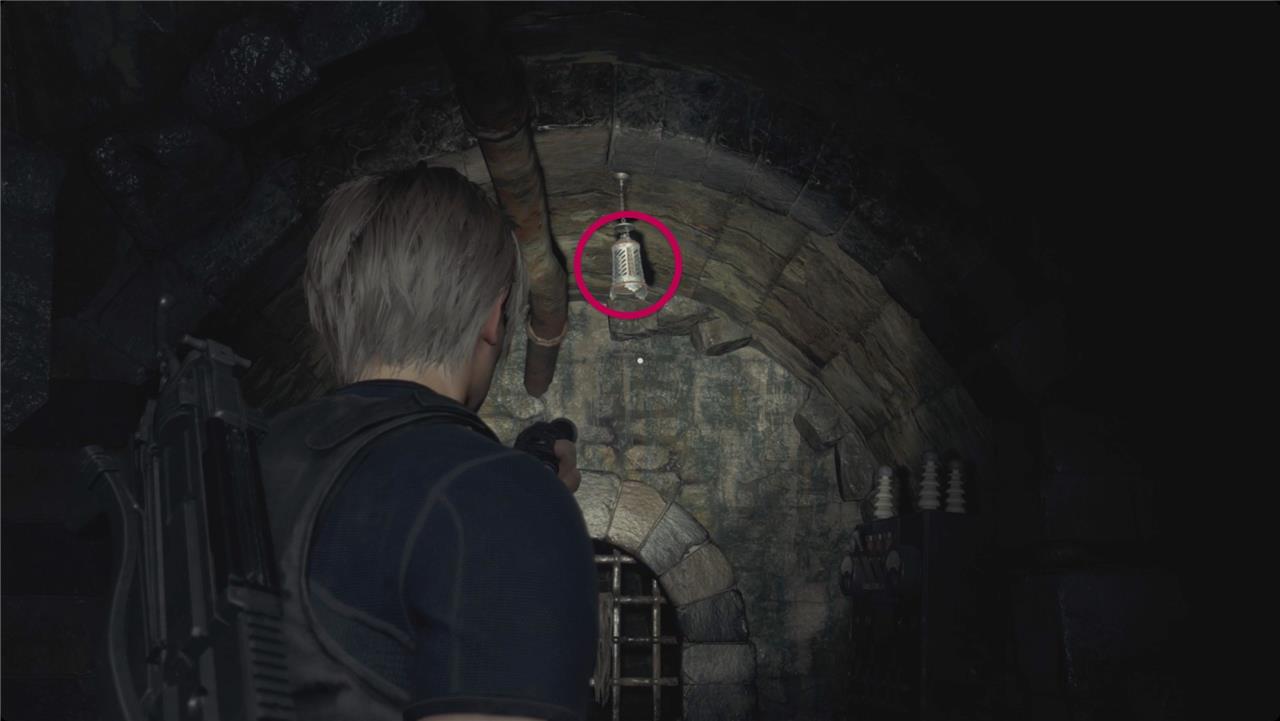
Look under the collapsed chandelier for a green herb, and then head to the left. There’s another hand grenade under the rubble and a lantern right above it with a ruby inside.
At the other end of that little tunnel, you’ll see another vase with pesetas and handgun ammo inside.
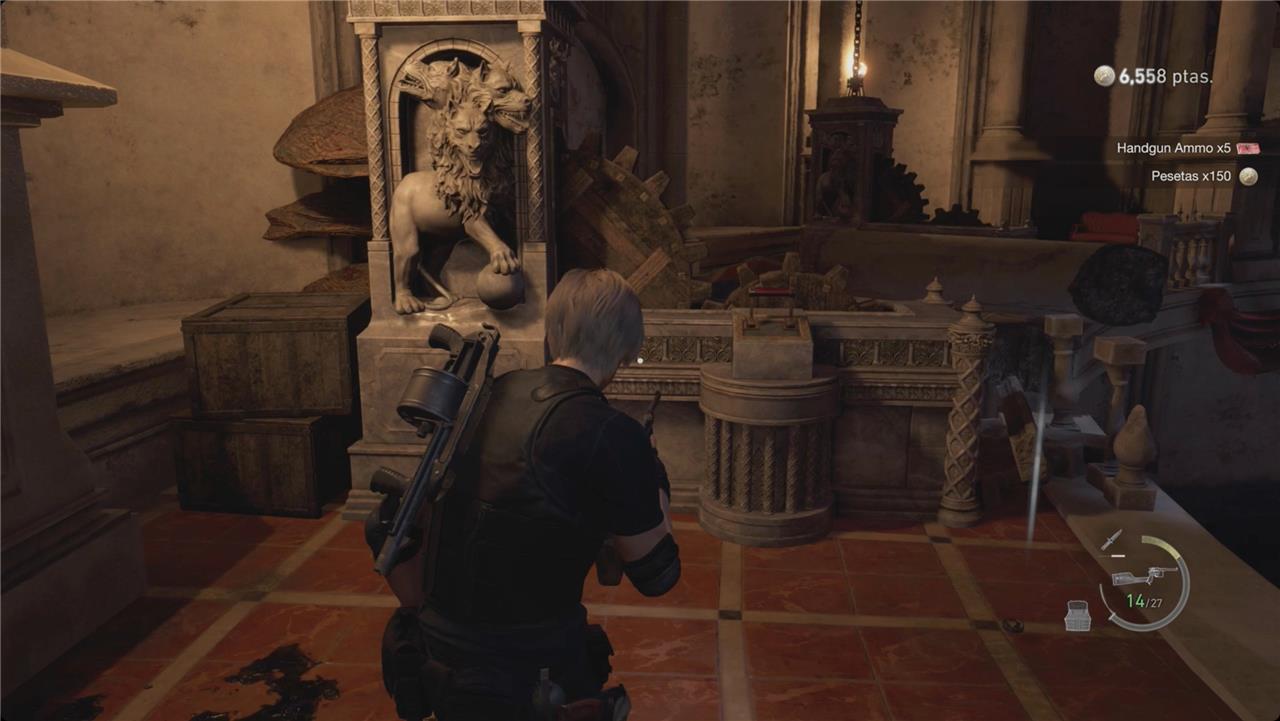
Go back to the base of the first set of stairs on the north side of the Ballroom. This time, take a right and follow the outside wall clockwise. Deal with a few more novistador, and then snake over to the crate for some handgun ammo and resources (L). Open the chest to the right for an Ornate Beetle.
Climb the ladder. At the top, deal with even more Unseen, and then throw the lever next to the Cerberus statue (nothing foreboding about that).
Drop off the ledge to the right and cross the room for one more vase with pesetas inside. Cross the room to the west and head up the other set of stairs (on the south side). Smash the crate at the top for some pesetas.
Follow the balcony around to a few more novistador. Watch on your left for a crate with even more pesetas. Grab the red herb from the table on your right as you pass. Take the second right into the offshoot room for a couple more novistador and a vase with pesetas inside.
At the end of the balcony, throw the second Cerberus lever and then drop down to head through the door you just opened.

On the circular stairs, smash the vase on the right for some pesetas, and then head all the way to the left for another vase with a velvet blue. From the landing there, look to the east and below the drawbridge. Shoot the counterweight to lower it partway.

At the top of the stairs, smash the vase on the left for some rifle ammo and then grab the handgun ammo from the railing on your left. Shoot the counterweight to the right of the drawbridge to lower it the rest of the way.
Before you cross it, consider heading back to the Merchant to save and grab the Bolt Thrower out of storage if you don’t have it with you. You’re about to face two Garradors and about a dozen zealots all at once, and you’re going to need everything you’ve got.
Antechamber
You enter the Antechamber after the Ballroom, a dimly lit room with scattered crates and a typewriter for saving. Grab the Shotgun Shells from the left shelf and the Velvet Pocket from the right table, which holds a Gold Bangle. Check the merchant’s stock here before pushing forward through the double doors to trigger the next sequence.
Across the drawbridge and inside the Antechamber, there are a lot of new friends for Leon.
The fight in the Antechamber is chaotic and there’s no secret solution to it (that we can find). Some general tips, though, include:
- Deal with as many zealots hand-to-hand as possible. Melee and parrying don’t make enough noise for the Garradors to notice or care.
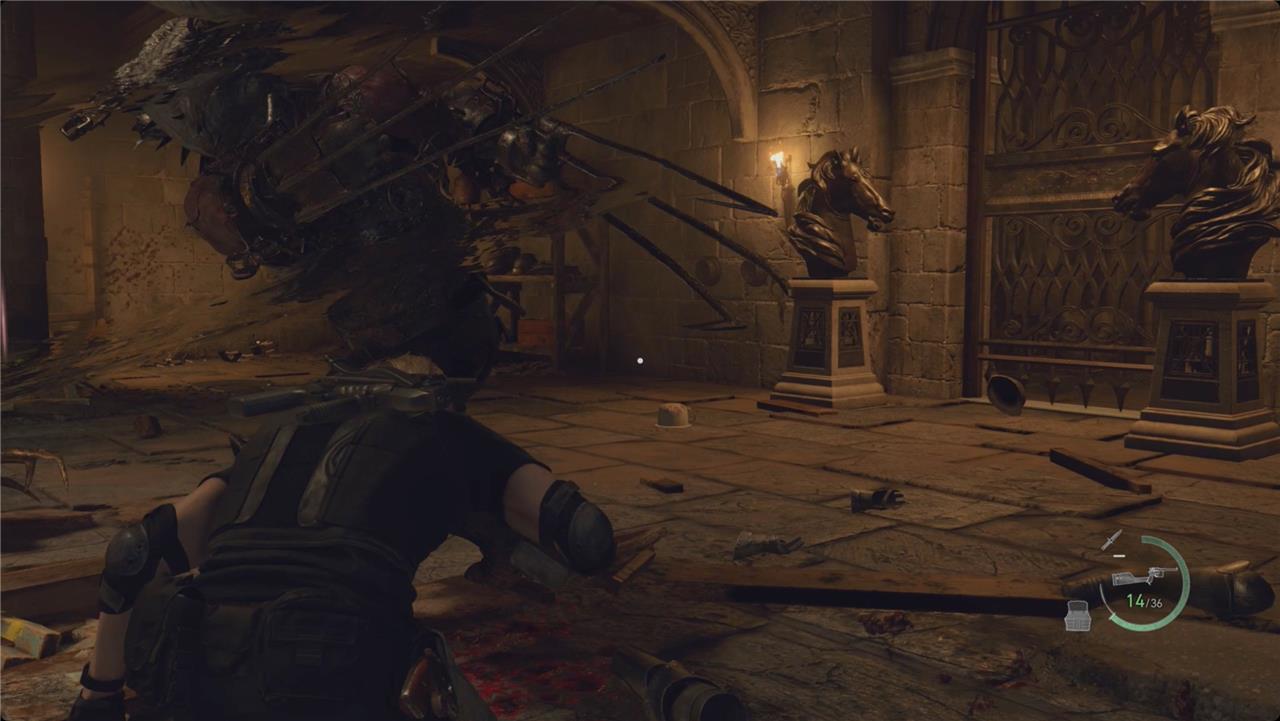
- Crouch a lot. Crouching makes you a little quieter, but it can also get you below the Garradors’ sweeping claw attacks.
- Hand grenades (and heavy grenades) are good because of the damage they do to zealots and also because the explosion will distract the Garradors.
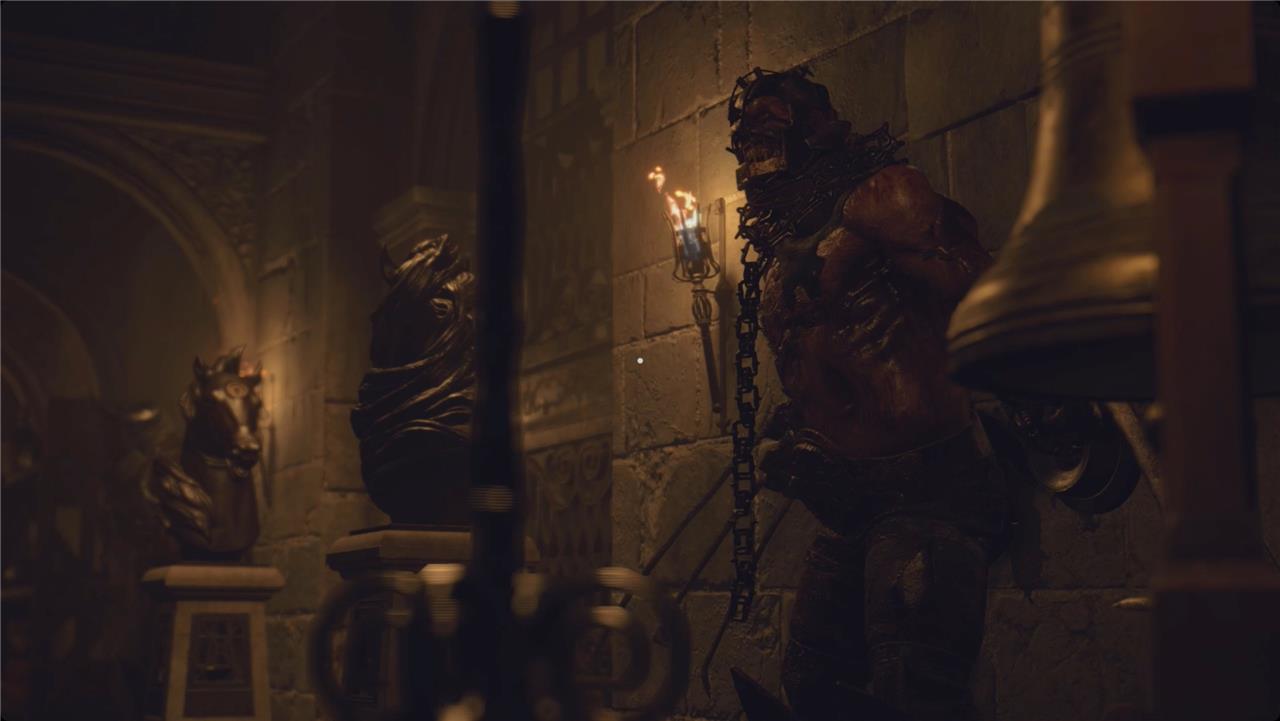
- Ring the bells – there are three around the room(s) – to draw the Garradors’ attention. A ringing bell will even trump the gun you shot to ring it. They’ll crash into the wall behind the bell and stun themselves for several seconds.
- Any time the Garradors are unaware of you or stuck, you can sneak up behind them to stab their parasite for extra damage. Their fronts are well-armored, but the parasite on their spines will always be at least a little exposed.
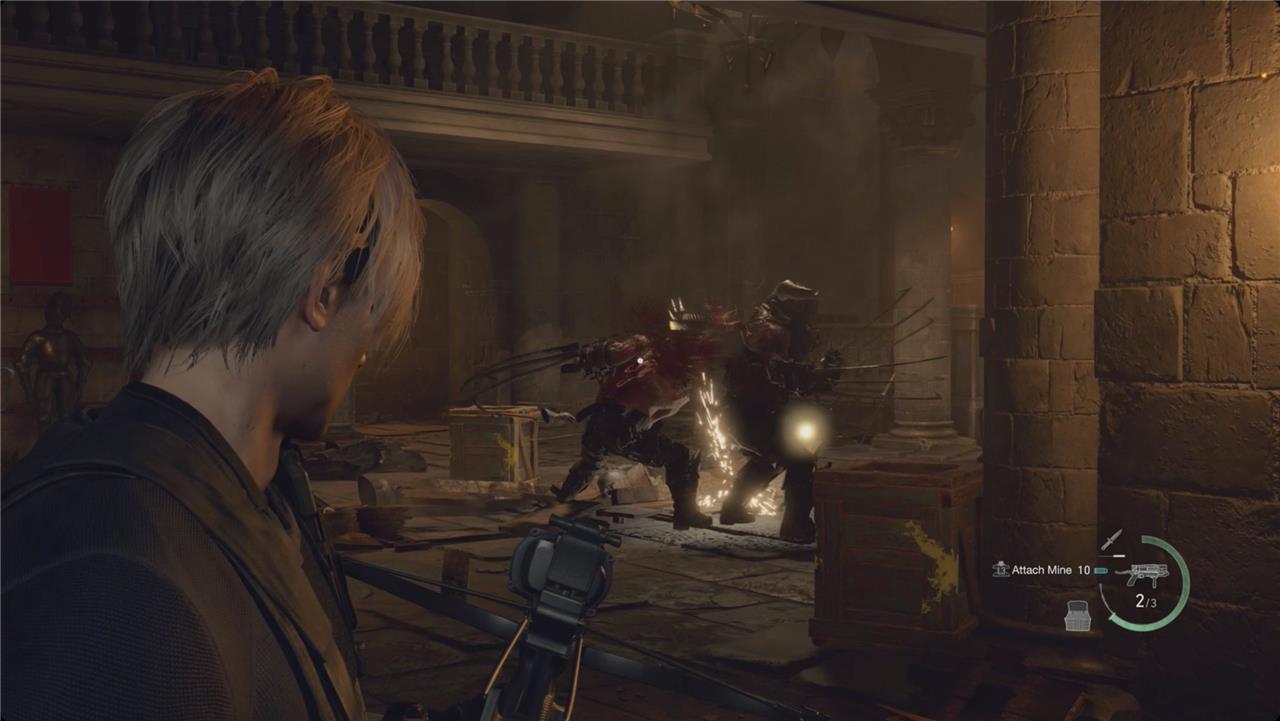
- Lure zealots into the paths of the Garradors. The Garradors crave only violence, so they’ll dice anything that gets in their way, including zealots and, occasionally, each other.
- The Bolt Thrower is good, but the Bolt Thrower with Attachable Mines is better. When the mines explode, the Garrador’s will head to the source of the sound.
On the lower floor, watch for a flash grenade, some bolts, and a vase with resources (S). There are more bolts upstairs along with a boot knife and some attachable mines.
We’re sure to have missed a couple of the default pickups in the room(s), but, by the end, there are going to be a lot of supplies to collect. The Garradors will each drop a Unicorn Horn.
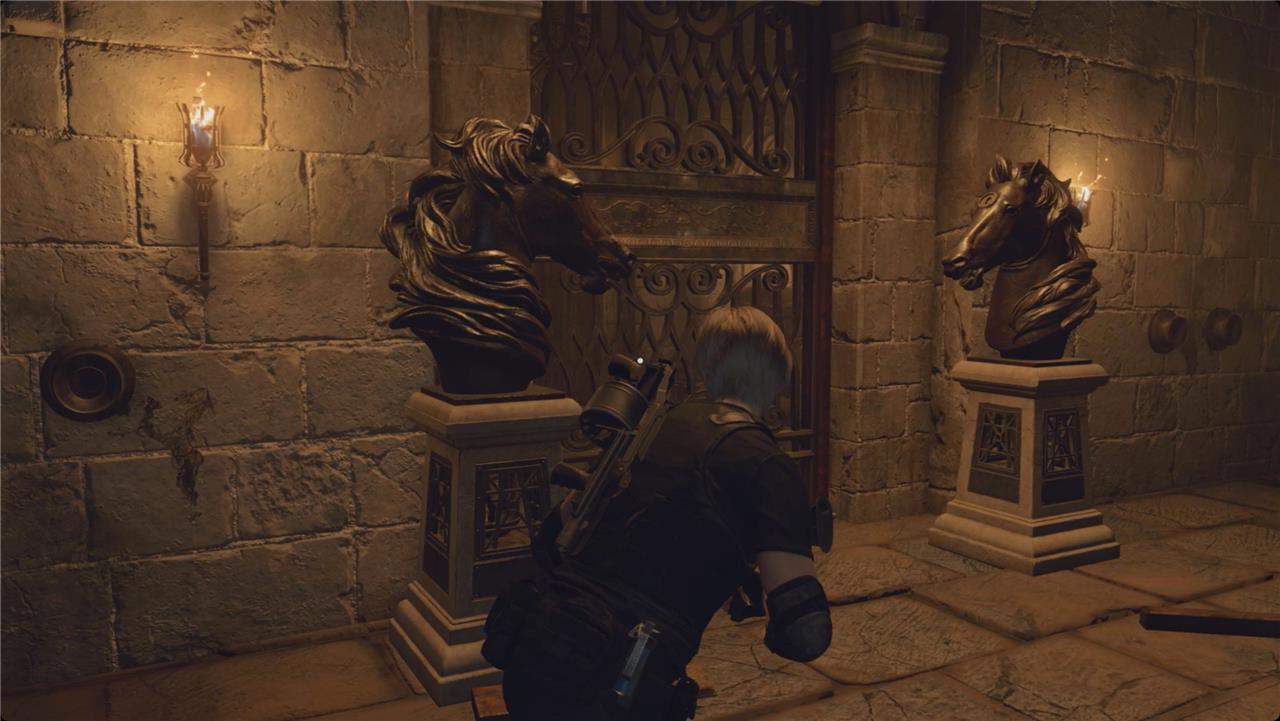
Place the Unicorn Horns in the two horse head statues (well, hornless unicorn head statues, really) by the gate to open it. Push through the next set of doors into the Throne Room.
After another cutscene starring the creepy little weirdo Ramon, Leon will take an express elevator to the next area.
Make your way to the surface // Depths
Climb through the sewer tunnels and scale the cliffs to reach the surface from the watery depths below the castle. Blast clusters of clustered dynamite along the path to clear blockages and enemies. Watch for falling debris and ambushes from soldiers as you ascend. At the top, a cutscene triggers before you enter the ballroom ahead.

When you regain control, start snaking your way along the only path you can. There’s a green herb on your left. Keep pushing through until you reach the large room at the center of the depths. There’s an underwater unseen here that will jump you. Keep an eye out for the disturbance on the surface of the water to put a few shots into it.
Continue around to the stairs and take them up. Drop off the other side. There isn’t anything to pick up, so just deal with the novistador when you find them – there are three.
When you reach the landing in the northwest, take a right and follow the stairs up and into the room. Grab the Prisoner’s Note file as you pass. Grab the Elegant Crown from the end of the hall.
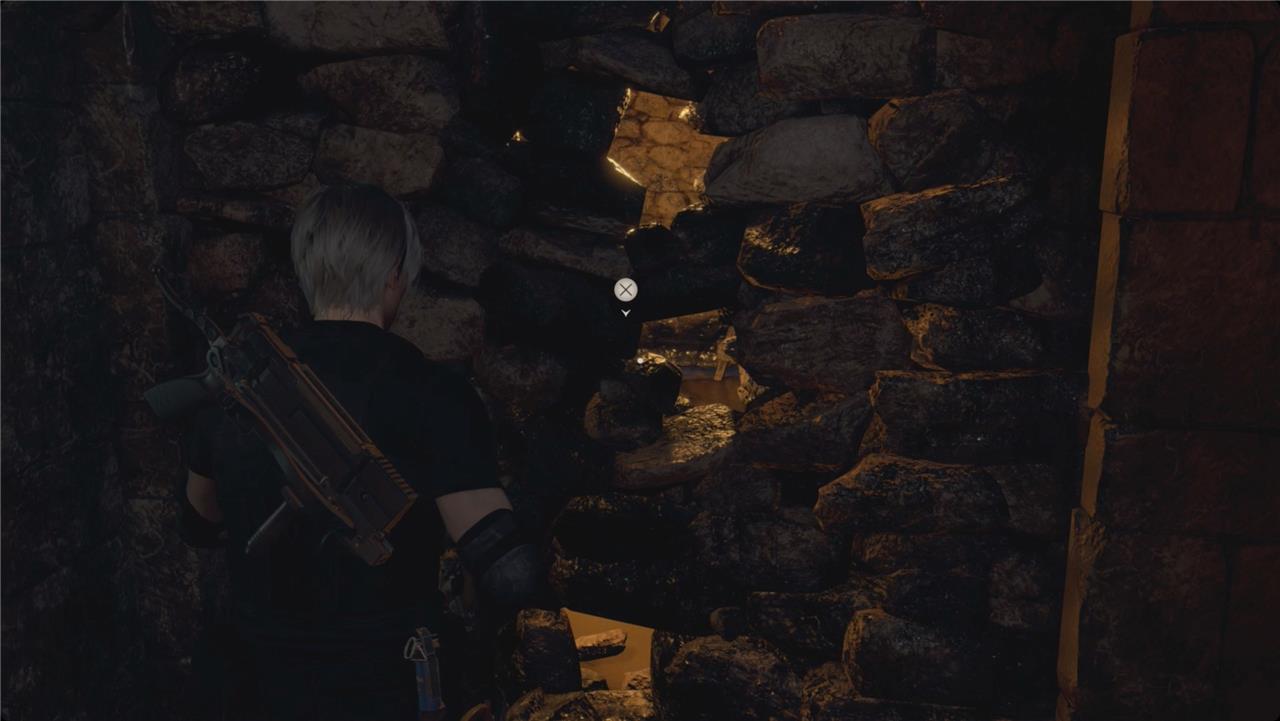
Smash through the wall on your left and look to the right for a yellow herb. Climb the ladder into the sewer.
There are two crates in the first alcove on your right with pesetas, resources (S), and a red herb. At the second alcove, smash the crate for some pesetas, and then look up to find a lantern with a red beryl inside.
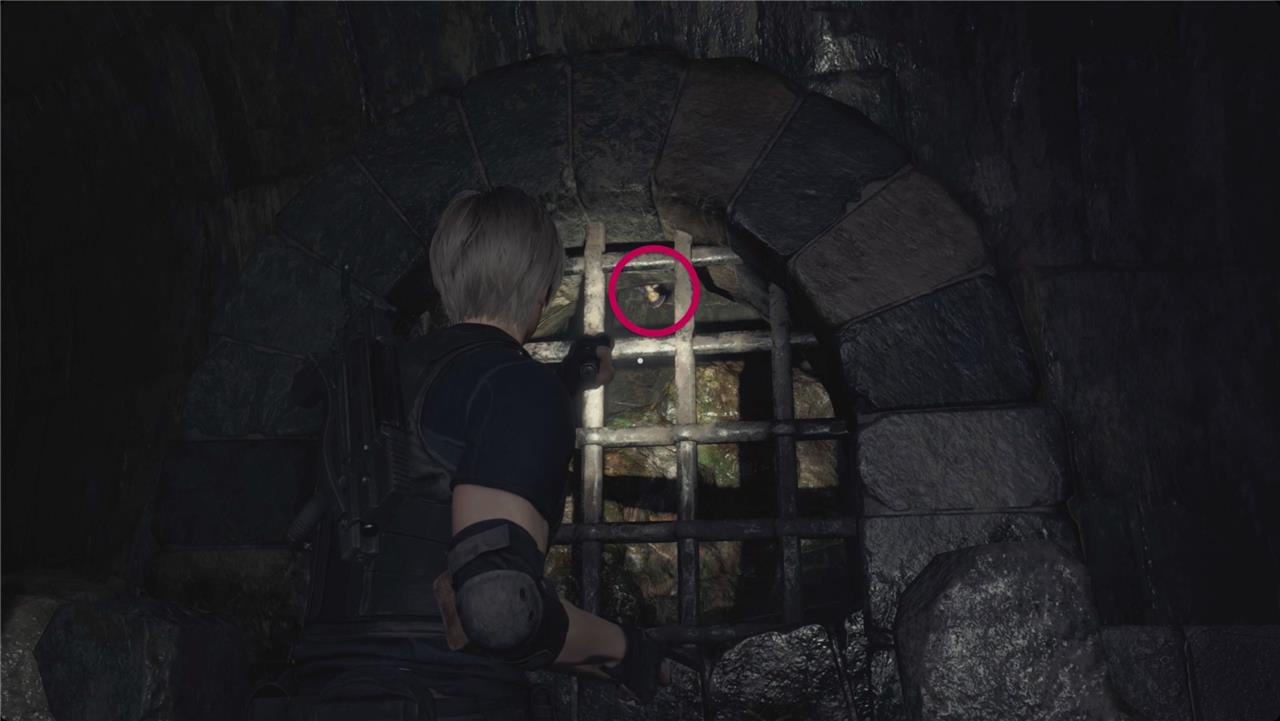
Push through the gate. The next left is the Merchant and a safe room, but before you go inside, turn to the right and look through the grate. Clockwork Castellan9 of 16 is hanging upside down behind it.
Inside the Merchant’s room, there’s a crate just inside the door with resources (S), pesetas, and shotgun shells. With the handful of gemstones we had laying around, we got the Elegant Crown up to 75,000 pesetas. Sell off any treasures you have, buy any tune-ups you want, and save at the typewriter.
Underground Laboratory
This underground section marks a tense shift in Chapter 10 as Leon follows the trail beneath the castle. The dim corridors are filled with eerie sounds, sudden ambushes, and scarce ammunition, demanding caution at every turn. Players must manage resources carefully while locating power controls that gate progress through the laboratory. The area builds pressure before introducing Verdugo, whose presence looms long before the actual encounter, heightening the feeling of isolation and dread.
Back outside, take a left. Grab the Emergency Liquid Nitrogen Showers file for some foreshadowing and then open the door.

In the next hall, do not push the button on the wall. That triggers the liquid nitrogen showers. We learned this the hard way. As you continue, note where the shower switches are, though – they’re going to be important shortly.
Take the first right and go through the door. Smash the crate on your left for rifle ammo and a boot knife, and pick up the Chronicles of Pursuit 3 file from the table ahead of you.
Check the shelves to the right for some handgun ammo, and smash another crate in the center of the room for some shotgun shells. There’s one more boot knife over by the elevator, and the Notice About Power Supply file is taped by the elevator door.
Head to the left and through the door. A couple steps down the hall, you’ll get a glimpse of something hunting you.
Look to the right at the first corner for a crate holding a hand grenade. Follow the hall back to the south. Take the next right and follow the tunnel until you come to a gate on your right. Inside, look to your left for a switch. Throw it to open a gate outside (but not the one behind you, frustratingly).
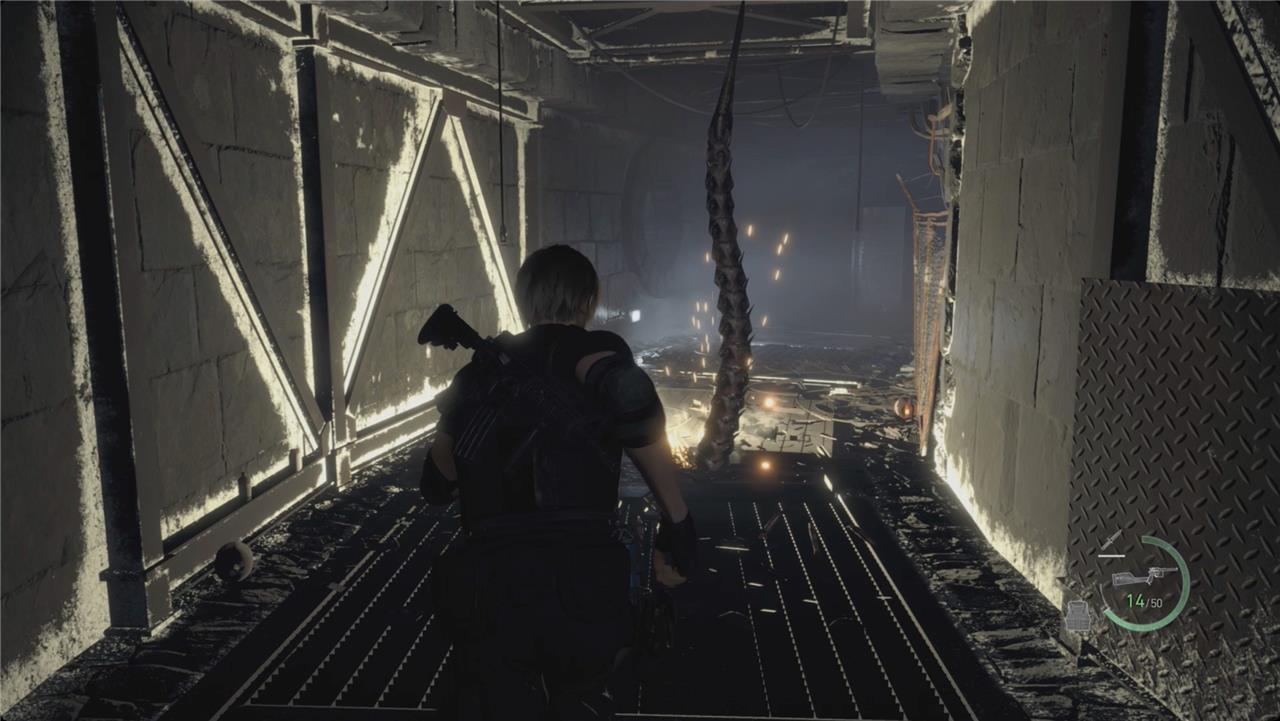
Back outside, keep going straight. You’ll get attacked by a tentacle from under the floor, so keep an eye out for the evade prompt. In the room at the end of the tunnel, you’ll get attacked again – from the ceiling, this time.
Grab the shotgun shells from the barrel ahead of you, and then work around to the back right corner. Throw the switch to restore power to the Depths.
How to defeat Verdugo boss fight
Grab the liquid nitrogen tank from the crane controls and freeze Verdugo during its attacks to slow it down. Switch to your TMP or rifle to shatter the ice and deal heavy damage while it recovers. Use the nearby pillars for cover against its lunges and tail swipes, and lure it into the laser trap by the exit door for massive harm. Keep moving to avoid grabs, and repeat the freeze-shoot cycle until the boss shatters completely.
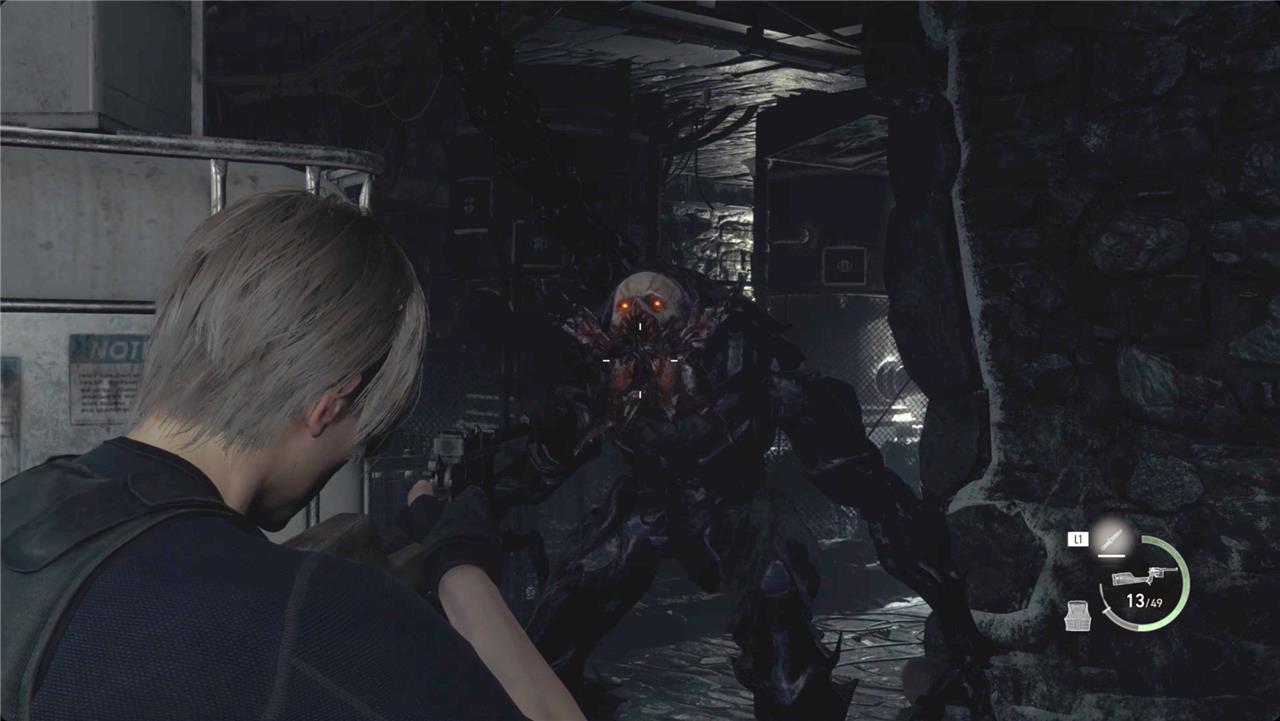
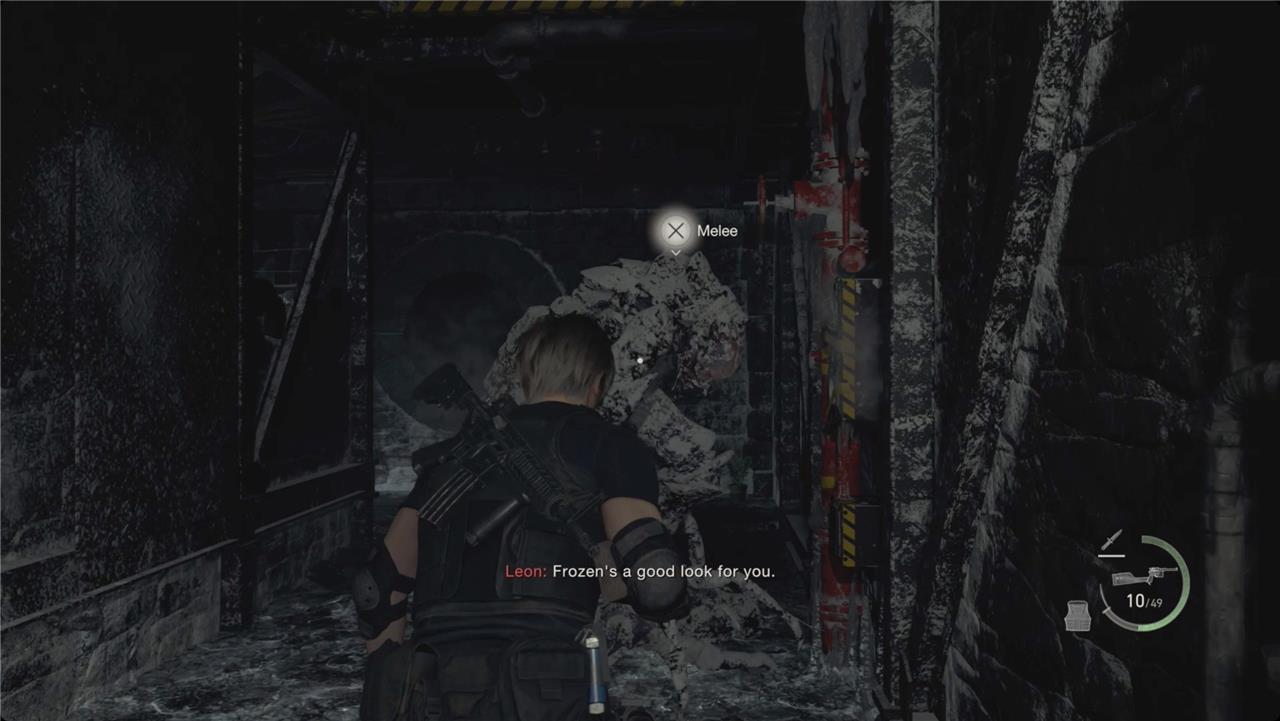
Verdugo – “Ramon’s lapdog” – will appear at this point and he’s fast. Also, you can’t actually kill him yet. Sprint back to the northern wall (northeastern, really) and hit the button to trigger the showers. When he is frozen, get in close and melee him.
Back at the doorway, use the wheel to crank open the door. Head down the main tunnel. Take the first left into that side room again. Open the chest at the right end for a yellow diamond and grab the first aid spray and gunpowder to the right.
Back in the main tunnel, take the next right. There are several crates around the outside of the room with gunpowder, resources (S), pesetas, resources (L), handgun ammo, a hand grenade, magnum ammo, and a heavy grenade. There’s also some handgun ammo on the boxes in the middle of the room. Get over to the door in the back right (southwest) corner. Unlock it and go through. There’s a shower button in the next hallway. Hit it to freeze Verdugo again.
Now you’re just buying time until the elevator (finally) gets down to you. There are two more shower buttons – one in the hall leading to the elevator and that very first one you passed. Use every one of them and employ a lot of bravely running away to keep yourself alive until the elevator gets there.
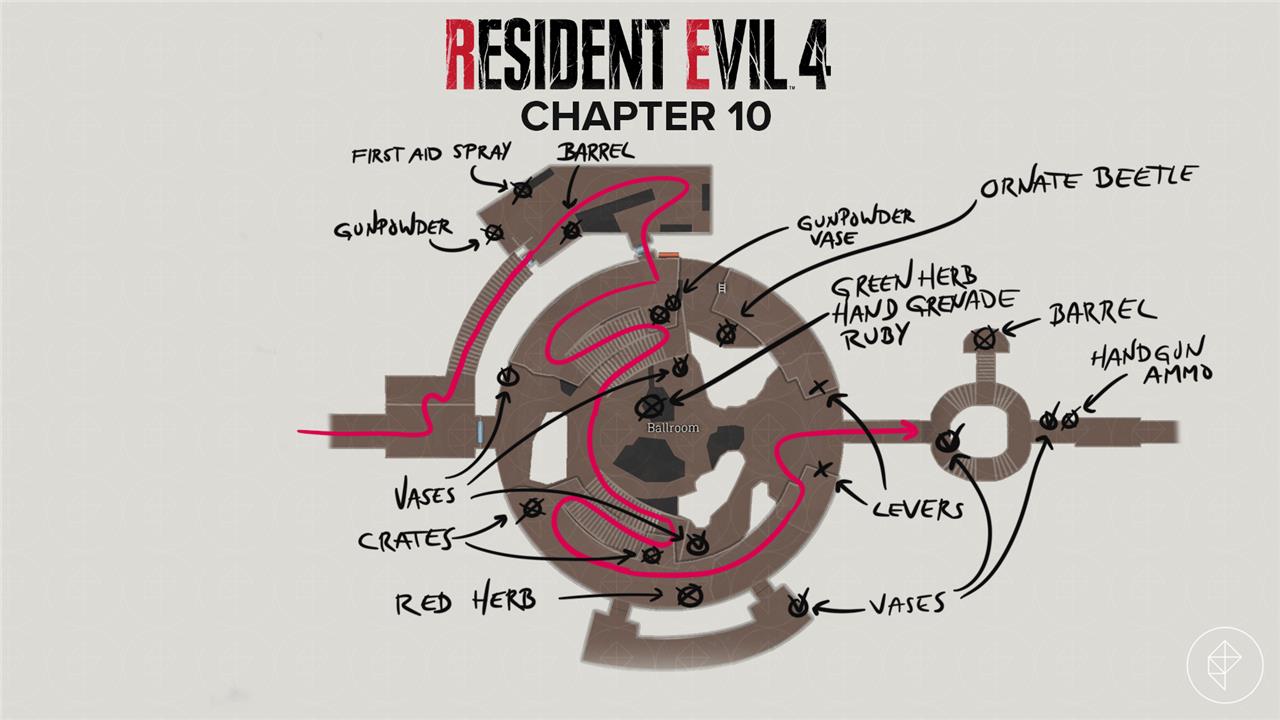
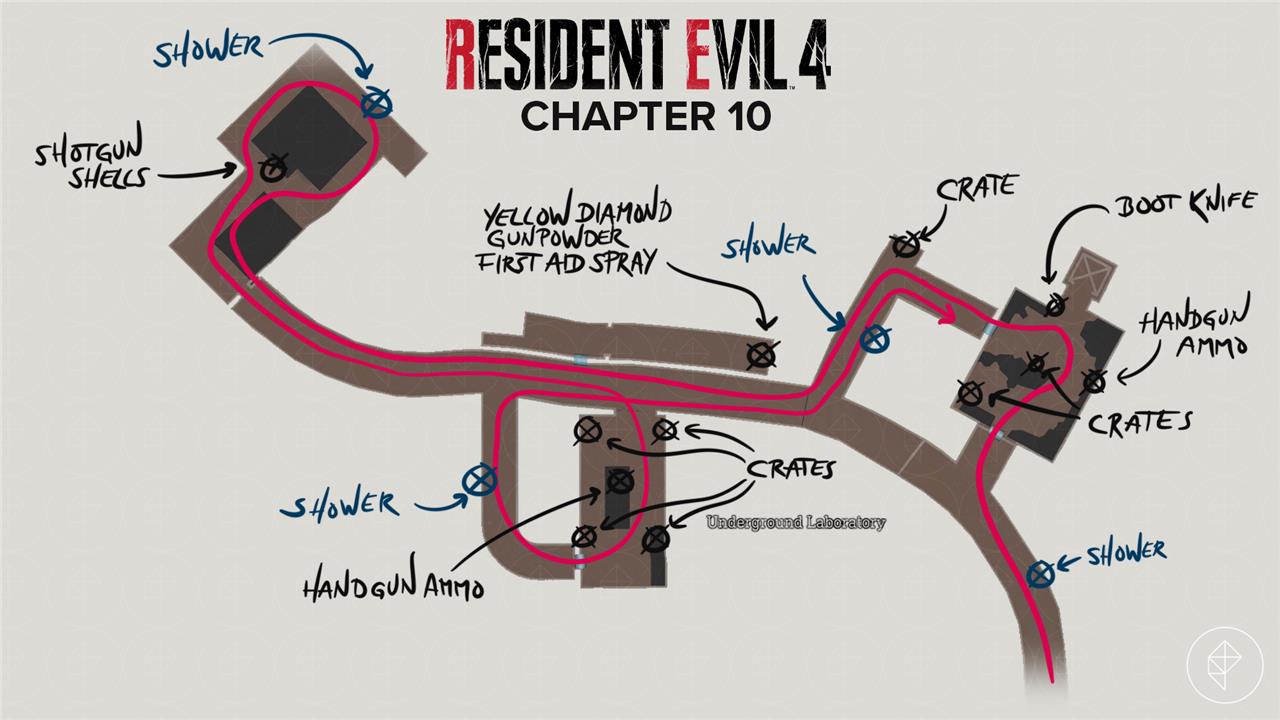
All collectibles and treasures in Chapter 10 Ballroom and Depths
Chapter 10 of Resident Evil 4 Remake features several treasures and collectibles in the Ballroom and Depths areas, crucial for 100% completion.
Ballroom Collectibles
-
Ruby: Under the fallen chandelier debris in the main Ballroom floor, inside a lantern you can shoot down.
-
Ornate Beetle: North side of the Ballroom ground floor; circle counterclockwise from the base of the first stairs to find it in a cabinet.
-
Unicorn Horn (x2): Dropped by the two Garradors (muscular claw enemies) in the Antechamber fight after the Ballroom; insert into unicorn statues to proceed.
Depths (Sewers/Lab) Collectibles
-
Elegant Crown: At the end of the flooded sewer hallway before squeezing through a gap and climbing the ladder.
-
Red Beryl: After the Elegant Crown, break the left wall, squeeze through, climb the ladder into the waterway; shoot down the silver lantern in the first left alcove.
-
Clockwork Castellan #10: In the Depths sewer, peer through a grate on the right before the Merchant room to spot and shoot it hanging upside down.
-
Yellow Diamond: In the Underground Laboratory, open the chest in the side room after cranking the wheel-open door.
-
Right Hand Trophy (optional): Fully kill Verdugo boss using all three nitrogen tanks for extra damage; drops upon death.
How to defeat Verdugo boss in Chapter 10
Verdugo in Resident Evil 4 Remake’s Chapter 10 is an optional full-kill boss; you can simply evade it until the elevator arrives (about 4 minutes) to progress safely.
Fight Overview
The encounter starts after restoring power in the Underground Lab Depths, as the creature ambushes during your elevator descent timer.
There are three nitrogen shower panels scattered around the arena: first hallway near entry, second by the elevator shaft, and third in the back room.
Lure Verdugo under each one by sprinting loops around pillars to dodge its lunges, tail swipes, and vent drops-activate panels just as it approaches to freeze it briefly.
Damage Strategy
While frozen, unload powerful weapons like the Rocket Launcher (one-shots if stocked), Magnum, Shotgun, grenades, or Bolt Thrower into its head or body for maximum damage.
Repeat the freeze-unload cycle three times; full kill yields the Right Hand Trophy (worth 1000pt bonus) but requires heavy ammo investment.
Prioritize evasion over direct confrontation, as Verdugo’s speed and grabs punish aggression outside freeze windows.