Twelve gods, one divine battleground-Euphrosyne challenges adventurers to test their strength against the powers of faith itself. Here’s where your next alliance raid begins in Final Fantasy XIV.
The Myths of the Realm: Euphrosyne alliance raid prerequisites
Players must complete the entire “Myths of the Realm” storyline to gain access to Euphrosyne. This means clearing the previous alliance raid, Aglaia, and finishing all key quests leading up to it. The quest “Return to the Phantom Realm,” which begins in Old Sharlayan from the NPC Fresh-faced Student, continues the narrative and opens the path to Euphrosyne. Reaching level 90 and completing Endwalker’s main scenario are also required before starting this content.
To unlock and complete Euphrosyne, you need to do the following:
- Complete the previous Myths of the Realm quest, “The Face of an Explorer.” (This requires you to obviously have beaten the Aglaia alliance raid.)
- Have one level 90 combat job.
- Have an item level of at least 595.
Where to unlock The Myths of the Realm: Euphrosyne alliance raid
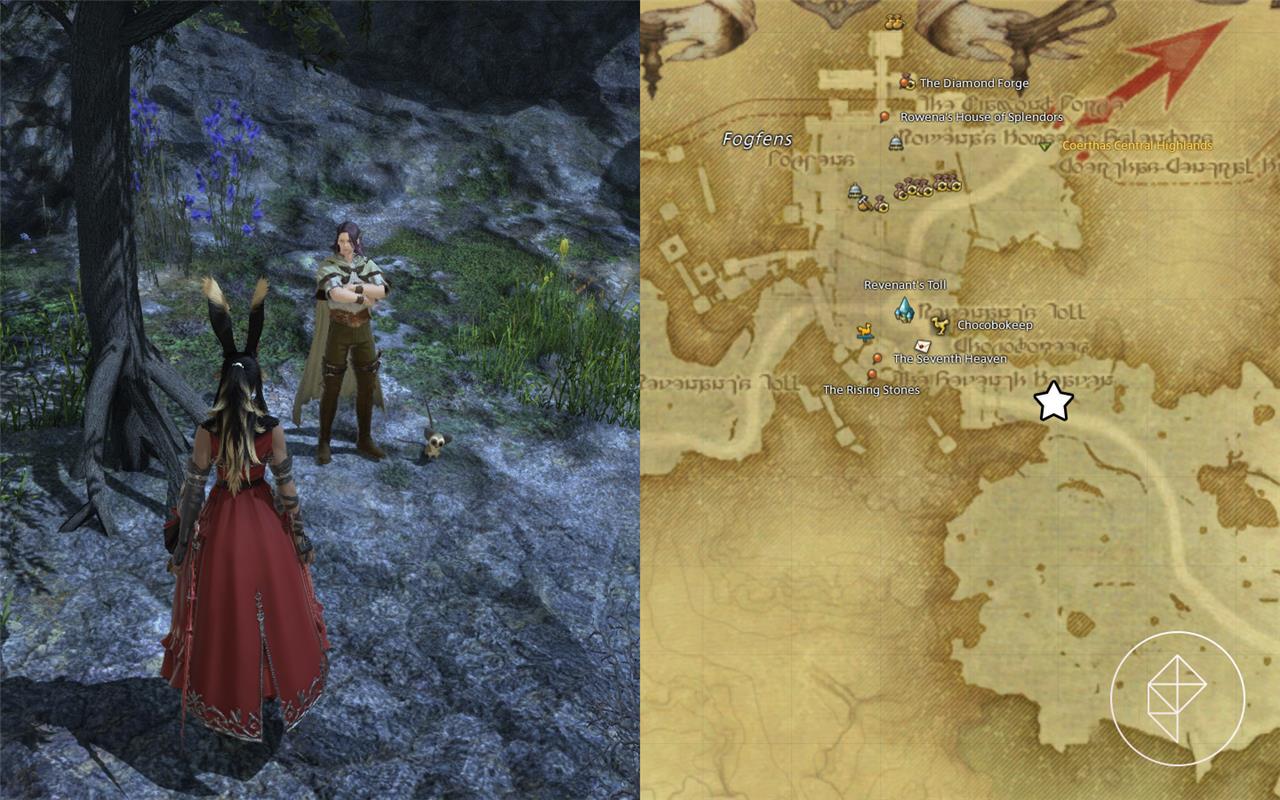
To access The Myths of the Realm: Euphrosyne alliance raid in Final Fantasy XIV, players must first complete the quest “Return to the Phantom Realm,” available from Deryk in Mor Dhona (X:23.9, Y:9.1). This quest appears after finishing all objectives in the previous chapter, Aglaia, from the same questline. Once accepted, follow Deryk’s instructions through a series of story-driven tasks that lead to the Euphrosyne raid entrance. The raid requires Level 90 characters with an average item level of 595 or higher.
Once you’ve met the above prerequisites, you’ll need to talk Deryk in Mor Dhona. He’ll have a blue quest marker above his head, giving you the quest “Return to the Phantom Realm.” He’s in the specific location marked below:
The Myths of the Realm: Euphrosyne alliance raid loot and rewards
The Euphrosyne alliance raid offers players a selection of coveted items from its treasure coffers, including high-ilvl weapons with vivid glamour options, armor pieces for multiple jobs, and orchestrion rolls that add new tracks to housing jukeboxes. Minions and furnishings draw from the raid’s aesthetic, while achievement rewards grant titles and mounts like the Euphrosyne Aetheric Ward. Weekly loot restrictions ensure fair distribution across the alliance, with tomestones convertible to gear upgrades at the venue’s vendor.
The Euphrosyne raids will reward item level 620 gear, which should help boost your stats a good amount (unless you have raid gear). Note that, until patch 6.4, you will only be able to claim one armor piece from Euphrosyne per week, so make sure to only roll for what you want. Don’t accidentally need or greed things you don’t want! The week resets on Tuesday mornings.
You can also get the Wind-up Halone minion, a Menphina Triple Triad card, and several Orchestrions (Dedicated to Moonlight, Rhythm of the Realm, and Favor) from Euphrosyne, which you can roll for freely without restrictions.
Once per week, you’ll also get an Euphrosyne Coin from completing Euphrosyne. You can trade one Aglaia Coin and one Euphrosyne Coin in for Moonshine Twine and Moonshine Coating to augment your Lunar Envoy tomestone gear. Trade in the coins at the NPC below in Radz-at-Han.
Euphrosyne raid boss guides and mechanics
Euphrosyne Overview
Euphrosyne is a 24-player alliance raid from FFXIV patch 6.3 in the Myths of the Realm series, featuring bosses Nophica, Althyk & Nymeia, Halone, and Menphina. Each boss has unique mechanics emphasizing positioning, debuff management, and pattern recognition, with enrage timers on some fights.
Nophica (First Boss)
Nophica uses arena-altering attacks like Landwaker for knockbacks and Reaper’s Gale for checkerboard AoEs, requiring players to move between safe zones. Floral Haze applies March debuffs that force movement in random directions, overlapping with circle AoEs and Sewing Circle expanding rings-pre-position to end up safe. Matron’s Plenty and Harvest cycle resets the arena with raid-wide damage.
Althyk & Nymeia (Second Boss)
This duo must be tanked separately to avoid their Sibling Revelry buff; they share health when one is low. Key mechanics include Lovers/Attraction Reversed debuffs (face away for pink Lovers, toward for green), fire/ice countdowns (stop for red Fire, keep moving for blue Ice), and an 8-minute Arcane Triumph enrage. Floral Haze returns with forced marches during Giving Land AoEs.
Halone (Third Boss)
Halone demands memory and pattern recall: Thousandfold Thrust shows expanding cleaves, Lochos spawns spears for quadrant line AoEs (one safe quadrant per set). Glacial Spears must be destroyed before her Fury’s Frost enrage fills, with barriers trapping players near spears; watch for knockbacks and ice spreads.
Menphina (Final Boss)
Menphina has two phases with moons and ice. Phase 1: Blue Moon raid-wide, Full Bright line from outer moon, Midnight Frost half-room cleaves (move opposite ice/boss face). Phase 2 adds Tetrapagos (memorize random telegraph order), Playful Orbit cleaves, Moonset jumps to circles, and Winter Halo donuts-gather near boss. Defeat four pillars before Lover’s Power enrage; watch edges to avoid falls.
Nophica boss strategy and phase transitions
Nophica, the first boss in FFXIV’s Euphrosyne alliance raid, cycles through four repeating phases tied to arena transformations via Matron’s Plenty and Matron’s Harvest. These transitions deal raid-wide damage and alter the battlefield-pink flowers for Spring (point-blank AoEs) or green forest for Summer (donut AoEs)-with brambles at edges to avoid.
Phase One: Plenty and Harvest
Nophica alternates Matron’s Plenty/Harvest with The Giving Land knockback AoEs and Reaper’s Gale checkerboard patterns across the arena. Floral Haze applies random “Face” debuffs (e.g., Right Face) that trigger forced marches, overlapping with AoEs-pre-position so your march lands you safely after the first set explodes. Sewing Circle adds expanding rings during this cycle.
Phase Two: Matron’s Breath
Two fields spawn (blue circles, yellow triangles) alongside matching-color beams that explode in sequence. Stand in the field color matching the next beam (watch pips or rings), swapping between fields between blasts. This phase focuses on color coordination amid raid-wide damage.
Phase Three: Plenty and Harvest Plus
Repeats Phase One but adds Sewing Circle (outward-moving circles) and Sowing Circle (four rotating AoEs from boss). Time movements for overlaps with forced marches and checkerboards, staying mindful of knockbacks.
Phase Four: Furrow and Heaven’s Earth
Introduces Heaven’s Earth (random stack marker to split) and triple tankbusters on all MT/ST/OT-tanks cooldown and bait away. Cycles back to prior mechanics until enrage; mitigate raid-wides heavily throughout.