Hidden among the sands of the Gerudo Desert, the Isisim Shrine challenges players with scorching heat, rising platforms, and clever use of fire mechanics. This guide breaks down how to reach its secret location and solve every part of its blazing puzzle.
Our guide will help you find the Isisim Shrine location, solve its puzzles, and receive the Light of Blessing. It’s not a terribly difficult shrine to complete, but it does require the use of Yunobo of Goron City, the Goron who Link helps during the Goron City and Fire Temple questlines, which means you’ll have to have at least started that to access the shrine.
When you’re done, our shrine locations page and interactive Hyrule map can direct you toward something else to do.
Isisim Shrine location
Isisim Shrine is situated in the Gerudo Highlands, southwest of Gerudo Town, near the cliffs overlooking the desert. Its coordinates are approximately (-4140, -1620, 0460). The area is cold, so bring gear or food that provides cold resistance. You can reach it by gliding from higher ground to the east or by scaling the cliffs from the valley below.
The Isisim Shrine is located within Eldin Canyon‘s YunoboCo HQ East Cave. It’s all the way in the back of the cave, which isn’t actually too far back. You’ll see the green swirls of the shrine, but the opening itself will be blocked by red stones. This is where Yunobo comes in. Send him charging at the red rocks to break them away – you won’t be able to break them otherwise. It’ll take a few tries to get enough of the rocks away to enter, but you don’t have to break ’em all.
The Isisim Shrine is located at the coordinates (1842, 2841, 0363).
Isisim Shrine walkthrough
Inside the Isisim Shrine, you’ll face a puzzle centered on controlling the flow of water and electricity. Use the water-filled zones to connect circuits and activate mechanisms that open new paths. Carefully position metal objects to bridge gaps and power devices, then use your abilities to manipulate the environment and progress through each section. Once the final circuit is complete, the route to the blessing chest opens, rewarding you for solving the shrine’s challenges.
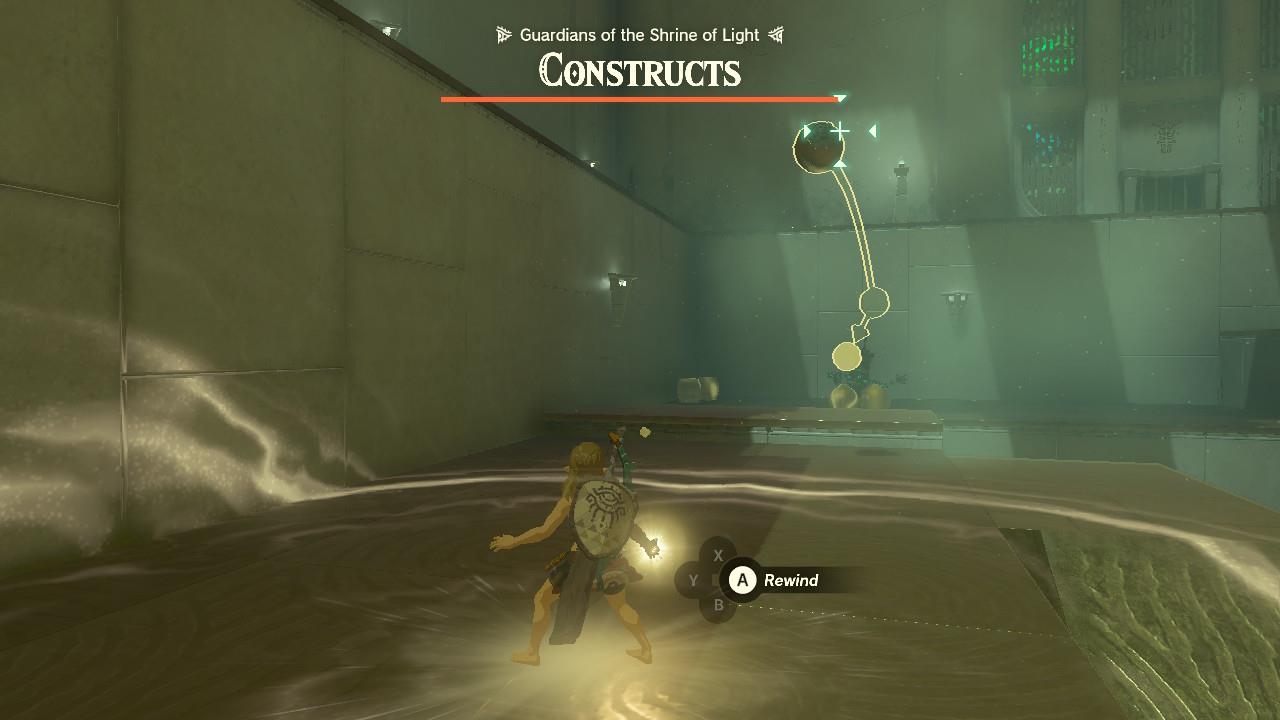
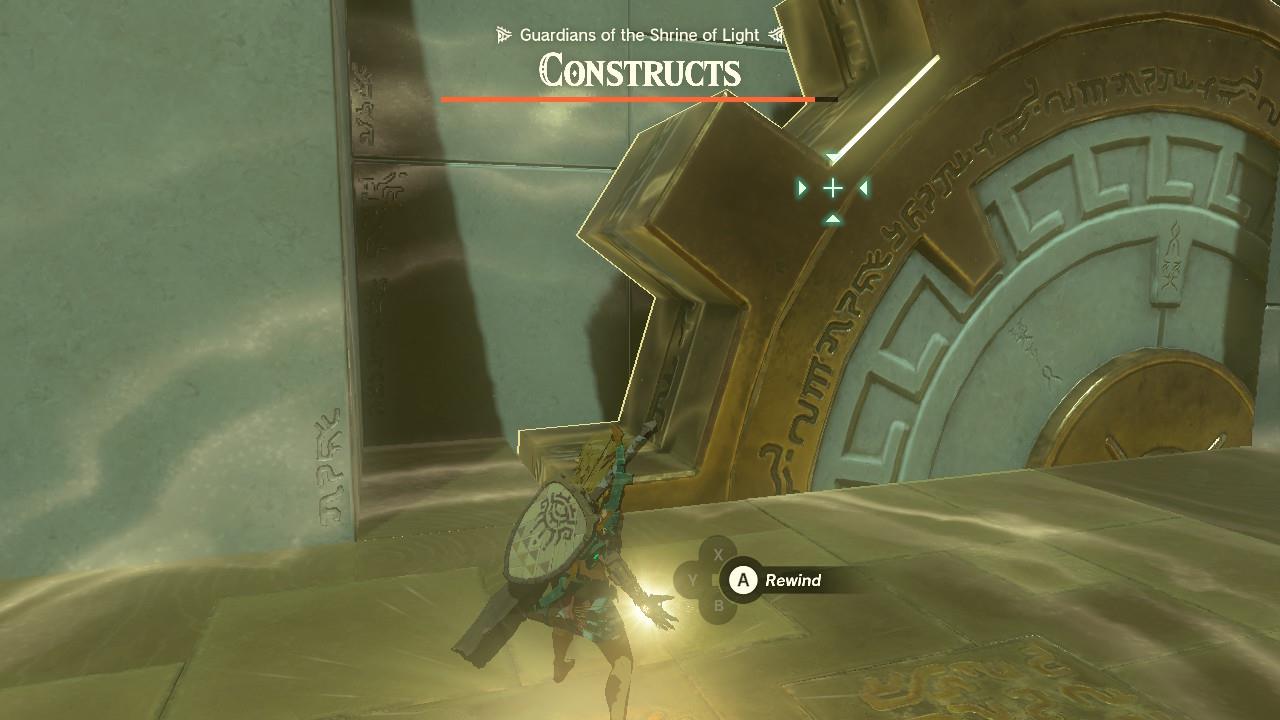
Isisim Shrine is a proving grounds shrine, which means you’ll be fighting. Once you enter the cave, you’ll be stripped of your weapons and given several low level ones to use, picking up more as you defeat enemies. “Proving Grounds: In Reverse” also requires use of the Recall ability, both to navigate the area and as a tool to defeat Constructs.
1. Head into the shrine and pick up the three weapons ahead on your left: an old wooden shield, a wooden stick, and a thick stick.
2. Take a left side and go up the ramp. Follow it to the top and straight ahead you’ll see a Construct surrounded by time bombs. Take note of the area and dodge any incoming projectiles, but wait until the Construct picks up a bomb and throws it. Quickly use Recall to send it straight back at the Construct.
3. The bombs will scatter, so make sure to avoid the blast radius even after you defeat the Construct. Pick up the bow nearby and head up to pick up the Construct’s loot. Use these to amp up your basic weapons.
4. Head back toward the ramp, but go straight instead of down. There’s a gear you can use to access the next level. Use Recall to reverse the gear and use it to hop up. There are several more Constructs on this level.
5. Defeat them. You can use basic combat skills, but they’ll also throw rocks that you can use Recall on to throw back at ’em. There are also several time bombs scattered around the arena, which can be handy.
6. Once you defeat a Construct, they’ll drop weapons. Pick up these and fuse other items to them to make them stronger.
How do I reach YunoboCo HQ East Cave fast travel point
The closest “fast travel point” to YunoboCo HQ East Cave is the Isisim Shrine itself, which becomes a warp point once activated. To reach it quickly you need to unlock either Goron City and YunoboCo HQ, then head to the cave entrance just northeast of the city.
Prerequisites
-
Progress the “Yunobo of Goron City” main quest far enough to reach YunoboCo HQ, north of Goron City.
-
Have at least one Goron-region travel point unlocked (Goron City, Marakuguc Shrine, or YunoboCo HQ itself) so you can warp nearby before going to the cave.
Route from Goron City
-
Fast travel to Goron City, then follow the main road north out of town, passing Marakuguc Shrine as you go uphill toward YunoboCo HQ.
-
At the rail area before YunoboCo HQ, ride or run along the path toward the HQ; from there, move slightly northeast to coordinates around ,,1762, 2825, 0398,, where the YunoboCo HQ East Cave entrance (a mound of red rock) is located.
Unlocking the “fast travel point”
-
Use Yunobo’s charge to break the red gloom rock at the cave entrance, then follow the cave downward until you reach the Isisim Shrine inside.
-
Activate the Isisim Shrine to turn it into a permanent warp point; from then on, you can fast travel directly to the shrine to access YunoboCo HQ East Cave quickly.
Best route from Goron City to YunoboCo HQ East Cave fast travel
From Goron City, the most efficient route to the YunoboCo HQ East Cave “fast travel” (Isisim Shrine) is to follow the main north-east exit and then use the mine cart rails to YunoboCo HQ before cutting east to the cave entrance. This minimizes climbing, keeps you on marked paths, and lines you up almost directly with the cave and shrine.
Step 1: Leave Goron City the right way
-
Start at Goron City and head toward the General Store, then take the path that leads out of the city to the right (east) as described in YunoboCo HQ directions.
-
Follow this path as it curves uphill past the Goddess Statue area and continues toward Marakuguc Shrine on the main road heading north.
Step 2: Use the road and rails to YunoboCo HQ
-
Stay on the main road going north from Goron City; you pass Marakuguc Shrine on your left as you climb toward the mine rail area.
-
At the large rail section with mine carts, use Ultrahand to put a cart on the rail and attach a Zonai Fan, then ride the rail directly to YunoboCo HQ as suggested in the YunoboCo HQ and “Ancient City of Gorondia!” quest guides.
Step 3: Cut to YunoboCo HQ East Cave
-
From YunoboCo HQ, walk a short distance east/northeast along the ledges and path; the YunoboCo HQ East Cave entrance is a red-rock mound just off the HQ area, slightly north of Goron City.
-
Break the red rocks with Yunobo’s charge (or bombs) to get inside, then follow the cave down to Isisim Shrine and activate it to make it your fast travel point for all future trips.