Hidden deep within the Faron region, the Joku-usin Shrine challenges players with a clever mix of gravity puzzles and precision gliding. Here’s how to find the shrine’s exact location and solve its mind-bending trials to claim your well-earned reward.
Traveling to the Joku-usin Shrine can be a little tedious, as the surrounding Sky Islands are in a perpetual thunder storm. You may need to bring some shock resistance and tweak your arsenal so it comprises shock-resistant gear (weapon, bow, and shield).
When you’re done, our shrine locations page or interactive Hyrule map can direct you toward something else to do.
Joku-usin Shrine location
The Joku-usin Shrine sits on the southern edge of the Gerudo Highlands, at coordinates (-3874, -2999, 0383). Players reach it by heading southwest from the Gerudo Highland Skyview Tower or paragliding down from nearby peaks after activating the Popla Foothills Skyview Tower. Its entrance appears as a standard shrine door carved into a rocky outcrop amid sparse snowfields, visible once you drop to ground level. Coordinates help pinpoint it on the Purah Pad map for quick travel setup.
The Joku-usin Shrine is found within the Faron Grasslands Sky region. The exact coordinates for the Joku-usin Shrine are (1074, -3347, 0786). If you’re progressing through the main story, you may come across the Joku-usin Shrine by happenstance, but if not, you may need to go out of your way to reach this location.
The Joku-usin Shrine can be found on the Thunderhead Isles, which is clouded in a storm on the southern section of the Sky map.
How to get to the Joku-usin Shrine
You can reach the Joku-usin Shrine by heading to the Thunderhead Isles region southeast of Faron. Glide from the Popla Foothills Skyview Tower toward the cloudy area above the islands, then use Zonai devices or nearby platforms to move between floating islands. Keep an eye on your energy level and weather conditions, as the lightning storms can make travel tricky. The shrine sits atop one of the smaller isles near the center of the clouds, visible once the storm clears.
To reach the Joku-usin Shrine, you can either use the Popla Foothills Skyview Tower or ride a piece of fallen rubble up into the Sky layer with Recall.
From the Popla Foothills Skyview Tower, head to the southwest into the storm to find the Thunderhead Isles. If you decide to glide over from the skyview tower, you’ll either need Tulin’s ability or two upgrades to your stamina.
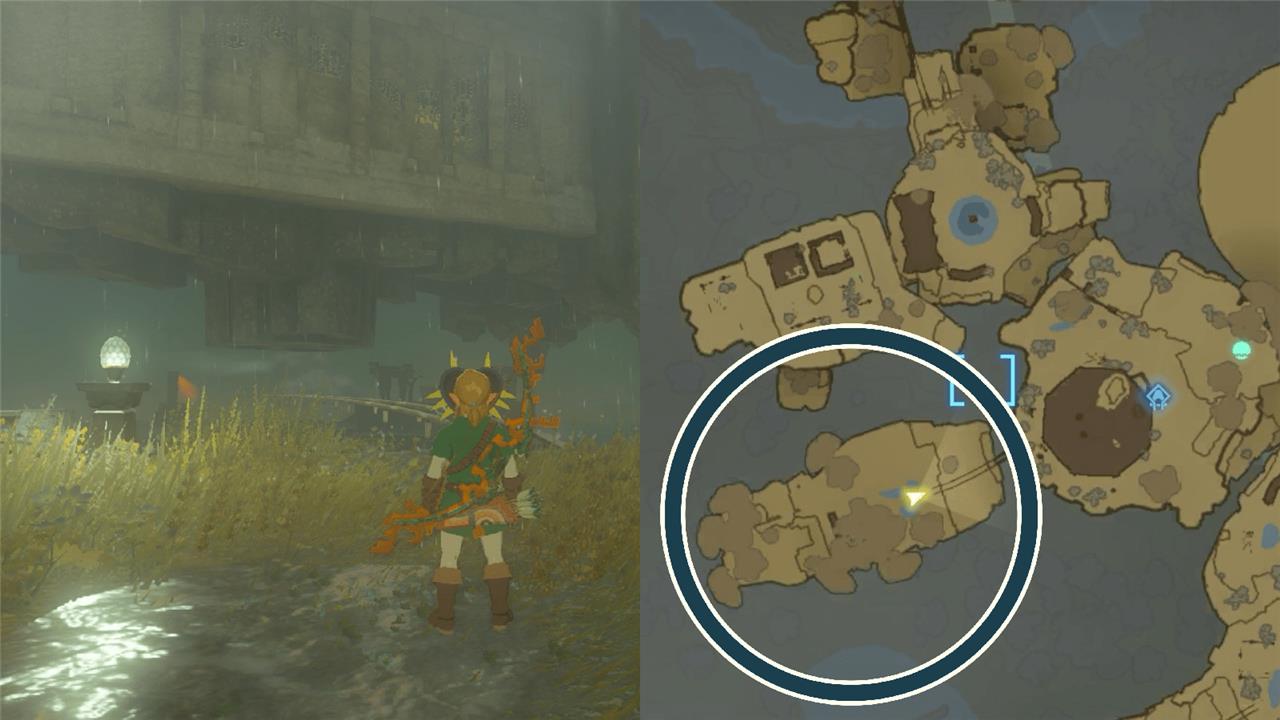
Progress through the isles until you reach the island just below the isle with the device dispenser. The island above you will have see-through walls, which will allow you to see the Joku-usin Shrine inside. To get inside, you’ll need to make a railcar contraption and then use Ascend to rise through the floor.
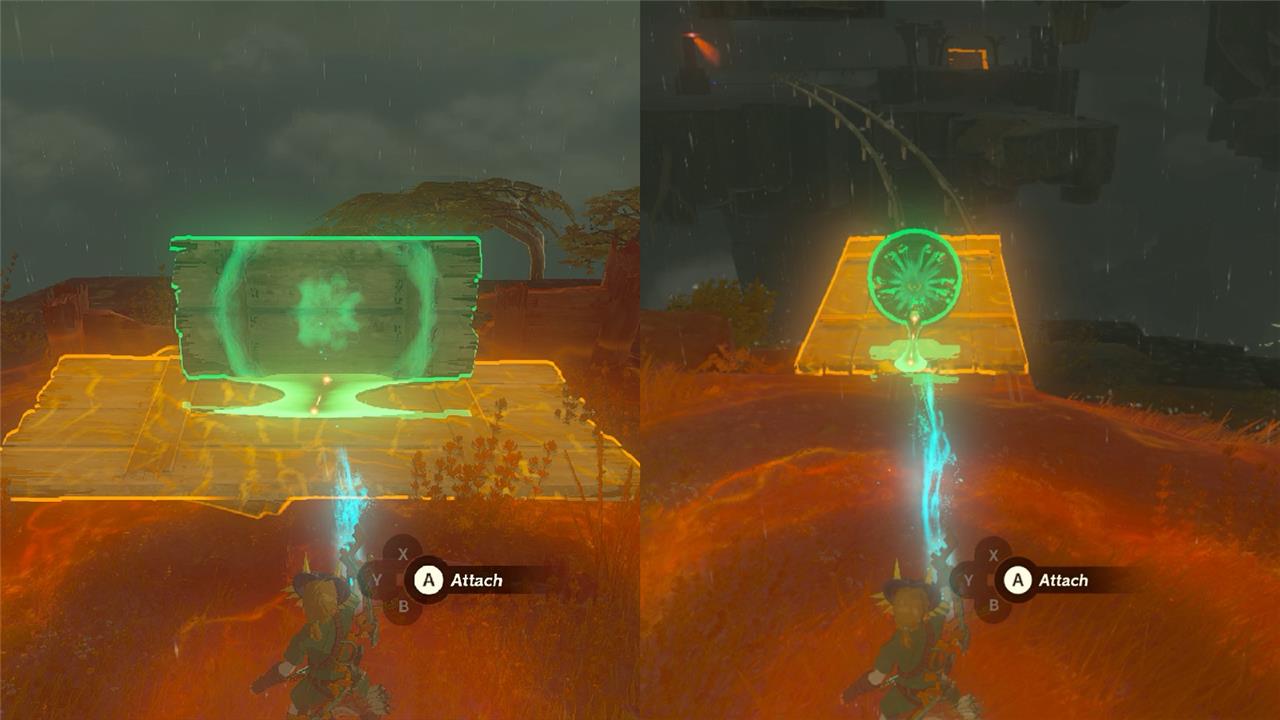
On this island, you’ll find a few wooden pallets and a couple fans. Place one of the wooden pallets flat onto the ground, and attach one of the wooden planks to its face in a vertical manner like in the image above. Put your creation on top of the rails, so the vertical plank fits in between the rails.
Grab one of the fans found on the island and attach it to your creation, so the fan would push your contraption forward. Activate the fan to start moving your vehicle, and then deactivate it just before your under the island. Use Ascend to rise into the island to find the Joku-usin Shrine.
Joku-usin Shrine walkthrough
The Joku-usin Shrine features puzzles centered on precise timing and motion control. Players must manipulate platforms and moving parts to create paths toward the exit, often requiring creative use of Ultrahand and Recall abilities. Combat is minimal, focusing more on physics-based challenges that reward patience and observation. Completing the shrine grants a Light of Blessing and offers a satisfying test of spatial awareness and problem-solving skills.
The Joku-usin Shrine is very fitting for its outside environment: You’ll use electric weapons to shock all of the Constructs within. In this “Proving Grounds” challenge, you will be stripped away of all of your equipment, but at least you’ll be given a few wooden sticks.
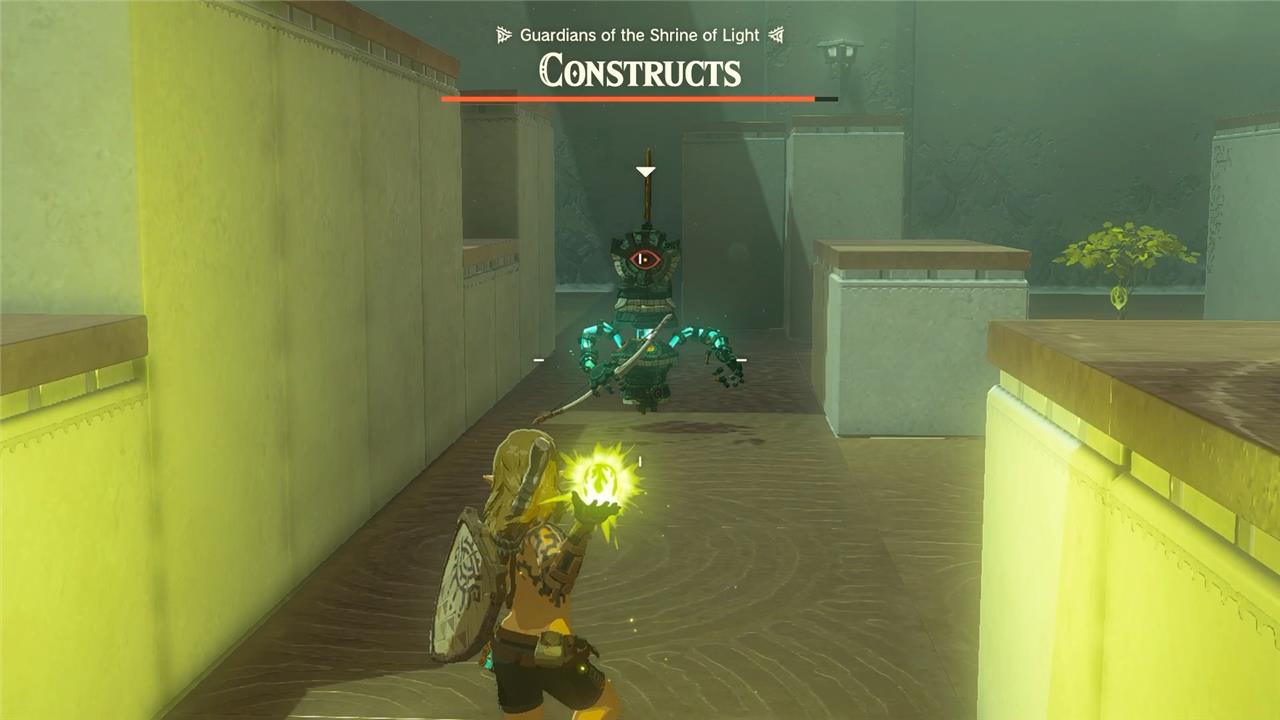
In the “Proving Grounds: Short Circuit” challenge, you’ll need to defeat five Soldier Constructs and one Soldier Construct III. You can either take on each Construct head on with your wooden sticks, or take advantage of the shock fruit to take down the regular Soldier Constructs in one hit. One of the Soldier Constructs is also equipped with a shock-emitter club that will help you take down the Soldier Construct III.
If you run out of shock weapons and shock fruit, Fuse your wooden sticks with the Construct horns or take down the Constructs with your bow. Once every enemy is defeated, the exit will open, revealing a chest containing an electro elixir. Then, you can complete the shrine and retrieve your Light of Blessing.
How to reach Thunderhead Isles without clearing the main quest
Reaching Thunderhead Isles without completing the main quest to clear the storm is possible but risky due to poor visibility from the constant thunderstorm and lightning strikes.
Popla Foothills Route
Launch from Popla Foothills Skyview Tower in western Faron Grasslands and glide southeast toward the dragon-shaped sky islands. Land on the initial platform ahead, then use Ascend on ledges or puddles to climb higher islands; follow lanterns south to metal rails and build fan-powered wooden platforms (T-shaped boards with fans from pedestals) to traverse them while dodging lightning.
Great Sky Island Route
Teleport to Nachoyah Shrine on Great Sky Island, ascend to the rooftop, and paraglide south toward Thunderhead Isles. High stamina (or Energizing Elixirs) lets you glide farther, potentially landing near Joku-usin Shrine; aim precisely through the storm for entry points like the dragon’s eye opening.
Challenges and Tips
Visibility remains low without “Secret of the Ring Ruins,” increasing fall risks, so build lightning shelters on rail vehicles using Zonai parts and stock Slip Resistant Elixirs for rain. Progress feels puzzle-heavy but skips quest barriers; shrines like Joku-usin remain accessible.
Best launch points to glide to Thunderhead Isles from Popla Foothills
Popla Foothills Skyview Tower serves as the primary and most reliable launch point for gliding to Thunderhead Isles.
Optimal Launch Technique
Activate the Skyview Tower at coordinates approximately (-0834, -1001, 0019) in western Faron Grasslands, then launch upward and immediately glide southeast toward the dragon-shaped cluster of sky islands visible on the horizon. Aim for the first intermediary sky island directly ahead to conserve stamina, using gusts from the launch for extra distance.
Secondary Spots Nearby
The tower’s rooftop platform provides the highest elevation; no better nearby alternatives exist without vehicles. Players sometimes drop to the tower base first for prep (e.g., elixirs), but the launch pad itself offers the best height and directional boost toward coordinates around 1074, -3346, 0786.