A storm brews above the desert as ancient mechanisms spark to life beneath the sand. The Lightning Temple hides secrets crackling with danger and brilliance-this guide shows how to outsmart its traps, master its puzzles, and face the deadly power waiting at its heart.
What you need to know before starting the Lighting Temple
The Lightning Temple demands two full batteries to power its generators, so charge your Zonai devices ahead of time or hunt for spares in the Gerudo Desert. Activate the four water pumps inside by aligning mirrors to direct light beams precisely. Chaff seeds stun Scorned Elves, clearing paths quickly. Bring arrows and Bomb Flowers for ranged combat against Gibdo enemies. Defeat Gibdo Queen on the top floor last, after securing all turbines.
Like the other temples, the Lightning Temple does have a central teleport point, so you’ll be able to freely enter and leave the temple as you wish. That said, remember to stock up on healing food before you enter.
We also recommend bringing a ton of arrows and elemental fruit or weapons. As you’ve previously seen in earlier parts of this quest, Gibdos are weak to elemental attacks, so bring your favorite elemental fruit to prepare against fighting them. For the boss fight specifically, consider bringing a Zonai mirror in a capsule or attached to your shield.
Once you’re ready to get started, use Riju to charge up an attack against that huge pink cocoon in the middle.
How to get to the Lightning Temple
To reach the Lightning Temple, travel to the Gerudo Desert and head toward the large sandstorm visible from a distance. Equip heat-resistant armor or elixirs to handle the daytime temperatures. Use Riju’s lightning ability to clear obstacles and activate switches as you progress. Follow the path marked by stone pillars and floating platforms until you spot the lightning-shaped structure in the storm’s heart, where the temple entrance awaits.
To get to the Lightning Temple, you’ll first need to get to Gerudo Town, then complete the “Riju of Gerudo Town” quest, which involves a large-scale fight and revealing mysteries in a sandstorm.
Lightning Temple chests
Several treasure chests are hidden throughout the Lightning Temple, each containing valuable items like weapons, shields, and materials. Pay attention to side corridors and elevated platforms, as some chests are tucked behind destructible walls or concealed by sand. Use electric abilities or Zonai devices to reach distant spots safely. Before engaging the final boss, sweep the temple one last time to ensure you have collected every reward.
- Flame emitter capsule
- Large Zonai charge
- Topaz
- Mighty Construct bow
Fighting Queen Gibdo
Queen Gibdo is the final challenge of the Lightning Temple, and she demands patience and precision. Use Riju’s lightning ability to break her dark armor and expose her weak points. Keep moving to avoid her sand attacks and flying minions, striking with powerful melee weapons or arrows once she’s vulnerable. As the fight progresses, she becomes faster and calls in more Gibdos, so stay close to Riju for extra protection and time your attacks carefully to bring her down.
A boss fight, this early? Really? No, not really – don’t worry, as Queen Gibdo will run off after you get a few hits in on her.
Use Riju’s charged up electricity to supplement your arrows at her a few times and she’ll skitter off. The queen will launch tornados at you, and if Riju gets hit with one, it’ll break her charge, so be mindful and try to fire off your arrows quickly once Riju is ready to fight.
We hit the queen twice with Riju’s electricity before she got upset and ran off.
Now it’s time for the actual temple.
Entering the Lightning Temple
The entrance to the Lightning Temple sits deep within the desert, surrounded by swirling sand and crackling energy. As you approach, you’ll need to solve a short puzzle to activate the massive doors powered by ancient Zonai mechanisms. Inside, the air hums with electricity, and enemies lurk around every corner, ready to strike. Keep your lightning-resistant gear equipped and watch for charged traps that can drain your health quickly. The temple’s design weaves together puzzles, combat, and precise timing, setting the stage for one of the game’s most electrifying challenges.
Use Riju’s electricity on the new pink blob blocking the entrance – don’t worry, there’s no boss behind this one.
Before you head in, hit the Gibdo nests outside with her electricity as well, but make sure to wait for them to be dark pink and pulsing before you hit them, as they won’t have any effect otherwise. (It’s just like the Gibdo nests you took down during the siege on Gerudo Town.)
Pluck the treasure chest out of the sand pile on the right for a flame-emitter capsule.
Use the Korok-frond guster that’s on the wall in a torch holder to start blowing away the sand piles in the room. Keep the guster on you throughout the temple, as it’ll repeatedly be helpful.
After clearing out a sand pile in the middle of the room, you’ll see a switch to step on and open the door deeper into the temple.
Grab a torch on the wall and use the nearby torch posts to light it. You don’t need to use a torch in any parts of this temple, but it’s kind of creepy in here.
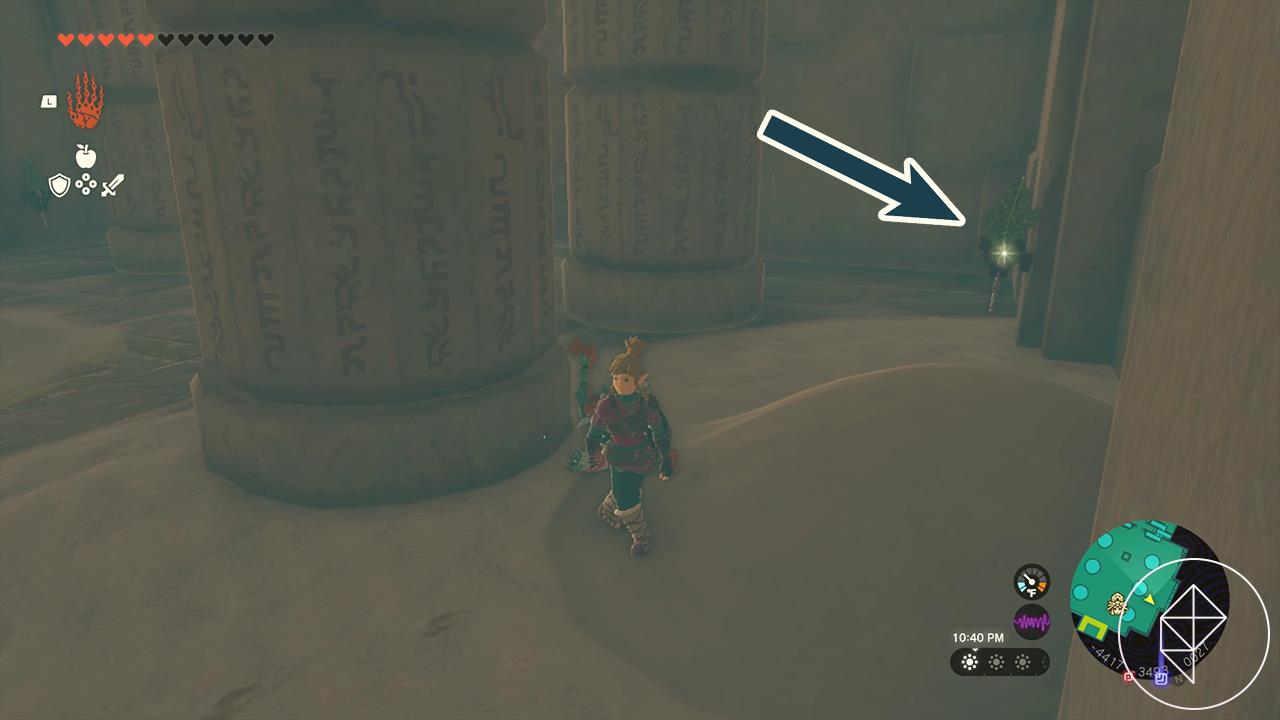
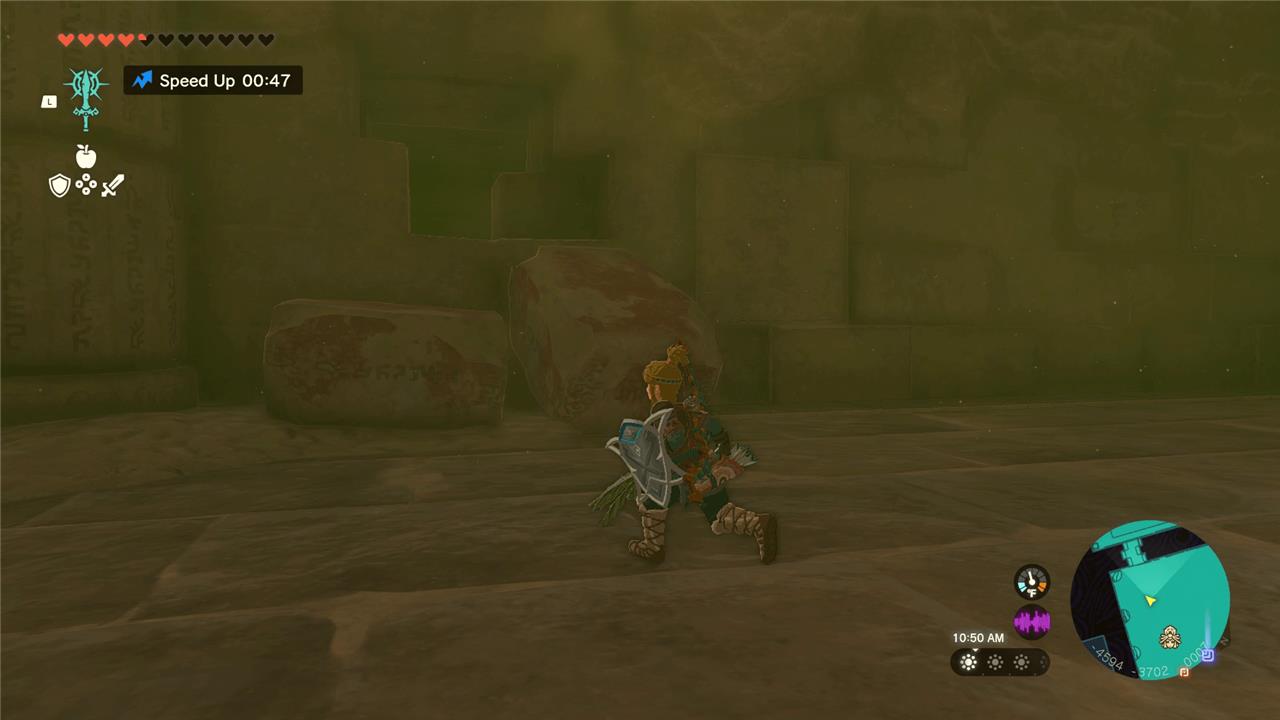
When you arrive in the room with two bridges over pits, jump into the second pit. You’ll need to fight a Gibdo in there, but you’ll be rewarded with a large Zonai charge in a chest. Ascend back up the bridge and proceed.
Use Ultrahand on the bricks directly in front to open a small room. Defeat the Gibdo inside and open the chest for a topaz.
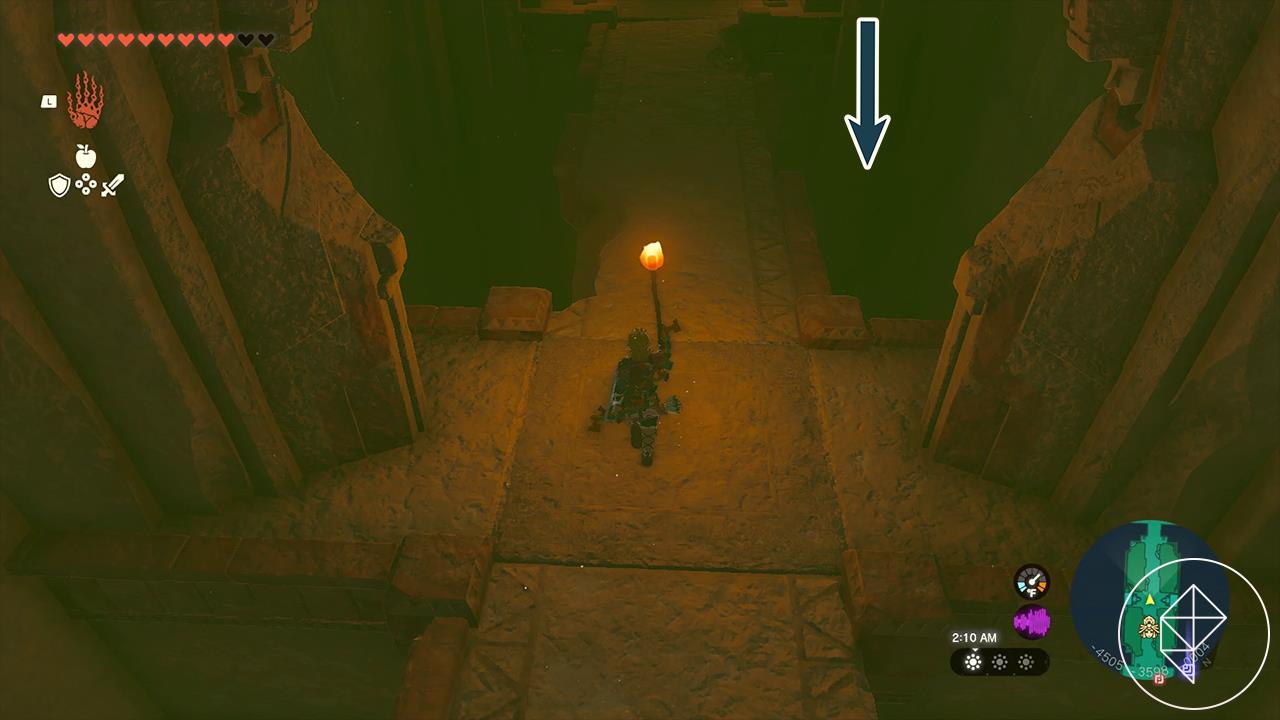
Turn back to the hall with the flames spitting out of the walls, but beware – the floor in the center of the room will drop down.
Take out the two Gibdo in front of the flame spitters (using the Korok-frond to blow them into the fire will work great). Backtrack to the room with the now-giant hole in the floor and jump down the hole. Use Ultrahand to pick up the stone slab in the room and place it on the flooring that fell down. There’s a Gerudo scimitar and a shock keese under the slabs.

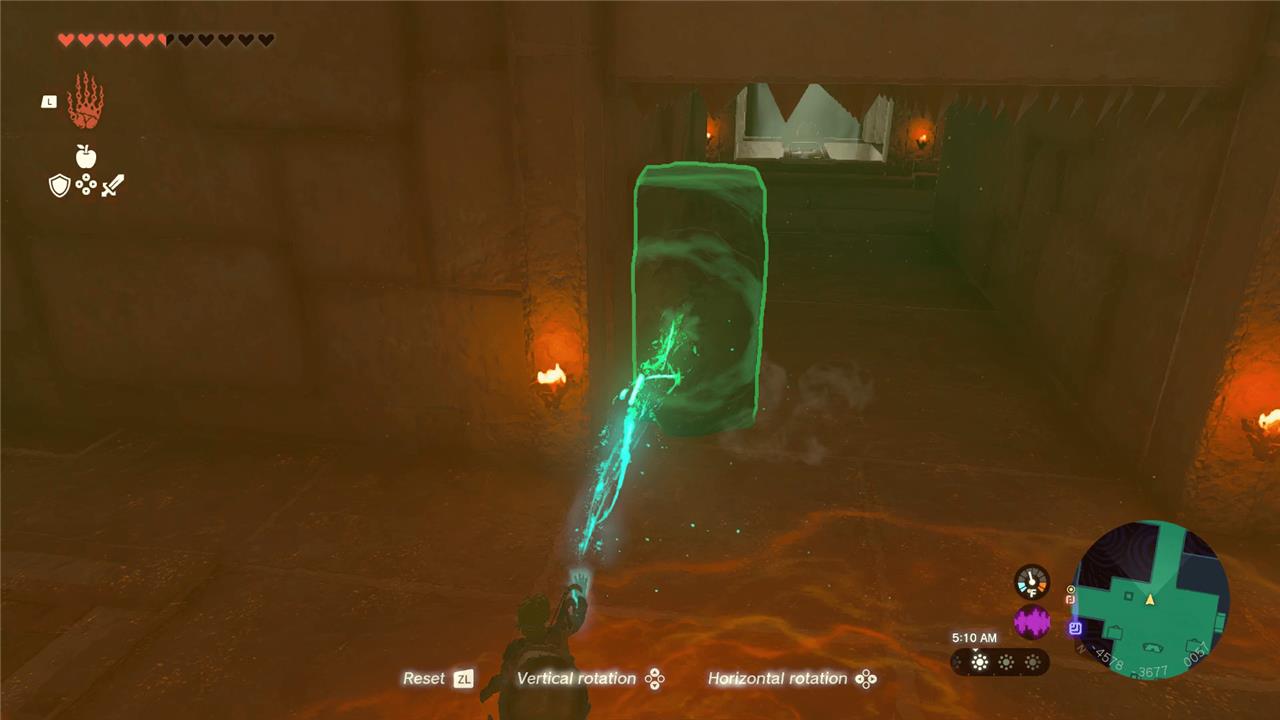
Use Recall on the flooring that fell to send it back up. Grab one of the stone planks off the floor using Ultrahand and use it to block the flames, allowing you safe passage.
Step on the switch at the end to turn off the flames, allowing Riju through. The next room will have a huge flaming boulder rolling down the path. Use Recall on the boulder and run up the path as it backtracks. Again, step on the switch at the end to allow Riju to follow safely.
Keep heading forward, taking out the Gibdo in the hall. Jump down the shallow pit in the next room, but be mindful of the Gibdo nest in the center. Take it out, along with any extra Gibdo that it spits out.
Lift up the slabs in the middle of the pit for a Gerudo bow.
Climb up the stairs and keep heading through the halls to get to the “Room of Hopeful Light.”
The Room of Hopeful Light
The Room of Hopeful Light is a puzzle chamber filled with reflective mirrors and sun motifs that guide beams of light toward hidden mechanisms. Players must rotate the mirrors carefully to direct the light onto specific panels, activating platforms and revealing new paths forward. Staying aware of how each reflection interacts with the environment is key to progressing smoothly through this radiant section of the Lightning Temple.
Take out the Construct inside (and remember you can use Riju to help pack a punch).
Use Ultrahand to pluck the mirror out of the sand pile in the corner of the room. (You can also use your handy Korok-frond.) Beware, as a nearby sand pile has a second Construct enemy in it – you can see its head sticking out of the top of the sand. Blow the sand off and take it down, if you want.
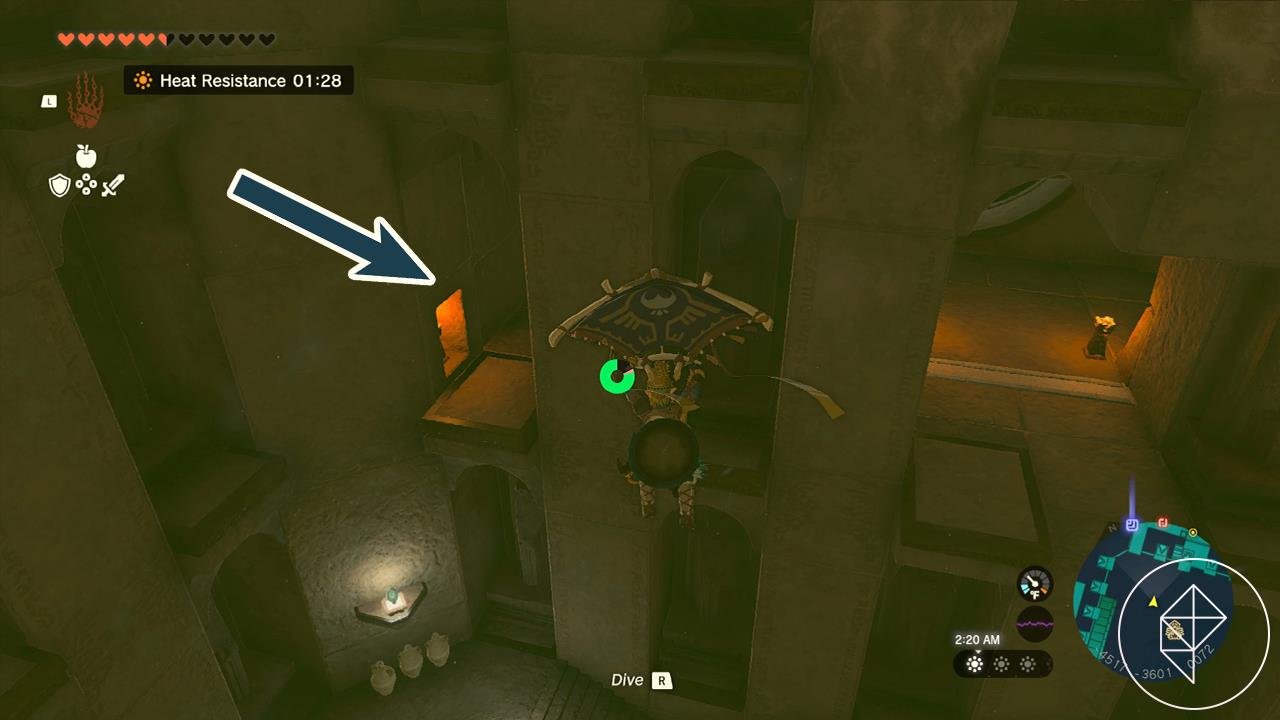
Head through the hole in the wall shown above to grab a chest. The floor under the chest will fall down, but don’t worry, as you can just Recall it back up. The chest has a mighty Construct bow inside.
Go back to the Room of Hopeful Light and use the mirror you unearthed to reflect light into the huge yellow-ish target above the door.
Once the door opens, climb up the stairs to get to the Room of Ascension, the main chamber of the Lightning Temple. Interact with the altar in the center to unlock the teleport waypoint. Whew.
The Room of Ascension
The Room of Ascension tests both timing and precision. Activate the Zonai fans to lift the platform, then use your bow to hit the lightning switches midair. As the platform rises, maintain control to avoid being struck by electricity. Once the final switch is triggered, the upper chamber opens, granting access to the Lightning Temple’s next section.
You need to power four batteries with Riju’s electricity to power the elevator up.
You do not have to charge the batteries in any specific order, but we’ve marked them below in order of location from lowest to highest, for the sake of organization.
Charging the first battery
The first battery is on the bottom floor, directly behind the altar. Move these boulders out of the way with Ultrahand, enter the room, and use Riju to strike the lightning rod. Simple enough!
Head back to the main area in front of the altar.
Charging the second battery
Use Ultrahand to take the boulder that’s blocking the air current out of the hole, allowing you to glide up the many floors instantaneously.
Ride the current up and enter the pathway we marked below:
A tunnel with two wheels missing a slice will be turning in front of you. Use Recall on one wheel and stop the recall when the two slices on the wheels line up, so that they’re rotating the same way.
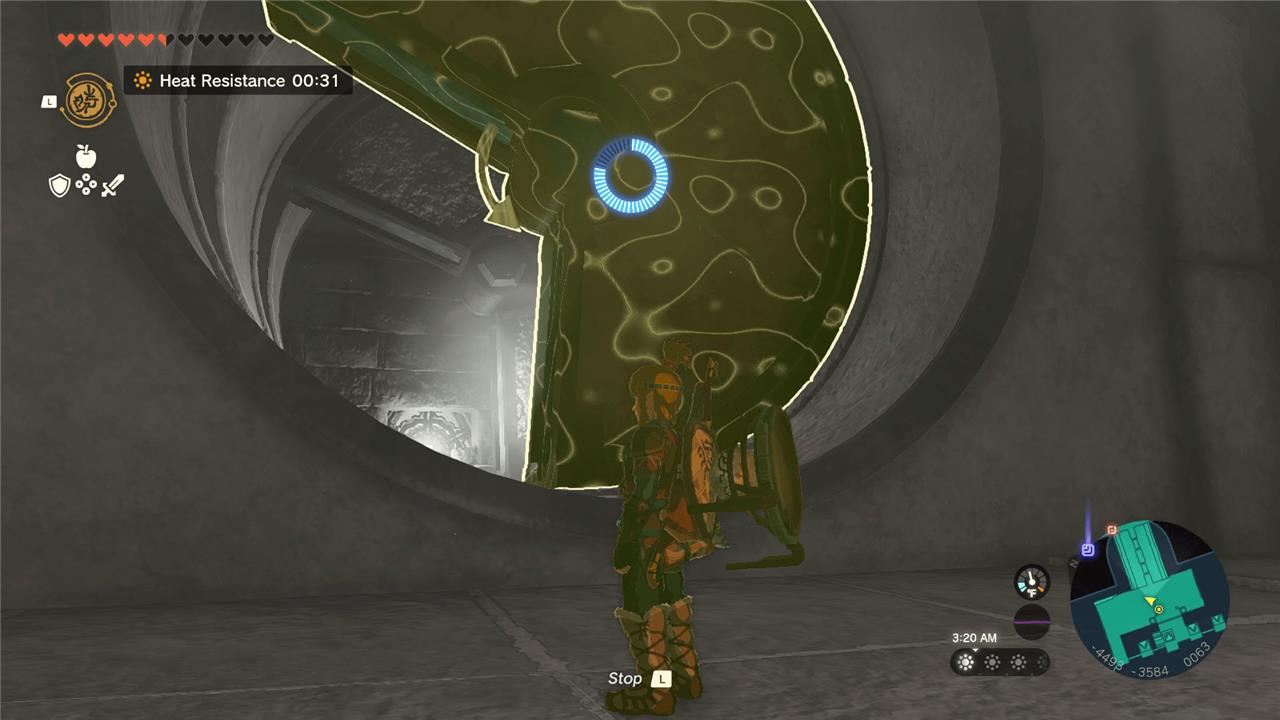
Head through the tunnel through the open slices and use Ultrahand to remove the rocks, allowing a light to shine through. The light, shining through the slices, will hit a statue directly across. Step on the switch that it moved off of to enter a new room.
Ultrahand the boulders on the right and place it between the smashing spike walls so that Link can get through. Step on the switch, turning the spikes off and allowing Riju through.
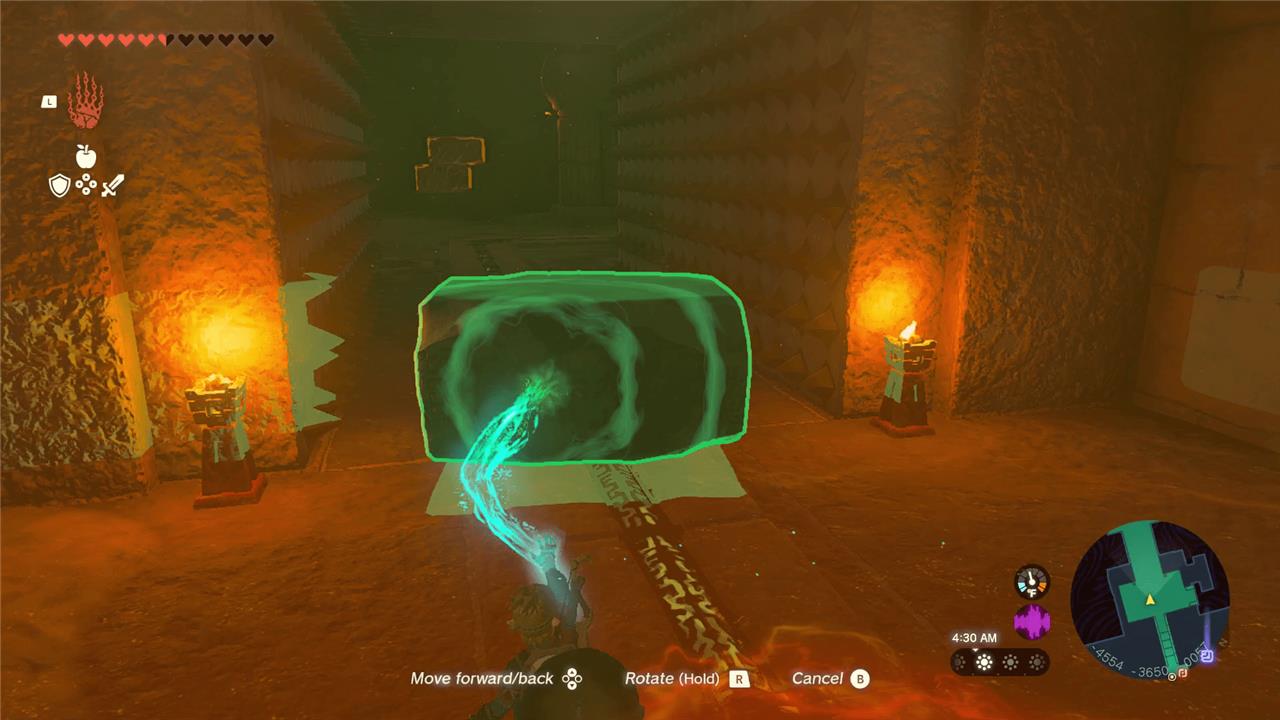
Straight ahead, Ultrahand one of those boulders to jam the mechanism on the right, allowing Link to walk through this hall without worrying about much danger. Head through the hall and take out the Constructs in the next room.
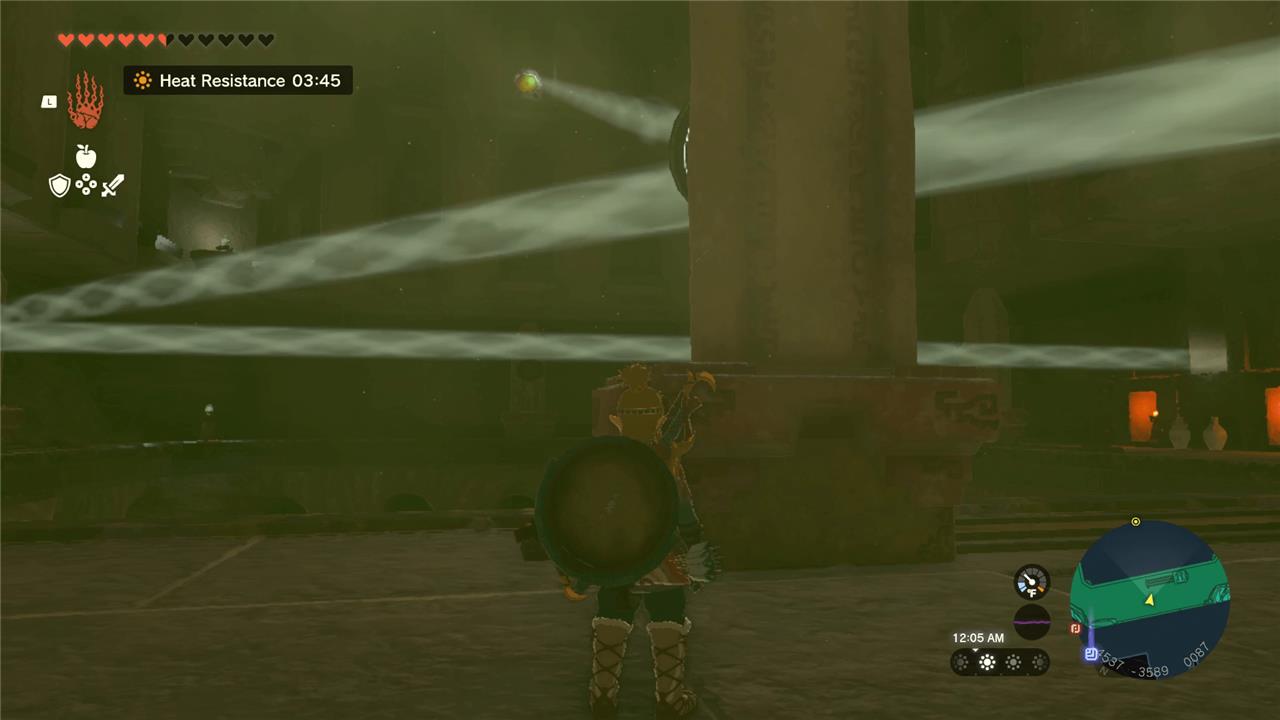
Jump down and pick up the stakes on the floor with Ultrahand. Carefully Ultrahand the stakes into the wall, so that the spinning stops, leaving the yellow light target open. (Getting the timing right here is tricky, but know that the stake only stops the wall once it’s in the wall and you’re not Ultrahanding it.)

Use the nearby mirror in the sand to reflect the light onto the target. Ascend back up and use the mirror on the tiny bridge over the light beam to shoot light at the large target across the hall.
You should now have access to the battery charger, so use Riju to strike it and head back to the main room.
Charging the third battery
Use the air current in the main room to fly all the way up and fight the Construct in front of the two torches. Climb into the hole in the wall between the two torches to get to the “Room of Natural Light.”
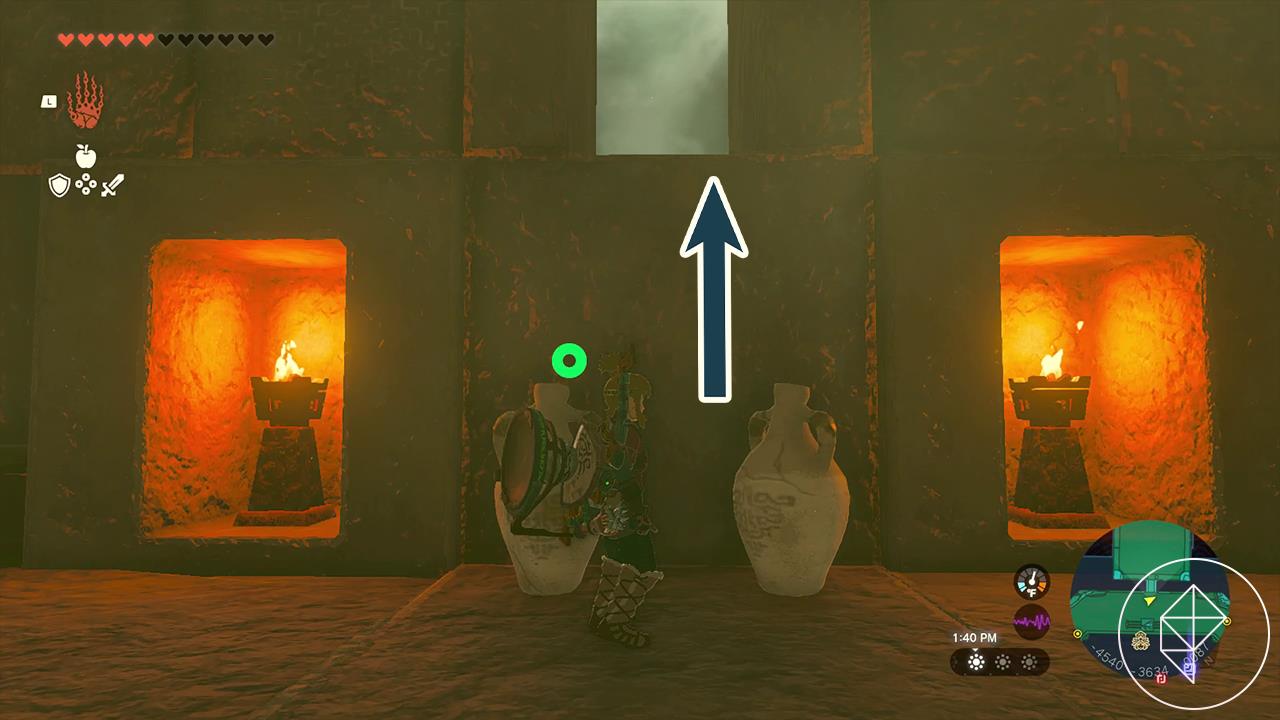
Ultrahand the boulder on the wall and grab a mirror from inside the wall. Place the boulder and mirror like so under the light:

Head back out of the Room of Natural Light and use Ultrahand on the statues holding mirrors so that they line up, shooting the light downward.

They’ll hit a statue below, which you can glide down to and enter the “Room of Offered Light.”
This room has a Gibdo nest and several Constructs, so take them all out. Focus on the Gibdo and its nest first, or else more enemies will keep amassing. Interestingly enough, the Constructs and Gibdo can fight each other, but they don’t do a great job taking each other out. Use Riju’s lightning to strike multiple enemies at once for the most effective take down.
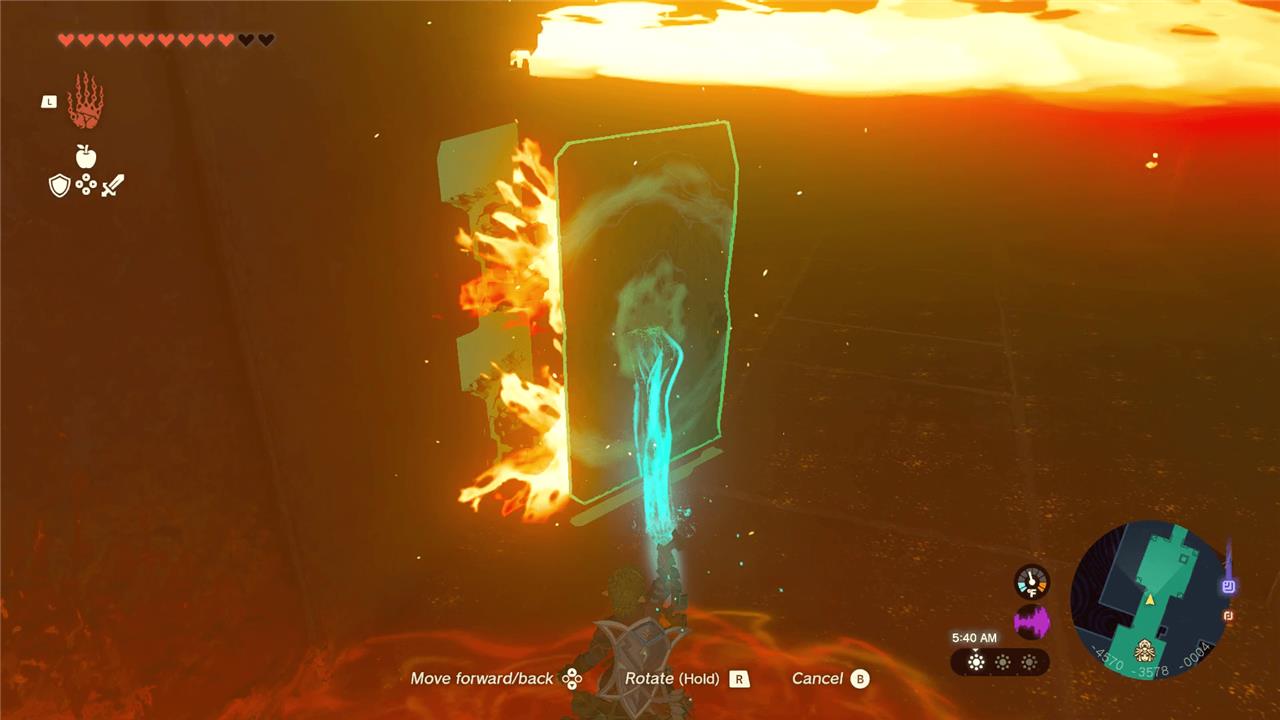
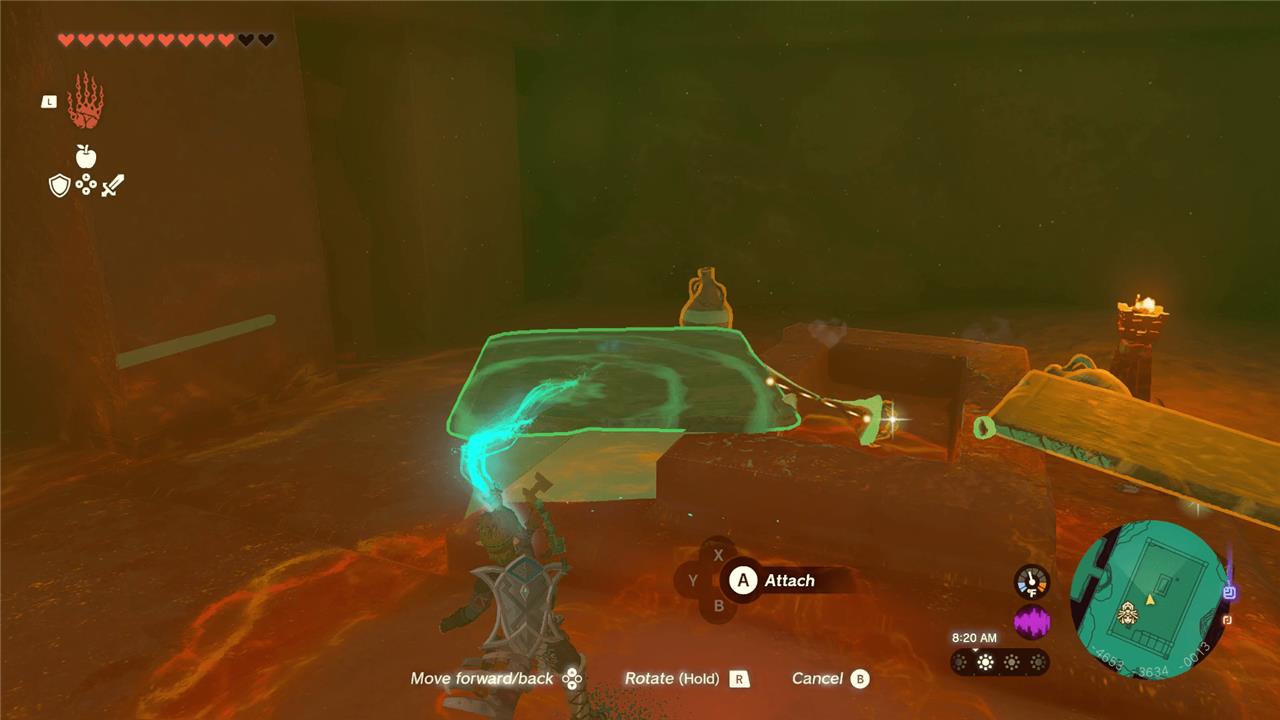
Once all the enemies are taken out, you’ll need to make a contraption like this using a balloon, torch, grate, and mirror:
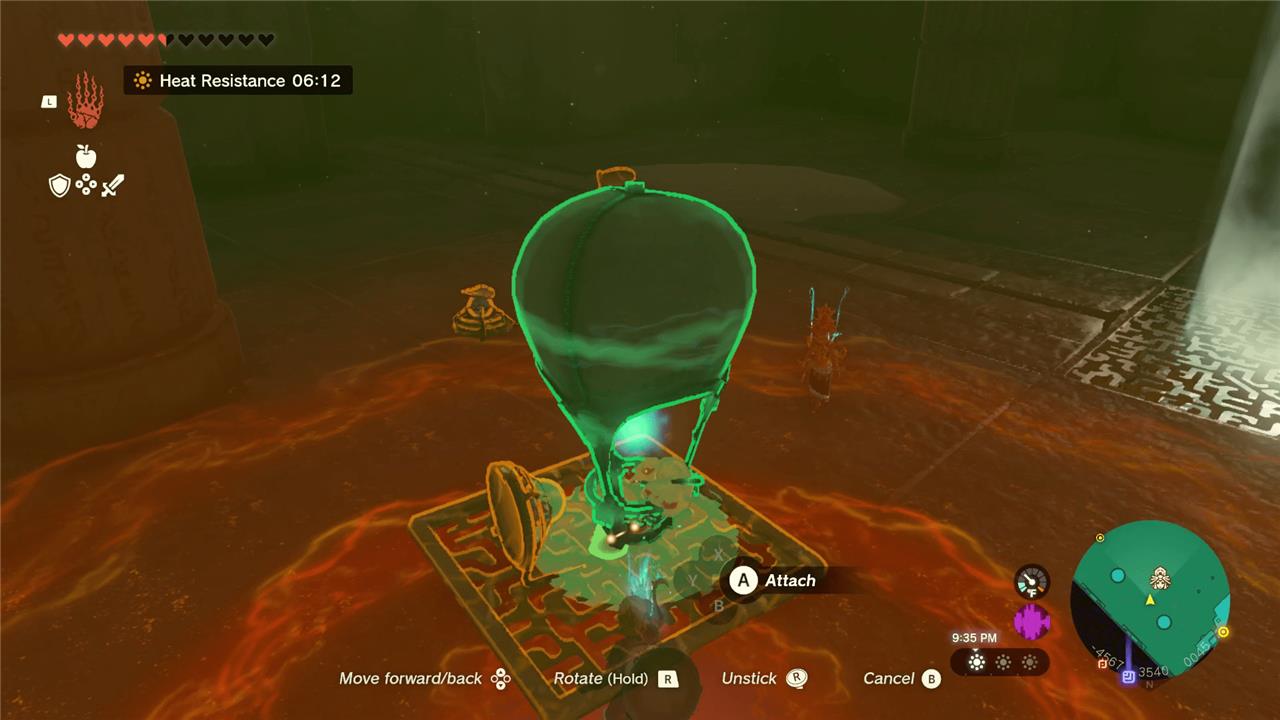
Attach the balloon, torch, and grate together, but leave the mirror un-attached. Place your newly built thingy in the middle of the light beam and ignite the torch. As you fly up, hold the mirror to precisely aim it at the target.
Once the light hits the target, the walls will lift, showing the next battery charger. Use Riju to hit it and head back to the main room.
Charging the fourth battery
Fly all the way back up to the top using the updraft again. Make sure you did the early steps for the last battery, setting up the light beam to shoot out of the Room of Offered Light. This time, move the first statue out of the way, so it doesn’t intercept the light.
Now move the two statues that you didn’t move for the last battery so that they hit a target that’s above you. One statue will be blocked by a sand pile, so blow it away using your Korok-frond. The light will shoot like so:
Once this upper door opens, use the air current to give yourself a boost up and climb the rest of the way to reach the sixth floor of the Lightning Temple.
You’ll face a hole with several beams of fire shooting in all sorts of directions. Carefully glide down, dodging the fire beams. Once you land, you’ll be in the “Room of Light and Flame.” Step on the switch and take out the two Constructs on the other side of the gate, if you haven’t already.
Wait a second for Riju to appear and use her to strike the battery charger. Head back to the main area, which should be fully charged now.
How to beat Queen Gibdo, boss of the Lightning Temple
Queen Gibdo begins the fight protected by a tough outer shell, so use Riju’s lightning ability to expose her weak points. Strike her with arrows or melee attacks once the lightning breaks her armor, then keep pressure on her before she recovers. During the second phase, smaller Gibdos will appear-defeat them quickly to avoid getting surrounded. Keep moving to dodge her charged attacks and use the temple’s light sources or Riju’s power to interrupt her healing attempts. Consistent lightning hits and sharp timing are the key to bringing her down.
Once you power up all four batteries, activate the elevator to head up to the seventh floor of the Lightning Temple.
Use Riju to hit the large pink pulsating cocoon (yuck) off the wall to start the battle against Queen Gibdo.

Just like you fought her before, you’ll want to use Riju’s attacks to deal massive shock damage to her. Once she’s hit, she’ll turn white, just like the other Gibdo. This is when you can jump in and use your stronger swords and other physical weapons against her to get in some good damage.
Beware, as she’ll shoot consistent beams of sand when she’s flying above you and belly flop onto you when she’s on the ground, so you’ll want to keep moving to avoid her attacks. She’ll also send over tornados to knock both you and Riju over, the same way she did when you first fought her at the entryway of the temple.
If you’re having a hard time hitting her, make use of keese eyes on your arrows to home in on her.
At the halfway point, those inactive Gibdo nests in the corner of the arena will now activate, creating horrific fast-crawling Gibdo and flying Gibdo. Thankfully, each one you take out will be replaced by a huge beam of light, which will protect you from Gibdo if you stand in it. The smallfry Gibdo will literally die if they hit the light too many times, so just stand in the center of the light.
If you have a Zonai mirror, you can Fuse it to your shield and redirect the light at the Gibdo to help fend them off, as well.
Using Riju, take out each tower one by one, while dodging Queen Gibdo’s attacks. Admittedly, it was really hard to see what the queen was doing while we were standing in the blinding protective light, so make sure to stay on your toes and heal up as you need it.
Once you take out the four Gibdo nests, go back to the original strategy: use Riju to hit the queen for massive amounts of damage and use your stronger weapons to hit it while it’s vulnerable.
After you take down the queen, you can claim a Heart Container and interact with the altar ahead to watch a lengthy cutscene about the history of the Gerudo sage. You’ll also get Riju’s powers to take around with you on your journey, which is pretty helpful for dealing massive damage against swarms of enemy.
How to defeat Queen Gibdo boss in Lightning Temple
You beat Queen Gibdo by stripping her armor with lightning, then focusing on hive control and safe melee bursts.
Prep before the fight
-
Bring plenty of arrows and some Bomb Flowers or elemental fruit (especially shock).
-
Eat an attack-up and/or defense-up meal; any decent armor set upgraded a bit is enough if you avoid big hits.
-
Having all available Sage abilities (Sidon’s shield, Yunobo’s charge, etc.) makes mistakes less punishing.
Phase 1: Break armor, burst damage
-
Keep Riju close and trigger her lightning circle, then fire an arrow through it at Queen Gibdo to strip her purple armor; she turns pale/white when vulnerable.
-
While she is white, hit her again with Riju’s lightning (another arrow through the circle or wait for the auto-strike) to knock her down, then rush in with your strongest melee weapon.
-
Repeat: lightning to remove armor → lightning again to knock down → fast melee combo, then back off before she recovers.
Avoiding Phase 1 attacks:
-
For her straight charge, dodge sideways at the last moment or sprint off her line; a shield block works but can shred weak shields.
-
For mud/sand beam and tornados, keep moving in a wide circle; Sidon’s water shield can block the beam if you have it.
Phase 2: Destroy hives first
At half HP, cutscene → hives spawn on the arena edge and start spitting Gibdos.
-
Shift focus to the purple hives: stand where Riju’s circle touches a hive and fire an arrow through it, or let the lightning auto-hit; only lightning destroys them instantly.
-
Each destroyed hive leaves a pillar of light; standing in the light kills or stuns regular Gibdos, so kite enemies through it if you’re overwhelmed.
-
Use bomb arrows or elemental arrows to thin out Gibdos while you move between hives so you’re not swarmed.
Once all hives are gone:
-
Go back to the Phase-1 loop: use Riju’s lightning to remove armor, then knock her down and unload melee damage.
-
Attach high-damage materials (like Gibdo bones) to arrows for big hits while she’s exposed, then finish with melee when she’s on the ground.
Simple “loop” you can follow
-
Stay mid-range, trigger Riju’s lightning circle.
-
Shoot through the circle to break Queen Gibdo’s armor.
-
Hit her with lightning again to knock her down.
-
Sprint in, full combo with best weapon, then retreat.
-
In Phase 2, destroy all hives between loops before fully focusing her again.
If you tell me what keeps killing you (tornados, adds, not enough damage, etc.), I can tailor a build and exact positioning tips around your current gear.
Best food buffs and armor for Queen Gibdo fight
For Queen Gibdo, prioritize high defense and either attack-up or defense-up food; you don’t need any special anti-element sets.
Recommended armor sets
Use any set you’ve upgraded a bit; the key is total defense, not a specific bonus.
-
Hylian set (Hylian Hood, Tunic, Trousers): cheap, easy to upgrade, and perfectly fine if you’ve visited at least one Great Fairy.
-
Soldier’s set: higher base defense than Hylian and very strong when upgraded; great if you have it.
-
Other good options you might already own (all work if upgraded a few stars):
-
Zonaite set, Fierce Deity, Barbarian, or any mixed pieces that get you to around 50-80 total defense.
-
For this fight, favor defense over niche set bonuses: if choosing between 30 defense with attack-up or 60+ defense with no set bonus, pick the higher defense.
Best food buffs
Run one defense-up dish and bring extra generic healing.
Good defense-up meals:
-
Tough Mushroom Skewer: all Ironshrooms for a straight defense boost.
-
Meat & Mushroom Skewer: meat + multiple Ironshrooms for more hearts and decent defense time.
-
Tough Steamed Fish: Armored Porgy/Carp + herb (or Armoranth + common fish) for a strong defense buff.
-
Any “tough” dish using Ironshroom, Armoranth, pumpkins, or Ironshell Crabs will work; just load 4-5 defense ingredients for max strength.
Optional attack-up:
-
If you’re surviving fine, swap to an attack-up meal (e.g., using Mighty Bananas or other “mighty” ingredients) so each stun window on Queen Gibdo does more damage.
Fuse and arrow tips that pair with this
These aren’t buffs/armor, but they massively increase your damage efficiency in the same fight.
-
Fuse arrows with Fire/Lightning items (Fire Fruit, Red/Yellow Chuchu Jelly, Fire or Electric Keese parts) to strip her armor when Riju isn’t lined up.
-
Fuse Gibdo Bones on melee weapons or arrows for very high damage while she’s in her white, weakened state.
If you tell me your current total defense and what armor sets you own, I can suggest an exact outfit and one or two specific recipes tailored to your inventory.