Hidden across fractured planets and derelict stations, rift anomalies in The Outer Worlds 2 offer rare loot, strange phenomena, and paths to legendary weapons that can reshape any build. Each anomaly tells a story-if you survive long enough to piece it together.
Paradise Island rift anomaly locations
Paradise Island hosts four rift anomalies ripe for exploration. The first sits atop the central volcano peak, accessible after scaling the lava flows. Head to the northern beach caves for the second, where a hidden crevice reveals the rift amid bioluminescent fungi. The third lurks in the southern jungle ruins, behind a breakable rock wall near the abandoned outpost. Finally, the fourth appears on the eastern cliffs, triggered by activating the nearby power generator during nighttime.
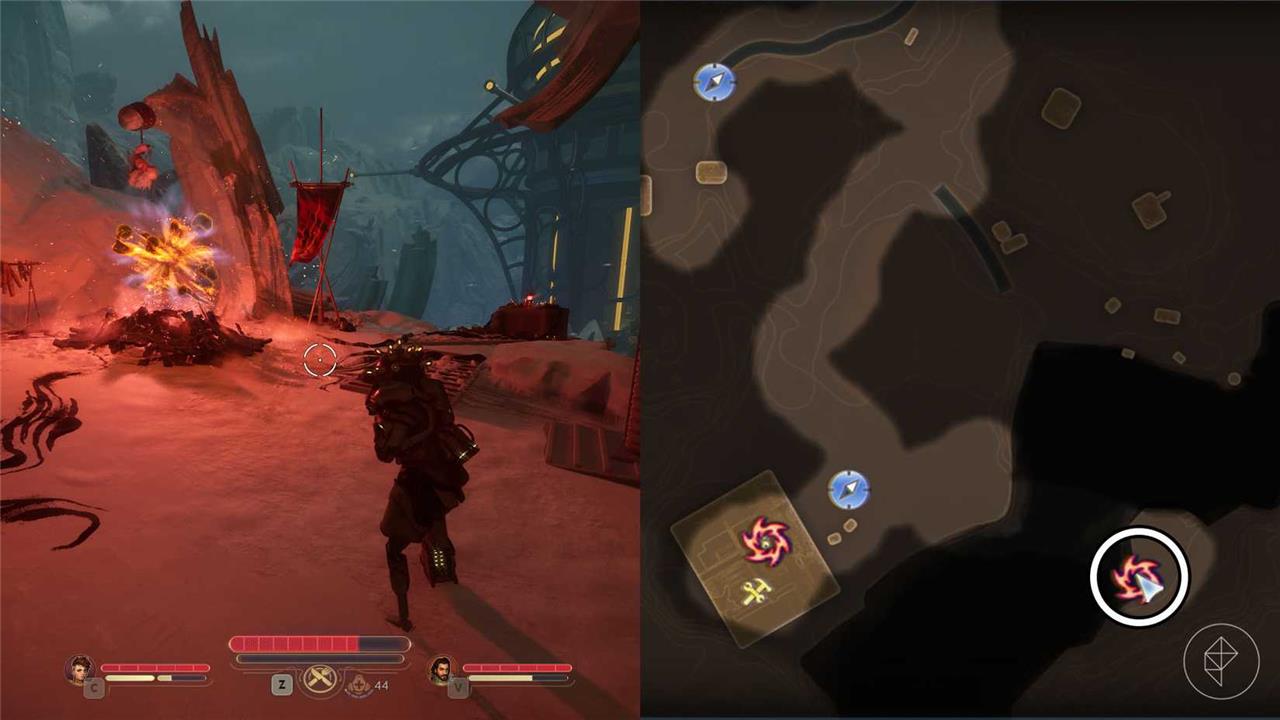
There are three rift anomaly locations in Paradise Island.
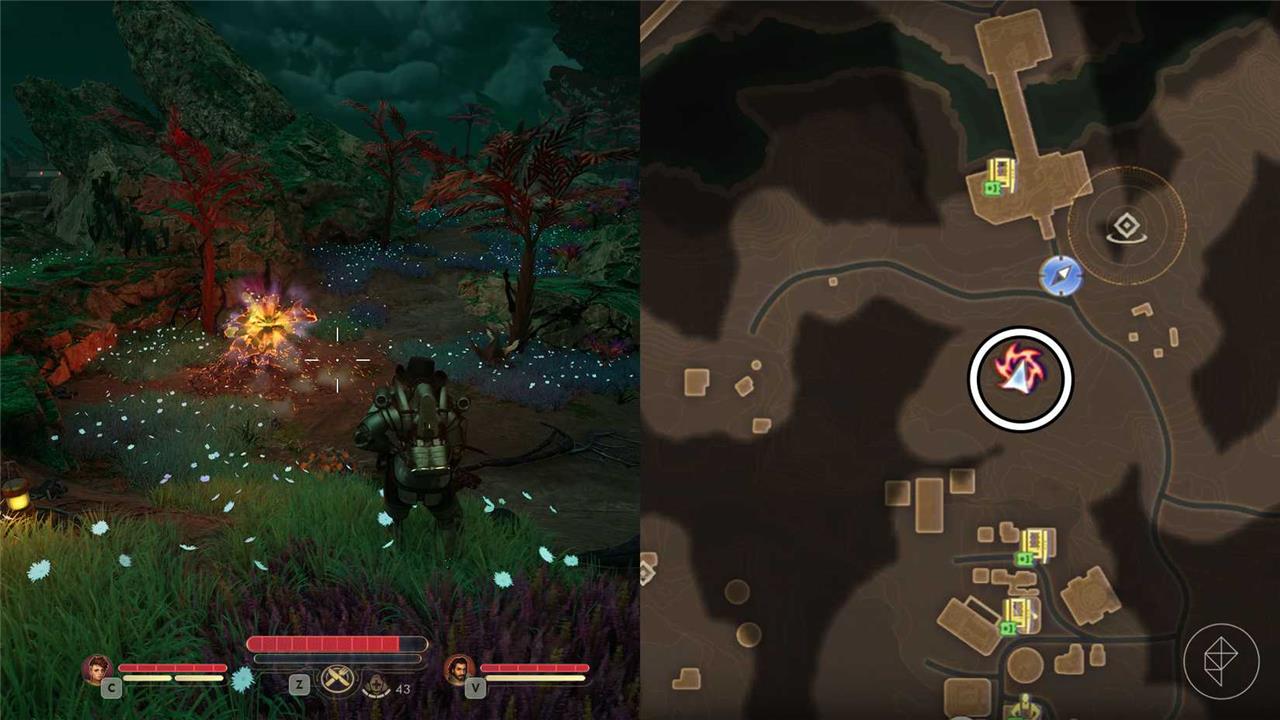
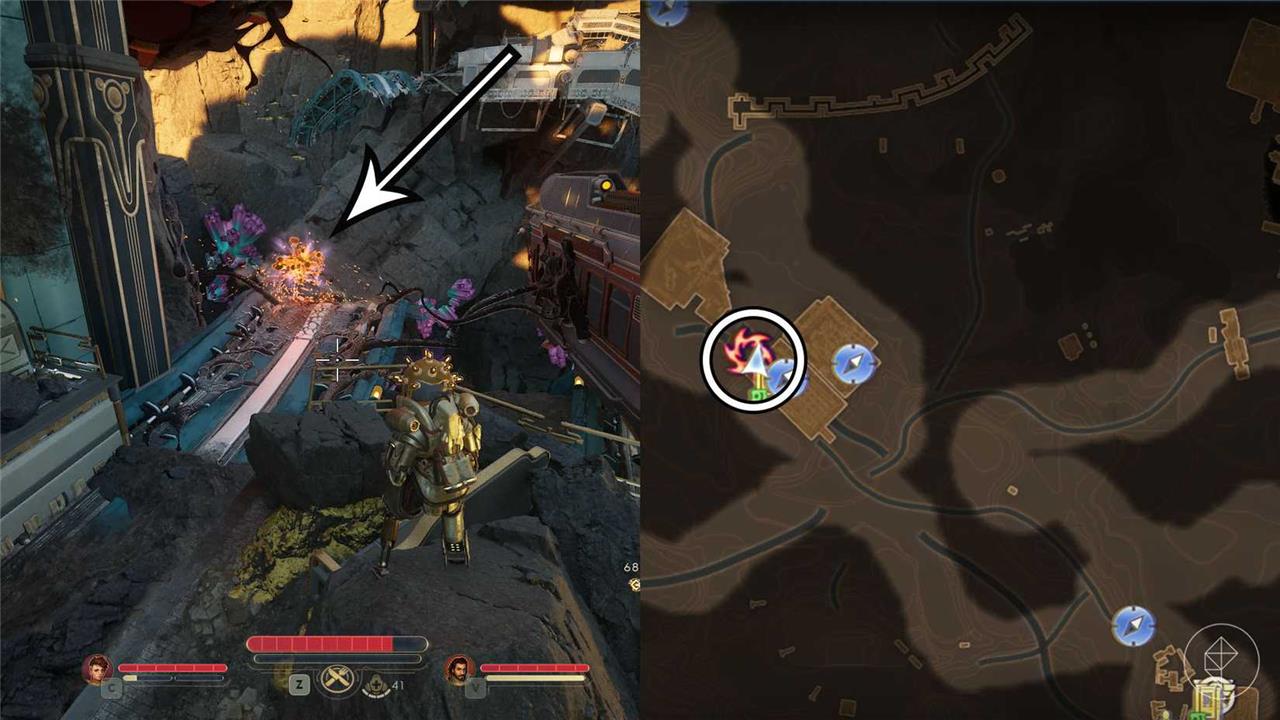
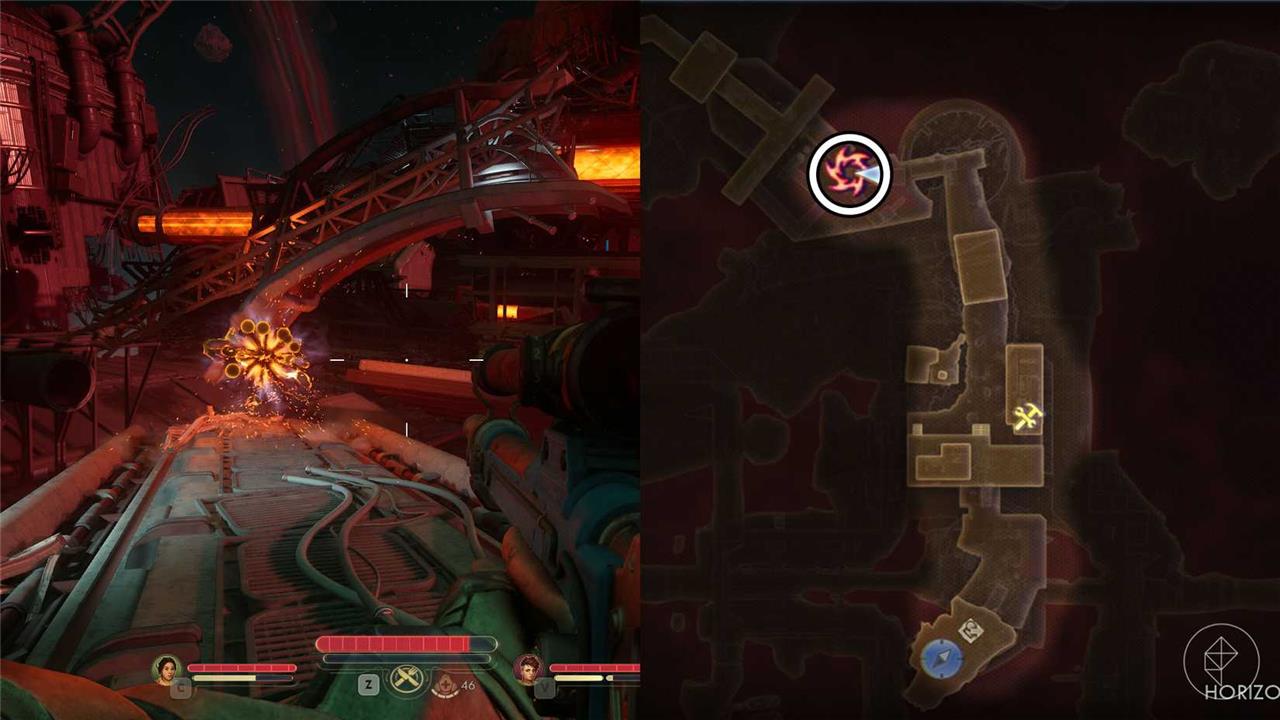
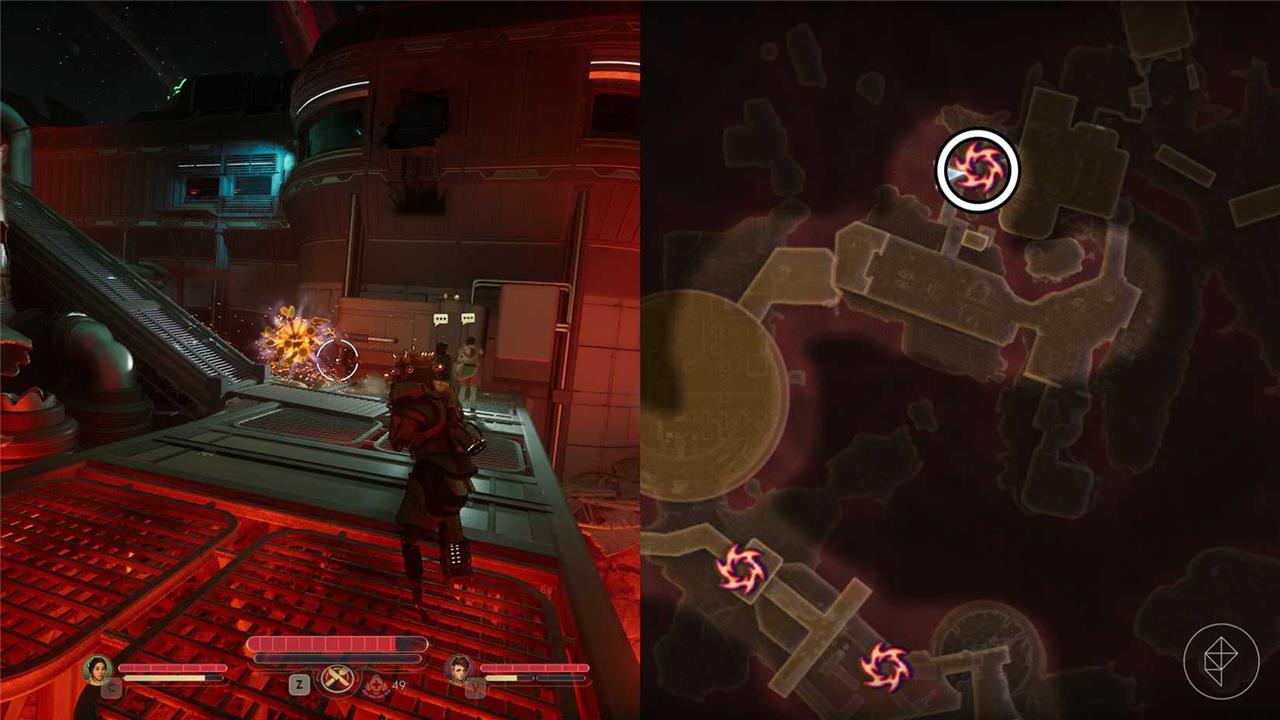
Rift anomaly #1 – North of Excogitation Chapel

You’ll find this rift anomaly north of the Excogitation Chapel, behind a small Protectorate camp on the cliff facing the Vex Relay Station. Opening it gives you the Goomerang legendary gun.
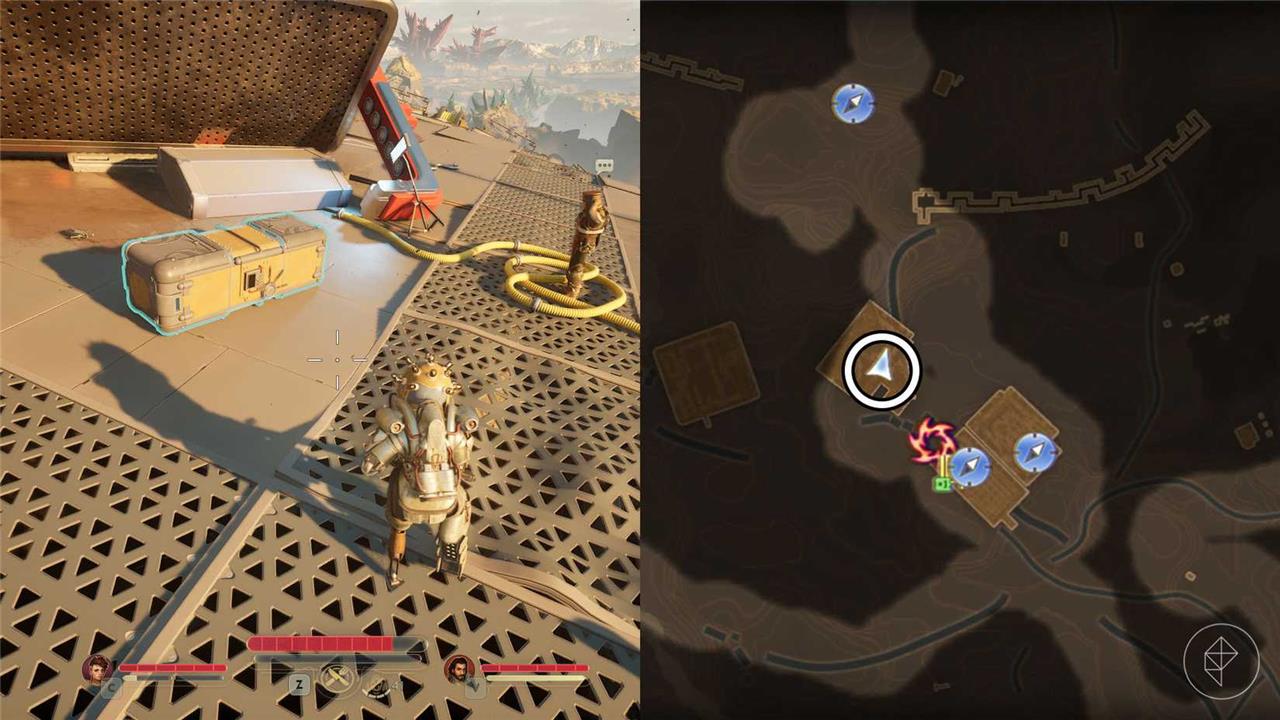
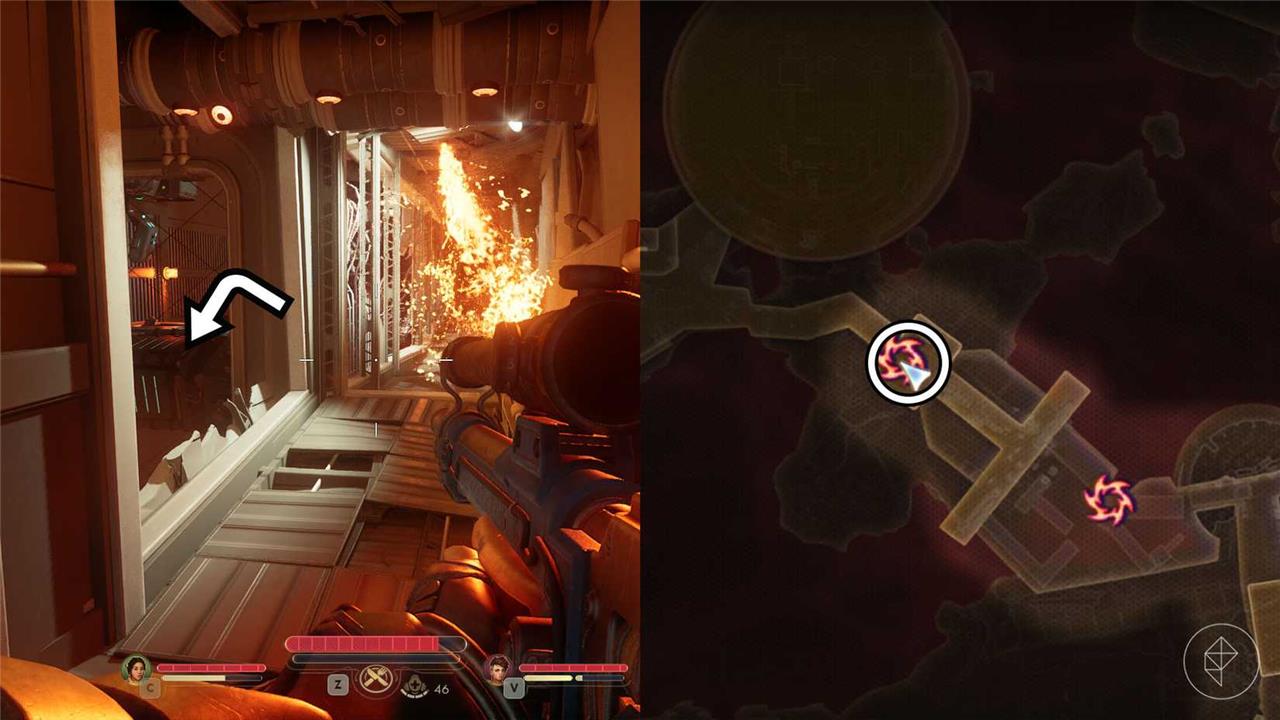
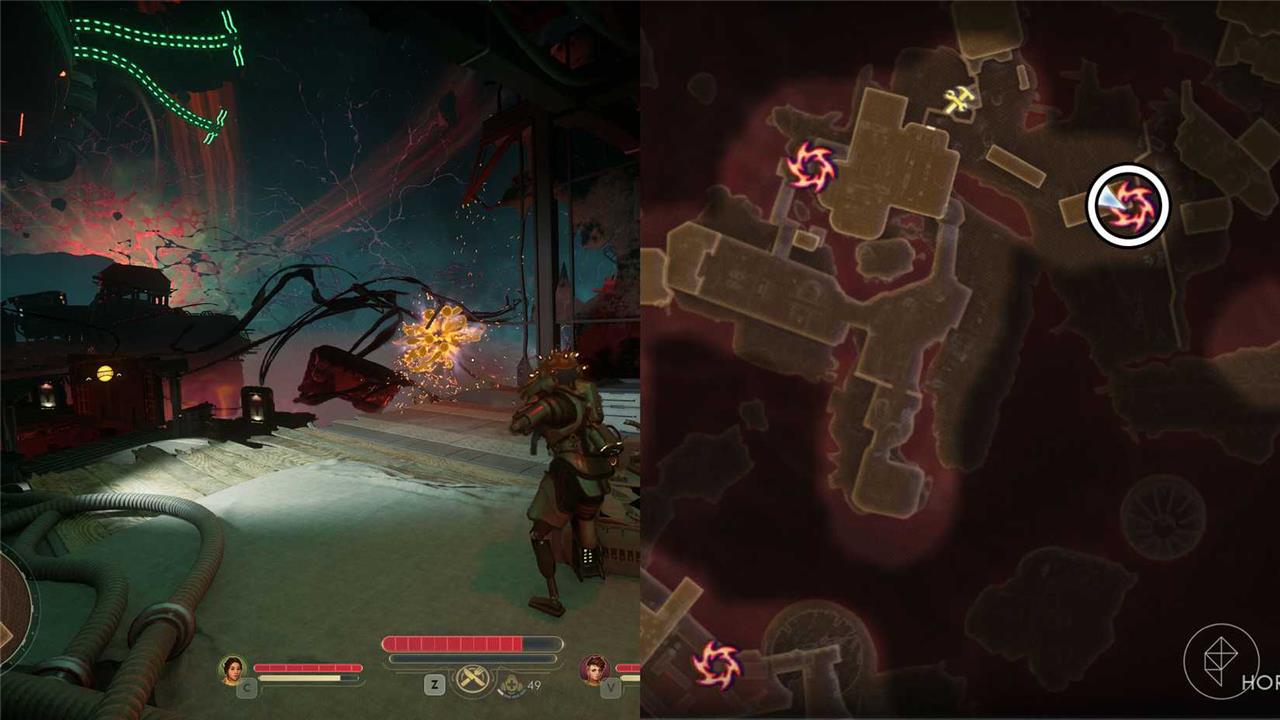
Rift anomaly #2 – Southwest of the Landing Pad
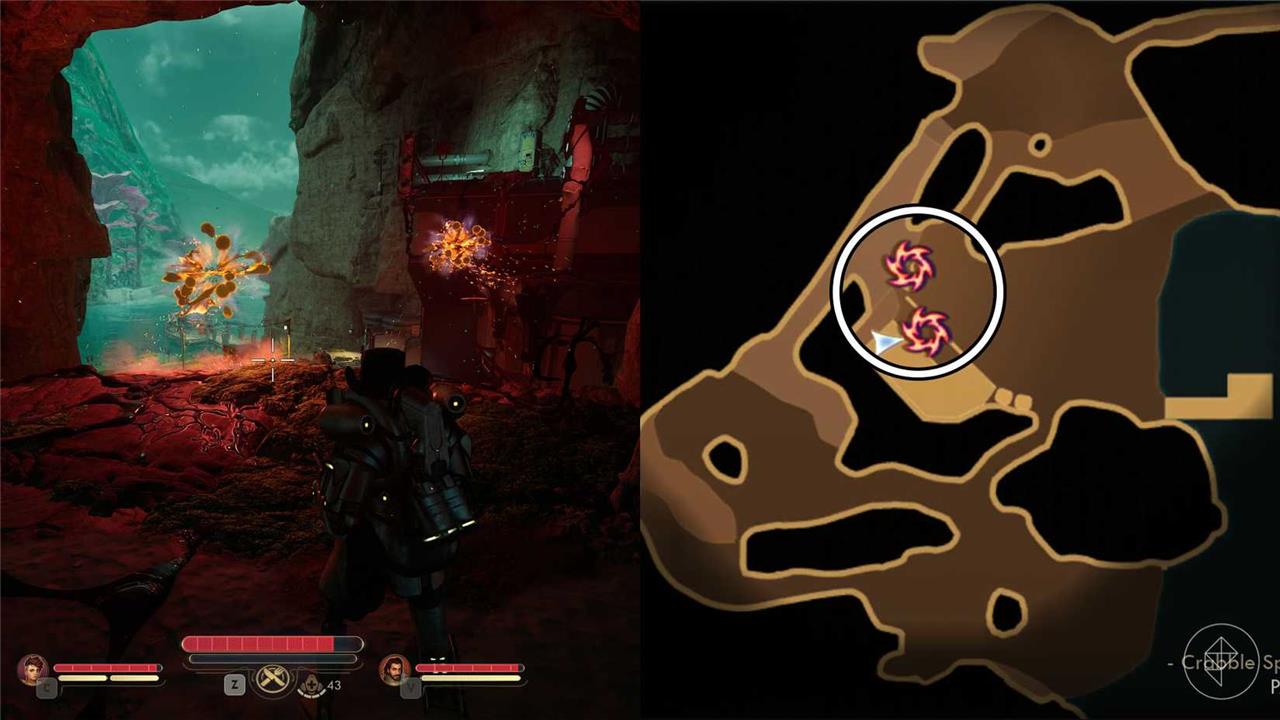
Southwest of the landing pad, you’ll find a small lake and the entrance to the Crabble Spawning Grounds. In this area, there are two rifts. Opening them reveals a few platforms that you’ll use to reach a higher location where you’ll find the Shrink Ray legendarygun.
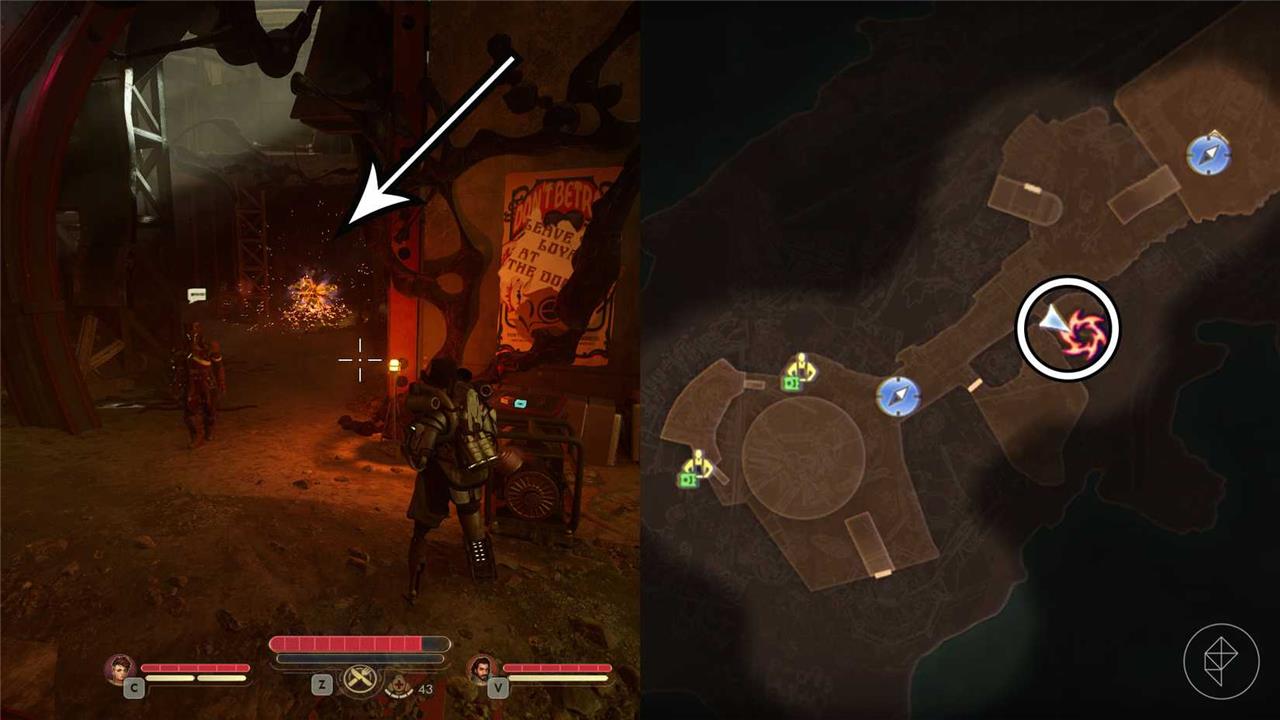
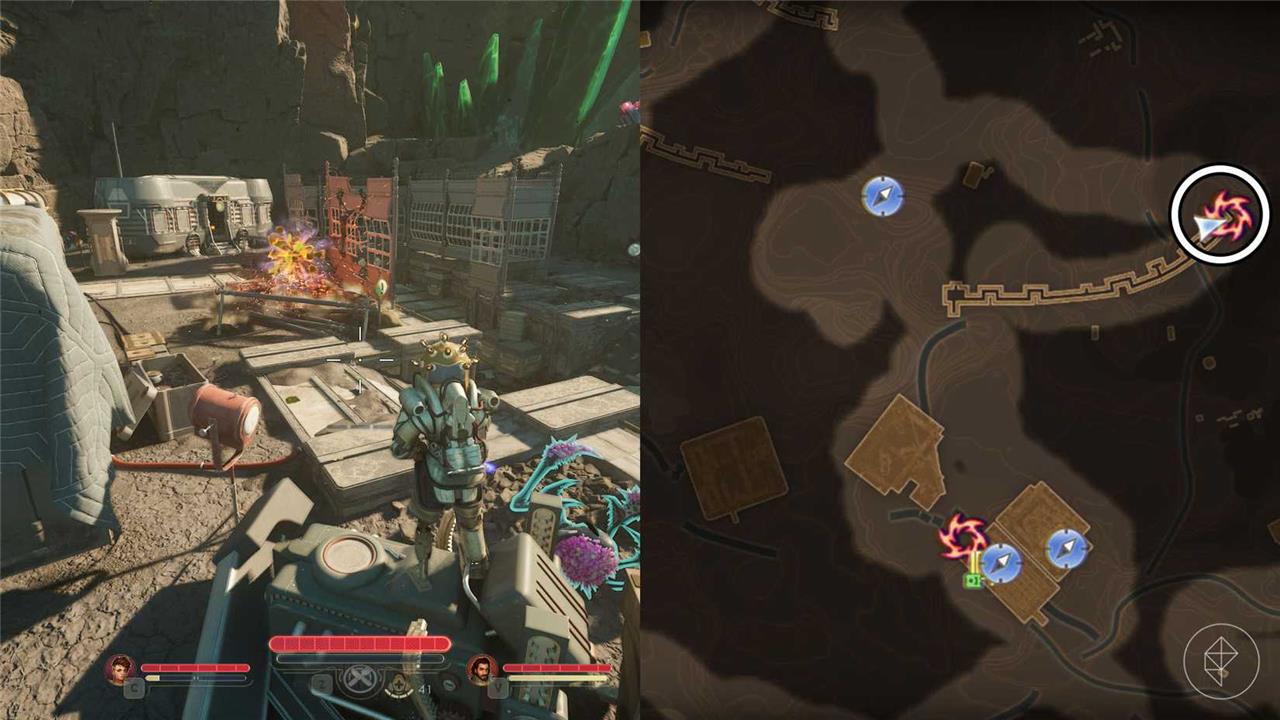
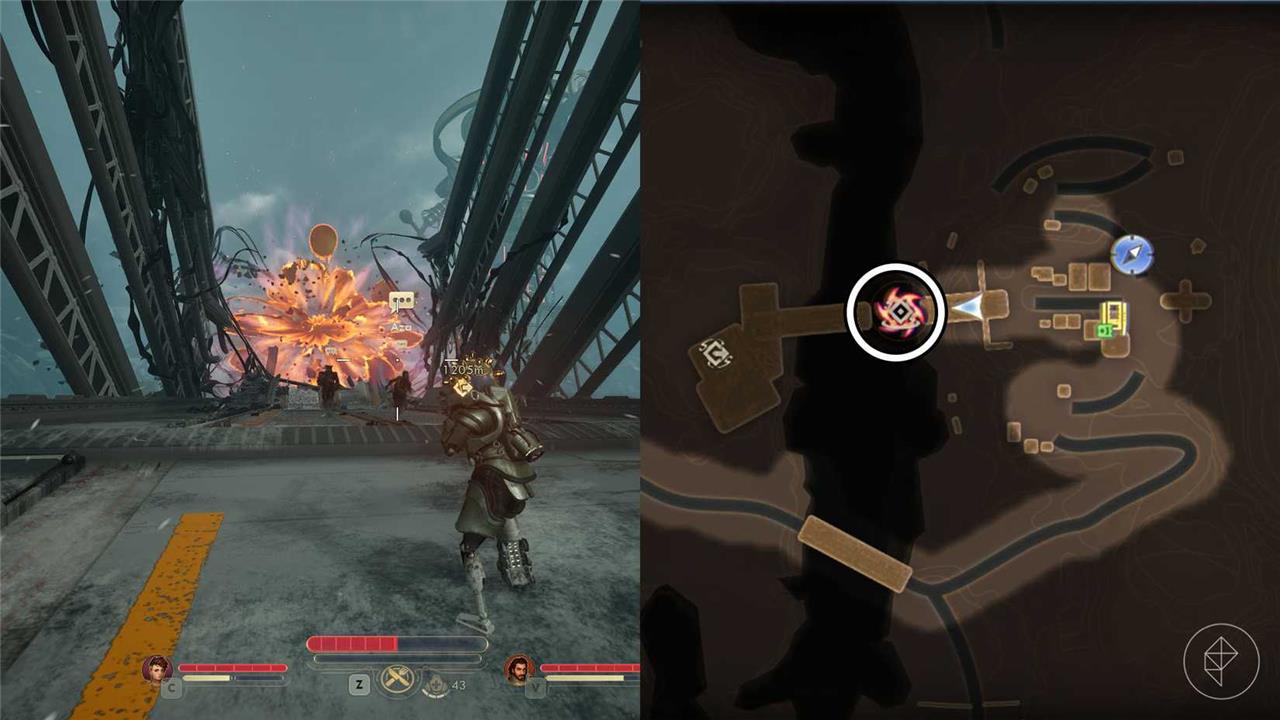
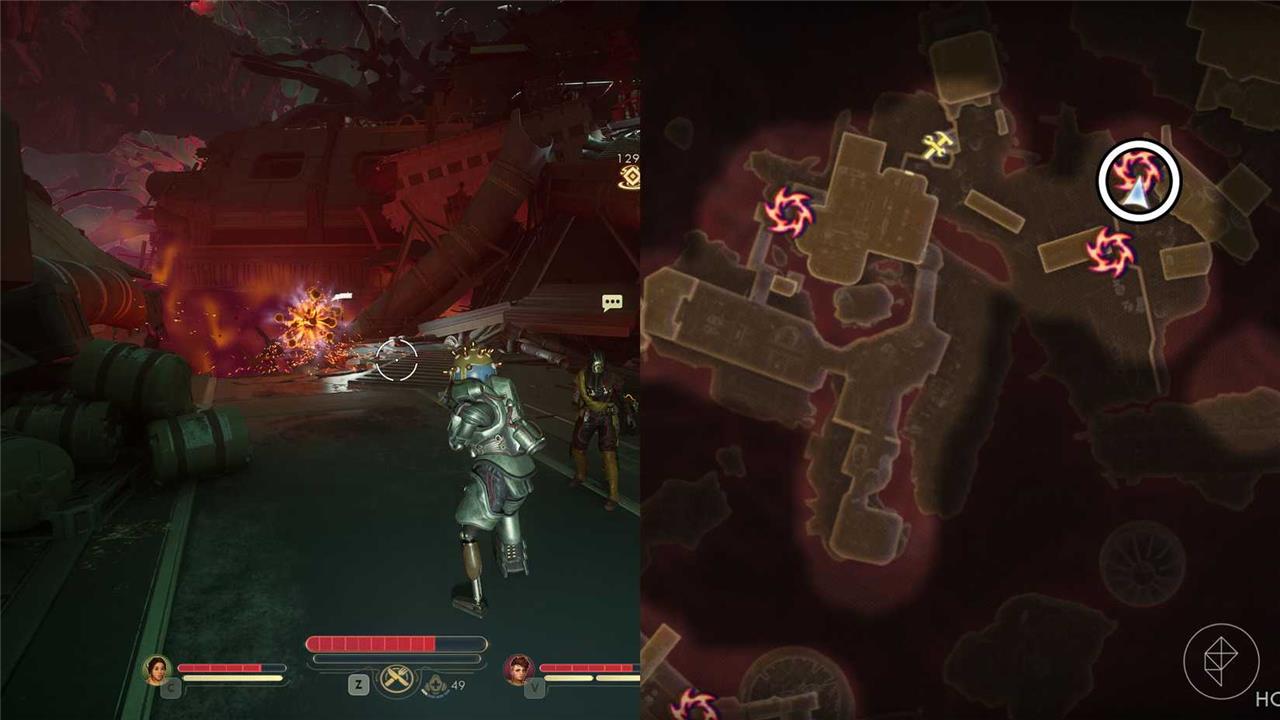
Rift anomaly #3 – Southwest of The Bridge of the Reverent
The quickest way to reach this rift anomaly is by going southwest of The Bridge of the Reverent fast travel point. It will reveal a corpse from which you can collect the Gary suit and the Tossball Card: Matthew Singh.
Free Market Station rift anomaly locations
Free Market Station rift anomaly locations are scattered across the surrounding systems, with each rift serving as a gateway to unique hazards and rewards. Track the marked conduits on star charts to pinpoint accessible entry points, and prepare for sudden enemy incursions and environmental hazards as you explore their shifting corridors.
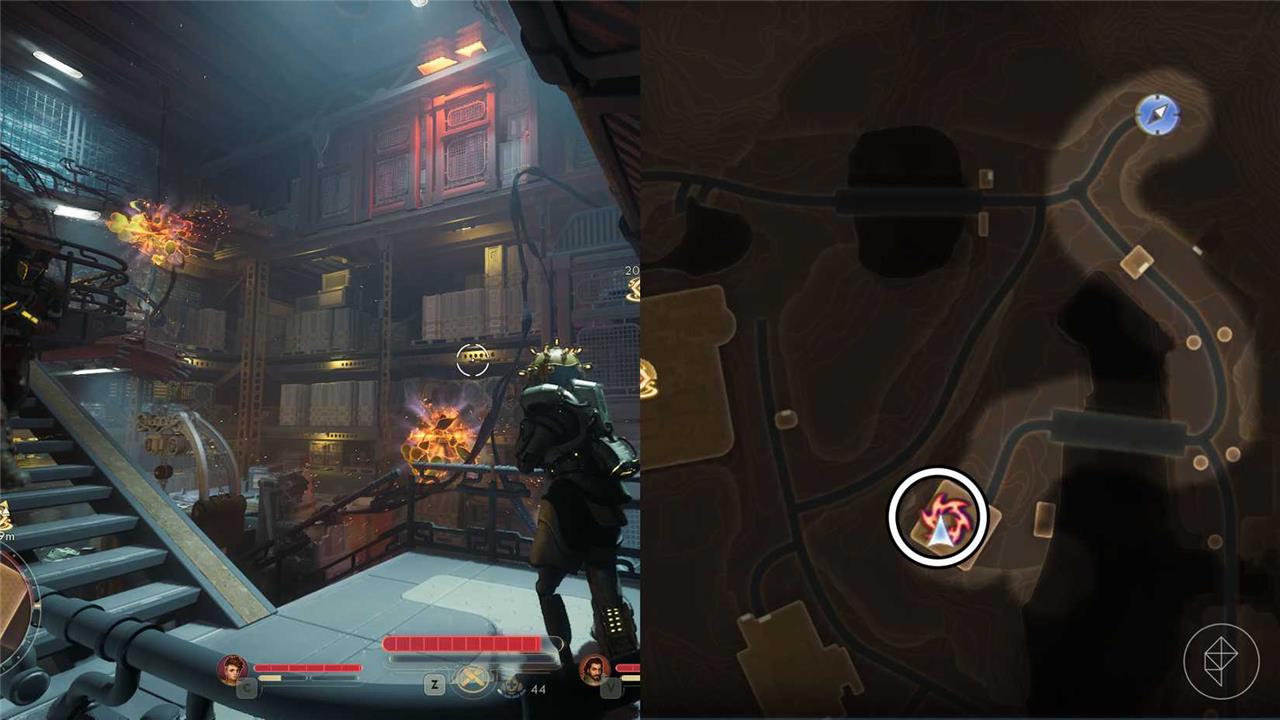
There’s only one rift anomaly in the Free Market Station. Before you get to the Free Market Plaza, there’s a small area you can access to the southeast. Follow the short corridor to find the rift anomaly.
Using the Rift Anomaly Modulator gives you access to a vendor that sells the following items:
- Bred Knife (legendary)
- Kinetic Shock Rifle
- Corrosive Plasma SMG
- Incendiary Heavy Machine Gun
- Corrosive Anti-Matter Plasma Sniper
- Kinetic Bio-Mass Shotgun
- Charged Shock Assault Rifle
- Twinned Autospray SMG
- Recyclable Plasmamancer Helmet
- Steadied Periscope Helmet 4.0
- Ported Fatcat Helmet
- Emanating Enlightened Seer Tutelary
- Repellent Shellacked Diversiform Uniform
Golden Ridge rift anomaly locations
Golden Ridge rift anomaly locations: From the cliffside overlook near the wind-swept mesas to the canyon’s shadowed alcoves, these anomalies cluster in sunbaked crags where mineral veining glitters. Traverse cautiously along narrow ledges to uncover pulsating rifts that pulse with alien energy, revealing hidden tech caches and one-of-a-kind gear as you progress through each site.
There are three rift anomaly locations in Golden Ridge.
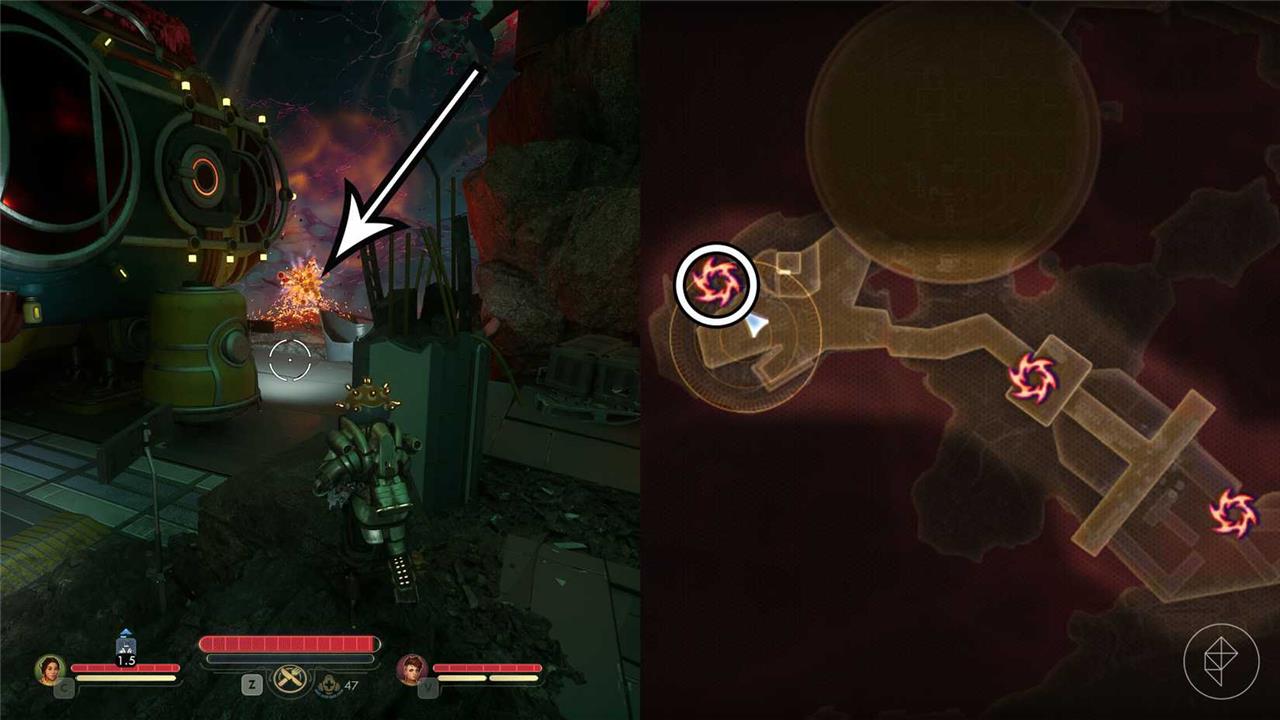
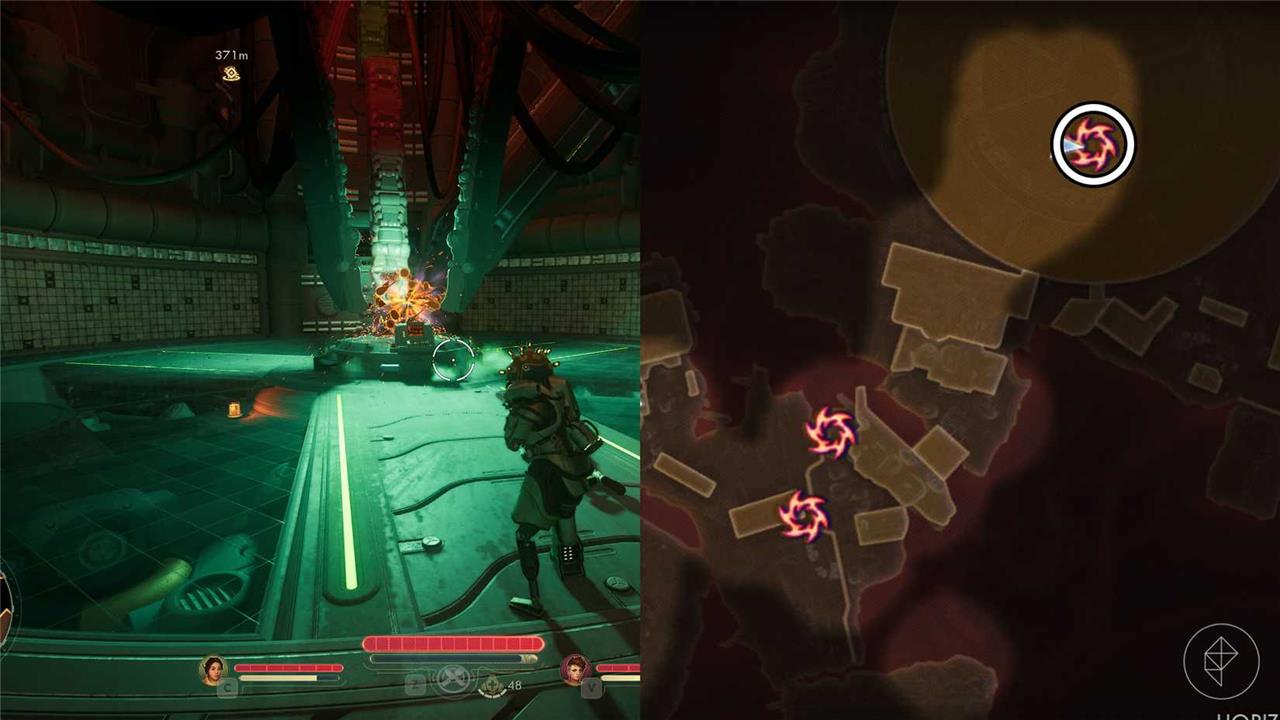
Rift anomaly #1 – Excavation site west of Golden Ridge
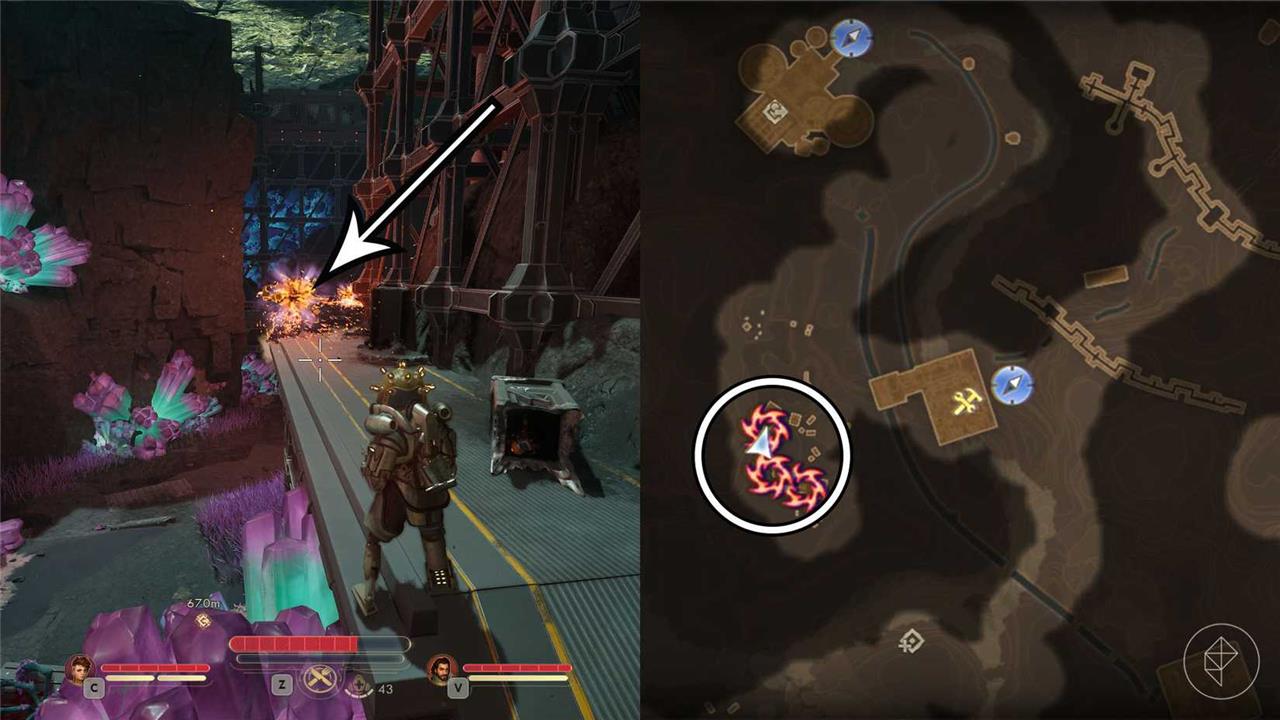
There are three rift anomalies in what seems like an excavation site west of Golden Ridge. The fastest way to get there and avoid the toxic river is by coming from the N-Ray Range fast travel point on the north side. When open, all three rifts will create platforms, helping you cross over the gaps, and reach the final platform where there’s a container with the legendary Minigun.
To start, open the southernmost rift anomaly, which will lead you to the other rift anomalies.
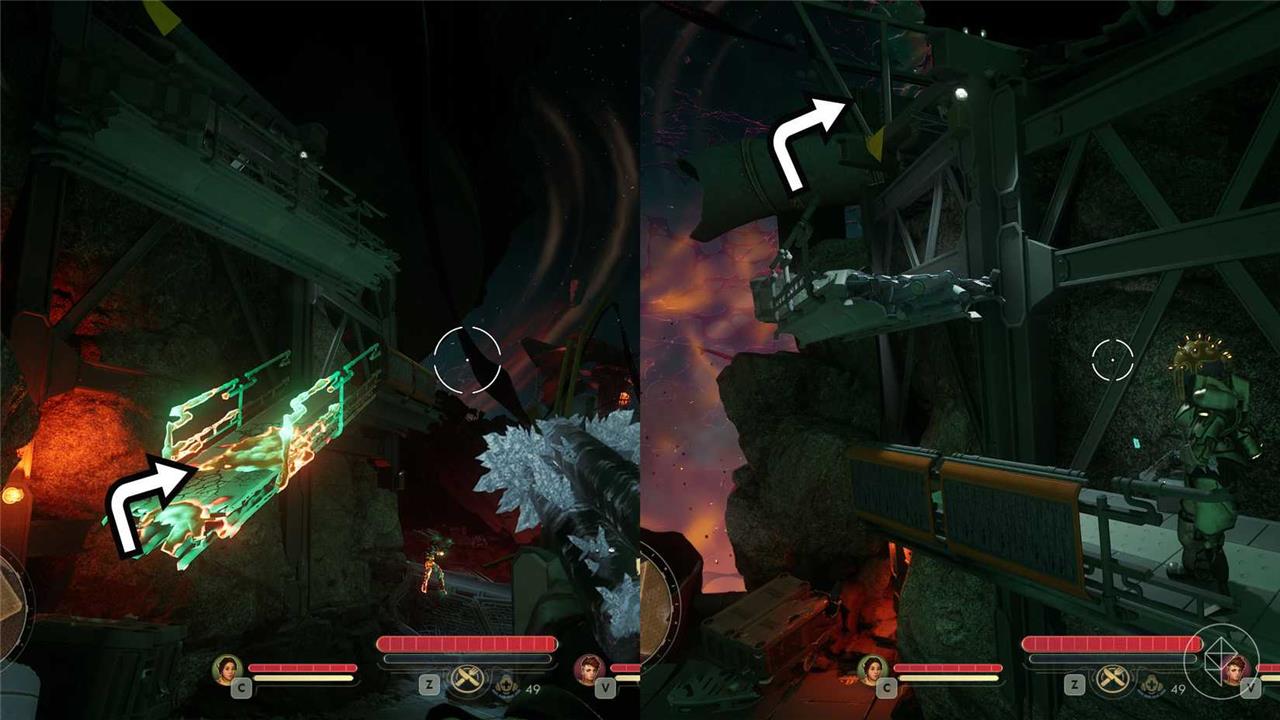
Rift anomaly #2 – Alexandra Station
At the Alexandra Station, near the landing pad, you’ll find this rift anomaly right at the edge of the station. By activating it, platforms will appear, allowing you to reach another segment of the station on the northwest side.
Cross to the other side, and you will find a container on the ground with the legendary gun Feedback Cannon.
Rift anomaly #3 – East of Scrapper’s Den
Head to the eastern end of a trench north of the landing pad to find this rift anomaly. We recommend using the Scrapper’s Den fast travel point northwest of it to quickly reach it.
Before you activate the rift anomaly, head inside the fenced area beside it. Look towards the rift anomaly to spot a hole in the fence along with a couple boxes conveniently stacked just below it. Stand on the boxes and activate the rift anomaly to spawn a container with three Advanced Decryption Keys and the rest of the fence.
Praetor rift anomaly locations
Rift anomalies appear across varied planetary regions, each marked by distinct environmental hazards and loot opportunities. Locating them often requires paying attention to cryptic signals and mapping faint energy signatures to pinpoint precise coordinates. Completing these anomalies rewards players with legendary weapons, unique schematics, and valuable crafting materials to enhance your build.
There are eight rift anomaly locations in Praetor, but rift anomalies #2 and #5 are mandatory parts of the “An Instrument to Unfold Space & Time” main quest, so you can’t miss them!
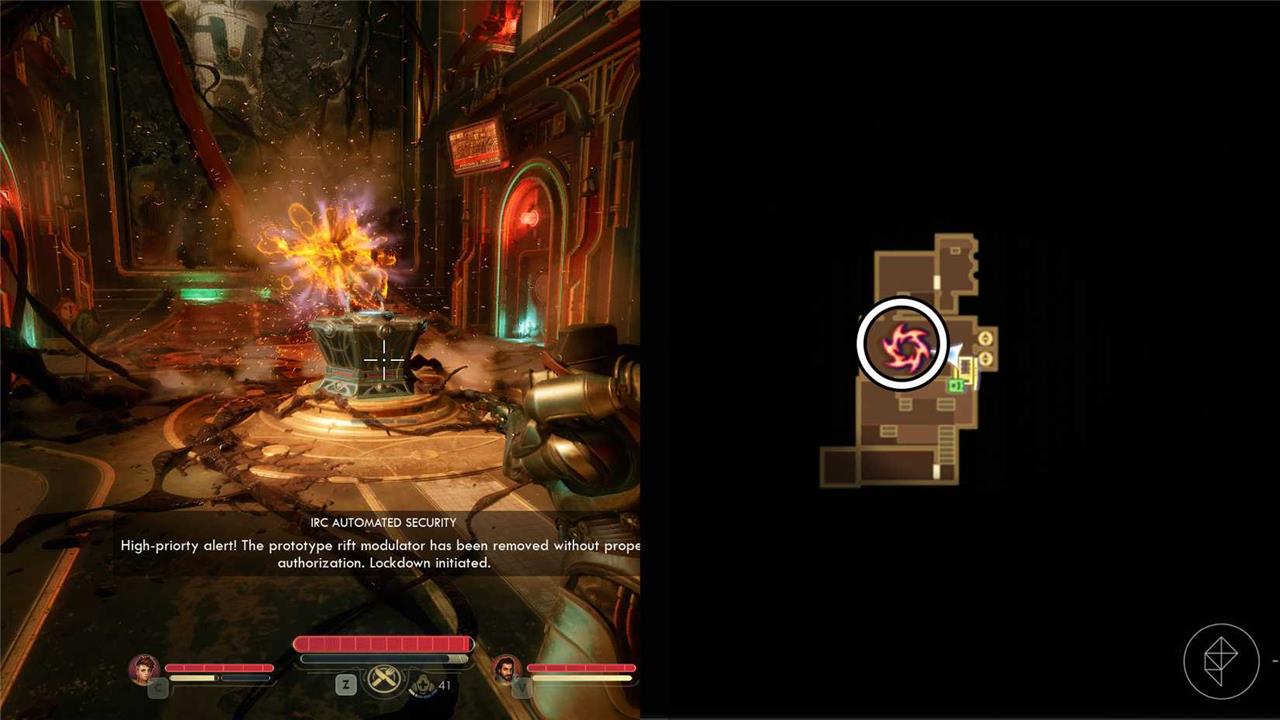
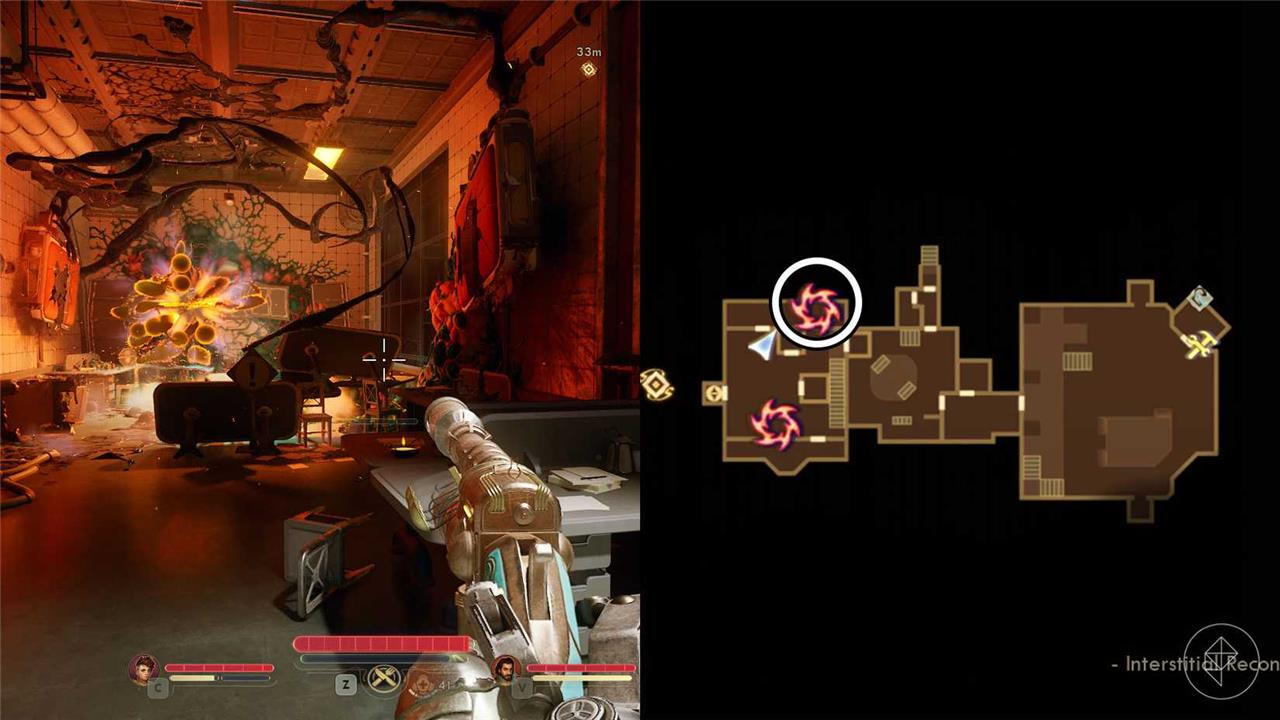
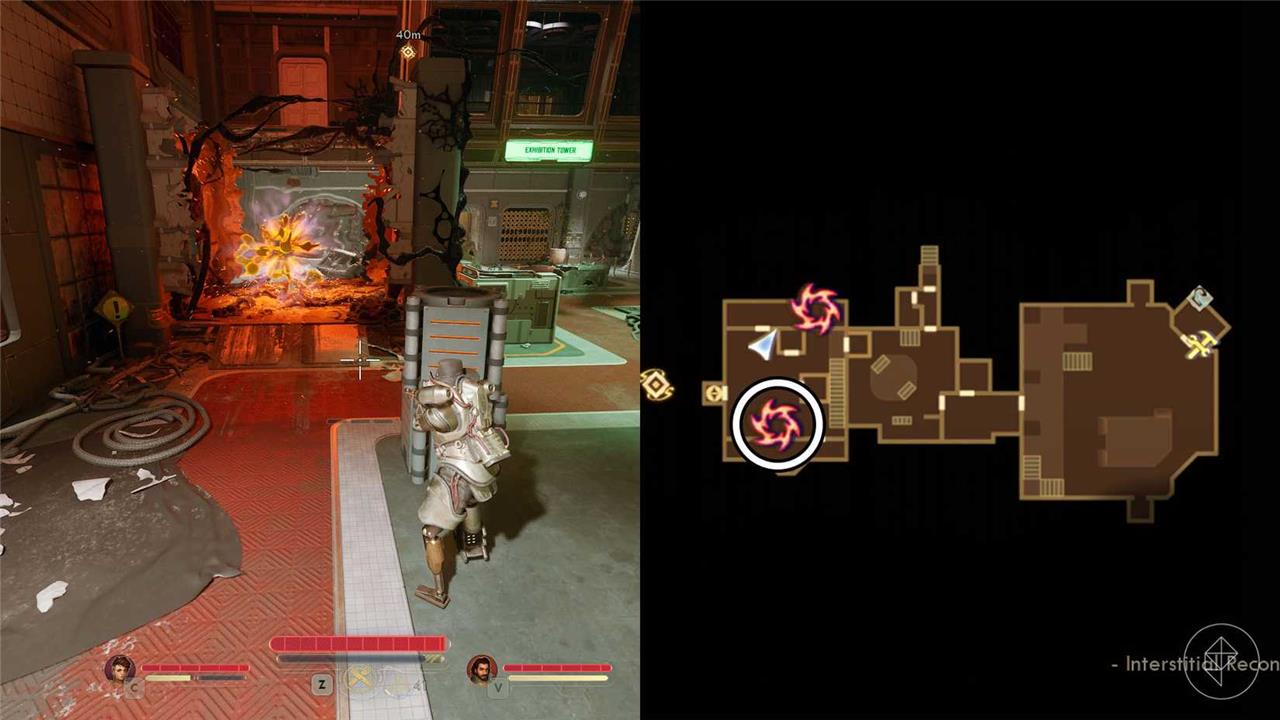
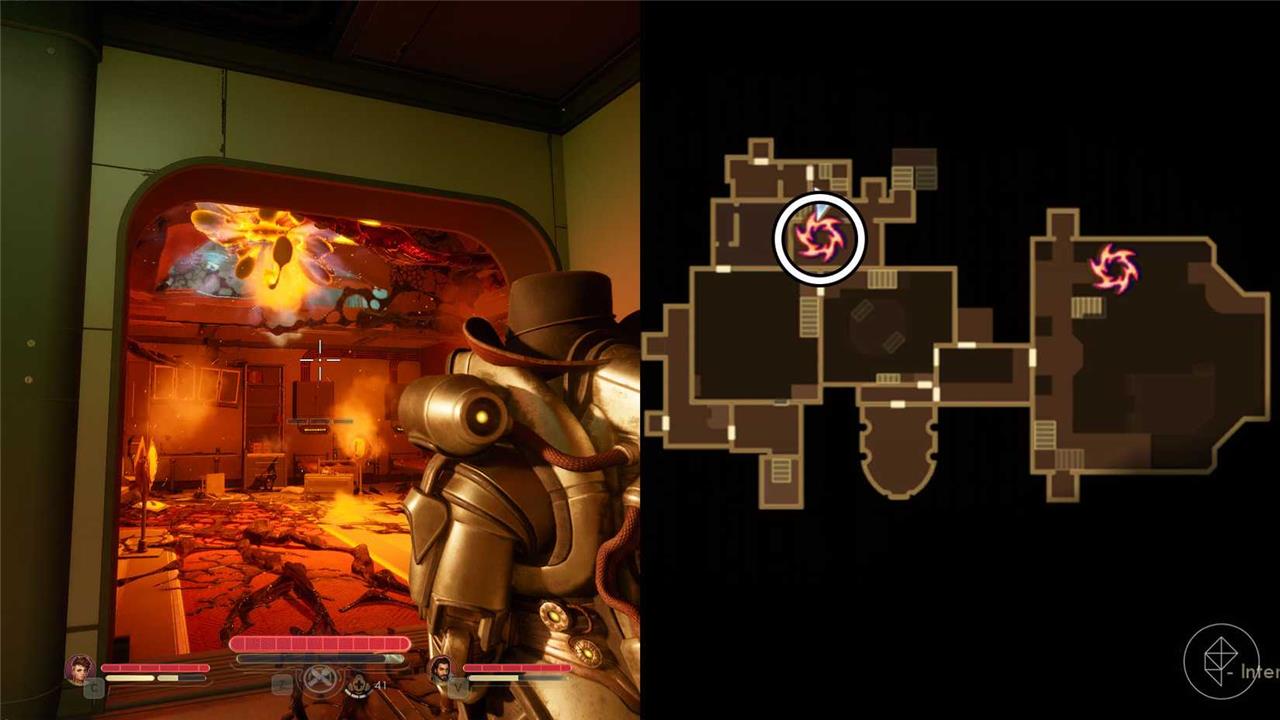
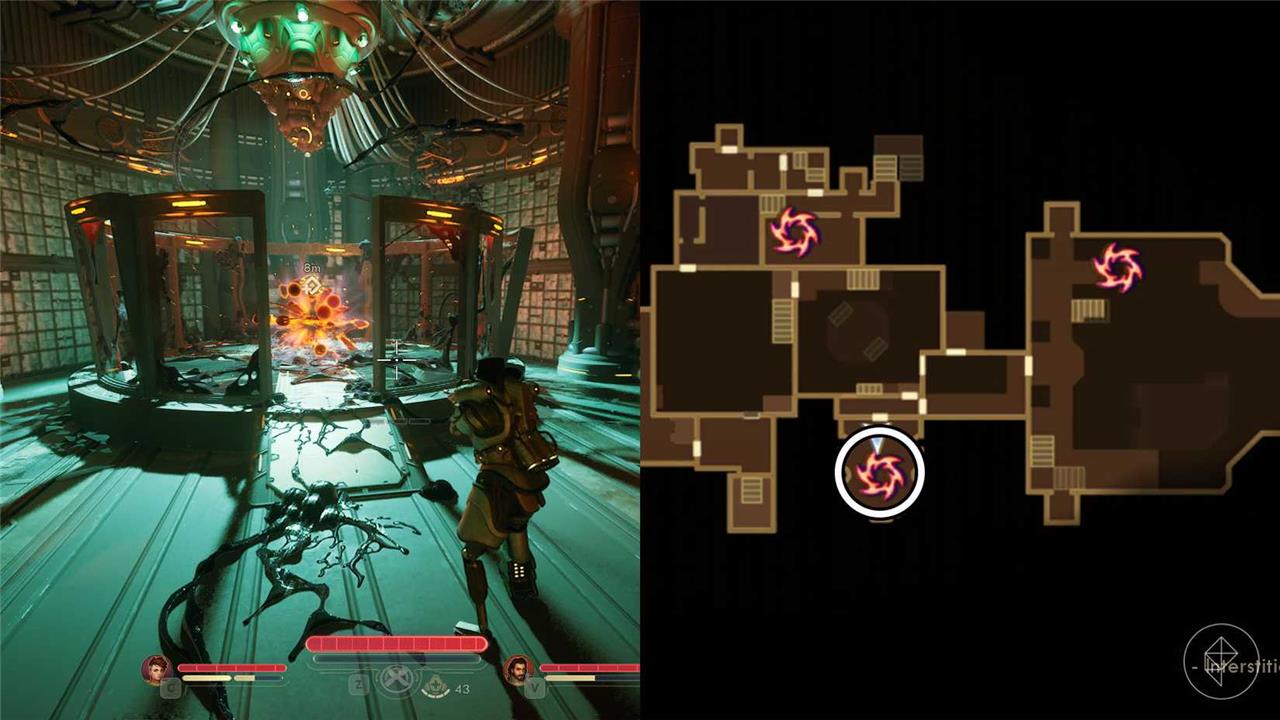
Rift anomaly #1 – Eastern side of Interstitial Reconfiguration Center
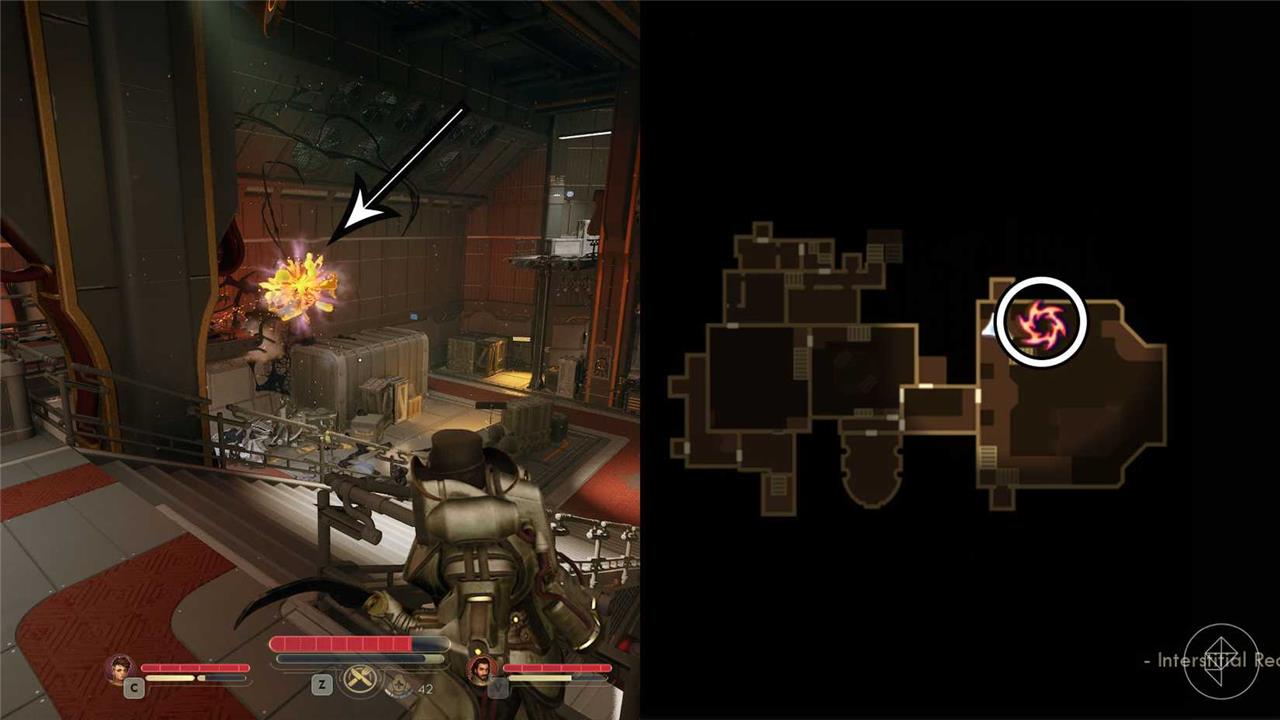
When you enter the Interstitial Reconfiguration Center, where you must go to complete the “An Instrument to Unfold Space & Time” main quest, you’ll find the main hall. On the right side, you will see this rift anomaly.
Rift anomaly #2
You’ll find this rift anomaly as you’re progressing through the “An Instrument to Unfold Space & Time” main quest.
Rift anomalies #3 and #4 – Prestige Observation Suite
You’ll find these two rift anomalies in the Prestige Observation Suite. To get there, use the elevator after finishing the segment where you find the Rift Anomaly Modulator.
The first is hidden behind a wall on the north side of the room, and once opened, it gives you the legendary gun Armageddon. The second is between the remains of two walls on the south side, and it creates a series of platforms for you to reach the exit.
Rift anomaly #5
You’ll find this rift anomaly as you’re progressing through the “An Instrument to Unfold Space & Time” main quest.
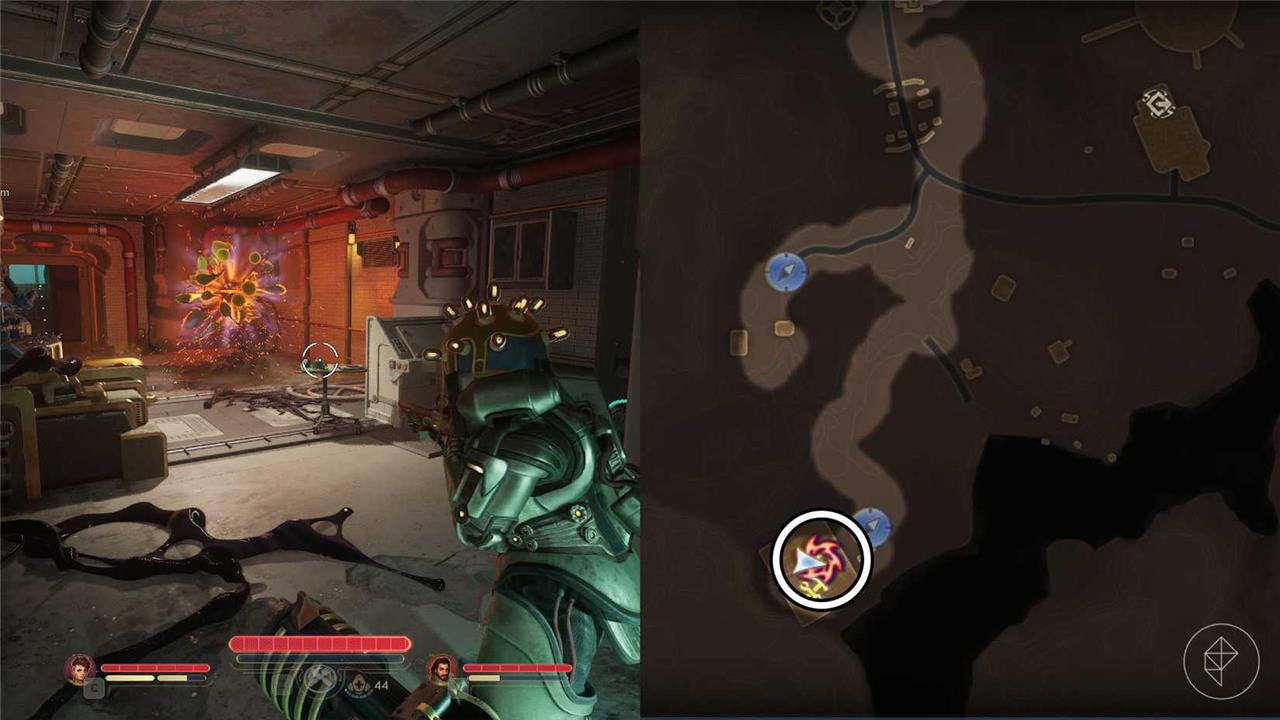
Rift anomaly #6 – Interstitial Reconfiguration Floor 2
In order to unlock the room where this rift is located, you must complete the secondary objective in the “An Instrument to Unfold Space & Time” main quest, which involves helping Dr. Hurley gain access to the restricted wing. Progressing in the quest after helping her will lead you to the room where this rift is hidden.
Rift anomaly #7 – Occultist camp north of the northwest Lightning Tower
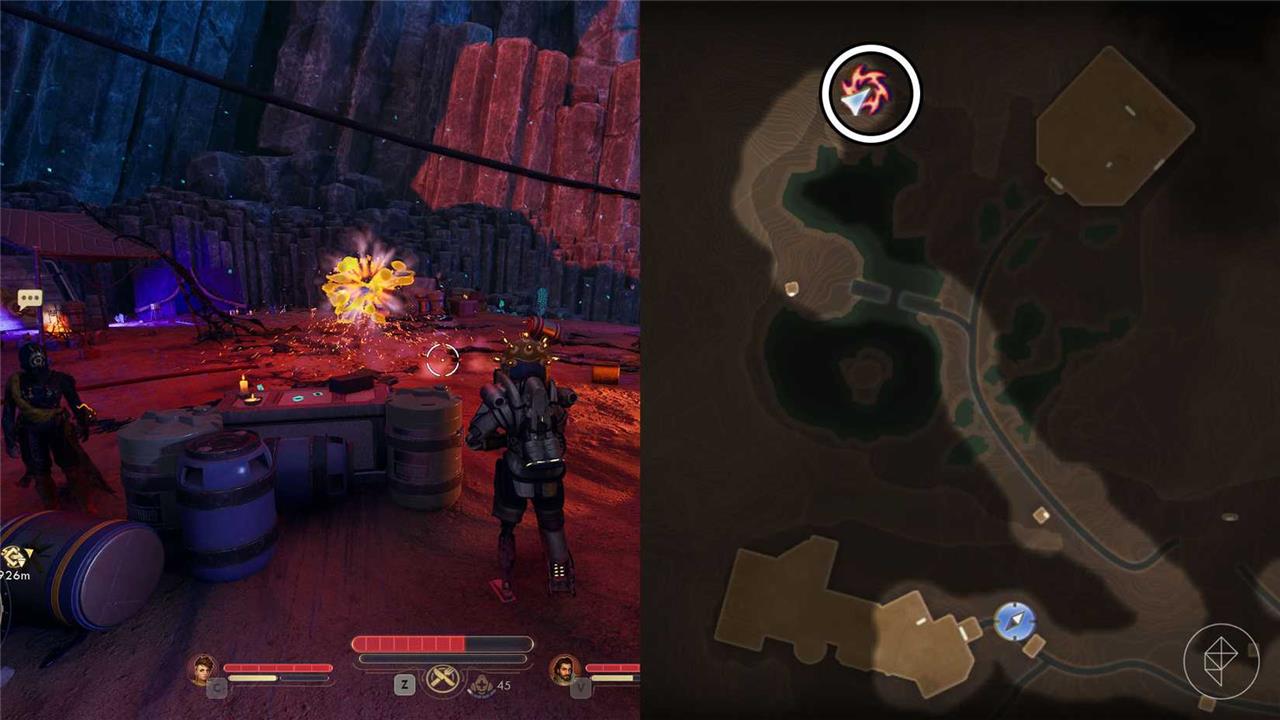
In the northwestern region of Praetor, you will find an occultist camp with a rift right at the center. Activating it makes a group of occultists appear. Kill them and retrieve the legendary gun Last Whisper from the container.
Rift anomaly #8 – Southwest Lightning Tower
In the southwest Lightning Tower, you’ll find two rift anomalies outside a locked room. The goal is to use both of them to access the room and grab all the items inside. First, activate the rift anomaly within the walls to make a few boxes appear outside. Next, activate the other rift outside.
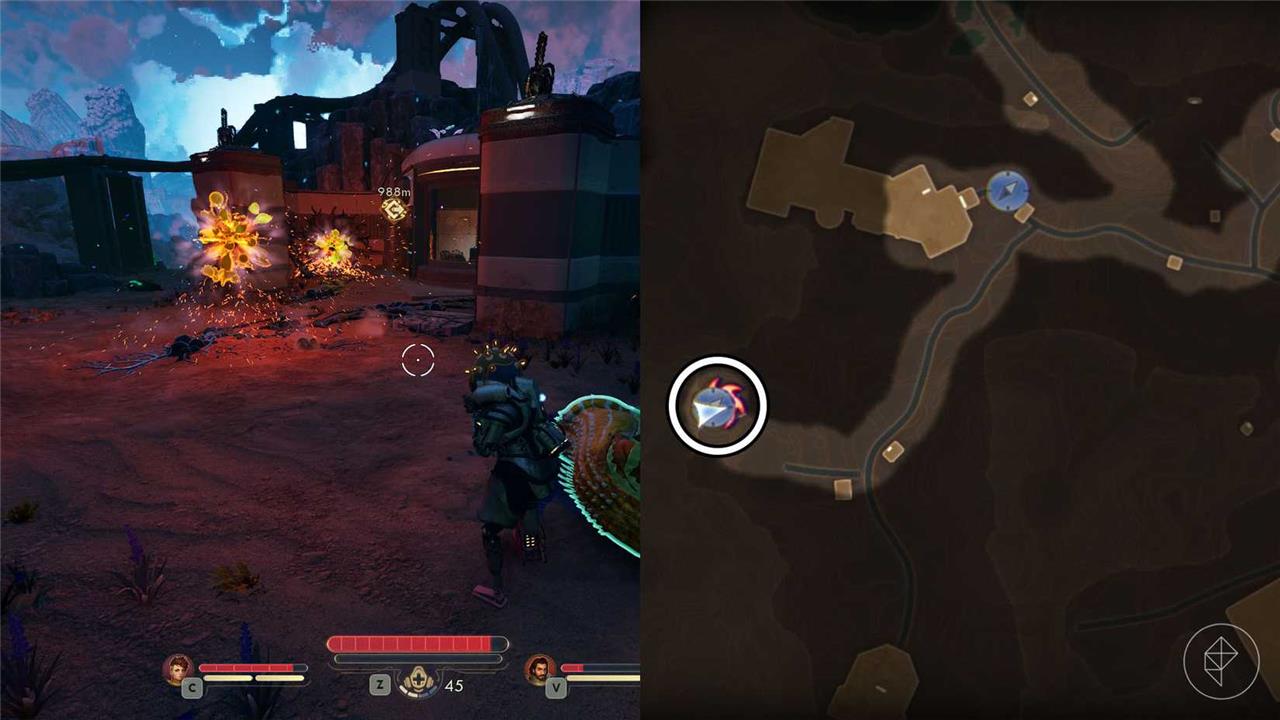
Although there’s a gate now blocking the path to the building, you can use the boxes to jump inside and use a new group of boxes that appear to reach the roof. Drop through the opening to head inside. When it comes to rewards, besides the items in the room, you can grab one rift residue on the roof and progress through the “Fiddling with Fulgurating Fulminations” quest.
Cloister rift anomaly locations
Cloister rift anomalies appear in three key spots within the game’s cloister zones. The primary site sits near the central altar chamber, marked by flickering purple energy fields that spawn elite enemies. A secondary cluster forms along the eastern cloister walls, where players activate anomalies by interacting with glowing runes on stone pillars. The third location hides in the underground cloister vaults, accessible via a hidden lever behind the main statue, yielding high-reward loot upon completion.
There are five rift anomaly locations in Cloister.
Rift anomaly #1 – East of Laplace’s Garden

The first rift in Cloister is located east of Laplace’s Garden. Follow the main road until you find two large Protectorate cannons. The rift will be on your left side. Interact with it to make a container with two rift residues appear.
Rift anomaly #2 – Earl
You find this second rift anomaly inside Earl, a Protectorate installation on the southwest side of Cloister. Enter the building and unlock the initial doors to find the rift. Despite the work and time involved in finding this rift, it only gives you a rift residue.
Rift anomaly #3 – East of Earl

East of Earl, you’ll find some tunnels with Mantisaurs. One of the Mantisaurs will take you to the cult’s camp where this rift is located.
Opening it gives you some materials like a rift residue, and the Adrenalized Bloodsoaked Gothic Helmet.
Rift anomaly #4 – Newton
During the “A Study in Disruption” side quest, you must visit the town of Newton and clear the area of cultists. To its west, you’ll find a broken bridge and a giant rift in front of it. Activate it and pieces of the bridge will appear, helping you cross over to the other side. The only rewards you get from this rift are a couple rift residues while traversing the path it creates.
Rift anomaly #5 – Cloister Underlands
There are two rifts in Cloister that become accessible as you progress in the “A Complication with the Computronic Cerebrum” main quest. After you reach the Archive and process your rift data, take the elevator down to enter the Cloister Underlands. Head south from the entrance and turn west to find a building with rifts inside.
Inside, you’ll find two rift anomalies. Interact with the rift on the lower level, take the stairs beside it, and enter the elevator on the left. In the walkway, get near the second rift and activate it. Now, you can use the platforms created by the first rift to reach the container holding the legendary shotgun Ice Breaker.
Horizon Point Station rift anomaly locations
Horizon Point Station hides several rift anomalies scattered across its outer platforms and maintenance decks. Players can locate three distinct anomalies: one near the eastern observation ring behind the reactor conduits, another deep within the cargo bay’s restricted zone, and a third floating above the hangar’s service bridge. Scanning these sites rewards valuable research data and increases your chance to encounter unique weapon schematics tied to station experiments.
In Horizon Point Station, there are eight rift anomaly locations, but rift anomaly #1, #4, and #6 are tied to the main quest. You’ll run into these rift anomalies as you progress in the story.
Rift anomaly #1
You’ll find this rift anomaly as you’re progressing through the “Sins of the Past on the Precipice of the Future” main quest.
Rift anomaly #2
In the initial area of Horizon Point Station, you will find a corridor overtaken by streams of fire. Jump into the hole on your left to find a rift anomaly. Open it and a few platforms leading you to a terminal will appear. Interact with the terminal to turn off the fire.
Rift anomaly #3 – De Vries’ ship
You’ll find this rift near De Vries’ ship. Activating it creates a platform to your right that allows you to access a higher platform where you’ll find a room with a jammed door.
To open it,you’ll need the “Brawny” trait or Engineering 13. Inside, you’ll find the Volted Rocket Pistol, five Mini-Rockets, a Vacuum Tube, an Advanced Decryption Key, and a Distraction Device.
Rift anomaly #4
You’ll find this rift anomaly as you’re progressing through the “Sins of the Past on the Precipice of the Future” main quest.
Rift anomaly #5
After meeting De Vries and Helena, instead of turning left, keep going east using the remains of a corridor to make your way to this rift anomaly.
Rift anomaly #6
You’ll find this rift anomaly as you’re progressing through the “Sins of the Past on the Precipice of the Future” main quest.
Rift anomaly #7
As you progress in the main quest, you will come upon this unstable rift anomaly. You can’t get near it before stabilizing it. In our experience, we found an equation on the upper floor and inputted it into the terminal near the rift to stabilize it. Activating it makes a couple of platforms appear, helping you cross to the other side.
Rift anomaly #8
Map of all Rift Anomaly locations by region
A good “map by region” for all Rift Anomalies is best handled with an interactive map and a region checklist side-by-side rather than a static image. Here’s how to get exactly that and how the regions are typically broken down.
Best way to get a full map
-
Use an online interactive map for The Outer Worlds 2 that lets you toggle “Rift Anomaly” markers on and off; you can usually also filter by region such as Eden, Golden Ridge, Praetor, Cloister, etc.
-
Most of these maps let you zoom into each area and show rift icons at precise world-space coordinates, which is more practical than a single flat image for all 33 anomalies.
Region list and counts
-
Common breakdown across guides is:
-
Paradise Island / Eden – several rifts near the Landing Pad, Crabble Spawning Grounds, and the Bridge of the Reverent.
-
Golden Ridge (Dorado) – a cluster around Alexandra Station and the ravine by the Decommissioned Autonomous Extractorium.
-
Praetor – the densest area, including the Interstitial Reconfiguration Center and Prestige Observation Suite.
-
Cloister, Horizon Point Station, Free Market Station – smaller sets of rifts but still included on full interactive maps.
-
Using the map efficiently
-
Filter to one region at a time (for example, start with Eden, then Golden Ridge, then Praetor) and clear every rift icon before moving on.
-
Reme
Interactive map showing Rift Anomalies by region
An interactive, region-filterable map does exist, and it’s the easiest way to see Rift Anomalies by area like Paradise Island, Golden Ridge, Praetor, and others. Here are the most useful options:
Full-game interactive map
-
A full Outer Worlds 2 interactive map lets you toggle icons for Rift Anomalies, fast travel points, quests, and more, and you can switch between regions (Eden/Paradise Island, Golden Ridge, Praetor, Cloister, Horizon Point Station, Free Market Station, etc.).
-
Each region has its own view, with individual rift markers you can click for a short description of how to reach it and what reward you get.
Guide-style interactive maps
-
Some guide sites embed regional maps (for example, Paradise Island and Golden Ridge) with rift icons and short text summaries such as “Crabble Spawning Grounds cave” or “Alexandra Station ravine platforms,” which function as mini interactive maps per area.
-
These guides often cross-link to a broader map hub where you can jump straight to a specific region’s map (like Horizon Point Station or Cloister) and then look only at the rift symbols there.
Using the maps for rifts
-
Filter or toggle to show only Rift Anomaly markers, then clear them region by region; the Paradise Island view will highlight the three early-game rifts, while Golden Ridge, Praetor, Cloister, Horizon Point Station, and others show their own sets.
-
Combine the interactive map with your in-game map: once you discover a rift it’s permanently marked in-game, so the online map is mainly for any anomalies you have not yet uncovered.