From secret crafting tricks to clever exploration tactics, these nine Hytale tips will help you build smarter, survive longer, and squeeze more fun out of every block you place.
Start with the basics
Before heading into complex builds or deep exploration, take time to learn the basics of controls, crafting, and survival. Practice gathering resources, managing your health, and using tools properly to build confidence early on. Understanding how different materials work and how to combine them will make future projects smoother and more enjoyable.
Hytale is a sandbox game, which means the idea is to do whatever you want. There’s no campaign guiding your progression, so you’re the one who determines the next step in your adventure. However, freedom may be a prison for those who don’t know what to do with it.
The best general guideline for progressing in the game while figuring out what to do is the crafting system. First, collect materials and craft all the items in the pocket crafting menu. Then, build a base, store everything inside – especially the bedroll, which works as a respawn point – and start crafting everything you can that is available at the Workbench. This process will require you to explore, search for ores, and learn where you can find the different types of materials required by the recipes, pushing you forward.
Run faster with charge attacks
Charge attacks aren’t just for dealing more damage-they can also boost your movement. By holding your attack and releasing it while sprinting, you gain a short burst of speed that helps chase enemies or evade danger. Use this trick to close gaps quickly or dart through groups of mobs without getting stuck. With practice, chaining charge attacks can make you surprisingly nimble in fights and exploration.
Playing Hytale involves walking – a lot. The map in Hytale is gigantic and finding the fastest way to traverse it is helpful, otherwise you will spend many minutes making your little cubic legs move as fast as they can by holding down sprint. There is, however, a method to move faster. You just need to attack. To be more specific, you use the sword or dagger’s charged attack by holding the attack button. The charged attack of these two weapons pulls you toward the direction you are facing. It’s not as fast as a teleporter, but it’s better than regular running.
Don’t underestimate a new zone
New zones in Hytale might look calm at first, but they often hide powerful creatures, unfamiliar terrain, or rare materials you won’t find elsewhere. Take time to prepare before moving in-study the environment, adapt your gear, and plan your escape route. Each region brings its own rhythm and surprises, rewarding players who stay alert and curious instead of rushing blindly ahead.
With a full copper armor set and a good weapon, you start to feel more confident. Once you’ve conquered the Emerald Wilds, the initial zone, and the scary undead are no longer a threat, you’ll think that it’s time to search for new challenges. While this is the right mindset when playing Hytale, you should never underestimate a new zone. Enemies are deadlier, and the higher-level zones also feature environmental dangers you must be careful of.
Whenever you plan on exploring a new zone, try to be overprepared. Craft the highest-tier set and weapons you can, prepare some meals, spare tools, and never carry your most precious materials with you, so you don’t risk losing them by dying in a dangerous place.
Determine a farming route for certain materials
Plot and plot a farming route that prioritizes nearby plots with fertile soil, nearby water sources, and consistent sun exposure to maximize yields while minimizing travel time.
Part of the true Hytale experience involves collecting large quantities of the same material. While you can find some, like copper ore and iron ore, in the same areas, farming others, such as linen scraps, becomes more difficult if you wander aimlessly trying to find them.
When farming materials that drop from enemies or animals, the best strategy is to mark the areas where you find groups of them and establish a route that you follow while visiting all the marked locations. Although this method limits the number of materials collected, it ensures you will always find the enemies you need, making it a more effective approach.
Turn on enemy health bars in your settings
Turning on enemy health bars makes every fight clearer and more strategic. With visible health indicators, you can plan your attacks better and know exactly when to defend or finish off an opponent. It helps you avoid wasting stamina or special abilities on enemies that are nearly defeated, keeping battles smooth and resource-friendly.
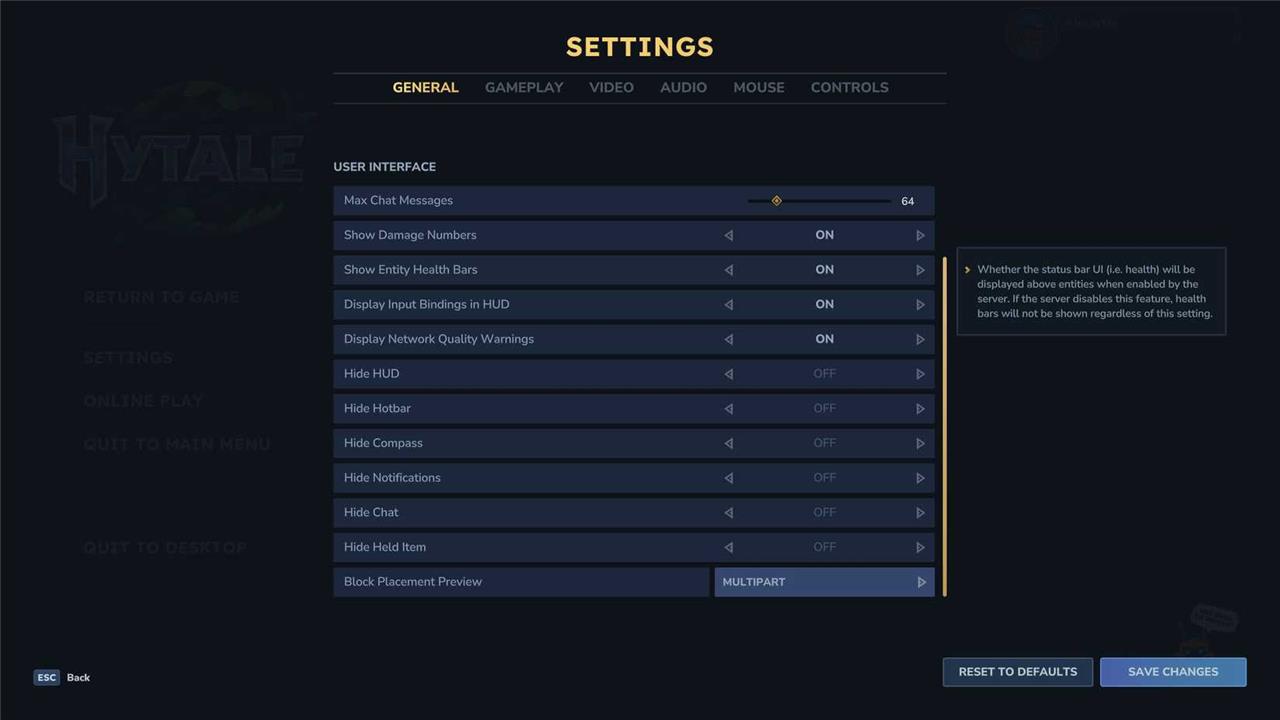
By default, you won’t be able to see how much HP an enemy has, but you can toggle a setting that’ll show you this! Under the “general” tab of the settings, make sure “show entity health bars” is on, which should help you gauge threats early.
While you’re in there, there’s a pretty good arachnophobia mode you can also turn on, which turns all spiders into crabs.
Claim a village
Establishing a village in Hytale gives you a steady base for crafting, trading, and growing your resources. Find a spot near trees, water, and ore for easy access to materials. Build homes, workshops, and storage areas to keep things organized, then attract villagers by creating safe and well-lit surroundings. Over time, your settlement becomes a lively hub that supports your adventures and keeps you supplied for whatever comes next.
Why build a bedroom or a farmstead when Hytale has cute, friendly villages ready to be claimed and plundered? If you encounter a friendly village, you’re free to walk in, claim a bed, adjust your new room any way you like, and empty the contents of any treasure chest in the village without angering the residents. You can also harvest any produce, such as eggplant, pumpkins, and cauliflower. Just don’t harm the farm animals unless you’re prepared for a fight.
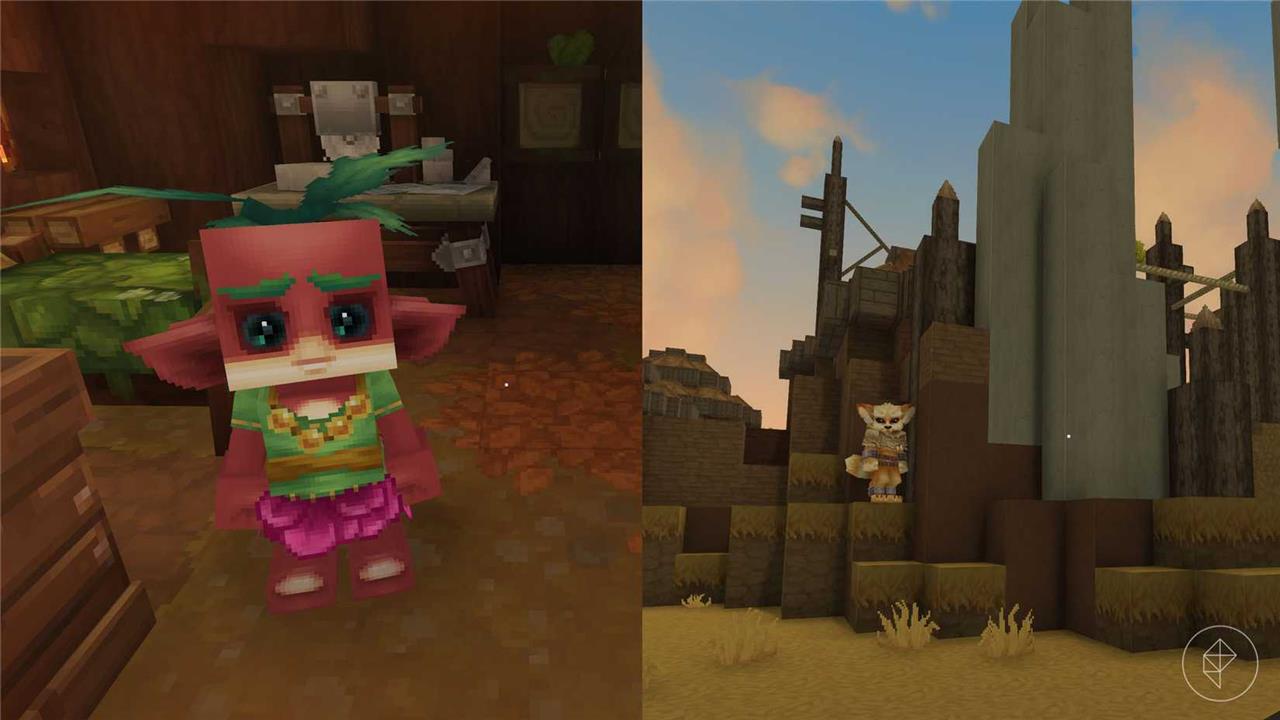
Here’s how you tell the difference between friendly and unfriendly villagers: The first are cute, but the latter look super evil and will attack you on sight. The two types of friendly villages you may find in early game are the Kweebec villages in the Emerald Wilds (the initial area you spawn in) and the Feran (fox) villages in the Howling Sands (the mustard-colored part of the map).
Grab valuable ores early
Grab valuable ores early to build a strong foundation in Hytale. Head underground right after spawning and mine iron or copper veins you spot near the surface. Smelt them into tools and armor that last longer than wood versions. This gives you an edge against early mobs and lets you gather resources faster. You will thank yourself later when tougher zones demand better gear.
If you’re a survival game veteran, you might assume that ore types follow a progression system where iron ore can only be mined with a copper pickaxe, thorium can only be mined with an iron pickaxe, etc. However, in Hytale, that’s not the case; you can mine even the most valuable ores, such as gold, using only a crude pickaxe.
This means there’s no need to stick to the Emerald Wilds any longer than you’d like; it’s perfectly fine to head straight into the snowy mountains of the Whisperfront Frontiers if that’s what you prefer. That said, skipping zones without gearing up is quite dangerous.
Switch to creative mode
Switch to creative mode and let your imagination loose as you explore bold builds, clever redstone tricks, and playful party ideas that turn ordinary blocks into memorable moments.
Tired of grinding wood, stone, and ores? In Hytale, you can switch between adventure mode and creative mode whenever you want. So, if you want to build an epic castle before starting a survival adventure, nothing is stopping you.
To switch between adventure and creative mode, enter your game world, press the Enter key, and type “/op self” to give yourself permission to use commands. From now on, you can toggle creative mode on and off by pressing O on your keyboard.
Forget what you learned in other games
Many players approach Hytale expecting it to follow the same rules as other sandbox titles, but that mindset can hold you back. The world behaves differently here-creatures act in unique ways, combat timing feels distinct, and crafting systems reward creativity over repetition. Treat each mechanic with fresh curiosity instead of relying on habits from other games, and you’ll notice how much more fun and surprising every session can become.
Hytale is its own game and functions a little differently when compared to other sandbox games. Crafting recipes you know and love like glass are different. Exploration is different as there are a lot of dungeons and points of interests to find. Movement is different as fall damage is a bit more forgiving and you have access to a sprint bar.
Best early-game crafting recipes in Hytale
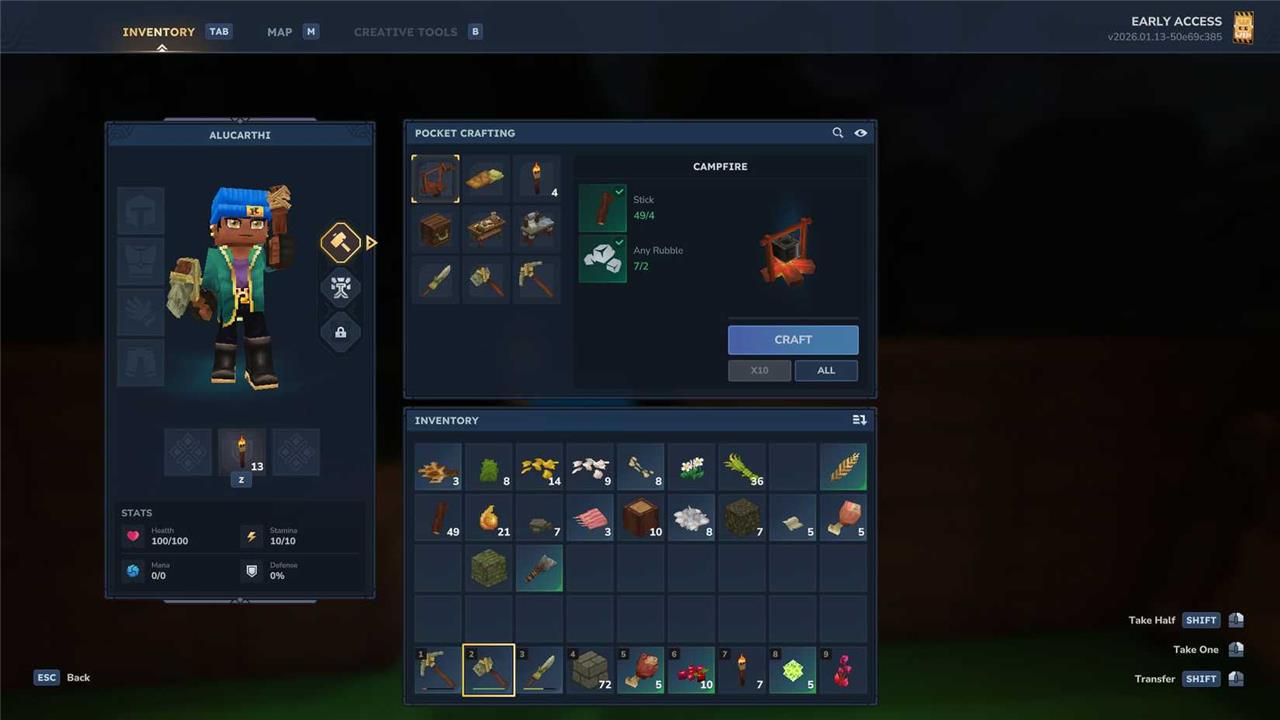
Early-game crafting in Hytale prioritizes pocket recipes and the basic Workbench to build survival essentials quickly from common resources like sticks, plant fiber, rubble, and tree trunks. These recipes unlock tools, shelter, and light sources without needing advanced stations.
Pocket Recipes
Start with inventory crafting (TAB menu) for immediate gear:
-
Workbench: 4 Tree Trunks + 4 Stone-core station for all progression.
-
Crude Pickaxe/Hatchet/Sword: Each needs 2 Rubble + 2 Plant Fiber + 2 Sticks-gather wood and stone first for mining and combat.
-
Campfire: 4 Sticks + 2 Rubble-cooks food and provides light.
-
Crude Bedroll: 3 Plant Fiber + 2 Light Hide-sets spawn point at base.
-
Crude Torch (x4): 1 Plant Fiber + 1 Tree Sap + 1 Stick-essential for night exploration.
Workbench Upgrades
Craft these next on the Workbench for expansion:
-
Builder’s Workbench: 6 Tree Trunks + 3 Stone-unlocks building items like doors and shutters.
-
Furnace: 6 Tree Trunks-smelts copper/iron ores into ingots for better tools.
Top Early Tools & Gear
Prioritize these for efficiency:
-
Copper Sword: 4 Copper Ingots + 4 Trunks + 3 Plant Fiber-stronger than crude options.
-
Copper Helmet/Cuirass: Copper Ingots + Plant Fiber-basic armor set for mob fights.
These focus on abundance and quick setup, transitioning to metalworking via Furnace for mid-game power.
Which workbenches to build first for fastest progression
For fastest progression in Hytale, prioritize the Tier 1 Workbench first, then immediately craft the Furnace and Builder’s Workbench, as they unlock smelting, better tools, and base expansion from basic resources.
Initial Workbench
Craft the Tier 1 Workbench using 4 Tree Trunks and 3 Stone via the pocket menu (Tab)-this serves as your central hub for all early unlocks. Place it centrally in your base for quick access.
Smelting Priority
Next, build the Furnace (6 Tree Trunks) at the Tier 1 Workbench to process copper and iron ores into ingots. This enables Tier 2 upgrades and metal tools, accelerating combat and mining efficiency.
Building Essentials
Follow with the Builder’s Workbench (6 Tree Trunks + 3 Stone) for doors, walls, and storage-secure your base against mobs while farming resources. Cluster these near each other to minimize movement.
Next Steps
After these, add the Farmer’s Workbench (6 Tree Trunks + 20 Plant Fiber) for food and seeds if focusing on sustainability. Upgrade the main Workbench to Tier 2 next with copper/iron ingots for iron gear.