Blood-soaked corridors, scarce ammo, and a planet that wants you dead-The Callisto Protocol doesn’t forgive mistakes. Before you face the horrors of Black Iron Prison, there are nine things that can keep you alive a little longer.
Whether you’re scrambling for ammo or simply tired of going over the same encounter again and again, the following tips for The Callisto Protocol will save you from some headaches as you explore.
You can block acid spit
You can actually block acid spit from enemies, but timing is everything. Raise your stun baton’s block as soon as you see an enemy wind up their ranged attack, and you’ll deflect the acid instead of taking a nasty hit. The move consumes a bit of stamina, so don’t spam it-wait for the right moment. Mastering this technique can save a lot of health packs, especially in tight areas where dodging isn’t an option.
Getting spat on isn’t everybody’s cup of tea, especially when there’s acid involved, but you can defend yourself by blocking the projectile. Whenever you’re about to get hit, just move backward; this will cause protagonist Jacob to put his guard up and block the acid spit. What’s more, you can also use other enemies as mutated human shields by grabbing them with telekinesis and covering yourself.
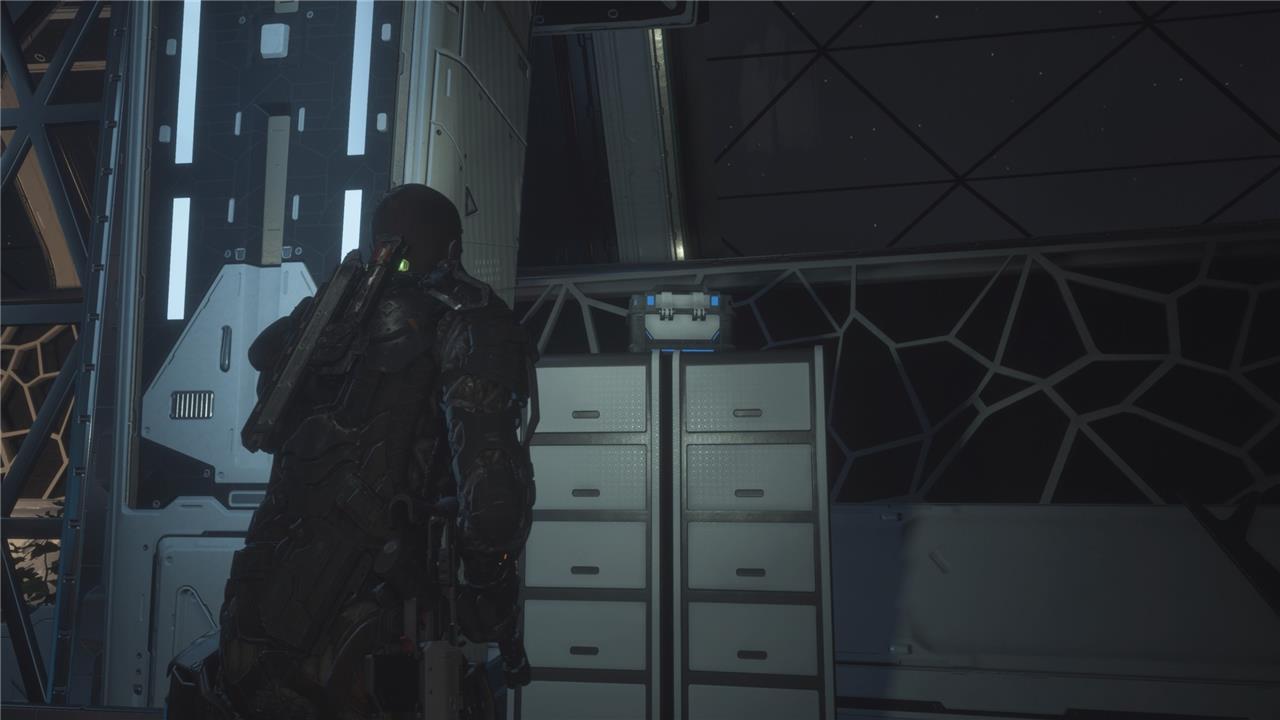
You can destroy glass walls and windows with your baton
Glass barriers aren’t just for show-they can be smashed with your baton. Breaking windows and glass walls can create new paths, reveal loot, or provide quick escapes during intense fights. Be mindful though, the noise will draw nearby enemies, so strike with purpose and plan for the commotion that follows.
You can’t break much in The Callisto Protocol‘s environment, but glass is definitely susceptible. This may become more apparent later on in the game when some cabinets begin to display ammo and other items, but keep an eye out for rooms that are protected by glass walls, as you can easily break them with your baton, too. Save that ammo for later.
Don’t heal yourself until after you’ve stomped all enemies
Healing items in The Callisto Protocol are scarce, and using them too early can waste valuable resources. Many enemies can deal heavy damage, especially if you’re caught during an animation, so it’s smarter to clear the room before you patch yourself up. Once the area is secure, you can heal safely without risking being interrupted or attacked mid-use. This approach helps you save supplies for tougher encounters later on.
It may be tempting to heal yourself immediately after an encounter, but you shouldn’t! I lost count of how many items I used a health injector only to stomp on an enemy and find out they were carrying health gel, which patches you up on the spot. The more you progress through the game, healing items become more scarce, so it’s best to hold onto them as much as possible.
Also, friendly reminder to stomp on all corpses. Yes, it takes time, and it can be annoying, but they’ll drop ammo, credits, or health 90% of the time.
You can grab boxes that are out of reach
Your GRP device isn’t just for pulling enemies closer-it can also help you reach items and containers placed on high ledges or behind barriers. Use it to grab boxes or supplies that seem out of reach, then toss them toward you or break them open for resources. This trick can make a big difference in keeping your inventory stocked, especially during tougher sections where ammo and health are scarce.
As you explore the ship, you may notice a few boxes that are out of reach – sometimes they’re on top of a shelf or just outside arm distance. Since you can’t jump on command, you can go ahead and use telekinesis to bring that box closer to you. Then, once it’s on the ground, go ahead and stomp it. You can also use said boxes as a throwable object against enemies – though note that they don’t deal much damage – and grab the loot after the impact.
Here’s how to tell what your current GRP level is
Your GRP level is shown above the health indicator on Jacob’s back, represented by a blue bar. Keep an eye on it, as each telekinetic move consumes some of that energy. You can refill it by picking up GRP batteries dropped by enemies or found throughout the facility, or by visiting recharge stations. Keeping your GRP at a healthy level gives you more control during combat, letting you manipulate enemies and objects more freely.
Can’t tell your GRP level in The Callisto Protocol? The key is to simply aim down your sights. Whenever you’re aiming with the left bumper, you’ll be able to see how many GRP charges Jacob has on the back of his neck, right above the health indicator.
Always explore the second door or room available
Many corridors in Black Iron Prison hide alternate paths that lead to extra loot, hidden audio logs, or shortcuts back to safer areas. If you encounter two doors or rooms, don’t rush through the first one you see-check the second option as it often rewards exploration with credits, ammunition, or crafting materials. These areas can make a real difference in surviving longer, especially during tougher encounters later on.
Rule of thumb: If you see the save icon on the bottom right corner – whether you’re entering a room, squeezing through a corridor, or crawling into a vent – that means you’re following the main path. It’s cool if you don’t want to explore further, but I highly recommend taking the time to check any secondary door or area you might have spotted. If you’re lucky, you’ll stumble upon a new weapon schematic or a chest with loot.
If you throw enemies off the map, say goodbye to their loot
Throwing enemies off ledges might feel satisfying, but it comes at a price. Any loot or resources they carry will be lost to the abyss, leaving you empty-handed. If you’re low on ammo or health packs, it’s smarter to take them down on solid ground so you can collect their drops afterward. Every bit of gear matters in The Callisto Protocol, so think twice before sending enemies over the edge.
Using telekinesis to throw enemies off bridges is fun, and I support your decisions, but offer a warning. Since killing enemies this way doesn’t leave behind a body for you to stomp, that means you’ll miss out on their loot. If you just want to get one or two enemies off your back, that’s fine, but be mindful that you may also be launching ammo and other useful items with that glove of yours.
Yes, you’ll get more inventory space later
Inventory space is tight at the start, and you’ll often need to sell or drop items to make room for more valuable gear. Don’t stress too much about it, though – later upgrades and suit improvements will add extra slots. Until then, manage your resources carefully, focus on carrying ammo, health injectors, and key sellable items, and make frequent stops at Reforge stations to keep space open for what matters most.
If you’re wondering how to increase your inventory size in The Callisto Protocol, easy: You just have to continue making progress in the main story until you reach the “Lost” chapter. Similarly to this year’s Signalis, you can only carry up to six items simultaneously. This includes health injectors, GRP batteries, items to sell in shops, and so on (though weapons have their own slots). Thankfully this is just temporary, and you will gain access to a total of 12 slots once you reach the chapter, alongside a nice bump to your maximum health.
Get the heavy attack for your baton ASAP
The heavy attack dramatically increases your melee power, letting you break through tougher enemies and stagger them long enough to follow up with combos. Upgrade it as soon as possible to shorten fights and save ammo, especially in tight areas where space is limited. Timing the heavy swing correctly can interrupt enemy strikes, turning risky encounters into controlled engagements.
If there’s one upgrade you should prioritize above others, it’s your baton’s heavy attack. This moves allows you to properly fight against enemies, mixing up heavy and light attacks depending on the situation, to the point where it feels weird that it isn’t part of Jacob’s moveset from the get-go. But what can you do? Those shops on the ship are greedy!
How to defeat all bosses in The Callisto Protocol
The Callisto Protocol features several tough boss fights that test your dodging, GRP usage, and resource management skills. Here’s a breakdown of how to defeat all major bosses, based on established strategies from guides and player tips.
Two-Headed Brute (Chapter 6: Below)
Clear four waves of biophages first by using GRP to toss them off the platform or into the fan, leaving one alive to loot chests. Once the boss spawns, circle-strafe while shooting its heads with the Riot Gun or Assault Rifle from a distance, using crates for cover. When it kneels, melee to rip off a head; repeat until both heads are gone, dodging its grabs and slams.
Captain Ferris (Chapter 8: Tower)
Dodge her unblockable baton combos by holding the directional dodge (left/right alternation), then counter with headshots using the Hand Cannon or Riot Gun. In phase two, she summons Blind enemies-GRP them away or stealth-shiv them before refocusing on her weak points. Stay mobile to avoid her grabs, and stomp her corpse for loot after multiple stagger phases.
Brute with Acid Spit (Later Variants)
Target legs to cripple, then GRP hurl into hazards or finish with melee; dodge acid pools by listening for wind-up cues. Use environmental explosives when available, and conserve ammo by alternating weapons.
Final Boss: Alpha (Chapter 16: Mother)
Phase 1: Close distance immediately to prevent ranged projectiles, dodge melee combos (hold dodge, alternate directions), and pump headshots with Riot Gun until it kneels-then run to kill exploding crawlers on arena edges. Repeat three cycles, using GRP to yeet crawlers back at Alpha for bonus damage.
Phase 2: Vault over waist-high cover to create space, shoot head while sprinting circles, and prioritize crawlers when it roars. Fully upgrade Riot Gun alt-fire for stuns; face it during stomps to dodge one-shots. After waves of bloaters, finish with sustained headshots.
Best weapons and upgrades for boss fights
For boss fights in The Callisto Protocol, prioritize weapons with high stagger potential and alternate-fire upgrades for crowd control against adds. The Riot Gun stands out as the top choice across most encounters due to its shotgun spread and charged shot.
Riot Gun Upgrades
Fully upgrade the alternate-fire charge shot first for massive stagger on bosses like the Two-Headed Brute and Alpha-it stuns them reliably for melee finishes. Max damage output next via scrap at Reforge stations, as it shreds heads and limbs effectively when paired with GRP throws. Use it for Phase 1 of the final boss to close distances safely before crawlers spawn.
Hand Cannon Backup
Invest in stability and capacity upgrades for precise headshots on mobile bosses like Captain Ferris, where Riot Gun recoil can falter. Its alt-fire grenade launcher clears summoned Blind enemies in her fight, saving GRP charges. Swap to it for acid-spitting Brutes to avoid close-range risks.
Assault Rifle Support
Upgrade piercing rounds for multi-hit potential on larger bosses, conserving shotgun shells during prolonged phases. Boost reload speed to maintain pressure in the Alpha’s Phase 2 crawler waves. Avoid over-relying on it early-save for mid-to-late game when ammo is plentiful from stomps.