Cold static fills the radio as your squad moves through the wrecked plains of Felt District-one wrong signal could turn the mission into a graveyard. The Combat Recon quest demands precision: locate the signal relays, neutralize enemy spotters, and survive the counterattack before your cover burns away.
‘Combat Recon’ quest walkthrough in Arc Raiders
The ‘Combat Recon’ quest tasks players with locating and destroying a series of enemy spotters that coordinate Raider patrols. Begin by scanning the designated area to identify signal beacons marking their positions. Use cover to approach each target and disable nearby drones before taking out the spotter units. Once all marked targets are eliminated, extract to the safe zone to trigger the completion sequence and receive your gear and experience rewards.
You need to scope out three cover spots for this quest:
- In the Parking Garage staircases
- In the buses near Marano Park
- In the attics around Main Street
Here are all three specific locations, and how to take down two spotters so you can deliver a spotter relay to Shani.
Where to scope out a cover spot in the Parking Garage staircases
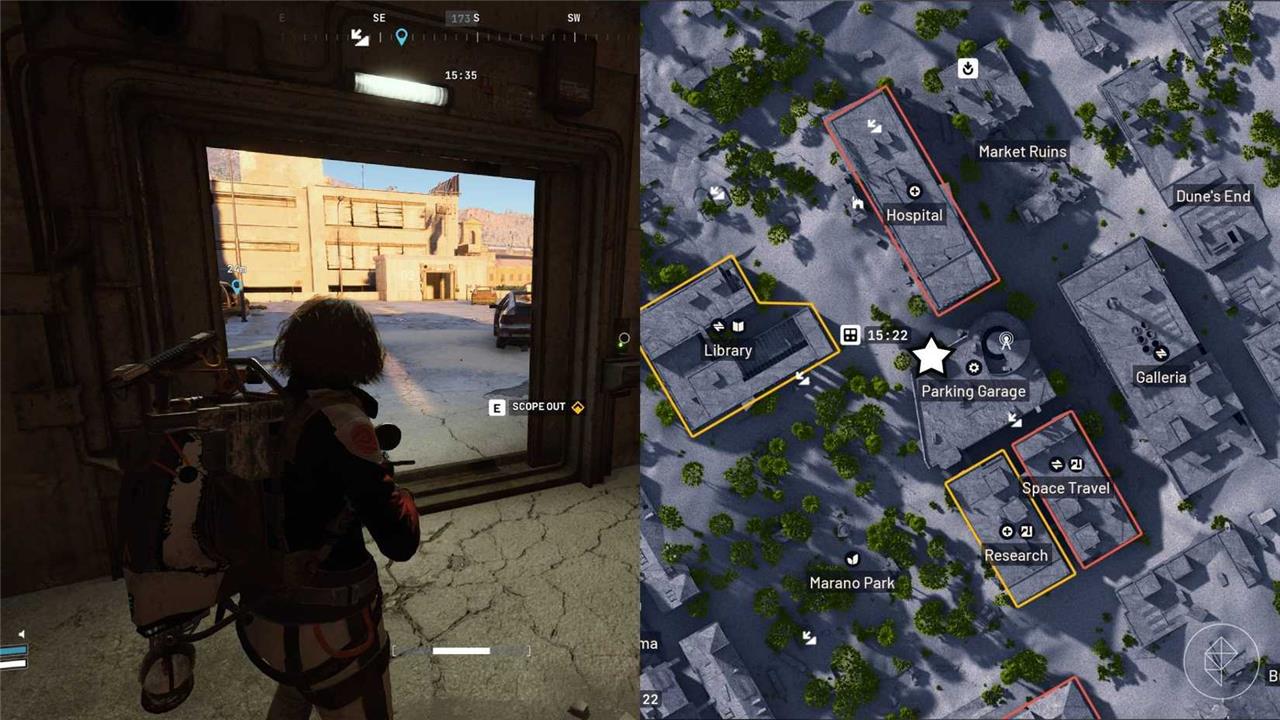
Firstly, the Parking Garage staircases. Head to either the roof or the second floor of the Parking Garage and you’ll find the entrance to the staircase. At the very top of the stairs, you’ll find a prompt to scope out. Interact with it and bam, objective complete.
Where to scope out a cover spot in the buses near Marano Park
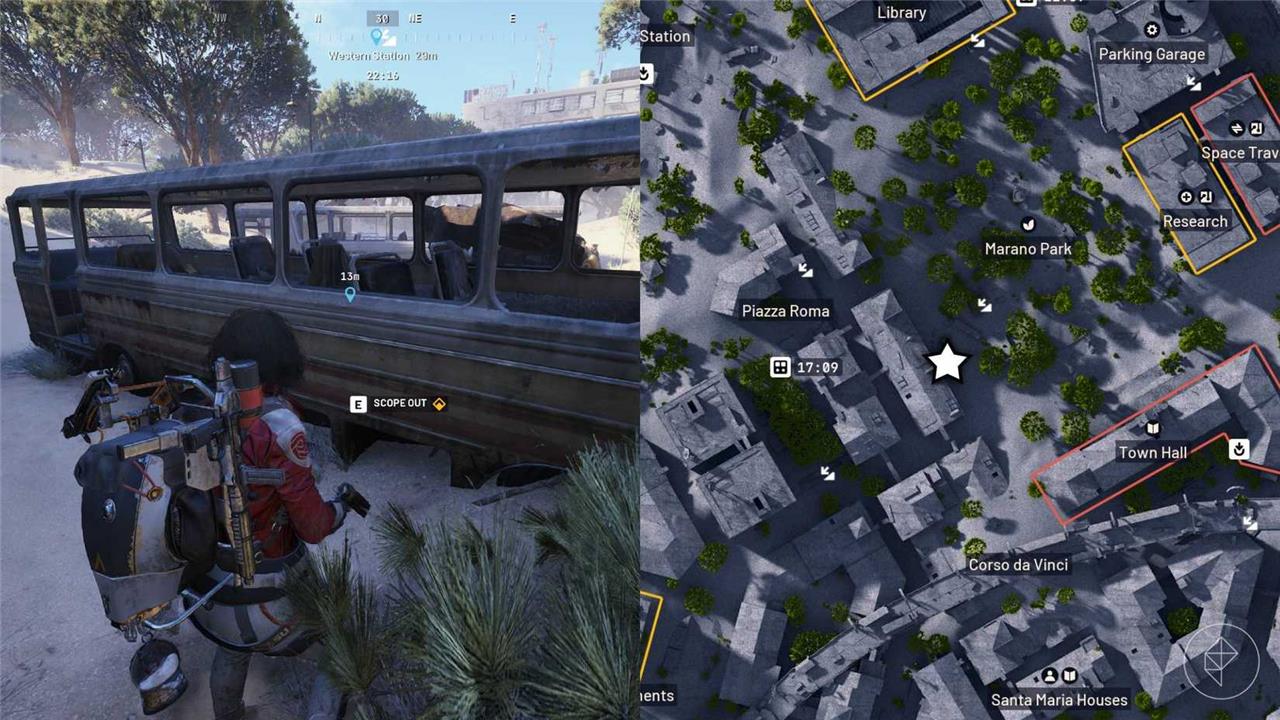
The buses in Marano Park are on the far west side, northwest of the Town Hall and southeast of Piazza Roma. Behind the bus closest to the building you’ll find another prompt to interact and scope out.
Where to scope out a cover spot in the attics around Main Street
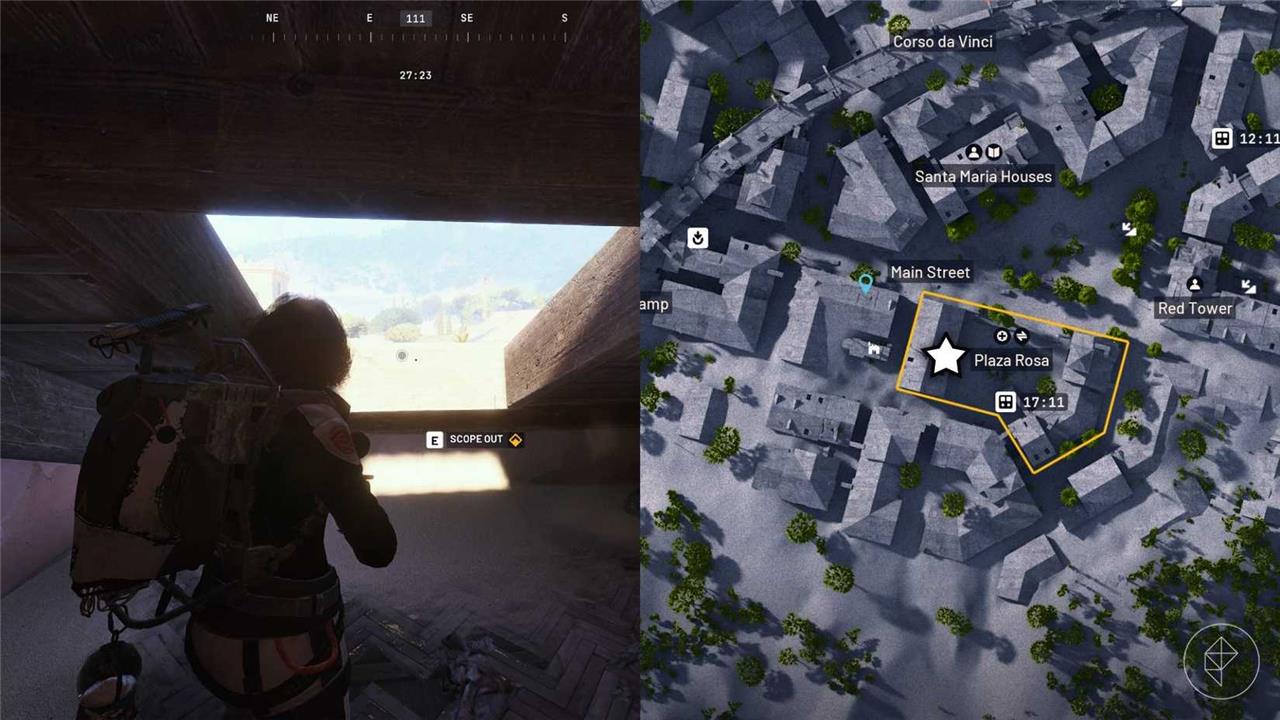
Finally, the attic you’re looking for near Main Street is actually in Plaza Rosa, in the westerly building, directly south on the map of the word “street” in Main Street. Go inside the building then find the openable attic window, which will have another prompt to interact with.
How to destroy two spotters and get a spotter relay
The Bombardier that patrols Main Street is the easier of the two elite arc enemies to focus on when you need to destroy two spotters, because that window in Plaza Rosa is the perfect place to fire from.
Take a heavy ammo weapon, such as an Anvil or Ferro, and each spotter – the small drones that fly alongside the Bombardier – should take two shots apiece. If they see you before you can kill them, get back inside the building, because you’ll have explosives landing on your head very shortly. When you’ve killed them both, loot one of them for a spotter relay, put it in your safe pocket, then head for an extract. Deliver it safely to Shani and you’ve completed the quest. but next up, you will need to take down a Bombardier.
How to defeat Bombardier in Buried City
To defeat a Bombardier in Buried City, you want solid cover, good explosives, and precise shots on its weak points, while managing its Spotter drones.
Know the Bombardier
-
Huge, slow ground tank with long-range artillery and two flying Spotter drones that mark your position for accurate shelling.
-
Very dangerous at range: a couple of direct hits can strip shields and kill you if you stay exposed.
Best positioning in Buried City
-
Fight it from inside buildings with ceilings, minimal windows, and at least two exits; the apartments around Plaza Rosa/Main Street are ideal.
-
If it spawns on top of the Parking Garage, shoot from lower levels or nearby buildings where floors and walls block artillery arcs.
Kill the Spotters first
-
Shoot down the two Spotter drones as soon as you engage; they do not deal damage, but they keep you permanently tracked.
-
After you destroy them, the Bombardier becomes less accurate and takes a short time before respawning new Spotters; use this window to reposition and attack.
Use explosives to chunk it
-
Start the fight by throwing strong grenades or mines (Trigger Nades, Blaze Nades, Wolfpacks, Heavy Fuse Nades, Deadline/Explosive mines) at its body or especially its back canister.
-
With enough grenades, you can kill a Bombardier almost entirely with explosives; slow movement and large size make it very vulnerable.
-
Parking-garage trick: if it’s on the top level, stick Trigger Nades to it, drop one floor down, then detonate from below so the concrete protects you from splash.
Target weak points with armor-piercing weapons
-
After you spend your explosives, switch to weapons with ARC Armor Penetration and aim at the yellow weak spots: leg joints and rear sections.
-
Breaking leg joints slows and briefly stuns the Bombardier, giving safe windows to keep shooting or throw more grenades.
-
Time your peeks right after it fires; there is a short downtime between shots where it’s most vulnerable.
Survival tips
-
Stay mobile: change windows and doors often so it can’t dial in on you.
-
Duck back into hard cover the moment you’re hit; two to four shots can kill you depending on shield size (light vs medium/heavy).
-
Always re-kill Spotters when they respawn, then hide until the Bombardier “loses” you before going back out to resume damage.
If you tell me your current gear (weapons, grenades, shield), I can suggest a specific loadout and a simple route in Buried City (e.g., exact floors/angles in the Parking Garage) tailored to you.
Best weapons and loadout for solo Bombardier kills
For solo Bombardier kills, stack cheap explosives plus one strong heavy weapon, and bring a fat heal/shield kit.
Core weapon setup
-
Primary (heavy slot):
-
Hullcracker – best raw damage and ARC armor penetration; deletes Bombardiers in a few shots if you hit weak spots, but expensive ammo.
-
Anvil – great middle-ground heavy rifle, 6-round mag, good penetration and easier to use than single-shot heavy weapons.
-
Ferro – budget craftable heavy rifle if you’re broke; needs more ammo but still shreds weak points.
-
-
Secondary:
-
Any accurate mid-range rifle/DMR you’re comfortable with, used mainly to finish off a low-HP Bombardier or clear adds.
-
Best explosives for Bombardier
Prioritize spending on grenades over more heavy ammo; they give the best damage per credit.
-
Top tier:
-
Wolfpacks – ARC-specific and insane damage; 2-4 well-placed Wolfpacks can take 90-100% of a Bombardier’s HP.
-
Trigger Nades – stick/plant them, then manually detonate; great for peeking from cover or floors below.
-
-
Very strong:
-
Blaze Nades – pile burning damage on leg joints; Bombardiers often sit in the fire.
-
Snap Nades / basic impact grenades – cheaper, easier throws that still do good damage on a big target.
-
-
Mines (situational):
-
Deadline / Explosive Mines – huge burst if you can make the Bombardier drive over them, but riskier to set up solo.
-
Simple solo combo: 1-2 Wolfpacks + 3-4 Trigger/Blaze/Snap Nades front-load most of its HP, then finish with Anvil/Ferro weak-spot shots.
Recommended solo loadout
-
Guns:
-
Slot 1: Ferro or Anvil (or Hullcracker if you’re rich).
-
Slot 2: Reliable mid-range rifle/DMR.
-
-
Explosives:
-
2-4 Wolfpacks (if you have them).
-
4-6 Trigger / Blaze / Snap Nades total.
-
-
Survivability & utility:
-
Medium or heavy shield; light shields die in about two Bombardier hits.
-
5-10 Shield Rechargers, plus Bandages/Herbal Bandages or similar heal items.
-
Optional: a couple of smokes to safely loot and extract after the kill.
-
How to use this loadout in a fight
-
Open from cover by dumping all your grenades/Wolfpacks into its back or legs while staying under a solid roof.
-
Kill Spotters on sight so it loses accurate artillery tracking.
-
After the explosive burst, peek during its firing downtime to land heavy-weapon shots on leg joints and rear panels until it drops.
If you tell me exactly which guns and grenades you own (and your shield tier), I can give a specific “use X of these grenades + Y ammo” plan tailored to your stash.