Ever wondered what it takes to bring down Nezarec and master the twisted corridors of the Root of Nightmares? This guide breaks down every mechanic, callout, and strategy you’ll need to conquer Destiny 2’s most surreal raid-from light and dark puzzles to heart-pounding final phases.
In this Destiny 2 Root of Nightmares guide, we’ll break down each of the raid’s four encounters, show you where you can find the two secret chests, and teach you how to get a guaranteed Deepsight weapon once each week.
Root of Nightmares Loot table
The Root of Nightmares raid offers a mix of powerful weapons and armor, each tied to specific encounters. Players can earn unique Legendary weapons like Nessa’s Oblation and Briar’s Contempt, along with the Conditional Finality Exotic shotgun from the final boss. Raid armor follows a thematic design based on the raid’s surreal aesthetic, dropping from all major encounters. Completing weekly challenges or the Master difficulty version grants access to Adept weapons and additional loot rolls, giving players more chances to enhance their gear.
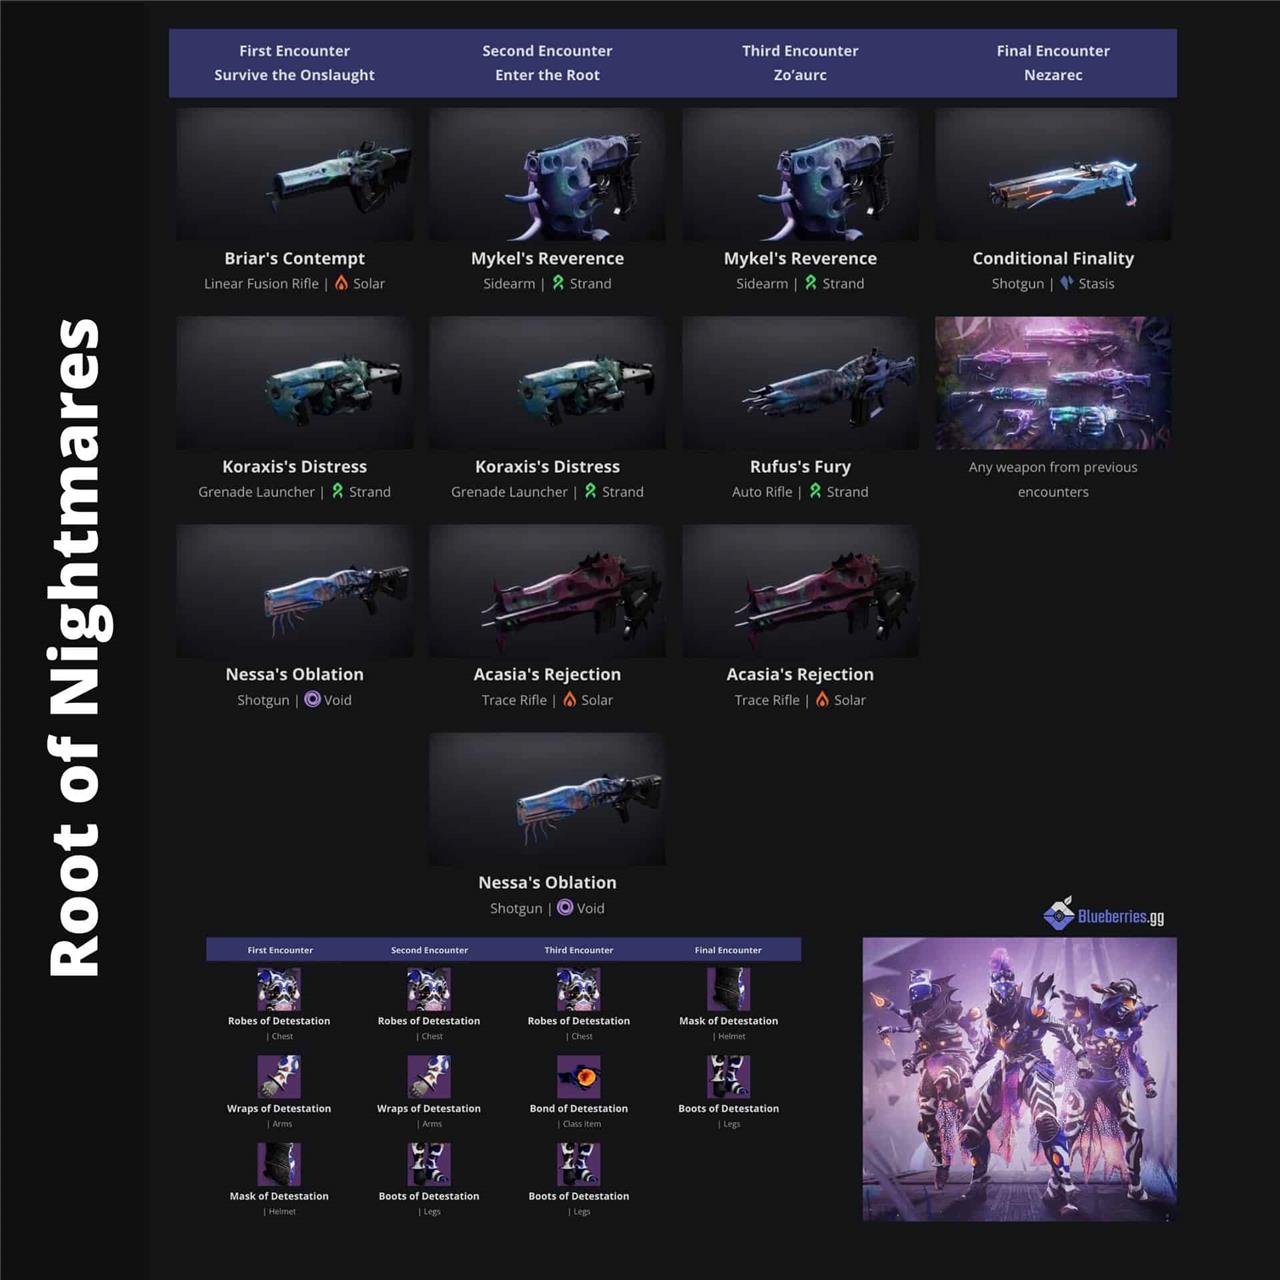
Blueberries.gg, known for their fast and accurate loot tables, has put together this one for the Root of Nightmares raid. Any of these items, minus the raid Exotic Conditional Finality, can be earned from the secret chests once you acquire them from an encounter. We’ll discuss those secret chest locations more below.
Guaranteed Deepsight Resonance chest
The guaranteed Deepsight Resonance chest in the Root of Nightmares raid appears after completing all encounter triumphs within a single week. Once these triumphs are cleared, the chest spawns near the final boss arena, giving one guaranteed Deepsight weapon each reset. This is the fastest way to complete raid pattern progress for craftable weapons, saving time on random drop farming. Make sure every triumph is active before claiming your loot to ensure the reward becomes available.
You can guarantee a Deepsight Resonance chest will spawn after defeating Nezarec, the final boss. The process is fairly easy (we’ve outlined it step-by-step below), and is something you should keep in mind from the jump. Or, if you’d prefer to just get started on the Root of Nightmares already, just skip to the next section.
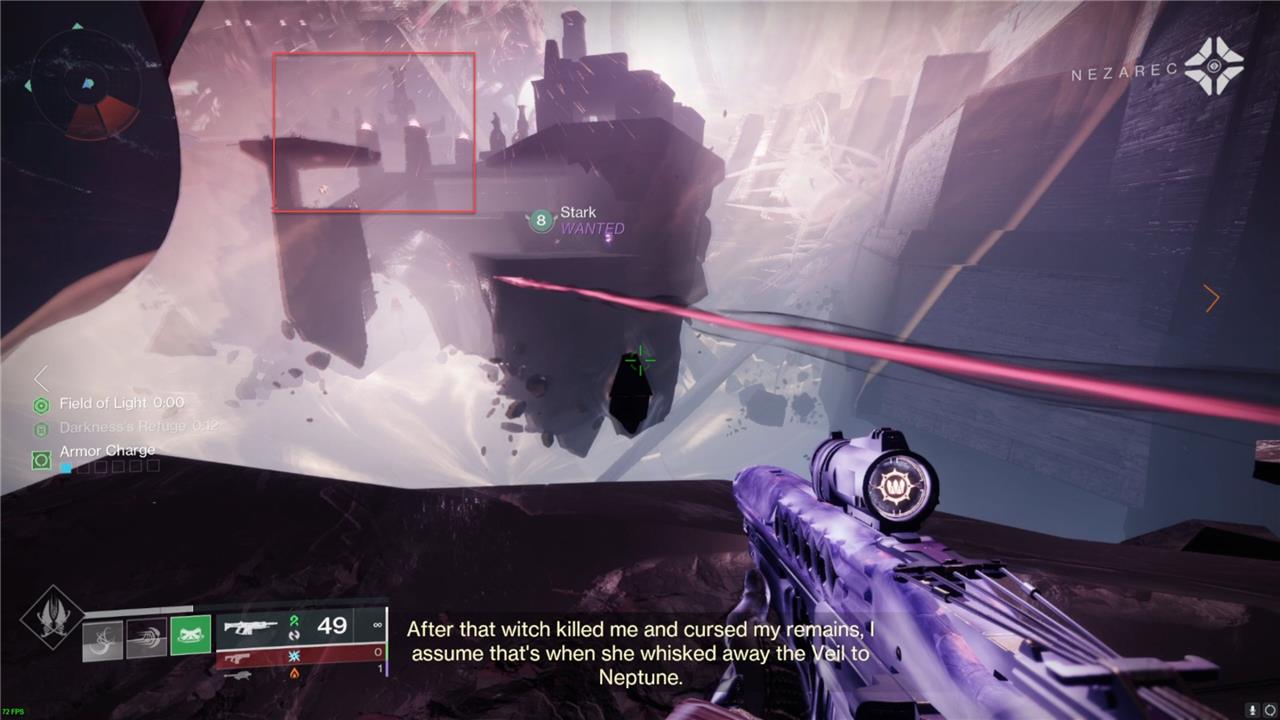
If you want the Deepsight Resonance chest, when you spawn into the raid, continue on the path and hug the left wall.
Deepsight Legend
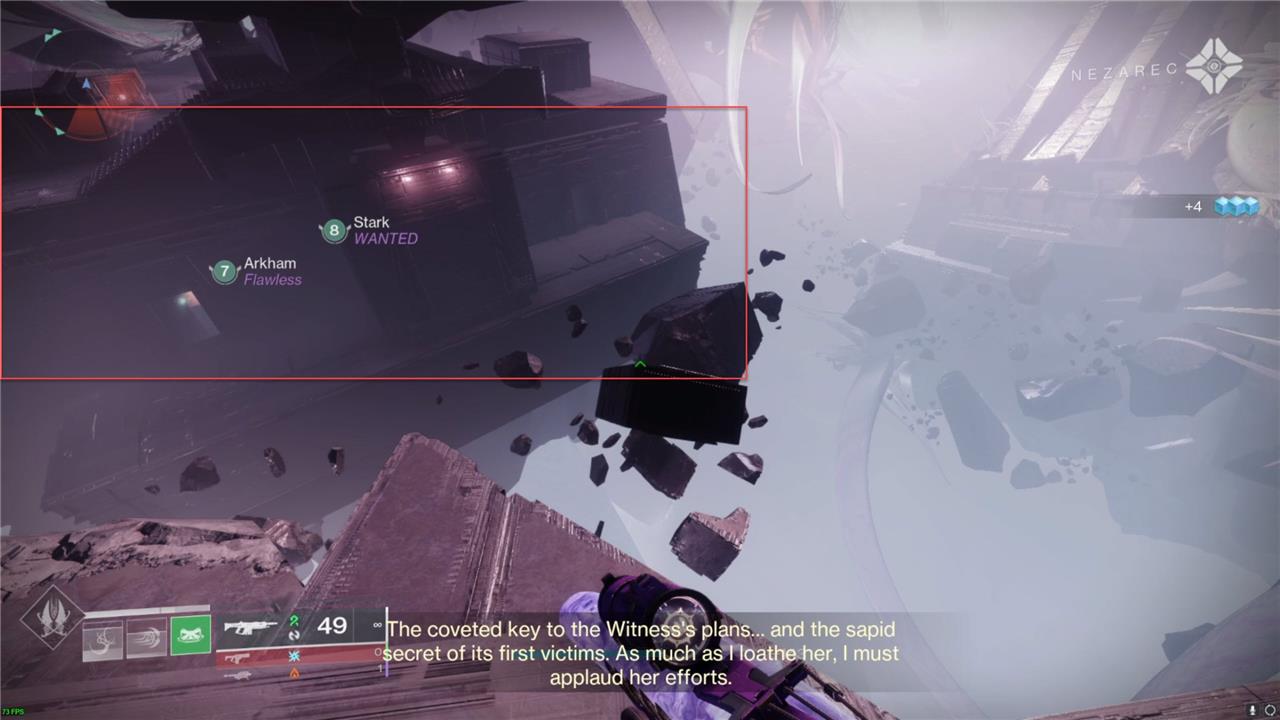
Head to the buildings shown above. Behind them, you’ll see a small display with three seeds inside.
Each seed will either be Light or Dark. You’ll read the display from left to right, indicating which seeds you must activate in their corresponding rooms. Let’s break down each room below.
Deepsight room one
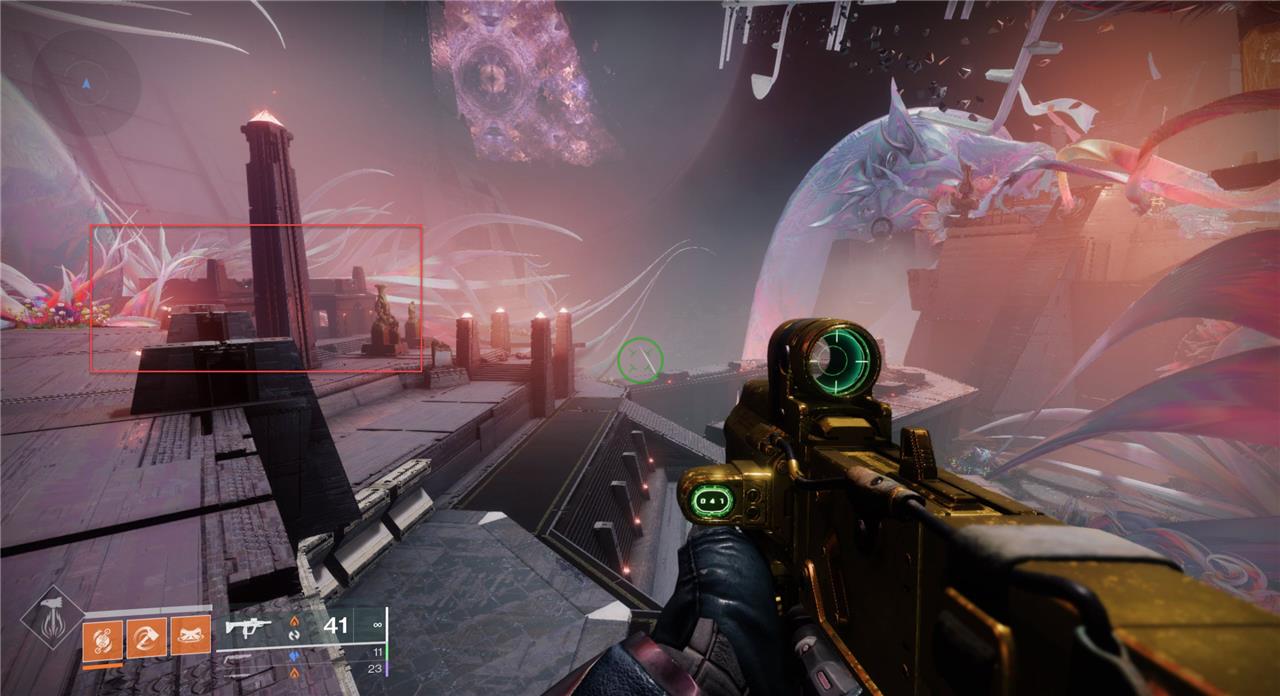
The first room is located just after the legend, before you get to the first encounter. Make your way to the room where you first see the light ribbons before you jump down.
You’ll find the room hidden on the far wall. Look out for the door shown above.
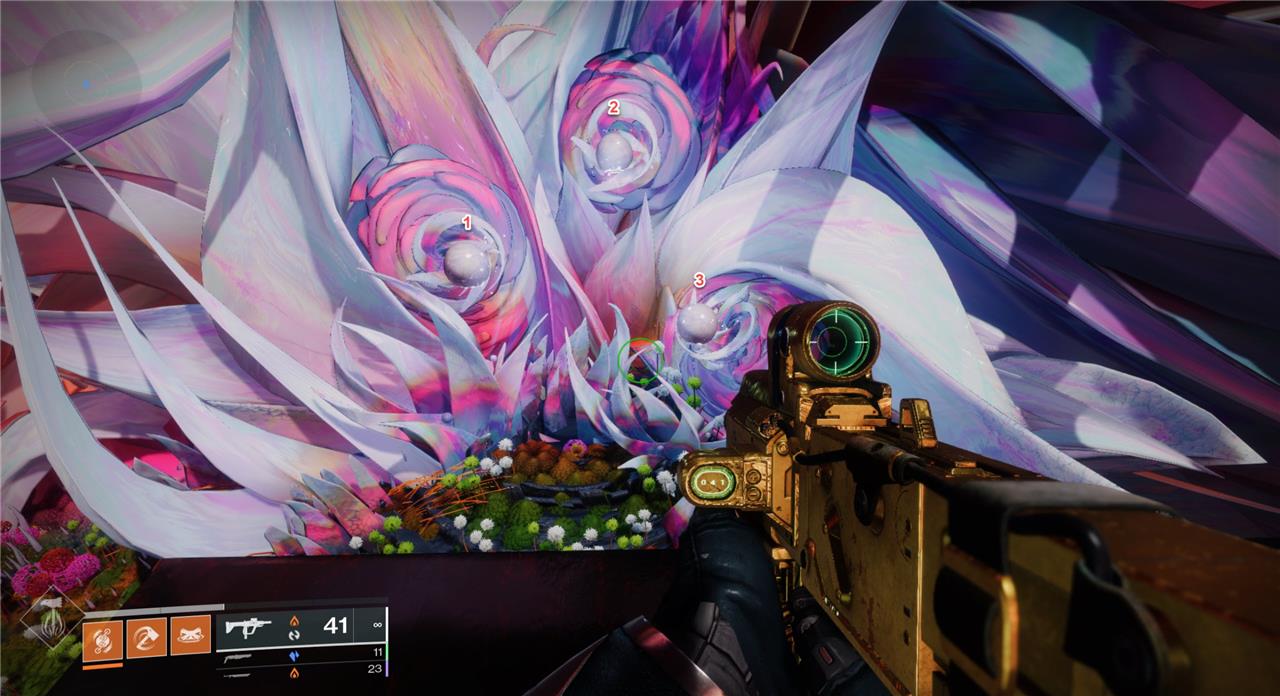
Once you find the room, you must activate the corresponding seed that matches the legend, using the Gardener mechanic (more on that in a sec). Using the example above, you’ll want to activate the light seed.
- If you activate the correct seed, you’ll see a message in the combat log saying, “Your actions take root..”
- If you activate the wrong seed, there will be a message saying, “Your spoils suffer irreparable damage..” This prevents you from getting the Deepsight chest on this run. Repeat this process for each of the following rooms.
Deepsight room two
You’ll find the second Deepsight room between the second and third encounters.
Make your way through the jumping puzzle until you reach the launcher above. The standard path through the puzzle would take you to the right, but if you look to the left, there will be a floating room. This is the second Deepsight room.
Complete the correct seed from the legend and move on through to the next encounter.
Deepsight room three
The third and final Deepsight room is located just before the last encounter.
Instead of jumping up to the final encounter, climb to the lower ribbons.
Land on the small platform and look up. There is a door, and you can jump up into it to complete the final seed.
Once you complete the final seed, assuming everything is correct, you’ll get the message “A great harvest awaits.” in the combat log. Complete the last encounter to receive your guaranteed Deepsight weapon. As with other raids that have this similar mechanic, you can only do this once per account per week.
How Root of Nightmares’ Gardener mechanic works
Players designate one or two Gardeners who step into a seed field and shoot the seed to gain Field of Light or Flux of Darkness buffs. Gardeners shoot primed nodes across a gap using launch pads, linking active nodes on one side to build node chains on the opposite side. Completing chains four times per encounter clears enemies like Tormentors and Psions while extending bridges or safe zones against wipes.
The primary mechanic of Root of Nightmares requires players to grow a seed by connecting multiple nodes, thus creating a chain. You start the chain by stepping into the seed field and shooting it.
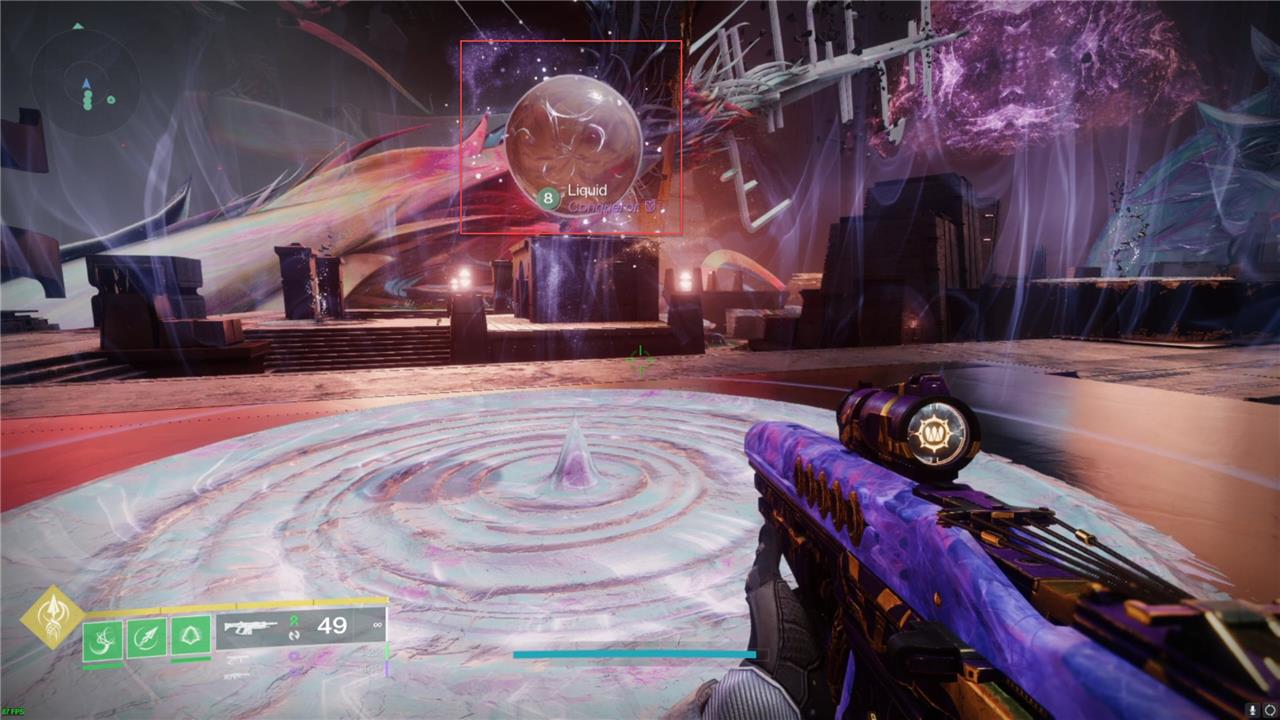
This gives you either the “Field of Light” or the “Flux of Darkness” buff, depending on if the seed you shoot is a light or dark seed.
You’ll need to take this buff to a node. You’ll know which node you need to go to because a beam of light will be pointing to it, as shown above.
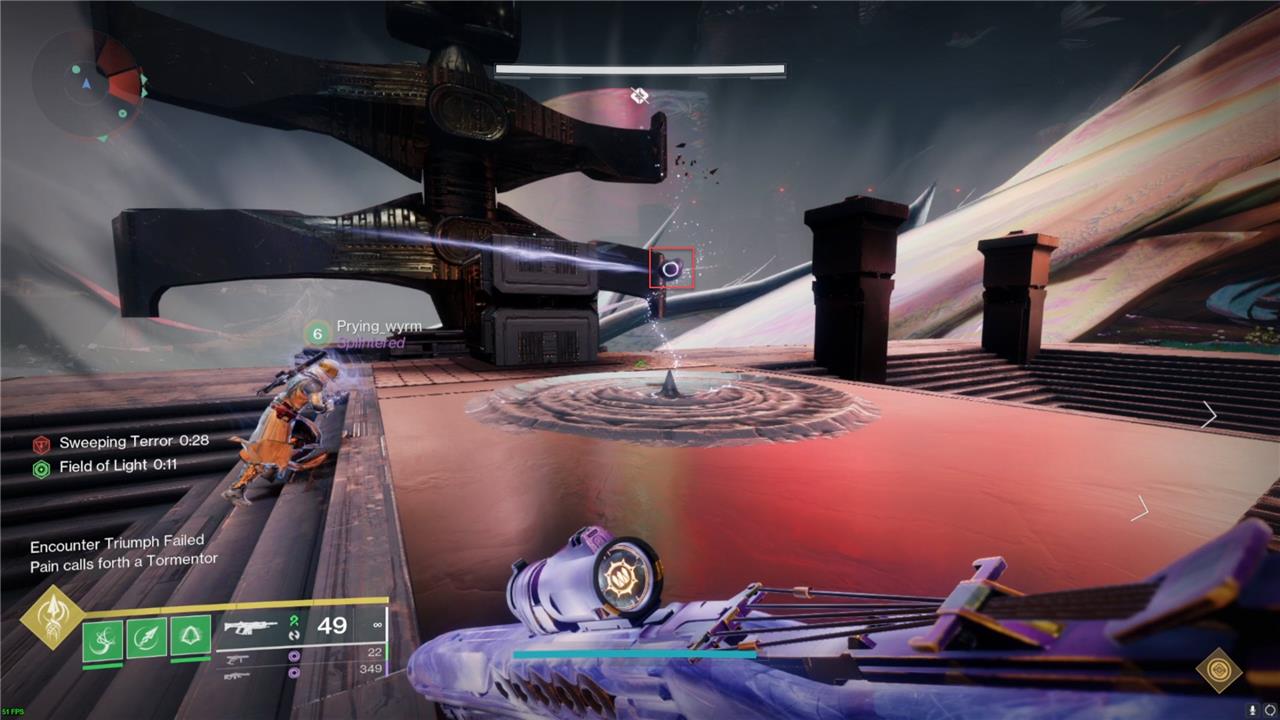
The node that needs to be activated will also be the only one with the sphere. You’ll step next to the sphere and shoot it to activate it. Once you shoot the node, you’ll lose the buff, indicating that the activation was successful.
Once that node is active, you must return to get the “Field of Light” or “Flux of Darkness” buff again. This will be at the original starting point for the first few nodes, but as the chain grows, it can be at any previously completed nodes.
You’ll need to look for the seed/node with the area lit up around it, denoting it as the seed you get the buff from. Pick up the buff again and go to the next node. The easiest way to find the next node is to follow the chain. The next node that needs to be activated will have a beam pointing to it from the last completed node, like the starting node shown above. The path is not 100% the same every time for the first and final encounters, though they do not vary too far from each other. You’ll need to use this mechanic for the first, second, and final encounters and in the space between all encounters after the first.
Note: While multiple people can have the “Field of Light” and “Flux of Darkness” buffs at once, everyone must gain it at the same time together – though each respective buff is independent of the others. If you attempt to get the buff while someone else has it, this will cause the nodes to get disrupted, and “Nodes of splendor have been disrupted” will appear in the combat log. You can’t complete nodes until the timers reset. Once the timers reset, you can continue the encounter.
Starting the Root of Nightmares raid in Destiny 2
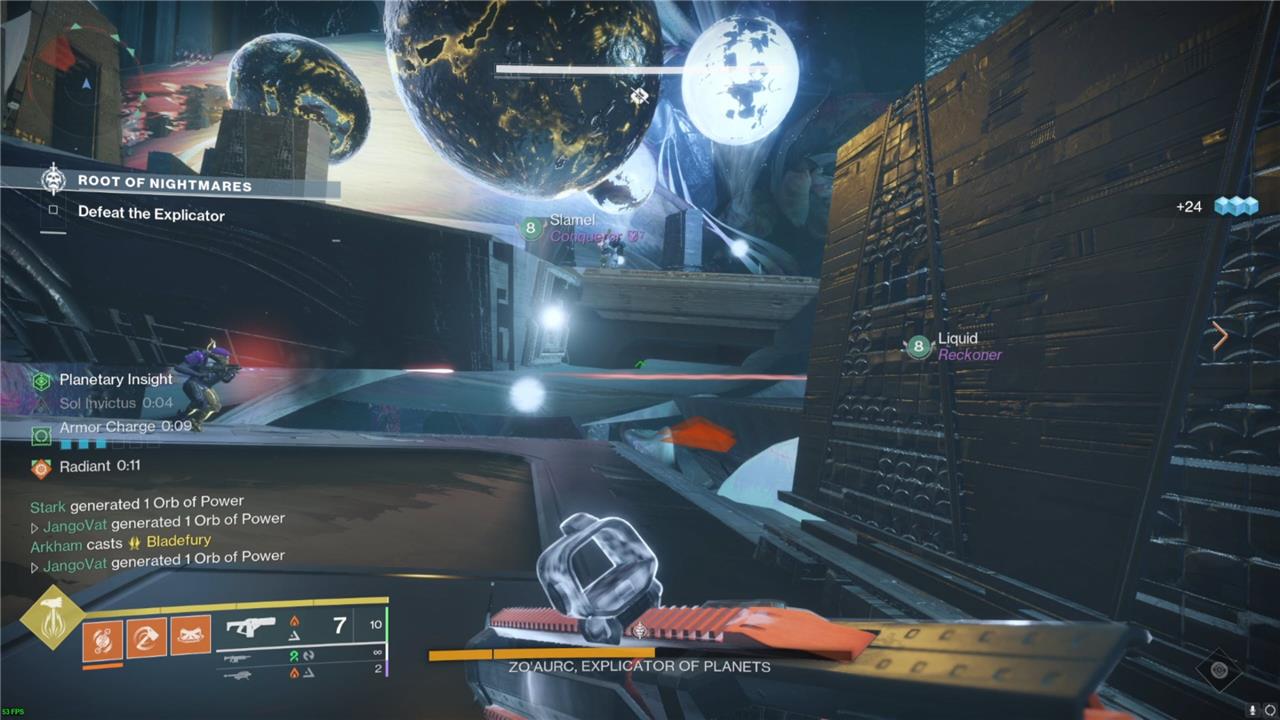
Load into the Nezarec’s Throne encounter at the raid’s opening. Your fireteam spawns on a circular platform amid cosmic debris, with a central light pillar activating the challenge. Split into three pairs and claim the three corner nodes by standing in their light beams to charge them-watch for incoming flux orbs from the sky that teams must shoot down together. Once nodes fill, light the middle pillar to spawn the first boss, Zo’Aurc, a hulking Explicator who summons adds and telegraphs slams. Position one player on each node to maintain the flux while others focus DPS on Zo’Aurc’s crit spot during his eye-glow phase, repeating until he falls and the path to the next arena unlocks.
This raid does not have a traditional opening encounter like other raids, including Vow of the Disciple and Kings Fall. Instead, you enter the raid through the Neptune node on the director and get dropped right in. Walk forward and follow the path. In not too much time, you’ll reach the first encounter, Cataclysm.
Cataclysm – the opening encounter
Cataclysm introduces players to the Root of Nightmares with a focus on controlling chaotic energy and managing movement between zones. Teams must coordinate to connect nodes of light while fending off waves of enemies. Staying aware of the field’s shifting threats and maintaining communication are key to keeping the chain intact. Effective role assignment-runners handling connections and defenders managing adds-sets the pace for success in this opening battle.
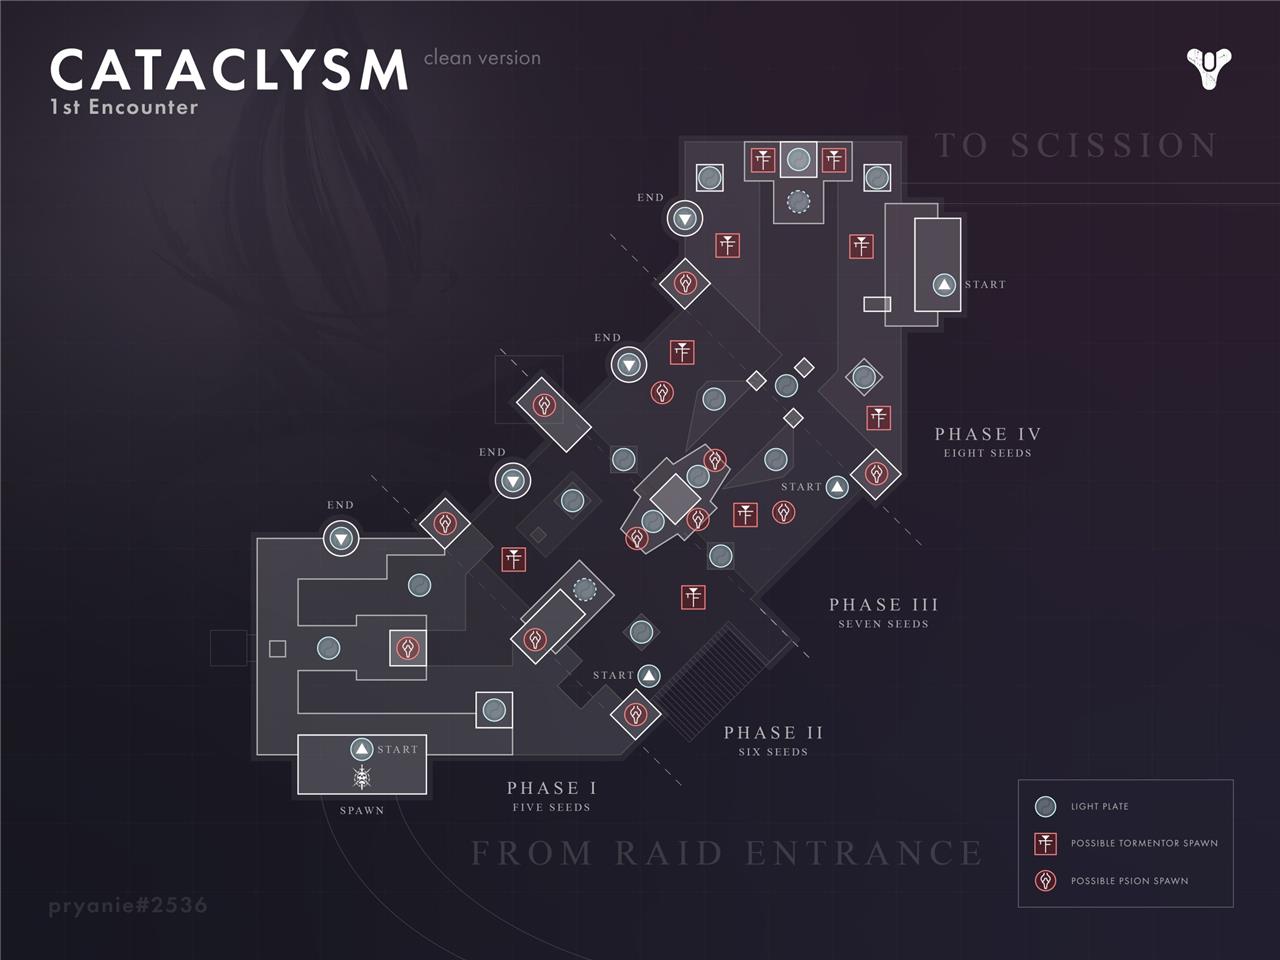
After all that setup, we finally reach the first encounter, Cataclysm. This encounter is pretty straightforward. A Gardener will complete node chains while the rest of the team kills Psions to spawn Tormentors, then kills those too. We’ll split the group down as the Gardener/Gardeners, and then the rest of the team.
The Gardener/Gardeners
You’ll need one or two players designated as the Gardener for this first encounter. We suggest having one player complete this role, but you can add a second Gardener if you struggle to complete the nodes in time. As described above, the Gardener will grow the seed, and they’ll need to complete four sets of nodes in total. This should be that player’s only focus. (As stated, the path of the nodes that you’ll need to activate will be different every time, but you can use the map above to see all the possible node sites.)
The rest of the team
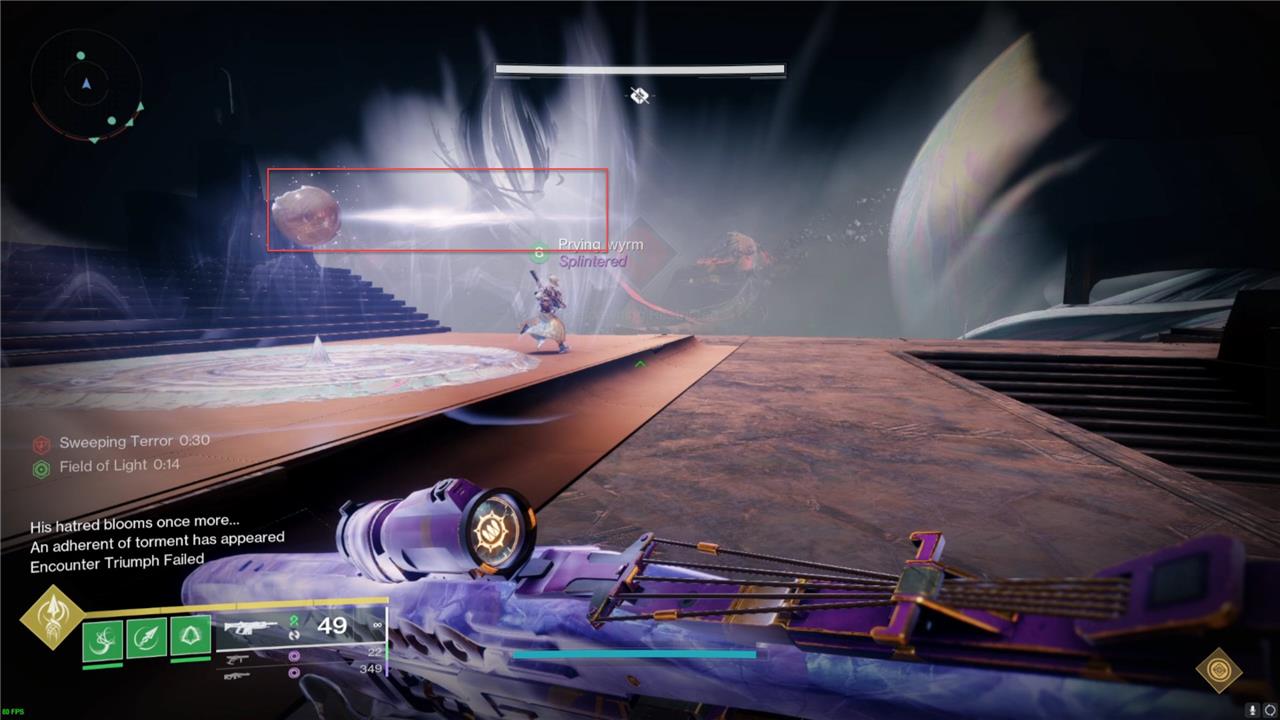
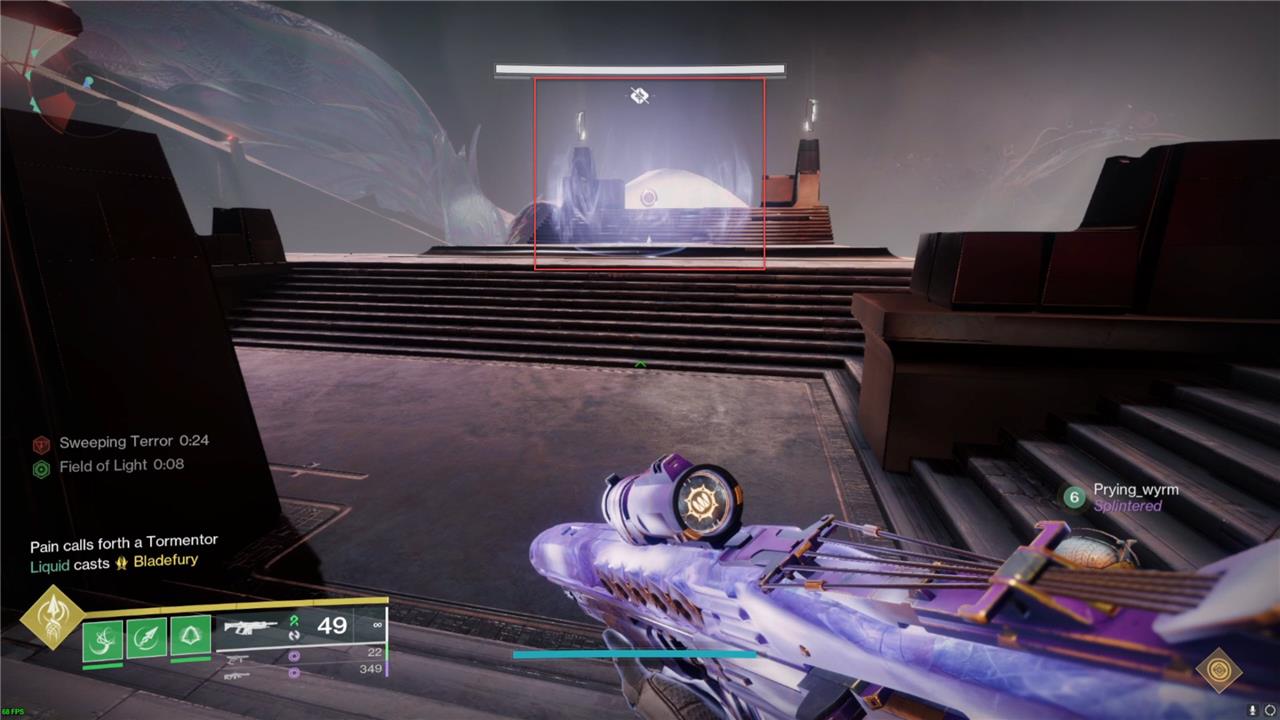
While the Gardener grows the chains, the rest of the team is responsible for preventing the wipe mechanism. While a chain is being grown, there will be a timer on the left side of the screen, “Sweeping Terror: X,” counting down to zero. You can increase this time by killing Tormentors.
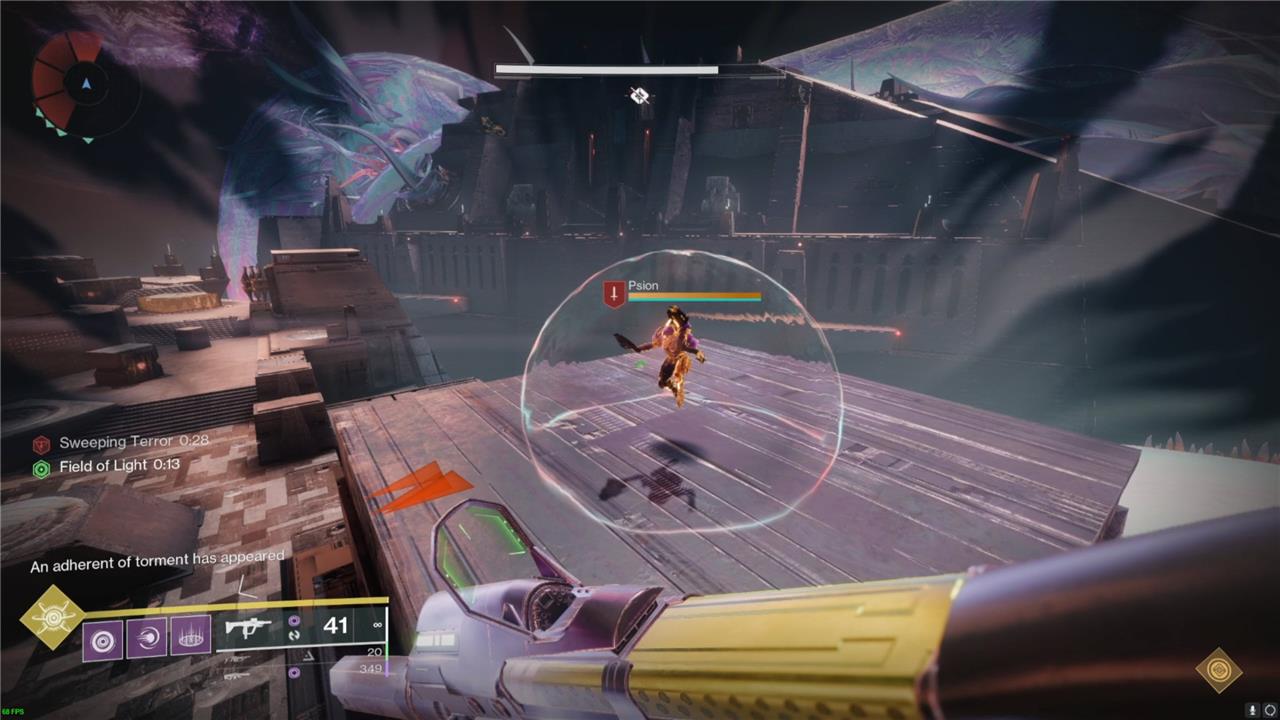
To spawn a Tormentor, you must kill two bubbled Psions. You’ll know these Psions have spawned in because “An adherent of torment has appeared” will show in the combat log.
Once both Psions are dead, a Tormentor will spawn at the front or back of the map. Whichever spot the Tormentor doesn’t spawn at, a Barrier Champion will spawn. Once you kill the Tormentor, you’ll add about 30 seconds to your Sweeping Terror timer.
When the Gardener has completed a chain, the timer will disappear, and there will be a small break to clear the ads before the next phase starts, repeating the whole cycle again. You must complete four chains. Once the fourth one is complete, the encounter is over.
Example cycle
An example cycle, using the first chain for reference, would look like the following:
- The Gardener shoots the first seed to get the buff and start the encounter.
- The rest of the team pushes out to kill adds and the two Psions.
- The Gardener continues building their chain as laid out above.
- The two Psions are killed, and a Tormentor spawns.
- The Tormentor is killed, and the rest of the team clears adds and the Barrier Champion.
- “An adherent of torment has appeared,” shows in the combat log, and the team finds and kills the Psions.
- The Psions are killed, and the Tormentor spawns.
- The Tormentor is killed.
- The Gardener completes the chain, and the timer disappears.
- Everyone kills adds and sets up for the next cycle.
First Root of Nightmares jumping puzzle and first secret chest
The First Root of Nightmares jumping puzzle challenges you to time a series of precise hops across shifting platforms, then rewards your precision with a secret chest tucked behind a hidden doorway that opens after you complete a quick plate sequence.
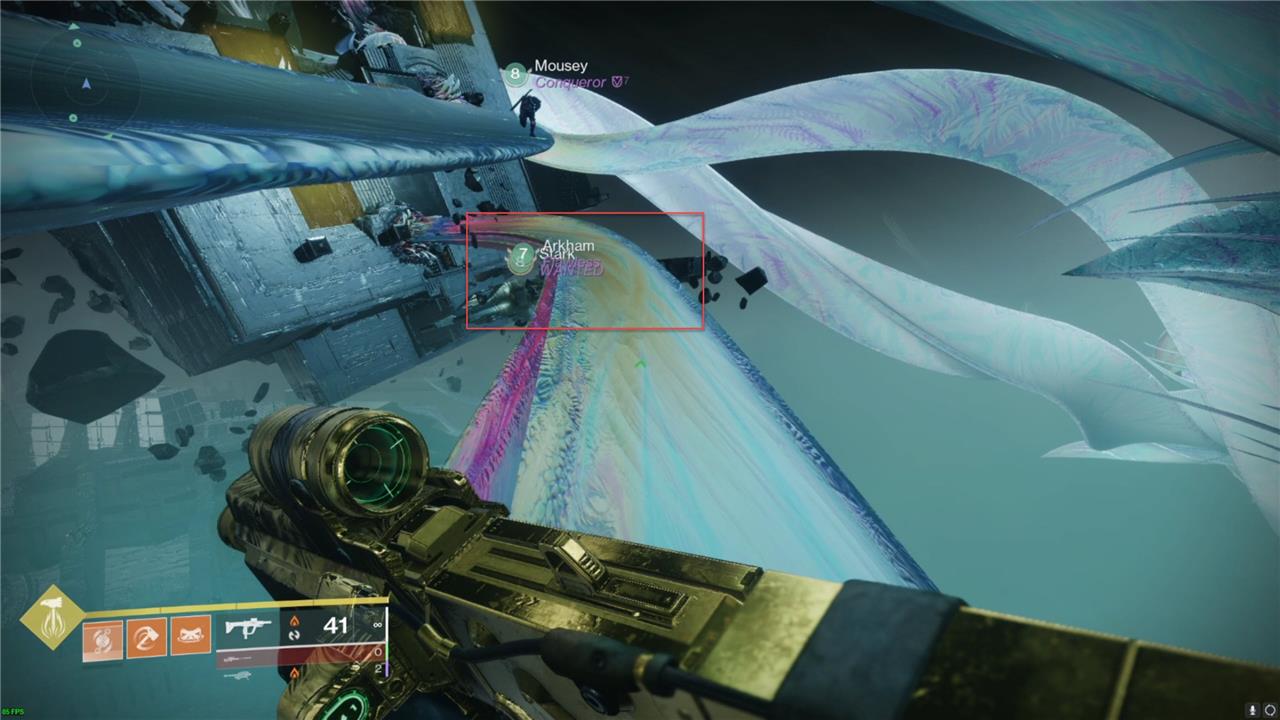
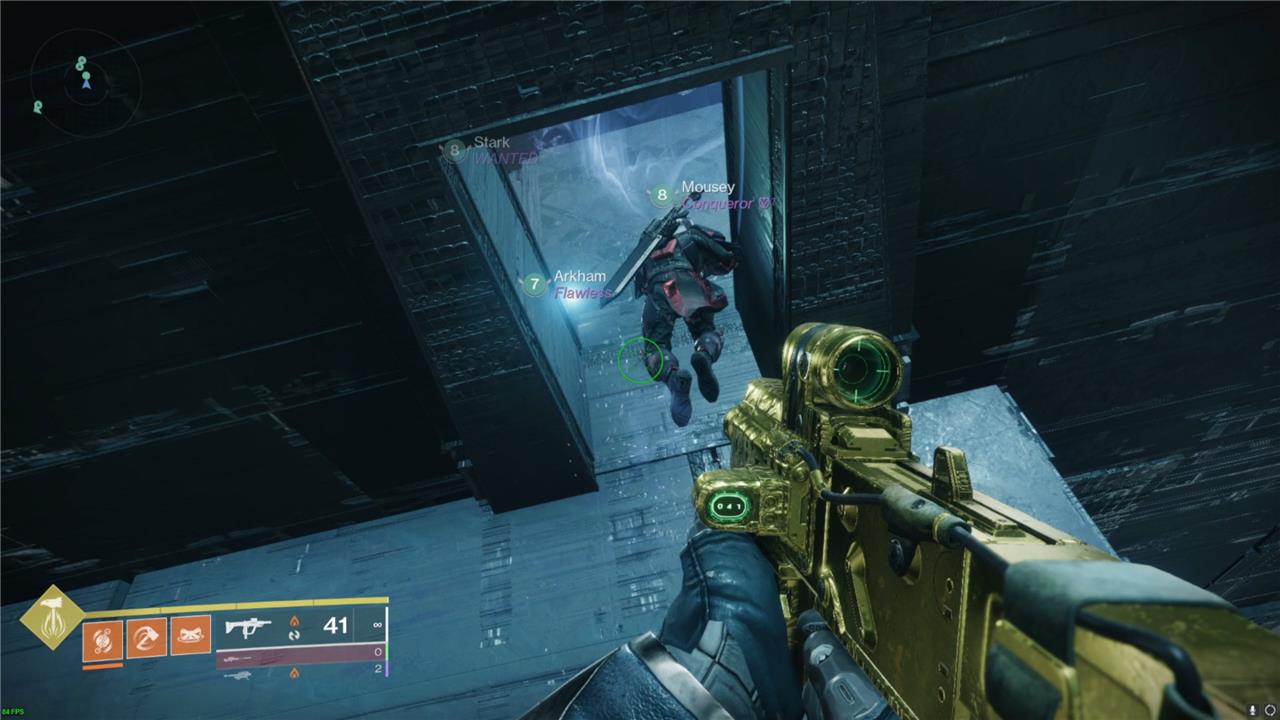
The first jumping puzzle takes place directly after the first encounter, and it takes you through and outside some Pyramid ship structures interwoven with light ribbons. The path is straightforward, tasking you with crossing over some gaps. Most of them are not notable, but if you are looking for the secret chest, keep an eye out at the end of the puzzle.
First secret chest
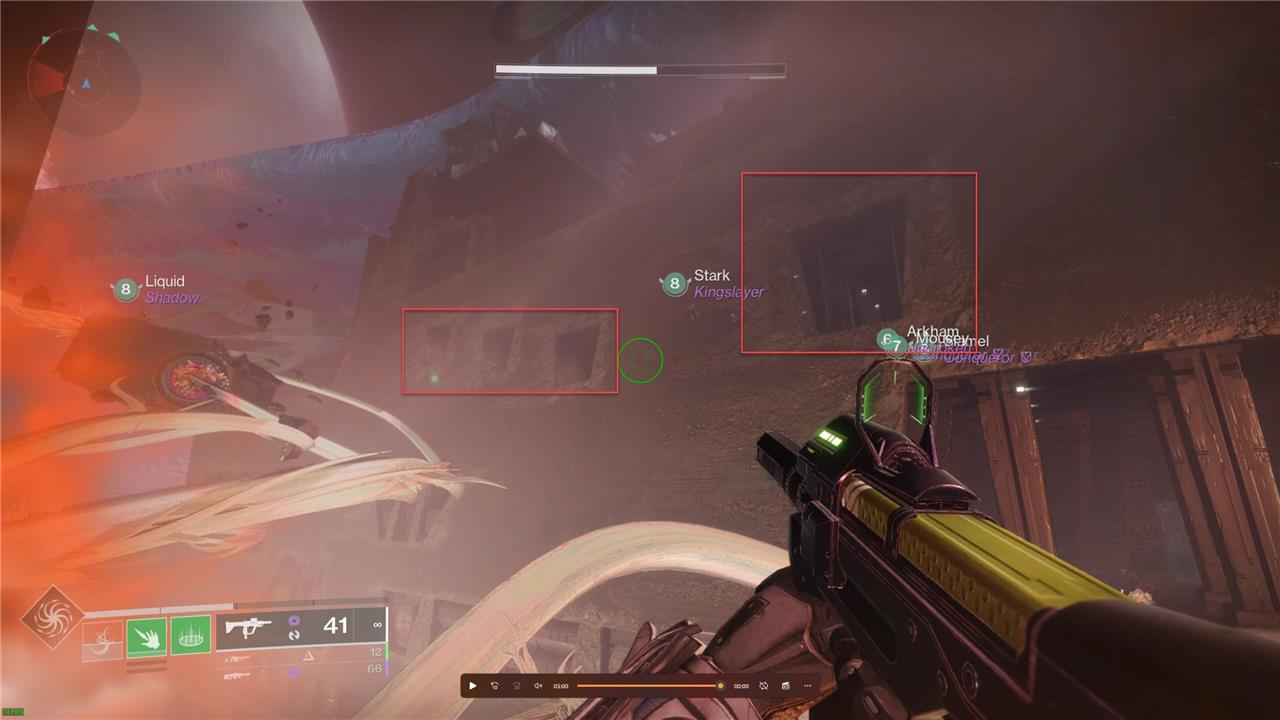
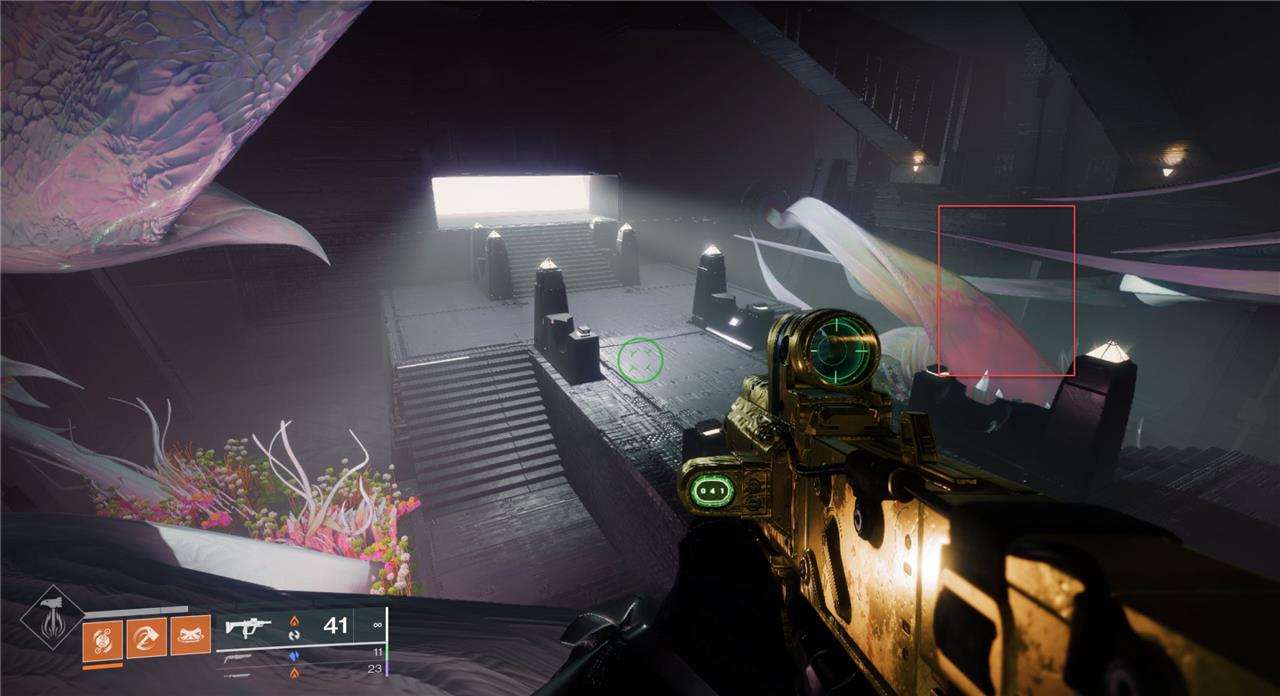
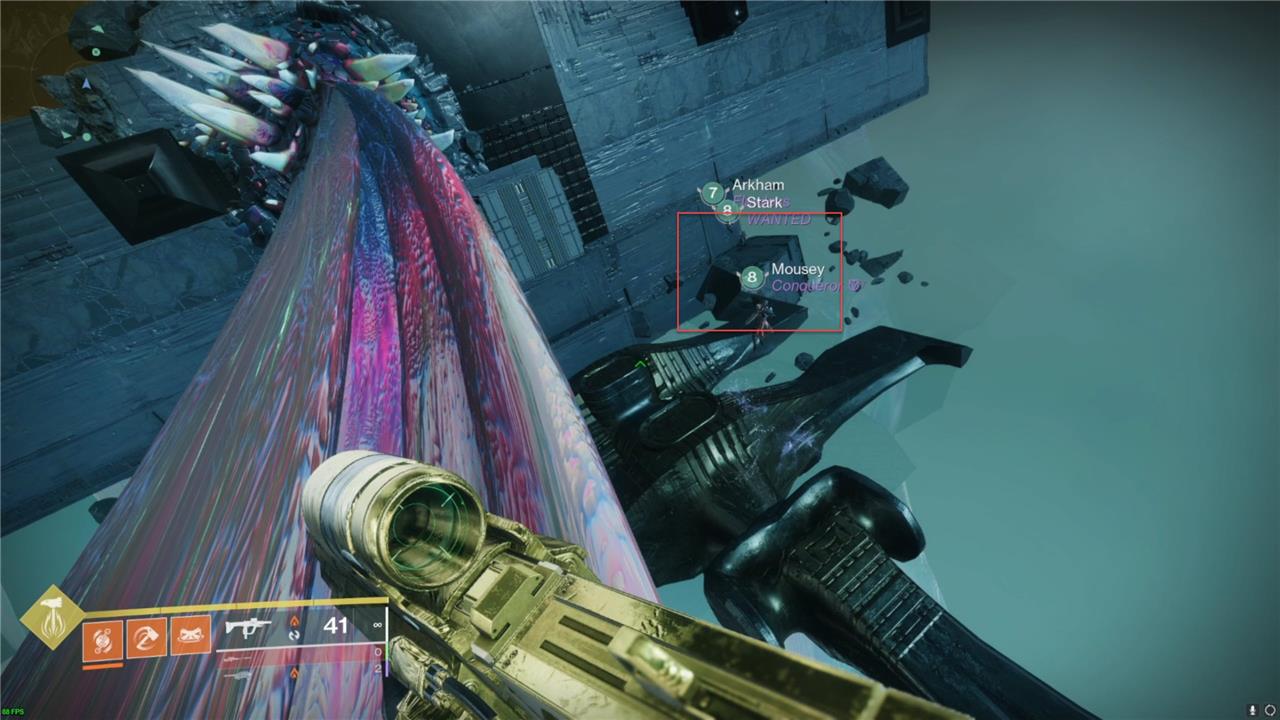
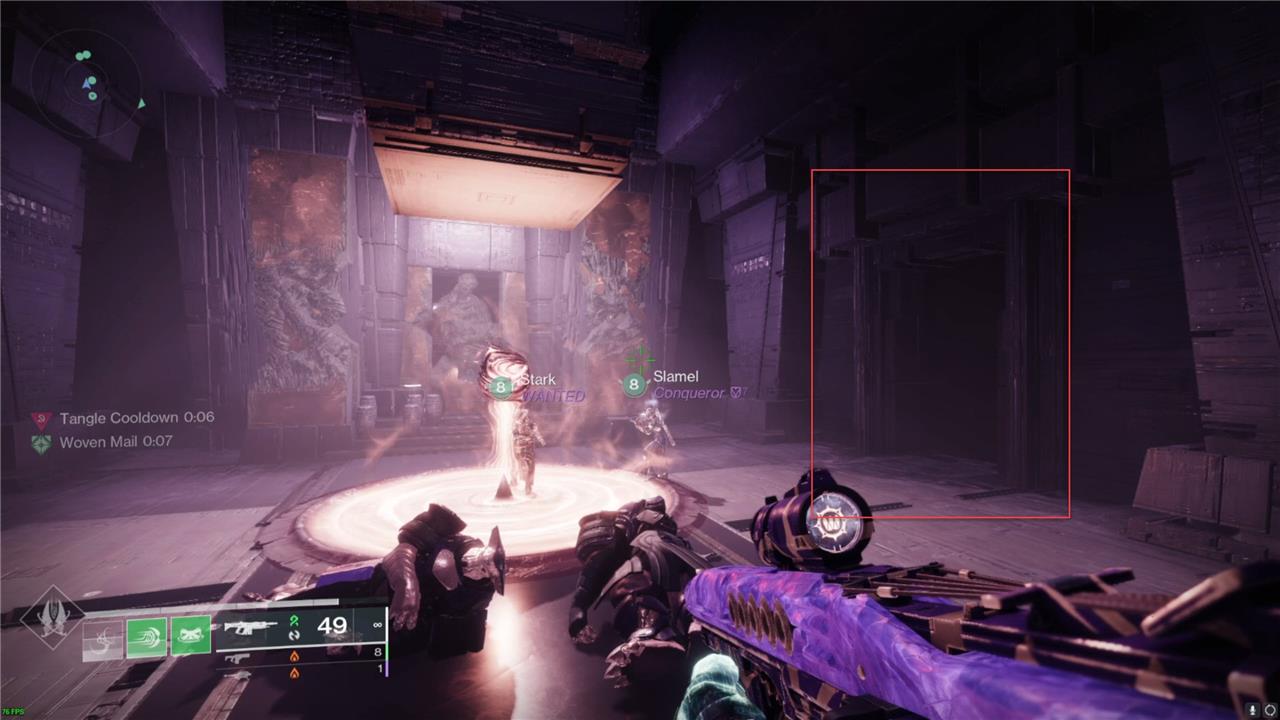
Once you reach the outer part just before the second encounter, look across; your view should look like the image above. There will be multiple doors, all leading to the same location.
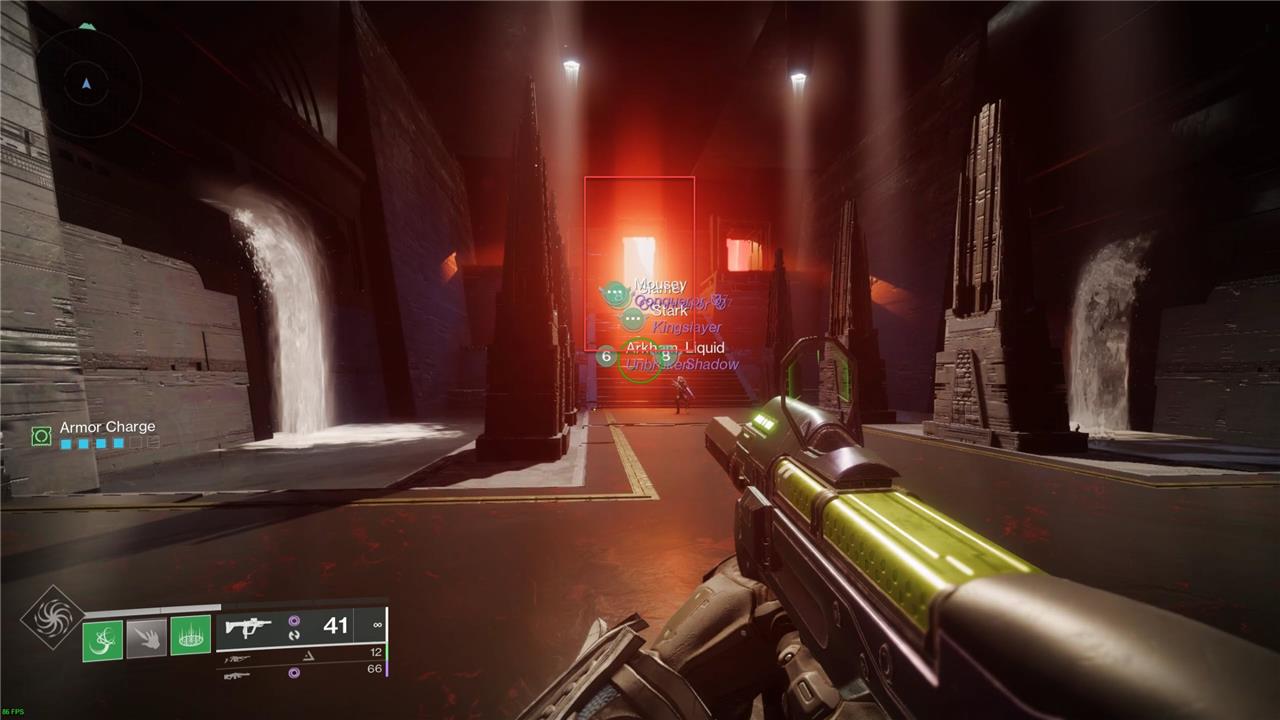
Once you jump through one of those doors, head toward the red light. There will be a Tormentor and some adds to kill. Just behind those adds will be the first secret chest.
Scission – the climb up the cavern
Scission challenges fireteams to scale a multi-tiered cavern split by streams of Light and Darkness. Players must link these energies by passing buffs between nodes while clearing waves of enemies across shifting platforms. Timing and coordination are key-missing a link resets progress, forcing teams to balance offense with precise movement. As the team ascends, the encounter grows more complex, demanding sharper awareness of both positioning and enemy spawns to keep the chain intact.
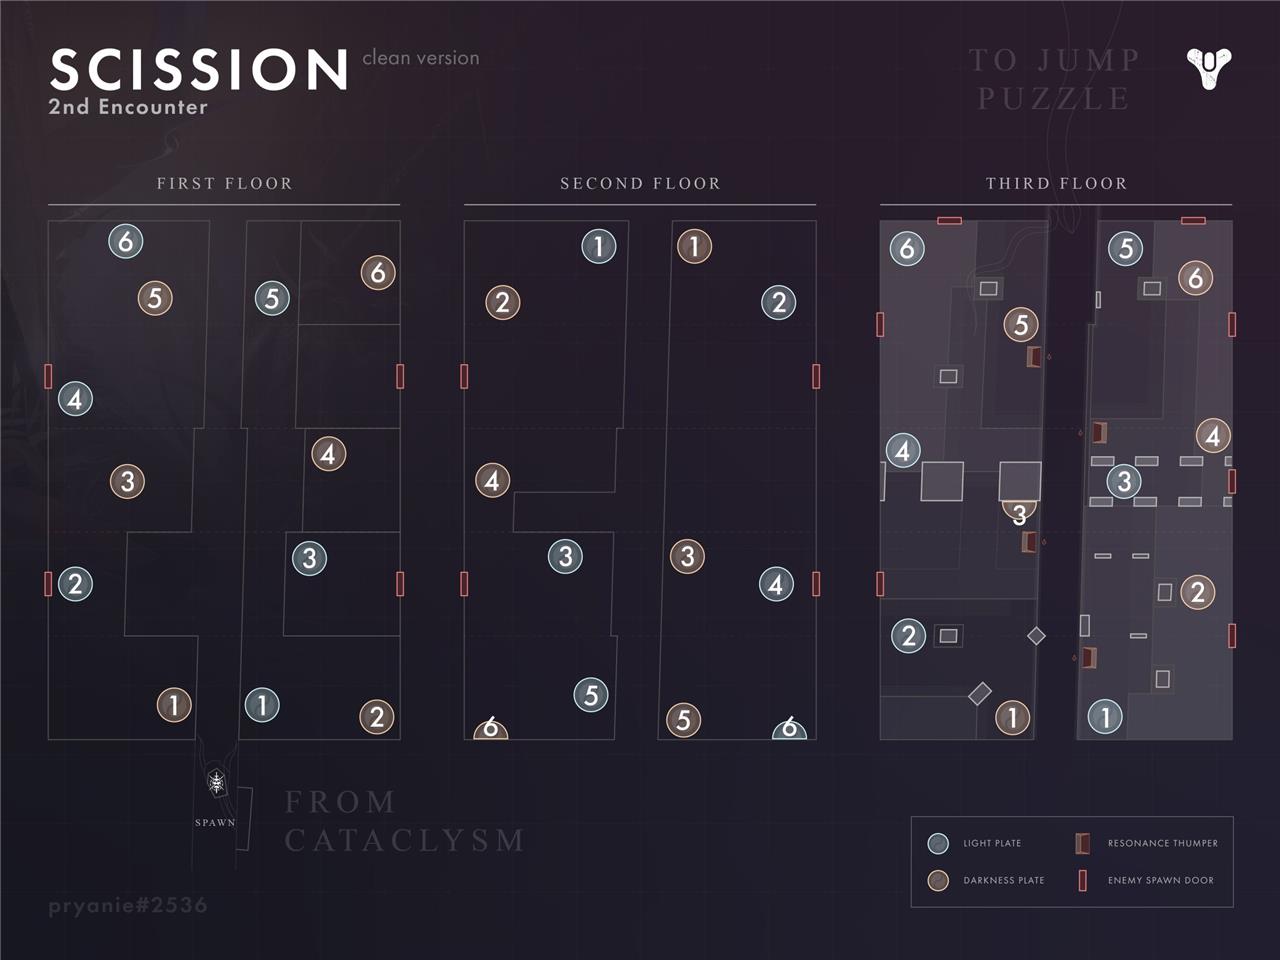
The Scission encounter is a blast to complete, launching players between two sides of a cavern to complete light and dark seeds. There are three floors, each with one light and one dark seed. You will want to split your team into two teams of three: a light team and a dark team. Each member of the team of three will have one of the following roles: the Gardener, the redolence slayer, and the add clearer. The dark team will start on the left, and the light team will start on the right. We’ll break down each role below.
The Gardeners
The Gardeners for this encounter follow the same steps as the Gardener mechanics section, but between each node activation, the Gardener will have to launch back and forth across the cavern. The path for all floors is the same: The even-number nodes you activate will be on the side opposite of where you start, while the odd-number nodes will be on your side. So, for the light side on floor one, nodes 2, 4, and 6 will be on the left dark side, and nodes 1, 3, and 5 will be on the right light side.
Unlike the previous encounter, the path between each node is the same every time you complete this encounter. The nodes that grant the buffs also follow the same path each time. For nodes 2, 3, and 4, you’ll use the starting node on your side, node 1. For nodes 5 and 6, you’ll use node 3 on your side to get the buff – this is the second node that you activate on the path, but the first node you activate on your side. Once all nodes are activated, the Gardener launches back to their original side and helps clear the remaining adds and shielded boss.
The redolence slayers
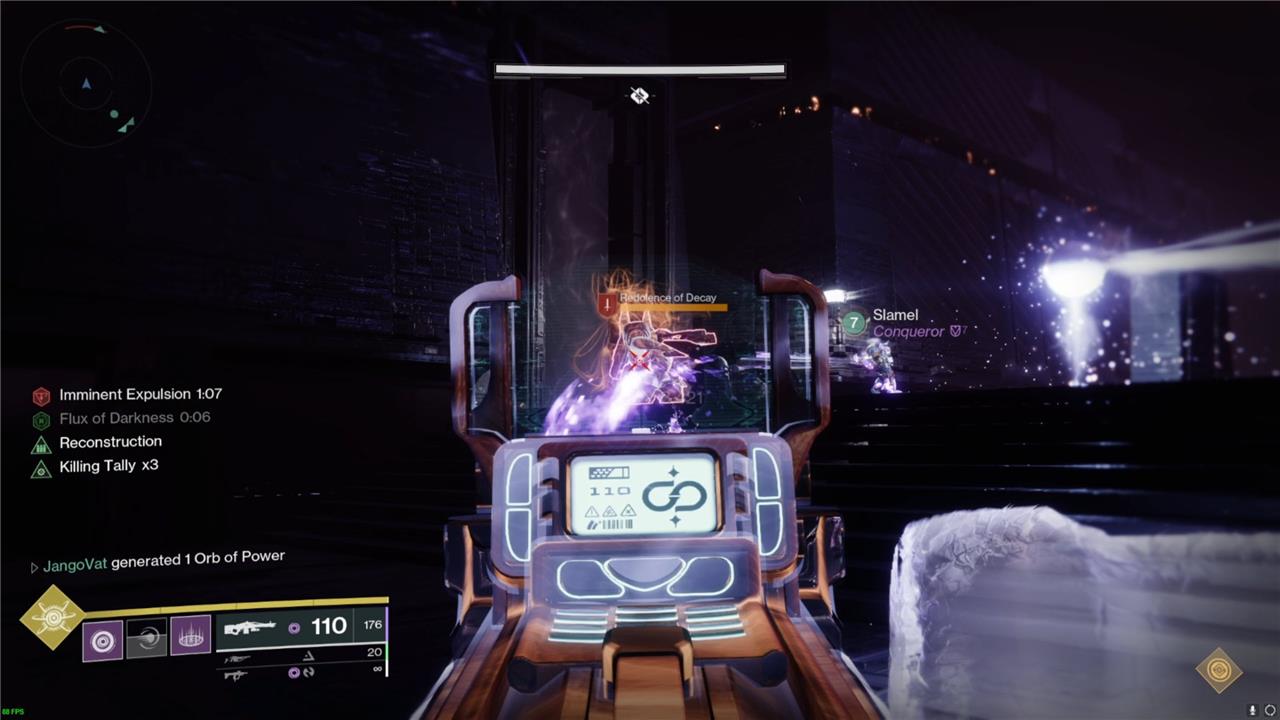
The redolence slayers are responsible for killing the shielded enemies – “Redolence of Decay” for the dark team and “Redolence of Splendor” for the light team. These enemies can only be killed while you have the corresponding buff (“Flux of Darkness” for the dark team and the “Field of Light” for the light team). Because of the node disruption issue discussed in the Gardener mechanic section, the redolence slayers need to stay in communication with their respective Gardener so that both are picking up the buff at the same time. If, for some reason, you miss the buff, have the Gardener continue and get it the next time they pick it up.
Once both sets of nodes are complete, the redolence slayers meet up with their add clearer, and Gardener time permitting, at the final node of their side. They activate it to gain the buff to kill the last shielded enemies and the shielded boss. Once you kill those enemies, you can launch up to the next floor.
Note: Starting the final part before both sets of nodes are complete can result in the later side being unable to get their buff, meaning they cannot kill their enemies. This causes the encounter to lock up and requires a wipe to fix. You’ll know both sides are complete because “Interlopers block your ascent” will appear in the combat log.
The add clearer
The add clearers have a pretty straightforward job: kill all of the adds that are not redolence-shielded enemies. As stated in the redolence slayer section, they’ll meet up with them at the end of the path to kill the shielded enemies.
Example cycle
An example cycle, using the dark side bottom floor for reference, would look like the following:
- The Gardener and redolence slayer step into the starting node and get the “Flux of Darkness” buff while the add clearer pushes forward and starts slaying adds.
- The Gardener crosses the gap and activates their first node.
- The redolence slayer pushes slightly forward to kill the first shielded redolence enemy.
- The Gardener crosses back over the gap and meets the redolence slayer at the starting node again, activating it while both are inside.
- The Gardener and redolence slayer push forward to activate the second node.
- The Gardener and redolence slayer fall back to the starting node, activating it while both are inside.
- The Gardener crosses the gap and activates their third node.
- The redolence slayer pushes slightly forward to kill the third shielded redolence enemy.
- The Gardener crosses back over the gap and meets the redolence slayer at the second node, which is now the buffing node, activating it while both are inside.
- The Gardener and redolence slayer push forward to activate the fourth node.
- The Gardener and redolence slayer fall back to the second node, activating it while both are inside.
- The Gardener crosses the gap and activates their fifth node.
- The redolence slayer pushes slightly forward to kill the fifth shielded redolence enemy.
- The Gardener crosses back over the gap.
- Once both the light and dark sides have been completed, both sides will enter their respective sixth nodes, activating them to get the buff to kill the shielded boss enemy that spawns.
- Once the boss and all other adds are slain, launch yourself to the next floor to continue the encounter and repeat the process above.
Second jumping puzzle and second secret chest
The second jumping puzzle appears after defeating Zo’aurc and leads through a series of floating platforms surrounded by bright energy currents. Players must carefully time their jumps to avoid being pushed off by shifting winds or sudden bursts of light. About halfway through, a hidden side path branches off to the left, revealing the second secret chest. This chest offers raid loot already collected, giving Fireteams an extra reward before heading toward the final encounter.
This jumping puzzle is one of the more complicated ones in the game, but it gets much easier once you learn the mechanic. After completing a light and dark chain with the Gardener mechanic, you must use the launch pads to navigate the puzzle. The path is relatively easy to follow, but every 15 to 30 seconds, a pulse of energy kills you – if you don’t have the “Darkness’s Refuge” buff. How do you get this buff, you might be asking? Easy: Link a dark and light seed together.
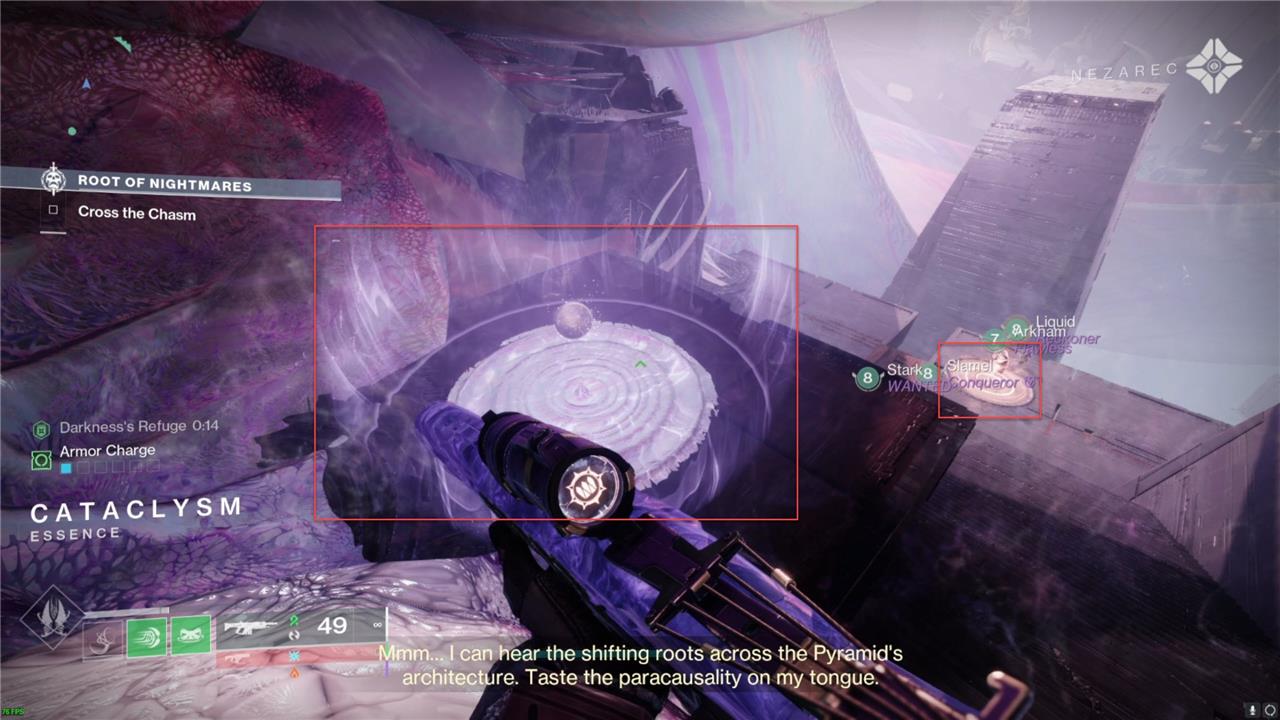
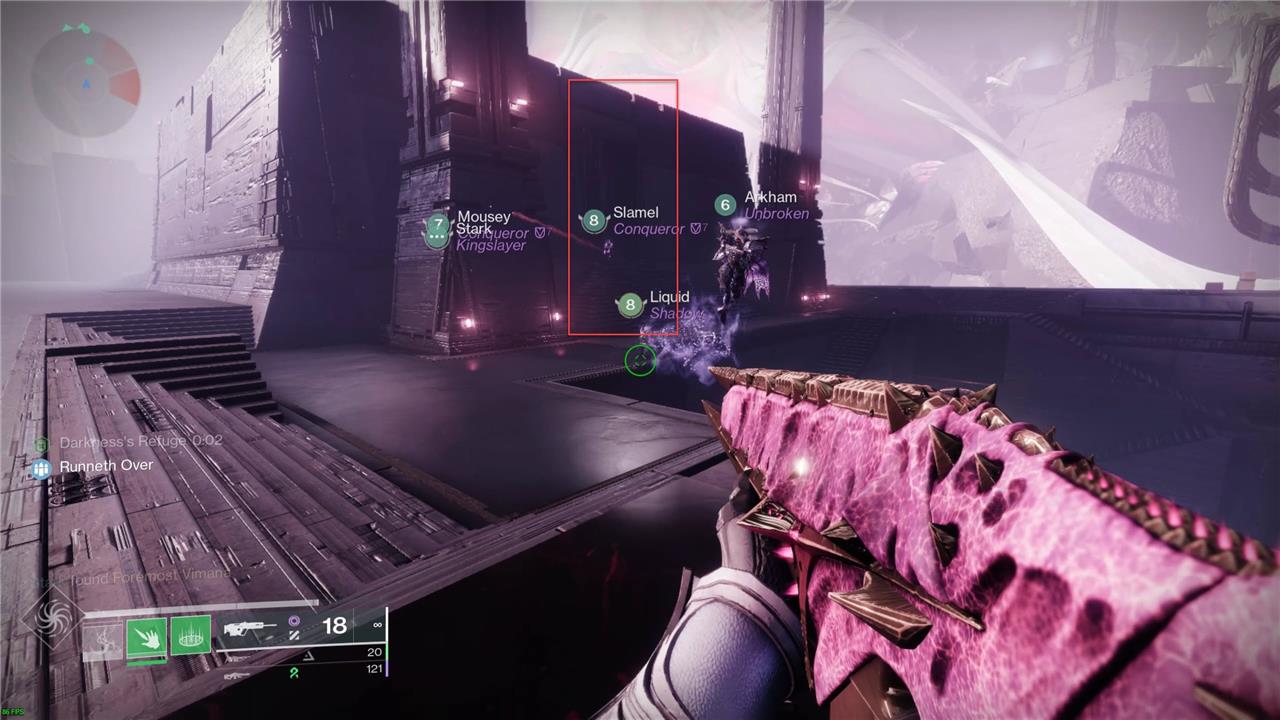
Once you get to this part of the jumping puzzle, drop down and activate the light node, granting you the “Field of Light” buff. While you have that buff, activate the next darkness node, which makes that particular darkness node a safe haven for a short time; players can get the “Darkness’s Refuge” buff here and move on to the next set of light and dark seeds.
Continue this all the way through until you reach the first door. Right behind this door is the area of the second secret chest, discussed below. (This door will only open once all players in the fireteam are present.) Once opened, repeat the same light-to-dark chains as before and you’ll eventually reach a second door. Once all players are present, the door will open, leading you to the third encounter, Macrocosm.
Second secret chest
After walking through the first door that requires all fire team members to be present, walk up the steps and look to the right.
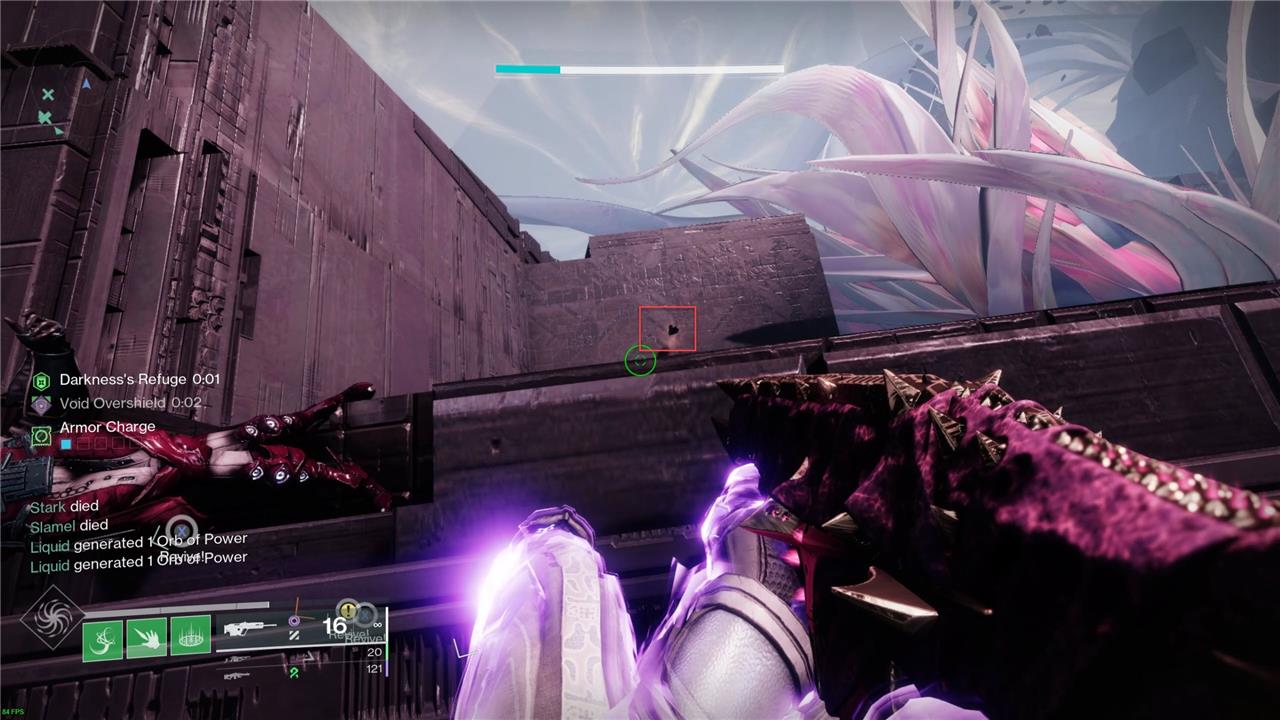
Jump up and look over the right edge. There will be a darkness crux; shoot it to open the door to the secret chest room.
Turn around and look right above the door you came through to enter the area. A new door will be opened, and inside is the chest.
Macrocosm – how to defeat Zo’Aurc, Explicator of Planets
Zo’Aurc summons planetary fragments that bombard the arena and spawn Scorn adds. Guardians split into two teams: one shoots weak points on the boss to drop his shield while the other clears adds and grabs orbs to deposit at the center node. Rotate roles after each cycle, matching symbols on orbs to the active planet’s glyph. Call out exposures during shield breaks to focus damage on Zo’Aurc’s crit spot. Push DPS until he falls, dodging the roaming macrocosmic mine.
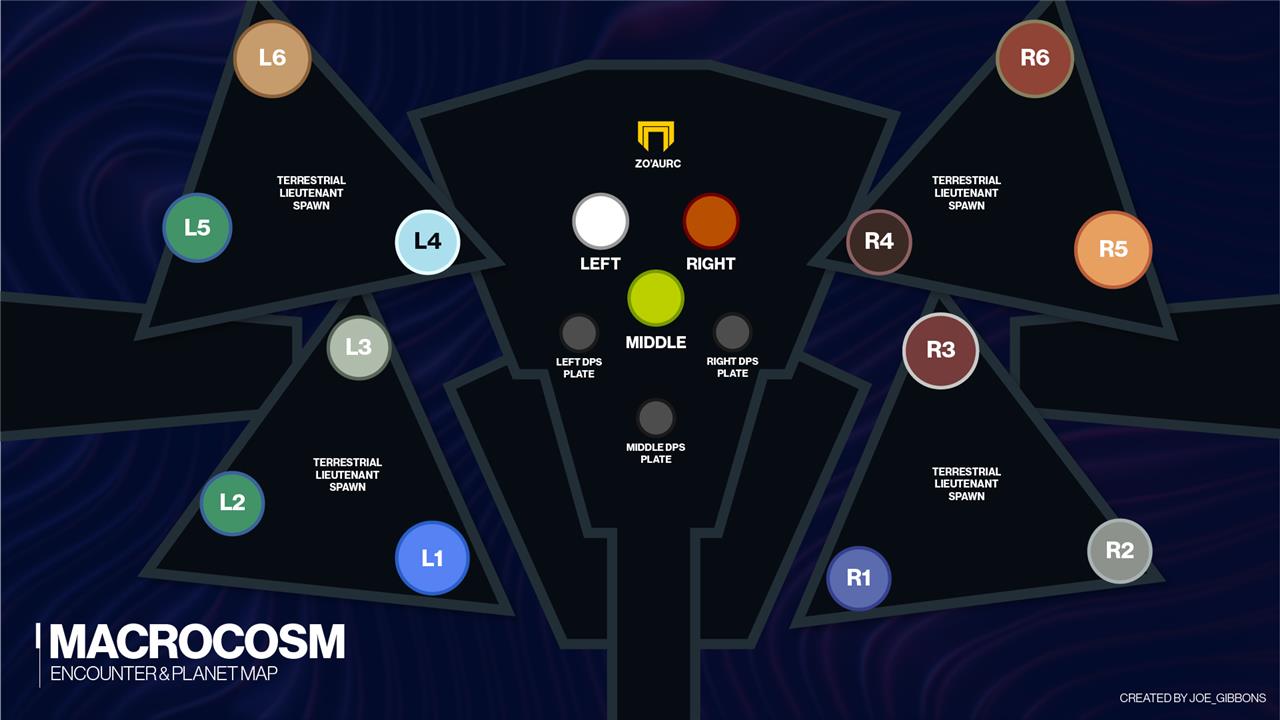
Fulfilling one of Savathun’s two truths and two lies from The Witch Queen campaign, this encounter grants the guardians power to move planets to take on Zo’Aurc, Explicator of Planets. This encounter has unique mechanics not seen anywhere else in the raid. You’ll want to split up your team into two teams of three, one left side and one right side. One member of each team will be the designated add clearers. Split up the other two players to cover each of the four planet clusters. This means one member of each side will cover planets 1 to 3, and the other will cover planets 4 to 6. We’ll break down each role below.
The planet movers
Each planet mover will be responsible for three planets, either 1 to 3 or 4 to 6. They should stay near these clusters as often as they can. Once the encounter starts, everyone should focus on the adds in the middle. After a few seconds, a Solar shielded Chieftain will spawn on each side, one left and one right. Killing each side’s respective Chieftain will spawn a “Terrestrial Lieutenant” at the respective left or right side plates. These enemies have a good amount of health but go down easy with a rocket or shotgun. The player that kills the Lieutenant will get the “Planetary Insight” buff. This allows them to see the color of their side’s planets.
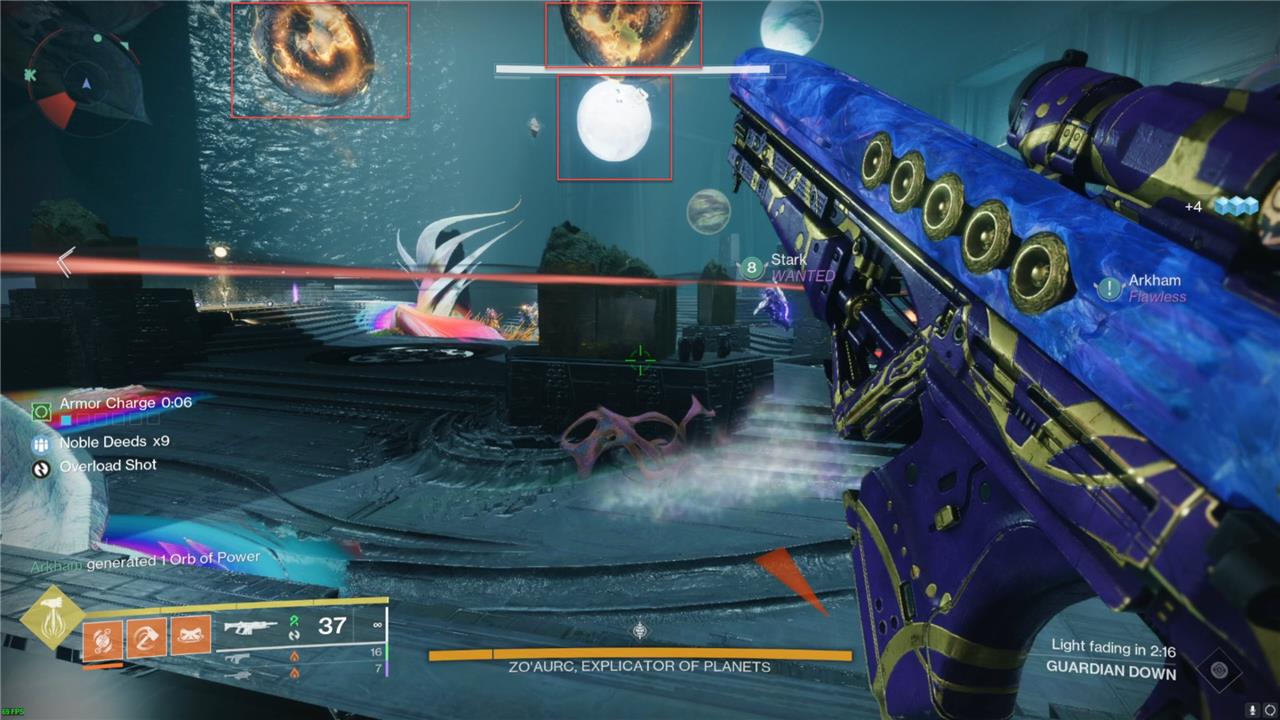
The left planets will all glow white, except for two, and the right side planets will all glow black and orange, except for two. Using the map above, you’ll need to call out the planets that do not match. One planet from each cluster will be different, and those are the ones that will be moved.
Once you call out all four planets, the planet movers will pick up the orb from under the planets called out, granting them the “Planetary Shift” buff. They will then carry that over to the opposite sides plate, staying in the same number group as before, and depositing into the planet that was moved from the other side. This means that if you call out L3 and R2, L3 would be taken to R2, and R2 would be taken to L3. After you deposit all four planets, the planets will start to move across the room. The movers should go back to their original clusters at this time. Once locked in, if they were correct, “The indexed planets reveal themselves” will appear in the combat log. If incorrect, those wrong planets will return to their original spots, and the phase must happen again.
Once all four planets are locked and confirmed, two new Chieftains will spawn. As before, once you kill them, a “Terrestrial Lieutenant” will spawn at each plate. Once you kill them, the players that kill them will get the “Planetary Insight” buff again, but this time instead of looking at the planets above their plates, they’ll look to the middle of the room.
The three planets in the middle of the room will now be glowing, either two light and one dark, or two dark and one light. Players from each side will have to pick up any planet from their side and take it to the middle. Whichever side has only one of them glowing their color will need to call out which planet mover will take it into the middle. Under those three planets will be deposit spots. Each player that takes a planet should be deposited into the spot that matches their color. If we use the example above, the left and middle plates will need a dark side planet (right 1 to 6) deposited into them, and the right plate will need a light side planet (left 1 to 6). Once you deposit them, the planets will move into position. All the movers should head to the middle and shoot the crux in the middle of the three planets. This will start the DPS phase.
The add clear
While the planet movers are doing their thing, the add clearers should focus on the middle of the map, where many waves of enemies will spawn. Kill them as fast as possible while not getting too close to the boss, as his stomps can send you flying. Once the planet movers finish their job, group up with them for DPS.
DPS
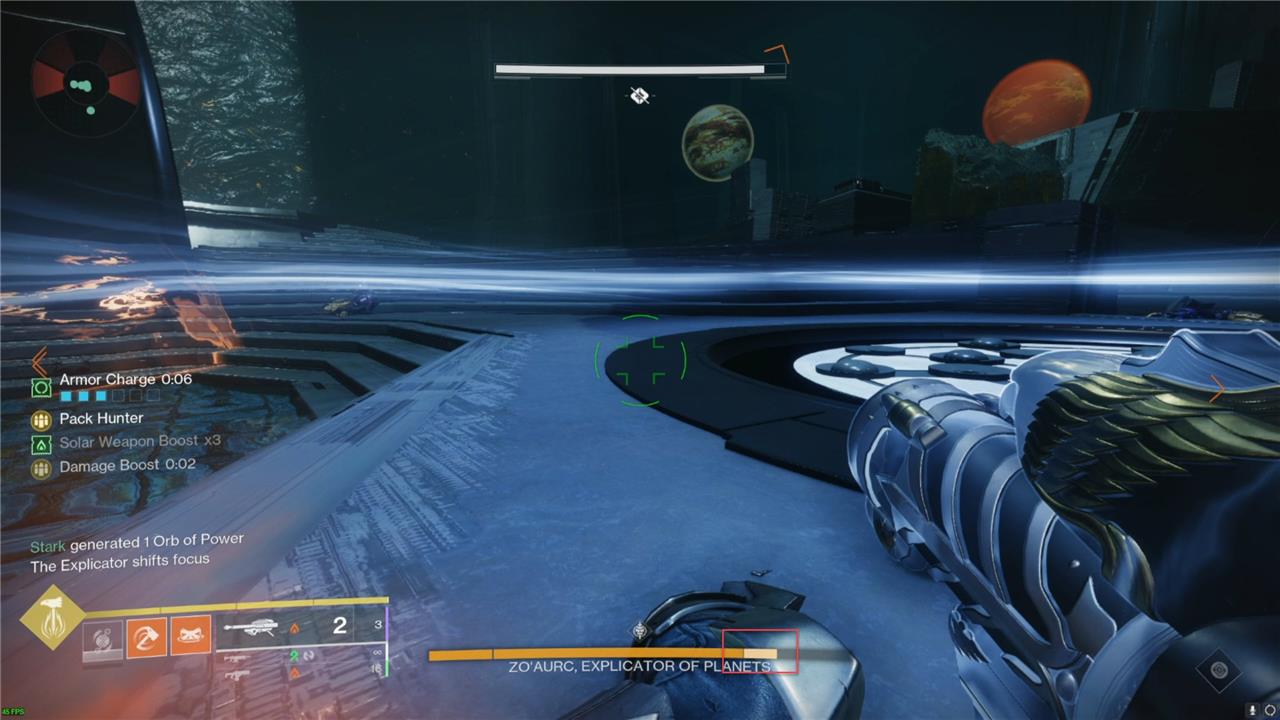
The DPS for this boss is a little complicated, but we’ll break down each part. Each DPS phase is broken down into three mini-phases. During each mini-phase, the boss will have a light or dark shield. To do damage to the boss, you’ll need to step onto a plate that matches that shield. (These plates are under the three middle planets and will match their polarity.)
Using the example we cited above, the left and middle plates would be where you go if the shield is dark, and the right plate is where you would go if the shield is light. There is a trick to the DPS: The shield will always go in the order of A-B-A, where A is the polarity used twice, and B is the polarity used once. In the previous example, A would be dark, and B would be light. If you know this trick, you can call out how the group of players should rotate through the plates before the DPS phase starts. (I try to start at either left or right first, so I would call out the plate order as Left, Right, and Middle if it was laid out as above.)
The boss will have a small section of glowing health. This is the amount of damage you can do before moving to the next plate – there are a few extra seconds of DPS at each plate, and this is how you can shorten the total boss fight.
Once you deplete the health bar, the boss will open a small screen and change his shield. The group must go to the next plate to get that buff to start damaging the boss. You do not need to stand on these plates for the DPS phase. Something my group does is drop a Well in between the three plates. We grab the buff from a plate, then move into the Well to do damage. Once each of the three mini-phases is complete, you’ll go back and move the planets again or will start his final stand.
During the boss’s final stand, he’ll throw up a similar shield as he did before. Look around at the plates and grab the buff that matches his shield. Do enough damage, and you’ll kill the boss, ending the encounter. If you don’t do enough, you’ll wipe and have to start over.
Example cycle
An example cycle would look like the following:
- Everyone kills adds and the shielded Chieftains that spawn in the back middle of the arena.
- The left and right add clearers kill adds as they spawn in.
- The four planetary movers kill their respective “Terrestrial Lieutenant” and acquire the planetary insight buff.
- The left planetary movers call out that L3 and L6 are dark.
- The right planetary movers call out that R2 and R4 are light.
- The front left planetary mover carries L3 to R2.
- The back left planetary mover carries L6 to R4.
- The front right planetary mover carries R2 to L3.
- The back left planetary mover carries R4 to L6.
- The planetary movers return to their original plates as the planets move into position.
- “The indexed planets reveal themselves” appears in the combat log, showing that all planets were correct.
- Everyone kills the next round of Chieftains.
- The planetary movers kill their respective “Terrestrial Lieutenant” and acquire the planetary insight buff.
- The middle planets show Left light, Middle dark, and Right light.
- The two left Light side planetary movers pick up a planet from any left planet site.
- One right Dark side planetary mover picks up a planet from any right planet site.
- The two left Light side planets get deposited into Left and Right.
- The one right Dark side planet gets deposited into Middle.
- One team member shoots the crux once the planets are in position, and all players move to the left DPS plate.
- The first DPS phase starts.
- The first DPS phase ends, and the players move to the middle plate to start the second DPS phase.
- The second DPS phase ends, and the players move to the right plate to start the third and final DPS phase.
- The third DPS phase ends, and players return to their original starting positions to start the cycle over.
Third jumping puzzle
The third jumping puzzle tests timing and movement across shifting platforms suspended above a bright void. Players must carry Light and Dark buffs between nodes while evading deadly projectiles and resetting their balance before the timer runs out. Coordination is key, as missing a jump or failing to transfer energy quickly can cause the entire fireteam to fall behind. Using mobility abilities and carefully planning routes helps maintain flow through this fast-paced section.
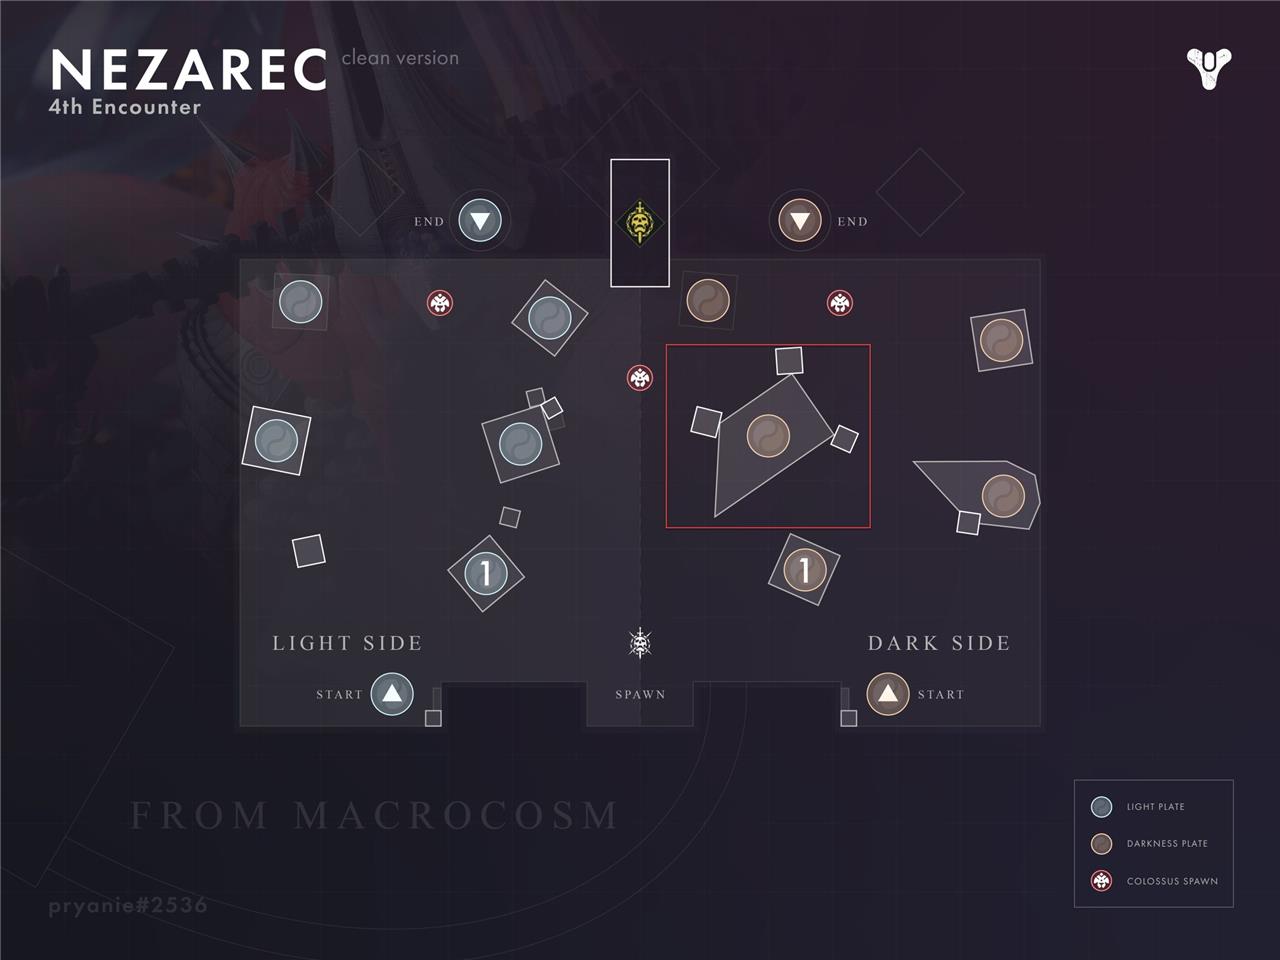
After completing the Macrocosm encounter, you must complete another light and dark chain using the Gardener mechanic. Once you do that, follow the path forward, up, and around until you reach the top, where the final boss fight occurs.
Nezarec – the final boss fight
Nezarec stands as the final challenge of the Root of Nightmares raid, combining tight coordination with high-intensity mechanics. Guardians must balance damage phases and control unstable energy while managing waves of adds across multiple arenas. Precise timing during the Light and Dark field rotations is key to surviving his area-wide attacks. Teams that coordinate burst damage windows and manage survivability tools will bring the fight to a decisive conclusion.
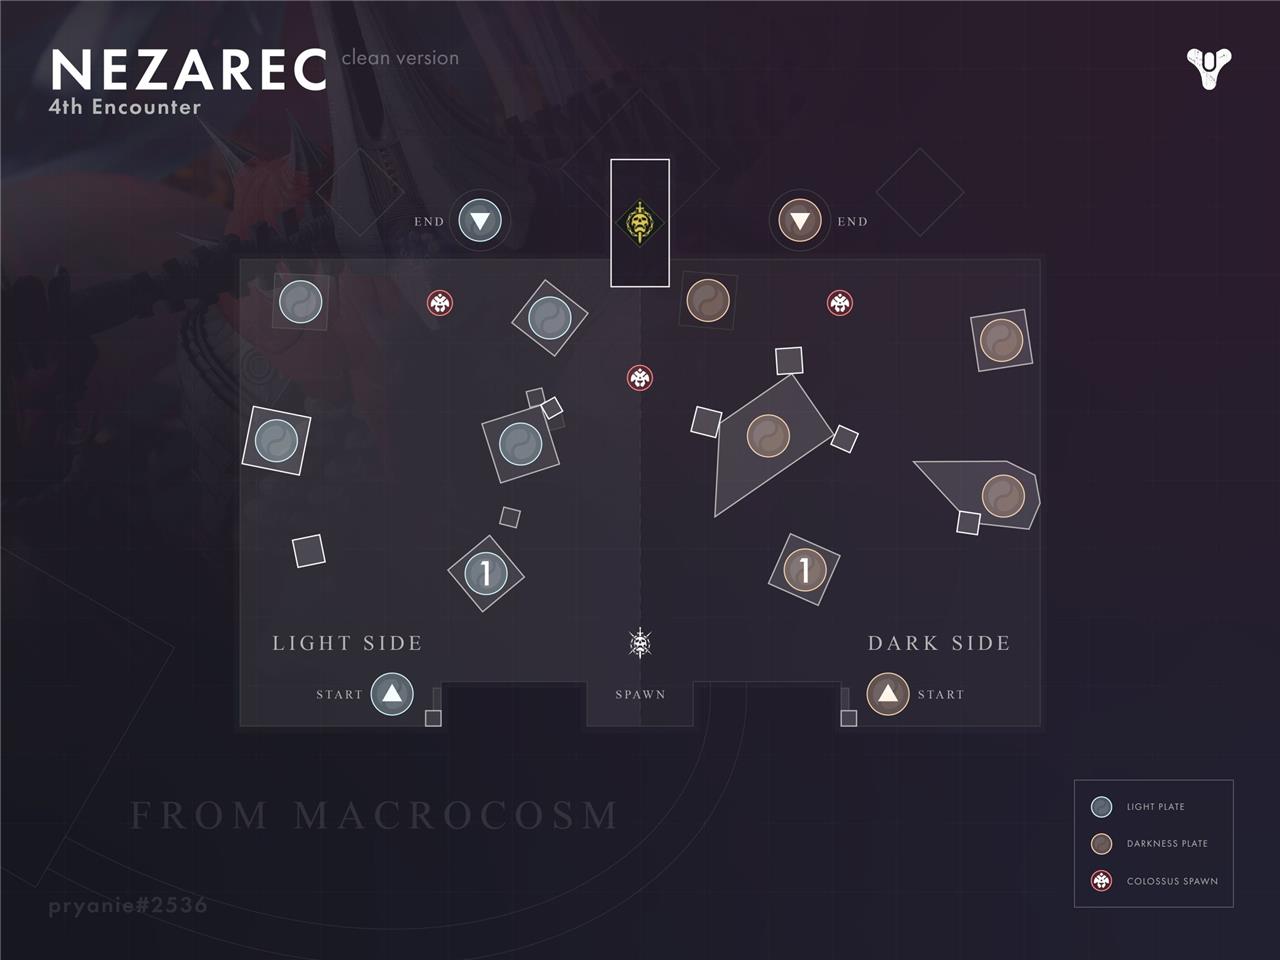
We’ve made it to the final fight, pitting Guardians against one of the Witness’s Disciples, Nezarec. This encounter requires players to make chains, clear adds, and taunt the boss as he chases them around the map. Like the previous two encounters, you will want to split your team into two teams of three, a left and a right team. Each team will have a Gardener, an add clearer, and a tank. We’ll break down each role below.
The Gardeners
The Gardeners’ role in this final encounter is similar to the previous encounters, though there is an extra step they’ll need to take. Besides completing the chain highlighted above in the Gardener mechanic section, Gardeners must create safe havens for their team to avoid Nezarec’s wipe mechanic.
When one of the tanks gains Nezarec’s attention, shoot one of his shoulders. When it pops, there will be a blast of energy from that shoulder, either white or orange. If the energy is orange, then the light side player will make the safe haven on a completed dark side node. If the energy is white, then the dark side player will make the safe haven on a completed light side node. (We suggest that you make this safe haven on node two.)
Once you make the safe haven and are safe from the wipe mechanic, go ahead and complete your chain. If you need extra time, the tanks can shoot the other shoulder to repeat the safe-haven process again.
The tanks
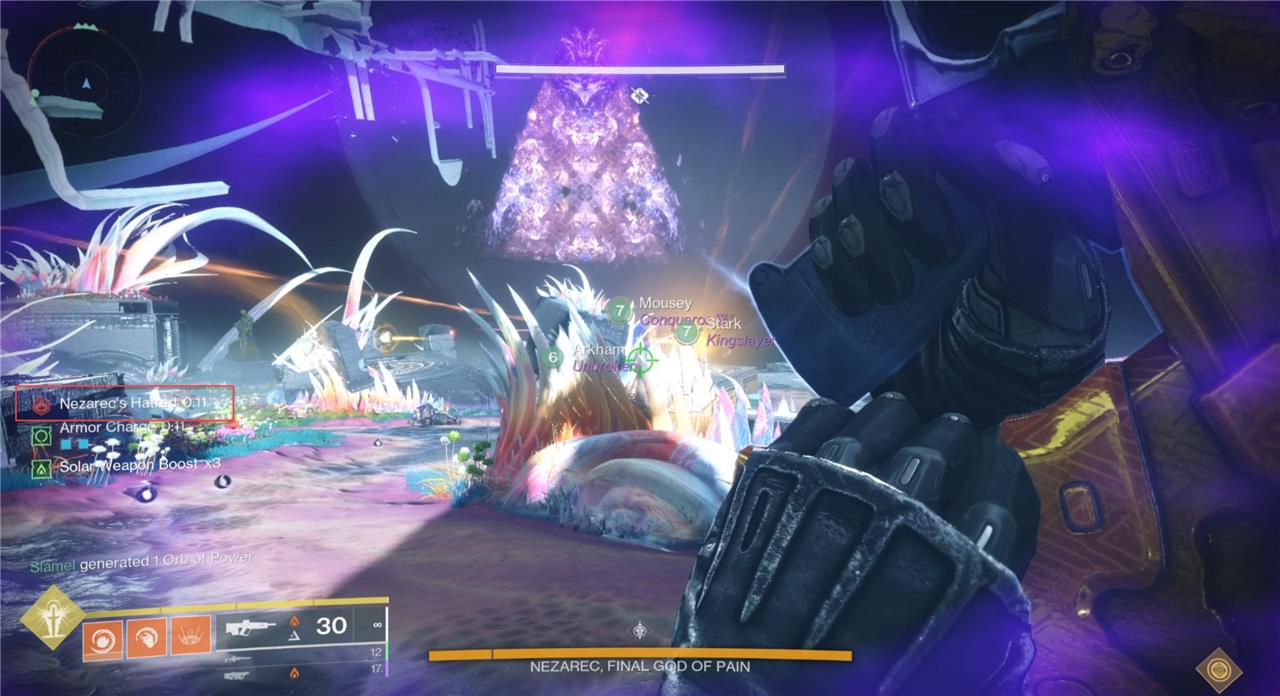
The tank’s role for this final encounter is to hold Nezarec’s aggro by getting the “Nezarec’s Hatred” debuff. Once he starts to hit the whole team with it, the tanks will shoot his chest to get the debuff. Once you get the debuff, shoot one of his shoulders. There will be a large explosion of either white or orange. Call this out so the Gardeners know where they need to create the safe haven. As the timer for the debuff runs out, the other tank needs to shoot his chest to get the debuff. The tanks need to juggle this back and forth until he begins his wipe mechanic or the Gardeners complete their chains.
The add clearer
The add clearer role needs to keep the side lanes clear for the Gardeners, and the middle lane clear for the tanks. The first wave of each phase will spawn with three Colossus, make sure you focus those down as they are deadly to your team. Once the Gardeners complete their chains, meet up with everyone to start DPS.
DPS
Once both chains are completed, the DPS phase will start. Meet up with your group on one of the high-ground spots. We suggest using the third node on the dark side (highlighted above). A large orange beam will shoot down from the middle of the map, and Nezarec will be able to take damage at this point. Hit him with everything you’ve got; we recommend rockets or, believe it or not, Thunderlord for DPS at the time of writing. Once the DPS phase ends, you’ll either repeat the process above or enter his final stand. There is nothing special about his final stand, just hit him as hard as you can before he wipes you. If you do, congrats: You beat the raid! If not, start the fight over and get him on the next run.
Example cycle
- Start the encounter, and the left and right Gardeners start their chain.
- The left and right add clear slay all of the adds, focusing on the colossus when it spawns.
- The two tanks help clear adds until Nezarec starts to apply the Nexarec’s Hatred debuff, then one of the tanks shoots him in the chest to gain his hatred.
- That tank shoots one of the shoulders to reveal Light as the color.
- The dark Gardener runs over and places the safety buff on the second Light node.
- All players get that buff at that node to survive the wipe mechanic.
- The tanks regain Nezarec’s Hatred and pass it back and forth until both gardeners are done.
- All players gather on the middle Dark node and wait for the beam from the center of the arena to note that DPS has started.
- Once DPS ends, all players return to their original locations and start the cycle over.
Root of Nightmares loot table and drop rates
Root of Nightmares offers six craftable legendary weapons, one Exotic shotgun, and class-specific armor sets as primary loot from its four encounters. Drops are limited to one item per character per encounter weekly, unless it’s the featured raid, enabling unlimited farming per character.
Weapons by Encounter
| Encounter | Weapons |
|---|---|
| Cataclysm | Briar’s Contempt (Solar Linear Fusion), Koraxis’s Distress (Strand GL) |
| Scission | Rufus’s Fury (Strand Auto), Mykel’s Reverence (Strand Scout) |
| Macrocosm | Caretaker (Solar Trace), DSR-1A7 (Void Shotgun) |
| Nezarec | Conditional Finality (Solar/Stasis Exotic Shotgun, all Legendaries possible), Field of Dreams (Strand Sidearm) |
All weapons can drop from Nezarec and are craftable after extracting five Deepsight patterns (one weekly via Spoils or puzzles).
Armor Drops
Each encounter drops 1-2 armor pieces from the Root of Nightmares set (e.g., Mask of Detestation helmet from Cataclysm, Bond of Detestation class item from Nezarec). Master difficulty yields higher-stat versions and Adept weapons; weekly challenges boost chances.
Drop Rates and Farming
No exact percentages are public, but Exotics like Conditional Finality have low rates (improved by triumphs); Legendaries are ~equal odds within pools. Farm via Spoils of Conquest (20 per item) at Nezarec’s chest for prior drops, or fully when featured (check Director map). Hidden chests yield repeats/mods.
Best god rolls for Root of Nightmares weapons
Root of Nightmares weapons feature craftable frames with strong perks for PvE add clear, DPS, and PvP duels, often prioritizing Reconstruction, Rewind Rounds, and damage boosts like Focused Fury or Target Lock.
Briar’s Contempt (Solar Linear Fusion)
PvE god roll: Arrowhead Brake, Accelerated Coils, Rewind Rounds/Reconstruction, Focused Fury/High-Impact Reserves.
PvP god roll: Arrowhead Brake, Liquid Coils, Keep Away, High-Impact Reserves.
Ideal for boss DPS with precision stacking; craft for range/stability.
Koraxis’s Distress (Strand GL)
PvE god roll: Arrowhead Brake, Disrupting Rounds, Reconstruction/Rewind Rounds/Demolitionist, Target Lock/Hatchling.
PvP god roll: Quick Launch, Disrupting Rounds, Perpetual Motion, Tap the Trigger.
Excels in chain explosions and utility for Strand builds.
Rufus’s Fury (Strand Auto)
PvE god roll: Hammer-Forged Rifling, Ricochet Rounds, Reconstruction, Frenzy/Target Lock/Hatchling.
PvP god roll: Hammer-Forged Rifling, Ricochet Rounds, Perpetual Motion, Target Lock.
High fire rate shines with sustained damage ramps.
Mykel’s Reverence (Strand Scout)
PvE god roll: Hammer-Forged Rifling, Ricochet Rounds, Perpetual Motion, Frenzy/Hatchling/Paracausal Finality.
PvP god roll: Hammer-Forged Rifling, Ricochet Rounds, Perpetual Motion, Tap the Trigger.
Top-tier for range and Threadling synergy.
Nessa’s Oblation (Void Shotgun)
PvE god roll: Hammer-Forged Rifling, Assault Mag/Accurized Rounds, Repulsor Brace/Reconstruction/Fourth Time’s the Charm, Destabilizing Rounds/Vorpal Weapon/Focused Fury.
PvP god roll: Hammer-Forged Rifling, Accurized Rounds, Dragonfly, Opening Shot.
Dual-purpose: ad clear volatility or slug DPS.
Field of Dreams (Strand Sidearm)
PvE god roll: Arrowhead Brake, Tactical Mag, Rewind Rounds, Frenzy/Focused Fury.
PvP god roll: Hammer-Forged Rifling, Ricochet Rounds, Perpetual Motion, High-Impact Reserves.
Versatile special ammo for mobility and damage.
Conditional Finality (Exotic Shotgun)
No rolls needed; toggles Solar/Stasis via charged shot kills for anti-champion and elemental application. Pairs with any build for raid flexibility.