Speed, precision, and a touch of chaos-mastering the DeadGear Cannonball route in Romeo Is a Dead Man can turn a risky sprint into pure rhythm. This guide breaks down the best path, timing tricks, and resets that separate flawless runs from fiery wrecks.
The best DeadGear Cannonball routes in Romeo Is a Dead Man
The best DeadGear Cannonball routes in Romeo Is a Dead Man streamline through tight streets and open checkpoints, balancing speed with caution as you weave between ferries, abandoned yards, and powder-blue warehouses to hit the key supply hubs and avoid patrol blocks.
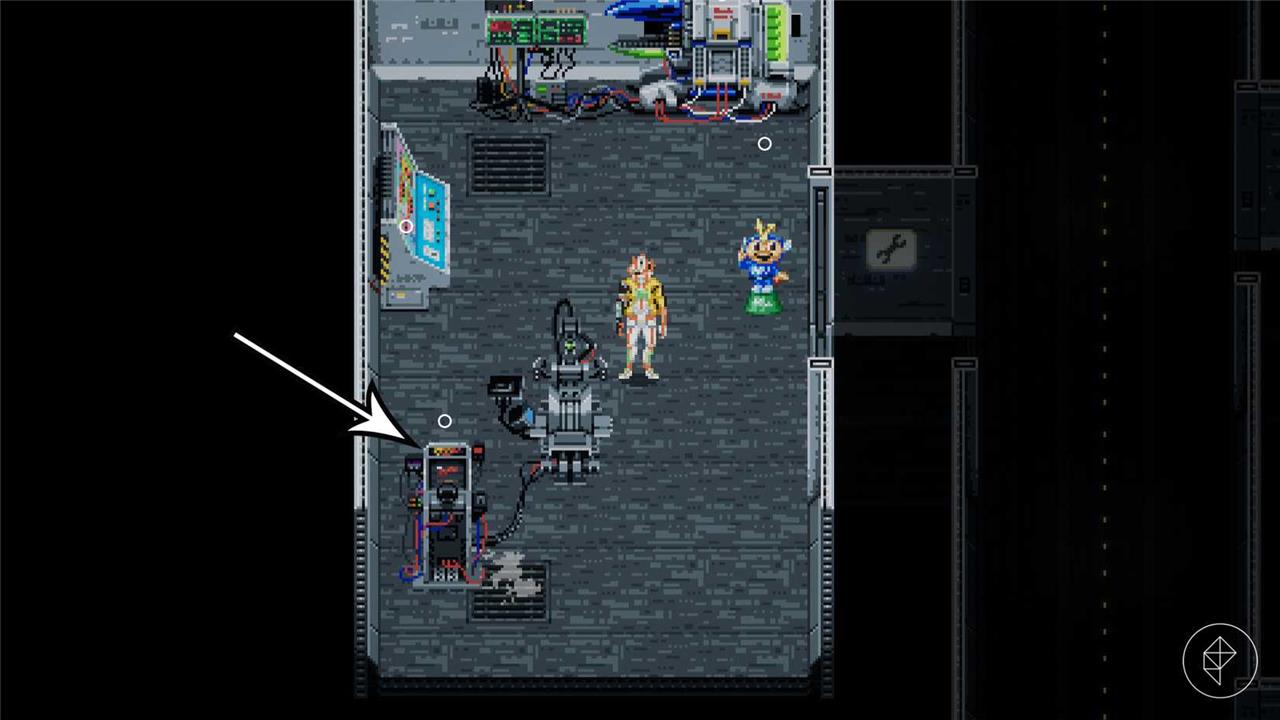
DeadGear Cannonball becomes available upon your first visit to the Last Night spaceship. Interact with the arcade machine at the bottom of the upgrade room to start the minigame.
The minigame’s difficulty lies in the Emerald Flowsion requirement; the further you move, the more Emerald Flowsion you consume. Since you also need this resource for weapon upgrades, Bastard seed purchases, katsu curry ingredients, and more, it’s important to find an efficient route.
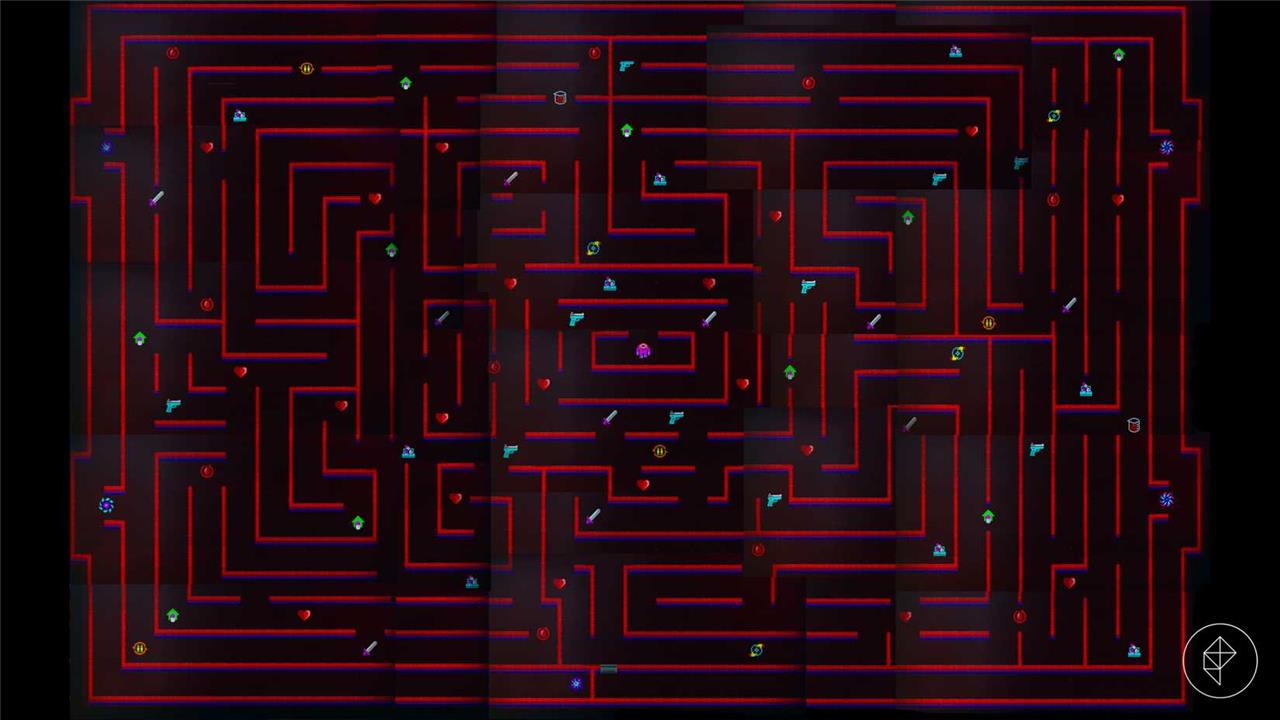
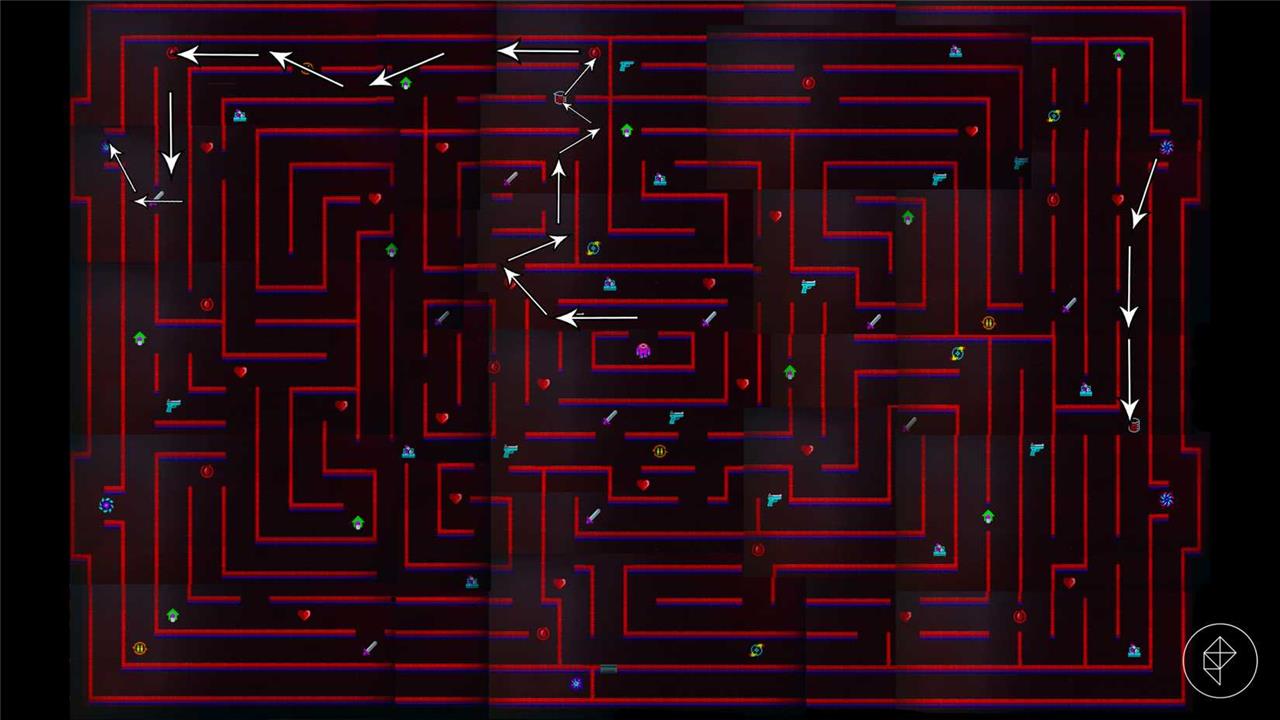
As you can’t see the full map at a glance, here’s an edited version of the entire DeadGear Cannonball layout, complete with all items:
You’re free to reset the game as often as you like without penalty, so you don’t need a perfect route on your first attempt. Furthermore, the DeadGear Cannonball map keeps the same layout throughout the game, so you can expand your existing without having to start over. Instead of returning to the Last Night spaceship, it’s also possible to modify your DeadGear Cannonball route at a Space-Time Pharmacy.
Although you should keep in mind that the best stats in Romeo Is a Dead Man depend on your personal playstyle (if you heavily rely on melee, for example, there’s no need to pick up that many ranged attack power-ups), here are some suggestions for the most efficient power-up routes at different points in the game.
Best DeadGear Cannonball route for early-game survival
The best DeadGear Cannonball route for early-game survival focuses on securing steady resource points while avoiding high-threat zones. Begin near the southern scrapyards, gathering fuel cells and salvage for early upgrades. Move northeast through the derelict convoy routes, picking up ammo caches and keeping a low profile to conserve health packs. Prioritize encounters with weaker patrols to build momentum and collect gear drops before approaching the fortified mid-map stations. This path balances risk and reward, giving players enough supplies to stay alive through the first major conflict zones.
During Chapter 2, you’ll likely have around 1,000 to 1,500 Emerald Flowsion. This is enough to grab a couple of valuable upgrades: A regenetizer charge (to restore HP during combat) and extra Bloody Summer HP recovery (regain HP upon using your ultimate attack). Pair that with a few handy attack upgrades, and you have a decent setup for early-game battles.
This route costs less than 1,300 Emerald Flowsion and unlocks the following power-ups:
- Melee attack up: 1
- Ranged attack up: 1
- HP up: 1
- Regenetizer carry limit up: 1
- Regenetizer HP recovery up: 0
- Reload speed up: 0
- Aim speed up: 0
- Bloody charge capacity up: 0
- Bloody Summer HP recovery up: 1
Best DeadGear Cannonball route for Bloody Summer
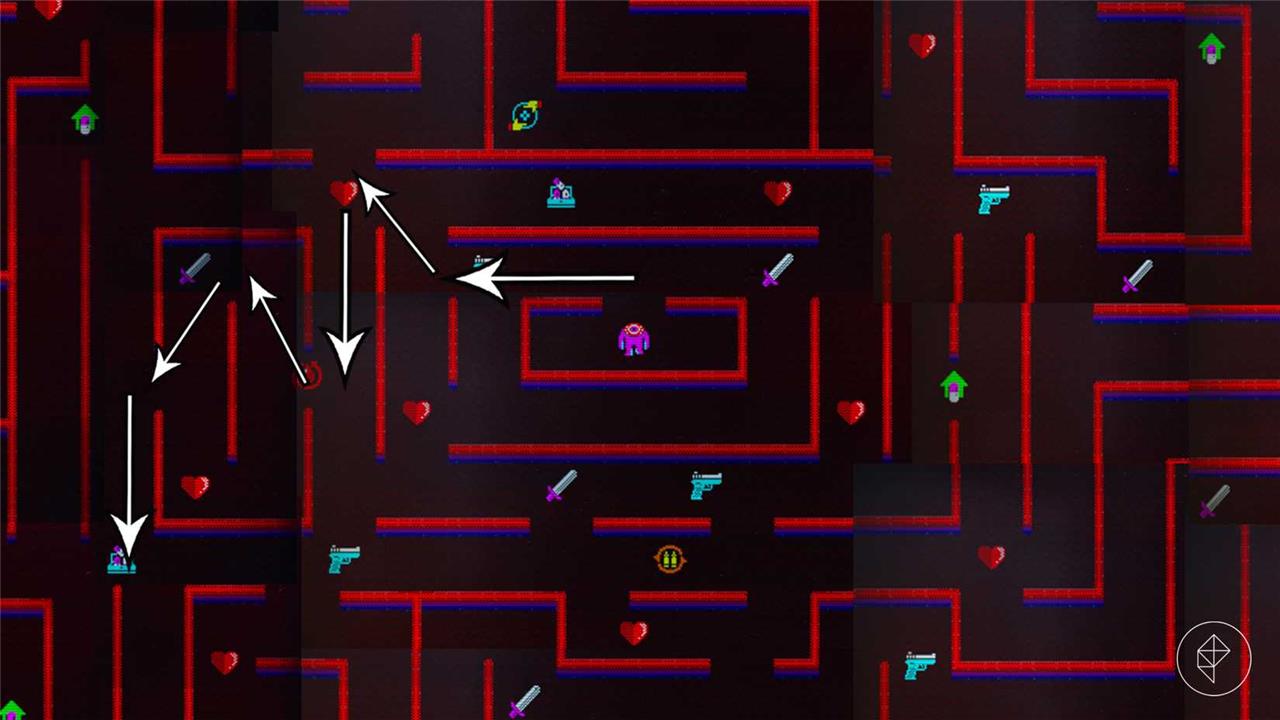
For a Bloody Summer-focused setup, route straight toward the two Bloody charge capacity upgrades, grabbing nearby Bloody Summer HP recovery nodes and at least one melee and ranged attack boost along the way to keep regular encounters manageable. This path spends more Emerald Flowsion than early-game routes, but it pays off by letting you trigger Bloody Summer more frequently and sustain through tougher chapters without leaning as heavily on Regenetizers.
Blood Charge Capacity UP is one of the best stat upgrades in Romeo Is a Dead Man as it adds an extra charge to Bloody Summer, your ultimate attack. This enables you to charge your ultimate even if you already filled the gauge once. Now you can save your ultimate attacks for the opportune moment.
Unfortunately, there are only two of them, and they’re placed fairly far from the DeadGear Cannonball starting point. The shortest route to the nearest Blood Charge Capacity power-up is this one:
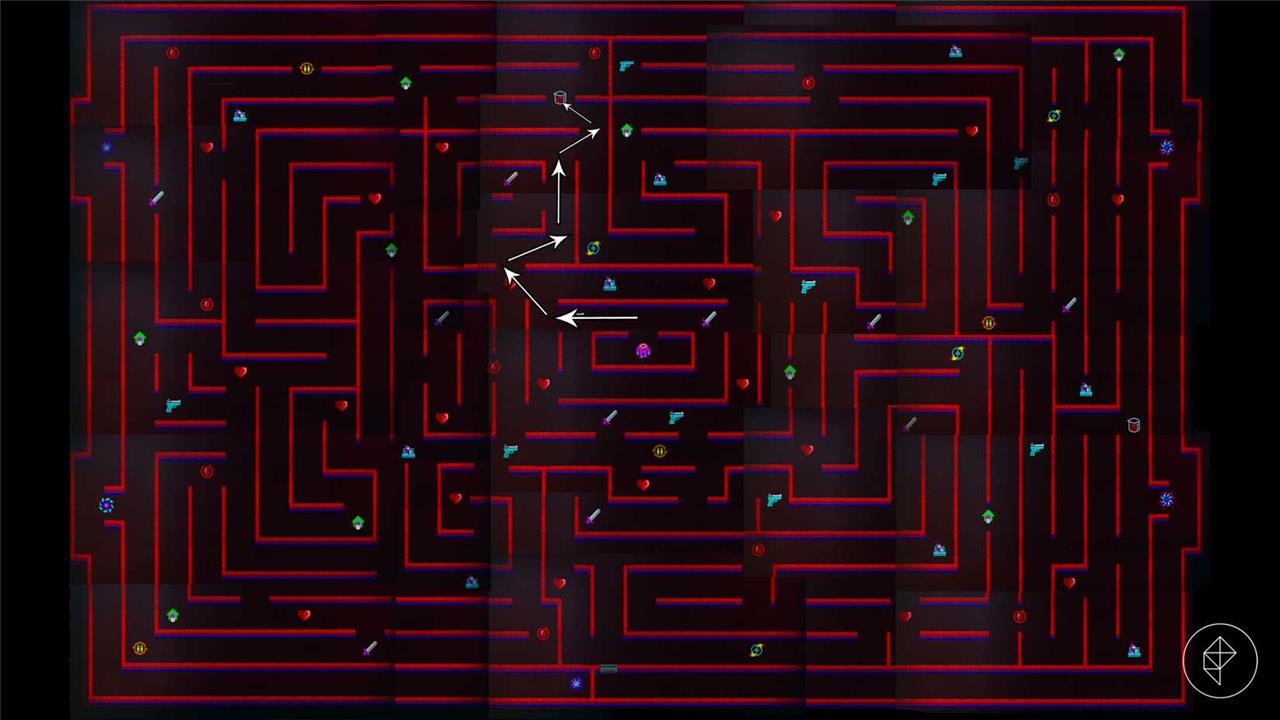
Eventually, you can expand this route to grab the second Blood Charge Capacity Upgrade as well. If you take the portal in the upper left corner, as shown in the picture below, you can reach the second upgrade with 3,800 Emerald Flowsion.
You will receive the following stats in total:
- Melee attack up: 1
- Ranged attack up: 1
- HP up: 1
- Regenetizer carry limit up: 0
- Regenetizer HP recovery up: 1
- Reload speed up: 1
- Aim speed up: 0
- Bloody charge capacity up: 2
- Bloody Summer HP recovery up: 2
Best DeadGear Cannonball route in mid-game
Master the mid-game push by coordinating DeadGear Cannonball with precise timing, using chokepoints to funnel enemies while your squad covers retreat paths and heals between skirmishes.
If you don’t care about rare upgrades that much and would rather have as many power-ups as possible, this Romeo Is a Dead Man stat route is for you. As item density is far higher around DeadGear Cannonball’s starting point, it’s best to stick to the center of the map. Try to circle around the starting point, like this:
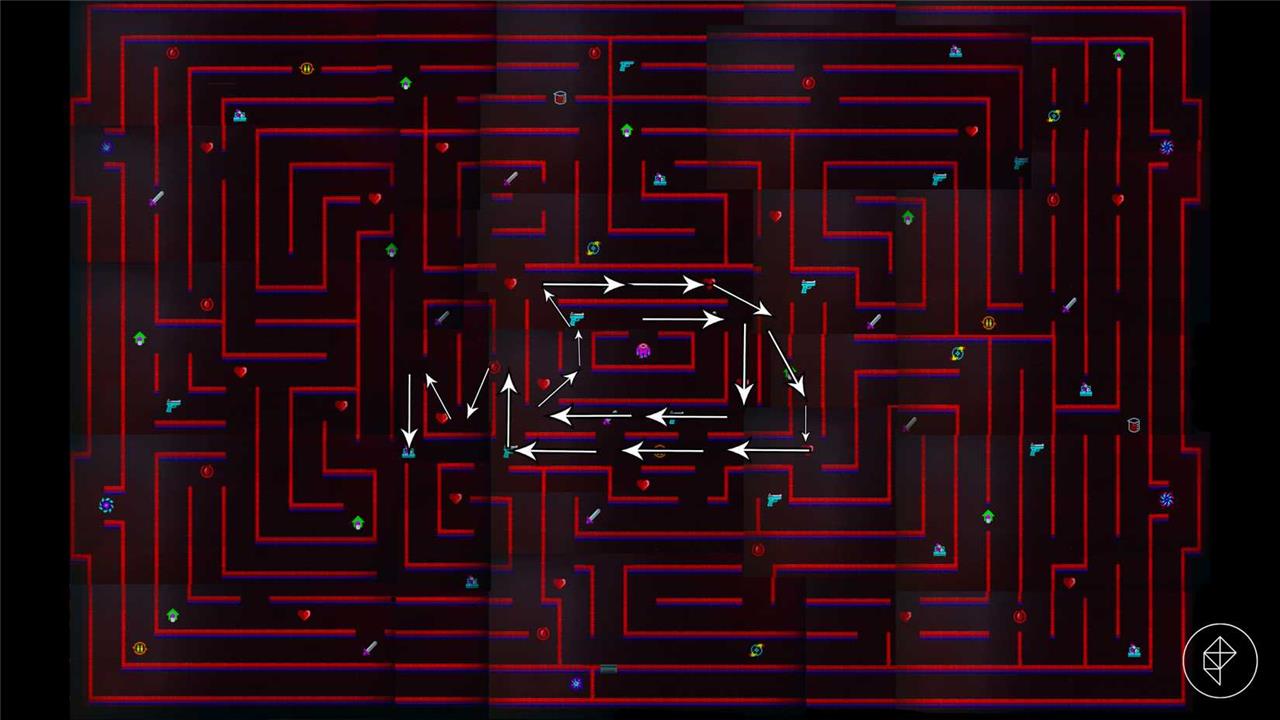
At the cost of just over 4,000 Emerald Flowsion, you’ll receive the following stats:
- Melee attack up: 2
- Ranged attack up: 3
- HP up: 5
- Regenetizer carry limit up: 2
- Regenetizer HP recovery up: 1
- Reload speed up: 1
- Aim speed up: 0
- Bloody charge capacity up: 0
- Bloody Summer HP recovery up: 1
How to farm Emerald Flowsion efficiently
Emerald Flowsion comes fastest from a mix of optimized space travel, targeted Rotter grinding, and smart use of Palace Athena, plus not wasting what you earn.
Core farming loop
-
Prioritize Rotter-heavy combat areas, since Rotters drop more Emerald Flowsion than standard enemies; pick routes where you can chain fights quickly.
-
During ship segments, always sweep through glowing green crystal fields and medium-length routes, which balance debris density and travel time for strong income per minute.
-
Treat Emerald Flowsion as a long-term resource: avoid spending small amounts constantly, and instead farm in focused bursts, then invest in big upgrades or Sentry conversions.
Best spots and methods
-
Farm around Space-Time Pharmacies (save points): clear nearby Rotters, save, exit and re-enter to respawn enemies, then repeat for rapid, low-risk gains.
-
In early chapters, stay near safe routes and basic Rotter packs; in mid-game and later, gradually move into tougher zones and Palace Athena once your weapons and upgrades are decent.
-
Stick to medium-length space routes connecting major story destinations, where debris spawns steadily without long dead time between clusters.
Palace Athena usage
-
Treat Palace Athena as a high-risk, high-reward farm: only start serious runs once your damage and survivability are upgraded.
-
Focus on clearing rooms quickly rather than full exploration, since Emerald Flowsion per minute matters more than total per run.
-
Use upgraded Bastard Seeds and Sentries to handle large packs so you can keep your pace high without dying.
Extra income sources
-
Hunt Tesseracts in every stage: they often contain sizeable Emerald Flowsion chunks, especially in hidden spots (upper floors in mall stages, behind machinery in industrial zones, patient rooms/basements in hospital areas).
-
Don’t skip Subspace/digital sections, because some of the best Tesseracts and Flowsion caches are locked behind them.
-
Cook Katsu Curry on The Last Night before long farming sessions to boost damage and clear enemies faster, raising Flowsion per hour.
Spending efficiently
-
Convert Emerald Flowsion into Enhanced or Elite Sentries in bulk rather than buying many Basic Sentries; the higher tiers are far more efficient for power gained per Flowsion.
-
In early-mid game, use your Flowsion primarily for core survivability and damage upgrades instead of spread-out niche perks, so each point makes future farming easier.
-
When using DeadGear Cannonball, plan routes in advance to avoid wasted fuel, since that currency is the same Emerald Flowsion you need for everything else.
If you tell me your current chapter, preferred weapon type (melee or ranged), and how long you like to farm in one sitting, I can propose a concrete loop (area + route + when to hit Palace Athena) tailored to your run.
Best routes for farming Brute Rotters
Brute Rotters spawn most consistently in mid- to late-game combat zones with dense Rotter packs; the best “routes” are short loops that pass several of these spawn clusters and a nearby Space-Time Pharmacy so you can quickly reset spawns.
Where to find Brute Rotters
-
Focus on areas with heavy Rotter presence rather than mixed enemy types, since Brute Rotters are an upgraded form of standard Rotters and appear more in those zones.
-
Mid-game combat stages and later Palace Athena floors tend to have the highest concentration of Rotters and thus more chances for Brute Rotters per minute.
Building a good Brute Rotter loop
-
Pick a Space-Time Pharmacy in a Rotter-dense stage, clear a tight circle of nearby rooms/streets where you regularly see multiple Brute Rotters, then return to the Pharmacy.
-
Save, exit to menu, and reload the area so the Rotters (and Brutes) around that Pharmacy respawn, then repeat the loop for steady Emerald Flowsion and Brute kills.
Route length and difficulty
-
Keep your loop short (2-4 combat encounters) so you hit Brutes as often as possible instead of spending time running between fights.
-
If you kill Brute Rotters quickly, increase difficulty or move into slightly tougher segments of the same area to raise Flowsion gained per Brute and per minute.
Extra tips to boost value
-
Prioritize Brutes, fire-buffed Rotters, and elite variants within your loop because they drop significantly more Emerald Flowsion than regular enemies.
-
Bring strong crowd-control or Sentry setups so you can clear full packs around each Brute quickly, rather than single-targeting slowly and wasting farming time.
If you tell me your current chapter and which stage you like farming in, I can outline a concrete Pharmacy-centered loop you can run repeatedly for Brute Rotters.