Bullets fly, time bends, and death is never quite the end. Romeo Is a Dead Man throws you into chaotic shootouts and surreal decisions where one mistake can cost everything. These eight beginner tips will keep you alive long enough to make sense of the madness.
Always hit the weak points – repeatedly!
Master the weak points by prioritizing fast, repeated strikes at exposed gaps-timing and precision beat brute force, so hit, reassess, and pounce again while your opponent remains vulnerable.
Did you spot a weird flower on an enemy’s body? That’s a weak point; be sure to hit it with a ranged weapon to deplete a large chunk of HP. Unfortunately, only elite enemies and bosses have weak points, so there’s no need to look for them in common foes.
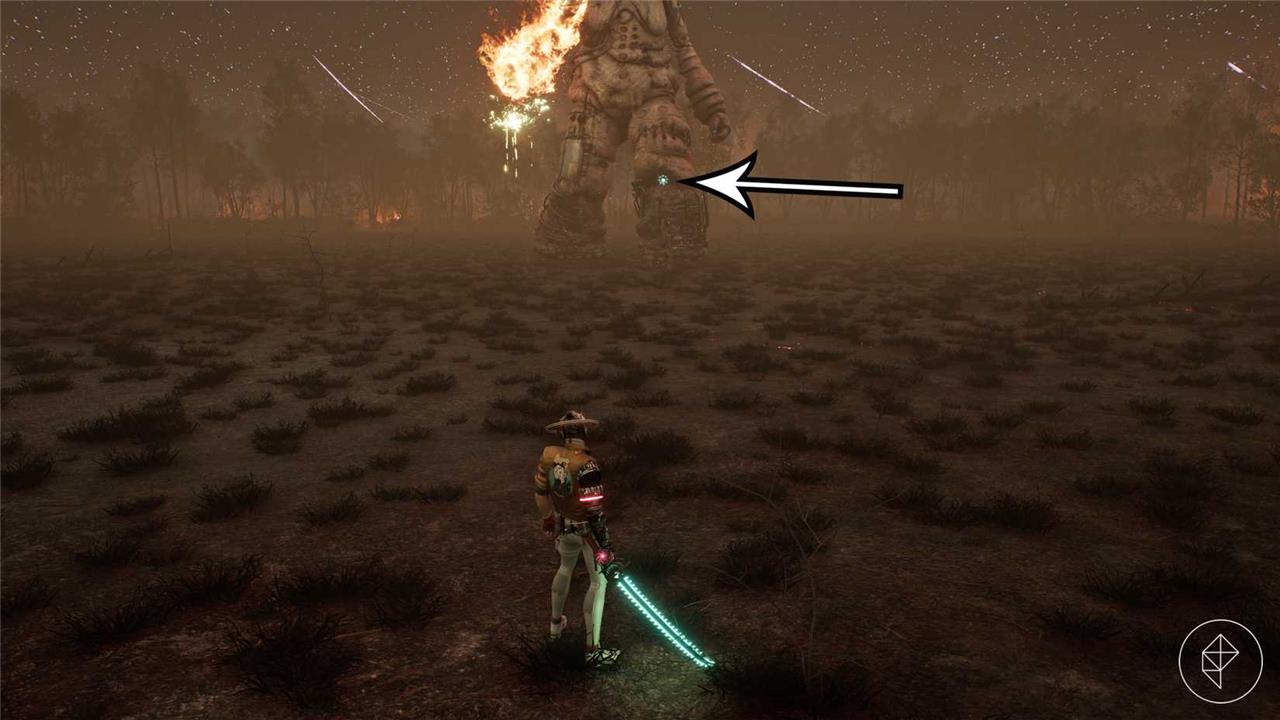
An important note to remember about weak points in Romeo Is a Dead Man:You can hit them more than once, despite their damaged appearance following the first hit. If you hit them repeatedly, until they disappear, you’ll stagger the boss, thus providing an amazing opportunity to unleash powerful melee attacks. It’s also good to know: Every ranged weapon hasunlimited ammo, so there’s no need to be stingy. You do need to reload, though!
Grab space debris – it’s free!
Space debris might look like junk, but collecting it pays off fast in Romeo Is a Dead Man. These floating scraps can be turned into useful materials for crafting upgrades, repairing gear, or trading for credits. Keep an eye out during combat or exploration – debris often drifts near destroyed ships or stations. Grab as much as you can before it disappears into space; it’s free, plentiful, and can give you an early edge in survival and customization.
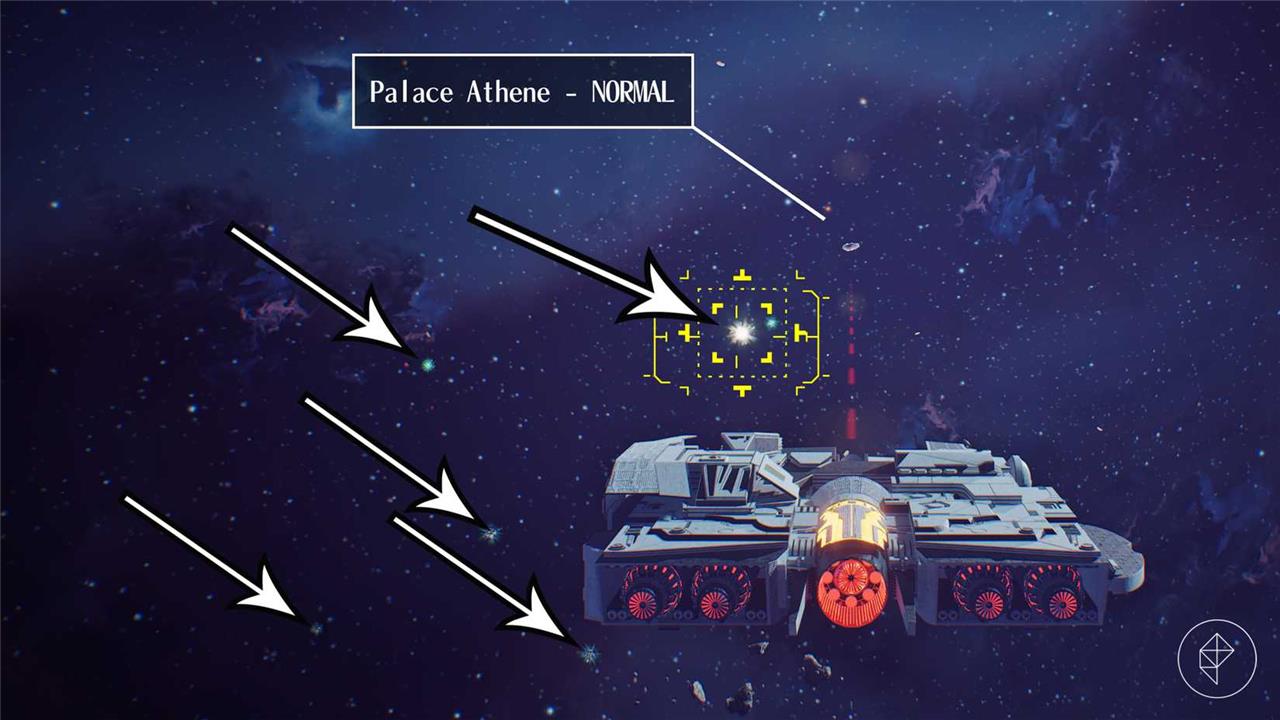
While flying your spaceship toward the next mission, you may occasionally spot some tiny glowing orbs to your left and right. If you move the ship’s reticle (your cursor) onto these orbs and wait a moment, you may collect some food resources, such as tomatoes and carrots, or space debris, which can be transformed into the upgrade material called Sentrey.
If you’d like to get a head start on the first mission in Chapter 2, which directs you to the Dimensional Seer, try to collect as much debris as you can find before entering the new dimension. Leave the steering wheel (thus re-entering the ship) before landing to spend your newfound resources in the following locations:
- Find the Sentrey Forge in the upgrade room (left side of the ship) to turn your space debris into Sentrey. Fill the bar at the top until it’s full, and you’ll receive one Green Sentrey.
- Go to the Weapon Power Up Monitor in the upgrade room (top right), click on a weapon you plan to use, and spend the Green Sentry to boost its abilities. Boosting “attack power” is always a safe bet.
- Go to the kitchen on the right side of the ship. Use the food resources to cook some katsu curry. Afterward, open the item inventory and equip the dishes in your item slots, ready to be used during combat.
Continue the journey to the Dimensional Seer when you’re ready.
Get the Green Sentrey first
Getting the Green Sentrey early gives you a huge advantage in combat and progression. This weapon’s speed and steady damage output make it reliable against both small enemies and tougher opponents. It’s found near the first checkpoint after completing the opening mission, so you can grab it without much risk. Once equipped, focus on upgrading it before spending resources on other gear, since it scales well with your early skill set and stays useful longer than most starter weapons.
While using the Sentrey Forge, mind the difference between Green and Red Sentrey. Fill the top bar to obtain the green variant, which requires 100 space debris, and the red bar to obtain the red version, which requires 1,000 space debris.
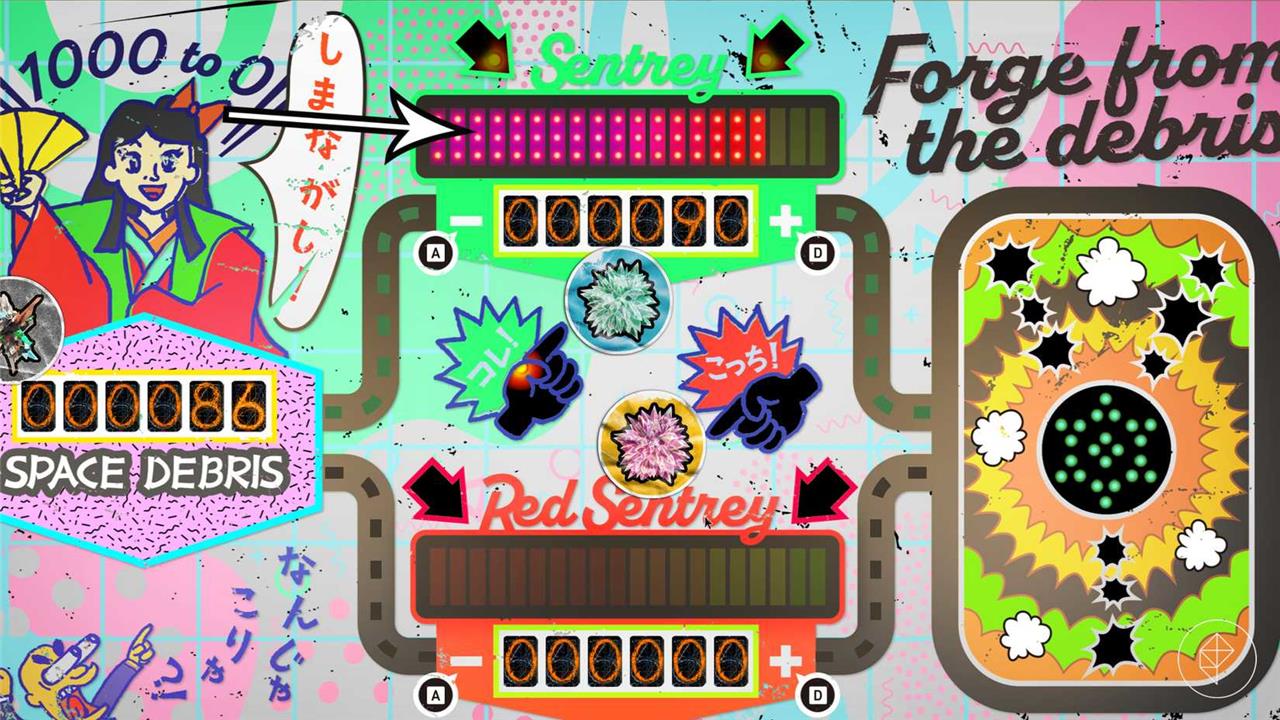
Since Green Sentrey is used for basic weapon upgrades and Red Sentrey is used for high-level upgrades, you won’t have any use for Red Sentrey as a new Romeo Is a Dead Man player. In the first couple of chapters (until Chapter 4 or so), be sure to forge Green Sentrey only!
Build an overpowered weapon
Building an overpowered weapon requires a careful balance of raw damage, reliable accuracy, and sustainable ammo. Prioritize components that boost fire rate and handling without excessively increasing recoil, invest in mods that extend magazine size or reduce reload times, and stack upgrades that improve crit chances or elemental effects. Pair it with solid dodge timing and map awareness to maximize uptime and consistency in tough encounters.
It may be tempting to unlock and try different Romeo Is a Dead Man weapons straight away, but it’s best to fully upgrade one melee weapon and one ranged weapon first. After all, you can only equip one of each type simultaneously, so it’s much better to have one overpowered blade rather than four mediocre ones.
Make curry and sell the surplus
Craft curry in Romeo Is a Dead Man to sustain your health during tough fights. Gather ingredients from scavenging runs or vendor stalls, then cook batches at safehouse stations. Sell extra portions to traders for quick cash, funding better weapons and ammo. This loop keeps you fed and your inventory stocked without wasting resources.
Romeo Is a Dead Man features a fairly simple cooking minigame:
- Go to the kitchen aboard the spaceship.
- Ask your mom for a katsu curry.
- Carefully watch the temperature meter in the lower right and press the interaction button when the temperature hits “180” to complete the dish.
The closer you are to 180, the higher the dish’s tier (ranging from D-tier to S-tier).
As you can only carry one dish of the same type, you may feel the urge to discard your low-tier food and try again. However, as discarding dishes doesn’t refund any ingredients, it’s better to sell them to Shiroyabu, the computer-merchant stationed on the Last Night. Find him on the left, between the upgrade room and the bedroom, and sell any katsu curry you don’t wish to use in return for Emerald Flowsion. Depending on the tier, you’ll receive 10 to 200 Flowsion per dish.
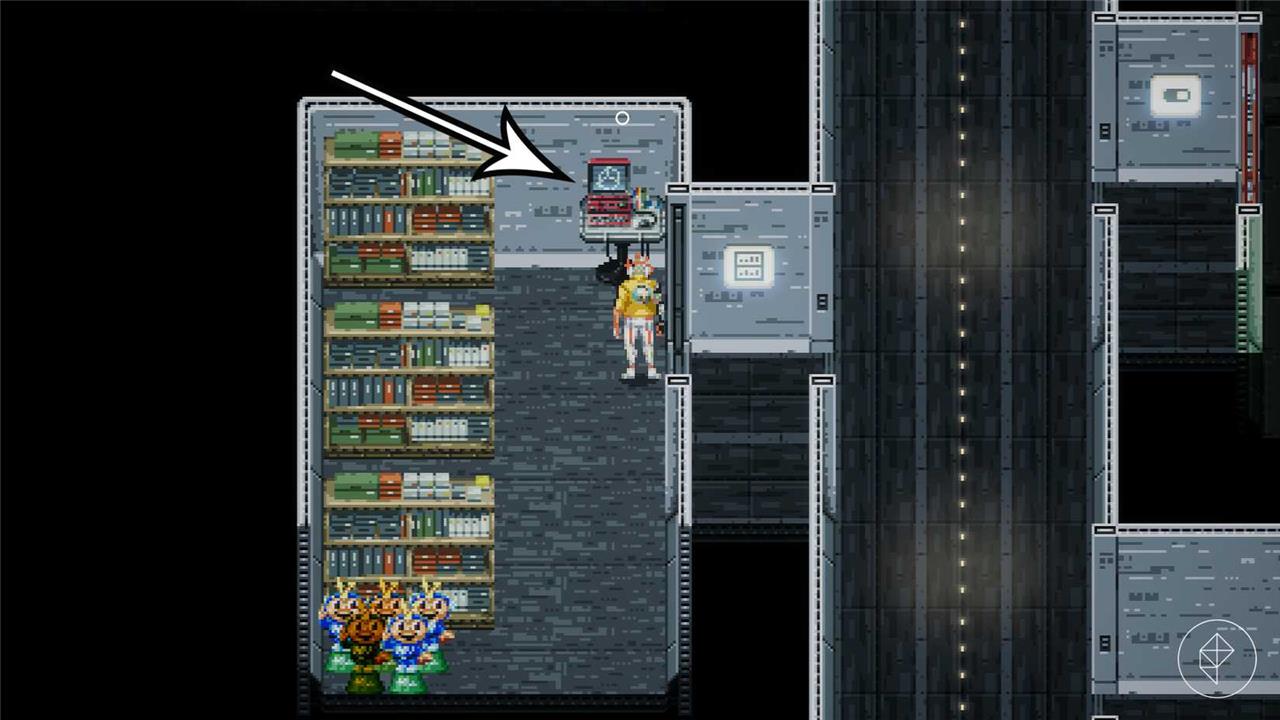
To obtain only high-quality food in Romeo Is a Dead Man, be sure to save your game before cooking (there’s a Space-Time Pharmacy on the left side of the ship, in the bedroom), and reload that save until you get an A- or S-tier dish from the cooking minigame. Why settle for D-tier curry?
Stop touching the Space-Time Pharmacy
Keep your hands off the Space-Time Pharmacy unless you know exactly what you’re doing. This strange hub messes with healing items and enemy spawns, and random tampering can reset progress or trigger combat loops that are hard to escape. Use it only after learning how timelines affect your health pool and ammo supply, or you might find yourself respawning with fewer resources than you started with. Treat it like a ticking bomb wrapped in neon-tempting, but dangerous.
To replenish your HP, teleport to a new location, unlock upgrades during missions, and save your game manually, you must interact with a large green cross: a Space-Time Pharmacy. As tempting as it is to use a Space-Time Pharmacy, refrain from touching them often. The HP recovery is nice, but doing so will respawn every enemy.
POLY Report: Subscribe and never miss what matters
Enter your email to get the best of AELGAMES sent straight to your inbox, packed with news, reviews, and insights from the gaming world.
Subscribe By subscribing, you agree to receive newsletter and marketing emails, and accept our Terms of Use and Privacy Policy. You can unsubscribe anytime.
Don’t overstate the importance of manually saving your game, either. Romeo Is a Dead Man‘s autosave feature makes fairly regular backups, so there’s really no need to run back to a Space-Time Pharmacy as you progress through a mission. In other words, falling in battle usually doesn’t mean you need to restart from the last manual save, so it’s fine to continue fighting until Romeo becomes – quite literally – a dead man.

Or. Keep touching the Space-Time Pharmacy?
The Space-Time Pharmacy isn’t just a fancy checkpoint-it’s a lifeline. Each visit lets you patch up wounds, tweak your build, and experiment with new buffs that can shift the flow of combat. Touching it too often, though, resets enemy placements and can eat up valuable time, so weigh the trade-off carefully. Sometimes patience pays off more than another quick fix.
If you’re the farming sort, you may actually be thrilled to hear the words “enemies respawn upon touching the Space-Time Pharmacy,” as it provides ample opportunity for Emerald Flowsion farming, a resource used to unlock new weapons, buy items, and improve Romeo’s stats.
As Emerald Flowsion is dropped by all enemies, and won’t disappear from your inventory upon using the Space-Time Pharmacy, you might want to find a Pharmacy near a large group of common enemies, take them all out, claim their Emerald Flowsion, and then use the Pharmacy to respawn them. Rinse and repeat until you’ve got the desired amount of Emerald Flowsion.
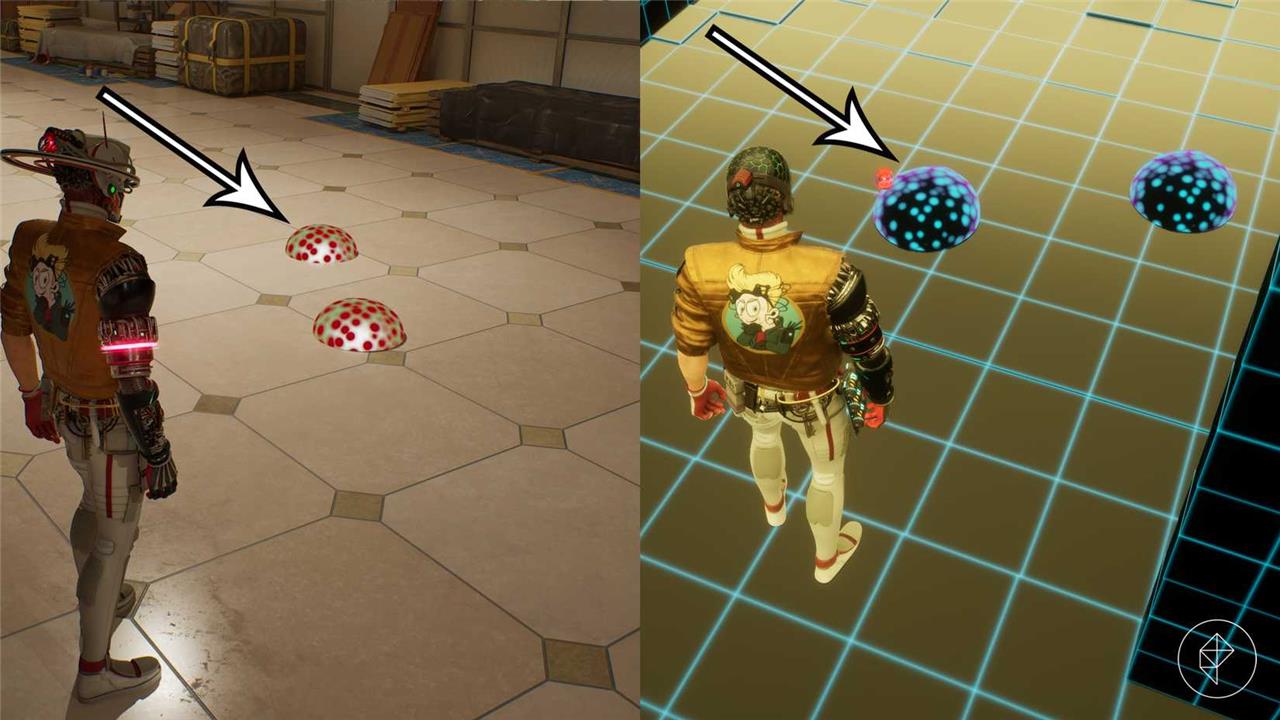
Collect the spotty mushrooms
Collect the spotty mushrooms by scouting damp, shaded areas near fallen logs and mossy patches. Look for caps with distinctive speckles and a pale stem, then harvest carefully to avoid damaging surrounding flora. Use a light touch and bag the harvest promptly to prevent bruising.
Yes, they look poisonous, but the spotty blobs found on floors and walls during missions are actually safe to touch. What’s more, touching them yields 5 Emerald Flowsion, an important resource to unlock new weapons, buy items, and boost your stats. Unfortunately, spotty blobs don’t respawn upon touching a Space-Time Pharmacy.
Romeo Is a Dead Man boss fight strategies
Here are practical boss-fight strategies that work for most encounters in Romeo Is a Dead Man, plus some specifics that are especially important for the early bosses.
Core boss fundamentals
-
Always identify the glowing or “flower-like” weak points and open fights by shooting them from range; destroying them deals big damage and usually knocks the boss down for a free combo window.
-
When a boss is staggered or on the ground, dump melee strings to build your Blood Gauge, but save Bloody Summer for when the boss is acting so you can potentially interrupt dangerous moves and self-heal.
Positioning, dodging, and pacing
-
Circle around bosses and try to stay at their sides or back; many have short-range frontal swipes or stomps but weak rear coverage.
-
Learn the rhythm of multi-hit patterns (like two fireballs in a row) and commit to either sprinting sideways or dodging through attacks at the last possible moment, instead of spam-rolling and losing control of spacing.
Using guns, Bloody Summer, and items
-
Use guns to: pop weak points, punish during big telegraphed moves, and chip damage when the arena is too dangerous for melee (fire walls, oil puddles, rotating flames, etc.).
-
Treat Bloody Summer as a “panic DPS and heal” button against bosses: build the gauge with safe melee, then fire it off when you see a long windup or when you’re low on health but confident you can connect.
Arena and hazard awareness
-
Many bosses create environmental hazards (oil puddles that are then ignited, sweeping fire lines, rotating flame pillars); as soon as you see the setup animation, disengage and reposition rather than trying to be greedy with damage.
-
Use these moments to reload, pop a curry, or shoot at weak points from a safe distance instead of forcing melee trades inside burning zones.
Example: Everyday Is Like Monday (first boss)
-
Prioritize its two weak spots: first on the left knee, then one that appears on the back of its leg; shoot them from afar, knock it down, rush in, unload melee, then back off before it recovers.
-
For survival:
-
Strafe or dodge sideways for the two-fireball pattern.
-
Jump the sweeping ground fire wave.
-
Back off when you see it shower oil, then stay out of the flaming puddles and gun it down.
-
Simple boss-fight checklist
| Goal | What to do in boss fights |
|---|---|
| Find openings | Spot weak points and shoot until stagger, then rush for melee. |
| Stay alive | Learn 2-3 key animations, dodge late, avoid greed during hazard setups. |
| Manage resources | Build Blood Gauge with melee, spend Bloody Summer on long windups. |
| Control arena space | Fight at sides/back, retreat during big hazard attacks, then re-engage. |
If you tell me which boss you’re stuck on (name or description), I can give you a tailored move-by-move plan for that specific fight.
Death Changeling boss fight strategies
Death Changeling is an aggression and endurance check with no weak points, so the fight is all about clean dodging, safe chip damage, and not panicking when the arena fills with hazards.
General game plan
-
Treat it as a war of attrition: no weak spots to burst, so focus on consistent, safe damage instead of big greedy punishes.
-
Rely heavily on your gun and any good ranged Bastards (like CreepingVenom and SentryCannon) so you can keep dealing damage while staying out of melee during its nastiest patterns.
Best times to attack
-
Your main melee windows are right after you dodge its basic punches and lunges; circle to the side or back, get 2-3 hits, then immediately disengage.
-
Good ranged windows: while it’s doing the Spinning Attack (ball form) but far from you, or when it starts the Laser Grid and stays mostly still at one end of the arena.
How to handle each key attack
-
Punches & lunges: Lock on, watch its shoulders and feet, and dodge sideways at close range, then counter from the side.
-
Fiery Jump (slam + fire wave): As soon as it jumps, get ready to dodge through the fire wave when it lands; do not stand right next to it when it comes down.
-
Scream (Mobility Impairment): Back away as soon as you see it rear up to scream; if you get hit and slowed, put as much distance as possible before trying to recover so you aren’t comboed to death.
-
Fireball: It spits a fireball that tracks and then sharply darts toward you near the end; unlock from the boss, watch the projectile, and dodge through it late.
-
Spinning Attack (spike ball): Sprint in a straight line out of its path instead of panic-dodging; once you’re safe, you can use this time to shoot or even pop Bloody Summer if you’re confident.
-
Laser Grid (low HP): When the arena fills with multiplying lasers that then “turn on,” stand mostly still in a safe lane and unload ranged damage instead of trying to weave in for melee.
-
Danger Balls (low HP): Big orbs bounce between floor and ceiling; move deliberately, not constantly, and use the gaps to reposition while prioritizing survival over damage.
Using Bloody Summer and Bastards
-
Save Bloody Summer to interrupt annoying or dangerous attacks (Fireball sequence or Spinning Attack) for an almost-guaranteed stagger rather than using it on random openings.
-
CreepingVenom helps stack damage over time while you play evasively, and SentryCannon piles on extra ranged damage during Laser Grid and other downtime phases.
Simple checklist for Death Changeling
-
Stay mid-range so you have time to read lunges, Fireballs, and Scream.
-
Only commit to short melee strings after clean dodges; never overextend.
-
Prioritize dodging Scream and Fireball to avoid Mobility Impairment and surprise hits.
-
Use guns and Bastards to keep DPS going during Spinning Attack, Laser Grid, and Danger Balls.
If you tell me your current build (main melee weapon, gun, and Bastards), I can suggest a specific “rotation” for this fight using what you already have.